
The Ultimate Cooling Mod

It appears that you basically cut out the plastic between the two washer spouts, right? Then modified the strut bar cover to open the full path from the engine bay. Seems simple enough. Good job!
practicing nihilist
Joined: Dec 2005
Posts: 990
Likes: 5
From: Jax, FL
i'm selling mine soon or i would partake...
personally, i would remove the strut bar cover completely before chopping it up. nearly every mod I've done is returnable to stock. the plastic covers can't cost that much to replace but are a bit recockulous to keep on if your trying to get maximum cooling under the hood.
personally, i would remove the strut bar cover completely before chopping it up. nearly every mod I've done is returnable to stock. the plastic covers can't cost that much to replace but are a bit recockulous to keep on if your trying to get maximum cooling under the hood.


Joined: Feb 2008
Posts: 4,096
Likes: 414
From: Scarborough, Ontario
you should cut one on the right as well.
The driver side lower grille already had a duct that lead to your filter.
Exposing it would allow (i assume) more air to enter the entire engine.
Deleting the part behind the pass. lower grille would help as well, i assume.
I did it to both sides, at first to install fogs. I later left it like that and never installed fogs.
Its been one year since i deleted the lower grille and its not that big of a deal in terms of dirt.
Only thing is that my filter gets dirtier quicker (but i also have a cf air duct that points to my filter as well as two missing fender liners-which i need to replace)
Last edited by o4Komodo; Oct 24, 2009 at 01:04 AM.
Thread Starter
Safety Car
Joined: Jan 2006
Posts: 4,442
Likes: 482
From: Houston, Texas
t0talacuratl,
Good job! I am surprise and happy at the number of folks doing this mod so late into the season. I thought this thread would head into hibernation until next summer.
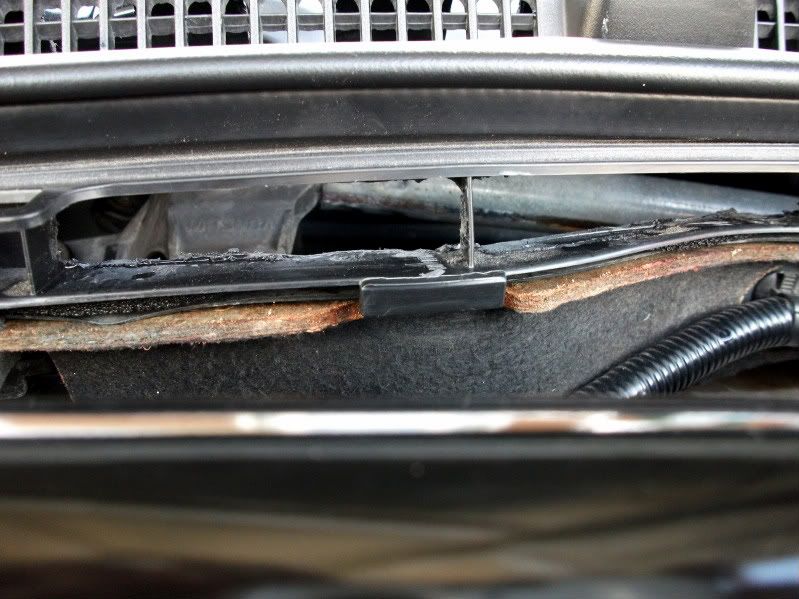
You did a great job of creating an opening in the lower sections of the cowl. It is not easy getting a dremel cutting-wheel between those ribs..
Your square cut-outs should be shedding a fair amount of BTU's. Can you feel much heat escaping thru the square cut-outs ? The square cut-outs look �trick�. Are you considering adding more square cut-outs to extend further along the cowl?
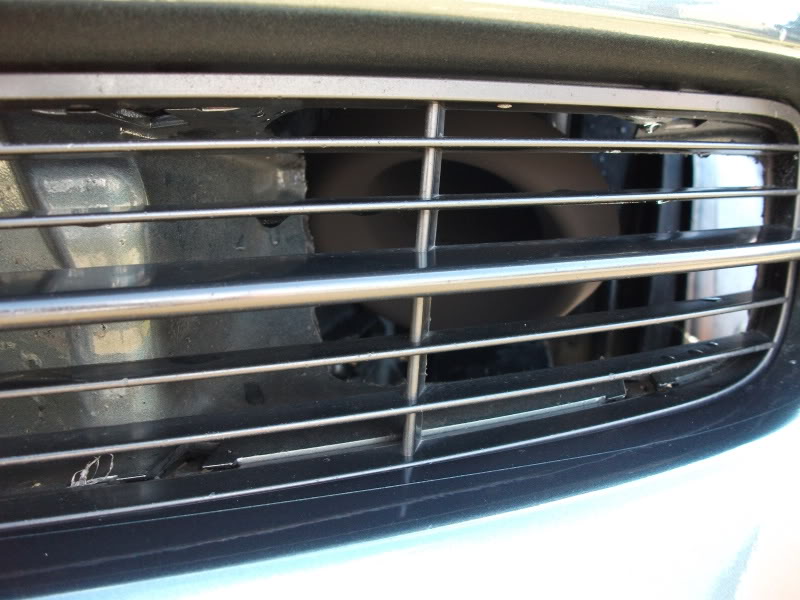
Glad to hear that you did the lower grill too to expose the CAI filter. I have never had a problem with the filter getting wet. I have been thru many heavy downpours and I know that my filter has been drenched. But, it does not affect my drivability in the least. Any pics of the lower grill mod?
Good job of customizing this mod and good pics too
Good job! I am surprise and happy at the number of folks doing this mod so late into the season. I thought this thread would head into hibernation until next summer.
You did a great job of creating an opening in the lower sections of the cowl. It is not easy getting a dremel cutting-wheel between those ribs..
Your square cut-outs should be shedding a fair amount of BTU's. Can you feel much heat escaping thru the square cut-outs ? The square cut-outs look �trick�. Are you considering adding more square cut-outs to extend further along the cowl?
Glad to hear that you did the lower grill too to expose the CAI filter. I have never had a problem with the filter getting wet. I have been thru many heavy downpours and I know that my filter has been drenched. But, it does not affect my drivability in the least. Any pics of the lower grill mod?
Good job of customizing this mod and good pics too
practicing nihilist
Joined: Dec 2005
Posts: 990
Likes: 5
From: Jax, FL
Nice, Adrian.
I have the 9 inch AEM filter on the end of my V1. Think I got the idea from you, Innacurate. Driver side cowling has a opening that the bottom of the filter pokes through. You reported positive gains but I didn't really feel a difference.
I have the 9 inch AEM filter on the end of my V1. Think I got the idea from you, Innacurate. Driver side cowling has a opening that the bottom of the filter pokes through. You reported positive gains but I didn't really feel a difference.
you should cut one on the right as well.
The driver side lower grille already had a duct that lead to your filter.
Exposing it would allow (i assume) more air to enter the entire engine.
Deleting the part behind the pass. lower grille would help as well, i assume.
I did it to both sides, at first to install fogs. I later left it like that and never installed fogs.
Its been one year since i deleted the lower grille and its not that big of a deal in terms of dirt.
Only thing is that my filter gets dirtier quicker (but i also have a cf air duct that points to my filter as well as two missing fender liners-which i need to replace)
The driver side lower grille already had a duct that lead to your filter.
Exposing it would allow (i assume) more air to enter the entire engine.
Deleting the part behind the pass. lower grille would help as well, i assume.
I did it to both sides, at first to install fogs. I later left it like that and never installed fogs.
Its been one year since i deleted the lower grille and its not that big of a deal in terms of dirt.
Only thing is that my filter gets dirtier quicker (but i also have a cf air duct that points to my filter as well as two missing fender liners-which i need to replace)
t0talacuratl,
Good job! I am surprise and happy at the number of folks doing this mod so late into the season. I thought this thread would head into hibernation until next summer.
You did a great job of creating an opening in the lower sections of the cowl. It is not easy getting a dremel cutting-wheel between those ribs..
Your square cut-outs should be shedding a fair amount of BTU's. Can you feel much heat escaping thru the square cut-outs ? The square cut-outs look “trick”. Are you considering adding more square cut-outs to extend further along the cowl?
Glad to hear that you did the lower grill too to expose the CAI filter. I have never had a problem with the filter getting wet. I have been thru many heavy downpours and I know that my filter has been drenched. But, it does not affect my drivability in the least. Any pics of the lower grill mod?
Good job of customizing this mod and good pics too
Here is a pic of the lower left opening. Excuse the velocity stack; that is not there anymore. I was trying out a SRI/true Ram idea. I got my V2 back on.
Thanks Jason! I wanted to try a longer filter, but could not find one that would fit on the 4" opening. Plus that thing is so low, it would not fit anyway. I did cut a half inch off of the pipe so the filter would sit alittle higher though.
LiQuiDFleX81
Joined: May 2007
Posts: 472
Likes: 1
From: Toms River, NJ
But, this Semi-UCM is a totally different animal. I go beyond just endorsing the Semi-UCM as a "compromise" to the real UCM. This is not a "Semi" version of the UCM. This is the New and Improved UCM.... there is nothing "semi" about it.... there is nothing compromising about it.... This is the New and Improved UCM.
Liquidflex81 - I know that you wanted to have a brand name. But, to call your mod as the "Semi-UCM" is not appropriate. If you are in agreement, I would like to call your mod as the "New and Improved" UCM. But, you remain the creator of the "New and Improved" UCM.
 So, I present to you the "New and Improved" UCM, founded by Liquidflex81.
The original UCM will remain as a mod for the hardcore radical person, such as myself.
Liquidflex81 - I know that you wanted to have a brand name. But, to call your mod as the "Semi-UCM" is not appropriate. If you are in agreement, I would like to call your mod as the "New and Improved" UCM. But, you remain the creator of the "New and Improved" UCM.
So, I present to you the "New and Improved" UCM, founded by Liquidflex81. The original UCM will remain as a mod for the hardcore radical person, such as myself.
yea all is fine by me dude New and Improved totally works. It just made sense to me as i was doing it,, thought about the car in motion, air enters from the center, most likely then the heat will exit thru the center.
And you are correct also on how i thought about it, heat rises, the middle being the highest point, just do the middle and keep the function of everything else.
Man i must have opened and closed my hood a good 50 times throught the proccess lol, making sure my eyes weren't playing tricks on me as visually lookin from the inside out looks completly different looking outside in.
Glad i was able to improve and inspire as well. and thank you for the idea in the first place!

Cruisin'
Joined: Nov 2009
Posts: 23
Likes: 0
nice ideas, but just seems to me like some incorrect panels are removed on applications.
sure, engine covers are of aesthetic reasons from the factory. but, covers by the grill is to prevent incoming air from leaking to other areas other than thru the radiator.
sure, engine covers are of aesthetic reasons from the factory. but, covers by the grill is to prevent incoming air from leaking to other areas other than thru the radiator.
Cruisin'
Joined: Nov 2009
Posts: 23
Likes: 0
also, another theory to consider.
and this is on heat transfer...
to improve heat transfer, focusing on exhausting heat off the exchangers reaps better gains than focusing on "ramming" in air.
and this theory is easy to practice.
-take a very basic tool, such as a funnel.
and don't only think of h20 passing thru it, but air also. there really shouldn't be much explaning here...
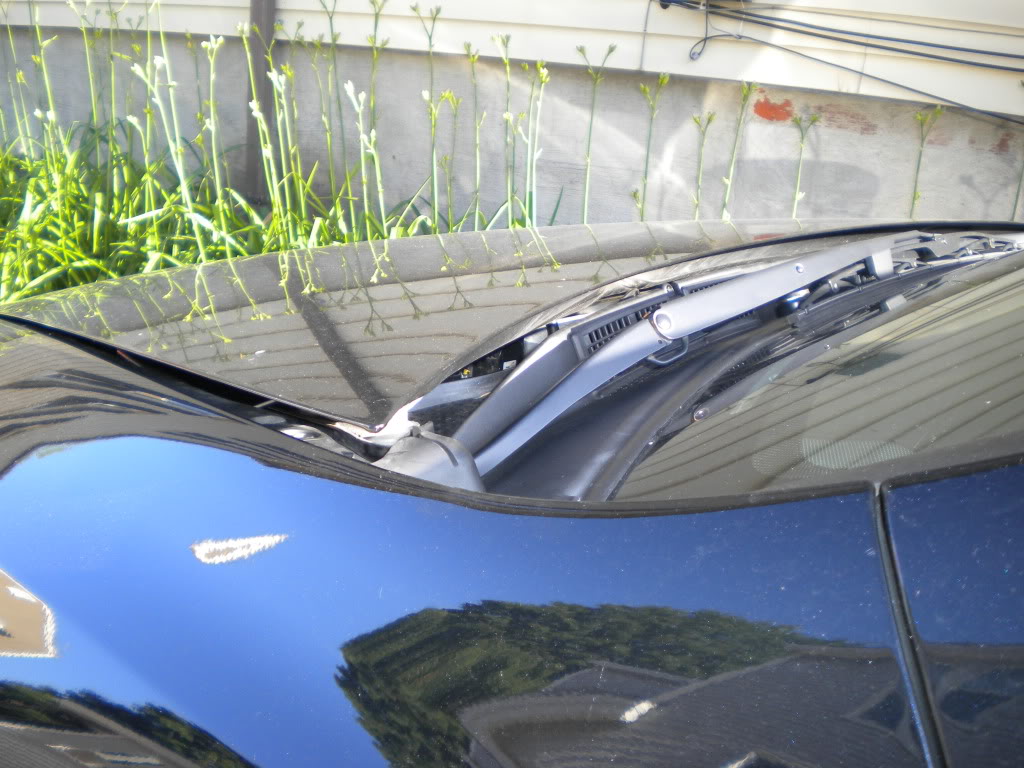
I took off the wipers,the crawl,cut some open spaces, and drilled holes all the way across. Also had to re-adjust my sprayers.
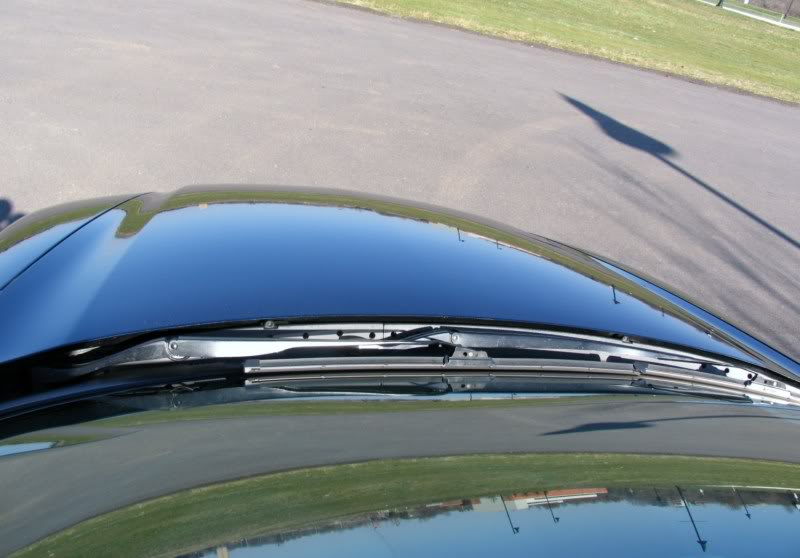
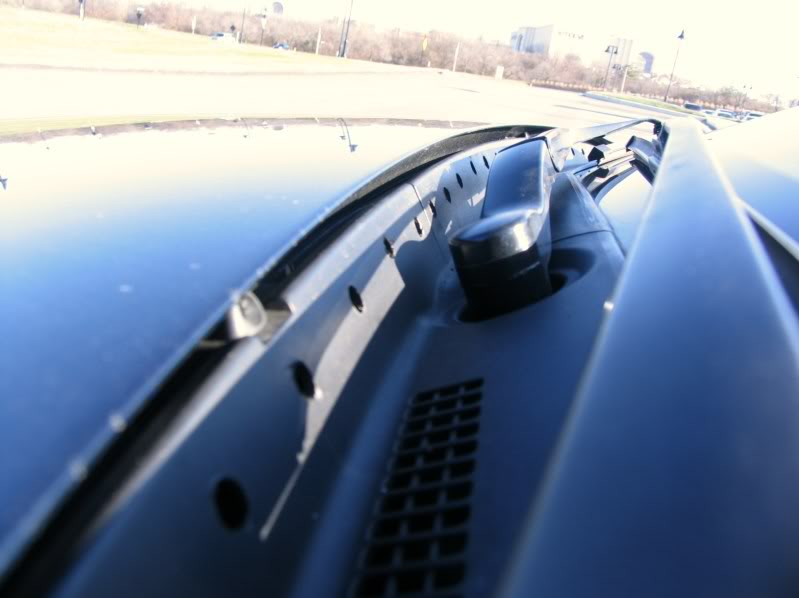

Biggest change I've noticed is that after driving and opening the hood I don't get a blast of hot air all at once, so the engine is cooling off quicker. I feel some heat coming out of the holes when the car is running and no performance gains to my knowledge. Over all I like the look and it's east to do.
Biggest change I've noticed is that after driving and opening the hood I don't get a blast of hot air all at once, so the engine is cooling off quicker. I feel some heat coming out of the holes when the car is running and no performance gains to my knowledge. Over all I like the look and it's east to do.
Thread Starter
Safety Car
Joined: Jan 2006
Posts: 4,442
Likes: 482
From: Houston, Texas
Sezniko,
Thanks for the pics. Looks clean and tricked-out.
The performance gains will not be noticeable right now with the cold weather that we are having. You should notice a difference when the weather is above approximately 90 degrees.
I still think that it is awesome to see folks doing this mod in the middle on winter. But, this is the right time to do it. When I did mine, it was the middle of summer and I had sweat dripping off of me.... no fun at all. I am trying to get most of my car modding done before the "dog days" of summer set-in.
Good job Sezniko! Thanks for sharing and the pics

Thread Starter
Safety Car
Joined: Jan 2006
Posts: 4,442
Likes: 482
From: Houston, Texas
Saleen ,
In the summer, are you annoyed that your TL losses it's pep? Do you drive your TL hard? If not, this mod would not help you.
This mod are for people that notice a power reduction during brisk acceleration when the weather is above 90 degrees.
In the summer, are you annoyed that your TL losses it's pep? Do you drive your TL hard? If not, this mod would not help you.
This mod are for people that notice a power reduction during brisk acceleration when the weather is above 90 degrees.
Here is my version. I didnt take pics from under the hood but I cut out the area directly behind all these squares. If you look at the way the cowl is constructed then its imperative that you cut this area out otherwise the hot air under the hood only goes through the mesh area on the driver side. Just like Inaccurate said, I'm able to hold my hand directly on the intake manifold after a long drive. Im a believer
Night shots brightened with photoshop


Night shots brightened with photoshop


Thread Starter
Safety Car
Joined: Jan 2006
Posts: 4,442
Likes: 482
From: Houston, Texas
I got a new toy to take temps of my UCM.
Fluke 62 Mini Infrared Thermometer (click here)

I had the thermometer for a few months. So, I was able to get some temps of the UCM in cooler months and now these hotter days of early summer.
Consistently, my intake manifold is always approx 20* F hotter than the weather temps.
When the weather was 60* F, the manifold was 80*.
When the weather was 80* F, the manifold was 100*.
Today, the weather was 97* F.
My MID showed 98*. My wife�s car said 97*.
So, the intake manifold should be 118*. Let�s check��.
The sidewalk in the shade reads 103*.

The wood fence below

Shows a reading of 118*

And the intake manifold is reading


An average of 119*
This was taken immediately after I got home from my daily commute, which is a 45-60 minute commute of mixed city/hwy. These temps (119*) is representative of most things under the hood that are not in direct contact with the engine/trans cases.
Stay cool
Fluke 62 Mini Infrared Thermometer (click here)
I had the thermometer for a few months. So, I was able to get some temps of the UCM in cooler months and now these hotter days of early summer.
Consistently, my intake manifold is always approx 20* F hotter than the weather temps.
When the weather was 60* F, the manifold was 80*.
When the weather was 80* F, the manifold was 100*.
Today, the weather was 97* F.
My MID showed 98*. My wife�s car said 97*.
So, the intake manifold should be 118*. Let�s check��.
The sidewalk in the shade reads 103*.
The wood fence below
Shows a reading of 118*
And the intake manifold is reading
An average of 119*
This was taken immediately after I got home from my daily commute, which is a 45-60 minute commute of mixed city/hwy. These temps (119*) is representative of most things under the hood that are not in direct contact with the engine/trans cases.
Stay cool
and here's my original patent on a cooling mod name
The Semi-UCM
i been following this thread and re-creating it in my own design,
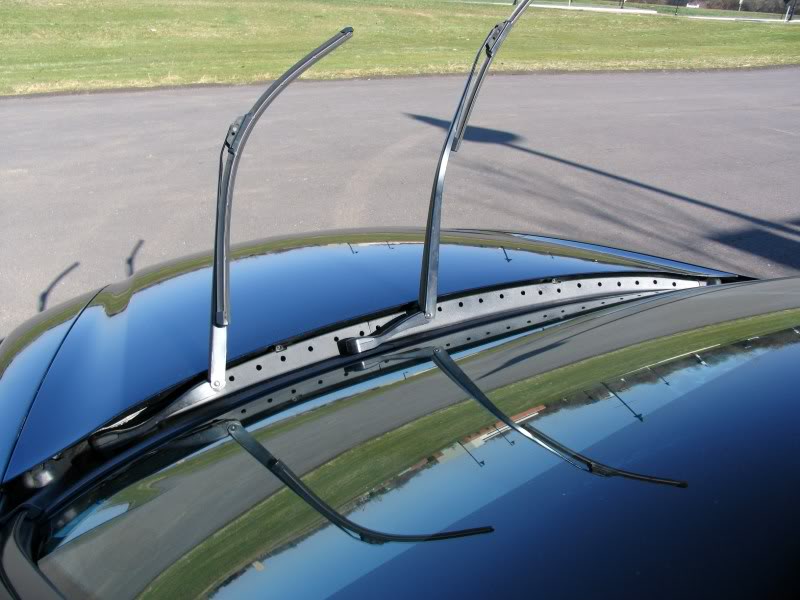
redesigned without losing the function of my washer fluid sprayers, that's important to me!
did NOT remove the rubber that protects the very bottom edge of the windshield (to keep the seal of the windshield protected from anything that could possibly hit it, rocks, hail, ect),
kept it so my "fresh air" still works on driver and passenger side
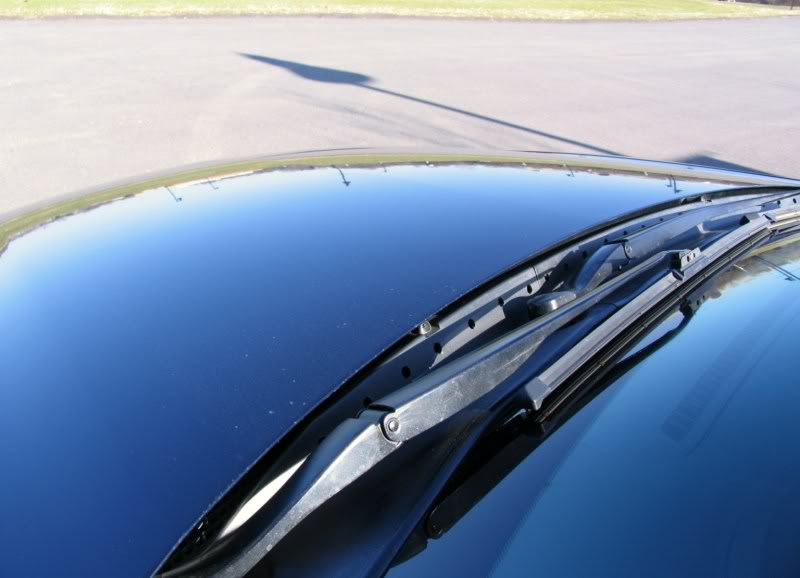
kept two of the engine bay covers that cover the strut tower bar EXCEPT i cut the part that was completly covering the CENTER section of the bar because
1) the bar looks cool, admit it
2) i realized if i didn't cut the center section to match the cowl cutting, the mod would kind of been a waste because before i cut the center bar it blocked ALL that "NEW OPENING" i made, so cut cut peeps!
DON"T just toss out the strut tower bar covers - there's tons of electronics under those and i wanted to make sure there was an absolut ZERO chance of water entering those areas in combonation with keeping 2 of the "fresh air" vents in the parts of the cowl i left, this works as a perfect seal for those areas!
From a week of driving around like this,, i've noticed 1) my CAI pipe is NEVER hot anymore, luke warm at most, 2) i can put my hands on my engine bay cover and intake manifold without being burned, 3) after the car is shut off, i put my hand where i Modded the heat to escape, and boy does IT ESCAPE! this mod was WELL WORTH the very little time it took to do, and my car does not lag like it used too!
side note - NO dremel was used in the making of this project, meaning you DON"T need a dremel for everything to the guys (like myself) who don't own a dremel, a razer blade in a holder cuts thru the cowl like BUTTER, just an FYI.
AND... TAKE YOUR TIME, i did and very pleased with the results of it all =)
next little project will be routing ducting hose from behind the grill straight to the CAI...
here are some pics of the "Semi-UCM".... finally lol
oh one last thing, i got bored during the project cuz it went by so fast, so i decided to paint my engine bay cover and intake manifold cover, that was fun and made the engine look not so dingy,dirty, crap lookin,, Brilliant Gold was the color i used to contrast my Abyss Blue Pearl exterior,, hm Gold colored wheels? who knows... it does look pretty hot on blue cars tho, just my .02.. what do you all think of my interpretation of this mod?


The Semi-UCM
i been following this thread and re-creating it in my own design
, redesigned without losing the function of my washer fluid sprayers, that's important to me!
did NOT remove the rubber that protects the very bottom edge of the windshield (to keep the seal of the windshield protected from anything that could possibly hit it, rocks, hail, ect),
kept it so my "fresh air" still works on driver and passenger side
kept two of the engine bay covers that cover the strut tower bar EXCEPT i cut the part that was completly covering the CENTER section of the bar because
1) the bar looks cool, admit it
2) i realized if i didn't cut the center section to match the cowl cutting, the mod would kind of been a waste because before i cut the center bar it blocked ALL that "NEW OPENING" i made, so cut cut peeps!
DON"T just toss out the strut tower bar covers - there's tons of electronics under those and i wanted to make sure there was an absolut ZERO chance of water entering those areas in combonation with keeping 2 of the "fresh air" vents in the parts of the cowl i left, this works as a perfect seal for those areas!
From a week of driving around like this,, i've noticed 1) my CAI pipe is NEVER hot anymore, luke warm at most, 2) i can put my hands on my engine bay cover and intake manifold without being burned, 3) after the car is shut off, i put my hand where i Modded the heat to escape, and boy does IT ESCAPE! this mod was WELL WORTH the very little time it took to do, and my car does not lag like it used too!
side note - NO dremel was used in the making of this project, meaning you DON"T need a dremel for everything to the guys (like myself) who don't own a dremel, a razer blade in a holder cuts thru the cowl like BUTTER, just an FYI.
AND... TAKE YOUR TIME, i did and very pleased with the results of it all =)
next little project will be routing ducting hose from behind the grill straight to the CAI...
here are some pics of the "Semi-UCM".... finally lol
oh one last thing, i got bored during the project cuz it went by so fast, so i decided to paint my engine bay cover and intake manifold cover, that was fun and made the engine look not so dingy,dirty, crap lookin,, Brilliant Gold was the color i used to contrast my Abyss Blue Pearl exterior,, hm Gold colored wheels? who knows... it does look pretty hot on blue cars tho, just my .02.. what do you all think of my interpretation of this mod?


waiting to test is out.


Advanced
Joined: May 2009
Posts: 78
Likes: 2
For the new and improved UCM can we see better pics of what parts to cut under the hood? I see that on the outside the cuts were made from spray nozzel to spray nozzel but im not quite sure what to cut on the inside.

Advanced
Joined: May 2010
Posts: 55
Likes: 0
have any of you guys considered running hood spacers? i spent $5 at Lowes for nylon bushings, 4 bolts and some washers. It's had the same dramatic effect while keeping the cowling in, with removal of the weather strip.
Thread Starter
Safety Car
Joined: Jan 2006
Posts: 4,442
Likes: 482
From: Houston, Texas
This was covered on page 4, but worthy of a re-post
Here is some reading for anyone interested in the Hood Spacers.
(Please remember that the Ultimate Cooling Mod has a much, much bigger gap than these hood spacers)
NEW: 06+ Civic CorSport Aluminum Hood Spacer Bushings (click here)
DIY - Installing Corsport Hood Spacers (click here)
DIY: $3.57 Hood Spacers (click here)
hood spacers or no hood spacers? (click here)
hood spacers. let me know what you think (click here)
Thread Starter
Safety Car
Joined: Jan 2006
Posts: 4,442
Likes: 482
From: Houston, Texas


Advanced
Joined: May 2010
Posts: 55
Likes: 0
This was covered on page 4, but worthy of a re-post
Here is some reading for anyone interested in the Hood Spacers.
(Please remember that the Ultimate Cooling Mod has a much, much bigger gap than these hood spacers)
NEW: 06+ Civic CorSport Aluminum Hood Spacer Bushings (click here)
DIY - Installing Corsport Hood Spacers (click here)
DIY: $3.57 Hood Spacers (click here)
hood spacers or no hood spacers? (click here)
hood spacers. let me know what you think (click here)
Here is some reading for anyone interested in the Hood Spacers.
(Please remember that the Ultimate Cooling Mod has a much, much bigger gap than these hood spacers)
NEW: 06+ Civic CorSport Aluminum Hood Spacer Bushings (click here)
DIY - Installing Corsport Hood Spacers (click here)
DIY: $3.57 Hood Spacers (click here)
hood spacers or no hood spacers? (click here)
hood spacers. let me know what you think (click here)
The civic spacers in this link DIY: $3.57 Hood Spacers (click here) are very similar but about 1/2 to 3/4 the thickness that i'm running in mine. It looks similar though since the civic has such a short hood.
Advanced
Joined: May 2010
Posts: 55
Likes: 0
I would also like to note that although spacers don't provide as much space as removing the cowling (aside from the first set of nylon spacers i used that looked idiotic  ) It does provide more breathing room than the hacked up cowling. Also, it creates space along the sides of the hood.
) It does provide more breathing room than the hacked up cowling. Also, it creates space along the sides of the hood.
Thread Starter
Safety Car
Joined: Jan 2006
Posts: 4,442
Likes: 482
From: Houston, Texas
), and your engine thanks you too. :wink:
IMO, hood spacers look terrible. I am about to start cutting into mine in the next few days, just trying to plan out how to keep it looking the cleanest. New ones from the dealer by the way are about $210 for both pieces. I picked up a used one locally for $80 so i can go back to stock if ever needed..... or if i F mine up! lol

Team Owner
Joined: Mar 2006
Posts: 20,172
Likes: 1,818
From: Bakersfield
Didn't realize there were no before and after underhood temps. I'll take some on the way home, I always have the thremometer in the car and use any excuse to use it.
Inaccurate are you just shooting the IM plenum? Any other areas you want me to shoot? I'm guessing it's going to be 70+ degrees over ambient.
Inaccurate are you just shooting the IM plenum? Any other areas you want me to shoot? I'm guessing it's going to be 70+ degrees over ambient.
Thread Starter
Safety Car
Joined: Jan 2006
Posts: 4,442
Likes: 482
From: Houston, Texas
IHC,
Try to mimic the last three pics in post #260. Please make sure to have the thermometer touching, or as close as possible, to the manifold as I show in my pics.
Another good spot for comparison would be the brake booster.
Try to mimic the last three pics in post #260. Please make sure to have the thermometer touching, or as close as possible, to the manifold as I show in my pics.
Another good spot for comparison would be the brake booster.