Factory IM Spacer - 17108-RDJ-A00
 07-07-2009, 07:03 PM
#481
Modding my TL in
Join Date: Jun 2005
Location: Chicago SW Burbs
Age: 52
Posts: 317
Likes: 0
Received 1 Like
on
1 Post
So I called all around town because as people have noted now the bolts are on back order. Well shit.
So, I called and visited the BMW dealer and bought (9) bolts, 2 more than needed.
I also ran around town to many different stores and ended up at the helpful place - Ace Hardware. I bought (2) 8x100 (fully threaded) bolts. I was looking for studs everywhere and no one had them. I figured worse case I could cut the heads off of these two bolts and turn them into studs.
However, without having the spacer, I'm not sure if I could use the 2 extra from the BMW dealer or the 2 I bought at Ace (in some fashion). I know some people are not using them, but I wanted to get as close to OEM as possible.
I am waiting for the spacer and gaskets to arrive to my house (hopefully tomorrow).
Oh, the BMW bolts cost me $2.98/each and the Ace bolts cost me $2.25/each.
The saga continues...
 07-07-2009, 10:41 PM
#482
practicing nihilist
May be wrong, but I don't think you can cut the heads off fully threaded bolts and use them as studs. The studs are threaded opposite direction from either end. Think a fully threaded bolt would not thread properly from both sides.
07-08-2009, 09:10 AM
#483
Modding my TL in
Join Date: Jun 2005
Location: Chicago SW Burbs
Age: 52
Posts: 317
Likes: 0
Received 1 Like
on
1 Post
We'll see what I can do. Supposedly I should be doing this later on this afternoon/evening as I'm tracking the spacer via Fed-Ex.
 07-08-2009, 02:26 PM
#485
practicing nihilist
^Concur. That's how I rocked mine, maybe gerzand, too. Held fine for the 3 weeks I had mine on. Once you've pulled that sucker off a couple times it'll be quick work to install the studs when they come around. Good reason to clean out the intake and ports, too.
 07-08-2009, 09:06 PM
#487
Modding my TL in
Join Date: Jun 2005
Location: Chicago SW Burbs
Age: 52
Posts: 317
Likes: 0
Received 1 Like
on
1 Post
Good evening everyone!
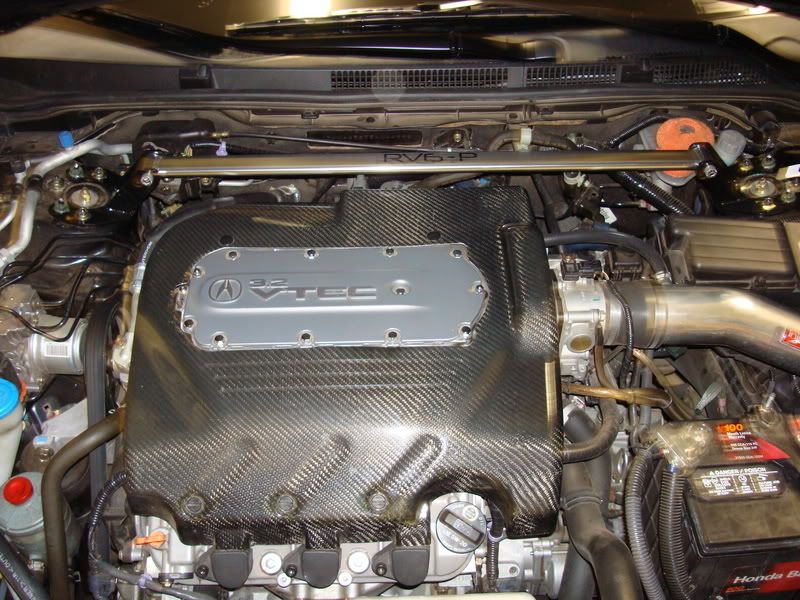
I received the spacer and two gaskets via FedEx today. Thanks CleanCL!
Since I had all the parts now (cancelled my Delray Acura order), I decided to do the mod.
Oh, I did the IM spacer install, then Richie's Strut Bar and J-Pipe Combo. Yes, this late afternoon, was very busy. For more info on my install of the J-Pipe Combo, look here: https://acurazine.com/forums/showthr...0#post11086170.
Back to the topic at hand.
So, after tagging everything I needed to unplug or remove with blue painters tape, I unbolted everything and removed the intake manifold. I cleaned it real good, and then removed the stock studs.
What I ended up doing was cutting the heads off of the 2, 8x100 fully threaded bolts I got yesterday from Ace Hardware and used those as studs - to line up the gaskets, spacers, and manifold. I tried not to use them, but for the life of me it was hard to line everything up. Okay, the gasket, the spacer, the gasket, and the manifold lined up fine.
I put everything back together and relocated a few items here and there (and with the stock strut bar off, it was much easier to do). Remember, I did Richie's Strut bar after putting everything back together, etc.
So when everything was buttoned up, I started the engine and got a code. Since I have a OBDII code reader, it told me what it was. Doh, I forgot to plug in the A/F sensor plug. Okay, did that, tried everything again - all is good, no CEL. I started the engine with a little gas, and my goodness, my intake is now deep sounding. I revved it, and it sounded awesome!
Next, I go to close the hood (remember I pre-cut my hood) and well, it didn't close. Son of a B. I figured out what it was and long story short, I had to cut about two more inches of the hood for the front of the intake manifold to clear (not the lid, but about an inch or two towards the front of the car from the IM lid. Okay, I did a good job, cut, smooth, paint. The hood closes with no problems now (looks stock and stealthy).
Oh, for those interested in retaining the stock engine cover - no way, it will not fit (at least the base TL). I tried everything and long story short, having the engine cover on (I secured it good for testing) will not allow the hood to close. Therefore, I scrap my project on trying to make it work.
Okay, so I didn't test drive it as it was raining and I still was going to do the J-Pipe + Test Pipe mod.
After I did all the mods and finally got it onto the road and a test drive, the car is much more free flowing, shifted quicker, deeper intake sound, deep exhaust sound with no rasp. Oh, when I looked down at the speedometer, let me just say it was very easy to get to triple digit numbers without even realizing it.
Overall I am extremely pleased and can "feel" the difference. It was hard to pound it as everything was wet. I'll report back in a few days my thoughts. Oh, I'm going to get a Dyno as soon as possible too.
Many thanks to everyone on this board for all the help. I'm really happy.
Picture below:
07-08-2009, 11:40 PM
#488
xcelir8TL - glad to see that it worked out for you. That's 2 people that I supplied this spacer to, haha. I bought one from Acura and one from Honda (Odyssey) sometime late 2007, early 2008. Don't ask, I just wanted to see the differences, but there was no chance of ever getting my CL-S hood to close.
07-09-2009, 10:42 AM
#490
Ryan Christopher
I know this has been touched on briefly in 1 other thread but it talked about using the 09 TL one, but what is the possibility of using the 07-08 type-s intake manifold on the 04-06? Is the throttle body the same on the two?
Also, it would be nice to be able to use the 09, but would require for P2R to make an adapter like they did for the 2nd Gen TL (I think, maybe it was the CL).
If they did, this would give about a 1/2" more clearance and reduce some weight.
Also, it would be nice to be able to use the 09, but would require for P2R to make an adapter like they did for the 2nd Gen TL (I think, maybe it was the CL).
If they did, this would give about a 1/2" more clearance and reduce some weight.
07-09-2009, 12:27 PM
#491
Senior Moderator
I know this has been touched on briefly in 1 other thread but it talked about using the 09 TL one, but what is the possibility of using the 07-08 type-s intake manifold on the 04-06? Is the throttle body the same on the two?
Also, it would be nice to be able to use the 09, but would require for P2R to make an adapter like they did for the 2nd Gen TL (I think, maybe it was the CL).
If they did, this would give about a 1/2" more clearance and reduce some weight.
Also, it would be nice to be able to use the 09, but would require for P2R to make an adapter like they did for the 2nd Gen TL (I think, maybe it was the CL).
If they did, this would give about a 1/2" more clearance and reduce some weight.
How much taller is the engine with the spacer on? If it was cut in half, would that allow the hood to close without cutting?
07-09-2009, 12:55 PM
#492
Ryan Christopher
the 07-08 IM's are a bit lighter since they are magnesium. You could buy an IM for around 300-500 dollars for an 07+ TL and have that put on. As well you could port and polish it to get a little more power.
How much taller is the engine with the spacer on? If it was cut in half, would that allow the hood to close without cutting?
How much taller is the engine with the spacer on? If it was cut in half, would that allow the hood to close without cutting?
07-09-2009, 01:12 PM
#493
We've already established that the insulator is just for sound rather than fire control. So that is unnecessary. If you checked out my pics in post #469, I had no issues with the spacer. And no one can tell with the hood down. Plus I'm loving the results!

BTW props to Al (stillhere153) for bringing this one out!
07-09-2009, 01:44 PM
#494
Ryan Christopher
Kudo's for you for milling it down, but I don't think cutting a 10" piece out of the frame in the hood is all that bad. IMO I was not all for the "pop hood look". Cutting is alot more stealthier and cheaper for this mod. You won't have to pay to get the spacer milled.
We've already established that the insulator is just for sound rather than fire control. So that is unnecessary. If you checked out my pics in post #469, I had no issues with the spacer. And no one can tell with the hood down. Plus I'm loving the results!
BTW props to Al (stillhere153) for bringing this one out!
I took a wild guess at the 7mm based on all the info provided in this thread, so I am grateful to everyone that gave input into this thread. Once I get some time, I am going to install it. I also picked up some M8x100mm socket head bolts from fastenel. I hope to get some time this weekend to get it done and post some pictures. I do hate that I am not going to be able to use my lovely MB carbon cover anymore!!
 07-09-2009, 06:27 PM
#497
Modding my TL in
Join Date: Jun 2005
Location: Chicago SW Burbs
Age: 52
Posts: 317
Likes: 0
Received 1 Like
on
1 Post
Follow up, driving the day after install, albeit dry conditions - the car accelerates effortlessly now, nice sound on both intake and exhaust, and still am a very happy camper!
07-10-2009, 08:34 AM
#498
Ryan Christopher
07-10-2009, 10:03 AM
#501
Full of water...
07-10-2009, 02:41 PM
#502
Modding my TL in
Join Date: Jun 2005
Location: Chicago SW Burbs
Age: 52
Posts: 317
Likes: 0
Received 1 Like
on
1 Post
Here are some pictures I took today:


I took the car about town today and I am still VERY HAPPY!
07-10-2009, 09:43 PM
#503
Modding my TL in
Join Date: Jun 2005
Location: Chicago SW Burbs
Age: 52
Posts: 317
Likes: 0
Received 1 Like
on
1 Post
Yesterday I ordered all new plastic engine bay covers (except the plastic engine cover itself) because they were either scratched up or clips broken.
All day I kept thinking about the possibility to put the engine cover back on.
So after many laborious hours I was able to do it! Yes, folks, the engine cover will now fit! So, what did I do? I honestly did four things, of which you only really need to do three.
After trial and error, this is what you need to do:
1. Make custom brackets to raise up the stock bracket rail that holds the front three clips of the engine cover.
2. I had to make my cut a little bigger/longer under the center of the hood.
3. I had to lightly pound some of the sheet metal so that the left side of the engine cover can clear with movement.
(4. - not necessary, I cut my engine cover as I was not comfortable at the clearance level to the right of the engine near the throttle body. After I cut it, doh! I realized all I had to do was to turn rubber tube clip sideways and therefore the cover lowered about 1/4" or so. Meh, I might order a new cover, but for now, I repainted it due to all the markups I made for trial and error).
Pictures below: (I'll follow up this post with one tomorrow showing the engine cover is on - as the cover is drying in my garage overnite of painting.)
(engine with brackets)

(my custom brackets!)

(hood with cut and pounded sheet metal = painted black)
So much work, pays off!
All day I kept thinking about the possibility to put the engine cover back on.
So after many laborious hours I was able to do it! Yes, folks, the engine cover will now fit! So, what did I do? I honestly did four things, of which you only really need to do three.
After trial and error, this is what you need to do:
1. Make custom brackets to raise up the stock bracket rail that holds the front three clips of the engine cover.
2. I had to make my cut a little bigger/longer under the center of the hood.
3. I had to lightly pound some of the sheet metal so that the left side of the engine cover can clear with movement.
(4. - not necessary, I cut my engine cover as I was not comfortable at the clearance level to the right of the engine near the throttle body. After I cut it, doh! I realized all I had to do was to turn rubber tube clip sideways and therefore the cover lowered about 1/4" or so. Meh, I might order a new cover, but for now, I repainted it due to all the markups I made for trial and error).
Pictures below: (I'll follow up this post with one tomorrow showing the engine cover is on - as the cover is drying in my garage overnite of painting.)
(engine with brackets)
(my custom brackets!)
(hood with cut and pounded sheet metal = painted black)
So much work, pays off!
07-11-2009, 08:57 AM
#504
practicing nihilist
Yesterday was a good day. I loaded up my car for an oil change with the OPTION of reinstalling the spacer. Holy Shit! VSA and "!" lights went away all by themselves! Sweet.
At the shop I find out they have a cutting tool for the hood notch. Sure, let's try it. Everything came off and went back on like butta. Cut came out very nice and I touched it up with a little engine paint. Hell, I didn't even drop a bolt down into the engine bay (I use the magnetic pickup tool a lot).
I need a longer sleeve for my AEM CAI. Its barely making the stretch.
07-11-2009, 09:22 AM
#505
Yesterday was a good day. I loaded up my car for an oil change with the OPTION of reinstalling the spacer. Holy Shit! VSA and "!" lights went away all by themselves! Sweet.
At the shop I find out they have a cutting tool for the hood notch. Sure, let's try it. Everything came off and went back on like butta. Cut came out very nice and I touched it up with a little engine paint. Hell, I didn't even drop a bolt down into the engine bay (I use the magnetic pickup tool a lot).
I need a longer sleeve for my AEM CAI. Its barely making the stretch.
At the shop I find out they have a cutting tool for the hood notch. Sure, let's try it. Everything came off and went back on like butta. Cut came out very nice and I touched it up with a little engine paint. Hell, I didn't even drop a bolt down into the engine bay (I use the magnetic pickup tool a lot).
I need a longer sleeve for my AEM CAI. Its barely making the stretch.
 07-11-2009, 02:30 PM
#510
Modding my TL in
Join Date: Jun 2005
Location: Chicago SW Burbs
Age: 52
Posts: 317
Likes: 0
Received 1 Like
on
1 Post
Ummm, well, after driving around today and examining the IM cover, some paint was peeled off/melted onto the parts of the hood that I pounded down. The actual IM cover wasn't burned or anything but I'm guessing due to the close proximity it was too hot! After sanding and repainting the bottom of the hood, I ordered a replacement cover that I am NOT going to paint. Clearance is fine. Don't lose hope!
07-11-2009, 03:14 PM
#511
94 DC4 RS LSV/Turbo
Thread Starter
iTrader: (1)
Join Date: Jul 2007
Location: New York City | Stuck in Traffic
Age: 38
Posts: 11,734
Likes: 0
Received 11 Likes
on
11 Posts
mmmh I applaud your will to keep the cover on... but honestly, how can you cover that sexy J motor with plastic... I like how raw the block looks without it...
so damn sexy naked
so damn sexy naked
07-11-2009, 04:27 PM
#512
Ummm, well, after driving around today and examining the IM cover, some paint was peeled off/melted onto the parts of the hood that I pounded down. The actual IM cover wasn't burned or anything but I'm guessing due to the close proximity it was too hot! After sanding and repainting the bottom of the hood, I ordered a replacement cover that I am NOT going to paint. Clearance is fine. Don't lose hope!
^ I agree with Al. Nice try though.
07-11-2009, 05:53 PM
#513
Modding my TL in
Join Date: Jun 2005
Location: Chicago SW Burbs
Age: 52
Posts: 317
Likes: 0
Received 1 Like
on
1 Post
Yeah, yeah. I'll put all the new covers on the car except the engine and see how I like it for a week. Then I'll put the new replacement engine cover on and see how I like it for another week and then make the decision. I'd rather have a CF cover though that or chrome the intake manifold!
07-11-2009, 07:28 PM
#514
practicing nihilist
I actually went to the auto/hobby shop on NAS Oceana. Very nice place with everything a motorhead wants.
F-ing lights came back on. I want to rip that damn VSA computer out.
07-13-2009, 04:27 AM
#516
Former Sponsor

Hey guys I am having a speical on my strut bar. Only $149 shipped in the US and $15 more Canada. I hear it helps with the clearance when using this spacer.
http://www.ecrater.com/product.php?pid=3303149
http://www.ecrater.com/product.php?pid=3303149
07-15-2009, 11:26 AM
#520
Former Whyner
Hey guys I am having a speical on my strut bar. Only $149 shipped in the US and $15 more Canada. I hear it helps with the clearance when using this spacer.
http://www.ecrater.com/product.php?pid=3303149
http://www.ecrater.com/product.php?pid=3303149