
A-122: DIY - 105k Service: Timing Belt, Water Pump, Spark Plugs, Thermostat *PICS*


 04-23-2014, 06:17 PM
#883
Race Director
Are we being trolled?
04-23-2014, 06:28 PM
#884
Okay, but seriously, word to the people doing the valve cover gaskets.
1st. FUCK YOU VALVE COVER GASKETS...the bolt gaskets need to be PRIED loose, then cut off (since they are brittle now, they won't slide over the bolt head). Then, the spark plug hole gaskets...don't go at them with a plier on the soft portion of the rubber. It'll just tear, and expose the imbedded wire reinforcement. Don't go at them with picks...you'll just tear holes in them but not remove them. Use a good, angled set of fat screwdrivers or pry bars. I have a 3 piece HF set and the small one popped the last 3 out without issue with some leverage.
Now...the travesty...I eat my pizza crust first. I do the sucky part of the job first.
So, after I used fresh oil to lube ALL my gaskets (figured if it's good for the oil filter compression, it's good for the valve cover gasket too)! Here's my mistake, did rear first and couldn't SEE the spark plug chambers. I figured that the bolts align the spark holes. WRONG...they don't. They require you to drum up fond memories of the first fingering of your first virgin squirrel...you must use your finger to pick one end, and kinda work and massage the gasket AROUND the spark hole. One goes on, move on to the middle one, then the last one. Now, because I torqued the rear down before realizing this, I ripped all 3 of my BRAND new fel-pro gaskets. First I was glad to have noticed, oil drenching 1/2 my cylinder plugs would have sucked, especially after the TB service. I almost put the old salvageable gaskets BACK on the rear, but nope nope nope...I am NOT in a rush and have a 2nd car. I am old enough to know, do it once, do it right. Wasted $35 on a 2nd set to be rush shipped (2 day prime
  ) for Friday.
On the plus side, I checked tolerance for a third time and I'm really confident that I'm good.
NFN, I also thought about what you said, but my conversion for my next step up is .013 inch feeler translates to: .3302mm, which exceeds the recommended +30 +/-.02mm. My thoughts are that Honda takes into account their need for exhaust being NOT TOO tight, and intake being tighter and that's WHY they have the 24/30mm split.
1st. FUCK YOU VALVE COVER GASKETS...the bolt gaskets need to be PRIED loose, then cut off (since they are brittle now, they won't slide over the bolt head). Then, the spark plug hole gaskets...don't go at them with a plier on the soft portion of the rubber. It'll just tear, and expose the imbedded wire reinforcement. Don't go at them with picks...you'll just tear holes in them but not remove them. Use a good, angled set of fat screwdrivers or pry bars. I have a 3 piece HF set and the small one popped the last 3 out without issue with some leverage.
Now...the travesty...I eat my pizza crust first. I do the sucky part of the job first.
So, after I used fresh oil to lube ALL my gaskets (figured if it's good for the oil filter compression, it's good for the valve cover gasket too)! Here's my mistake, did rear first and couldn't SEE the spark plug chambers. I figured that the bolts align the spark holes. WRONG...they don't. They require you to drum up fond memories of the first fingering of your first virgin squirrel...you must use your finger to pick one end, and kinda work and massage the gasket AROUND the spark hole. One goes on, move on to the middle one, then the last one. Now, because I torqued the rear down before realizing this, I ripped all 3 of my BRAND new fel-pro gaskets.
First I was glad to have noticed, oil drenching 1/2 my cylinder plugs would have sucked, especially after the TB service. I almost put the old salvageable gaskets BACK on the rear, but nope nope nope...I am NOT in a rush and have a 2nd car. I am old enough to know, do it once, do it right. Wasted $35 on a 2nd set to be rush shipped (2 day prime ) for Friday. On the plus side, I checked tolerance for a third time and I'm really confident that I'm good.
NFN, I also thought about what you said, but my conversion for my next step up is .013 inch feeler translates to: .3302mm, which exceeds the recommended +30 +/-.02mm. My thoughts are that Honda takes into account their need for exhaust being NOT TOO tight, and intake being tighter and that's WHY they have the 24/30mm split.
Last edited by rockstar143; 04-23-2014 at 06:32 PM.
 04-23-2014, 06:39 PM
#886
Race Director
Okay, but seriously, word to the people doing the valve cover gaskets.
1st. FUCK YOU VALVE COVER GASKETS...the bolt gaskets need to be PRIED loose, then cut off (since they are brittle now, they won't slide over the bolt head). Then, the spark plug hole gaskets...don't go at them with a plier on the soft portion of the rubber. It'll just tear, and expose the imbedded wire reinforcement. Don't go at them with picks...you'll just tear holes in them but not remove them. Use a good, angled set of fat screwdrivers or pry bars. I have a 3 piece HF set and the small one popped the last 3 out without issue with some leverage.
Now...the travesty...I eat my pizza crust first. I do the sucky part of the job first.
So, after I used fresh oil to lube ALL my gaskets (figured if it's good for the oil filter compression, it's good for the valve cover gasket too)! Here's my mistake, did rear first and couldn't SEE the spark plug chambers. I figured that the bolts align the spark holes. WRONG...they don't. They require you to drum up fond memories of the first fingering of your first virgin squirrel...you must use your finger to pick one end, and kinda work and massage the gasket AROUND the spark hole. One goes on, move on to the middle one, then the last one. Now, because I torqued the rear down before realizing this, I ripped all 3 of my BRAND new fel-pro gaskets. First I was glad to have noticed, oil drenching 1/2 my cylinder plugs would have sucked, especially after the TB service. I almost put the old salvageable gaskets BACK on the rear, but nope nope nope...I am NOT in a rush and have a 2nd car. I am old enough to know, do it once, do it right. Wasted $35 on a 2nd set to be rush shipped (2 day prime ) for Friday.
1st. FUCK YOU VALVE COVER GASKETS...the bolt gaskets need to be PRIED loose, then cut off (since they are brittle now, they won't slide over the bolt head). Then, the spark plug hole gaskets...don't go at them with a plier on the soft portion of the rubber. It'll just tear, and expose the imbedded wire reinforcement. Don't go at them with picks...you'll just tear holes in them but not remove them. Use a good, angled set of fat screwdrivers or pry bars. I have a 3 piece HF set and the small one popped the last 3 out without issue with some leverage.
Now...the travesty...I eat my pizza crust first. I do the sucky part of the job first.
So, after I used fresh oil to lube ALL my gaskets (figured if it's good for the oil filter compression, it's good for the valve cover gasket too)! Here's my mistake, did rear first and couldn't SEE the spark plug chambers. I figured that the bolts align the spark holes. WRONG...they don't. They require you to drum up fond memories of the first fingering of your first virgin squirrel...you must use your finger to pick one end, and kinda work and massage the gasket AROUND the spark hole. One goes on, move on to the middle one, then the last one. Now, because I torqued the rear down before realizing this, I ripped all 3 of my BRAND new fel-pro gaskets.
First I was glad to have noticed, oil drenching 1/2 my cylinder plugs would have sucked, especially after the TB service. I almost put the old salvageable gaskets BACK on the rear, but nope nope nope...I am NOT in a rush and have a 2nd car. I am old enough to know, do it once, do it right. Wasted $35 on a 2nd set to be rush shipped (2 day prime ) for Friday.On the plus side, I checked tolerance for a third time and I'm really confident that I'm good.
NFN, I also thought about what you said, but my conversion for my next step up is .013 inch feeler translates to: .3302mm, which exceeds the recommended +30 +/-.02mm. My thoughts are that Honda takes into account their need for exhaust being NOT TOO tight, and intake being tighter and that's WHY they have the 24/30mm split.
NFN, I also thought about what you said, but my conversion for my next step up is .013 inch feeler translates to: .3302mm, which exceeds the recommended +30 +/-.02mm. My thoughts are that Honda takes into account their need for exhaust being NOT TOO tight, and intake being tighter and that's WHY they have the 24/30mm split.
You're OK using the 0.013". The specs are listed in both mm and inches:
Intake: 0.20-0.24mm (0.008-0.009"), exhaust: 0.28-0.32mm (0.011-0.013")
The following users liked this post:
rockstar143 (04-23-2014)
04-23-2014, 07:00 PM
#887
^^^Thanks, man. I appreciate it.
Okay, I'll retighten them down properly, I thought it was just
I know intake was pattern, inside out, criss cross and 16 ft/lb, but I thought vc was just 8.7 hand tight. I'll figure it out.
Offhand, anyone know the ft/lb for the thermostat housing? Figured I'd get the old hoses off and the thermostat to not be a TOTAL waste today. Got them off...and as I was told, they look fantastic, inside and out, oh well...can't hurt to go new.
04-23-2014, 10:07 PM
#888
Registered Bike Offender
iTrader: (3)
I didn't replace the bolt gaskets when I did my valve adjustment, they were as firm as a girl's ass that squats. I'll replace them when I do the 105k for sure. Probably just get new bolts to save the trouble. Yes, the spark plug tube seals are a huge pain in the ass to take off. I cut mine as well being careful not to damage the covers. I got the new ones in with a rubber mallet and a socket that matched the diameter of the seal to pound it in as deep as it can go 
I knew the tubes were going to be a pain to line up so I made sure all of the seals were in place properly and that the valve cover gasket itself didn't shift before I fully tightened down the cover bolts.
I also checked the valve tolerance three times lol. And I made sure that the next size up feeler gauge didn't fit, since I'm not experienced with what the drag is supposed to feel like. After putting it all back together, I knew I did a great job because the engine was super quiet and nothing smelled.
The following users liked this post:
rockstar143 (04-24-2014)
04-23-2014, 10:21 PM
#889
Chapter Leader (Southern Region)
Thread Starter

9.8 lbs ft
The following users liked this post:
rockstar143 (04-24-2014)
04-23-2014, 10:25 PM
#890
Chapter Leader (Southern Region)
Thread Starter
 04-23-2014, 10:54 PM
#892
Team Owner

Okay, but seriously, word to the people doing the valve cover gaskets.
1st. FUCK YOU VALVE COVER GASKETS...the bolt gaskets need to be PRIED loose, then cut off (since they are brittle now, they won't slide over the bolt head). Then, the spark plug hole gaskets...don't go at them with a plier on the soft portion of the rubber. It'll just tear, and expose the imbedded wire reinforcement. Don't go at them with picks...you'll just tear holes in them but not remove them. Use a good, angled set of fat screwdrivers or pry bars. I have a 3 piece HF set and the small one popped the last 3 out without issue with some leverage.
Now...the travesty...I eat my pizza crust first. I do the sucky part of the job first.
So, after I used fresh oil to lube ALL my gaskets (figured if it's good for the oil filter compression, it's good for the valve cover gasket too)! Here's my mistake, did rear first and couldn't SEE the spark plug chambers. I figured that the bolts align the spark holes. WRONG...they don't. They require you to drum up fond memories of the first fingering of your first virgin squirrel...you must use your finger to pick one end, and kinda work and massage the gasket AROUND the spark hole. One goes on, move on to the middle one, then the last one. Now, because I torqued the rear down before realizing this, I ripped all 3 of my BRAND new fel-pro gaskets. First I was glad to have noticed, oil drenching 1/2 my cylinder plugs would have sucked, especially after the TB service. I almost put the old salvageable gaskets BACK on the rear, but nope nope nope...I am NOT in a rush and have a 2nd car. I am old enough to know, do it once, do it right. Wasted $35 on a 2nd set to be rush shipped (2 day prime ) for Friday.
On the plus side, I checked tolerance for a third time and I'm really confident that I'm good.
NFN, I also thought about what you said, but my conversion for my next step up is .013 inch feeler translates to: .3302mm, which exceeds the recommended +30 +/-.02mm. My thoughts are that Honda takes into account their need for exhaust being NOT TOO tight, and intake being tighter and that's WHY they have the 24/30mm split.
1st. FUCK YOU VALVE COVER GASKETS...the bolt gaskets need to be PRIED loose, then cut off (since they are brittle now, they won't slide over the bolt head). Then, the spark plug hole gaskets...don't go at them with a plier on the soft portion of the rubber. It'll just tear, and expose the imbedded wire reinforcement. Don't go at them with picks...you'll just tear holes in them but not remove them. Use a good, angled set of fat screwdrivers or pry bars. I have a 3 piece HF set and the small one popped the last 3 out without issue with some leverage.
Now...the travesty...I eat my pizza crust first. I do the sucky part of the job first.
So, after I used fresh oil to lube ALL my gaskets (figured if it's good for the oil filter compression, it's good for the valve cover gasket too)! Here's my mistake, did rear first and couldn't SEE the spark plug chambers. I figured that the bolts align the spark holes. WRONG...they don't. They require you to drum up fond memories of the first fingering of your first virgin squirrel...you must use your finger to pick one end, and kinda work and massage the gasket AROUND the spark hole. One goes on, move on to the middle one, then the last one. Now, because I torqued the rear down before realizing this, I ripped all 3 of my BRAND new fel-pro gaskets.
First I was glad to have noticed, oil drenching 1/2 my cylinder plugs would have sucked, especially after the TB service. I almost put the old salvageable gaskets BACK on the rear, but nope nope nope...I am NOT in a rush and have a 2nd car. I am old enough to know, do it once, do it right. Wasted $35 on a 2nd set to be rush shipped (2 day prime ) for Friday. On the plus side, I checked tolerance for a third time and I'm really confident that I'm good.
NFN, I also thought about what you said, but my conversion for my next step up is .013 inch feeler translates to: .3302mm, which exceeds the recommended +30 +/-.02mm. My thoughts are that Honda takes into account their need for exhaust being NOT TOO tight, and intake being tighter and that's WHY they have the 24/30mm split.
For what it's worth I also double check with the next size up. I err on the tight side with the intakes and loose side with the exhausts. As long as you recheck them you won't be too far off. At one time I had a great feel for valve adjustments but I've always rechecked my work.
04-24-2014, 01:09 AM
#893
Chapter Leader (Southern Region)
Thread Starter
That's very un-Orthodox of you Vlad. 
The following users liked this post:
Vlad_Type_S (04-24-2014)
04-24-2014, 10:14 AM
#894
Funny Maj, I had a feeling it was in the OP, was just being lazy since we were having dialogue, but thanks for answering. I categorize all 7-10 ft/lb to be tight with ratchet in palm of my hand.
The old spark plug gaskets come out easily with the small pry tool...and no need to get new bolts, I bet they're pricey at the dealer! Just plan to pry out the old rubber and cut a slit with razor.
Thanks Matt, good point...since I have to pull the valve cover off again today, I may check it a 4th time. I'm toruqed to 14 ft/lb all around right now so I'm inclined to not touch it, but that's easy enough to redo. I did go through and check all intake and exhaust with 1 size smaller and they all slid fairly easily...one thing I noticed that made me doubt my work was that on the back 3, the angle you have to check them at and the long feeler gauge catching on stuff made me feel like I had fickle drag on the gauge when it was really because it wasn't being slid in perfectly at the perfect angle...once it's in, I moved it side to side and up down and felt confident the clearance was good.
04-25-2014, 07:43 AM
#895
Update: I'm an idiot.
Only success last night was I went back over and redid the adjustment with NFN's suggestion.... .008" intake (tighter tolerance) and .013" exhaust (looser tolerance).
Thanks for the suggestion.
Now, 1st, the reason I damaged the first set of spark gaskets was I put them in upside down so yesterday, I rectified and put them in right and quickly learned why you need to torque down slowly, in 3 steps to make sure the gaskets are centered on the spark plug hole. BUT, I only realized that after I had torqued down the rear cover with 2 misaligned and damaged yet ANOTHER set. So...another $28 down the drain for another FULL set of gaskets.
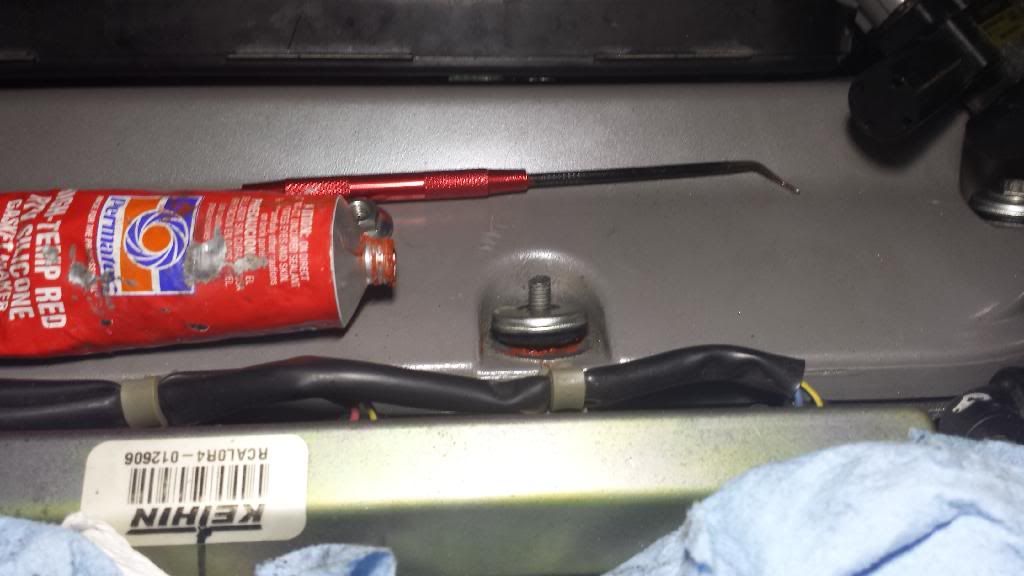
2nd, I set my torque wrench to 7.8 ft/lb...since I realized it starts at 5...and managed to be an idiot and snapped the middle top bolt on the front one, and stripped the threading on the head on the middle rear one. I was able to back the threading out carefully on the snapped one, so I moved the good bolt to the front and after reading a 2 year old NFN reply to someone, I'll just use some high temp red gasket maker to seal up the rear top center one (still holding up well NFN?)
J.
I felt so defeated last night.
Only success last night was I went back over and redid the adjustment with NFN's suggestion.... .008" intake (tighter tolerance) and .013" exhaust (looser tolerance).
Thanks for the suggestion. Now, 1st, the reason I damaged the first set of spark gaskets was I put them in upside down
so yesterday, I rectified and put them in right and quickly learned why you need to torque down slowly, in 3 steps to make sure the gaskets are centered on the spark plug hole. BUT, I only realized that after I had torqued down the rear cover with 2 misaligned and damaged yet ANOTHER set. So...another $28 down the drain for another FULL set of gaskets. 2nd, I set my torque wrench to 7.8 ft/lb...since I realized it starts at 5...and managed to be an idiot and snapped the middle top bolt on the front one, and stripped the threading on the head on the middle rear one. I was able to back the threading out carefully on the snapped one, so I moved the good bolt to the front and after reading a 2 year old NFN reply to someone, I'll just use some high temp red gasket maker to seal up the rear top center one (still holding up well NFN?)
J.
I felt so defeated last night.
04-25-2014, 08:24 AM
#896
Registered Bike Offender
iTrader: (3)
Dude. You should be able to buy the tube seals individually.
Link: 12342-RYE-004 2$
Same part for 99-13 TL.
Link: 12342-RYE-004 2$
Same part for 99-13 TL.
04-25-2014, 08:58 AM
#898
Race Director
Damn those bolts!! Did you stop when it hit the stop even if it was before 8.7 was reached? If so, I don't know what to tell you. They are very weak...
Yeah, no issues with my valve cover so far. Zero oil loss all this time. I won't mess with that bolt until the next TB change.
Yeah, no issues with my valve cover so far. Zero oil loss all this time. I won't mess with that bolt until the next TB change.
04-25-2014, 09:08 AM
#899
well, I'm a moron, and I didn't look that closely at the design until it was too late...I realized after when I felt the HARD resistance that it was the stop.
I wasn't THAT mad when I snapped the bolt...I was FURIOUS when I realized that the back center one I'd stripped the threading IN the head.
1/4" ratchet from now on. Thanks for the reassurance, I'll just trim down and use the red silicone maker on the snapped bolt head as sort of a plug.
I wasn't THAT mad when I snapped the bolt...I was FURIOUS when I realized that the back center one I'd stripped the threading IN the head.
1/4" ratchet from now on. Thanks for the reassurance, I'll just trim down and use the red silicone maker on the snapped bolt head as sort of a plug.
04-25-2014, 09:10 AM
#900
Did I get your gist right about my valve adjustment? .008" intake and .013" exhaust...that way tight end of tolerance on intake and loose end on tolerance on exhaust. I did it and went back and checked it with a 2nd round but I'd nailed it. I also realized that you since you have to hit each at different angles you will drive yourself nuts thinking, oh...this is very tight in comparison to the last. I went with my first instinct, if it felt fine on round 1, it was fine.
04-25-2014, 09:14 AM
#901
Race Director
Did I get your gist right about my valve adjustment? .008" intake and .013" exhaust...that way tight end of tolerance on intake and loose end on tolerance on exhaust. I did it and went back and checked it with a 2nd round but I'd nailed it. I also realized that you since you have to hit each at different angles you will drive yourself nuts thinking, oh...this is very tight in comparison to the last. I went with my first instinct, if it felt fine on round 1, it was fine.

The following users liked this post:
rockstar143 (04-25-2014)
04-25-2014, 10:59 AM
#902
Chapter Leader (Southern Region)
Thread Starter
I knew Murphy would bite you in your ass J. 
Keep pluggin' away.
Keep pluggin' away.
The following users liked this post:
rockstar143 (04-25-2014)
04-25-2014, 01:39 PM
#903
Thanks NFN. I don't think we're enemies anymore. 
Maj...dude, when I snapped the one bolt, then realized I'd sheared the head threading on the other AND torn the set of spark gaskets...I literally was on the verge of crying or smashing something. I walked away...read up on it and was relieved to know that I didn't damage the 4 that provide the pressure to keep it sealed...I was like, whew.
I've decided to hang onto the felpro set...after dealer fees/tax I'd be close to $20 for a bunch of OEM gaskets AND have to drive to the place. Eff it...I also realize that putting fresh oil on those is a mistake, maybe just outer ring to slide in place easier, but not the other part, I think the spark plug tube is supposed to kinda hold it in place while it's being torqued down and it's hard to do when covered in oil. Derp.
Murphy is right...
04-26-2014, 09:02 AM
#904
Okay, so after thinking the valve cover gasket job would be a 10 minute thing...3 days later, I'm done with it...one stripped bolt hole filled with gasket maker and 12 ruined spark plug gaskets later...
I finally read this thread
https://acurazine.com/forums/1g-tsx-2004-2008-124/diy-valve-cover-removal-valve-cover-gasket-replacement-813314/
and realized that the collars of the spark cover gaskets have to slide OVER the tube...when lined up, and pressed down, if done perfectly, the spark plug hole would have a little ring of the plastic pressed in the way, seriously looked like that's how it had to be. Wasted 3 hours last night trying to get the rear perfect...only to find they should slide OVER...that would explain why it was nearly impossible to get it perfect.
Anyway, small flat head later, and another 30 minutes to redo, and I'm golden, FINALLY.
When I went to redo the fronts, I'm glad I did, by compressing the gaskets perfectly, I'd sliced all 3 into perfect circles. My plugs would have been swimming in oil.
Live and learn, I guess.
04-26-2014, 09:13 PM
#905
Maj...was on the verge of texting you when I had a question, but wifey figured it out.
I have to say that if you're ever in Sofla, or me in TX...I owe you a beer, incredible write up helped me have the confidence needed to dominate this mofo.
I have a couple of lessons learned that will save someone some hours, but that's later.

Have a great weekend.
I have to say that if you're ever in Sofla, or me in TX...I owe you a beer, incredible write up helped me have the confidence needed to dominate this mofo.
I have a couple of lessons learned that will save someone some hours, but that's later.
Have a great weekend.
The following users liked this post:
Majofo (04-26-2014)
04-26-2014, 11:46 PM
#906
Chapter Leader (Southern Region)
Thread Starter
Hey, glad to hear you got through it. I knew you would.. just needed a push. 
Thanks for sharing your experience too, should help many as well!
Thanks for sharing your experience too, should help many as well!
The following users liked this post:
rockstar143 (04-27-2014)
04-27-2014, 11:38 AM
#907
Well, considering you saved me $1000 by putting this together and giving me that push I needed...the beers will be on me, that's for sure.
Seriously, having done it now...I greatly appreciate the effort you put into this. I think if I were doing JUST belt service, I could knock it out pretty quickly now that I've experienced it first hand.
I have 2 posts...1, my fix for having stripped that one valve cover bolt threading (in head, not the bolt) as well as the big mistake I ALMOST made that wifey helped me figure out.
Seriously, having done it now...I greatly appreciate the effort you put into this. I think if I were doing JUST belt service, I could knock it out pretty quickly now that I've experienced it first hand.
I have 2 posts...1, my fix for having stripped that one valve cover bolt threading (in head, not the bolt
) as well as the big mistake I ALMOST made that wifey helped me figure out.
04-27-2014, 02:59 PM
#908
Chapter Leader (Southern Region)
Thread Starter
You owe Betty a beer.
Better start knocking stuff down on the Honey-Do List.
Better start knocking stuff down on the Honey-Do List.
04-27-2014, 06:40 PM
#909
Bro...she took 2 naps yesterday.
I worked from 815am until 4pm without a break for food or drink...and then immediately spent another hour cutting the grass. I literally almost passed out from being tired.
Okay, so here's my additional "tips" you could say...
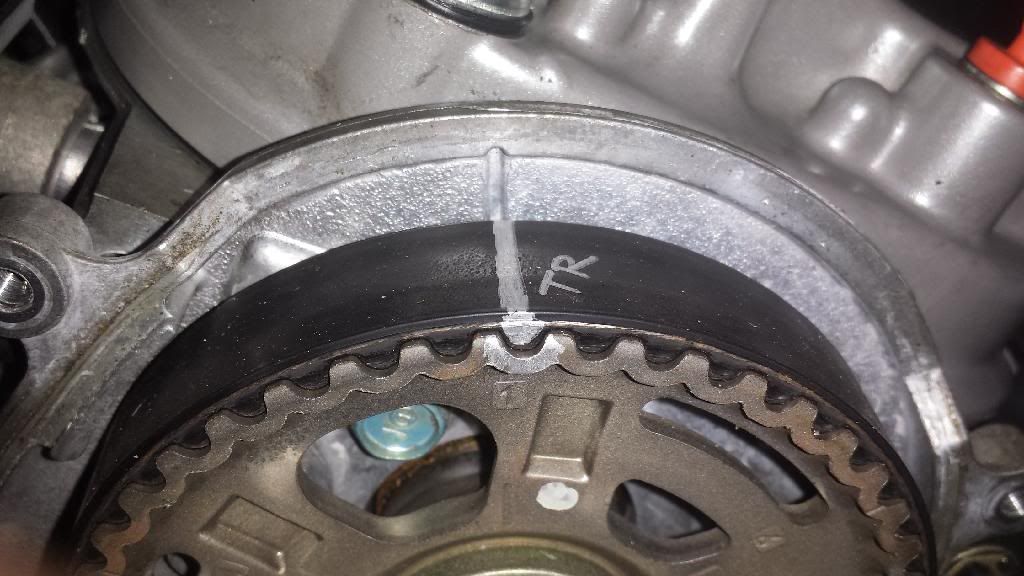
Here's how much I marked that mofo to ensure it lined up. I did the counter clock-wise tension on belt install and when I got to the rear cam, I could NOT pull the belt hard enough to get the belt tooth to sit in the right cradle...I almost called you, Maj, to ask if I could move the rear cam and line the marks back up, but then realized...obviously yes, I can...as long as when the belt was back on and slack was in the correct area and all 3 marks were good, I was okay.
Here's where I ALSO got stuck that Betty helped me out. I was about to install the pulley that has the tensioner butting up against it and I luckily test fit it and realized it was rubbing against the water pump. I vaguely recall someone having this issue at some point...OMG, literally the DEEPEST part of the install...well, I was freaking and going to again call you to ask if I should swap the pulley itself over to the other one when she pointed out that middle sections slides out and NEEDS to be put on the new one! OMG, that was SO not obvious...so yes, do this swap or the bolt won't line up perfectly and the pulley WILL rub against the water pump.
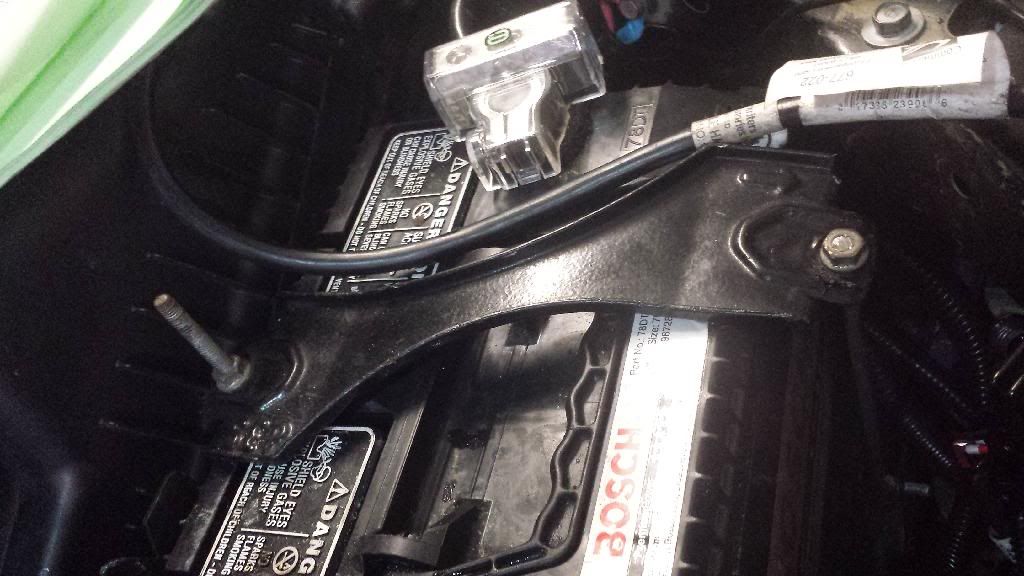
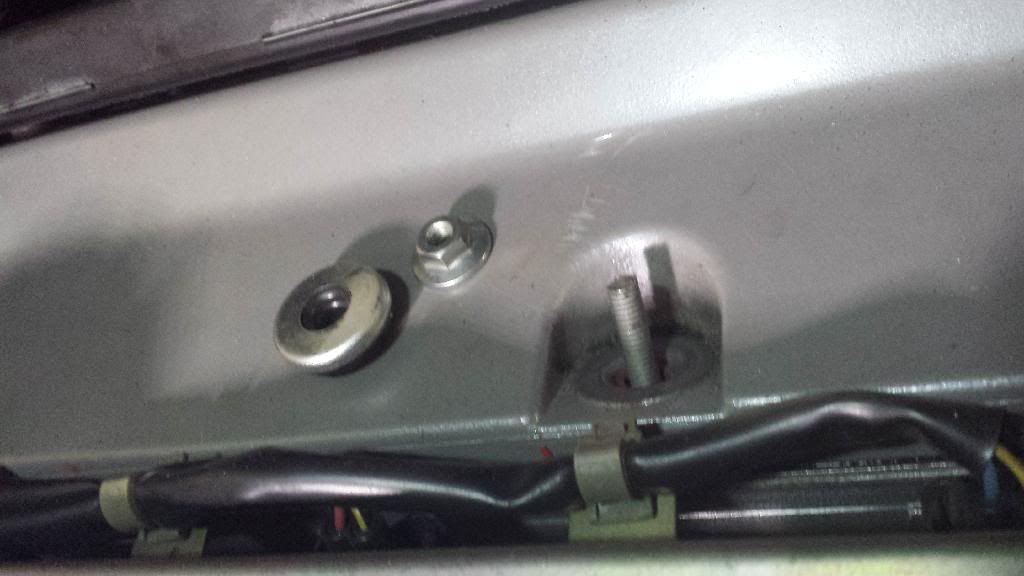
and here is my super duper genius fix for being a fucking idiot and stripping the head threading for the valve cover bolt...I was just going to fill the hole like NFN did with red gasket maker, but I didn't like that there would be no pressure applied to keep the oil in. Since there's a stopper on the oem bolt...there is threading that runs deeper that was not damaged...I sacrificed one of my battery tie downs...hand tightened in, then cut with the dremel to size...still left enough threading to use on the battery!
Proud of this fix.
Done deal!
and that's it, that's my addition to the DIY.
I worked from 815am until 4pm without a break for food or drink...and then immediately spent another hour cutting the grass. I literally almost passed out from being tired.
Okay, so here's my additional "tips" you could say...
Here's how much I marked that mofo to ensure it lined up. I did the counter clock-wise tension on belt install and when I got to the rear cam, I could NOT pull the belt hard enough to get the belt tooth to sit in the right cradle...I almost called you, Maj, to ask if I could move the rear cam and line the marks back up, but then realized...obviously yes, I can...as long as when the belt was back on and slack was in the correct area and all 3 marks were good, I was okay.

Here's where I ALSO got stuck that Betty helped me out. I was about to install the pulley that has the tensioner butting up against it and I luckily test fit it and realized it was rubbing against the water pump. I vaguely recall someone having this issue at some point...OMG, literally the DEEPEST part of the install...well, I was freaking and going to again call you to ask if I should swap the pulley itself over to the other one when she pointed out that middle sections slides out and NEEDS to be put on the new one! OMG, that was SO not obvious...so yes, do this swap or the bolt won't line up perfectly and the pulley WILL rub against the water pump.


and here is my super duper genius fix for being a fucking idiot and stripping the head threading for the valve cover bolt...I was just going to fill the hole like NFN did with red gasket maker, but I didn't like that there would be no pressure applied to keep the oil in. Since there's a stopper on the oem bolt...there is threading that runs deeper that was not damaged...I sacrificed one of my battery tie downs...hand tightened in, then cut with the dremel to size...still left enough threading to use on the battery!
Proud of this fix.


Done deal!

and that's it, that's my addition to the DIY.
 04-27-2014, 07:27 PM
#910
Chapter Leader (Southern Region)
Thread Starter
1) You lined up the cam mark on the tooth right?
2) It's called a collar and it's in the OP.
2) It's called a collar and it's in the OP.
04-27-2014, 09:27 PM
#911
Advanced
So i went to my local Acura dealership for a price quote on a 105km service. But they said no such thing exist. But i got a quote for a timing belt service for 1050$ im not sure what all is included in the timing belt service. My TL is close to 100000km and my belts are starting to squeal on cold starts every so often. If anyone can enlighten me with what this timing belt serivce includes? i assume its just the timing belt and not water pump
04-28-2014, 12:08 AM
#912
Chapter Leader (Southern Region)
Thread Starter
105k miles or 105k kilometers? 
Acura dealerships push the maintenance minder so some new dummy service writers don't know the reference. Usually timing belt service at the dealership only includes the belts and water pump.
Acura dealerships push the maintenance minder so some new dummy service writers don't know the reference. Usually timing belt service at the dealership only includes the belts and water pump.
The following users liked this post:
rockstar143 (04-28-2014)
04-28-2014, 12:13 AM
#914
Chapter Leader (Southern Region)
Thread Starter
Ah, saw your location.
In KMs, it shouldn't be til 168k kilometers or so.. but you're in Edmonton. Lots of the white stuff up there..
In severe weather, if your TL has driven a lot of miles under -29C, you should replace it every 100k kilometers. It's a judgement call. I know you guys have pretty long and rough winters, but if you don't see all that many days below -29C, you probably still have some good life on the components.
04-28-2014, 12:52 AM
#915
Advanced
Ah, saw your location.
In KMs, it shouldn't be til 168k kilometers or so.. but you're in Edmonton. Lots of the white stuff up there..
In severe weather, if your TL has driven a lot of miles under -29C, you should replace it every 100k kilometers. It's a judgement call. I know you guys have pretty long and rough winters, but if you don't see all that many days below -29C, you probably still have some good life on the components.
In KMs, it shouldn't be til 168k kilometers or so.. but you're in Edmonton. Lots of the white stuff up there..
In severe weather, if your TL has driven a lot of miles under -29C, you should replace it every 100k kilometers. It's a judgement call. I know you guys have pretty long and rough winters, but if you don't see all that many days below -29C, you probably still have some good life on the components.
04-28-2014, 01:41 AM
#916
Chapter Leader (Southern Region)
Thread Starter
On in severe conditions.. driven regularly above 43C or under -29C.
04-28-2014, 07:20 AM
#917
A squeaky accessory belt might be the tensioner assembly/pully...that went for me at 6 years/approx 40K MILES (USA!).
Yes sir, finally joined the club!
Maj...sorry, man...I was overwhelmed with information and research, I may have missed it, but yes, I lined the teeth back up after giving the belt slack with the rear collar, once belt was on the right spot, I turned it back and put the tension on it. Spun the motor by hand 10 times to make sure TDC lined up along with the 2 others.
Fantastic!
04-28-2014, 07:20 AM
#918
A squeaky accessory belt might be the tensioner assembly/pully...that went for me at 6 years/approx 40K MILES (USA!).
Yes sir, finally joined the club!
Maj...sorry, man...I was overwhelmed with information and research, I may have missed it, but yes, I lined the teeth back up after giving the belt slack with the rear collar, once belt was on the right spot, I turned it back and put the tension on it. Spun the motor by hand 10 times to make sure TDC lined up along with the 2 others.
Fantastic!
Yes sir, finally joined the club!
Maj...sorry, man...I was overwhelmed with information and research, I may have missed it, but yes, I lined the teeth back up after giving the belt slack with the rear collar, once belt was on the right spot, I turned it back and put the tension on it. Spun the motor by hand 10 times to make sure TDC lined up along with the 2 others.
Fantastic!
04-28-2014, 07:33 AM
#919
Team Owner
A squeaky accessory belt might be the tensioner assembly/pully...that went for me at 6 years/approx 40K MILES (USA!).
Yes sir, finally joined the club!
Maj...sorry, man...I was overwhelmed with information and research, I may have missed it, but yes, I lined the teeth back up after giving the belt slack with the rear collar, once belt was on the right spot, I turned it back and put the tension on it. Spun the motor by hand 10 times to make sure TDC lined up along with the 2 others.
Fantastic!
Yes sir, finally joined the club!
Maj...sorry, man...I was overwhelmed with information and research, I may have missed it, but yes, I lined the teeth back up after giving the belt slack with the rear collar, once belt was on the right spot, I turned it back and put the tension on it. Spun the motor by hand 10 times to make sure TDC lined up along with the 2 others.
Fantastic!
Would you mind elaborating on the pulley rubbing on the water pump? I didn't quite understand what parts you were talking about swapping, was it the sleeve?
You know you can always call me for help if Majofo is too busy with Justin lol. But seriously if you're ever in a bind feel free to call.
The following users liked this post:
rockstar143 (04-28-2014)
04-28-2014, 08:22 AM
#920
Oh, I'm like you alright...
Check this ish out...in such a rush and so elated to see the light at the end of the tunnel that I didn't plug in that big plug on the back end of the throttle body. Turn car on, nothing is exploding, smell a little burning from the antifreeze or dripped power steering fluid left over where I couldn't dry off (presumably)...car sounds good, idling high though, check engine light on, VSA light on and something else (can't remember). FK ME...what did I do wrong...get out the OBDII reader etc...then think, let me make sure...sure enough, FKKKK FORGOT THAT PLUG. Cleared codes, idles perfect.
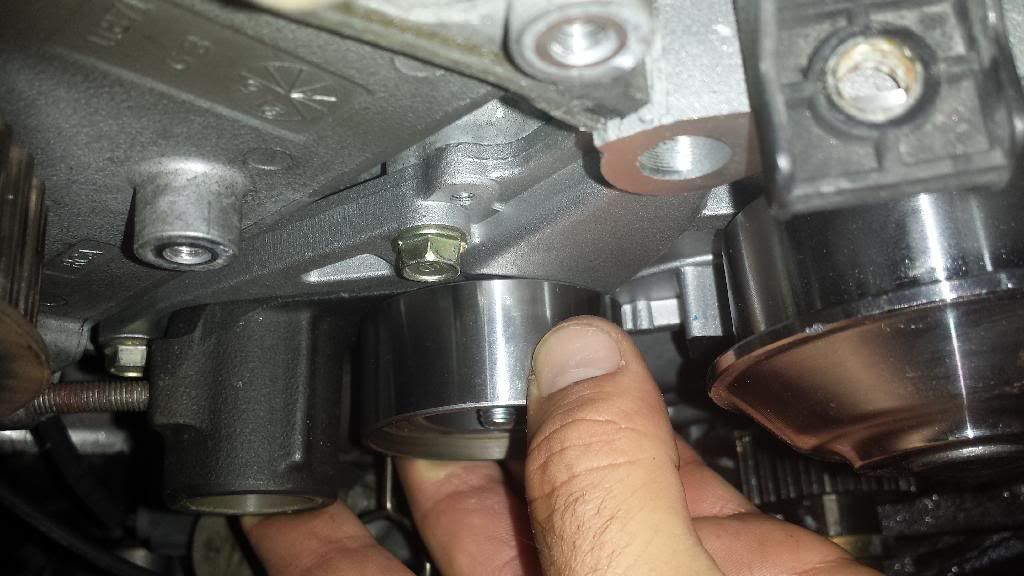
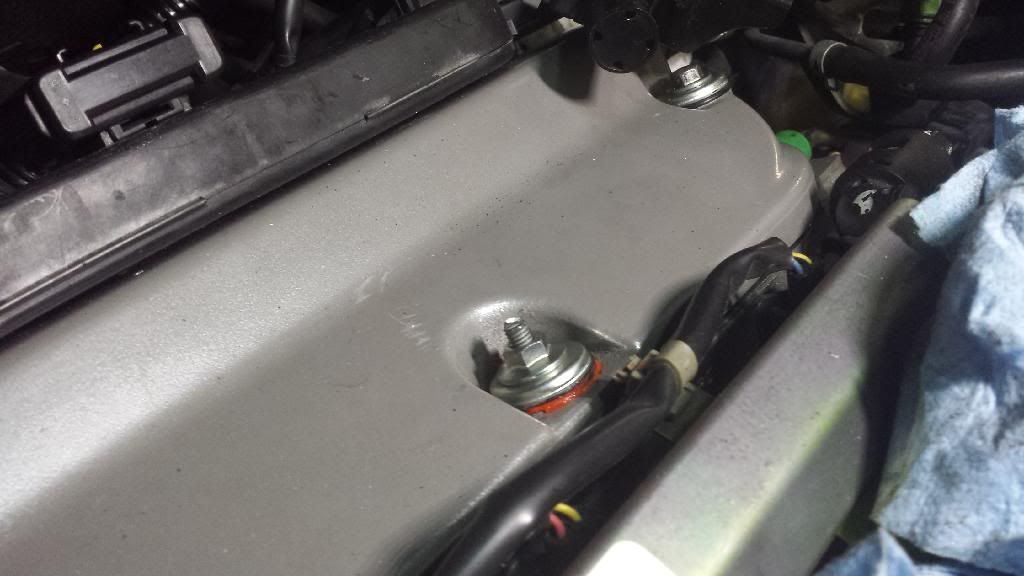
Here is what I'm talking about, that sleeve that comes out of the pulley assembly, at first, it didn't seem obvious that it was removable. I just thought the new one was a different design, glad I test fit and moved it back and forth for clearance because the pulley itself was resting on the water pump without that extra few mm of clearance the sleeve provided.
See here, you can see it touching where my thumb is pointing, this is WITHOUT the sleeve transferred from the OEM one:
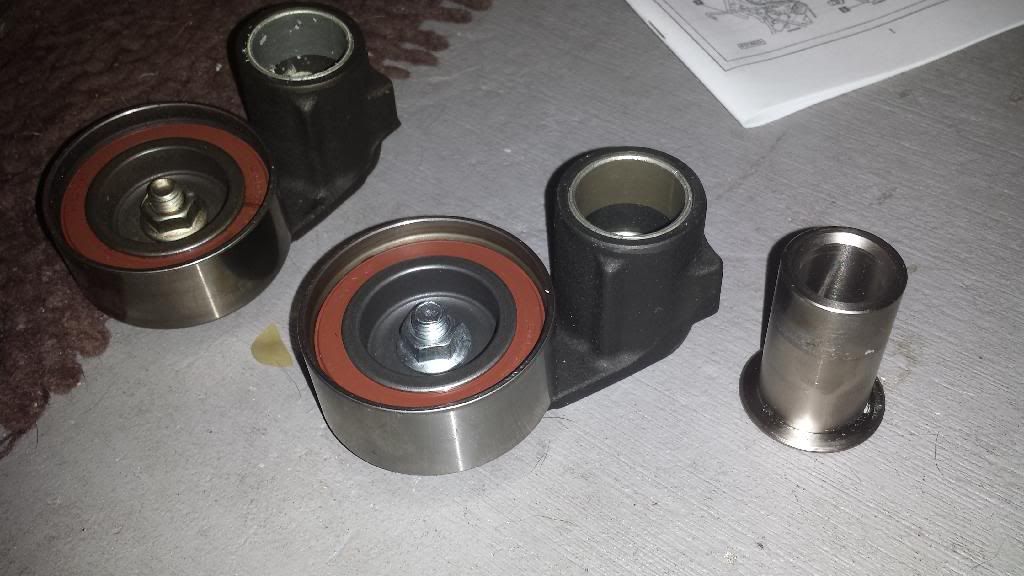
and here it is, old sitting next to new, with the sleeve out and ready to be swapped over.
Yeah, seriously, babysitting Justin is a full time job, you're absolutely right. Haha...
I'd need your number to call you!
Check this ish out...in such a rush and so elated to see the light at the end of the tunnel that I didn't plug in that big plug on the back end of the throttle body. Turn car on, nothing is exploding, smell a little burning from the antifreeze or dripped power steering fluid left over where I couldn't dry off (presumably)...car sounds good, idling high though, check engine light on, VSA light on and something else (can't remember). FK ME...what did I do wrong...get out the OBDII reader etc...then think, let me make sure...sure enough, FKKKK FORGOT THAT PLUG. Cleared codes, idles perfect.
Here is what I'm talking about, that sleeve that comes out of the pulley assembly, at first, it didn't seem obvious that it was removable. I just thought the new one was a different design, glad I test fit and moved it back and forth for clearance because the pulley itself was resting on the water pump without that extra few mm of clearance the sleeve provided.
See here, you can see it touching where my thumb is pointing, this is WITHOUT the sleeve transferred from the OEM one:
and here it is, old sitting next to new, with the sleeve out and ready to be swapped over.
Yeah, seriously, babysitting Justin is a full time job, you're absolutely right. Haha...
I'd need your number to call you!