Innovative motor mount discussion. **New mount info on page 13**
 02-02-2008, 12:08 PM
#1
Senior Moderator
Thread Starter
Innovative motor mount discussion. **New mount info on page 13**
some of us are experiencing problems w/the motor mounts. the intention of this thread is to discuss issues and resolutions. comments must stay on topic or they will be deleted.
1. mike - 3 mounts installed. STRONG vibrations through out the cabin while stopped. strong vibrations at low rpms. humming at 3k+ rmps. large increase in engine note at all rpms...not that that's a bad thing
1. mike - 3 mounts installed. STRONG vibrations through out the cabin while stopped. strong vibrations at low rpms. humming at 3k+ rmps. large increase in engine note at all rpms...not that that's a bad thing
 02-02-2008, 02:33 PM
#2
Uses turn signals in my
2. TCM 01 CL-S: Three mounts installed. Used Stock hardwear. Vibrations are less and less each time I drive the vehicle. Humming during medium and WOT acceleration from 1st to 3rd. Also less and less as time goes on. Stock side mount had at the very least 30k miles on it, stock rear motor mount was broken and stock front had about 30k on it. Plenums in light contact with hood liner (on passenger front corner), but my hood needed adjustment (driver side way too high and passenger was kinda low), made adjustments with the rubber stoppers and I believe there is no more contact.
For the record both of my transmission mounts are shot. I am getting those replaced monday.
For the record both of my transmission mounts are shot. I am getting those replaced monday.
02-02-2008, 02:55 PM
#3
houston i believe we have a problem. should i not post this here?
3. Distortedolskool: i purchased the longer bolts and decided to double check the side alignment since silver brought up a possible issue. below is what i have found.
first i just traced the oem mount holes on the paper and then lined up the innovative mount and traced the upper bracket. i understand that my pen wasn't exactly level but it still reveals a possible issue.

next i installed the oem mount, aligning the 2 lower holes and snapped a pic of the upper bracket alignment. perfect fit.
then i installed the innovative mount, aligning the 2 lower holes and snapped a pic of the upper bracket alignment. both the test fit and the paper tracing reveal the same issue. i believe this upper bracket needs to be extended.
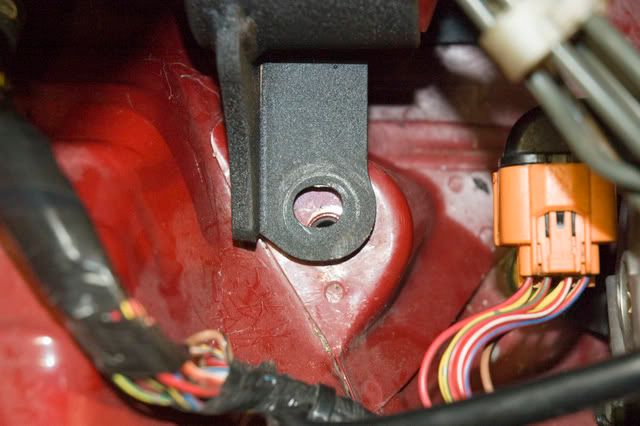
can anyone else confirm this possible issue??
3. Distortedolskool: i purchased the longer bolts and decided to double check the side alignment since silver brought up a possible issue. below is what i have found.
first i just traced the oem mount holes on the paper and then lined up the innovative mount and traced the upper bracket. i understand that my pen wasn't exactly level but it still reveals a possible issue.
next i installed the oem mount, aligning the 2 lower holes and snapped a pic of the upper bracket alignment. perfect fit.
then i installed the innovative mount, aligning the 2 lower holes and snapped a pic of the upper bracket alignment. both the test fit and the paper tracing reveal the same issue. i believe this upper bracket needs to be extended.
can anyone else confirm this possible issue??
02-02-2008, 03:19 PM
#5
10mm diameter, 1.25 pitch, 30mm length (make sure you get grade 8 +)
i am considering drilling out the lower brackets a little and the upper one some to gain the necessary adjustment. i just don't want to drill only the upper because the metal will be thin around the edges.
i am considering drilling out the lower brackets a little and the upper one some to gain the necessary adjustment. i just don't want to drill only the upper because the metal will be thin around the edges.
02-02-2008, 04:01 PM
#6
THE J35A2...
Originally Posted by distortedolskool
10mm diameter, 1.25 pitch, 30mm length (make sure you get grade 8 +)
i am considering drilling out the lower brackets a little and the upper one some to gain the necessary adjustment. i just don't want to drill only the upper because the metal will be thin around the edges.
i am considering drilling out the lower brackets a little and the upper one some to gain the necessary adjustment. i just don't want to drill only the upper because the metal will be thin around the edges.
Trending Topics
02-02-2008, 06:24 PM
#9
well i got the side installed by just barely tightening all the bolts and then snugging them up, forcing the mount tight with the unibody. with the upper bolt loosely installed i had to twist the mount to get the lowers in.
i also tried installing the motor bracket & center pin and the upper mount holes lined up perfect but the lowers were off; as seen in the pics below. something is still weird about the alignment of this mount vs the oem. when i did this same thing with the oem everything fit perfect. sorry for the rambling but this has got me confused.
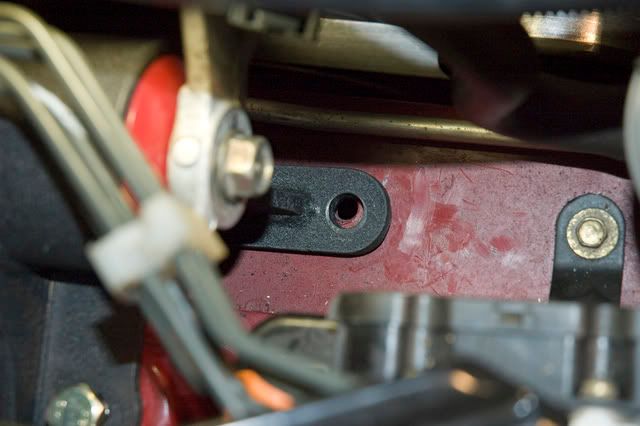

i also tried installing the motor bracket & center pin and the upper mount holes lined up perfect but the lowers were off; as seen in the pics below. something is still weird about the alignment of this mount vs the oem. when i did this same thing with the oem everything fit perfect. sorry for the rambling but this has got me confused.
 02-02-2008, 07:35 PM
#11
Originally Posted by rp_guy
honestly, are you jacking the engine up ?
currently i'm just going to install the front and take her out for a spin tomorrow. see if any issues arise.
02-02-2008, 08:07 PM
#12

The side mount needs to be redesigned. You will get a humming/whinning sound on acceleration. I currenty just have my front and rear innovative mounts on and will not put the side back on unless innovative redesignes it and sends me the new one. The side one also in my opinion needs an entension bracket on one of the lower legs with a hole in it so you can put the plastic bracket in there that holds the AC line tight. That shouldnt be a thing thats so hard to add it needs to be left out. It was just left out to cut costs in myopinion.
02-02-2008, 10:10 PM
#14
I must say I'm not sure I want to attempt to put these on. This could get expensive for labor if you have a shop do it & then have to remove them because of problems.
Figures, this seem to happen with everything made custom for the CL.
For the side mount can you drill out the mounting hole to make them elongated so there's some space for the bolt?
Figures, this seem to happen with everything made custom for the CL.
For the side mount can you drill out the mounting hole to make them elongated so there's some space for the bolt?
02-03-2008, 12:11 AM
#15
Drifting
Join Date: Jul 2007
Location: Stockton, California
Age: 33
Posts: 3,301
Likes: 0
Received 22 Likes
on
11 Posts
Originally Posted by fuzzy02CLS
For the side mount can you drill out the mounting hole to make them elongated so there's some space for the bolt?

I am still thinking I am going to get these, just hope they have the kinks worked out by that time.
02-03-2008, 12:32 AM
#16
Originally Posted by Mike
how is the vibration at a stop light?
Fuzzy i totally understand. I did the front and side myself so i saved a bit but had the rearput on at a shop. Cost me 180.00 and i may end up taking it back off if the vibrations dont get better so theres 180 bux down the drain. So figure out what you want now that youve gotten to hear feedback before you put your mounts on. If you want just replace the front, since thats the one that seems to fail the most, and you wont notice any vibrations or noise by just putting on that mount
02-03-2008, 10:08 AM
#17
Instructor
Hey, you guys got to remember that a stronger/stiffer mount will give you more vibration over stock. That�s the nature of it. The reason Honda makes the mounts as soft as they do is for comfort. Honda designs there mounts to give you maximum comfort while still trying to make the mount have a long life. Unfortunately you can�t really have both in terms of comfort and lasting forever.
Innovative makes mounts that are stronger than factory and will actually outlast a Honda engine mount. From the stronger engine mounts, you will get faster 60 foot times, resulting in faster 1/4 mile times. That�s the #1 reason why aftermarket mounts are nice. But the stiffness of the mounts does result in more vibration over stock mounts.
As far as alignment of the engine mount goes. I can only say as much as I know. I have these mounts in my 98 accord, and I didn�t have any issues with install. My friend over at AR Performance also installed a set a few days ago, and didn�t have issues. The only advice I can give you guys is to not tighten any mount completely until you install and line up all three mounts, this way you can catch threads on all the mounts, then tighten them all. Remember anytime you tighten a bolt all the way, it can take the alignment of another hole off.
Not trying to take sides, but just sharing my knowledge
02-03-2008, 11:35 AM
#18
Senior Moderator
Thread Starter
vibrations were expected. the entire cabin shaking enough to rattle fillings wasn't. we were going from the experiences of the accord guys and apparently they're not experiencing the same problem.
02-03-2008, 01:39 PM
#19

Has anyone contacted / mentioned this problem to Innovative Design or Accelerate regarding mount holes.
PowerRev is also correct in his statement, "to not tighten any mount completely until you install and line up all three mounts, this way you can catch threads on all the mounts, then tighten them all." This is KEY..
I cannot say as I do not have the mounts but I do plan on purchasing a set in the future.
Can anyone else confirm that the mount holes do not line up with OEM units as distortedolskool pointed out?
02-03-2008, 03:42 PM
#21
Lead Footed
Originally Posted by distortedolskool
houston i believe we have a problem. should i not post this here?
3. Distortedolskool: i purchased the longer bolts and decided to double check the side alignment since silver brought up a possible issue. below is what i have found.
first i just traced the oem mount holes on the paper and then lined up the innovative mount and traced the upper bracket. i understand that my pen wasn't exactly level but it still reveals a possible issue.
next i installed the oem mount, aligning the 2 lower holes and snapped a pic of the upper bracket alignment. perfect fit.
then i installed the innovative mount, aligning the 2 lower holes and snapped a pic of the upper bracket alignment. both the test fit and the paper tracing reveal the same issue. i believe this upper bracket needs to be extended.
can anyone else confirm this possible issue??
I'm betting I wouldn't have needed to apply any force to the powersteering pulley . . which ended up being a MAJOR STUPID move on my part. See my post in the BG thread.
Other than that, I do feel the vibrations. Event these mounts are definately not for anyone wanting to maintain an OEM feel. It really doesn't bother me that much as I've driven a muscle car where the whole thing shook . . people in cars in front or next to me thought is was an earthquake.

Anyway, I do believe that these mount will soften up a bit over time, but how much remains to be seen. It would be interesting to know if there is a softer bushing that they could use for more of an stock feel. My
 is that if there were, a lot more people would go this route. The OEM mounts are not suited for the power these cars have. I've even got a service manager at the local Acura dealer waiting to hear how this turns out. If it's good, they're considering offering this as an option to their customers. That's right, it a fairly common problem.
Ruf
02-03-2008, 03:48 PM
#22
Lead Footed
Originally Posted by Silvaccordex01
The side mount needs to be redesigned. You will get a humming/whinning sound on acceleration. I currenty just have my front and rear innovative mounts on and will not put the side back on unless innovative redesignes it and sends me the new one. The side one also in my opinion needs an entension bracket on one of the lower legs with a hole in it so you can put the plastic bracket in there that holds the AC line tight. That shouldnt be a thing thats so hard to add it needs to be left out. It was just left out to cut costs in myopinion.
Just a thought, try checking the tension on the power steering belt. If it feels tight, try loosening a bit and see if the humming goes away. If not, do you have a mechanics stethoscope? If not use a long screwdriver will work, but not as good. Anyway, place it on the power steering pump and see if that's were the humming is coming from. If not, you might want to try the altenator.
If it's not the PSP belt being too tight, I'm guessing that alignment can be off just enough to put the PSP or other moving part run by the belts in a slight bind.
Ruf
02-03-2008, 03:53 PM
#23
Lead Footed
This is a post in the GB from 1/27.
Possible fitment issue with the side mount!
I started on the side as well as it looked straight forward. For the most part it was pretty easy with the right tools and approach. I'll post more details once I get to a stopping point, but I wanted to caution everyone installing a side mount for a fitment problem I ran into. If it weren't for that problem, it would have taken me about 30mins or less to remove and replace it.
The first problem was getting the 2 back holes to line up. I'm guessing that they are off by slightly more than 1/32" to 1/16'. I started with the single bolt closest to the passenger fender well, and no matter what I tried I could not get both back bolt holes to line up. The I tried it with the single bolt out, and was able to work both back bolts in. However, I couldn't get the single bolt to line up and start threading. I even tried tightening the 2 back bolts and then attempted to move the motor around to get it to line up. It was then during the tightening of the 2 back bolts did I notice another problem. The bolts were barely starting before they tightened up. As I looked at the thickeness of old mount's frame and that of the new mount that the new mount's frame was thicker.
Okay, off to buy some new bolts, about 1/4" longer. I went ahead and got a grade 8 bolt, which was harder than the OEM.
Anyway, now using the new longer bolts, it was easier to fiddle with the alignment and get all bolts started. There also this piece of aluminum bracket that the motor mount attaches to. I took the bolts out of those so I could fiddle with getting everything to align. I'll tell you about the last trick to getting the long bolt that goes through the motor mount bushing and that bracket in a bit.
If the spacing of the back two holes was slightly wider, and the single front hole about 1/32" closer to the passenger fender well, I think it would have been a piece of cake!
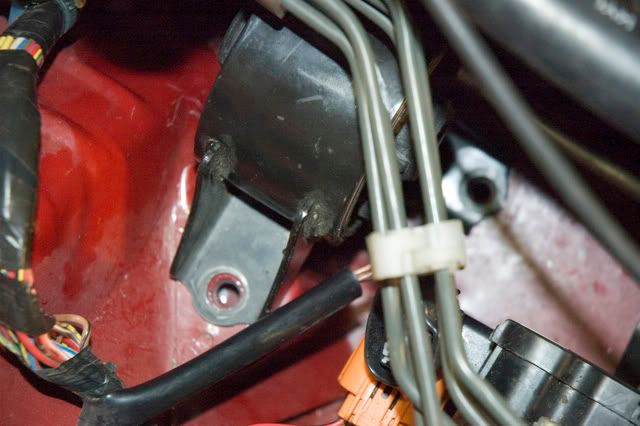
Note: there's some sort of throttle control modual and braket that sit over the single bolt. If you remove it you will be able to get to it easily.
Once all the bolts are started, make sure you don't tighten them yet! You will need some play to get the long bolt to go through the bushing and bracket.
If the long bolt does not start easily, you will need to do the following. Tighten the 2 bolts that hold the bracket to the motor. Leave the motor mount bolts loose. Then you will need to use a jack and slowly lift the engine up until you see that the holes are starting to align. Once I got it as close as I could with the jack, I then used a large screwdriver and placed it between the bracket and the motor mount and applied some leverage to get the bolt to start easily. It went pretty easy until there was about 1" to 1 1/2" to go and got tight. I found that by letting some pressure off the mount by barely lowering the jack it went easily again. Once the long bolt was tightened, I tightened the other 3 motor mount bolts . . and that was it for the side mount.
As a side note, I was shocked at how much I had to jack the engine up to get the long bolt holes to align. The reason is that when I took the old mount off . . . I didn't have to do anything but unbolt it and take it out. And it made sense once I inspected and played with the old mount. It was TOTALLY SHOT! GONE! WIPED OUT! Well . . I sort of knew that, but until then could only guess it was. Anyway, since the mount was totally shot, there was no tension on the long bolt or any of them for that matter.
To make the job easier, you'll need some long extention bars and a swivel adaptor helps too. Also, I found my long magnetic retrival tool real helpful in fishing the bolts out, and to place the back 2 bolt in position as I could not reach down there. Other than that, a 10mm socket to remove the bracket/module (I'll get pics posted later), a 14mm and 17mm sockets.
Since I got a late start today, I may not tackle both front and rear, but maybe the front as it looks easy as well. Wait, didn't I think that about the side mount?
Regarding that little steel nipple . . well after a closer look at the front mount set up, you'll see that they have one too. There's a small hook arm on the bracket that wraps around that nipple. Not quite sure as to what purpose it serves as it's too small to help with any twisting or torque that could be applied by the engine or installation. Anyway, at least now I think I know which way these mounts should be installed.
More after I tackle these.
And did I say my side mount was totally shot?
Ruf
Possible fitment issue with the side mount!
I started on the side as well as it looked straight forward. For the most part it was pretty easy with the right tools and approach. I'll post more details once I get to a stopping point, but I wanted to caution everyone installing a side mount for a fitment problem I ran into. If it weren't for that problem, it would have taken me about 30mins or less to remove and replace it.
The first problem was getting the 2 back holes to line up. I'm guessing that they are off by slightly more than 1/32" to 1/16'. I started with the single bolt closest to the passenger fender well, and no matter what I tried I could not get both back bolt holes to line up. The I tried it with the single bolt out, and was able to work both back bolts in. However, I couldn't get the single bolt to line up and start threading. I even tried tightening the 2 back bolts and then attempted to move the motor around to get it to line up. It was then during the tightening of the 2 back bolts did I notice another problem. The bolts were barely starting before they tightened up. As I looked at the thickeness of old mount's frame and that of the new mount that the new mount's frame was thicker.
Okay, off to buy some new bolts, about 1/4" longer. I went ahead and got a grade 8 bolt, which was harder than the OEM.
Anyway, now using the new longer bolts, it was easier to fiddle with the alignment and get all bolts started. There also this piece of aluminum bracket that the motor mount attaches to. I took the bolts out of those so I could fiddle with getting everything to align. I'll tell you about the last trick to getting the long bolt that goes through the motor mount bushing and that bracket in a bit.
If the spacing of the back two holes was slightly wider, and the single front hole about 1/32" closer to the passenger fender well, I think it would have been a piece of cake!
Note: there's some sort of throttle control modual and braket that sit over the single bolt. If you remove it you will be able to get to it easily.
Once all the bolts are started, make sure you don't tighten them yet! You will need some play to get the long bolt to go through the bushing and bracket.
If the long bolt does not start easily, you will need to do the following. Tighten the 2 bolts that hold the bracket to the motor. Leave the motor mount bolts loose. Then you will need to use a jack and slowly lift the engine up until you see that the holes are starting to align. Once I got it as close as I could with the jack, I then used a large screwdriver and placed it between the bracket and the motor mount and applied some leverage to get the bolt to start easily. It went pretty easy until there was about 1" to 1 1/2" to go and got tight. I found that by letting some pressure off the mount by barely lowering the jack it went easily again. Once the long bolt was tightened, I tightened the other 3 motor mount bolts . . and that was it for the side mount.
As a side note, I was shocked at how much I had to jack the engine up to get the long bolt holes to align. The reason is that when I took the old mount off . . . I didn't have to do anything but unbolt it and take it out. And it made sense once I inspected and played with the old mount. It was TOTALLY SHOT! GONE! WIPED OUT! Well . . I sort of knew that, but until then could only guess it was. Anyway, since the mount was totally shot, there was no tension on the long bolt or any of them for that matter.
To make the job easier, you'll need some long extention bars and a swivel adaptor helps too. Also, I found my long magnetic retrival tool real helpful in fishing the bolts out, and to place the back 2 bolt in position as I could not reach down there. Other than that, a 10mm socket to remove the bracket/module (I'll get pics posted later), a 14mm and 17mm sockets.
Since I got a late start today, I may not tackle both front and rear, but maybe the front as it looks easy as well. Wait, didn't I think that about the side mount?
Regarding that little steel nipple . . well after a closer look at the front mount set up, you'll see that they have one too. There's a small hook arm on the bracket that wraps around that nipple. Not quite sure as to what purpose it serves as it's too small to help with any twisting or torque that could be applied by the engine or installation. Anyway, at least now I think I know which way these mounts should be installed.
More after I tackle these.
And did I say my side mount was totally shot?
Ruf
02-03-2008, 03:55 PM
#24
Lead Footed
This is a post from the GB on 1/28
Front Mount Installation: Note, I have headers, so OEM exhaust will be a bit different as I expect the heatshield will make access harder.
Well, as Silvaccordex01 stated, this one is no cakewalk, but with the right tools and technique, it wasn't that bad. As noted above, because there were multiple options on how to get this bad boy out, I played around with the angles and spacing. Anyway, here's the list of tools you'll need.
- extension bars - about 2 feet worth is what I used for taking out the bottom 4 bolts that hold the mount to the frame, and the 4 12mm bolts that hold the motor mount sub components together, I'll explain this later.
12mm socket - see note above
14mm socket
19mm socket
swivel adaptor
14mm box end wrench
magnetic tool retriever
Okay to start, in my case I needed to jack the car up and put it on the lowest setting of the jack stands . . . because I can't even get a low profile jack under the front end . . . yes, it sits too low so, we're on jack stands and the jack under the tranny ready to go.
Next I unbolted the big 19 nut holding the top of the mount to the bracket. Then I took out the 4 bolts holding the mount to the frame. The bolt on the top-left, when looking down on the mount, can be accessed by putting a short 14mm socket with a 3/8" swivel on the bolt head from underneath. Then from the top you can connect extension bar to it and take it easily out. While you are down there, disconnect that vaccum line and plug it.
Then take out the 4 12mm bolts that hold the steel mount retainer to the bottom half of the mount. Here's why I did this. When it comes time to removing the mount, you will need to pivot the mount with the bracket, and taking out these bolts gave me just enough extra to play with and slip the mount out. Note, once loose, I needed to hold the nut on the bottom with my fingers to keep the bolt from spinning.
Now for the fun part. To give you the play space to pivot the mount out, you need to remove 2 of the 3 aluminum bracket bolts that hold the big bolt on the mount to the motor. The 2 you remove are, when facing the engine, are the right bolt, and the top bolt. The left bolt (closest to the exhaust) just needs to be loosened. This allows you to rotate the bracket, and we'll get to that point in a minute. Note, the bracket has a little hook arm the is used to help center the mount and bracket when aligning them. The new mount has a steel nipple for this purpose. It'll also help you to know which way the new mount needs to face.
All this is not hard, but I couldn't get a socket on the top bolt because the OEM blocks it, so I used a 14mm box end wrench. And because the way the bolt is set, you can only make small turns, and that take some time and patience. Good news is that the new mount make putting it back in a breeze.
Now to actually remove or even loosen these bolts, I found I needed to jack the motor up, which didn't make sense and I didn't want to try and figure out why, and just did it since it worked. Okay, once you get the 2 bolts out, and the left one lose you're ready to take this beast out. Note: before you can do this next part, you need to make sure you can wiggle the aluminum bracket easily.
Okay, now rotate/swing the bracket towards the left (toward the exhaust) and at the same time pivot the motor mount to the left as well. In doing so you can jiggle the mount and the clearance needed to get the bolt to slip out of the bracket. It's out and now just work it up and out between the radiator hoses. Many what a fish!
Okay, now everything from hear on out is easier . . . much so I think.
The first thing I did was position the mount over the 4 subframe holes and install the 4 bolts. Note, the plates on the new mounts aren't thicker than the OEM, so the old bolts work just find. Next remove the large bolt from the top of the mount. Then swing the bracket back in to place and put the 2 bolts back in and tighten them. Notice that you can now get a socket on that middle bolt and it's done in seconds.
Once the bracket and mount are tight, you'll notice that mount will pivot. Also notice the steel nipple mentioned above. Once you have them in general alignment, I needed to jack the motor up until the bracket and mount came in to alignment allowing me to start the big bolt. Once I got that tightened down, I rechecked all the bolts to make sure I tightened them.
Did you remember to plug the vacuum line?
Done . . . as I said, once I figured out the best process, it wasn't that bad. Here are some pics of the new and old. Sorry, didn't think of taking any before shots.
Ruf
02-03-2008, 03:58 PM
#25
Lead Footed
This is a post in the GB from 2/3.
SHEEEEEEEET, the rear mount kicked my
Counting the time spent just trying to get the rear mount to slip out and then to start the new bolt in the new MM, I spent almost 6hrs. Not counting the wasted time on those 2 problem items, it would have taken me about an hour to an hour and 30 mins.
And to top it off, I think I bent a power steering line some where. The noise was something like a whirring/humming sound coming from the powersteering pump, so at first I though it may have been the side mount problem mentioned. But I fear it may not be. I'll post later on what I find out.
I don't know why the rear was so hard. I tried a number of angles, but could not get the mount to turn sideways enough to get the bolt to come out of the mount bracket. I ended up undoing the side and front mounts and grinding the rear mount bolt flush, and then jack the engine up until I could get it to slip out.
Once I finally got it out, the only problem after that was getting the new rear bolt to thread. The problem was that I couldn't move the engine around enough for a perfect positioning. Again I resorted to trying a longer bolt, and BINGO, worked like a charm. If I had some one to help at this point, one could have moved the engine in to place which the other started the bolt. But I couldn't get the motor to align good enough to do it with the bolt supplied.
Ruf
02-03-2008, 04:01 PM
#26
Lead Footed
This is a post from the GB on 2/3.
Well . . . . . aaaayyyyiiiieeee
The news on bending or pinching a power steering line came back negative. I traced every line and had to partially pull the grill and bumper to make sure nothing going to the radiator was messed up. That's the good news.
Next I checked to see if the side mount was a factor. Well, I disconneted it and . . . nope, no difference.
That led me to think the power steering unit itsef was messed up. I just couldn't think how. So to make sure I pulled the belt and the noise completely stopped . . oh oh. As I looked at the pulley for a while . . . it hit me. After getting the front and rear mounts in place - bolts were still loose on both so I could move the egine around to align the side mount. It was then I remembered having a bit of a problem getting the holes to align. It was close, but not close enough to get the bolts started . . . I needed an extra set of hands, but since none were available, I used a large screwdriver to apply a little force between the bracket and the . . . . pulley. It was only off a tiny bit, but thought - could I have possibly bent the pulley, thereby bending the impeller shaft. With the belt still loose, I started the engine and as I watched it spin . . . my heart sank. DAMN . . . it had the slightest wobble.
It figures it would be the most expensive part.
Well, there go my struts for a while . . .
Lesson learned . . . . you can pay 'em now or later.
Anyway, that goes to show that an old hot rodder needs to learn, you can treat parts like you did on your old 60's muscle car. Steel will take a bit of force, but not a small aluminum shaft.
Ruf
02-03-2008, 05:44 PM
#27
Originally Posted by RUF87
Just a thought, try checking the tension on the power steering belt. If it feels tight, try loosening a bit and see if the humming goes away. If not, do you have a mechanics stethoscope? If not use a long screwdriver will work, but not as good. Anyway, place it on the power steering pump and see if that's were the humming is coming from. If not, you might want to try the altenator.
If it's not the PSP belt being too tight, I'm guessing that alignment can be off just enough to put the PSP or other moving part run by the belts in a slight bind.
Ruf
If it's not the PSP belt being too tight, I'm guessing that alignment can be off just enough to put the PSP or other moving part run by the belts in a slight bind.
Ruf
02-03-2008, 06:51 PM
#28
Senior Moderator
Thread Starter
a quick summary from what i've read:
the side mount needs to be redesigned
the rear mount has some issue(s) that cause serious vibrations through out the cabin
if this is correct the best way to handle it is to have a member (w/all 3 mounts installed) go to innovative and spend the better part of the day there getting things checked out.
sound right to you guys?
02-03-2008, 07:06 PM
#29
Uses turn signals in my
Originally Posted by Mike
a quick summary from what i've read:
the front mount needs to be redesigned
the rear mount has some issue(s) that cause serious vibrations through out the cabin
if this is correct the best way to handle it is to have a member (w/all 3 mounts installed) go to innovative and spend the better part of the day there getting things checked out.
sound right to you guys?
I've been pretty happy with mine overall, just curious about the humming sound I have, even thought it does sound badass.
02-03-2008, 08:38 PM
#31
Uses turn signals in my
Originally Posted by Mike
 yes, i meant the side mount. i'll fix it
your car doesn't shake and rattle while in D5 at a full stop??
It vibrates some at a full stop, but nothing excessive like you have described, it has become less and less as I've worn them in.
02-03-2008, 10:49 PM
#33
Lead Footed
Originally Posted by Silvaccordex01
I put my stock side mount back in and the sound went away. You must not of read my entire post =) That is why 1 reason why i think the mount needs to be redesigned
 , I was too focused on determining where exactly the humming was coming from with the Innovative mount. My though is that it's one of two things.
#1 - the design of the mount is changing the angle of the engine just enough so that it's putting pressure on the power steering.
#2 - Since this mount is much firmer that OEM, it's allowing the whirring noise of the power steering and or alternator to transmit.
Ruf
02-03-2008, 11:08 PM
#34
Originally Posted by Mike
a quick summary from what i've read:
the side mount needs to be redesigned
the rear mount has some issue(s) that cause serious vibrations through out the cabin
if this is correct the best way to handle it is to have a member (w/all 3 mounts installed) go to innovative and spend the better part of the day there getting things checked out.
sound right to you guys?
Were not really sure if the vibrations are excessive in your case because we havnt driven the car. it could be that your just more sensitive to the vibrations than other people, or there could really be an issue such as a loose bolt or something causing more vibrations than what the mounts would normally produce.
02-03-2008, 11:20 PM
#35
Uses turn signals in my
Originally Posted by RUF87
You're right , I was too focused on determining where exactly the humming was coming from with the Innovative mount. My though is that it's one of two things.
#1 - the design of the mount is changing the angle of the engine just enough so that it's putting pressure on the power steering.
#2 - Since this mount is much firmer that OEM, it's allowing the whirring noise of the power steering and or alternator to transmit.
Ruf
, I was too focused on determining where exactly the humming was coming from with the Innovative mount. My though is that it's one of two things.#1 - the design of the mount is changing the angle of the engine just enough so that it's putting pressure on the power steering.
#2 - Since this mount is much firmer that OEM, it's allowing the whirring noise of the power steering and or alternator to transmit.
Ruf
 02-04-2008, 12:09 AM
#37
Senior Moderator
Thread Starter
Originally Posted by TCM 01 CL-S
I only get the humming sound when I am accelerating moderate to WOT in 1st to 3rd gear. When I rev it in nuetral, nothing out of the ordinary. What do you think of this?
02-04-2008, 12:11 AM
#38
Senior Moderator
Thread Starter
Originally Posted by Silvaccordex01
Im not sure if the rear mount really has any "issues" its just the mount that causes the most vibrations in my experience with these mounts. That was 1 side effect to these mounts is more vibrations in the cabin due to a more solid design rather than a more spongy design (rubber) that OEM uses. The side mount is what needs to be redesigned.
Were not really sure if the vibrations are excessive in your case because we havnt driven the car. it could be that your just more sensitive to the vibrations than other people, or there could really be an issue such as a loose bolt or something causing more vibrations than what the mounts would normally produce.
Were not really sure if the vibrations are excessive in your case because we havnt driven the car. it could be that your just more sensitive to the vibrations than other people, or there could really be an issue such as a loose bolt or something causing more vibrations than what the mounts would normally produce.
 it was fine the way it was. you should have left it alone"
02-04-2008, 01:57 PM
it was fine the way it was. you should have left it alone"
02-04-2008, 01:57 PM
#39
Lead Footed
Originally Posted by Mike
it's bad enough that my kid can't wait for me to get it fixed. wife drove the car once and said " it was fine the way it was. you should have left it alone"
it was fine the way it was. you should have left it alone"I just got my power steering pump replaced and all noises have stopped. Damn, that was an expensive screw up on my part.
I've not driven it yet, but I did put it in gear and there is more vibration than I expected. With just the side and front it wasn't bad at all. I just think that adding a 3rd mount to the situation increases it to another level. I would try to replace the side to see how it does, but my OEM side is torn . . busted, so that doesn't help me. I may try disconnecting the side and put it in gear and see how it does.
Ruf
02-04-2008, 02:50 PM
#40
Senior Moderator
iTrader: (2)
Join Date: May 2000
Location: where the weather suits my clothes
Age: 55
Posts: 27,921
Received 1,080 Likes
on
661 Posts
Not sure if this helps any but I did the window weld trick to a set of brand new OEM motor mounts a few weeks ago and I have some vibration as well. Definitely more than when I had the old ones in.