
rockstar143's '04 NBP progress thread (part deux continues after 6 year hiatus)
 11-23-2011, 09:05 PM
#1041
Race Director
iTrader: (8)
There's a trick to get them out without drilling them out.
Just hammer on the screws really hard. The vibration gets the screws loose and you'll be able to just take a screwdriver and take them out. No impact screwdriver or anything!
I saw my mechanic do it today and I DOUBT my rotor screws have ever been taken off in its lifetime.
 11-23-2011, 10:44 PM
#1042
Hmmmm...that's great to know...so just hammer the shit out of the head of the screw then? I didn't try, but I have a feeling mine would come out with just the screwdriver, maybe not. 
Now, a bigger thing for me is that they are still in good condition, so I don't know if I should go drop 200 bucks on new zinc plated ones...maybe...hmmm...
Now, a bigger thing for me is that they are still in good condition, so I don't know if I should go drop 200 bucks on new zinc plated ones...maybe...hmmm...
11-24-2011, 12:32 AM
#1043
I was able to get my rotor screws off (note that I have an 04, that's in CANADA. Rust galore!!!).
There's a trick to get them out without drilling them out.
Just hammer on the screws really hard. The vibration gets the screws loose and you'll be able to just take a screwdriver and take them out. No impact screwdriver or anything!
I saw my mechanic do it today and I DOUBT my rotor screws have ever been taken off in its lifetime.
 11-27-2011, 12:15 AM
#1044
Hmmm...well, I'll have an awesome update tomorrow but I DID try hammering on the screw area and tried to unscrew and it wouldn't budge (just for kicks)...the screw is recessed a bit...did the guy use a punch of something to hit the head of the screw? Or just whack the shit out of the area where the screw sits?
J
J
11-27-2011, 12:24 AM
#1045
^ I first sprayed the screw with a little screw loose (wd-40) will work also. Then i placed the screw driver on the screw and hammered away. After that just twist the screw driver as if you were gonna unscrew the screw and at the same time hit it again with the hammer, you should feel the screw budge. Hope that helps.
Last edited by acura_dipset_tl; 11-27-2011 at 12:27 AM.
11-27-2011, 09:55 AM
#1046
takin care of Business in
iTrader: (5)
Join Date: Jan 2008
Location: Kansas City, MO
Age: 40
Posts: 30,994
Received 4,732 Likes
on
4,064 Posts
am assuming you guys dont have a breaker bar....
or access to Firestone or some shop like that....they can break the bolt loose and hand tighten it....you drive home and pop everything off
or access to Firestone or some shop like that....they can break the bolt loose and hand tighten it....you drive home and pop everything off
The following users liked this post:
rockstar143 (11-27-2011)
11-27-2011, 10:11 AM
#1047
Team Owner
iTrader: (4)
Hmmmm...that's great to know...so just hammer the shit out of the head of the screw then? I didn't try, but I have a feeling mine would come out with just the screwdriver, maybe not.
Now, a bigger thing for me is that they are still in good condition, so I don't know if I should go drop 200 bucks on new zinc plated ones...maybe...hmmm...
Now, a bigger thing for me is that they are still in good condition, so I don't know if I should go drop 200 bucks on new zinc plated ones...maybe...hmmm...
http://community.craftsman.com/Craft...ws?tab=details
They are great for removing those screws. HF also has one for a hell of a lot less but I was not able to find it at my HF. This thread reminds me I need to pick one up.
Last edited by RaviNJCLs; 11-27-2011 at 10:17 AM.
The following users liked this post:
rockstar143 (11-27-2011)
11-27-2011, 10:14 AM
#1048
Race Director
iTrader: (8)
Hmmm...well, I'll have an awesome update tomorrow but I DID try hammering on the screw area and tried to unscrew and it wouldn't budge (just for kicks)...the screw is recessed a bit...did the guy use a punch of something to hit the head of the screw? Or just whack the shit out of the area where the screw sits?
J
J
You have to hammer it HARD.
My mechanic gave it a few hard hits with the hammer and I think it knocked off a LOT of rust too lol
The following users liked this post:
rockstar143 (11-27-2011)
11-27-2011, 10:17 AM
#1049
Thanks fellas...thankfully, this was all a preemptive attempt! I probably won't be changing my discs just yet, since I don't have a vibration when braking or anything. I do like the brakemotive ones and it's a heck of a deal for the discs, but I don't want to pay for the pads too. Plus, I just took the time to sand down and wire brush and repaint the hubs and discs. Took many, many hours...but was well worth the end result.
11-27-2011, 10:23 AM
#1050
Race Director
iTrader: (8)
Thanks fellas...thankfully, this was all a preemptive attempt! I probably won't be changing my discs just yet, since I don't have a vibration when braking or anything. I do like the brakemotive ones and it's a heck of a deal for the discs, but I don't want to pay for the pads too. Plus, I just took the time to sand down and wire brush and repaint the hubs and discs. Took many, many hours...but was well worth the end result.
I'll be getting different brake pads too because I heard the ones that they sell make a lot of brake dust.
The following users liked this post:
rockstar143 (11-27-2011)
11-27-2011, 10:24 AM
#1051
Team Owner
iTrader: (4)
Thanks fellas...thankfully, this was all a preemptive attempt! I probably won't be changing my discs just yet, since I don't have a vibration when braking or anything. I do like the brakemotive ones and it's a heck of a deal for the discs, but I don't want to pay for the pads too. Plus, I just took the time to sand down and wire brush and repaint the hubs and discs. Took many, many hours...but was well worth the end result.
The following users liked this post:
rockstar143 (11-27-2011)
11-27-2011, 10:48 AM
#1052
Ok...so this long holiday weekend, decided to tackle this, since I knew I could leave my car out of commission and take my time.
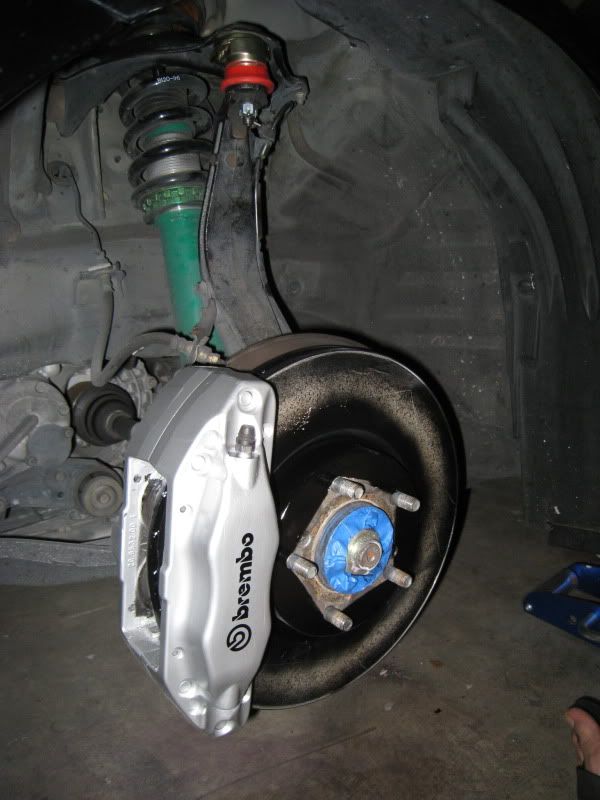
Got 2 things done, swapped out my ebay special jpower front camber balljoint to the spc one. I have to say, the jpower people did a GREAT job of copying the style. It's identical, save for the 17mm castle nut vs the 16mm spc (lucky I realized before I stripped it). Also, the SPC one, when you tighten it down, it actually presses the balljoint into the upper control arm, the ebay one was moveable as soon as you'd loosen the upper nut.
Next up, I got my brake calipers and hubs/discs done. I had done a half assed job of spraying the discs in silver a year ago , but I definitely didn't prep correctly. I'll probably end up getting some zinc plated brakemotive discs down the line, but this'll buy me some time.
On to the pics...I made a semi DIY, although I'm sure it's pretty self explanatory. Won't bother with the camber pics, although there's one of the spc one installed.
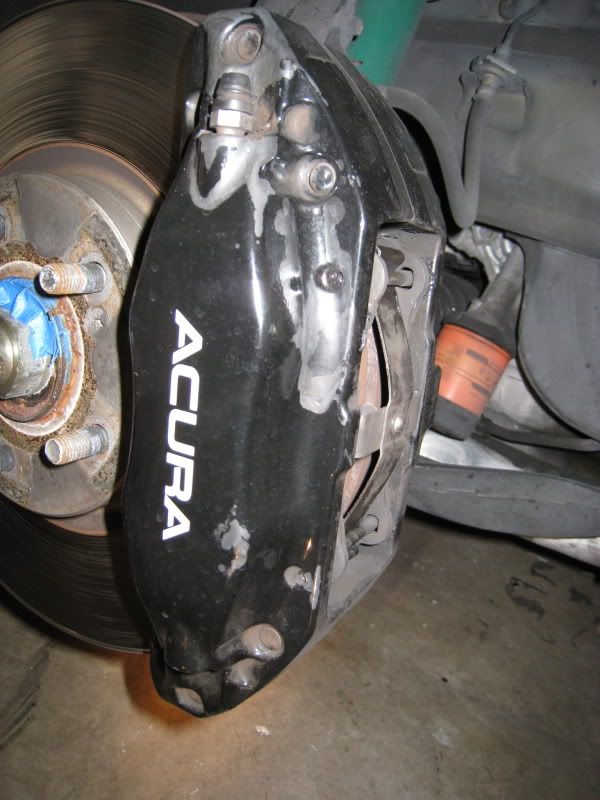
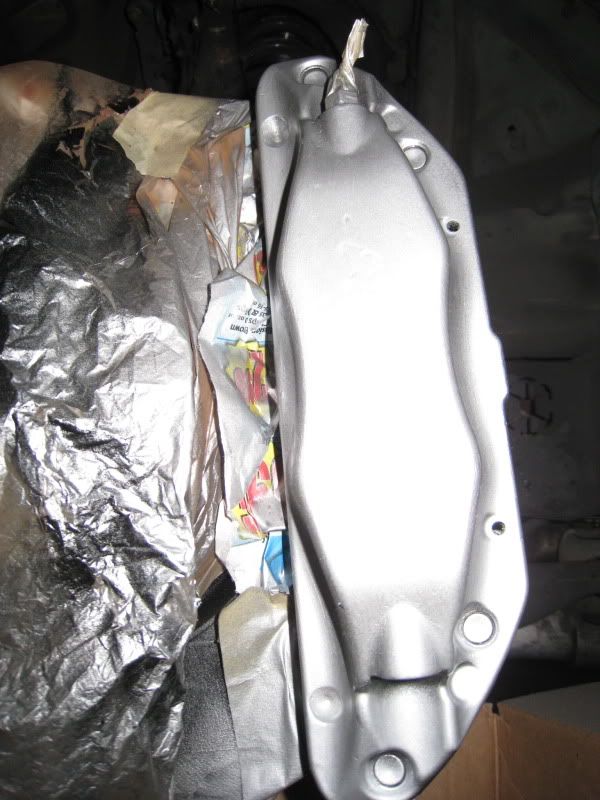
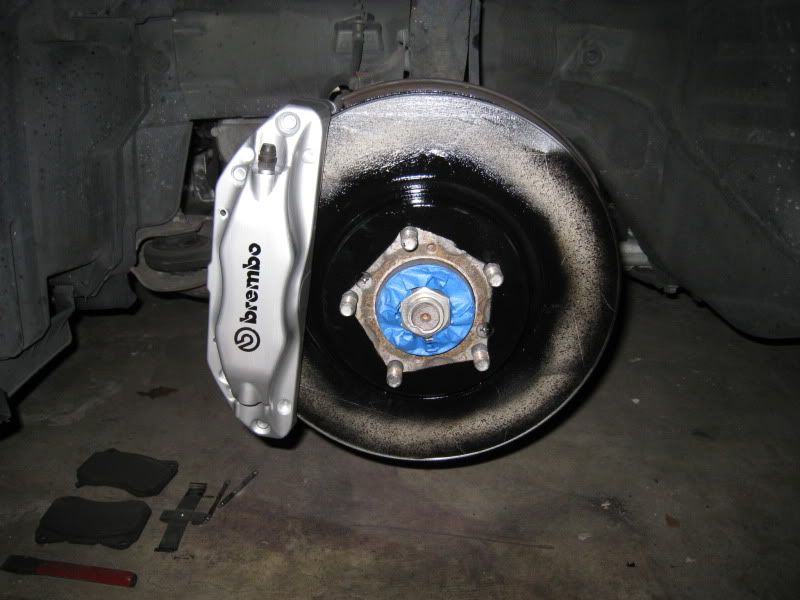
Here's what we're starting with...some rusty hubs and here are some good pics of the bubbling that was occurring on my brembos...the final push I needed to go ahead with repainting them.
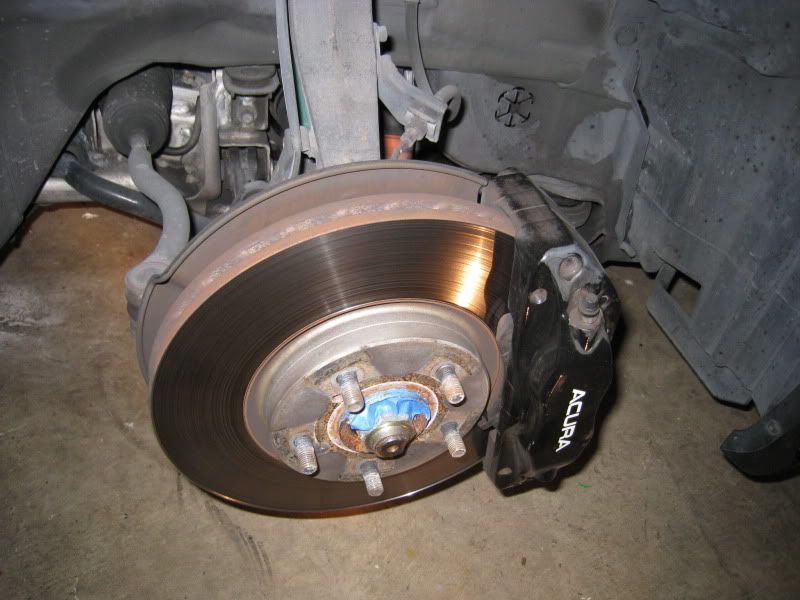
prepped everything at once, wiped down with some natural solvent stuff for the kitchen, then sanded with 50 grit and then 150, then wiped down again, then taped up, then wiped down with IPA. I learned on one side, use 150, the 50 leaves deep scratch marks, but you have to look closely to see them.


depending on your rims, you can see some parts of where the rim seats against the hub, so paint that too...covered the lugs, you don't want a few millimeters of paint on those.


Ok, HUB done...
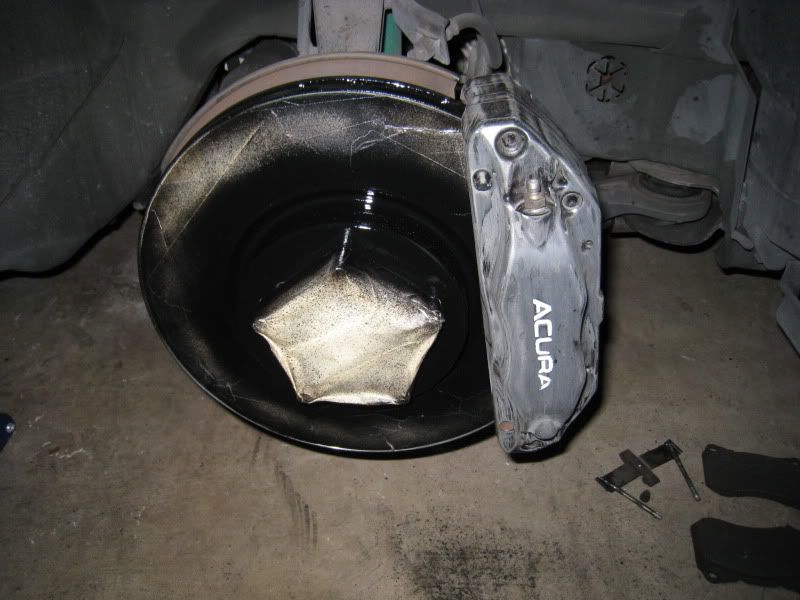
For the discs...the brakes will take care of scraping and burning off any extra paint after, but you don't want all that gunk on there...I used 1.5" painters tape, put on long straight strips to cover the most area...then I put a razor blade on the grooves and spun the disc by hand to cut a perfect circle. Took about 5 minutes per disc and made cleanup a breeze (nonexistent). An ounce of prevention...pound of cure, right?
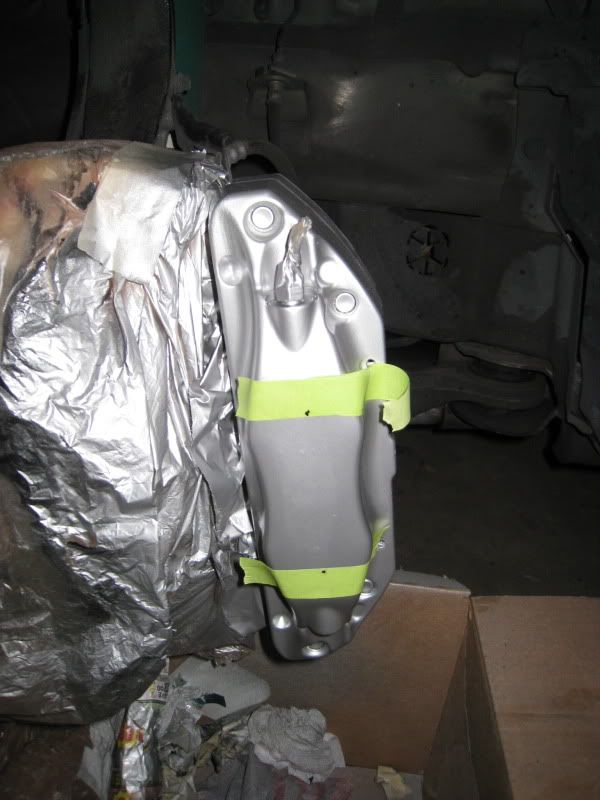
Once that was dry (and after getting home from the UM game)...I reversed the process...covered up the disc and secluded the caliper. I will make this recommendation when doing this, if you want to do it right and get good coverage and NOT on your pads or have weird paint lines where you should have painted but didn't because you had to tape and overtaped (if you've ever painted calipers back in the day you'll know what I mean). The level of detail and perfection is the line in the sand that separates if something looks oem and classy or like a hack job and why would you do that to that poor tl look from people. SO REMOVE THE BRAKE PADS/SLIDES/PINS. Seriously. Takes an extra few minutes but makes it easier to mask under...I basically just put a piece of newspaper and then slid it under the caliper.
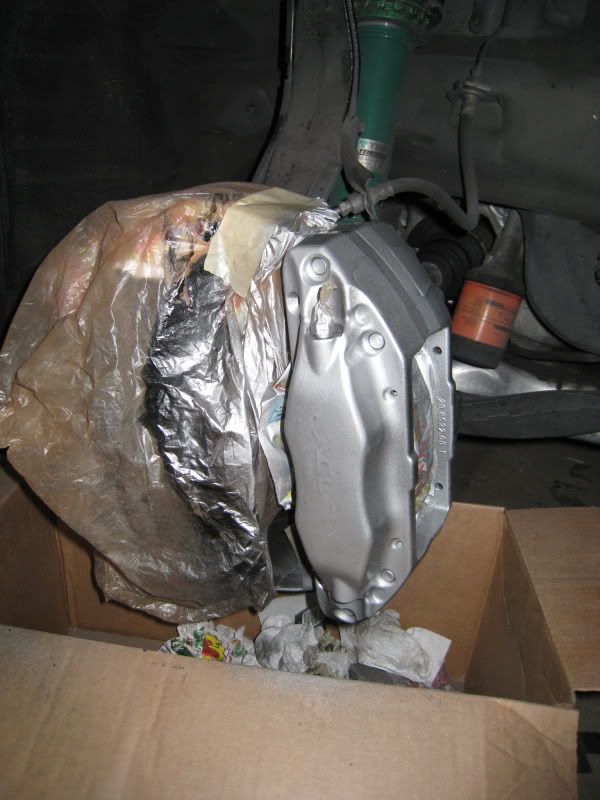
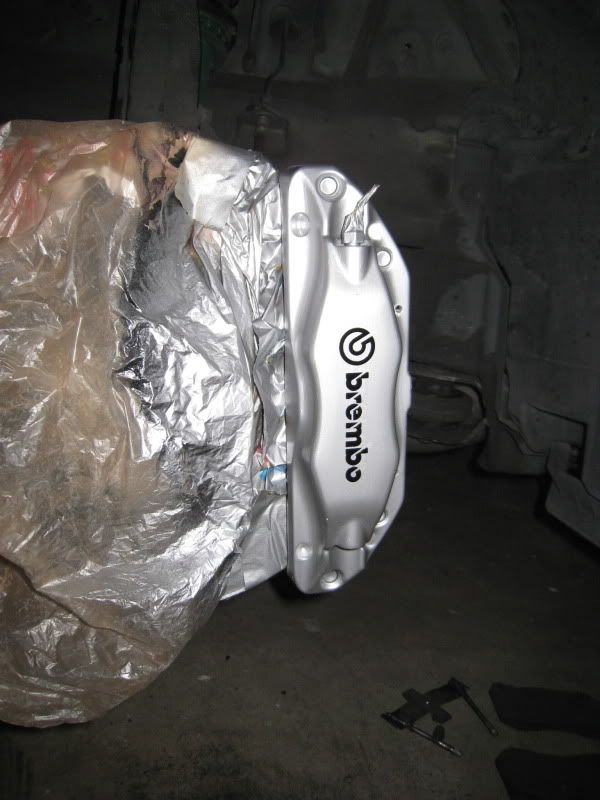
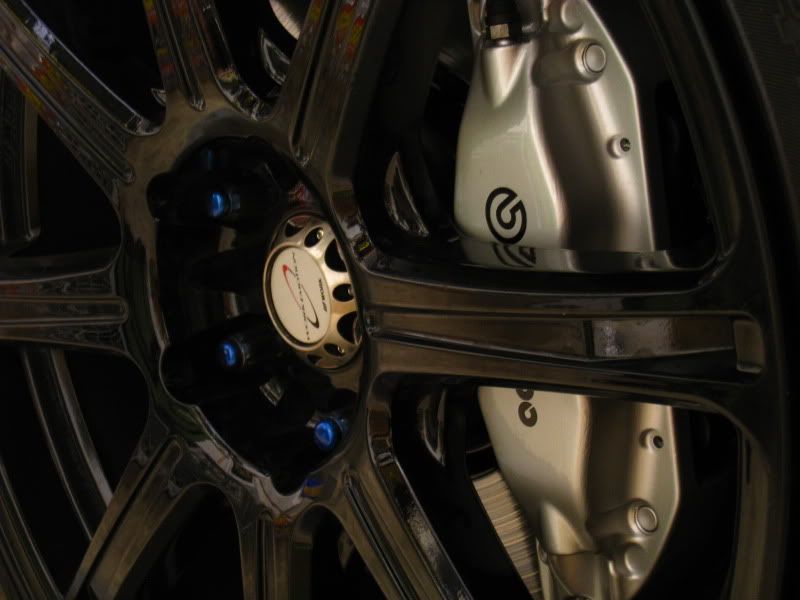
Already looking pretty good...OK, now, let me say this too...get a bearing on where the decal ends up...once this thing touches the semi wet paint (i installed after 30 minutes after the last coat of the base silver color, after an hour, they say not to do another coat of anything for a week) it will stick and NOT move. I messed up the first time...the pulled the letters off and put on my second one...but you could kind of see the ghosted image of where I messed up and put down the original letters...so scrapped it all and sanded it all back down and redid it. Then I measured where the center was vertically for a bearing, and then eyeballed horizontally...got it right. Only had 4 black decals so once I messed up the first two...ZERO margin for error.
Then clear it...I did 3 coats of base, 3 of clear.
Rears done...
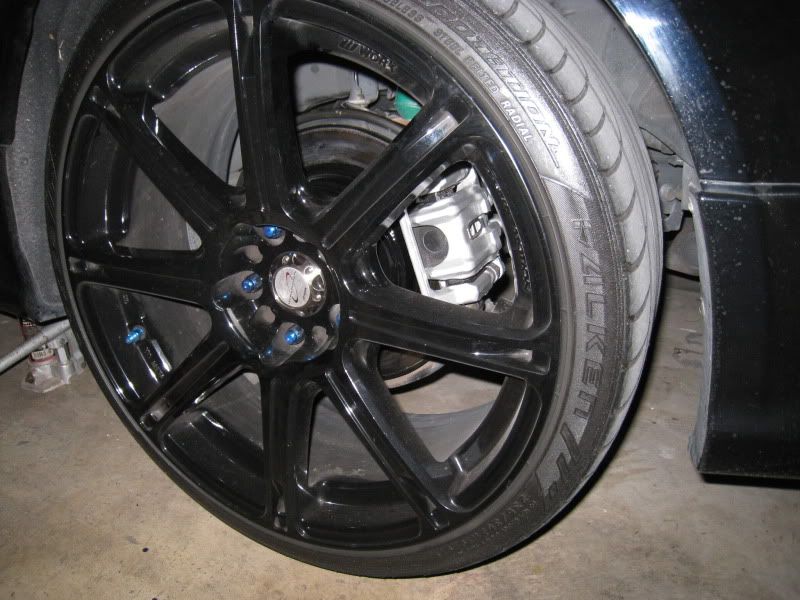
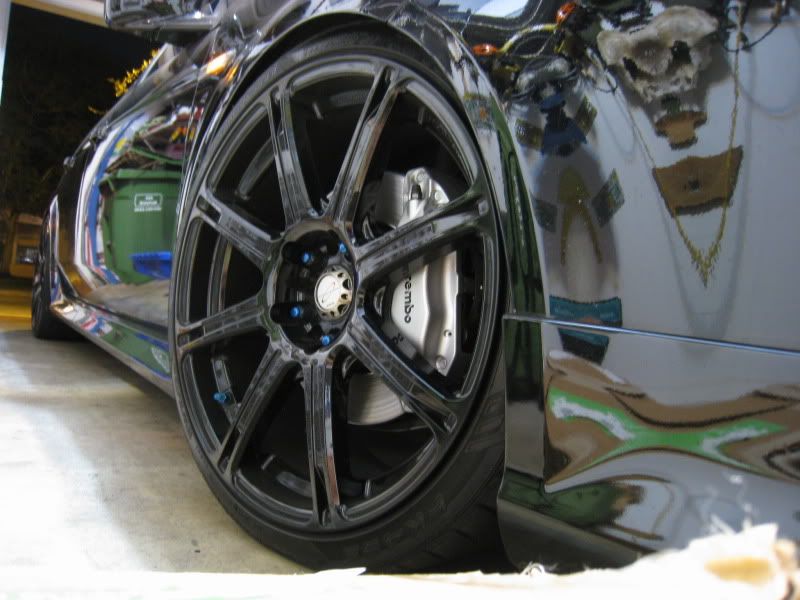
and now the fronts...
with the tein and spc, it looks like Christmas under my fender!
and here it is, complete...


Got 2 things done, swapped out my ebay special jpower front camber balljoint to the spc one. I have to say, the jpower people did a GREAT job of copying the style. It's identical, save for the 17mm castle nut vs the 16mm spc (lucky I realized before I stripped it). Also, the SPC one, when you tighten it down, it actually presses the balljoint into the upper control arm, the ebay one was moveable as soon as you'd loosen the upper nut.
Next up, I got my brake calipers and hubs/discs done. I had done a half assed job of spraying the discs in silver a year ago
, but I definitely didn't prep correctly. I'll probably end up getting some zinc plated brakemotive discs down the line, but this'll buy me some time. On to the pics...I made a semi DIY, although I'm sure it's pretty self explanatory. Won't bother with the camber pics, although there's one of the spc one installed.
Here's what we're starting with...some rusty hubs and here are some good pics of the bubbling that was occurring on my brembos...the final push I needed to go ahead with repainting them.
prepped everything at once, wiped down with some natural solvent stuff for the kitchen, then sanded with 50 grit and then 150, then wiped down again, then taped up, then wiped down with IPA. I learned on one side, use 150, the 50 leaves deep scratch marks, but you have to look closely to see them.
depending on your rims, you can see some parts of where the rim seats against the hub, so paint that too...covered the lugs, you don't want a few millimeters of paint on those.
Ok, HUB done...
For the discs...the brakes will take care of scraping and burning off any extra paint after, but you don't want all that gunk on there...I used 1.5" painters tape, put on long straight strips to cover the most area...then I put a razor blade on the grooves and spun the disc by hand to cut a perfect circle. Took about 5 minutes per disc and made cleanup a breeze (nonexistent). An ounce of prevention...pound of cure, right?
Once that was dry (and after getting home from the UM game)...I reversed the process...covered up the disc and secluded the caliper. I will make this recommendation when doing this, if you want to do it right and get good coverage and NOT on your pads or have weird paint lines where you should have painted but didn't because you had to tape and overtaped (if you've ever painted calipers back in the day you'll know what I mean). The level of detail and perfection is the line in the sand that separates if something looks oem and classy or like a hack job and why would you do that to that poor tl look from people. SO REMOVE THE BRAKE PADS/SLIDES/PINS. Seriously. Takes an extra few minutes but makes it easier to mask under...I basically just put a piece of newspaper and then slid it under the caliper.
Already looking pretty good...OK, now, let me say this too...get a bearing on where the decal ends up...once this thing touches the semi wet paint (i installed after 30 minutes after the last coat of the base silver color, after an hour, they say not to do another coat of anything for a week) it will stick and NOT move. I messed up the first time...the pulled the letters off and put on my second one...but you could kind of see the ghosted image of where I messed up and put down the original letters...so scrapped it all and sanded it all back down and redid it. Then I measured where the center was vertically for a bearing, and then eyeballed horizontally...got it right. Only had 4 black decals so once I messed up the first two...ZERO margin for error.
Then clear it...I did 3 coats of base, 3 of clear.
Rears done...
and now the fronts...
with the tein and spc, it looks like Christmas under my fender!
and here it is, complete...
The following 2 users liked this post by rockstar143:
swoosh (11-27-2011),
veggiemonster (11-28-2011)
11-27-2011, 10:53 AM
#1053
Race Director
iTrader: (8)
damn man that turned out REALLY good
GREAT job!!!
GREAT job!!!
The following users liked this post:
rockstar143 (11-27-2011)

The following users liked this post:
rockstar143 (11-27-2011)
The following users liked this post:
rockstar143 (11-27-2011)
The following users liked this post:
rockstar143 (11-27-2011)
11-27-2011, 11:00 AM
#1057
takin care of Business in
iTrader: (5)
Join Date: Jan 2008
Location: Kansas City, MO
Age: 40
Posts: 30,994
Received 4,732 Likes
on
4,064 Posts
J I have to mention you are a damn Rockstar....
Complements:
1> Professional Job
2> Great DIY
3> Patience you got
4> Awesome outcome
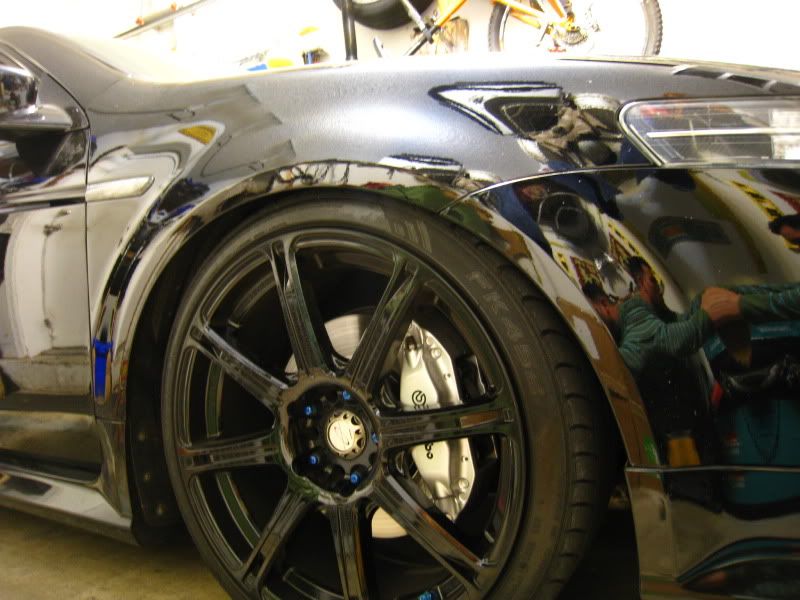
5> Caliper stands out very nice without taking the attention away from your rims
Critics:
1> Looks stock (some might take this as a complement...but the way I see it is, if I spend sooo much time trying to make the caliper stand out, I want it to be like "dude well done"....rather than "baah it came stock" or "rich kid got brembo's")
2> Too many colors black/blue/silver/golden (on the wheel caps)
But again....great job....it looks awesome....
you make me wanna do a BBK swap
Complements:
1> Professional Job
2> Great DIY
3> Patience you got
4> Awesome outcome
5> Caliper stands out very nice without taking the attention away from your rims
Critics:
1> Looks stock (some might take this as a complement...but the way I see it is, if I spend sooo much time trying to make the caliper stand out, I want it to be like "dude well done"....rather than "baah it came stock" or "rich kid got brembo's")
2> Too many colors black/blue/silver/golden (on the wheel caps)
But again....great job....it looks awesome....
you make me wanna do a BBK swap
The following users liked this post:
rockstar143 (11-27-2011)
11-27-2011, 11:03 AM
#1058
Moderator
iTrader: (3)
Dayyyuuummmmmmmmm 
The following users liked this post:
rockstar143 (11-27-2011)
11-27-2011, 11:23 AM
#1059
Thanks, buddy! I appreciate the compliment, especially from such a diyer yourself.
...by all means, greatest form of flattery, right?!?
Totally agree Ravi, without the logo (or some kind of logo on it) I think it would look like ass. Like you dumbed down a mod. Honestly, I would have stuck with the ACURA emblem, but the brembo ones were more readily available on ebay and cheap. Also, I would NOT put a brembo sticker on if it wasn't a brembo caliper. The lady that sold them to me, sold me 12 for $7 shipped. She had 1/2 of them being smaller ones for the rear that I said hell no to. She swapped them to all full sized ones.
, thanks dipset. I appreciate it.
Swoosh, thank you very much, buddy. I appreciate the compliment very much. It definitely tried my patience, but we used my fiance's accord all weekend so I could just leave mine on jacks in the 1 car garage. Did 1 side, then the other the next day. PS...you don't have BBK, huh?!?! You're hating on my color choice because of it! At 32 years old...if someone said "rich kid got brembos'" I would just be super happy that someone still thought of me as a "kid"
I get what you're saying though, and don't take offense since I know you're rockin blue. But I had done some test samples and found that if I did a base of silver, I could lay over some of that anodized finish blue that I did my lugs in and it would have matched beautifully...but only in the sun, such a large surface area, in the dark would look like normal blue and that just reminded me of my old 1997 accord. Not to say it COULDN'T look good, but for me...I feel like I'm always on the verge of overdoing it and I don't want to push my car (as a whole) to a level of looking like I've just done every mod to it. I like the black and blue theme a lot, but I think less is more. The silver, popped...didn't look as much like the oem black (which I didn't feel like doing all that work for it to look stock)...the blue I think would have been overkill. The copper from my engine bay covers was my other option...but that DEFINITELY would have been too many colors and Lesbianas, like someone (maybe you?) mentioned...those super loud calipers should be done by powdercoat and should be on lambo's and cts-v's. Don't quote me though, I may end up changing them up in the future, or if the silver doesn't hold up . Oh, and the center cap, has like a golden hue to it, but when you see them in person, they look like silverish...so black, blue and silver are all I got, really.
For now though, I'm very happy with it.
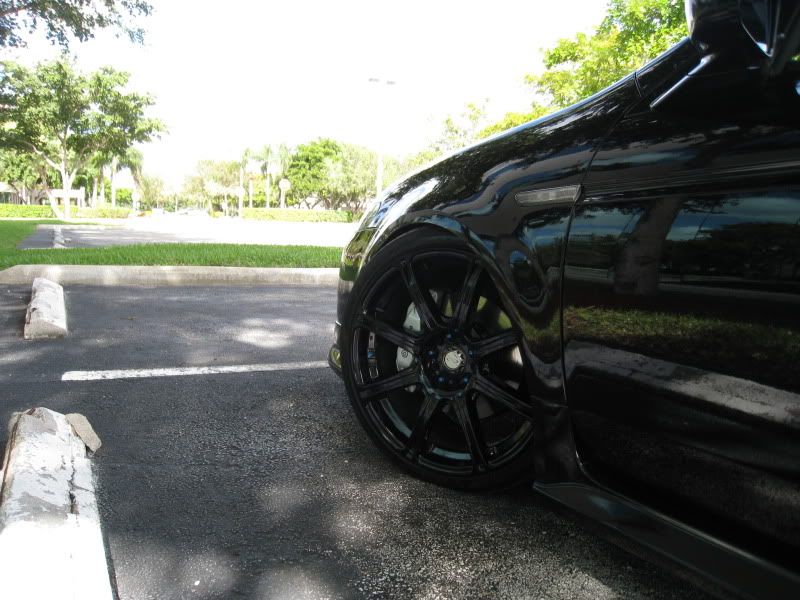
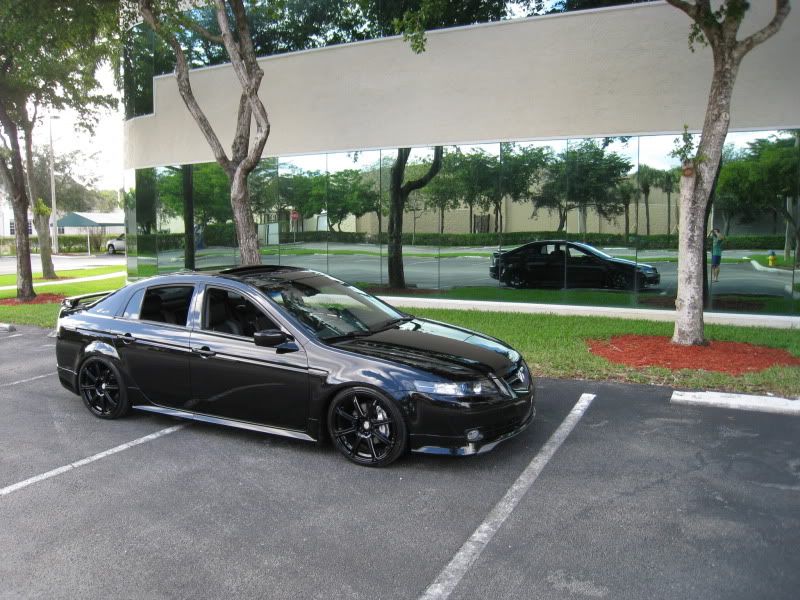
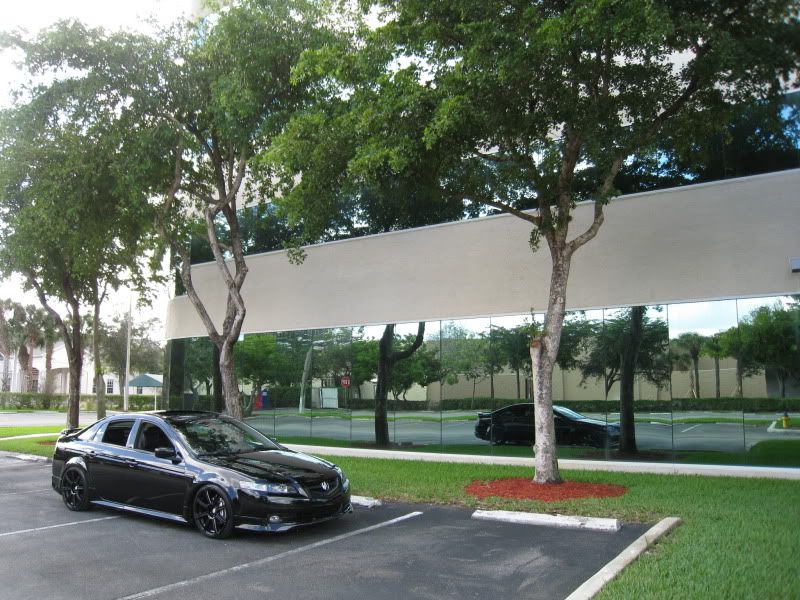
PS, this guy pulled up next to me last week and is really what had me reconsider doing the blue...

Tyler...thanks! 1 word is worth a thousand pictures!
I appreciate the compliment, especially from such a diyer yourself. ...by all means, greatest form of flattery, right?!?
, thanks dipset. I appreciate it.J I have to mention you are a damn Rockstar....
Complements:
1> Professional Job
2> Great DIY
3> Patience you got
4> Awesome outcome
5> Caliper stands out very nice without taking the attention away from your rims
Critics:
1> Looks stock (some might take this as a complement...but the way I see it is, if I spend sooo much time trying to make the caliper stand out, I want it to be like "dude well done"....rather than "baah it came stock" or "rich kid got brembo's")
2> Too many colors black/blue/silver/golden (on the wheel caps)
But again....great job....it looks awesome....
you make me wanna do a BBK swap
I get what you're saying though, and don't take offense since I know you're rockin blue. But I had done some test samples and found that if I did a base of silver, I could lay over some of that anodized finish blue that I did my lugs in and it would have matched beautifully...but only in the sun, such a large surface area, in the dark would look like normal blue and that just reminded me of my old 1997 accord. Not to say it COULDN'T look good, but for me...I feel like I'm always on the verge of overdoing it and I don't want to push my car (as a whole) to a level of looking like I've just done every mod to it. I like the black and blue theme a lot, but I think less is more. The silver, popped...didn't look as much like the oem black (which I didn't feel like doing all that work for it to look stock)...the blue I think would have been overkill. The copper from my engine bay covers was my other option...but that DEFINITELY would have been too many colors and Lesbianas, like someone (maybe you?) mentioned...those super loud calipers should be done by powdercoat and should be on lambo's and cts-v's. Don't quote me though, I may end up changing them up in the future, or if the silver doesn't hold up
. Oh, and the center cap, has like a golden hue to it, but when you see them in person, they look like silverish...so black, blue and silver are all I got, really.For now though, I'm very happy with it.
PS, this guy pulled up next to me last week and is really what had me reconsider doing the blue...
Tyler...thanks!
1 word is worth a thousand pictures!
Last edited by rockstar143; 11-27-2011 at 11:26 AM.
 11-27-2011, 11:46 AM
#1061
takin care of Business in
iTrader: (5)
Join Date: Jan 2008
Location: Kansas City, MO
Age: 40
Posts: 30,994
Received 4,732 Likes
on
4,064 Posts
J thanks for the explanation bro...i hope no offense were taken by you as well...am just thinking out loud (or writing out loud  )
)
i dont have BBK since no MT or Type S
but yeah those calipers on the truck look like crap....but hey you and him got the same tires LOL....
none the less...the calipers look great....and shit i didnt know u were 32....LOL
)i dont have BBK since no MT or Type S
but yeah those calipers on the truck look like crap....but hey you and him got the same tires LOL....
none the less...the calipers look great....and shit i didnt know u were 32....LOL
11-27-2011, 01:30 PM
#1062
LOL...sometimes I don't even know I'm 32!!!
no offense, at all...
I write like I think too...that's why my explanations are so long sometimes...because I type fast so I just write at the thoughts pop up and go with it.
So on a negative note, I got under the car today to see if I could finally find this annoying exhaust vibration I get under load when accelerating...it doesn't do it when just revving. I also noticed, I had it originally when I installed the j pipe but from one day to the next it got much worse. I thought maybe the muffler or a heat shield...
I've retightened all nuts to the jpipe.
I bent heat shields away from the exhaust to make sure there was no vibration
Today I opened up my intake again to retighten the nuts that I torqued down when I installed the thermal gasket.
2 things I noticed,
There was some fluid on the oil pan...but it wasn't oil...I think it was power steering fluid, maybe from turning the wheel when I didn't have the car on since it overflows from the pump...not sure. All my fluid levels are normal though so I am not too worried. I cleaned it up and will find the source later.
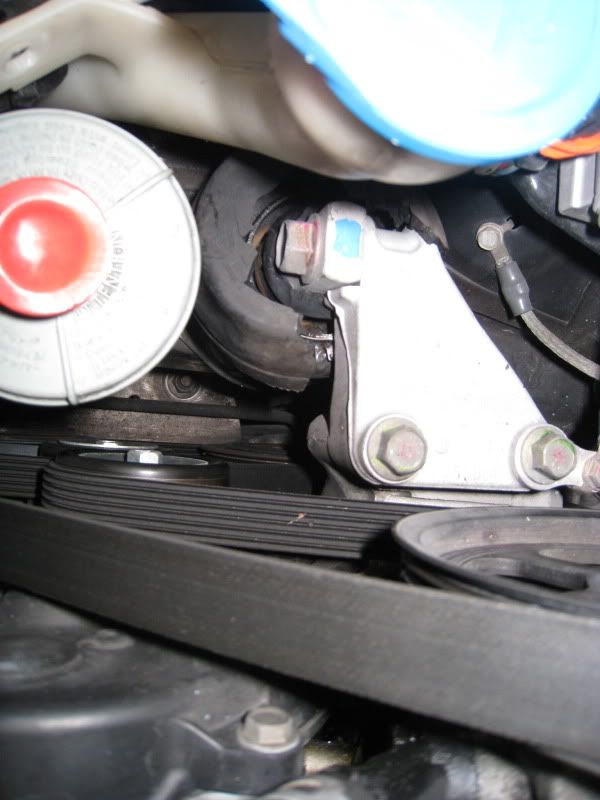
I noticed that under my valve covers or even where they join to the block, there seems to be a lot of crud built up. 75K and 8 years seems early for an oil leak, no?
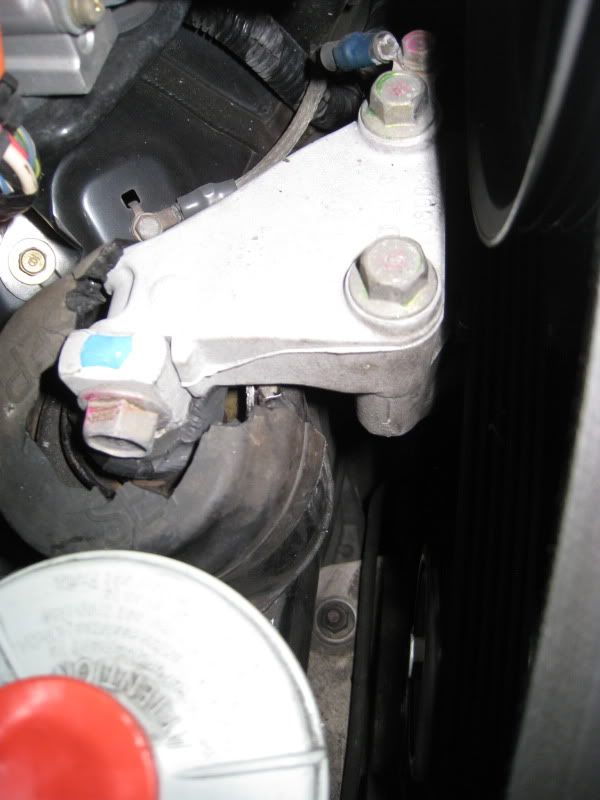
Then, I noticed this:
side motor mount is shot. I'm thinking it finally gave completely way and it's allowing the motor to twist when accelerating at a certain speed which, in turn, is putting a strain on the exhaust from one side causing the weird vibration/raspy sound.
If I'm not mistaken, the front and rear motor mounts are liquid filled so if I don't see liquid all over the place around them, they are probably not broken, right?
J.
no offense, at all...
I write like I think too...that's why my explanations are so long sometimes...because I type fast so I just write at the thoughts pop up and go with it.
So on a negative note, I got under the car today to see if I could finally find this annoying exhaust vibration I get under load when accelerating...it doesn't do it when just revving. I also noticed, I had it originally when I installed the j pipe but from one day to the next it got much worse. I thought maybe the muffler or a heat shield...
I've retightened all nuts to the jpipe.
I bent heat shields away from the exhaust to make sure there was no vibration
Today I opened up my intake again to retighten the nuts that I torqued down when I installed the thermal gasket.
2 things I noticed,
There was some fluid on the oil pan...but it wasn't oil...I think it was power steering fluid, maybe from turning the wheel when I didn't have the car on since it overflows from the pump...not sure. All my fluid levels are normal though so I am not too worried. I cleaned it up and will find the source later.
I noticed that under my valve covers or even where they join to the block, there seems to be a lot of crud built up. 75K and 8 years seems early for an oil leak, no?
Then, I noticed this:
side motor mount is shot. I'm thinking it finally gave completely way and it's allowing the motor to twist when accelerating at a certain speed which, in turn, is putting a strain on the exhaust from one side causing the weird vibration/raspy sound.
If I'm not mistaken, the front and rear motor mounts are liquid filled so if I don't see liquid all over the place around them, they are probably not broken, right?
J.
Last edited by rockstar143; 11-27-2011 at 01:38 PM.
11-27-2011, 02:33 PM
#1063
and back to fun...looked on oemacuraparts...dang...shipping is 18 bucks for the side motor mount. I'll stop by acura...they give it to me at 15% above what they pay...probably just as cheap with only 3 bucks tax instead of 18 shipping.
11-27-2011, 06:00 PM
#1064
The following users liked this post:
RaviNJCLs (11-27-2011)
11-27-2011, 06:02 PM
#1065
Team Owner
iTrader: (2)
Join Date: Jan 2008
Location: Kansas City, MO (Overland Park, KS)
Posts: 36,545
Received 6,470 Likes
on
5,162 Posts
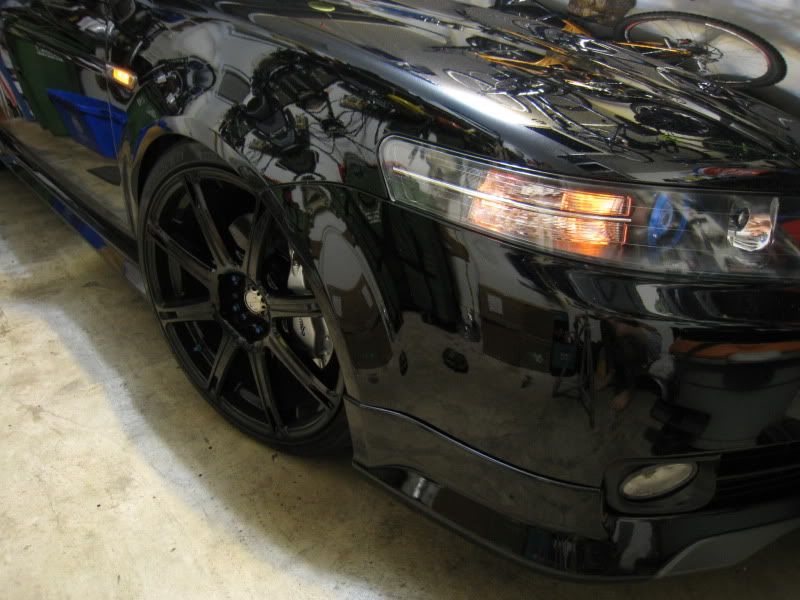
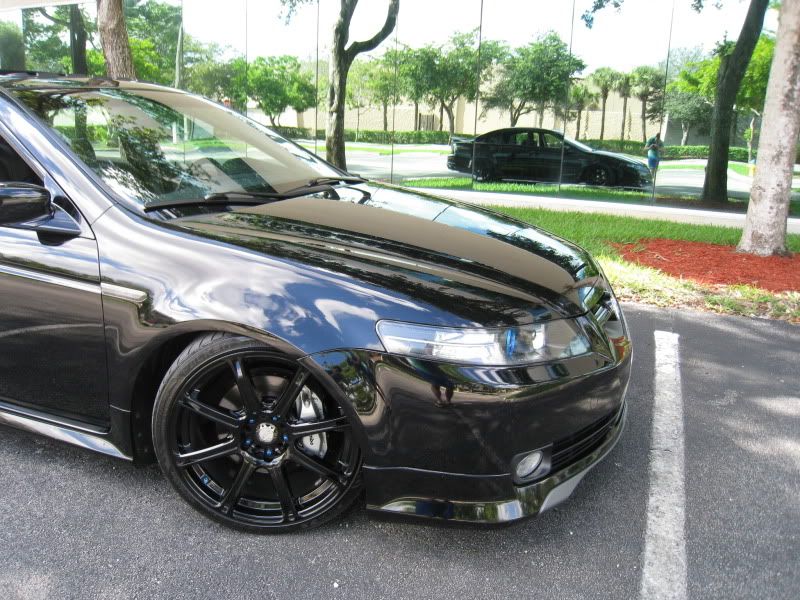
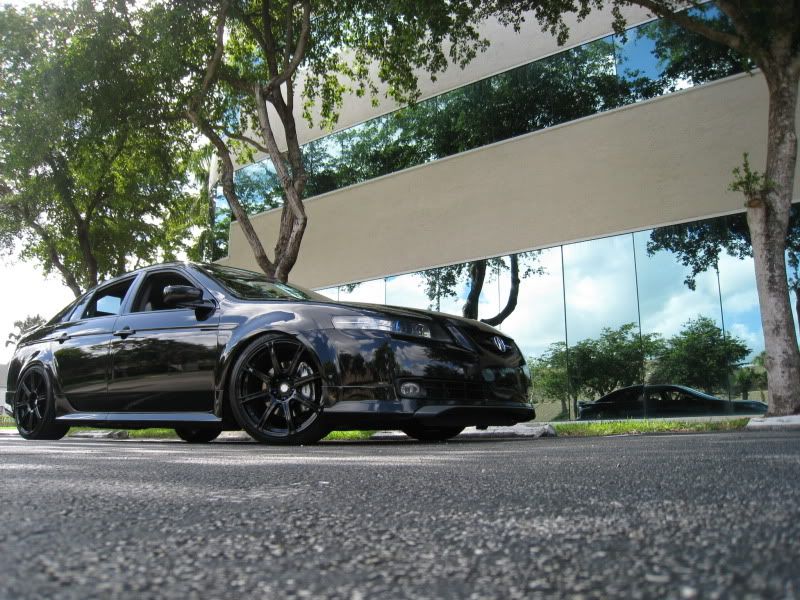
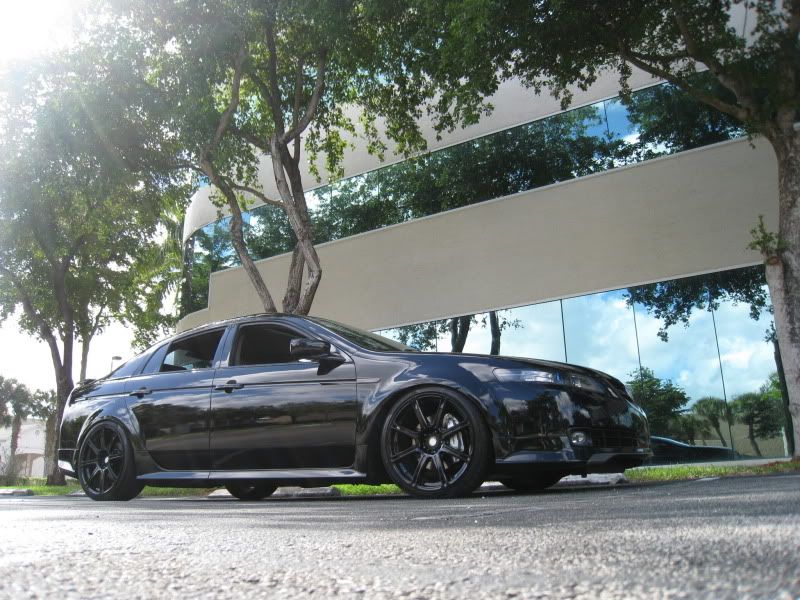
Wow, love the new beauty shots brother!
The following users liked this post:
rockstar143 (11-27-2011)
11-27-2011, 06:04 PM
#1066
Race Director
iTrader: (8)
Nice shots!
My motor mount (the same one you took pics of) is torn too - just not as bad as yours are lol
My motor mount (the same one you took pics of) is torn too - just not as bad as yours are lol
The following 2 users liked this post by guitarplayer16:
rockstar143 (11-27-2011),
veggiemonster (11-28-2011)
11-27-2011, 06:12 PM
#1067
Thank you very much Steven, I'm honored!
GP...gotcha...I'm really thinking it was weak and finally snapped, that would explain the exhaust slightly twisting and causing the vibration/rasp under load. If something was just loose or touching...it would make the noise when I was revving. ALSO...I think it's imperative to fix it soon because if not, it'll probably end up destroying the front and rear ones since they are not designed to take the extra load. I will probably order and put up a DIY on how to change it. Looks easy enough. I'm hoping it also gets rid of my slight shudder...
J.
11-27-2011, 06:42 PM
#1068
Team Owner
iTrader: (4)
Yeah, I'm with you, I had 75K on the rear pads and probably could have gone longer...but I had them all apart, so figured it was a good time to grease everything up and put new pads. I also opted to switch over to ceramic since my brembos up front are ceramic since 40K or so. I've changed them once already but mostly because if you buy your pads from autozone, their warranty includes wear, so you technically can walk in every 10K and they hand you new ones.
11-27-2011, 07:48 PM
#1071
N0w $hiftinG N/A
frigggin sweet bro if you can charge me a good price or help me out since im local 2 also NBP I would like to spray the ring in the head lights as well a nice color i dont wana say until its done with pix.
11-27-2011, 08:19 PM
#1072
since you pm'd me the color...want me to tell everyone what color??!!
lol...just kidding. Like I said, I don't think I'm at THAT level yet to be charging people to do their headlights but I WILL tell you that I think you can do it...just read up ALL THE DIY THREADS beforehand and learn what you need to learn before you start...then get your materials together etc.
lol...just kidding. Like I said, I don't think I'm at THAT level yet to be charging people to do their headlights but I WILL tell you that I think you can do it...just read up ALL THE DIY THREADS beforehand and learn what you need to learn before you start...then get your materials together etc.
11-27-2011, 08:48 PM
#1073
man i love your car, great job on the calipers man!
The following users liked this post:
rockstar143 (11-28-2011)
The following users liked this post:
rockstar143 (11-28-2011)
11-27-2011, 10:25 PM
#1075
takin care of Business in
iTrader: (5)
Join Date: Jan 2008
Location: Kansas City, MO
Age: 40
Posts: 30,994
Received 4,732 Likes
on
4,064 Posts
Holy shit !!! the new pix look awesome....you have great camera skills....
Veggie where are you....his editing skills will make those pix EPIC !!!
EDIT: Yeah the side mount is busted...why dont u look into Innovative mounts/XLR8 mounts ?
Veggie where are you....his editing skills will make those pix EPIC !!!
EDIT: Yeah the side mount is busted...why dont u look into Innovative mounts/XLR8 mounts ?
The following users liked this post:
rockstar143 (11-28-2011)
11-27-2011, 11:03 PM
#1076
Race Director
iTrader: (8)
since you pm'd me the color...want me to tell everyone what color??!!
lol...just kidding. Like I said, I don't think I'm at THAT level yet to be charging people to do their headlights but I WILL tell you that I think you can do it...just read up ALL THE DIY THREADS beforehand and learn what you need to learn before you start...then get your materials together etc.
lol...just kidding. Like I said, I don't think I'm at THAT level yet to be charging people to do their headlights but I WILL tell you that I think you can do it...just read up ALL THE DIY THREADS beforehand and learn what you need to learn before you start...then get your materials together etc.
And yes you're at "that" level =)
The following users liked this post:
rockstar143 (11-28-2011)
The following users liked this post:
rockstar143 (11-28-2011)
11-28-2011, 08:13 AM
#1078
rear end link?
http://www.acuraoemparts.com/delray/jsp/prddisplay.jsp?inputstate=5&catcgry1=TL&catcgry2=2 008&catcgry3=4DR+BASE+(NAVIGATION)&catcgry4=KA5AT& catcgry5=REAR%2BLOWER%2BARM&ListAll=All&vinsrch=no
part number - 52325-SFY-J01
its also named "Stabilizer link" stabilizer means the rear sway bar.
it says $13.69 from del ray.
at the dealership it should be about the same... $40 is crazy
thank you though!
11-28-2011, 08:42 AM
#1079
The lady that sold them to me, sold me 12 for $7 shipped. She had 1/2 of them being smaller ones for the rear that I said hell no to. She swapped them to all full sized ones.
I get what you're saying though, and don't take offense since I know you're rockin blue. But I had done some test samples and found that if I did a base of silver, I could lay over some of that anodized finish blue that I did my lugs in and it would have matched beautifully...but only in the sun, such a large surface area, in the dark would look like normal blue and that just reminded me of my old 1997 accord. Not to say it COULDN'T look good, but for me...I feel like I'm always on the verge of overdoing it and I don't want to push my car (as a whole) to a level of looking like I've just done every mod to it. I like the black and blue theme a lot, but I think less is more. The silver, popped...didn't look as much like the oem black (which I didn't feel like doing all that work for it to look stock)...the blue I think would have been overkill. The copper from my engine bay covers was my other option...but that DEFINITELY would have been too many colors and Lesbianas, like someone (maybe you?) mentioned...those super loud calipers should be done by powdercoat and should be on lambo's and cts-v's. Don't quote me though, I may end up changing them up in the future, or if the silver doesn't hold up
. Oh, and the center cap, has like a golden hue to it, but when you see them in person, they look like silverish...so black, blue and silver are all I got, really.about the silver/blue thing. look at this. when i was 16 i was in a CAD/product design class. designed a car for a competition, and had to make a model as well. i did this with duplicolor spray cans and 3 coats of silver, with 2 coats of the 'electric blue'. (well, there was joint compound, and a shit load of black primer to get it smooth)...i mean its not professional since it was my 5th night in a row without sleep, but just an example

also, lastly, what brand silver did you buy? i ask because my project ^^ the 'silver' was really chrome until the clear coat hit it. so there was some really weird spots and the blue paint didnt cover over that silver as well as i wanted (look at the fade down the sides)
The following users liked this post:
rockstar143 (11-28-2011)


The following users liked this post:
rockstar143 (11-28-2011)