When you click on links to various merchants on this site and make a purchase, this can result in this site earning a commission. Affiliate programs and affiliations include, but are not limited to, the eBay Partner Network.
I love that you're so optimistic and gungho about this so hopefully I'm not Buzz Killington, but it's not *quite* that easy.
Cutting is no problem. Just seal the cut with some electrical tape or something to keep moisture out. The now shorter piece will be brighter on the same inverter circuit since there is essentially less resistance. You might see some sparking shorts at the cut location the first time you power it on; just let it cook itself. Once it stops sparkling the charring will be nonconductive.
As for reconnecting the cut side without the connector, that might be easier said than done.
Does the strip lamp have a faint, unlit line running down the center?
Ah, okay. That's not what I meant but also answers the question. Without going into too much detail, there are two basic ways to print a lamp. One has a split electrode on the back and it results in a thin unlit line down the middle. Those don't look great when lit because of the dead space but I think you could manage to attach some leads to that with some creative, gentle, sanding of the back to expose the electrode layer. It looks like this:
The better lamp style use what you appear to have. There is an electrode on the polyester substrate and a second one printed on the back of the lamp. Think of it like an ice cream sandwich. The two cookies are the electrodes and the ice cream is the dielectric and phosphorous that illuminates.
The unfortunate thing is that both electrodes are printed over one another and one of them is printed directly on the polyester, sandwiched way down below like 7 other layers.
What you pointed out in your picture is a silver printed buss bar. That's what you want to tie into, but it's buried pretty well and only a few mils thick. You can try sanding down to it with a really fine sandpaper to expose it. Soldering could be difficult but not impossible. A small crimp would work better or perhaps a conductive adhesive if there is such a thing. There should also be a similar silver buss bar printed on the other side (ie. The left side o the picture you posted) of the lamp on the back. Same deal with that one: expose it somehow and tie into it.
But they're so terrible that they've start to come back around to being awesome.
I'm not sure how to explain it. Like, I hate them so much that I sort of start liking them. Sort of like bitter melon. It's so bad that it's good.
I don't know. Maybe I hit my head and woke up even more simple than I was before.
I'm sure you'll get over it. They look better as 16"ers on DC2s or something than what you saw up there, IMO. Nonetheless, the design itself is still meh.
Congrats on the wheels! What'd you do to make them fit? Looks great. I need that modulo.... but no monies
edit:
nvm noticed in the other thread. Surprised you were able to fit some spacers under there! I'm guessing those narrow tires really helped lol
Thanks bro! I was surprised as well... it was definitely the tire size that helped!
Ran into an issue after rolling the fenders (which was entirely my fault for not test fitting the wheels after already having them for a few months ) it turned out that the hubs on the wheels were smaller than the hubs on my car, so they wouldn't fit! Which is why I needed 5mm spacers...
But I'm definitely pleased with the outcome. Next up, I'll be installing my window visors and most likely a respray once I decide on a color.
before this i had one 24, one 27 and a 19... matching sizes are so much nicer lol.
i got this triple setup for stupid cheap (for what it is)... Korean IPS/PLS imported monitors from eBay sellers. Only downsides is there is only 1 input per monitor (DVI) and it only works on GPUs that have built in scalers and dual dvi.
lol, i'll admit lately i've just been sitting on the couch and using my laptop.. much more comfy.
I love the multi-monitor setup though. Since i got my 3d printer i've been starting to do some CAD work and these monitors are great for that, and i always have a free monitor to keep an eye on my VMs or remote sessions
Originally Posted by cu2wagon
HFS! My setup is a secondhand couch and a nearly busted 13.3" Toshiba laptop. I primarily use my Nexus 7.
You's guys is crazy!
Whats even crazier was my original idea. 3x3 monitor grid lol


















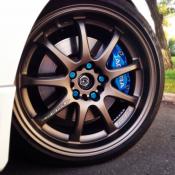



 ) it turned out that the hubs on the wheels were smaller than the hubs on my car, so they wouldn't fit! Which is why I needed 5mm spacers...