CCColtsicehockey's Home Projects Thread
 08-07-2023, 10:36 PM
#1441
tehLEGOman
Join Date: Dec 2004
Location: Charlotte, NC
Age: 41
Posts: 9,162
Received 1,983 Likes
on
1,336 Posts
Jason i am excited to see your car castle develop.

The following 2 users liked this post by ACCURATEin:
97BlackAckCL (08-09-2023),
CCColtsicehockey (08-08-2023)
08-08-2023, 07:19 AM
#1442
Moderator
Regional Coordinator (Southeast)
Regional Coordinator (Southeast)
Thread Starter
Join Date: Dec 2003
Location: Mooresville, NC
Age: 38
Posts: 43,593
Received 3,789 Likes
on
2,555 Posts
As am I. It feels like it is moving forward at a snails pace though.
The latest update is that last week we were told two more weeks till we would have Engineering Drawings back. Then it finally goes to review and permitting which my builder says right now he is seeing a decently fast turn around of 1-2 weeks. If all that really does happen on schedule we should be finally clearing the land by the end of the month. Which means I really need to start on the fence project right now.
The latest update is that last week we were told two more weeks till we would have Engineering Drawings back. Then it finally goes to review and permitting which my builder says right now he is seeing a decently fast turn around of 1-2 weeks. If all that really does happen on schedule we should be finally clearing the land by the end of the month. Which means I really need to start on the fence project right now.
08-08-2023, 03:41 PM
#1443
tehLEGOman
Join Date: Dec 2004
Location: Charlotte, NC
Age: 41
Posts: 9,162
Received 1,983 Likes
on
1,336 Posts
Are you gonna get an integra type S?
08-09-2023, 12:56 PM
#1444
Moderator
Regional Coordinator (Southeast)
Regional Coordinator (Southeast)
Thread Starter
Join Date: Dec 2003
Location: Mooresville, NC
Age: 38
Posts: 43,593
Received 3,789 Likes
on
2,555 Posts
The following users liked this post:
97BlackAckCL (08-09-2023)
08-11-2023, 08:42 AM
#1445
tehLEGOman
Join Date: Dec 2004
Location: Charlotte, NC
Age: 41
Posts: 9,162
Received 1,983 Likes
on
1,336 Posts
The following users liked this post:
CCColtsicehockey (08-14-2023)
08-11-2023, 08:44 AM
#1446
tehLEGOman
Join Date: Dec 2004
Location: Charlotte, NC
Age: 41
Posts: 9,162
Received 1,983 Likes
on
1,336 Posts
I do keep watching integra type S videos on youtube. Will i get one!? Things are always possible.
08-14-2023, 09:21 AM
#1447
Moderator
Regional Coordinator (Southeast)
Regional Coordinator (Southeast)
Thread Starter
Join Date: Dec 2003
Location: Mooresville, NC
Age: 38
Posts: 43,593
Received 3,789 Likes
on
2,555 Posts
08-21-2023, 09:43 AM
#1448
Moderator
Regional Coordinator (Southeast)
Regional Coordinator (Southeast)
Thread Starter
Join Date: Dec 2003
Location: Mooresville, NC
Age: 38
Posts: 43,593
Received 3,789 Likes
on
2,555 Posts
Well, the fence project has begun. Something I question several times throughout the process but it is way too far to turn back now.
It began Friday with me tearing out the remaining wire fence that had split my larger split rail fenced yard into 2. I had ripped out about 1/2 of this several years ago so I could get my tractor to the other side. I think the previous owners used it to fence their dogs in while having company outside.
Post-pulling is much easier with a tractor but still not completely easy. Sometimes this smaller tractor still isn't strong enough. Either way it still helps save my back.


I now have my two rolls of the wire fence that will become my temporary fence for my fence project and later my garage construction project.

Still might be a few posts short when I do the larger temporary fence during construction but I have most of what I need.

Saturday, after working on the ISF for a little, I got started on tearing down the wood fence. I wanted to try and save all the slates as I was happy they were already weathered and grey. I will be replacing all the posts and rails though.

Enzo is like, hey I can see out front now.

Not all slats could be saved


So far so good on save the slats project

One side finished by lunch time

The rest after lunch


I also had to install a temporary fence to keep the dogs in.

In the past, I have always used a sledgehammer to install these posts. I think I am going to buy one of these post drivers for when I need to install the 120ft of temporary fence for construction.
Day 2 of tear down I started by measuring the slope of the current fence. For the first 24ft of the fence, it was 1in for every 2ft, then for the next 8ft it was 1.75in for every 4ft, and the last 8ft was 1/4in for everything 4ft.

Removing the rails might have been the easiest part of the job

The next fun part was going to be pulling the posts which I figured out were in some amount of concrete.

One was already rotted through as they did the concrete wrong and in some cases, people don't even believe in using it at all if you have the right type of soil. I will not be for my new posts.
Thankfully only the top 12-16in had concrete

My helper watching my backside while I work

Tried to straight pull the first post out without digging it at all. Not enough power. Eventually got it pulled though with breaking up the top soil and a little bit of the dirt around the first few inches of concrete. Still better than having to dig the entire thing out.

Now for the fun part. They put the posts through my septic drainage field. Not once but all 3 drain lines. It seems though that we are so far down the lines and the field was made so well that I don't have any problems from this. I mean the fence has been here for 17-18 years so I don't plan to do anything about it. Infact I plan to use 6 of the 7 holes over again for the new posts.

Continued to pull the rest of the posts with the tractor. Found that only one of them they had decided for some reason not to use any concrete. That or they just ran out.


All the posts finally out

I then began to dig two of the holes to depth. I didn't get them done but I am shooting for 4ft deep holes so that I can bury 42in of each posts for a super solid install without concrete. I will be using 6x6 for the support posts for the gates. Each gate being 5 1/2ft long will also have cross braces in the ground as well.

It began Friday with me tearing out the remaining wire fence that had split my larger split rail fenced yard into 2. I had ripped out about 1/2 of this several years ago so I could get my tractor to the other side. I think the previous owners used it to fence their dogs in while having company outside.
Post-pulling is much easier with a tractor but still not completely easy. Sometimes this smaller tractor still isn't strong enough. Either way it still helps save my back.
I now have my two rolls of the wire fence that will become my temporary fence for my fence project and later my garage construction project.
Still might be a few posts short when I do the larger temporary fence during construction but I have most of what I need.
Saturday, after working on the ISF for a little, I got started on tearing down the wood fence. I wanted to try and save all the slates as I was happy they were already weathered and grey. I will be replacing all the posts and rails though.
Enzo is like, hey I can see out front now.
Not all slats could be saved
So far so good on save the slats project
One side finished by lunch time
The rest after lunch
I also had to install a temporary fence to keep the dogs in.
In the past, I have always used a sledgehammer to install these posts. I think I am going to buy one of these post drivers for when I need to install the 120ft of temporary fence for construction.
Day 2 of tear down I started by measuring the slope of the current fence. For the first 24ft of the fence, it was 1in for every 2ft, then for the next 8ft it was 1.75in for every 4ft, and the last 8ft was 1/4in for everything 4ft.
Removing the rails might have been the easiest part of the job
The next fun part was going to be pulling the posts which I figured out were in some amount of concrete.
One was already rotted through as they did the concrete wrong and in some cases, people don't even believe in using it at all if you have the right type of soil. I will not be for my new posts.
Thankfully only the top 12-16in had concrete
My helper watching my backside while I work
Tried to straight pull the first post out without digging it at all. Not enough power. Eventually got it pulled though with breaking up the top soil and a little bit of the dirt around the first few inches of concrete. Still better than having to dig the entire thing out.
Now for the fun part. They put the posts through my septic drainage field. Not once but all 3 drain lines. It seems though that we are so far down the lines and the field was made so well that I don't have any problems from this. I mean the fence has been here for 17-18 years so I don't plan to do anything about it. Infact I plan to use 6 of the 7 holes over again for the new posts.
Continued to pull the rest of the posts with the tractor. Found that only one of them they had decided for some reason not to use any concrete. That or they just ran out.
All the posts finally out
I then began to dig two of the holes to depth. I didn't get them done but I am shooting for 4ft deep holes so that I can bury 42in of each posts for a super solid install without concrete. I will be using 6x6 for the support posts for the gates. Each gate being 5 1/2ft long will also have cross braces in the ground as well.
The following 2 users liked this post by CCColtsicehockey:
00TL-P3.2 (08-21-2023),
97BlackAckCL (08-21-2023)
08-21-2023, 09:53 AM
#1449
Moderator
Fence work is no fun, definitely don't miss the cardboard fences from our old house. In the 5 years we were there, had 6 or 7 posts rot at the base & need replacing.
 08-21-2023, 11:11 AM
#1450
Ex-OEM King

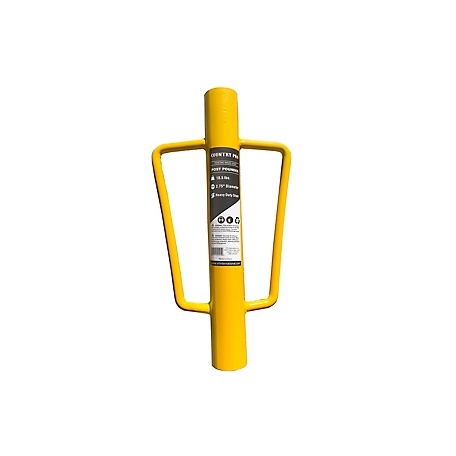
Have you looked into the expanding foam for the post bases? Way better (and easier) than concrete and just as strong. I used it for mailbox posts at my old house and it worked great. Might make for less digging through what looks like some fun clay soil as well. 
Last edited by SamDoe1; 08-21-2023 at 11:13 AM.
08-21-2023, 12:48 PM
#1451
Moderator
Regional Coordinator (Southeast)
Regional Coordinator (Southeast)
Thread Starter
Join Date: Dec 2003
Location: Mooresville, NC
Age: 38
Posts: 43,593
Received 3,789 Likes
on
2,555 Posts
Not this size hole but close for my gate posts at least. I plan to use this cross brace idea in the ground to also help prevent lean.
How To Install A Heavy-Duty Fence Post For A Wide Gate
My bigger concern at this point is how high I might have to build the gate off the ground due to the slope of the ground. If I built the gate to match the slope I could have issues opening the gate on the uphill direction.
Last edited by CCColtsicehockey; 08-21-2023 at 12:51 PM.
08-21-2023, 01:16 PM
#1452
Whats up with RDX owners?
iTrader: (9)

Time to grade the land.
The following users liked this post:
CCColtsicehockey (08-21-2023)
08-21-2023, 02:00 PM
#1453
Ex-OEM King
Yes, I have seen the foam. I don't hate it as much as concrete cause it does make a better seal. I just feel better with a deeper hole as opposed to a wider one. (insert sex joke here) I know it should be just as strong. I am thinking of building the gates out of 4x4 though with lap joints so at 6ft tall and almost 5 1/12ft wide that is a good bit of weight. My other fear is the chemicals that shit is made of and my dogs.
Not this size hole but close for my gate posts at least. I plan to use this cross brace idea in the ground to also help prevent lean.
How To Install A Heavy-Duty Fence Post For A Wide Gate
My bigger concern at this point is how high I might have to build the gate off the ground due to the slope of the ground. If I built the gate to match the slope I could have issues opening the gate on the uphill direction.
Would your dogs actually eat the foam? Once it's cured, licking it wouldn't matter and you can bury the foam under the soil (trim it down and cover up) so they wouldn't see it.
The following users liked this post:
CCColtsicehockey (08-21-2023)
08-21-2023, 02:05 PM
#1454
Moderator
Regional Coordinator (Southeast)
Regional Coordinator (Southeast)
Thread Starter
Join Date: Dec 2003
Location: Mooresville, NC
Age: 38
Posts: 43,593
Received 3,789 Likes
on
2,555 Posts
I have thought of not digging the 4x4 other post as deep though maybe only 36in for those. If I attach the rails under a little tension pulling on the gate post it should allow the gate post to use the other posts to help counter as well I would imagine.
The following users liked this post:
SamDoe1 (08-21-2023)
08-24-2023, 02:17 PM
#1455
Moderator
Regional Coordinator (Southeast)
Regional Coordinator (Southeast)
Thread Starter
Join Date: Dec 2003
Location: Mooresville, NC
Age: 38
Posts: 43,593
Received 3,789 Likes
on
2,555 Posts
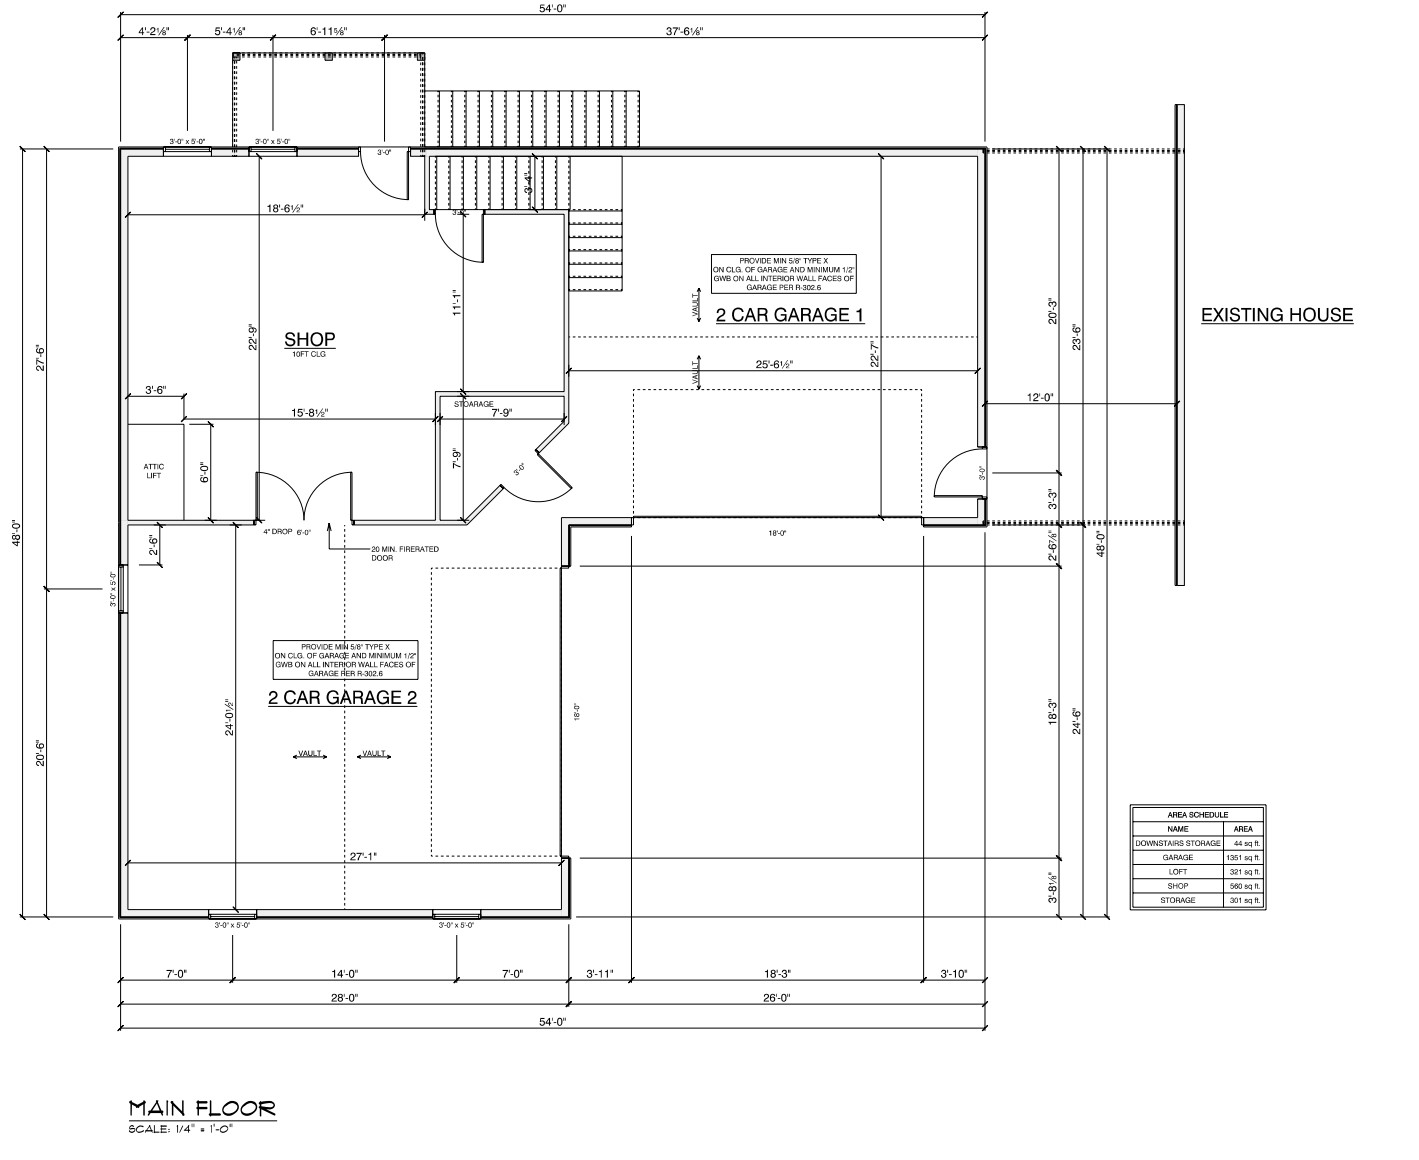
Garage update. Finally got a full copy of the digital plans with the engineering signoffs. I had seen a print copy of them last week. The plans went to plan review and permitting on Monday this week. Things still feel like they are moving at a snails pace but I am sure once it starts it will seem overly fast for any in-progress decisions that need to be made.


The following 3 users liked this post by CCColtsicehockey:
08-25-2023, 08:05 AM
#1456
Moderator

The following users liked this post:
CCColtsicehockey (08-25-2023)
08-25-2023, 09:19 AM
#1458
Ex-OEM King
That looks amazing. Excited to see it all coming together.
The following users liked this post:
CCColtsicehockey (08-25-2023)
08-26-2023, 11:12 AM
#1459
tehLEGOman
Join Date: Dec 2004
Location: Charlotte, NC
Age: 41
Posts: 9,162
Received 1,983 Likes
on
1,336 Posts
Any epoxy on the garage floor ideas?!
Hexagon leg lights?!
Hexagon leg lights?!
08-26-2023, 05:22 PM
#1460
Moderator
Regional Coordinator (Southeast)
Regional Coordinator (Southeast)
Thread Starter
Join Date: Dec 2003
Location: Mooresville, NC
Age: 38
Posts: 43,593
Received 3,789 Likes
on
2,555 Posts
The following users liked this post:
civicdrivr (08-28-2023)
09-18-2023, 10:02 AM
#1462
Moderator
Regional Coordinator (Southeast)
Regional Coordinator (Southeast)
Thread Starter
Join Date: Dec 2003
Location: Mooresville, NC
Age: 38
Posts: 43,593
Received 3,789 Likes
on
2,555 Posts
I don't use my gas grill as much as I used to and I really have been wanting to try making some meals you need a griddle for so I decided to convert it into a griddle with a kit from Steelmade.
Like I said I don't use it often so it needed a good cleaning.

It is a Weber so it is made well and takes the abuse for the most part from me not always remembering to cover it after I am done with it. They also seem to have chosen to use crap metal for this one part of the grill that covers the bottom of the controls.

The screws were so rusted nothing would budge them so I had to drill them out. Now I will have to drill the metal and retap the new holes for new screws.

I only needed to take this panel off cause the ignitor had failed. I had been lighting it with a lighter for the last year but that would be much more of a pain with the griddle on top now.

On top cleaning


Not perfect but looks a lot better in person and there is no debris inside either now.

Assembly. You have to fold the grates up to fit the griddle drip tray.

Lining it with foil makes cleanup so much easier

First two seasoning bakes


Food photos can be found in the grill thread. Click Here
Like I said I don't use it often so it needed a good cleaning.
It is a Weber so it is made well and takes the abuse for the most part from me not always remembering to cover it after I am done with it. They also seem to have chosen to use crap metal for this one part of the grill that covers the bottom of the controls.
The screws were so rusted nothing would budge them so I had to drill them out. Now I will have to drill the metal and retap the new holes for new screws.
I only needed to take this panel off cause the ignitor had failed. I had been lighting it with a lighter for the last year but that would be much more of a pain with the griddle on top now.
On top cleaning
Not perfect but looks a lot better in person and there is no debris inside either now.
Assembly. You have to fold the grates up to fit the griddle drip tray.
Lining it with foil makes cleanup so much easier
First two seasoning bakes
Food photos can be found in the grill thread. Click Here
Last edited by CCColtsicehockey; 09-18-2023 at 10:15 AM.
09-18-2023, 10:09 AM
#1463
Moderator
Nice, might have to look into something like that, but need a new grill first...the 'floor' of mine has all but collapsed, had to line it with HD foil the last 2 times we used it, and it's only maybe 2 years old 
The following users liked this post:
CCColtsicehockey (09-18-2023)
09-18-2023, 12:16 PM
#1465
Moderator
Regional Coordinator (Southeast)
Regional Coordinator (Southeast)
Thread Starter
Join Date: Dec 2003
Location: Mooresville, NC
Age: 38
Posts: 43,593
Received 3,789 Likes
on
2,555 Posts
The following users liked this post:
rockstar143 (09-19-2023)
09-19-2023, 10:33 AM
#1466
Ex-OEM King
I did the same thing earlier this summer. The steelmade griddle is great for converting a gas grill and the grease trap holds a surprising amount of stuff before you have to empty it. The issues I've found is doing things like rice and smaller veggies on there, a lot of them fall through the holes which sucks. Other than that, it's great and I love it. Was thinking about getting a blackstone or something but I'm not sure it's worth it now that I have this.
Though after reading your post, I really need to clean out my grill too.
Though after reading your post, I really need to clean out my grill too.
The following users liked this post:
CCColtsicehockey (09-19-2023)
09-19-2023, 11:33 AM
#1467
Moderator
Regional Coordinator (Southeast)
Regional Coordinator (Southeast)
Thread Starter
Join Date: Dec 2003
Location: Mooresville, NC
Age: 38
Posts: 43,593
Received 3,789 Likes
on
2,555 Posts
I did the same thing earlier this summer. The steelmade griddle is great for converting a gas grill and the grease trap holds a surprising amount of stuff before you have to empty it. The issues I've found is doing things like rice and smaller veggies on there, a lot of them fall through the holes which sucks. Other than that, it's great and I love it. Was thinking about getting a blackstone or something but I'm not sure it's worth it now that I have this.
Though after reading your post, I really need to clean out my grill too.
Though after reading your post, I really need to clean out my grill too.
10-16-2023, 06:10 AM
#1469
Moderator
Regional Coordinator (Southeast)
Regional Coordinator (Southeast)
Thread Starter
Join Date: Dec 2003
Location: Mooresville, NC
Age: 38
Posts: 43,593
Received 3,789 Likes
on
2,555 Posts
Way behind on updates here. To say life has been crazy and the weather has not helped projects would be an understatement.
Had to get all the new lumber for the new posts and rails for the fence. I am trying to reuse all the pickets I can from the old fence since I will have about 80ft of fence to use to rebuild 40ft with the garage going up.
Borrowed a neighbor's trailer to go pick it up.

I'm glad I finally got around to putting hooks on the bucket a little while ago.


Back to the weather issues. The old fence was torn down and the the holes were dug in about a weeks time after work. However, it took about another full month to get all 6 posts installed do to basically having rain every other day or every 2 day for about 3 weeks. The ground would just never dry out to allow for tamping the posts in. Even had to bail the posts holes out several times.


Eventually, I was able to get started.


Only to have more rain. I tried to cover it the best I could but have to say it didn't do much.

When I did get going again, on the larger 6x6 I used for the gate posts I also added extra in ground bracing to try and help prevent them from ever coming loose. I was not using concrete and only tamped dirt so I have seen people do this online so hopefully it works.


Finally all the posts are done.

Time to trim them off. The 4x4s were easy.

Borrowed this from a buddy so not to have to deal with a cord while working above my head for the cuts.

It did have one problem. I didn't realize the blade depth was only 2.5in.

Multitool for the remaining piece with a sawzaw for what was left in the middle got it done.

Now ready to build the rest.

Had to get all the new lumber for the new posts and rails for the fence. I am trying to reuse all the pickets I can from the old fence since I will have about 80ft of fence to use to rebuild 40ft with the garage going up.
Borrowed a neighbor's trailer to go pick it up.
I'm glad I finally got around to putting hooks on the bucket a little while ago.
Back to the weather issues. The old fence was torn down and the the holes were dug in about a weeks time after work. However, it took about another full month to get all 6 posts installed do to basically having rain every other day or every 2 day for about 3 weeks. The ground would just never dry out to allow for tamping the posts in. Even had to bail the posts holes out several times.
Eventually, I was able to get started.
Only to have more rain. I tried to cover it the best I could but have to say it didn't do much.
When I did get going again, on the larger 6x6 I used for the gate posts I also added extra in ground bracing to try and help prevent them from ever coming loose. I was not using concrete and only tamped dirt so I have seen people do this online so hopefully it works.
Finally all the posts are done.
Time to trim them off. The 4x4s were easy.
Borrowed this from a buddy so not to have to deal with a cord while working above my head for the cuts.
It did have one problem. I didn't realize the blade depth was only 2.5in.
Multitool for the remaining piece with a sawzaw for what was left in the middle got it done.
Now ready to build the rest.
The following 2 users liked this post by CCColtsicehockey:
97BlackAckCL (10-24-2023),
godfather2 (10-16-2023)
10-16-2023, 06:15 AM
#1470
Moderator
Regional Coordinator (Southeast)
Regional Coordinator (Southeast)
Thread Starter
Join Date: Dec 2003
Location: Mooresville, NC
Age: 38
Posts: 43,593
Received 3,789 Likes
on
2,555 Posts
Once the posts were complete the rest of the the fence went up fast.

Once I had mounted the rails I had to put in two temp supports. I needed to remove the rails to install the 3 pickets that were behind the fireplace bump out on the house.

This ended up working perfectly and it went right back in place when I was done.

Pickets went on fast and I finished almost the entire thing in a day.


Once I had mounted the rails I had to put in two temp supports. I needed to remove the rails to install the 3 pickets that were behind the fireplace bump out on the house.
This ended up working perfectly and it went right back in place when I was done.
Pickets went on fast and I finished almost the entire thing in a day.
The following users liked this post:
godfather2 (10-16-2023)
10-16-2023, 06:27 AM
#1471
Moderator
Regional Coordinator (Southeast)
Regional Coordinator (Southeast)
Thread Starter
Join Date: Dec 2003
Location: Mooresville, NC
Age: 38
Posts: 43,593
Received 3,789 Likes
on
2,555 Posts
During the time I was tearing down the fence and rebuilding it we ended up taking a week long trip to Key West to celebrate my Dad's 75th birthday.
On the way there I got some not so great news. My builder called me and told me after 3.5 weeks that the county had had my plans they were rejected due to the township saying they had not met their requirements. The reasoning they gave was that the breezeway needed to be walled in and could not be open air.
If you have been following along earlier, the open air breezeway was exactly what the township had told me a year earlier to do so that I could build what I want to build. While at the air port trying to keep my cool I drafted and sent an email to my contact I had been working at at the township regarding what had happened trying to see if there was just some miscommunication on their end internally and the person that had reviewed it maybe had not been aware. I also attached a copy of the previous email stating exactly what I needed to do.
The next day I received a reply back that they would accept my plans as is due to the agreement before but the reason it was rejected was that the regulation had changed in the year since my emails with them and that I should have submitted plans sooner. This seemed crazy as I was working with them so I didn't pay an architect to design plans that were not usable in the first place. So much for trying to be proactive.
Now, no one is going to admit this but I think I might have an idea what actually caused the change. Down the road from me, not a mile away, is a property that is nearing the end of construction. It is roughly a 4-5k sqft house with like a 40-50ft long breezeway with a garage that has top be at least 5k sqft in size and is two stories. My guess is that got through and someone didn't like it and then pushed to have it changed so it couldn't happen again. I won't likely ever know if that is for sure the reason but it fits the time line at a minimum.
10-16-2023, 06:52 AM
#1472
Moderator
Regional Coordinator (Southeast)
Regional Coordinator (Southeast)
Thread Starter
Join Date: Dec 2003
Location: Mooresville, NC
Age: 38
Posts: 43,593
Received 3,789 Likes
on
2,555 Posts
On Tuesday this past week, we finally got underway on things. Tree company showed up to take down all the trees in the area of the building plus a 15ft buffer all around the building.
Starting with some before pictures just to have a comparison


Before they started I had to remove some of the fence that would be in the way.


Also grabbed a few before drone shots.


Starting with some before pictures just to have a comparison
Before they started I had to remove some of the fence that would be in the way.
Also grabbed a few before drone shots.
The following users liked this post:
godfather2 (10-16-2023)
10-16-2023, 07:26 AM
#1473
Moderator
Regional Coordinator (Southeast)
Regional Coordinator (Southeast)
Thread Starter
Join Date: Dec 2003
Location: Mooresville, NC
Age: 38
Posts: 43,593
Received 3,789 Likes
on
2,555 Posts
Day 1 of Tree Work - Most clearing brush and taking down the smaller trees


I planned to keep the trees that were not pine for future firewood at my firepit. I had to build this after they were done the first day as I had run out of time the weekend before working on the fence. Hopefully this keeps the wood dry and off the ground till I end up cutting it all up and splitting it.

Made it wide enough so I would just my grapple to stack it on the first level. Had to use loader forks to load the second level.


That night I also tore down the rest of the fence in the area they were taking down trees as well as the gate.

Day 2 of Tree Work - Most of the large trees were taken down and the tops chipped with the rest to be hauled away. Only 5 trees were left on the building site to be taken down


Few drone shots after day 2.


Day 3 of Tree Work - Rest of Large Trees came down. Day was cut short though as their log grapple tore a tread and it took 3 hours for a repair company to show up and install new ones on site.


Few drone shots after day 3


While I was up taking those pictures I grabbed a shot across the street of the lake.

Day 4 of Tree Work - Hauling away the pine trunks and taking down a few other dead trees on the property.
Thankfully the day before my forks finally showed up. It allowed me to be able to stack the rest of what I was keeping as well as clear some brush piles I had been building around the property for them to chip.


This should hopefully at least be enough wood for this season at the firepit. I use it a lot though as I put a TV out there so I watch most of my sports in the fall from there.

I planned to keep the trees that were not pine for future firewood at my firepit. I had to build this after they were done the first day as I had run out of time the weekend before working on the fence. Hopefully this keeps the wood dry and off the ground till I end up cutting it all up and splitting it.
Made it wide enough so I would just my grapple to stack it on the first level. Had to use loader forks to load the second level.
That night I also tore down the rest of the fence in the area they were taking down trees as well as the gate.
Day 2 of Tree Work - Most of the large trees were taken down and the tops chipped with the rest to be hauled away. Only 5 trees were left on the building site to be taken down
Few drone shots after day 2.
Day 3 of Tree Work - Rest of Large Trees came down. Day was cut short though as their log grapple tore a tread and it took 3 hours for a repair company to show up and install new ones on site.
Few drone shots after day 3
While I was up taking those pictures I grabbed a shot across the street of the lake.
Day 4 of Tree Work - Hauling away the pine trunks and taking down a few other dead trees on the property.
Thankfully the day before my forks finally showed up. It allowed me to be able to stack the rest of what I was keeping as well as clear some brush piles I had been building around the property for them to chip.
This should hopefully at least be enough wood for this season at the firepit. I use it a lot though as I put a TV out there so I watch most of my sports in the fall from there.
The following 4 users liked this post by CCColtsicehockey:
97BlackAckCL (10-24-2023),
civicdrivr (10-16-2023),
godfather2 (10-16-2023),
rockstar143 (10-16-2023)
10-16-2023, 08:24 AM
#1474
Dude, I thought you were just clearing some trees, I didn't realize was for your project! This is supremely cool!
I'm such a wuss...something this daunting would have caused me to just use the space I already have better...
but when you're done, you're gonna have a next level car showcase home. Incredible.
I'm such a wuss...something this daunting would have caused me to just use the space I already have better...
but when you're done, you're gonna have a next level car showcase home. Incredible.
The following users liked this post:
CCColtsicehockey (10-16-2023)
10-16-2023, 10:24 AM
#1475
Ex-OEM King
This is so awesome, excited to see it all come together!
The following users liked this post:
CCColtsicehockey (10-16-2023)
10-16-2023, 11:57 AM
#1476
Moderator
Regional Coordinator (Southeast)
Regional Coordinator (Southeast)
Thread Starter
Join Date: Dec 2003
Location: Mooresville, NC
Age: 38
Posts: 43,593
Received 3,789 Likes
on
2,555 Posts
Dude, I thought you were just clearing some trees, I didn't realize was for your project! This is supremely cool!
I'm such a wuss...something this daunting would have caused me to just use the space I already have better...
but when you're done, you're gonna have a next level car showcase home. Incredible.
I'm such a wuss...something this daunting would have caused me to just use the space I already have better...
but when you're done, you're gonna have a next level car showcase home. Incredible.

The following users liked this post:
CCColtsicehockey (10-17-2023)
10-16-2023, 10:14 PM
#1478
tehLEGOman
Join Date: Dec 2004
Location: Charlotte, NC
Age: 41
Posts: 9,162
Received 1,983 Likes
on
1,336 Posts
This reminds me of the cool dude I saw over on the big island of Hawaii that has the detached garage...
The following 2 users liked this post by ACCURATEin:
00TL-P3.2 (10-18-2023),
CCColtsicehockey (10-17-2023)
10-17-2023, 06:35 AM
#1479
Moderator
Regional Coordinator (Southeast)
Regional Coordinator (Southeast)
Thread Starter
Join Date: Dec 2003
Location: Mooresville, NC
Age: 38
Posts: 43,593
Received 3,789 Likes
on
2,555 Posts
That is a nice garage. What a collection of JDM.
The following users liked this post:
CCColtsicehockey (10-17-2023)