
CCColtsicehockey's Home Projects Thread


Ex-OEM King


Joined: Dec 2013
Posts: 17,880
Likes: 7,027
From: Minnesnowta
Yes but net sqft isn't the same as useful sqft...
Snipped out the pics for space...
Anyway, you can always inlay stone tile in key areas instead of making a custom poured top. Seems like a few of your examples did just that and I'd advise to do the same for heat management purposes. Also, definitely go with cedar. You don't want any pressure treated anything near a heat source or your food. The fumes and chemicals are toxic and it doesn't take much to get the process started.
I like your concept a lot though, looks clean and functional. Drawers aren't hard to make, just watch a few YouTube videos and you should be good to go. If you can make a table like that, you can make a drawer... Just make sure to use plywood for the drawer bottom and not solid wood.
So I need to pick a design. At this point I think I am going to build a 60x32 table and be done with it. It won't look as full custom build it but It will allow me to play around and figure out which position I like the grill and the smoker in the most. Also with a 60x32in design it is the same size tables that Green Egg sells so there will be a premade cover I can buy for it instead of having to have a custom cover made. This won't be under a roof so I would like to have the wood table covered when not in use to try and increase the life of it. Also I should be able to eventually sell this table when I look to build something else. Still not ruling out a bigger table completely. Here are a few of my favorite designs. Anything I do right now will have a wooden top. I am not trying to learn how to do poured concrete right now.
Would like to keep the cost of building the cart to $200 or less. So currently leaning to doing it in cedar or pressure treated lumber. I actually like the rustic look of cedar when it turns grey so I really wouldn't even have to stain it.
Would like to keep the cost of building the cart to $200 or less. So currently leaning to doing it in cedar or pressure treated lumber. I actually like the rustic look of cedar when it turns grey so I really wouldn't even have to stain it.
Anyway, you can always inlay stone tile in key areas instead of making a custom poured top. Seems like a few of your examples did just that and I'd advise to do the same for heat management purposes. Also, definitely go with cedar. You don't want any pressure treated anything near a heat source or your food. The fumes and chemicals are toxic and it doesn't take much to get the process started.
I like your concept a lot though, looks clean and functional. Drawers aren't hard to make, just watch a few YouTube videos and you should be good to go. If you can make a table like that, you can make a drawer... Just make sure to use plywood for the drawer bottom and not solid wood.
Thread Starter
Moderator
Regional Coordinator (Southeast)
Regional Coordinator (Southeast)


Joined: Dec 2003
Posts: 44,123
Likes: 4,434
From: Mooresville, NC
Ok cedar it is. Makes it a little more expensive but should look better and be safer. Hopefully going to pickup the egg tonight and start drawing up some sketches. I will post them up at some point and see if anyone thinks I am missing anything.
Regarding the stone inset. Any suggestion on the best way to do that? I know some people are just using 24x24in pieces of ceramic tile. I was thinking that might be easier than getting a piece of granite cut. Not sure how much a 24x24x3/4 or 1 piece of granite would be. It would probably be the better surface to use.
Regarding the stone inset. Any suggestion on the best way to do that? I know some people are just using 24x24in pieces of ceramic tile. I was thinking that might be easier than getting a piece of granite cut. Not sure how much a 24x24x3/4 or 1 piece of granite would be. It would probably be the better surface to use.
Ex-OEM King
Joined: Dec 2013
Posts: 17,880
Likes: 7,027
From: Minnesnowta
Go to Menards, they have slabs of granite for sale the size of a bathroom vanity or small kitchen island. Since you're building a custom set up, you can size things to fit. Other option is to either get the smallest slab they sell as an insert or just get granite tiles.
Thread Starter
Moderator
Regional Coordinator (Southeast)
Regional Coordinator (Southeast)
Joined: Dec 2003
Posts: 44,123
Likes: 4,434
From: Mooresville, NC
Sadly we don't have a Menards. I will have to check Lowe's or Home Depot to see if they have anything. I worry that typical granite tyle will be too weak if I don't use some type of backer board.
Ex-OEM King
Joined: Dec 2013
Posts: 17,880
Likes: 7,027
From: Minnesnowta
It'll be fine as long as it's fully supported underneath and you're not hitting it with any kind of impact or dynamic loads. If you're just using it as a holder for the egg then it'll be fine.
Thread Starter
Moderator
Regional Coordinator (Southeast)
Regional Coordinator (Southeast)
Joined: Dec 2003
Posts: 44,123
Likes: 4,434
From: Mooresville, NC
So I have decided I am going to base my design off this one. This is built for a large egg so I will have to make a few changes to accomadate a xl egg instead.

Here is a link to the build thread of the table https://eggheadforum.com/discussion/...almost-done/p1
I like the fact that where possible pressure treated lumber was used to save a little cost where you will not see it. I will use cedar boards though for the floor and shelf and only use pressure treated for the supports you don't see. I am not sure I will be making the cabinet doors so I want the floor to match the outside incase I don't. Both Lowe's and Home Depot see to be out of Cedar 2x4's so I am going to have to locate some of those before I can start. I have two lumber yards near by so going to give them a call today to check it out.
Some questions for you SamDoe with all the wood working you have done. The builder of the table I am copying use pocket joines for every joint except the joint that holds the egg itself. For that he mortise and tenon joints. That isn't something I am familiar with doing and was wondering if you think pocket joints would be strong enough that I could just use them. The XL Green Egg weights in at 220lbs by itself. With any additional accessories used in it, charcoal, and whatever I am cooking I would imagine it could weight 250-275 at times So I think I would need the shelf to support at least 300lbs. One modificaton I am thinking of doing is where 2x4 are used for the middle vertical supports I am thinking of using another 4x4 and notching it so it sits flush front and back. Lastly I can't seem to figure out how the side boards on the cabinet are attached from the pictures in that build. Any ideas? Appreciate your help.


Ex-OEM King
Joined: Dec 2013
Posts: 17,880
Likes: 7,027
From: Minnesnowta
I like the fact that where possible pressure treated lumber was used to save a little cost where you will not see it. I will use cedar boards though for the floor and shelf and only use pressure treated for the supports you don't see. I am not sure I will be making the cabinet doors so I want the floor to match the outside incase I don't. Both Lowe's and Home Depot see to be out of Cedar 2x4's so I am going to have to locate some of those before I can start. I have two lumber yards near by so going to give them a call today to check it out.
Some questions for you SamDoe with all the wood working you have done. The builder of the table I am copying use pocket joines for every joint except the joint that holds the egg itself. For that he mortise and tenon joints. That isn't something I am familiar with doing and was wondering if you think pocket joints would be strong enough that I could just use them. The XL Green Egg weights in at 220lbs by itself. With any additional accessories used in it, charcoal, and whatever I am cooking I would imagine it could weight 250-275 at times So I think I would need the shelf to support at least 300lbs. One modificaton I am thinking of doing is where 2x4 are used for the middle vertical supports I am thinking of using another 4x4 and notching it so it sits flush front and back. Lastly I can't seem to figure out how the side boards on the cabinet are attached from the pictures in that build. Any ideas? Appreciate your help.
Some questions for you SamDoe with all the wood working you have done. The builder of the table I am copying use pocket joines for every joint except the joint that holds the egg itself. For that he mortise and tenon joints. That isn't something I am familiar with doing and was wondering if you think pocket joints would be strong enough that I could just use them. The XL Green Egg weights in at 220lbs by itself. With any additional accessories used in it, charcoal, and whatever I am cooking I would imagine it could weight 250-275 at times So I think I would need the shelf to support at least 300lbs. One modificaton I am thinking of doing is where 2x4 are used for the middle vertical supports I am thinking of using another 4x4 and notching it so it sits flush front and back. Lastly I can't seem to figure out how the side boards on the cabinet are attached from the pictures in that build. Any ideas? Appreciate your help.
Pocket hole screws are NOT going to support 300lbs at all. It's not so much that the screws themselves won't take the load (they will) but the threads holding into the wood will strip out real fast with that kind of load. M/T joints are incredibly strong but takes a good amount of time/skill to do. I personally don't do them often because of the time it takes to make it happen. A good alternative (like you said) is a notch out a portion of the 4x4 post and glue the 2x4 rail into it (lap joint) or just use some (I'd use 3 per joint) 3/8" dowels and glue. You can get a dowel jig for like $15 on amazon or a local woodworking store to make it super easy.
Granite is a rock that naturally sits outside all the time. It'll be fine. The only thing that would concern me with cracking is water ingress and then freezing. This can be solved by keeping it well sealed and allowing enough gaps on all sides for expansion.
Thread Starter
Moderator
Regional Coordinator (Southeast)
Regional Coordinator (Southeast)
Joined: Dec 2003
Posts: 44,123
Likes: 4,434
From: Mooresville, NC
I see your point on going all cedar. Makes sense
So three pocket screws at the end of each support screwed into the 4x4 posts will not be enough? I was also going to put some cross supports between the out pieces? I am not familiar with creating any type of wood on wood joints nor do I have the tools to do so. I was really hoping to hide all the hardware. Obviously though I won't want to build it and have it fall to the floor.
So three pocket screws at the end of each support screwed into the 4x4 posts will not be enough? I was also going to put some cross supports between the out pieces? I am not familiar with creating any type of wood on wood joints nor do I have the tools to do so. I was really hoping to hide all the hardware. Obviously though I won't want to build it and have it fall to the floor.


Ex-OEM King
Joined: Dec 2013
Posts: 17,880
Likes: 7,027
From: Minnesnowta
I see your point on going all cedar. Makes sense
So three pocket screws at the end of each support screwed into the 4x4 posts will not be enough? I was also going to put some cross supports between the out pieces? I am not familiar with creating any type of wood on wood joints nor do I have the tools to do so. I was really hoping to hide all the hardware. Obviously though I won't want to build it and have it fall to the floor.
So three pocket screws at the end of each support screwed into the 4x4 posts will not be enough? I was also going to put some cross supports between the out pieces? I am not familiar with creating any type of wood on wood joints nor do I have the tools to do so. I was really hoping to hide all the hardware. Obviously though I won't want to build it and have it fall to the floor.
Do you have a table saw? If not, then it might be time to get one. Otherwise you can get by with a circular saw and a straight edge but it would take a while.
Yes, exactly this. You need support in the vertical direction and this will provide that in spades. Get some titebond 3 wood glue (only TB3, TB1 and TB2 are not waterproof), spread it around, and glue the pieces into place in the lap joint area. You won't even need screws on an edge grain to edge grain glue joint though if you are doing end grain to anything glue joint, then you'll need some other means of holding it together as the glue won't do jack (last statement not applicable to plywood). As I said before, hardwood dowels are an easy out too. They are basically considered floating tenons, just drop some TB3 in the dowel hole and shove the rods in (giggity).
Thread Starter
Moderator
Regional Coordinator (Southeast)
Regional Coordinator (Southeast)
Joined: Dec 2003
Posts: 44,123
Likes: 4,434
From: Mooresville, NC
Would it be safe to put screws through the remaining piece of the post into the outer board from the backside? Basically screws still hidden cause they are coming from the lap joint?
Also planning to do the shelf out of 4x4 now with the lap joint. Going to route out 1in x3/4in on the inside all the way around for the shelf slats to sit in then. At least in my head that sounds like a good solid idea.
Also planning to do the shelf out of 4x4 now with the lap joint. Going to route out 1in x3/4in on the inside all the way around for the shelf slats to sit in then. At least in my head that sounds like a good solid idea.
Ex-OEM King
Joined: Dec 2013
Posts: 17,880
Likes: 7,027
From: Minnesnowta
Would it be safe to put screws through the remaining piece of the post into the outer board from the backside? Basically screws still hidden cause they are coming from the lap joint?
Also planning to do the shelf out of 4x4 now with the lap joint. Going to route out 1in x3/4in on the inside all the way around for the shelf slats to sit in then. At least in my head that sounds like a good solid idea.
Also planning to do the shelf out of 4x4 now with the lap joint. Going to route out 1in x3/4in on the inside all the way around for the shelf slats to sit in then. At least in my head that sounds like a good solid idea.
And yes, what you're talking about is a rabbet and is a great idea if you want to make it flush. I don't think a 4x4 is needed for that though, you could easily get by with a 2x4. You can get rabbet bits for your router too, makes it super easy.
Last edited by SamDoe1; May 24, 2018 at 03:36 PM.
Thread Starter
Moderator
Regional Coordinator (Southeast)
Regional Coordinator (Southeast)
Joined: Dec 2003
Posts: 44,123
Likes: 4,434
From: Mooresville, NC
 I knew there was a term for it and couldn't think of it at the time. I have some rabbit bits from when I made my drawer dividers for my kitchen and also my picture frames.
 I figured using a 4x4 and rabbiting it would give a bigger edge for the shelf for the egg to sit on. If I did a 2x4 it would only give it a 3/4in edge to sit in. Do you think that will be enough? If so it would save me some money since the 4x4s are more than twice the price of 2 2x4s.
Ex-OEM King
Joined: Dec 2013
Posts: 17,880
Likes: 7,027
From: Minnesnowta
I knew there was a term for it and couldn't think of it at the time. I have some rabbit bits from when I made my drawer dividers for my kitchen and also my picture frames.I figured using a 4x4 and rabbiting it would give a bigger edge for the shelf for the egg to sit on. If I did a 2x4 it would only give it a 3/4in edge to sit in. Do you think that will be enough? If so it would save me some money since the 4x4s are more than twice the price of 2 2x4s.
Thread Starter
Moderator
Regional Coordinator (Southeast)
Regional Coordinator (Southeast)
Joined: Dec 2003
Posts: 44,123
Likes: 4,434
From: Mooresville, NC
That was why I was going to do the 4x4 just for the middle shelf so I could rabbit out about 2in for it and still have a clean edge all the way around the sides. I am known for doing a lot of things overkill so it wouldn't be the first time.
Just like I bought an XL egg and might have gotten away with a large which weights close to 100lbs less.
Just like I bought an XL egg and might have gotten away with a large which weights close to 100lbs less.
Thread Starter
Moderator
Regional Coordinator (Southeast)
Regional Coordinator (Southeast)
Joined: Dec 2003
Posts: 44,123
Likes: 4,434
From: Mooresville, NC
Still working on finalizing the drawlings. Having trouble still finding cedar 2x4s so going to go with pressure treated ones where you can't see them and going to rip down cedar 2x6s for the outer parts I need them for so I can start work on it this weekend. Also can't find 5/4 x 6 cedar deck boards which was my plan for the counter top area. If I had a planner I could just plan down more 2x6s to fit but I will just have to special order some or go with 1x6s for the top.
Found one more really good build that is for a XL egg rather than the one I am adapting to an XL build. https://eggheadforum.com/discussion/...-labor-of-love Sam do you think with this being outside I need to take the time to make my own tung and groove boards for the side paneling and connecting to each other and where they meet the bottom and top boards? Or can I get away with glueing and tack nailing them from behind with finish nails? I have seen it done both ways on builds however I have seen people say the tongue and groove is much better for heat expansion with I am sure I will have a lot of here down south.
Found one more really good build that is for a XL egg rather than the one I am adapting to an XL build. https://eggheadforum.com/discussion/...-labor-of-love Sam do you think with this being outside I need to take the time to make my own tung and groove boards for the side paneling and connecting to each other and where they meet the bottom and top boards? Or can I get away with glueing and tack nailing them from behind with finish nails? I have seen it done both ways on builds however I have seen people say the tongue and groove is much better for heat expansion with I am sure I will have a lot of here down south.
Joined: Sep 2008
Posts: 78,249
Likes: 20,202
Sam is a dork.
and now Jason is a dork too.
Holy lord. Way to turn working with your wood into science class and super boring.
What ever happened to the good ole days of uneven edges and nails you didn't quite hammer in straight and all the way...

and now Jason is a dork too.
Holy lord. Way to turn working with your wood into science class and super boring.
What ever happened to the good ole days of uneven edges and nails you didn't quite hammer in straight and all the way...
Thread Starter
Moderator
Regional Coordinator (Southeast)
Regional Coordinator (Southeast)
Joined: Dec 2003
Posts: 44,123
Likes: 4,434
From: Mooresville, NC
Four of the pallets from the last group of five I aquired were still in the back of the Tahoe. I needed to use it today so I had to take them apart first cause I couldn't lose the garage space with the new project about to start.
I hope this shelf doesn't break.

They used a ton of screws to put those 5 pallets together. I counted them all on one pallet and came up with over 100 screws. All the screws from tearing down the pallets that were not broken.

I hope this shelf doesn't break.
They used a ton of screws to put those 5 pallets together. I counted them all on one pallet and came up with over 100 screws. All the screws from tearing down the pallets that were not broken.
Thread Starter
Moderator
Regional Coordinator (Southeast)
Regional Coordinator (Southeast)
Joined: Dec 2003
Posts: 44,123
Likes: 4,434
From: Mooresville, NC
So I ran around today trying to get everything needed to build this table in the next 48 hours so I could cook on Moinday.
Got all the lumber. Even found a Lowe's that had 5/4 x 6 x8ft Cedar deck boards I was looking for for the top. Only lumber I still need is to make the drawer, drawer face, and cabinet doors.

Then got all the stuff to cook with.
Then I went to pickup my Egg. Turns out the lady put the order in wrong and it was just sitting in waiting. So no egg for me for this weekend. Thankfully I won't have to drive 30 min to the store again to pick it up. They are going to put it together and deliver eveything next Friday for me free of charge. So I guess that is one plus. I now also have 7 day to get this table buit.
Got all the lumber. Even found a Lowe's that had 5/4 x 6 x8ft Cedar deck boards I was looking for for the top. Only lumber I still need is to make the drawer, drawer face, and cabinet doors.
Then got all the stuff to cook with.
Then I went to pickup my Egg. Turns out the lady put the order in wrong and it was just sitting in waiting. So no egg for me for this weekend. Thankfully I won't have to drive 30 min to the store again to pick it up. They are going to put it together and deliver eveything next Friday for me free of charge. So I guess that is one plus. I now also have 7 day to get this table buit.
Ex-OEM King
Joined: Dec 2013
Posts: 17,880
Likes: 7,027
From: Minnesnowta
Still working on finalizing the drawlings. Having trouble still finding cedar 2x4s so going to go with pressure treated ones where you can't see them and going to rip down cedar 2x6s for the outer parts I need them for so I can start work on it this weekend. Also can't find 5/4 x 6 cedar deck boards which was my plan for the counter top area. If I had a planner I could just plan down more 2x6s to fit but I will just have to special order some or go with 1x6s for the top.
Found one more really good build that is for a XL egg rather than the one I am adapting to an XL build. https://eggheadforum.com/discussion/...-labor-of-love Sam do you think with this being outside I need to take the time to make my own tung and groove boards for the side paneling and connecting to each other and where they meet the bottom and top boards? Or can I get away with glueing and tack nailing them from behind with finish nails? I have seen it done both ways on builds however I have seen people say the tongue and groove is much better for heat expansion with I am sure I will have a lot of here down south.
Found one more really good build that is for a XL egg rather than the one I am adapting to an XL build. https://eggheadforum.com/discussion/...-labor-of-love Sam do you think with this being outside I need to take the time to make my own tung and groove boards for the side paneling and connecting to each other and where they meet the bottom and top boards? Or can I get away with glueing and tack nailing them from behind with finish nails? I have seen it done both ways on builds however I have seen people say the tongue and groove is much better for heat expansion with I am sure I will have a lot of here down south.
That build has a fuck ton of M/T joints, looks like it took a while to do but is awesome craftsmanship!
Woodworking is such a challenge and that's why I love it. So many small details to consider to make a quality finished product.
Thread Starter
Moderator
Regional Coordinator (Southeast)
Regional Coordinator (Southeast)
Joined: Dec 2003
Posts: 44,123
Likes: 4,434
From: Mooresville, NC
Depends on how far you want to take this. T/G is the right way to do this. Wood will expand perpendicular to the grain direction so any constraint can cause cracking and joint failure. You can completely avoid this by using exterior plywood if you want an easy out. If not, then you'll have to at least T/G the top joint and don't glue it in place. You can definitely just glue the vertical pieces together though.
That build has a fuck ton of M/T joints, looks like it took a while to do but is awesome craftsmanship.
That build has a fuck ton of M/T joints, looks like it took a while to do but is awesome craftsmanship.
Thread Starter
Moderator
Regional Coordinator (Southeast)
Regional Coordinator (Southeast)
Joined: Dec 2003
Posts: 44,123
Likes: 4,434
From: Mooresville, NC
So got some work in on the table the past few days. Not as much as I had hoped while having some company in town and also trying to watch the Monaco Grand Prix this weekend too.
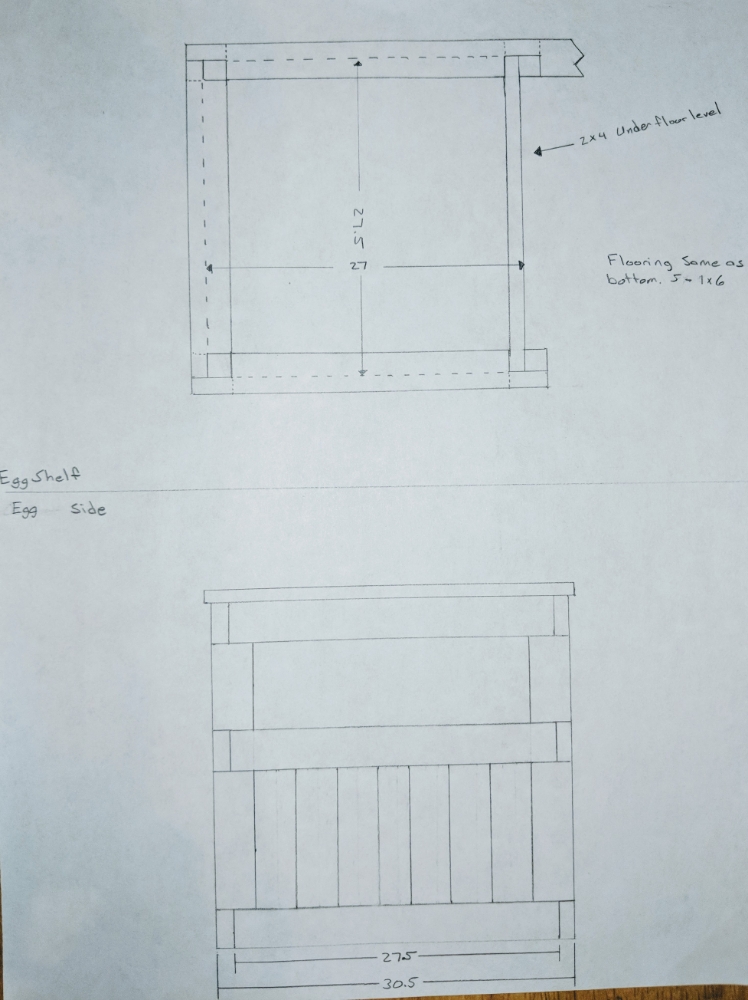
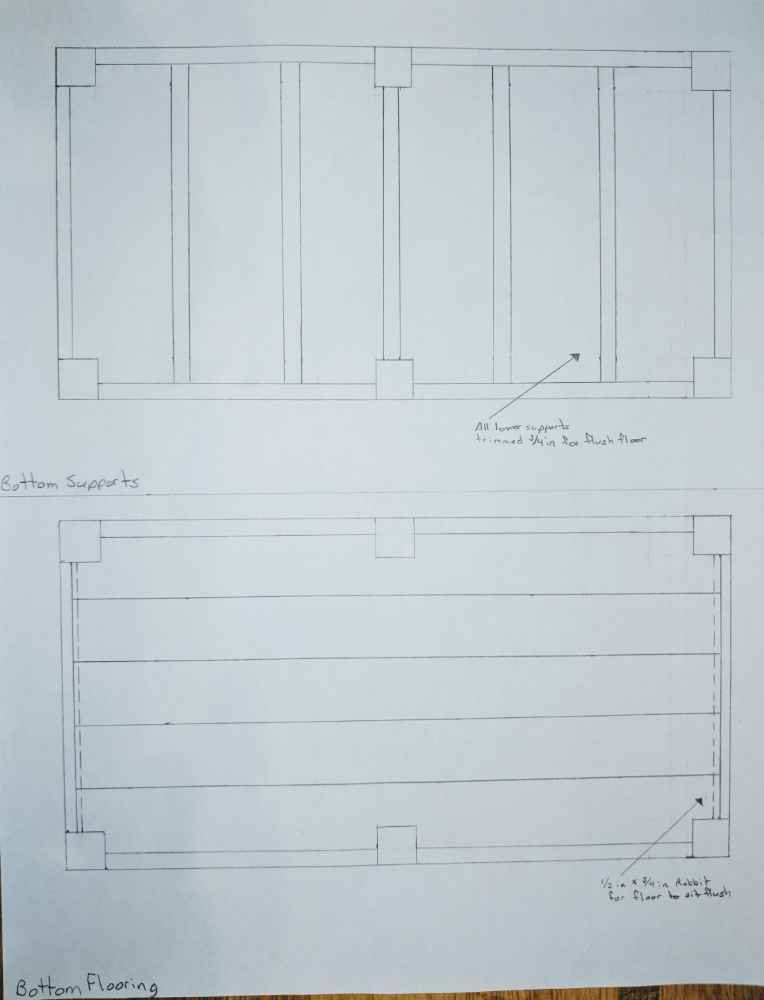
Finally for the most part have finalized my plan drawings. I still need to dimension some of the stuff but since it is based off the dimension of the Green Egg XL table so I can use their cover they offer it will be fairly close to that size. I have increased the heigh though of it by about 3in so it is about level with my deck railing so there is no chance the lid hinge hits the railing when pushed up against. Still have to design the drawer and the cabinet doors on the plans eventually as well.
Technical Drawling in high school paying off a bit
Front

Left end & Shelf dimensions
Right end

Back

Floor supports and floor board layout
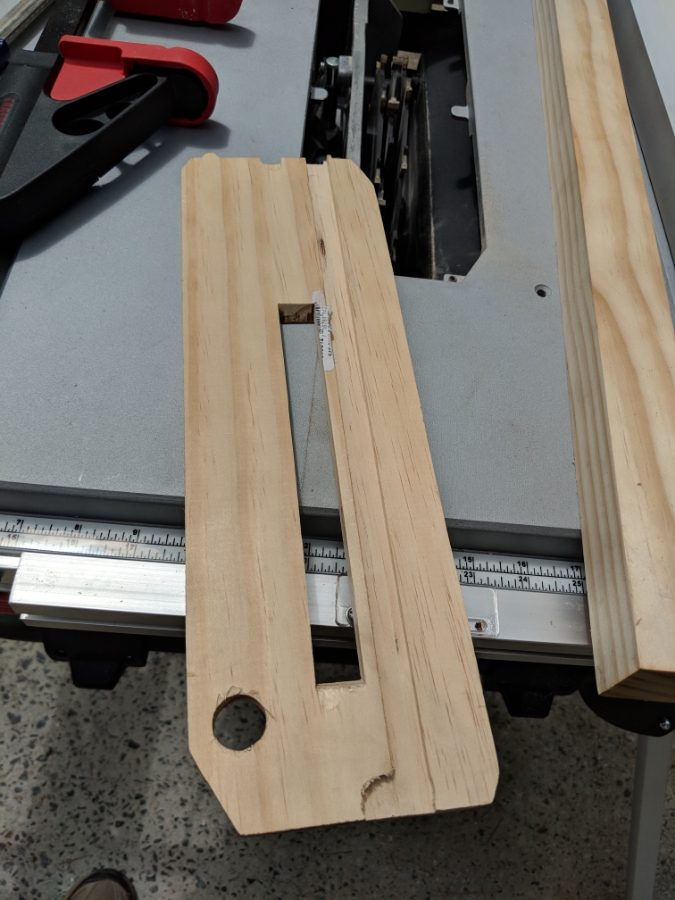
Started with getting the main frame cut to length. This is the first large thing I have built using my saw stand other than my picture frames. The support arms also have lips to lock in place board lengths. Made getting all posts and other boards the same that needed to be very easy.
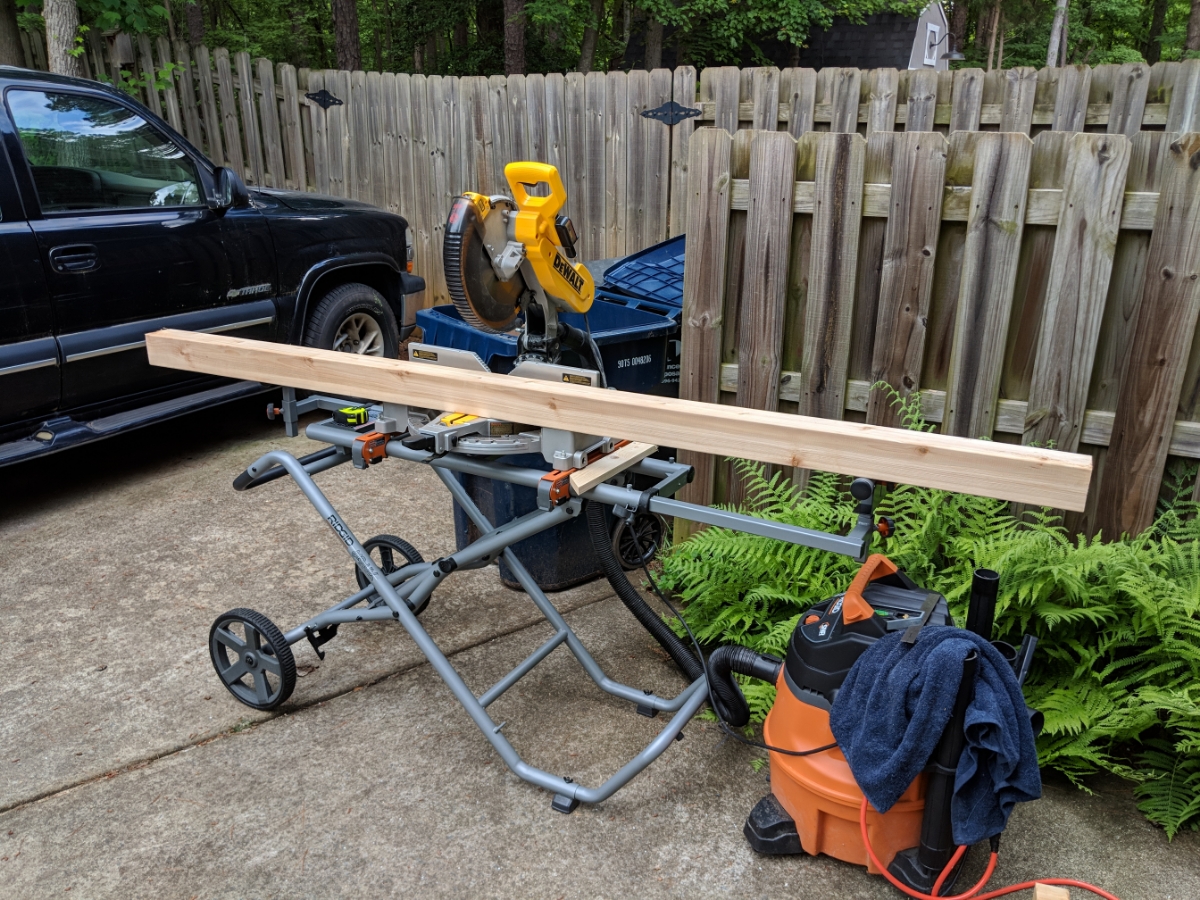
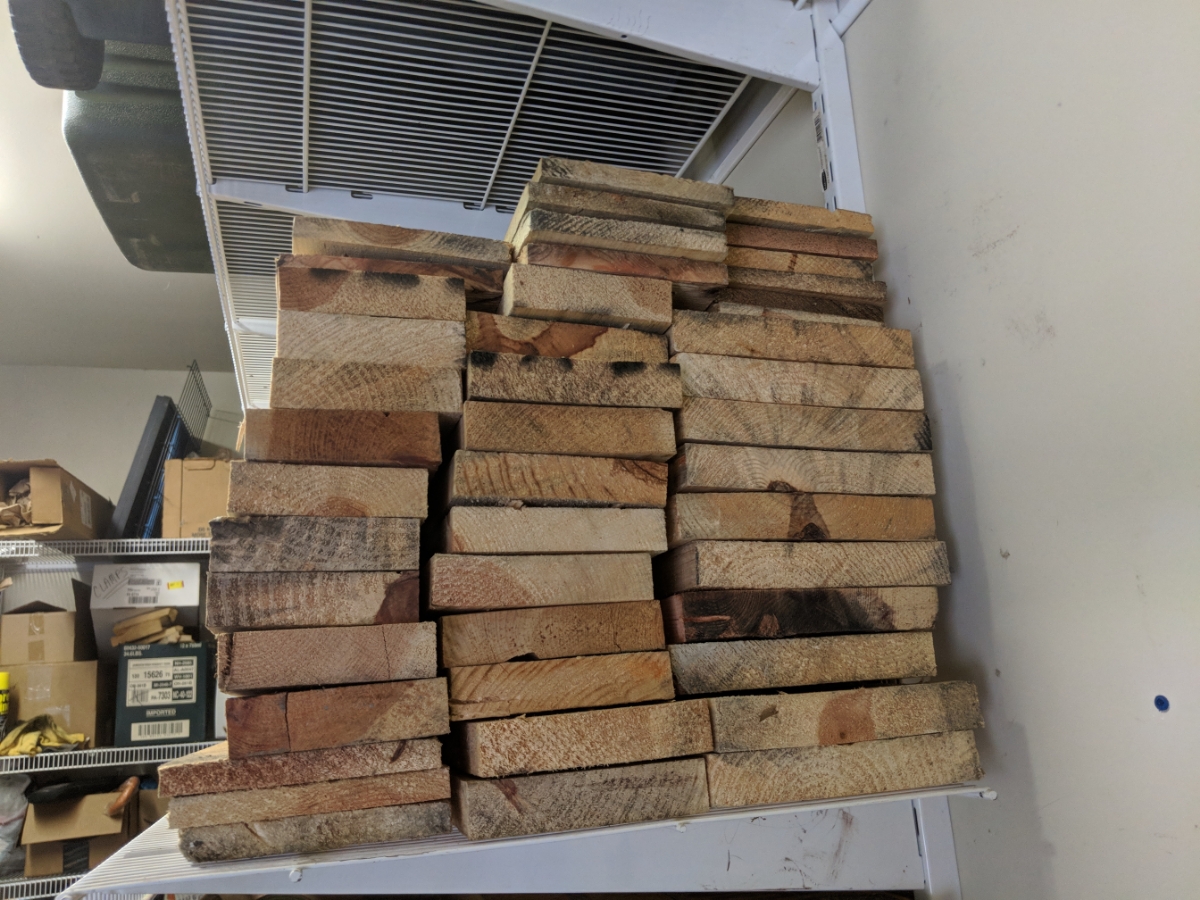
Got everything cut up for the basic frame. Well almost. Turns out I didn't count enough cedar 2x4s since I originally planned to support the counter top and floor base with pressure treated 2x4s. I got to cutting all my supports that are 27.5in and cut enough for everything forgetting I needed two more 58.5in long front and rear full length boards. Have to pickup 2 more of them tomorrow now.

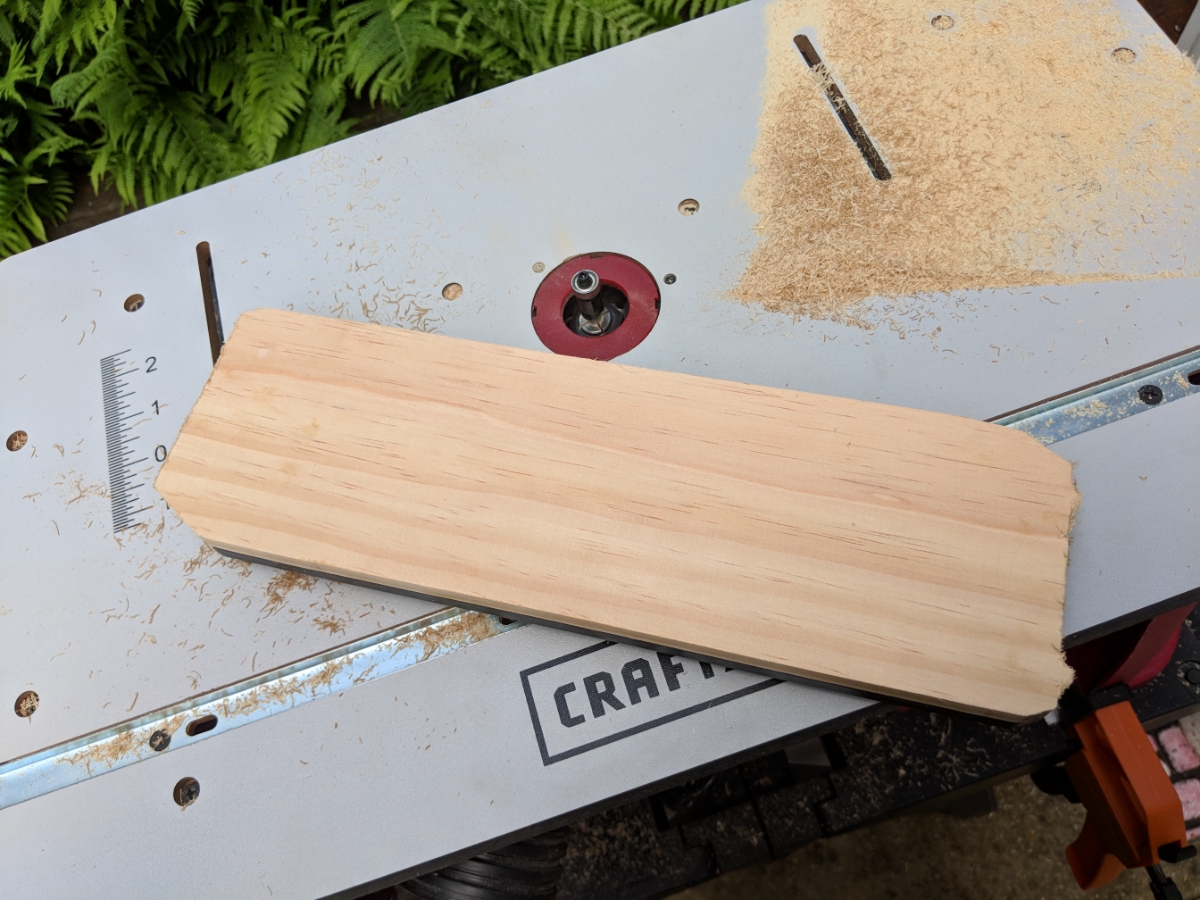
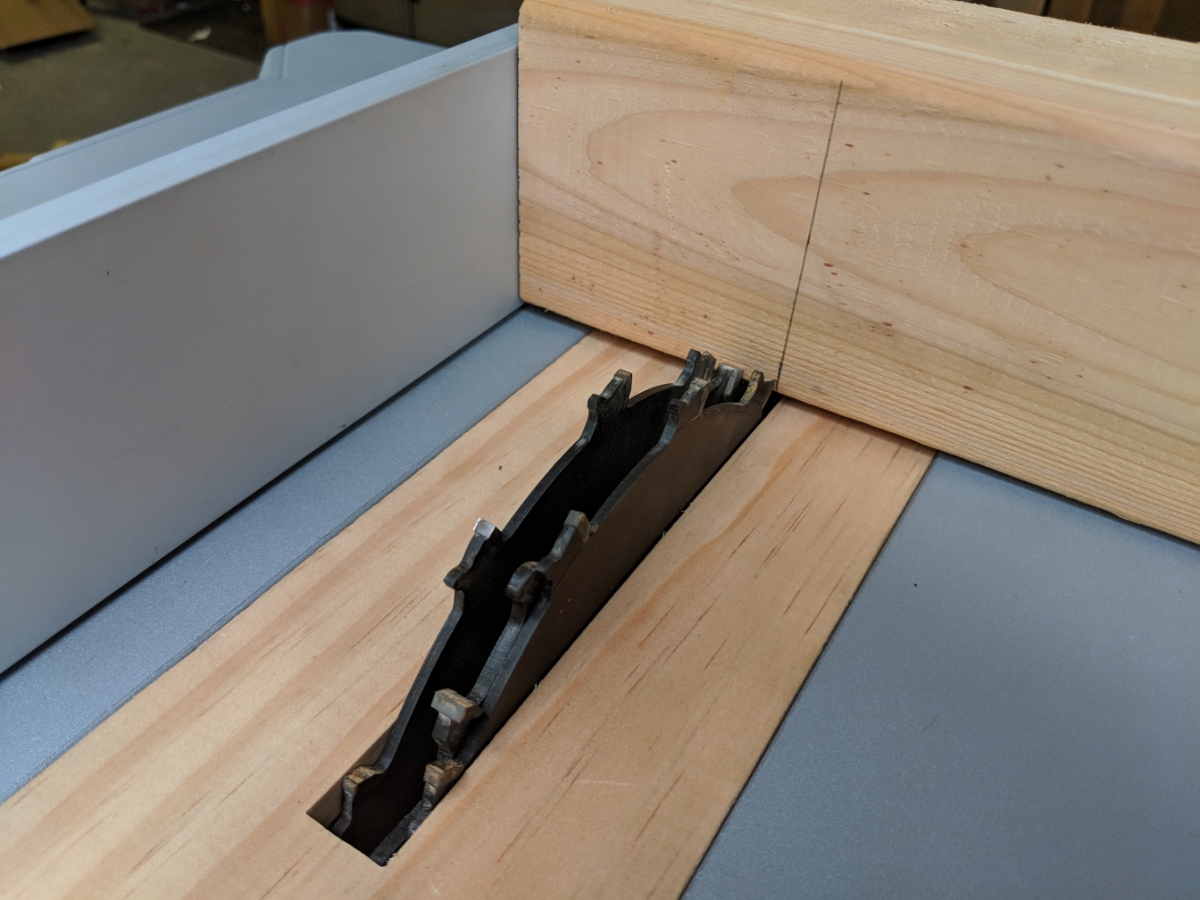
While I was cutting everything to length my neighbor who works construction stopped over. We were chatting about my project and how I was using lap joints for everything for added strength. I was dreading cutting a million cuts in each board and having to chisel everything out. Well he had a dado blade kit he loaned me to make my life much easier. Only issue is I didn't have a dado plate for my table saw. Nothing a little Google search and YouTube couldn't fix. Time to make a zero clearance dado plate at 3/4in wide. The kit could do 13/16th and so could my saw but didn't want to overdo the motor to much.
Used the router to trace the outside shape of the factory plate.


Basics done
Had to route out a grove on the bottom for a support and drill a hole to make it easy to remove. Also had to mess with some trimming of the lock tabs at the top end.
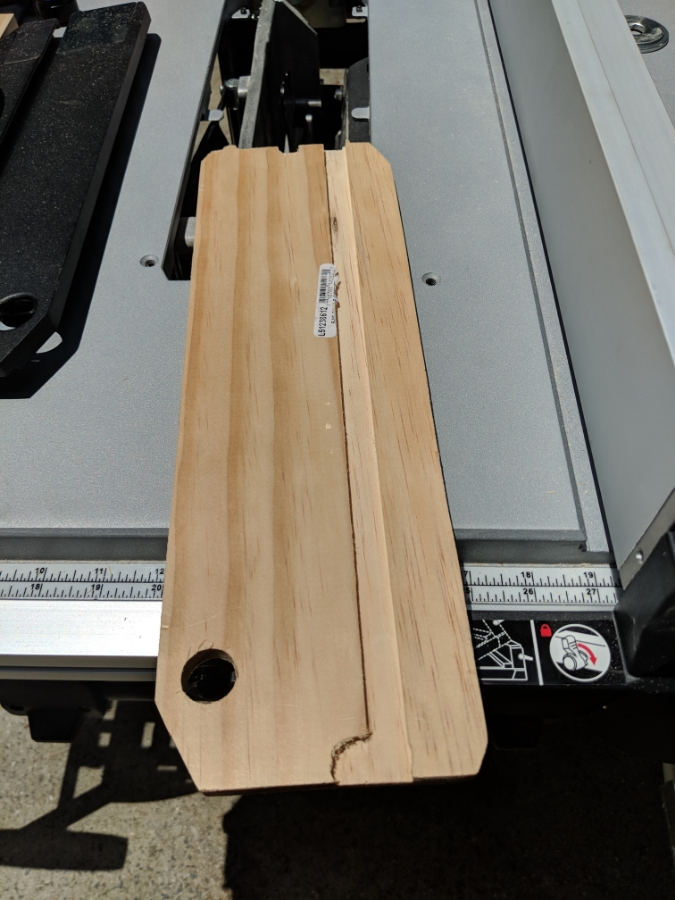
Fits so tight it doesn't matter that I don't have the locking mechanism the factory one does.
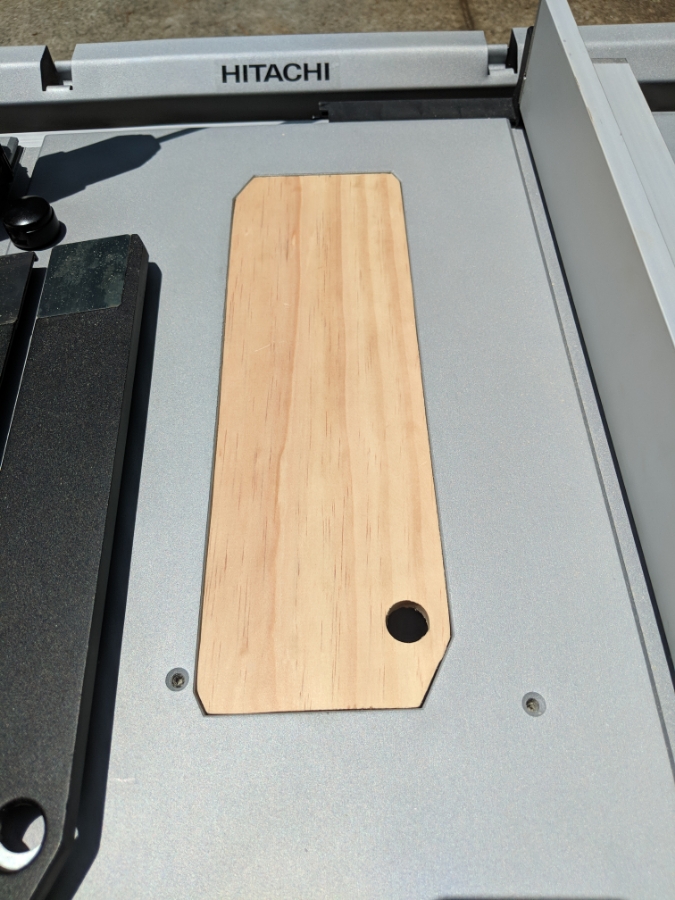
After slowly rasing the blade to cut the blade slot with have a large enough slot to allow me two inches of blade height through the plate. That is the most I will need for this project.
Fits perfect

Today I finally got to put all that work to use. First I marked all the lines for my cuts on the posts. Then set the fence so I couldn't cut to much.

Posts complete


Next step is notching the 4x4s for the shelf and also rabbiting them for the shelf boards to sit in. Hoping to get the basic frame completed tomorrow night if possible.
Finally for the most part have finalized my plan drawings. I still need to dimension some of the stuff but since it is based off the dimension of the Green Egg XL table so I can use their cover they offer it will be fairly close to that size. I have increased the heigh though of it by about 3in so it is about level with my deck railing so there is no chance the lid hinge hits the railing when pushed up against. Still have to design the drawer and the cabinet doors on the plans eventually as well.
Technical Drawling in high school paying off a bit
Front
Left end & Shelf dimensions
Right end
Back
Floor supports and floor board layout
Started with getting the main frame cut to length. This is the first large thing I have built using my saw stand other than my picture frames. The support arms also have lips to lock in place board lengths. Made getting all posts and other boards the same that needed to be very easy.
Got everything cut up for the basic frame. Well almost. Turns out I didn't count enough cedar 2x4s since I originally planned to support the counter top and floor base with pressure treated 2x4s. I got to cutting all my supports that are 27.5in and cut enough for everything forgetting I needed two more 58.5in long front and rear full length boards. Have to pickup 2 more of them tomorrow now.
While I was cutting everything to length my neighbor who works construction stopped over. We were chatting about my project and how I was using lap joints for everything for added strength. I was dreading cutting a million cuts in each board and having to chisel everything out. Well he had a dado blade kit he loaned me to make my life much easier. Only issue is I didn't have a dado plate for my table saw. Nothing a little Google search and YouTube couldn't fix. Time to make a zero clearance dado plate at 3/4in wide. The kit could do 13/16th and so could my saw but didn't want to overdo the motor to much.
Used the router to trace the outside shape of the factory plate.
Basics done
Had to route out a grove on the bottom for a support and drill a hole to make it easy to remove. Also had to mess with some trimming of the lock tabs at the top end.
Fits so tight it doesn't matter that I don't have the locking mechanism the factory one does.
After slowly rasing the blade to cut the blade slot with have a large enough slot to allow me two inches of blade height through the plate. That is the most I will need for this project.
Fits perfect
Today I finally got to put all that work to use. First I marked all the lines for my cuts on the posts. Then set the fence so I couldn't cut to much.
Posts complete
Next step is notching the 4x4s for the shelf and also rabbiting them for the shelf boards to sit in. Hoping to get the basic frame completed tomorrow night if possible.
Ex-OEM King
Joined: Dec 2013
Posts: 17,880
Likes: 7,027
From: Minnesnowta
I can't even begin to tell you how long it'll take or if it'll ever happen, it all depends on weather, temperature, moisture content, etc so my guess is as good as yours. You can get T/G router bit sets to do this quickly and easily though.
Also, word of advice in safety, NEVER use the fence AND the miter gauge at the same time with a table saw. You can get some epic kickback with the workpiece pinching the blade and it'll fling the workpiece right in your face at a rather high rate of speed. A good way to get around it is to clamp a short piece of wood to the fence as a spacer to align your workpiece and then push it past the spacer and into the blade so you have a gap there to avoid pinching the blade.
Just don't want to see you get hurt doing this stuff.


Last edited by SamDoe1; May 29, 2018 at 10:10 AM.
Thread Starter
Moderator
Regional Coordinator (Southeast)
Regional Coordinator (Southeast)
Joined: Dec 2003
Posts: 44,123
Likes: 4,434
From: Mooresville, NC
Even with all my plan drawings still worried about getting this completed by Friday. Also trying to decide how I want to attach the shelf top, Table top, and outer boards to enclose the table. Don't really want to see the hardware if I don't have too but that is obviously the easiest way. Also need to buy some big clamps if I am going to go with glueing the top together.
Thread Starter
Moderator
Regional Coordinator (Southeast)
Regional Coordinator (Southeast)
Joined: Dec 2003
Posts: 44,123
Likes: 4,434
From: Mooresville, NC
 So I have about 12hrs left to finish this table. I am a little worried about that. My mistake this weekend cost me big time in terms of hours.
Thread Starter
Moderator
Regional Coordinator (Southeast)
Regional Coordinator (Southeast)
Joined: Dec 2003
Posts: 44,123
Likes: 4,434
From: Mooresville, NC
Also, word of advice in safety, NEVER use the fence AND the miter gauge at the same time with a table saw. You can get some epic kickback with the workpiece pinching the blade and it'll fling the workpiece right in your face at a rather high rate of speed. A good way to get around it is to clamp a short piece of wood to the fence as a spacer to align your workpiece and then push it past the spacer and into the blade so you have a gap there to avoid pinching the blade.
Just don't want to see you get hurt doing this stuff.
Just don't want to see you get hurt doing this stuff.
Ex-OEM King
Joined: Dec 2013
Posts: 17,880
Likes: 7,027
From: Minnesnowta
Even with all my plan drawings still worried about getting this completed by Friday. Also trying to decide how I want to attach the shelf top, Table top, and outer boards to enclose the table. Don't really want to see the hardware if I don't have too but that is obviously the easiest way. Also need to buy some big clamps if I am going to go with glueing the top together.
Other option is to heavily countersink the screws and top them with 1/4" wood dowels. Then it looks like you doweled the whole thing together without actually doing so.
Thread Starter
Moderator
Regional Coordinator (Southeast)
Regional Coordinator (Southeast)
Joined: Dec 2003
Posts: 44,123
Likes: 4,434
From: Mooresville, NC
So you wouldn't use kreg jig and screws to hold the top on?
Thinking of just using glue and my nail gun to put in the floor inside rather rather bother with screws. You think that will be good enough or would you do everything with screws instead of nails?
Thinking of just using glue and my nail gun to put in the floor inside rather rather bother with screws. You think that will be good enough or would you do everything with screws instead of nails?

Ex-OEM King
Joined: Dec 2013
Posts: 17,880
Likes: 7,027
From: Minnesnowta
I'm confused as to which joint you're talking about. Have a picture with an example?
Thread Starter
Moderator
Regional Coordinator (Southeast)
Regional Coordinator (Southeast)
Joined: Dec 2003
Posts: 44,123
Likes: 4,434
From: Mooresville, NC
Similiar to the ones in this picture of the design I am kind of following. These appear to be nailed down.

Also wish I had bought a planer or gotten finish grade wood so that I had square corners instead of rounded off ones. Oh well. I will probably build another someday and hopefully flip this one for a slight profit.
Last edited by CCColtsicehockey; May 29, 2018 at 03:19 PM.