Factory IM Spacer - 17108-RDJ-A00
 06-23-2009, 02:32 PM
#321
Everyone cutting their spacer will cause a TQ SHIFT UP. So what im saying is that if you cut the spacer in half you might as well not have a spacer on at all. Simply because the whole point of the big spacer is to shift TQ down were you need it. If you’re not looking for TQ and only HP. Reduce heat under your hood will solve that problem. I think it's extremely funny how let’s cut it down and it should still work right? NO! It won’t. If you don’t like to mess with hood latches like the rest of us don’t do this mod. It's a waste of money and time. Leave the mod alone unless you have your parents pocket to play with and in that note you’re totally GAY!
 06-23-2009, 02:38 PM
#322
What exactly do you want a picture of?
You mean just little pressure the strut bar is putting on that hose is causing roughness? That woul be nice if it were the fix but I think its a reach. Don't see how that would be related to the 02 sensor. Well, if my friend can shave a 1/4" off it won't be an issue.
I know some of the roughness is due to the contact with hood when closed but I did a slow drive with the hood popped and it wasn't that big a difference. I'm mostly worried about the squeak and shuttering.
06-23-2009, 02:52 PM
#323
New shoes on my
iTrader: (3)
Join Date: Aug 2008
Location: Long Island, NY
Age: 38
Posts: 1,186
Likes: 0
Received 3 Likes
on
2 Posts
Beachexotic, I agree that if you are cutting the spacer in half, then you might as well not do the mod at all, but if you're shaving off like 1/2" so that you can maybe pop the hood a little less or something along those lines, then is the TQ shift up really that much? I'm not asking to be a smart ass, I'm really curious. I think i might sacrafic getting like lets say only 90% out of this mod in exchange for the clearance benefits. Just curious on what you think.
06-23-2009, 02:56 PM
#324
Ryan Christopher
Everyone cutting their spacer will cause a TQ SHIFT UP. So what im saying is that if you cut the spacer in half you might as well not have a spacer on at all. Simply because the whole point of the big spacer is to shift TQ down were you need it. If you�re not looking for TQ and only HP. Reduce heat under your hood will solve that problem. I think it's extremely funny how let�s cut it down and it should still work right? NO! It won�t. If you don�t like to mess with hood latches like the rest of us don�t do this mod. It's a waste of money and time. Leave the mod alone unless you have your parents pocket to play with and in that note you�re totally GAY!
The idea to cut it half was not the best one, but milling it down to get it to work is still going to give a benefit.
06-23-2009, 03:07 PM
#325
You are correct about cutting it in half, but to mill it down 10-15mm and still use a thermal gasket, you are only about 4-5mm under what the spacer would be by itself. The loss of tq compared to the test dyno that was already given in the thread will be negligible. So for that that don't want to do a 2-4mm hood pop, this is the way to go. You still get a good gain down low without having to sacrifice the look of the car.
The idea to cut it half was not the best one, but milling it down to get it to work is still going to give a benefit.
The idea to cut it half was not the best one, but milling it down to get it to work is still going to give a benefit.
06-23-2009, 03:38 PM
#326
Burning Brakes

It all comes down to opportunity cost. Let’s do some math ok? 60 for the spacer kit plus shipped to your door plus 20 5/16 washers 3.00 parts store. Zero for labor if you do it yourself. So we have $63 total cost. So we take 63 divided by 10TQ that’s $6.30 per 1 TQ. Cutting it down We have 63 plus 50 for milling down a � so we have let’s say your 90% so we take 10x1.90=19-10 is 9TQ/113 is $12.55 for 1TQ your paying double to lose TQ and save hood clearance? Are you people nuts? That’s a total RIP! Now if we fallow the step that other members have fallowed like raising hood latch and using spacers you will have no hood issues and you will have 50 dollars. Do the math!
06-23-2009, 03:40 PM
#327
Ryan Christopher
It all comes down to opportunity cost. Let�s do some math ok? 60 for the spacer kit plus shipped to your door plus 20 5/16 washers 3.00 parts store. Zero for labor if you do it yourself. So we have $63 total cost. So we take 63 divided by 10TQ that�s $6.30 per 1 TQ. Cutting it down We have 63 plus 50 for milling down a � so we have let�s say your 90% so we take 10x1.90=19-10 is 9TQ/113 is $12.55 for 1TQ your paying double to lose TQ and save hood clearance? Are you people nuts? That�s a total RIP! Now if we fallow the step that other members have fallowed like raising hood latch and using spacers you will have no hood issues and you will have 50 dollars. Do the math!
In the overall scheme of things, you are still gaining 9 ft/lbs of torque for $113 at your estimated cost. How much TQ does a CAI at $200+ add? Far less per $. There are so many mods that cost more per lb/tq then this. So even if you think we are "nuts", we are still gaining tq in the end.
I really doubt you will lose 10% by milling 4-5mm. This is an option for those that choose not to space there hood and retain a complete factory look. For each his own, but don't call someone "nuts" just because they don't feel the same way you do about something.
06-23-2009, 03:58 PM
#328
Race Director
iTrader: (1)
Damn you people in this thread that think this is "your" mod and that it should only be done "your" way need to think twice. Take your opinions elsewhere, seriously.
I've asked three times in this thread if milling it down would hurt the #s, and obviously it would. But taking only a small amount off can't.
God cocky people piss me off.
I've asked three times in this thread if milling it down would hurt the #s, and obviously it would. But taking only a small amount off can't.
God cocky people piss me off.
06-23-2009, 05:17 PM
#329
practicing nihilist
[IMG]
 [/IMG]
06-23-2009, 05:50 PM
[/IMG]
06-23-2009, 05:50 PM
#330
practicing nihilist
I understand the math, but most people don't want a ricer popped hood on their sport/luxury sedan. The spacer looks to be nearly 2" tall. Milling 1/4"+ out of it won't be a big deal nor significantly impact low and midrange gains. Additionally, the reduced height will aleviate some of the wiring/hose issues. Spending $200 vs spending $60 isn't a huge deal for most people on the site. Keep your popped hood for entertainment value for the rest of us to point and laugh at.
gotta disagree. I never knew or noticed "popped hoods" until this thread started. then, started seeing them here and there. what I'm getting at is, the average person would never notice a 5mm rise in the hood line. a tuner might and I think that just opens a round of conversation on what you've done to the engine to necessitate the increased clearance.
06-23-2009, 05:55 PM
#331
practicing nihilist
You are correct about cutting it in half, but to mill it down 10-15mm and still use a thermal gasket, you are only about 4-5mm under what the spacer would be by itself. The loss of tq compared to the test dyno that was already given in the thread will be negligible. So for that that don't want to do a 2-4mm hood pop, this is the way to go. You still get a good gain down low without having to sacrifice the look of the car.
The idea to cut it half was not the best one, but milling it down to get it to work is still going to give a benefit.
The idea to cut it half was not the best one, but milling it down to get it to work is still going to give a benefit.
06-24-2009, 07:37 AM
#334
Ryan Christopher
just my 2 cents, but I think 15 mm is roughly 3/4". those of us that added 5 mm in washers and are still rubbing might clear it with 1/4" shaved off but, don't plan on putting the under hood felt barrier back in. That thing has some fiberglass material that is 3/4" think here and theres and would most definitely ride on the IM cover.
Thank you again for the input on the numbers and I have been wanting to take the under hood cover off, just haven't had the time, so that is not a problem.
06-24-2009, 07:40 AM
#335
Ryan Christopher
 06-24-2009, 09:18 AM
#336
Three Wheelin'
iTrader: (3)
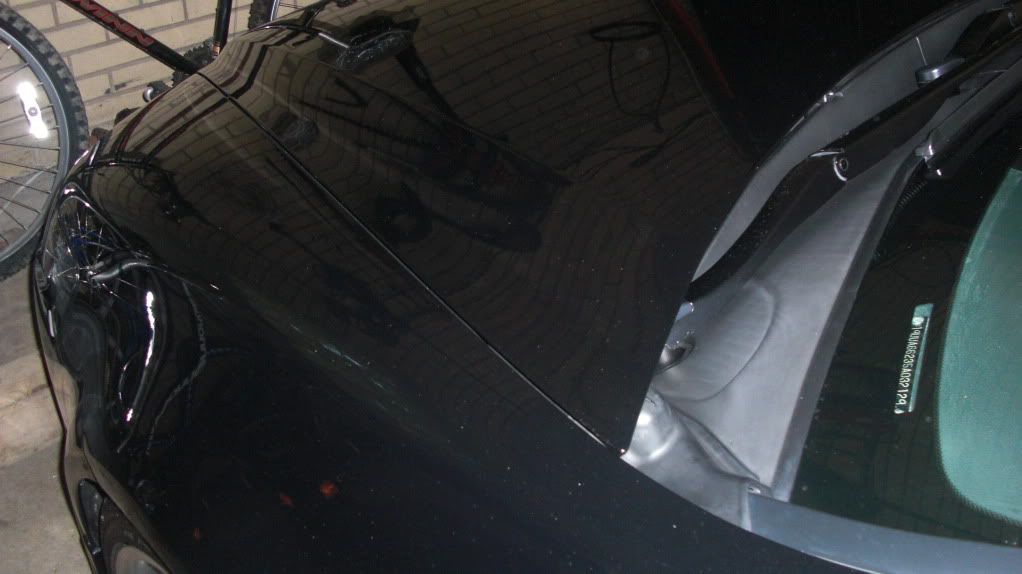
ok guys, here is an update on rubbing issues after long term testing of over 1000 miles (500 normal miles and 500 aggressive)
As many of you may not know, I have done this mod but HAVE NOT used the p2r or outlaw engineering thermal gaskets. I have simply used OEM gaskets. This means that my motor is 1/4 inch lower than most other peoples doing this mod.
I have noticed no performance loss after some hardcore driving for hours on end, and feel the p2r spacer truly wasn't worth the extra time and money getting things to fit.
Below, I have listed what I did to make the motor fit with no rubbing BEFORE and AFTER my participation in the Ohio GumBall330 rally, in which I pushed the motor to its limit for 5 hours of rally racing on some of the most challenging roads Ive ever seen. I did a lot of down shifting and wheel hops (burnouts), and even FWD drifting (!!??) which caused a lot of vertical motor movement.
If you use this method, you will require no external modifications to the vehicle, including no hood pop provided you are NOT using the P2R or Outlaw engineering thermal gaskets!
BEFORE:
1) Adjust hood latch to within a few mm of its max height.
2) Remove heat shielding material from underside of hood.
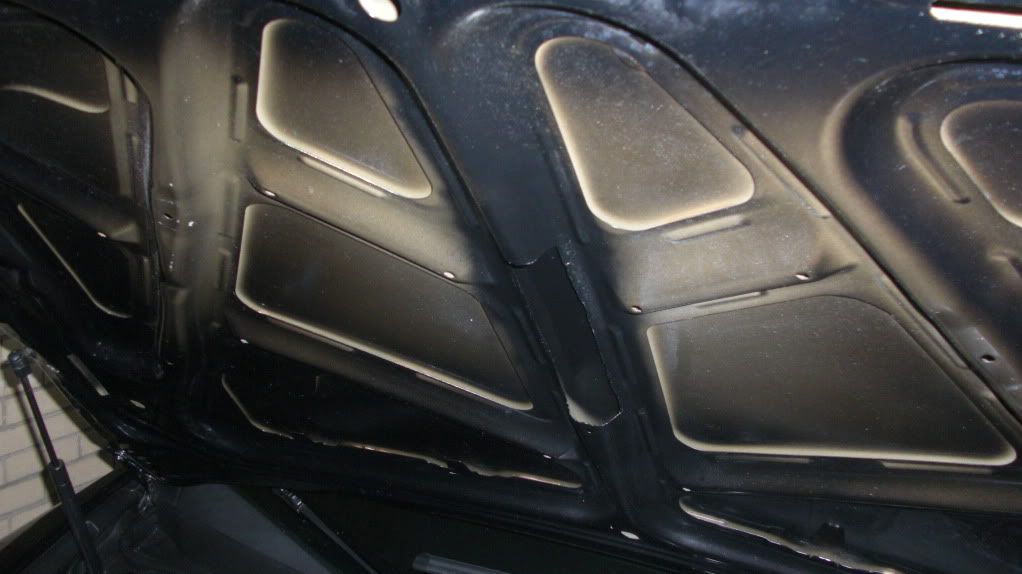
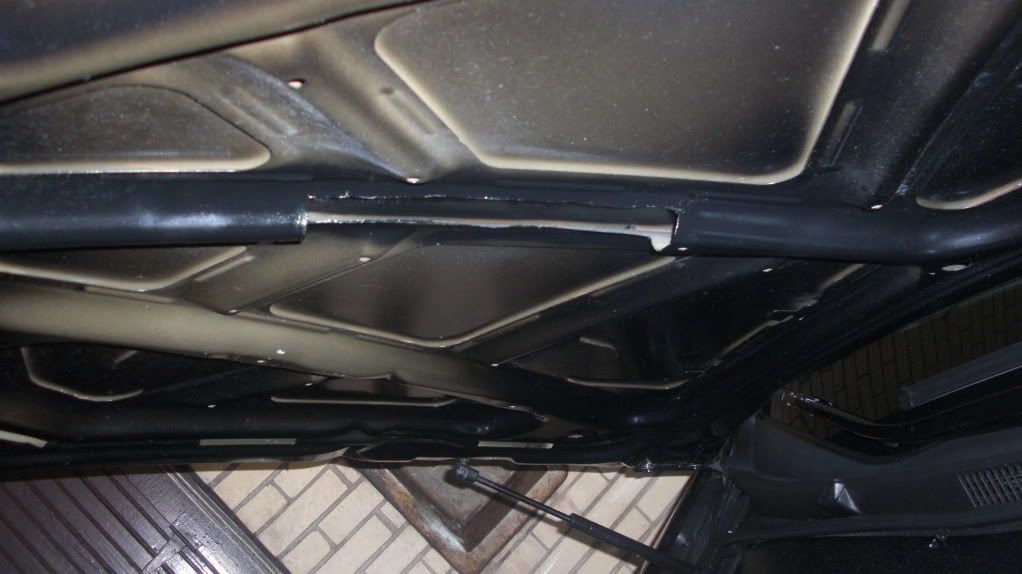
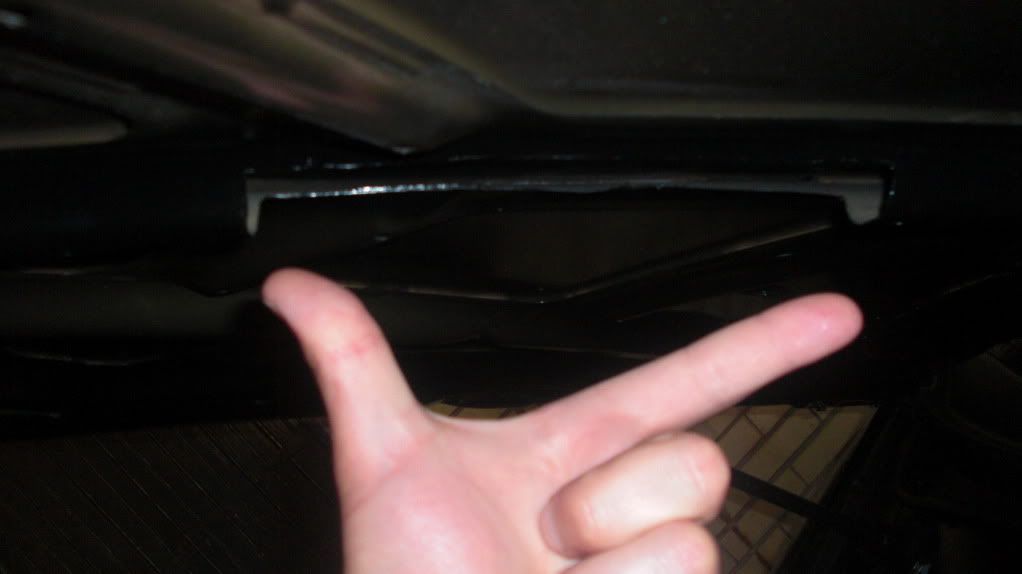
3) Used a Dremel tool or equivalent with metal cutoff wheel to cut a 1/2'' deep (preliminary) by 8'' long notch out of the center hood reinforcement bar. (The hood's structural rigidity has not been compromised enough to matter). Then paint with high temp engine enamel or touch up paint.
AFTER:
A small amount of rubbing was going on, and some moderate scratching was made to my IM cover during increased motor movement, so I decided to cut another 1/4 inch out of the bar, taking the total depth to a FINAL: 3/4'' deep. This is a perfect fit, and I now have a beautifully chemically stripped and painted NBP IM Cover which I know wont get beat up!
Pics tonight after the ride gets back from the paint shop for some other work being done!
As many of you may not know, I have done this mod but HAVE NOT used the p2r or outlaw engineering thermal gaskets. I have simply used OEM gaskets. This means that my motor is 1/4 inch lower than most other peoples doing this mod.
I have noticed no performance loss after some hardcore driving for hours on end, and feel the p2r spacer truly wasn't worth the extra time and money getting things to fit.
Below, I have listed what I did to make the motor fit with no rubbing BEFORE and AFTER my participation in the Ohio GumBall330 rally, in which I pushed the motor to its limit for 5 hours of rally racing on some of the most challenging roads Ive ever seen. I did a lot of down shifting and wheel hops (burnouts), and even FWD drifting (!!??) which caused a lot of vertical motor movement.
If you use this method, you will require no external modifications to the vehicle, including no hood pop provided you are NOT using the P2R or Outlaw engineering thermal gaskets!
BEFORE:
1) Adjust hood latch to within a few mm of its max height.
2) Remove heat shielding material from underside of hood.
3) Used a Dremel tool or equivalent with metal cutoff wheel to cut a 1/2'' deep (preliminary) by 8'' long notch out of the center hood reinforcement bar. (The hood's structural rigidity has not been compromised enough to matter). Then paint with high temp engine enamel or touch up paint.
AFTER:
A small amount of rubbing was going on, and some moderate scratching was made to my IM cover during increased motor movement, so I decided to cut another 1/4 inch out of the bar, taking the total depth to a FINAL: 3/4'' deep. This is a perfect fit, and I now have a beautifully chemically stripped and painted NBP IM Cover which I know wont get beat up!
Pics tonight after the ride gets back from the paint shop for some other work being done!
06-24-2009, 10:16 AM
#339
Ryan Christopher
ok guys, here is an update on rubbing issues after long term testing of over 1000 miles (500 normal miles and 500 aggressive)
As many of you may not know, I have done this mod but HAVE NOT used the p2r or outlaw engineering thermal gaskets. I have simply used OEM gaskets. This means that my motor is 1/4 inch lower than most other peoples doing this mod.
I have noticed no performance loss after some hardcore driving for hours on end, and feel the p2r spacer truly wasn't worth the extra time and money getting things to fit.
Below, I have listed what I did to make the motor fit with no rubbing BEFORE and AFTER my participation in the Ohio GumBall330 rally, in which I pushed the motor to its limit for 5 hours of rally racing on some of the most challenging roads Ive ever seen. I did a lot of down shifting and wheel hops (burnouts), and even FWD drifting (!!??) which caused a lot of vertical motor movement.
If you use this method, you will require no external modifications to the vehicle, including no hood pop provided you are NOT using the P2R or Outlaw engineering thermal gaskets!
BEFORE:
1) Adjust hood latch to within a few mm of its max height.
2) Remove heat shielding material from underside of hood.
3) Used a Dremel tool or equivalent with metal cutoff wheel to cut a 1/2'' deep (preliminary) by 8'' long notch out of the center hood reinforcement bar. (The hood's structural rigidity has not been compromised enough to matter). Then paint with high temp engine enamel or touch up paint.
AFTER:
A small amount of rubbing was going on, and some moderate scratching was made to my IM cover during increased motor movement, so I decided to cut another 1/4 inch out of the bar, taking the total depth to a FINAL: 3/4'' deep. This is a perfect fit, and I now have a beautifully chemically stripped and painted NBP IM Cover which I know wont get beat up!
Pics tonight after the ride gets back from the paint shop for some other work being done!
06-24-2009, 10:50 AM
#340
Chapter Leader (NY/NJ)
iTrader: (10)
ok guys, here is an update on rubbing issues after long term testing of over 1000 miles (500 normal miles and 500 aggressive)
As many of you may not know, I have done this mod but HAVE NOT used the p2r or outlaw engineering thermal gaskets. I have simply used OEM gaskets. This means that my motor is 1/4 inch lower than most other peoples doing this mod.
I have noticed no performance loss after some hardcore driving for hours on end, and feel the p2r spacer truly wasn't worth the extra time and money getting things to fit.
Below, I have listed what I did to make the motor fit with no rubbing BEFORE and AFTER my participation in the Ohio GumBall330 rally, in which I pushed the motor to its limit for 5 hours of rally racing on some of the most challenging roads Ive ever seen. I did a lot of down shifting and wheel hops (burnouts), and even FWD drifting (!!??) which caused a lot of vertical motor movement.
If you use this method, you will require no external modifications to the vehicle, including no hood pop provided you are NOT using the P2R or Outlaw engineering thermal gaskets!
BEFORE:
1) Adjust hood latch to within a few mm of its max height.
2) Remove heat shielding material from underside of hood.
3) Used a Dremel tool or equivalent with metal cutoff wheel to cut a 1/2'' deep (preliminary) by 8'' long notch out of the center hood reinforcement bar. (The hood's structural rigidity has not been compromised enough to matter). Then paint with high temp engine enamel or touch up paint.
AFTER:
A small amount of rubbing was going on, and some moderate scratching was made to my IM cover during increased motor movement, so I decided to cut another 1/4 inch out of the bar, taking the total depth to a FINAL: 3/4'' deep. This is a perfect fit, and I now have a beautifully chemically stripped and painted NBP IM Cover which I know wont get beat up!
Pics tonight after the ride gets back from the paint shop for some other work being done!
As many of you may not know, I have done this mod but HAVE NOT used the p2r or outlaw engineering thermal gaskets. I have simply used OEM gaskets. This means that my motor is 1/4 inch lower than most other peoples doing this mod.
I have noticed no performance loss after some hardcore driving for hours on end, and feel the p2r spacer truly wasn't worth the extra time and money getting things to fit.
Below, I have listed what I did to make the motor fit with no rubbing BEFORE and AFTER my participation in the Ohio GumBall330 rally, in which I pushed the motor to its limit for 5 hours of rally racing on some of the most challenging roads Ive ever seen. I did a lot of down shifting and wheel hops (burnouts), and even FWD drifting (!!??) which caused a lot of vertical motor movement.
If you use this method, you will require no external modifications to the vehicle, including no hood pop provided you are NOT using the P2R or Outlaw engineering thermal gaskets!
BEFORE:
1) Adjust hood latch to within a few mm of its max height.
2) Remove heat shielding material from underside of hood.
3) Used a Dremel tool or equivalent with metal cutoff wheel to cut a 1/2'' deep (preliminary) by 8'' long notch out of the center hood reinforcement bar. (The hood's structural rigidity has not been compromised enough to matter). Then paint with high temp engine enamel or touch up paint.
AFTER:
A small amount of rubbing was going on, and some moderate scratching was made to my IM cover during increased motor movement, so I decided to cut another 1/4 inch out of the bar, taking the total depth to a FINAL: 3/4'' deep. This is a perfect fit, and I now have a beautifully chemically stripped and painted NBP IM Cover which I know wont get beat up!
Pics tonight after the ride gets back from the paint shop for some other work being done!
06-24-2009, 11:09 AM
#341
Former Whyner
 Jealous
06-24-2009, 11:36 AM
Jealous
06-24-2009, 11:36 AM
#342
Former Whyner
the Temperature sensor will set off a CEL if you didn't give the wires enough room for play and you just stretched them. This means that when you rev your engine it�s pulling on the wires causing a short in the sensor. It�s the first sensor in the manifold right off the TB. Check these 2 items and your problems are fixed.

Now will this code throw the CPU into safe mode or something crazy like that cuz i only drove 10 miles or so home and the car didnt feel different but I think I might have burnt more gas...
 06-24-2009, 12:21 PM
#343
Three Wheelin'
iTrader: (3)
Hey man, attend the next one in August! But bust out your rally lights (or triple set of 55w HID's like me) cuz its goona be a night race and ur goona need em!  I cant wait! Everyones welcome to come
  . We had ppl from Illinois and Canada this year and 40 cars ranging from CL55 AMG's to Diesel trucks, to slammed miata's. It's a SICK time. No lie.
I cant wait! Everyones welcome to come . We had ppl from Illinois and Canada this year and 40 cars ranging from CL55 AMG's to Diesel trucks, to slammed miata's. It's a SICK time. No lie.
06-24-2009, 02:31 PM
#344
Former Whyner
Hey man, attend the next one in August! But bust out your rally lights (or triple set of 55w HID's like me) cuz its goona be a night race and ur goona need em! I cant wait! Everyones welcome to come . We had ppl from Illinois and Canada this year and 40 cars ranging from CL55 AMG's to Diesel trucks, to slammed miata's. It's a SICK time. No lie.
I cant wait! Everyones welcome to come . We had ppl from Illinois and Canada this year and 40 cars ranging from CL55 AMG's to Diesel trucks, to slammed miata's. It's a SICK time. No lie. 06-24-2009, 03:35 PM
#346
Race Director
iTrader: (1)
06-24-2009, 03:59 PM
#347
94 DC4 RS LSV/Turbo
Thread Starter
iTrader: (1)
Join Date: Jul 2007
Location: New York City | Stuck in Traffic
Age: 38
Posts: 11,734
Likes: 0
Received 11 Likes
on
11 Posts
Hood popped chit chat needs to stop
Having your hood propped at the latches as mentioned before is 100% tuner and the opposite of rice
Rice is adding pointless shit that yields no gains...
Sorry but even if this gained 1lbs tq it would not be rice
The fact that it gains 8x times that makes you guys that are "anti hood pop" pointless... In other words.. This mod which I decided to unveil is for the guys who've modded beyond the average aziner... Meaning they've got full freeflowing exhausts with that minimal loss in tq.. And this mod brings that low end tq back and then some
This is not for a member who's car is purely stock and only has a cai... Its pretty pointless in my mind to install this spacer if you only have a cai
Long post summed up.... Quit bitching about hood popping and those of you who installed it w/ the p2r.. Put the crack pipe down, because that thermal gasket aint doing a got damn thing sandwiched in there... Quit wasting your time worrying about the rub a dub dub and install 2 oem gaskets and call it a day
Ps. For all of you who never got a chance to see my ride (which is long gone) you should look it up... I was the official all go and no show tl-s
 HE HAS SPOKEN

 06-24-2009, 04:46 PM
#350


 06-24-2009, 06:12 PM
#351
06-24-2009, 06:53 PM
#352
94 DC4 RS LSV/Turbo
Thread Starter
iTrader: (1)
Join Date: Jul 2007
Location: New York City | Stuck in Traffic
Age: 38
Posts: 11,734
Likes: 0
Received 11 Likes
on
11 Posts
hahah I like how you cutout a section of the support to clear the IM... good shit bro... good shit
more incentive to show this mod is worth the wild
more incentive to show this mod is worth the wild
06-24-2009, 07:24 PM
#353
Three Wheelin'
iTrader: (3)
Good stuff man! This is the info I've been waiting on. One question though; I help Ronjon757 install his spacer, but we could not figure out how to adjust the hood latch. Can you explain that a little further and possible post pictures of what you did to adjust it. That is all I need to take the plunge on this mod. Thanks for the help!
P.S- when your done, adjust the rubber bump stops that the hood rests on while closed by turning them counter-clockwise(?) to raise them so the hood doesn't rattle/have slop.
Last edited by gerzand; 06-24-2009 at 07:28 PM.
06-24-2009, 07:31 PM
#354
practicing nihilist
Good stuff, all. This was one of those mods where a bunch of us experimental types jumped right in and there was some trial-and-error/lessons learned along the way.
Got a friend looking into chopping a 1/4" off mine and I think I'll ace the P2R spacer. Don't mind the pop but won't do it if I don't need it.
I'm spacer-less as of right now for trouble shooting and a trip to the dealer. Found the j-pipe connection to rear cat delete was loose and I've isolated the vibe & squeak to the rear cat delete connection to the manifold. I remember how much of a bitch the bolts were and can't say I'm that suprised they backed off. Hope this takes care of it and gets rid of the O2 sensor code.
I pulled the plastic shield above the grille off and saw the 4 bolts holding the hood latch mechanism in place. Don't really see how it can be adjusted in elevation, though.
Cheers
06-24-2009, 07:57 PM
#357
No need for pics really, just remove the 3 clips and 2 screws that hold the front piece of engine bay plastic trim on which lays on top of the the hood latch (It's 3 feet long. You cant miss it!). Then, stick your hand behind the grill and pull the recessed piece of debris-shielding plastic off from around the latch release handle and set it aside. Once this is off, slip you hand as well as a 10mm socket behind the grill again and loosen (don't remove) the 3 bolts. Adjust it a little bit at a time, tightening them back up after each test fitment of the hood. Within 5 mins, your done!
P.S- when your done, adjust the rubber bump stops that the hood rests on while closed by turning them counter-clockwise(?) to raise them so the hood doesn't rattle/have slop.
P.S- when your done, adjust the rubber bump stops that the hood rests on while closed by turning them counter-clockwise(?) to raise them so the hood doesn't rattle/have slop.
I just ordered the spacer and metal gaskets. I had the outlaw spacer on, but wasn't planning on using it for this spacer anyway. I will have to order the bolts from BMW when I get back. Thanks man!
06-24-2009, 08:10 PM
#358
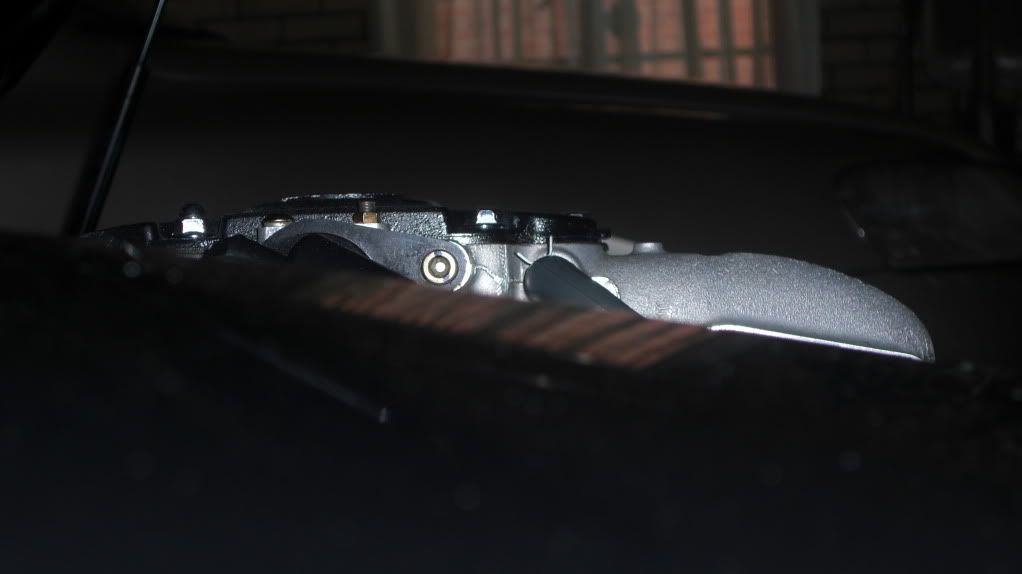
Three Wheelin'
iTrader: (3)
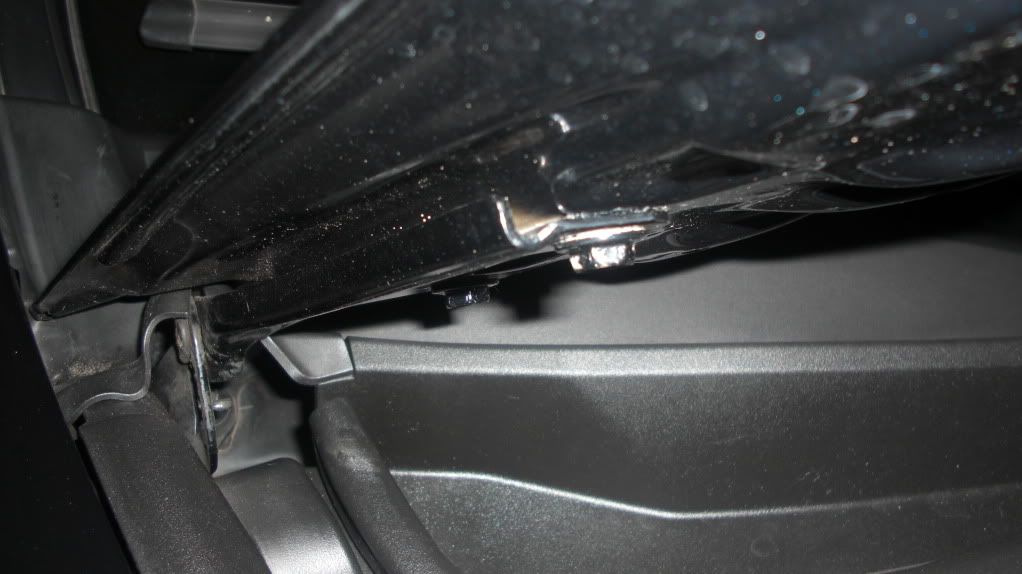
My alternate location for the brake booster vacuum solenoid which originally fastened to the top of the IM via a bracket and 8mm bolt (you can in the pics see where mine is no longer present). The reason for the relocation was that it rubs on both the stock and RV-6 strut tower bar. I zip tied it around the rear spark plug wire guide, right below its original location.
