DIY Amp Wire (and backseat removal)
 03-29-2011, 05:53 PM
#1
Senior Moderator
Thread Starter
On Sunday I embarked on a mission to get a 4-gauge wire from my battery to my trunk through the interior of the car. I knew it could be done by practically anyone b/c the people at Mother's Tint/Alarm did it to Legend #1, and they had no clue how to do anything right. I noticed one day they bent my back seat trying to get the wire through.  Since the damage was done and I needed to run an RCA cable anyways, I pretty much redid everything they had done. The only thing they did that I didn't was drill through the firewall.
This is the part that had me shaking in my boots. About to take a drill to my new (to me) car with no advice from prior experience is a little nerve racking. Nonetheless, I successfully completed that part of the project and am almost ready to hook everything up and blast away.
For this project you will need: An electric drill, a metal drill bit with a diameter of the outer diameter of your grommet, a grommet with an inner diameter of the diameter of your wire, rust resistant paint, caulk, and an interior trim pry tool. The pry tool is not completely necessary, but will help tremendously to get out any clips that slip from their holders. Also rubber gloves will help to keep your dirty hands off of the interior. To remove the back seat you will need a wrench or ratchet with proper socket sizes.
The idea of drilling through the firewall is to locate a place where there are no wires, tubing, or important systems on EITHER side of the firewall. What I learned from experience is that it also helps to find a spot that is only one sheet of metal thick. Here is a pic of where I chose to drill.
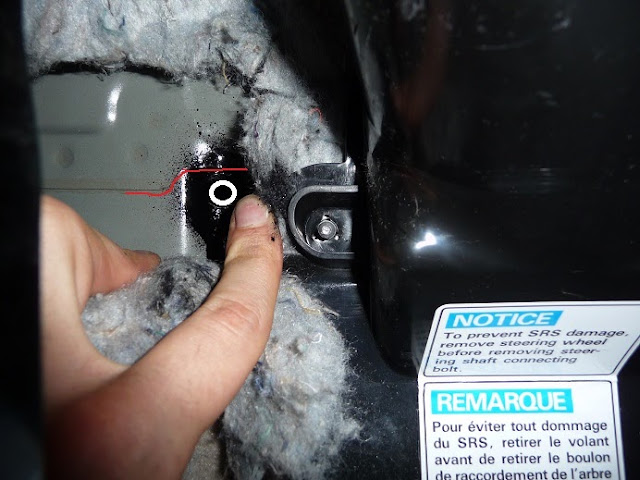
This is just to the left of the steering joint case cover. The white circle is the outline of the hole. Notice the red line. This is a secondary sheet of metal. If you choose to go through here, you will need to have two grommets. On the left side of this hole is the wheel well, so you can only go farther to the right. The case cover is pretty much the same on both sides of the firewall, so you can get really close to that.
Once you have drilled, you will want to paint the hole to stop rust and corrosion. Once the paint is dried, place the grommet

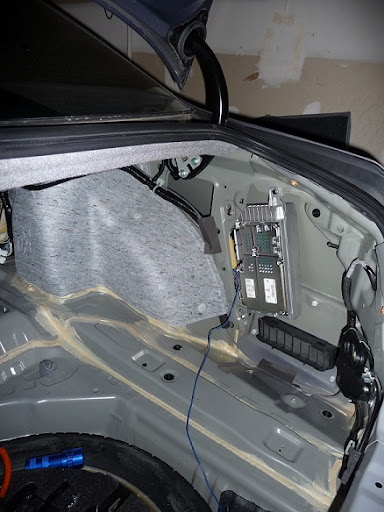
in the hole. I used WD-40 to lube the grommet so it would not push through when I pushed the wire through. It does not matter which side you push through, but from the interior is the shortest and easiest to guide route. I actually had to get under the car and guide the wire up through the engine bay to get it to the battery. Once finished, mine looks like this.

Now that the wire is through the firewall, you should be ready to tear apart (figuratively) your interior.
Start by removing the door trim. Using the gloves here will help keep everything clean. Slide your fingers under the trim and feel for the four clips holding it down. Simply pushing my fingers in was enough to release these clips.

This step is the same for the front and back doors. Once this piece is off, you can remover the cover holding the fuse box door on. There is a clip in the left corner and one in the upper right. If you remove the lower left first, you can just slide it out of the upper right one. I ran the wire over the parking brake brace and down with the other wires going through the door trim under the carpet.

You have two options when you get to the B-column: remover the bottom of the column or use a feed a wire from one door to the other, tape the amp wire to it, and pull through (this is what I did). Once you are past the B-column, you will need to remove your back seat to run the wire to the trunk.
Removing the back seat is almost the exact same as on the previous Legend. There are two clips on the front of the lower seat portion.

If you press on the seat (I just sat on it), there is an anchor shaped release tab for each clip.

I slid two fingers on each side while sitting on the seat and pulled toward the front of the car. Once both clips are removed, the front of the seat can be lifted, and the seat can be pulled out towards the front of the car.
The back of the seat is bolted down by 4 bolts. Here is a pic of the right side.
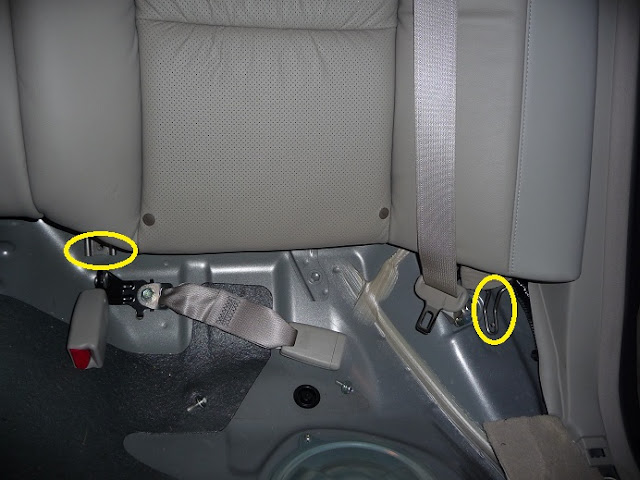
The left side is a mirror image of this. One thing I noticed too late is that the loops on the outside pivot. This helps to have less things get caught on the seat belt when pulling the seat out. Remove the seat belts from their guides.
To remove the back of the seat, remove the 4 bolts and lift the seat straight up towards the ceiling. There are two clips in the back you have to get out of to let the seat come forward.

Once these clips are cleared you can remove the back of the seat.
There is only a small spot to run the wire from the back door trim to the trunk, and you will need your other wire again to get through it. This hole is closest to the outside of the car under the rear door trim.
Once you are through here, it is up to you where the wire should come out.
A few notes:
My 4-gauge wire is tight under the carpet, so if you plan on going 0-gauge, you may want to try a different route. LSM went next to his break lines (I think).
If you notice in the top right corner of the removed carpet on the firewall, there is another hole... This is the experience lesson I learned from all of this. No damage done, but a useless hole I have to plug up. There are two sheets of metal and another metal block directly behind it. Therefore, I do not suggest going immediately above my final hole.
I'm sure there is another place higher on the firewall to go through, but I can't imagine how to get a power drill with a 5/8" bit there.
Since the damage was done and I needed to run an RCA cable anyways, I pretty much redid everything they had done. The only thing they did that I didn't was drill through the firewall.This is the part that had me shaking in my boots. About to take a drill to my new (to me) car with no advice from prior experience is a little nerve racking. Nonetheless, I successfully completed that part of the project and am almost ready to hook everything up and blast away.
For this project you will need: An electric drill, a metal drill bit with a diameter of the outer diameter of your grommet, a grommet with an inner diameter of the diameter of your wire, rust resistant paint, caulk, and an interior trim pry tool. The pry tool is not completely necessary, but will help tremendously to get out any clips that slip from their holders. Also rubber gloves will help to keep your dirty hands off of the interior. To remove the back seat you will need a wrench or ratchet with proper socket sizes.
The idea of drilling through the firewall is to locate a place where there are no wires, tubing, or important systems on EITHER side of the firewall. What I learned from experience is that it also helps to find a spot that is only one sheet of metal thick. Here is a pic of where I chose to drill.
This is just to the left of the steering joint case cover. The white circle is the outline of the hole. Notice the red line. This is a secondary sheet of metal. If you choose to go through here, you will need to have two grommets. On the left side of this hole is the wheel well, so you can only go farther to the right. The case cover is pretty much the same on both sides of the firewall, so you can get really close to that.
Once you have drilled, you will want to paint the hole to stop rust and corrosion. Once the paint is dried, place the grommet
in the hole. I used WD-40 to lube the grommet so it would not push through when I pushed the wire through. It does not matter which side you push through, but from the interior is the shortest and easiest to guide route. I actually had to get under the car and guide the wire up through the engine bay to get it to the battery. Once finished, mine looks like this.
Now that the wire is through the firewall, you should be ready to tear apart (figuratively) your interior.
Start by removing the door trim. Using the gloves here will help keep everything clean. Slide your fingers under the trim and feel for the four clips holding it down. Simply pushing my fingers in was enough to release these clips.
This step is the same for the front and back doors. Once this piece is off, you can remover the cover holding the fuse box door on. There is a clip in the left corner and one in the upper right. If you remove the lower left first, you can just slide it out of the upper right one. I ran the wire over the parking brake brace and down with the other wires going through the door trim under the carpet.
You have two options when you get to the B-column: remover the bottom of the column or use a feed a wire from one door to the other, tape the amp wire to it, and pull through (this is what I did). Once you are past the B-column, you will need to remove your back seat to run the wire to the trunk.
Removing the back seat is almost the exact same as on the previous Legend. There are two clips on the front of the lower seat portion.
If you press on the seat (I just sat on it), there is an anchor shaped release tab for each clip.
I slid two fingers on each side while sitting on the seat and pulled toward the front of the car. Once both clips are removed, the front of the seat can be lifted, and the seat can be pulled out towards the front of the car.
The back of the seat is bolted down by 4 bolts. Here is a pic of the right side.
The left side is a mirror image of this. One thing I noticed too late is that the loops on the outside pivot. This helps to have less things get caught on the seat belt when pulling the seat out. Remove the seat belts from their guides.
To remove the back of the seat, remove the 4 bolts and lift the seat straight up towards the ceiling. There are two clips in the back you have to get out of to let the seat come forward.
Once these clips are cleared you can remove the back of the seat.
There is only a small spot to run the wire from the back door trim to the trunk, and you will need your other wire again to get through it. This hole is closest to the outside of the car under the rear door trim.
Once you are through here, it is up to you where the wire should come out.
A few notes:
My 4-gauge wire is tight under the carpet, so if you plan on going 0-gauge, you may want to try a different route. LSM went next to his break lines (I think).
If you notice in the top right corner of the removed carpet on the firewall, there is another hole...
This is the experience lesson I learned from all of this. No damage done, but a useless hole I have to plug up. There are two sheets of metal and another metal block directly behind it. Therefore, I do not suggest going immediately above my final hole.I'm sure there is another place higher on the firewall to go through, but I can't imagine how to get a power drill with a 5/8" bit there.
Last edited by oo7spy; 12-10-2014 at 07:55 AM.
 03-29-2011, 05:55 PM
#2
Senior Moderator
Thread Starter
I have no clue why the title is unhappy. If a moderator could change this, I would appreciate it. It was supposed to be a happy thread... (Edit:  )
)
Oh, I almost forgot the caulk. I used my finger to spread the caulk around the grommet to keep any moisture out of the cabin.
)Oh, I almost forgot the caulk. I used my finger to spread the caulk around the grommet to keep any moisture out of the cabin.
Last edited by oo7spy; 12-10-2014 at 07:56 AM.
03-30-2011, 09:22 AM
#3

Wish we had more threads like this with pictures to help noobs like me. Wish people congratulated others for their efforts more so here's mine, great job and keep them coming.
04-07-2011, 11:33 PM
#4
Senior Moderator
Thread Starter
The Final Product
Here is a pic of my final product. It took me a whole lot of planning and preparation b/c I was going for maximized trunk space and the cleanest look possible. The only way I could think to make it cleaner would be to build a fiberglass enclosure, and cut the liner more to let the power wires through without bending the liner.

Still, I don't think it's TOO shabby.
Still, I don't think it's TOO shabby.
09-27-2011, 11:03 PM
#6

hey great write up. i do have a coupled of question.
where did you plug in the remote for the amp? what fuse did you use, unless you went behind the radio?
what did you use to get the RCA plugged in? did you tap before the boss amp or at the sub? do you have any pics of this stage?
Thanks, great job.
where did you plug in the remote for the amp? what fuse did you use, unless you went behind the radio?
what did you use to get the RCA plugged in? did you tap before the boss amp or at the sub? do you have any pics of this stage?
Thanks, great job.
09-28-2011, 09:06 AM
#7
Senior Moderator
Thread Starter
Both remote and speaker level wires can be accessed at the stock Bose amp on the right side of the trunk. You will have to remove the amp from the three bolts to get to the wires.
Here is a wiring diagram of the amp.

Carbon Legend and I both used a Line Out converter tapped into B5 and B14, the lines from the amp to the sub woofer, and C19 for the amp remote power. I first tried A24 b/c of the "Remote On" label, but this turned out to be a 5V signal. My first amp required a 12V signal so I had to use C19. Depending on the amp needs you can choose between these two wires.
I don't have any pics of this stage, but all you need is a line out converter, and three wire taps. You will want two larger wire taps, 10-12 gauge, for the LOC because the sub wires are relatively large. I used a 16 gauge tap for the remote.
Here is a link to Carbon's install which helped me prepare for mine. His thread is one reason I left some info out. We happened to be doing them around the same time, and I didn't feel like repeating info.
https://acurazine.com/forums/2g-rl-audio-bluetooth-electronics-navigation-90/video-diy-aftermarket-sub-amp-rl-810416/
While you have access to the amp, I suggest you take the time to unplug the ANC system at the bottom of the amp. Everyone that I have seen here with an aftermarket sub has had to disable a portion of the system one way or another. Most people have chosen to unplug the rear ANC mic. Some people have had to unplug both front and rear. When I attempted to unplug the back one, I found it semi-difficult and wasn't sure I would be able to restore it if need be. There is a way to turn off the ANC through the head unit diagnostics, but the car will not remember this setting. You will have to do it every time you start up, and it gets very annoying quickly. By unplugging the ANC at the amp, you disconnect everything and to put it back, all you have to do is plug it back in. There are no error messages or consequences that I have had.
Don't be fooled when you are setting up the system that you will not have the feedback. The ANC only works when the doors are closed and the engine is running. I thought I was the lucky one who wouldn't have to do anything, but low and behold, I had my door open when I was testing the system.
Here is a wiring diagram of the amp.
Carbon Legend and I both used a Line Out converter tapped into B5 and B14, the lines from the amp to the sub woofer, and C19 for the amp remote power. I first tried A24 b/c of the "Remote On" label, but this turned out to be a 5V signal. My first amp required a 12V signal so I had to use C19. Depending on the amp needs you can choose between these two wires.
I don't have any pics of this stage, but all you need is a line out converter, and three wire taps. You will want two larger wire taps, 10-12 gauge, for the LOC because the sub wires are relatively large. I used a 16 gauge tap for the remote.
Here is a link to Carbon's install which helped me prepare for mine. His thread is one reason I left some info out. We happened to be doing them around the same time, and I didn't feel like repeating info.
https://acurazine.com/forums/2g-rl-audio-bluetooth-electronics-navigation-90/video-diy-aftermarket-sub-amp-rl-810416/
While you have access to the amp, I suggest you take the time to unplug the ANC system at the bottom of the amp. Everyone that I have seen here with an aftermarket sub has had to disable a portion of the system one way or another. Most people have chosen to unplug the rear ANC mic. Some people have had to unplug both front and rear. When I attempted to unplug the back one, I found it semi-difficult and wasn't sure I would be able to restore it if need be. There is a way to turn off the ANC through the head unit diagnostics, but the car will not remember this setting. You will have to do it every time you start up, and it gets very annoying quickly. By unplugging the ANC at the amp, you disconnect everything and to put it back, all you have to do is plug it back in. There are no error messages or consequences that I have had.
Don't be fooled when you are setting up the system that you will not have the feedback. The ANC only works when the doors are closed and the engine is running. I thought I was the lucky one who wouldn't have to do anything, but low and behold, I had my door open when I was testing the system.
The following users liked this post:
HEAVY_RL (09-28-2011)
Trending Topics
09-28-2011, 11:21 AM
#8
hey thanks for the info. and seeing the videos, i thought the settings would remain. im guessing it didnt remain for you on the ANC. do you know if it remained for carbon? well thanks again will attempt this already have the battery wire going back just didnt know where to tap in the remote, i usually tap in the lower kick panel fuse box.
https://acurazine.com/forums/2g-rl-audio-bluetooth-electronics-navigation-90/i-027-diy-anc-disable-aftermarket-sub-no-tools-814274/
https://acurazine.com/forums/2g-rl-audio-bluetooth-electronics-navigation-90/i-027-diy-anc-disable-aftermarket-sub-no-tools-814274/
07-11-2012, 11:42 PM
#9

Thanks for the detailed instructions! I'm new to the forum and have been reading through several posts and was hoping to get some clarifications on your install:
1) For running the Power wire through the firewall, I saw another post that indicated that there is already a hole that can be used (https://acurazine.com/forums/2g-rl-audio-bluetooth-electronics-navigation-90/quick-easy-way-run-amp-power-wire-through-firewall-838975/). Is there a reason you didn't use this existing hole and decided to drill? The reason I ask is that I'm hesitant to drill a hole through the firewall and would prefer to use an existing hole if possible.
2) For unplugging the ANC at the stock amp, is it labeled on the bottom of the amp and easy to unplug?
Thanks!

Thread
Thread Starter
Forum
Replies
Last Post
cycdaniel
1G TSX Performance Parts & Modifications
8
12-17-2019 10:58 AM
detailersdomain
Wash & Wax
3
10-09-2015 10:13 PM
STL TL-S
3G TL Problems & Fixes
9
09-23-2015 08:52 PM