
My '03 CLS6 progress thread

This rubber edge trim would probably work. You can select 1/8" which is the thickness of the lexan. They want you to order 500ft of it at a price of $557 tho. 
http://www.trimlok.com/prod/Rubber-E...7&ProductID=48
Something like this hatch seal in configuration c might work also. They don't even let you select option c online tho.
http://www.trimlok.com/prod/Hatch-Se...9&ProductID=46
http://www.trimlok.com/prod/Rubber-E...7&ProductID=48
Something like this hatch seal in configuration c might work also. They don't even let you select option c online tho.
http://www.trimlok.com/prod/Hatch-Se...9&ProductID=46


Check out the links below for samples of seals in regards to what I was trying to convey in the previous post: There is a channel to accept the flat part of the Lexan and then an 'open circle' type of space that would tend to compress with mounting pressure to form some what of a seal.
http://www.reidsupply.com/sku/STP-1831/
http://www.reidsupply.com/sku/STP-1827/
There is this type of seal, as well. It's like the first link above and less expensive; however, the website does not say how long it is overall.
http://www.foxbodyworld.com/product....FQeFnQod7W4AVg
In addition, just picture how much cleaner it would look if one were to go just a little farther and incorporate some sort of edge sealing gasket, if possible.


RP's setup looks clean, don't get me wrong; however, I would not want to deal with a sealant if I could get away with it, though. That's just me.

Good Luck.
Last edited by zeta; Apr 12, 2013 at 12:20 PM.
Another option might be sunroof butyl sealant tape.
The seals you posted zeta are like the rear hatch seal I posted. You would want it on the back versus the side I would say. It helps if it is coated in butyl also for better grip.
Here is one I was looking at. The bulb is smaller.
http://www.dkhardware.com/product-41...60-to-170.html
They sell a chain will a piece of each seal on it to test fit and see which you need. Might be worth it.
http://www.dkhardware.com/product-27...als-chain.html
There you go, you are on your way.
hehe, I tried to find you a vendor that would sell by smaller increments than a whole roll or a minimum length. I've been burned many times by this. As you know, the specialty stuff is out there, but takes a little research time to root it out.
hehe, I tried to find you a vendor that would sell by smaller increments than a whole roll or a minimum length. I've been burned many times by this. As you know, the specialty stuff is out there, but takes a little research time to root it out.
Ferrari owners? Most any of my family members has spent on a car was 70,000 or less. I will have 10k in inheritance as the only inheritance I ever receive so don't see what the big deal is. What is with personal attacks anyway, I never insult you when it could be very easy to. Keep the talk to cars please.
I was just joking about how ugly the Aztek is, there was nothing more to it then that.
I was just joking about how ugly the Aztek is, there was nothing more to it then that.
go with brackets in the back that will mount from 2 places,much more sturdy.
OK Boss


I will probably just look into a race mirror instead.
The lexan moonroof project is kind of on hold until I find a seal that will work and receive it.
I ordered the 3rd gen tl moonroof seal and it arrived today. Sadly, it will not work. It is the opposite of what I need with a section that sticks out instead of recessing in. Hopefully I can sell it to a member on here.


I just ordered this from grainger. It is from trim-lok.
http://www.grainger.com/Grainger/TRI...006?Pid=search
Just need to wait for it to arrive now.
It will be interesting to see how this works out for your project. I was thinking, if by some chance, the round portion of the edge seal becomes a little difficult to compress or gets in the way somehow. It would be easy to trim it, say for instance, in half, fold it under the female portion that receives the glass, that would lay between the cut-out (sandwiched) and the metal recess. Using it as an additional layer of seal as the Lexan is tightened down around the periphery.
In addition, maybe it would be possible to find an inexpensive substitute material that is firm enough to use that you could use to practice with until you find that 'sweet spot' as far as cut-out size. Maybe 1/4 inch plywood or fiber board?
In addition, maybe it would be possible to find an inexpensive substitute material that is firm enough to use that you could use to practice with until you find that 'sweet spot' as far as cut-out size. Maybe 1/4 inch plywood or fiber board?
The second one is a good idea since I don't want to ruin the expensive lexan and have to order another.
The overall size of the sunroof filler, where its edge meets the edge of the recess in the roof, will determine any gap where they meet all around.
The object is to get the proper overall size of the sunroof filler so that the gap will accommodate a degree of compression of the 'O' portion of the seal, as one fastens down via the mounting brackets, to make it watertight.
Therein, lies the need to have an inexpensive substitute material to make your test fits. You may find, depending on the size of the sunroof filler, with the seal attached, that the 'O' portion of the seal may bulge, more than you like, once you fit it/mount it to the recess.
Therefore, it probably will be necessary to experiment a few times with varying increments of size to get it to your liking coupled with an adequate seal.
Now, if the above 'O' portion somehow does not work out aesthetically as you like. Then you may be able to experiment further with the seal, so that you can achieve a proper look; but only as a last resort.
Adapt to and overcome what dilemmas may present themselves.
I would not bother using the oem glass seal.
I tryied to hold my glass with seal up in the hole and it did not even seal well at all.
you will need something thicker and do what I did. You can't beat 25 bucks. after a 2nd seal job it's been holding fine.
I tryied to hold my glass with seal up in the hole and it did not even seal well at all.
you will need something thicker and do what I did. You can't beat 25 bucks. after a 2nd seal job it's been holding fine.
The few pics you posted were kind of blurry so I am not sure what you did. It is gonna end up costing me a lot more than $25 to do this.
I received the 2 items in the mail yesterday I was waiting on.
Trim-lok edge seal from grainger.

CRL sunroof butyl sealant tape.

I will be spending some time later today working on this project.
I got some progress done yesterday. I ended up getting a metal shard stuck in my eye for 3-4 hours before it delodged itself. That sucked and hindered my progress.
I bought a 1/8" x 2' x 4' sheet of hardboard from menards. I cut it out smaller than my template. Gonna adjust till I get it just right.

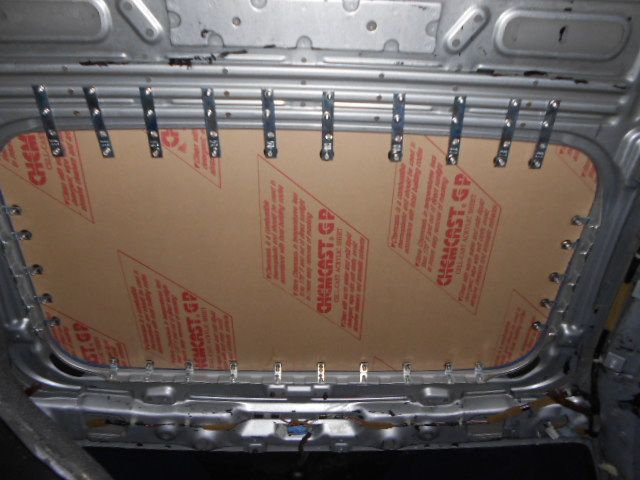
Installed all the rear brackets but 1. Only options really are self-tapping screws or welding brackets on. I would prefer welded on, but I don't have a welder. I used same method and brackets as RP did. Brackets are from lowes and I used #10 3/8" self tapping screws.


For the front and side brackets I am gonna use m5 button cap screws and self locking nuts since there is room for it. I bought these brackets from home depot. Then I cut part of the brackets off so they line up with the bottom of the lip. Next up, I drilled holes in the roof lip. Finally, install brackets and tighten down.


I bought a 1/8" x 2' x 4' sheet of hardboard from menards. I cut it out smaller than my template. Gonna adjust till I get it just right.

Installed all the rear brackets but 1. Only options really are self-tapping screws or welding brackets on. I would prefer welded on, but I don't have a welder. I used same method and brackets as RP did. Brackets are from lowes and I used #10 3/8" self tapping screws.


For the front and side brackets I am gonna use m5 button cap screws and self locking nuts since there is room for it. I bought these brackets from home depot. Then I cut part of the brackets off so they line up with the bottom of the lip. Next up, I drilled holes in the roof lip. Finally, install brackets and tighten down.


Nice progress,
Good thing you got the metal out of your eye.
I got metal in my eye when I was grinding my header flanges and it ended up costing me just over 1k to get out,and I just got it payed off 2 days ago.
So my headers cost about 270, over 300 for the coating and over 1000 for the hospital.
My headers cost me ruffly 1600 and some pain
I finished installing the front brackets and fit a section of the edge trim around the hardboard cutout. The cutout is slightly too small, but I should be able to get the next one just right. Still need to do side brackets.
Here are pics of the panel just sitting on top of the brackets.


Being a 6th gen Accord guy I never check CL threads. Saw your sunroof plug mod and was very happy to see this method.
Was planning to have someone make a Fiberglass plug for my Accord sunroof and mount it up with sealant, similar to the TL-diet....
...now, I will use this method.
How exactly will the rubber gasket seal up the plug?
Was planning to have someone make a Fiberglass plug for my Accord sunroof and mount it up with sealant, similar to the TL-diet....
...now, I will use this method.
How exactly will the rubber gasket seal up the plug?
I made some progress on it today. Will post an update with pics tomorrow.
Last edited by brian6speed; Apr 21, 2013 at 09:22 PM.

Where is that? Under the windshield and plastic cowl I assume since that is only spot I haven't checked besides behind the fender linings.
After I finish sunroof plug I will be pretty much done with weight removal. Carbon fiber hood and trunk could be possibilities and a lighter stoptech bbk. I see no point in taking it further unless it becomes a track only car with a trailer but I don't have the means for that.
Gonna focus more on suspension, custom headers, safety equipment, etc.
Last edited by brian6speed; Apr 23, 2013 at 10:46 AM.
Its under the wiper motor and transmission.
I see it when I was putting my wipers back in and thought I'd get you another lb.
I removed my cluster so I can get a new one in there and I always get carried away. I pulled my dash and all the foam so far.
Going to see how hard it will be to get at the tar off the dash now.
Any pointers for that ?
I thought of a new way to remove the tar. This time I used my heat gun to heat it up and make it gummy. Then I just used a plastic chisel and some muscle power to push under the tar and scrape it up. My hand is so sore right now tho." Then I used 3m adhesive remover to remove the tar residue.
I took this pic on my iphone last month but forgot to post it. I spotted this cl in round lake when I was eating at chipolte. It reminded me of my car and has an acurazine sticker on it.

Here are all the brackets installed.

Hardboard cutout with mounting holes drilled. I decided I might try just using this as the panel before I make the lexan one. I sanded it, cleaned it, then I primed it using almost 2 full cans of primer. I first used a fill-in primer and then a sandable primer. I then sanded it with 320 grit sandpaper. Next up is painting it flat black with a clear coat and more sanding.

I forgot to take pics of when I had it mounted to the roof. After painting and sanding then it is just deciding what hardware to use and applying spacers above brackets. I have both nylon and rubber spacers/washers to use with stainless button head bolts.
Last edited by brian6speed; Apr 23, 2013 at 01:56 PM.
I painted the panel with 2 cans of flat black paint. Decided it is time to test fit it again. The panel fits good with no visible gaps. Turned out better than I ever expected. Rear hardware installed. Need to go buy hardware for the front and sides.
I want to drive with this panel to see if it flexes and makes noise before I begin work on lexan one.
Here is a teaser pic of the panel installed.

I want to drive with this panel to see if it flexes and makes noise before I begin work on lexan one.
Here is a teaser pic of the panel installed.

Nice.
It looks like you achieved a decent amount of compression without total collapse. Once all of the hardware is in place, it may be necessary to test the seal, say by running a water hose or something over it to simulate a down pour.
It looks like you achieved a decent amount of compression without total collapse. Once all of the hardware is in place, it may be necessary to test the seal, say by running a water hose or something over it to simulate a down pour.
The one thing you have to take into account is the edge trim will automatically be more compressed in the corners from bending and stretching around the curve. I took that into account by extending the corners out probably roughly 3mm. Just gotta take your time and measure everything multiple times.
Last edited by brian6speed; Apr 25, 2013 at 06:12 PM.

Spinsisko, you should check out innacurate's and vill0's threads in 3g tl performance section. Those threads are better than mine.
I had some trouble painting the panel outside in the wind. No matter how much I sanded after it would still be blotchy from the wind painting. After probably painting it 10 times I am finally satisfied with it. The paint is still not perfect but it is good enough for now.

The final paint I used was this.

I wanted to point out an issue I encountered with the bracket install. If you do it like I did and tighten it down through the 2 layers of sheet metal, it can flex and distort the roof panel. The roof panel is very sensitive. I noticed that and removed all the brackets. You will need to fill the gap between the 2 layers of sheet metal with spacers. The sheet metal edges have a slight lip so the spacers need to be slightly larger than the opening and jammed in there. Make sure that there is no flex in the panel when you tighten each bracket down again. Check the roof for any signs of waviness. It was mainly only the front brackets that did this.

The bottom of the edge trim sits on the top of the metal brackets. Then you fill in the space to the board/panel with spacers. I used a combination of nylon, fiber, and aluminum washers/spacers with a rubber washer on top to fill the gaps.


Panel with all the hardware installed. I tested it for leaks by dumping a cup of water on it and I saw no signs of water coming through so far.

Weight Reduction Progress
03 Acura CL-S 6
Stock curb weight: 3446 lbs
EXTERIOR
SSR wheels -32 lbs
Project Kics Lugs -1.05 lbs
Exhaust -13 lbs
OEM mirrors replaced with APR -5.39 lbs
Front license plate and holder -1 lbs
Rear emblems -.05 lbs
Amber headlight reflectors -.11 lbs
Horn & horn cover -.91 lbs
Front bumper beam swiss cheesed -5.5 lbs
Moonroof assembly -30 lbs
Zeal coilovers (not sure)
TRUNK
Trunk wire removal -.86 lbs
Trunk light -.04 lbs
Spare tire -29.5 lbs
Jack -3.63 lbs
Trunk tools -1.61 lbs
Trunk carpet floor -8 lbs
Trunk side carpet (2 pieces) -6 lbs
Trunk plastic -3.06 lbs
Trunk sealant -.4 lbs
Trunk springs -.5 lbs
Trunk lid cover/fabric (not sure)
Stock amp -1.75 lbs
REAR SEATS
C Pillars(x2) -1.81 lbs
Rear deck lid -3 lbs
Third brake light -.72 lbs
Rear speakers -3.58 lbs
Rear seat belts -4.4 lbs
Seat belt protectors -.08 lbs
Rear seat back -26 lbs
Rear seat bottom cushions(x2) -11 lbs
Rear seat console -7 lbs
Rear seat side panels(x2) -11 lbs
Sound deadening(entire car) & rear seat a/c ducting -47.27 lbs
White plastic covers -.29 lbs
White padding -.68 lbs
Cross member gussets swiss cheesed -6.5 lbs
FRONT SEATS
Headliner -4.5 lbs
Metra dash kit and card holder -1.21 lbs
Metal support radio/dash -3.24 lbs
Dash Metal brackets -.14 lbs
Dash mat material -.4 lbs
Driver visor -1.76 lbs
Passenger visor -1.76 lbs
Dome light -.16 lbs
Roof console -.96 lbs
Roof handle -.23 lbs
Roof hanger -.06 lbs
Quarter window weather-stripping -1.22 lbs
A-Pillars -1.44 lbs
Radio antenna -.41 lbs
Engine mount solenoid control unit -.31 lbs
Plastic piece under accelerator pedal -.14 lbs
Door Panels -22 lbs
Driver seat swapped for recaro -40.8 lbs
Passenger seat swapped for recaro -24.5 lbs
B Pillars(x2) -.93 lbs
Kick panels(x2) -.68 lbs
Center console -13.69 lbs
Carpet -23 lbs
Stock radio -6.07 lbs
Front seatbelts -9.76 lbs
SRS side airbag sensors -1.72 lbs
Steering column plastic -1.83 lbs
Front speakers -4.1 lbs
Mugen/ works bell steering wheel(stock delete) -5 lbs
Gas cap release bracket metal -.03 lbs
Dash wire removal -2.3 lbs
Driver wire removal -.77 lbs
Passenger wire removal -1.48 lbs
Footrest metal removal -1.25 lbs
Glovebox -4.21 lbs
Front passenger airbag -8.92 lbs
SRS unit -1.42 lbs
SRS connectors metal bracket -.47 lbs
Passenger dash side panel -.26 lbs
Plastic toe stop -.14 lbs
Cruise control button -.1 lbs
Memory seat position switch -.09 lbs
Side mirror control switch -.08 lbs
Driver door handle plastic removed -.02 lbs
Door handle protectors -.5 lbs
ENGINE BAY
P/S hose bracket -.075 lbs
IMRC runner, bracket, & control module -2 lbs
Braille battery(15 lb) -23.5 lbs
Cruise control -2.81 lbs
Front bumper damper -7 lbs
Engine cover (not sure)
Small engine cover -.92 lbs
Plastic over radiator -1 lbs
Hood insulation -1.5 lbs
Comptech strut bar (not sure)
Comptech headers (not sure)
Option pulley -7 lbs
Firewall insulation -.4 lbs
Washer fluid reservoir ,fluid, & lines -7.47 lbs
Front hood seal -.1 lbs
Subracted weight I am sure of -495.74 lbs
ADDED WEIGHT
Stock spoiler (not sure)
Harness bar +7 lbs
Harnesses +7 lbs
UR 4-point bar (not sure)
Cusco front tie bar (not sure)
Rear tie bar (not sure)
Oil catch can (not sure)
Ingall’s stiffy mount (not sure)
Tow hook
P2r tb spacer
I am definitely under 3k lbs now. I can leave the passenger seat out for more weight loss also at events.
Last edited by brian6speed; May 3, 2013 at 11:53 AM.

I ran across this article in the latest hondatuning mag and thought it was interesting. I will list what it says in case you can't read from the pic.
D series: 309 lbs
B series non-vtec: 395 lbs
B series vtec: 405 lbs
2.0 K series: 405 lbs
2.4 k series: 413 lbs
H series vtec: 485 lbs
J series: 550 lbs
J series- "Different intake manifold configurations result in small variences in weight, but most 3.2L J-series engines measure relatively the same. Larger 3.5L and 3.7L engines feature longer-stroke, heavier crankshafts, and larger diameter sleeves, which results in roughly 25 lbs of additional weight".
"***All weights include engine, transmission, intake and exhaust manifolds, axles, and major accesories. All weights are approximate. All weights include manual transmission only".
Last edited by brian6speed; May 7, 2013 at 09:08 AM.
I ordered a few things from blackworks racing.
A 30mm temperature sensor adapter for the water temp gauge, a pair of urethane exhaust hangers, and a reservoir cover.


The exhaust hanger holes are larger than needed. I just wrapped the metal hanger with electrical tape to get the right thickness. These are probably not worth buying.


OBX silicone radiator hoses. They don't seem like a perfect fit, but should work.


I picked up another tow hook for the rear that is the same as the front one.

I noticed this site advertised in hondatuning mag and decided to order a few things from them.
http://www.eeffectapparel.com/
Shirt front

Shirt back


I also ordered some ARP chrome-moly wheel studs.
http://www.heeltoeauto.com/arp-chrom...roductid=66001

Hmmm not sure. I bought it off ebay. It was listed for the 99-03 tl and 01-03 cl. It doesn't seem to match the pictures other sites used. The bag it came in has part number 11791 written in marker on it. Nothing comes up when I type in that part number though.
Now I need to figure out what car it was meant for so I can sell it. I guess I deserve this for buying a low quality item off eBay. Ill just stick with oem hoses.
Now I need to figure out what car it was meant for so I can sell it. I guess I deserve this for buying a low quality item off eBay. Ill just stick with oem hoses.