
Yungone501's- Excessive infatuation with the J-series
 02-04-2014, 10:49 PM
#1081
I think its funny how a many of us here with the big power builds are all down atm. Thats not to say that theres still some of you guys out there ringing out their motors waiting to be struck with the same bug.....inevitably rendering their vehicle useless until completion of the build.

 02-06-2014, 11:26 PM
#1082
Ugh, don't remind me. It's driving me (unintentional play on words) crazy and can't wait!
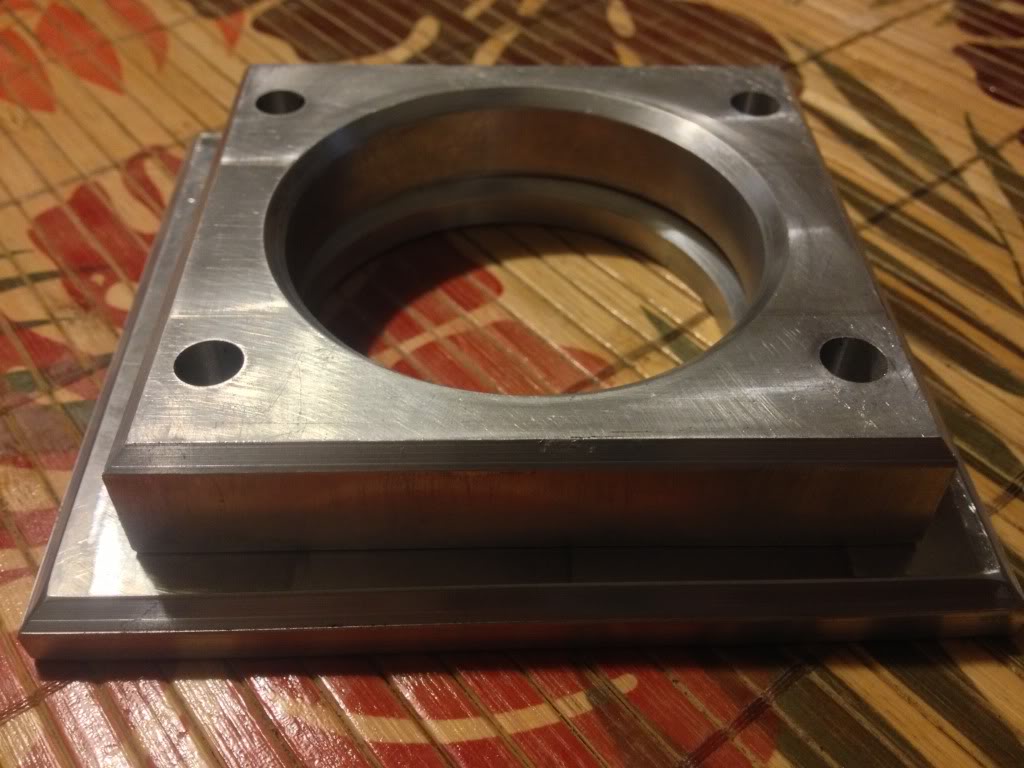
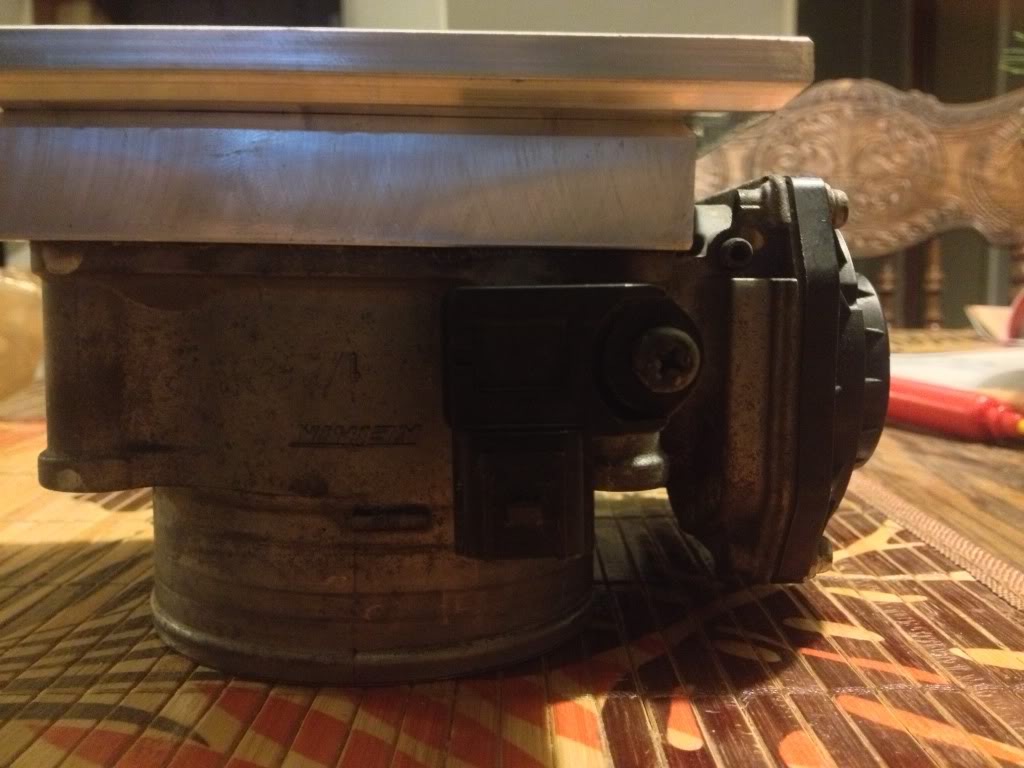
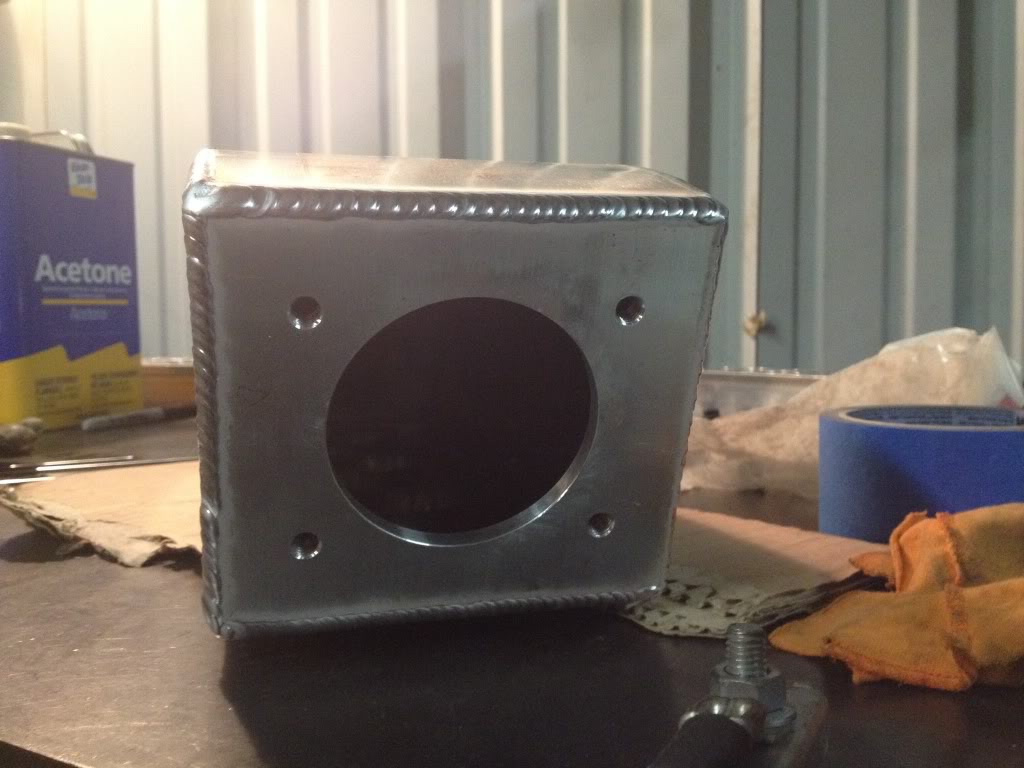
Had these made today for the intake Matts been working on for me. The larger of the two plates will be the actual plate that the throttle body mounts to and the other is simply just a spacer so the TB can mount flush. The lower picture illustrates my point. You can see how the electronic actuator motor on the side would not allow it to lay flat. Don't worry, this isn't the actual TB ill be using. Mine is painted.....guess what color.....black.
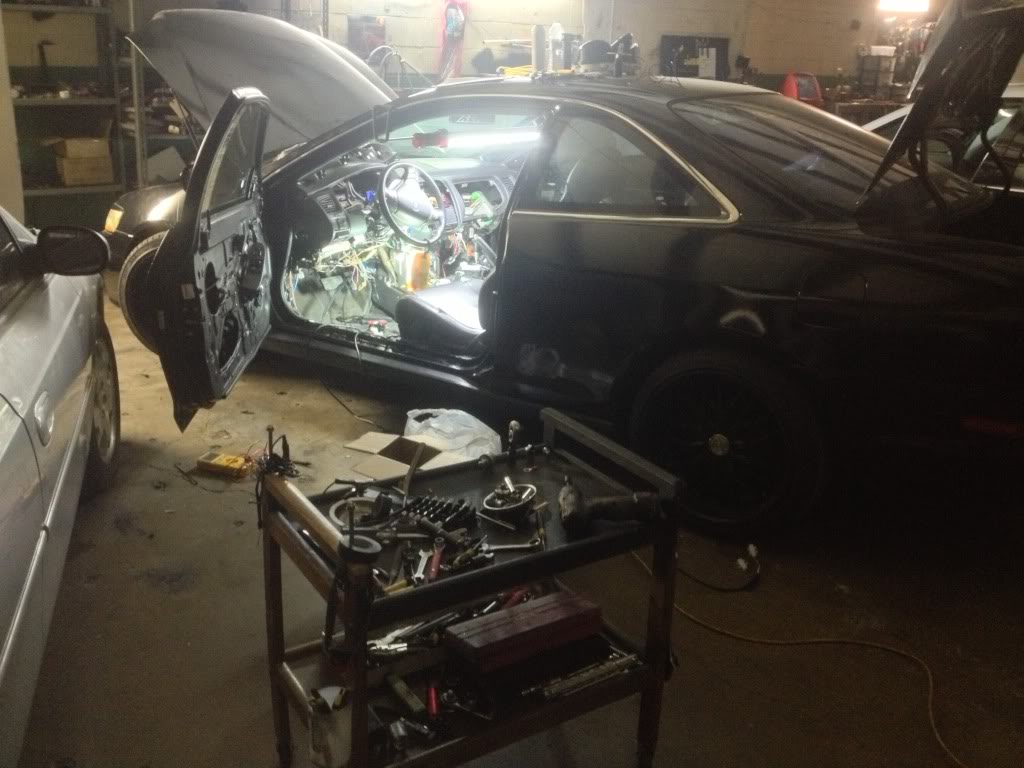
And last but not least, the harness was finished tonight. I will be working on the car off and on throughout the remainder of the week to get it installed. Still a ton more work to do on the inside of the car for the monitoring systems but I'm getting pretty damn close to driveable.
Had these made today for the intake Matts been working on for me. The larger of the two plates will be the actual plate that the throttle body mounts to and the other is simply just a spacer so the TB can mount flush. The lower picture illustrates my point. You can see how the electronic actuator motor on the side would not allow it to lay flat. Don't worry, this isn't the actual TB ill be using. Mine is painted.....guess what color.....black.
And last but not least, the harness was finished tonight. I will be working on the car off and on throughout the remainder of the week to get it installed. Still a ton more work to do on the inside of the car for the monitoring systems but I'm getting pretty damn close to driveable.
02-09-2014, 01:56 AM
#1083
Got a few hours in with the car and routed the harness for final install....WUT!
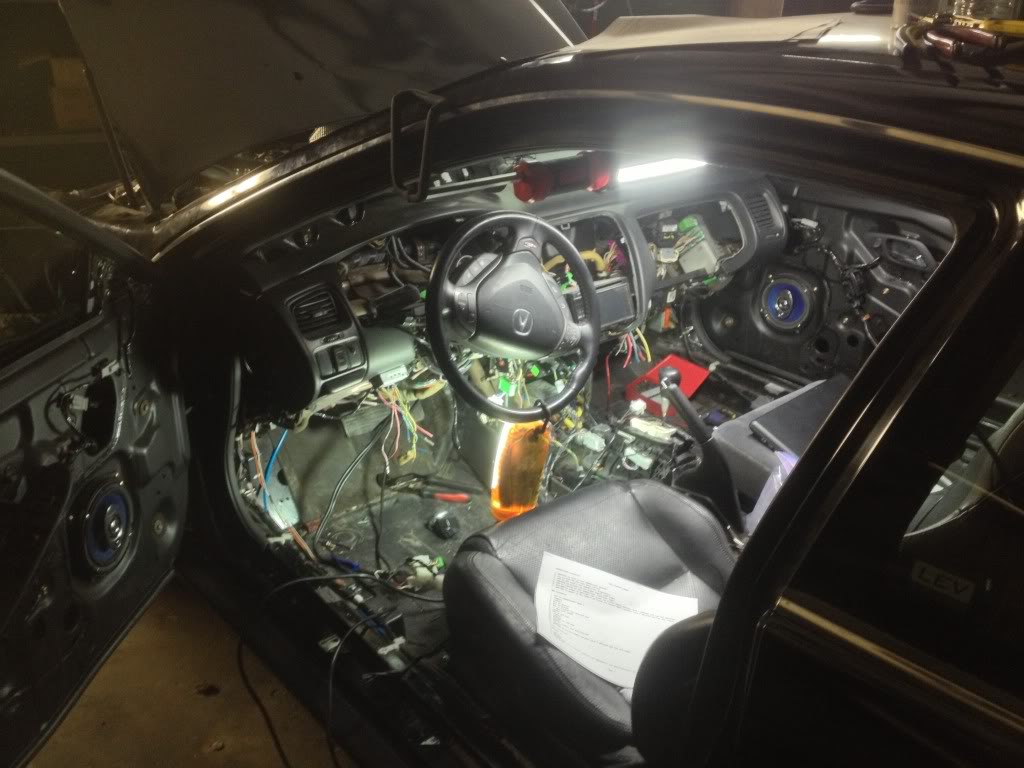
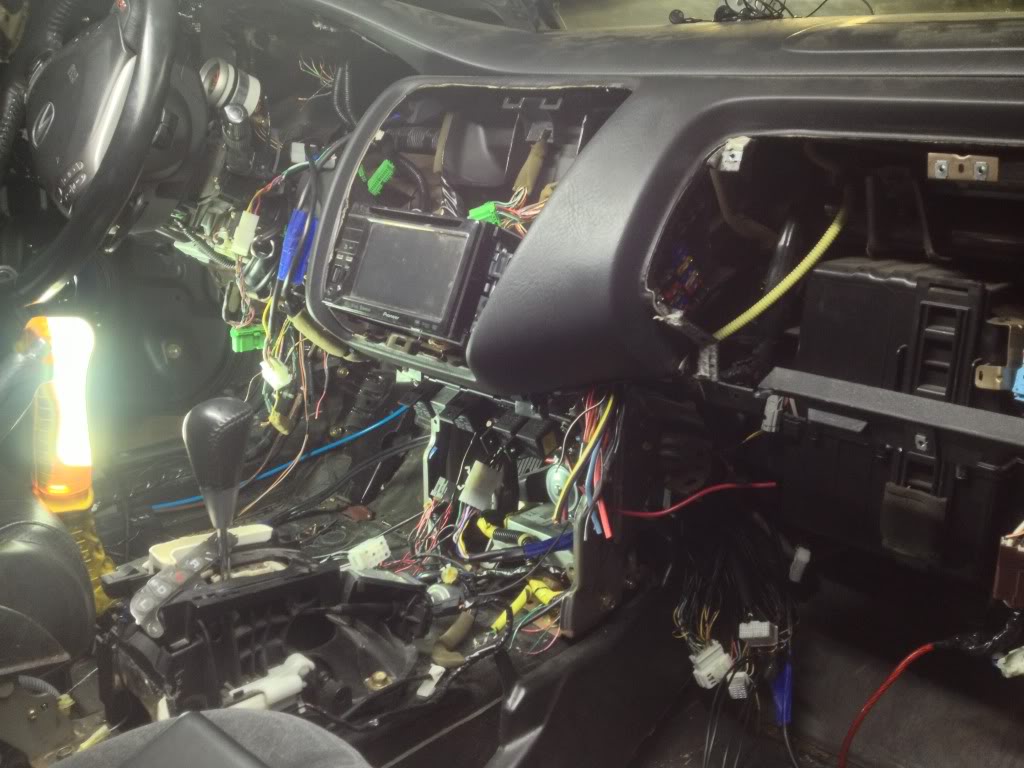
Yup, harness is in and I began to integrate it with the Accords wiring. I was able to do roughly 80% of the entire harness out of the car but there were some things I had to wait on such as the pinning the opposite sides of the connectors I prewired. The two "biggest" parts are the connector pinning were the instrument cluster and the Volkswagen fuse/relay blocks. Remember, I've made component (immobilizer, fuse block, shifter assy, even the OBD port) connectors separate from the original harness. That means between the original ECM connectors and say the immobilizer connector, there's another connector that allows me to disconnect that portion of the harness in case I need to add/subtract/modify a portion of that wiring if something changes in the car like adding in an audible fault detection system if my AF ratio drops too low. I did this because I have many more ideas and plans with the Accord and would have to keep rewiring the car anytime I add something. And just so you guys know, I HATE harness "lay overs" where wiring is ran where ever it was convenient to run. Not only is this ugly and unprofessional, its also very unreliable in terms of a wire catching a jagged piece of metal on the dash bracketry and possible shorting out important safety systems such as methanol injection or knock controller wiring.
Anywho, I've included a few pics to show the status and also give those who can actually make out what's going on a chance to do so. If you look closely, in some of the pictures you can see various small, white connectors. These are Molex connectors and are the connectors I was explaining above that allow me to service the harness. They are very user friendly, cheap, high quality, widely available (local electronics supply) connectors that I've used for years and I love them.
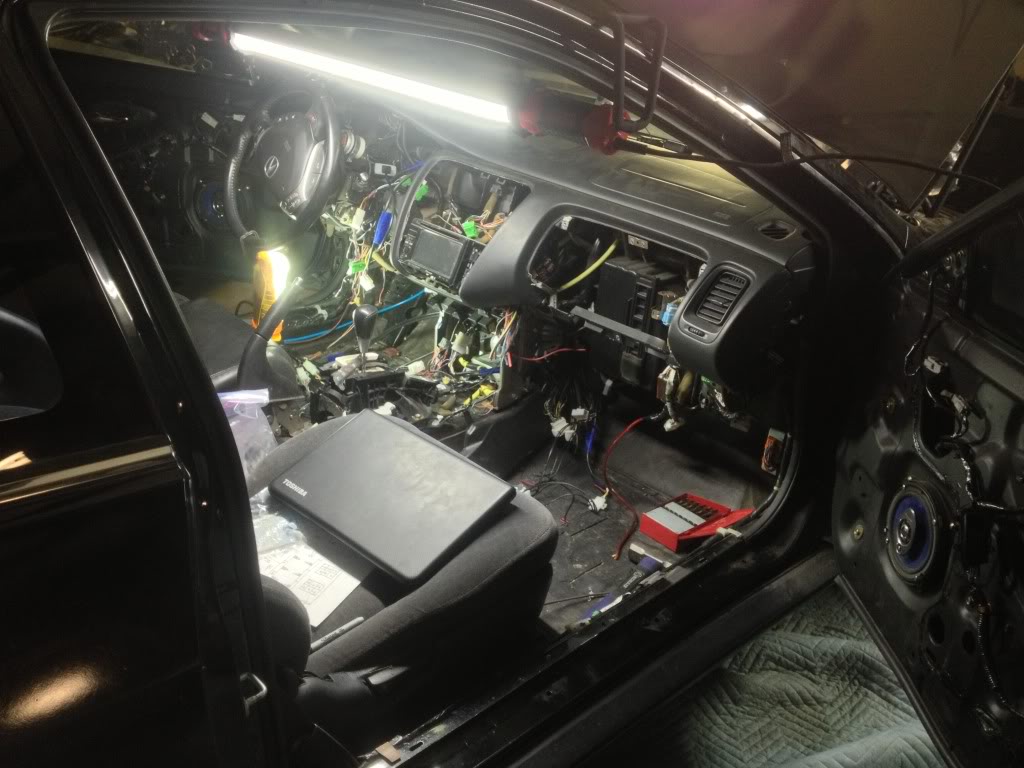
The third picture shows a few things that I wanted to point out. First you can see the stock Honda green cluster connector hanging right below the ignition lock cylinder and then a few inches before that is a 9-pin Molex connector. Several feet down into the harness near the center of the dash, there another one that allows me to quickly remove that entire harness and add any circuits I need and then also quickly reinstall all the while keeping things neat/clean. Secondly, right above the airbag module that's bolted to the floor of the center console (below radio) you'll see something silver and what looks like the top of a D battery. This is a continuous duty relay that is basically a very large relay (in solenoid form) of which can consistently supply its load 125 amps. I have nearly all of my "ignition on" electrical components wired into this as their source of power when the key is turned on. This is controlled by one small wire of which is energized by the ignition switch "ON" signal. This is generally one of the absolute best things a person can do to their car IF they have added many electrical loads to their car (or one or more larger loads like a subwoofer and amp) because it can protect and isolate the wiring in your car from damage done from excessive amperage draw, wiring faults, shorted harness, etc. worth the $50+ you will pay for it....TRUST me. In that same picture, you can see I moved the relay block slightly up more and out of the way. The fuse block is also there to the right of it and to the far left of the glove compartment area.
You will notice that the wiring looks like crap...especially down by the ECM. Well, that's because its not done yet. Trust me, it will all look very nice when its all tidied up and wrapped with loom. I'm showing you guys the rawness of the car as I'm doing it. Not just the pretty shots like so many others only show. Lol
Also, a link to Molex's website for anyone interested in learning more about their connectors or products:
http://www.molex.com/molex/index.jsp
Yup, harness is in and I began to integrate it with the Accords wiring. I was able to do roughly 80% of the entire harness out of the car but there were some things I had to wait on such as the pinning the opposite sides of the connectors I prewired. The two "biggest" parts are the connector pinning were the instrument cluster and the Volkswagen fuse/relay blocks. Remember, I've made component (immobilizer, fuse block, shifter assy, even the OBD port) connectors separate from the original harness. That means between the original ECM connectors and say the immobilizer connector, there's another connector that allows me to disconnect that portion of the harness in case I need to add/subtract/modify a portion of that wiring if something changes in the car like adding in an audible fault detection system if my AF ratio drops too low. I did this because I have many more ideas and plans with the Accord and would have to keep rewiring the car anytime I add something. And just so you guys know, I HATE harness "lay overs" where wiring is ran where ever it was convenient to run. Not only is this ugly and unprofessional, its also very unreliable in terms of a wire catching a jagged piece of metal on the dash bracketry and possible shorting out important safety systems such as methanol injection or knock controller wiring.
Anywho, I've included a few pics to show the status and also give those who can actually make out what's going on a chance to do so. If you look closely, in some of the pictures you can see various small, white connectors. These are Molex connectors and are the connectors I was explaining above that allow me to service the harness. They are very user friendly, cheap, high quality, widely available (local electronics supply) connectors that I've used for years and I love them.
The third picture shows a few things that I wanted to point out. First you can see the stock Honda green cluster connector hanging right below the ignition lock cylinder and then a few inches before that is a 9-pin Molex connector. Several feet down into the harness near the center of the dash, there another one that allows me to quickly remove that entire harness and add any circuits I need and then also quickly reinstall all the while keeping things neat/clean. Secondly, right above the airbag module that's bolted to the floor of the center console (below radio) you'll see something silver and what looks like the top of a D battery. This is a continuous duty relay that is basically a very large relay (in solenoid form) of which can consistently supply its load 125 amps. I have nearly all of my "ignition on" electrical components wired into this as their source of power when the key is turned on. This is controlled by one small wire of which is energized by the ignition switch "ON" signal. This is generally one of the absolute best things a person can do to their car IF they have added many electrical loads to their car (or one or more larger loads like a subwoofer and amp) because it can protect and isolate the wiring in your car from damage done from excessive amperage draw, wiring faults, shorted harness, etc. worth the $50+ you will pay for it....TRUST me. In that same picture, you can see I moved the relay block slightly up more and out of the way. The fuse block is also there to the right of it and to the far left of the glove compartment area.
You will notice that the wiring looks like crap...especially down by the ECM. Well, that's because its not done yet. Trust me, it will all look very nice when its all tidied up and wrapped with loom. I'm showing you guys the rawness of the car as I'm doing it. Not just the pretty shots like so many others only show. Lol
Also, a link to Molex's website for anyone interested in learning more about their connectors or products:
http://www.molex.com/molex/index.jsp
The following users liked this post:
03 tls nc (08-02-2014)
The following users liked this post:
Marcelechka (02-09-2014)
02-09-2014, 08:35 PM
#1087
takin care of Business in
iTrader: (5)
Join Date: Jan 2008
Location: Kansas City, MO
Age: 40
Posts: 30,994
Received 4,732 Likes
on
4,064 Posts

 02-12-2014, 10:35 PM
#1093
takin care of Business in
iTrader: (5)
Join Date: Jan 2008
Location: Kansas City, MO
Age: 40
Posts: 30,994
Received 4,732 Likes
on
4,064 Posts
^^^ you want it wide open at the inlet as at that point you are feeding 6 cylinders....the farthest corner, you are barely feeding 2 cylinders and hence the shape....
remember you want it to flow well and have volume but at the same time you need to keep the intake velocity high
remember you want it to flow well and have volume but at the same time you need to keep the intake velocity high
The following users liked this post:
gnuts (02-13-2014)
02-13-2014, 01:12 AM
#1094
I can't wait to get our intake manifolds Robert! They looks sick.
02-13-2014, 11:44 PM
#1095
^^^ you want it wide open at the inlet as at that point you are feeding 6 cylinders....the farthest corner, you are barely feeding 2 cylinders and hence the shape....
remember you want it to flow well and have volume but at the same time you need to keep the intake velocity high
remember you want it to flow well and have volume but at the same time you need to keep the intake velocity high
 kidding brother.
In response to Gnuts post, hood clearance won't be an issue. This is because, there will more than likely be a large hole or cowling of some sort directly above this massive intake. Matt and I have already discussed the matter and will more than likely be dropping that off to him to work some metal-magic on it. Btw, I'm on the hunt for any good ideas or designs people have to offer. I have one so far and would like others. Being creative and "artsy" is definitely not my particular area of professionalism. I do electrical, swap/conversions, heavy line mechanical and that's about it.
Dude, I hear ya. I'm so excite too! According to him, it will be mailed out tomorrow.
***UPDATE***
Harness has nearly been completely installed. Have managed to put 2-3 hours in her at work this week....some how? So far, the install has went very smooth and feel good about the overall quality and functionality. I make sure and double check my self written schematic before soldering/inserting any pins into connectors. This should be one of those 'Start first crank' jobs after all work has been completed. We shall see...
While I've been waiting to finish the harness, I've put some additional time on an important matter: meth injection. I've redesigned a new system that will be suitable for the new manifold and be much more effective at its purpose. The AEM system in there now will not have a single component (other than its volume regulating controller) left installed on the car.
Here's my plan. Because higher pressure produces a much better atomization effect when properly paired with the right nozzles, I've decided on using a much stronger pump. The AEM system uses a 200psi pump. The new pump will have a working pressure of around 1000 psi. I will have six .008" ultra-fine nozzles plumbed directly into the runners of the manifold like a direct port nitrous system. Because of the extremely small orifice on the nozzle and the extremely high pressure of the pump, the system will have such a dramatic effect on heat removal that I may run a less corrosive water/meth mixture around 9:1. The nozzles will be fed using individual steel braided hoses to each runner all coming from a common block feed with 8 ports (6 feeds, 1 supply, 1 sensor) that will be metered using a Big Shot nitrous solenoid. I'm using the nitrous solenoid because its designed to work with extremely high pressures such as these. I've already ordered the pump, nozzles and aluminum materials that the block will be CNC milled from. I will post pics as soon as I get them and have the block cut.
Until that day...
The following users liked this post:
Marcelechka (02-14-2014)
02-14-2014, 08:44 AM
#1096
02-14-2014, 09:11 AM
#1097
Racer
Any word on if the LSD out of the 6mt transmission from the 07-08 TL-S could be retrofitted into the 5at on the 07-08 TL-S? I have an auto with the J35a8 but just got a brand new (2000 miles) shortblock out of an 2013 MDX for $200. 
Wondering if I can just change out the shortblocks without running into any issues?
P.S.
Read the entire 28 page thread. Love the progress, keep up the good work!
Wondering if I can just change out the shortblocks without running into any issues?
P.S.
Read the entire 28 page thread. Love the progress, keep up the good work!
02-14-2014, 04:24 PM
#1098
Three Wheelin'
iTrader: (3)
Robert, all the love in the world but you're stacking systems on systems on systems. Use the KISS mentality for the first startup! Trust me I know the type of pain too much technology can bring for an inaugural vogage.
02-15-2014, 01:25 AM
#1099
The main reason methanol or alcohol is added to the mixture is because it actually does effectively increase the octane because both have much slower burn rates than gasoline. Though it does posses heat latency properties, both fuels are nowhere near what water alone can do but is still used for the simple fact of how much further it can increase octane (or ability to stave off detonation) just by adding very little. Not that its bad to run 100% water by itself but you can easily gain another 5 points of actual octane just by adding some of this into the mixture. Btw, water alone give the EFFECT of adding 15-20 points alone.
Any word on if the LSD out of the 6mt transmission from the 07-08 TL-S could be retrofitted into the 5at on the 07-08 TL-S? I have an auto with the J35a8 but just got a brand new (2000 miles) shortblock out of an 2013 MDX for $200.
Wondering if I can just change out the shortblocks without running into any issues?
P.S.
Read the entire 28 page thread. Love the progress, keep up the good work!
Wondering if I can just change out the shortblocks without running into any issues?
P.S.
Read the entire 28 page thread. Love the progress, keep up the good work!
Thanks for reading.

Brother, as if this car hasn't been a "stacked systems on a system on a system" from day one! Having a simple car usually means one of two things: you're car is not fast -OR- if it is fast, it won't be lasting very long. For a man who once had to learn how to be a plumber so he could install a nitrous system on his old setup, you sure are a KISS-agonist.
Nothing but love from over on this side of town my friend! Btw, got some info and numbers for ya on something. Get back to me ASAP bud.
The following users liked this post:
gnuts (02-15-2014)
02-15-2014, 10:39 AM
#1100
Racer
That's what I'm thinking, this is no easy task. It might take some special machining, who knows what until they attempt it.
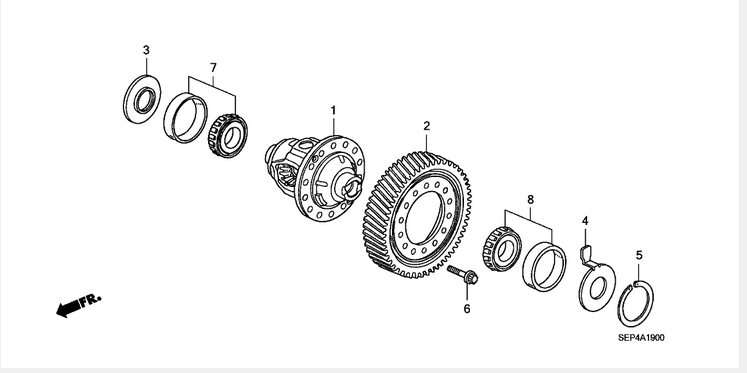
Above: 5at Diff
Above: 6mt Diff
Above: 5at Diff
Above: 6mt Diff
Last edited by Corey_Straker; 02-15-2014 at 10:40 AM. Reason: labeling pics
02-15-2014, 10:24 PM
#1101

 02-18-2014, 12:49 AM
#1102
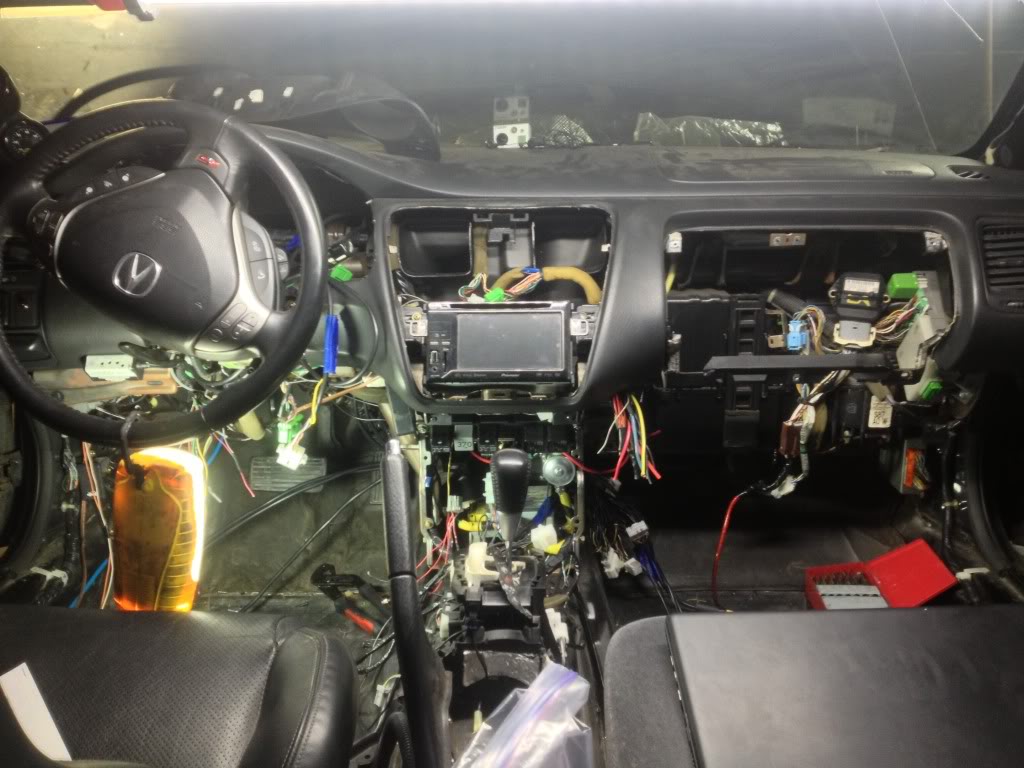
Came in Sat and Sun a few hours each day and did some more wiring. I even managed to find 45 min today and did a little more. It's a painstakingly slow process as I am particular on how perfect the work must be. I will admit that I wasn't expecting the entire process to be such a long one but if I never have to worry about an electrical related issue causing any sort of failure on the car, so be it. It's all worth it to me. My primary goal at this point is to have the car and all unfinished work complete by the approaching warm weather. I've told myself I need to enjoy the car now that I've spent so much time and money into it. I will probably spend the spring and summer beating the engine down while preparing for the next motor which I've already started acquiring parts for. I love working on it, there is nothing I find more relaxing. Even now, I could spend days in the shop with it just making things better or right. As I've said, I've had to make myself stop the modding after getting the harness done and enjoy it. I will keep doing things here and there but nothing big or time consuming until the next engine build.
Until the mean time, I'm bringing her back to life one wire at a time.
Until the mean time, I'm bringing her back to life one wire at a time.
02-21-2014, 02:50 PM
#1103
Racer
I know that the primary shafts on both the 5AT and 6MT transmissions shared the same diameter shafts as well as many other internal specs and dimensions. I basically compared Acura service manuals on the rebuild of both transmissions as well as the specs that were given for the tech to measure during the rebuild. I took this alongside the design similarity of the actual differential assemblies in both units from the diagrams in that same manual and must say how eager I was to want to try the LSD conversion right away. My next step was to try and find an old used or even broken/damaged LSD and compare it to one out of the auto to see what differences (if any) there were in regards to its physical shape and size. If someone, like yourself, wants to donate or loan me an LSD unit from a first (03 CLS and 04-06 TL) or second (07-08 TLS) generation 6MT I'd be more than happy to do some R&D. All 6MT from the first and second gen transmissions use the same LSD differential so that leaves the doors open pretty wide for a donation likelihood.
I think this is a very real possibility and will just take the auto to being one step closer to being just as good as the 6mt.  The diff alone costs $1500 on the estore. I'll keep an eye out for one at my dealership and keep browsing LKQ.
02-21-2014, 04:26 PM
The diff alone costs $1500 on the estore. I'll keep an eye out for one at my dealership and keep browsing LKQ.
02-21-2014, 04:26 PM
#1104
as much as I enjoy all the GoFast parts...makes me wonder if you have something to stop this beast...I would hate to see photos of this thing out of commission because you smacked into another car and not due to a wiring issue or something else you've spent months fussing over.
02-24-2014, 06:18 PM
#1105
Racer
as much as I enjoy all the GoFast parts...makes me wonder if you have something to stop this beast...I would hate to see photos of this thing out of commission because you smacked into another car and not due to a wiring issue or something else you've spent months fussing over.
02-24-2014, 10:32 PM
#1106
Since everyone is hitting the brakes here, I'll play along I suppose. I've already purchased a pair of almost new TLS Brembo calipers with D&S rotors. I've juggled the idea of buying some used large 6 piston NASCAR calipers alongside the custom caliper brackets that can be easily adapted to the RL steering knuckle/spindle and give me twice as much for roughly the same in cost.
Now then, let's see some more go fast parts aye?
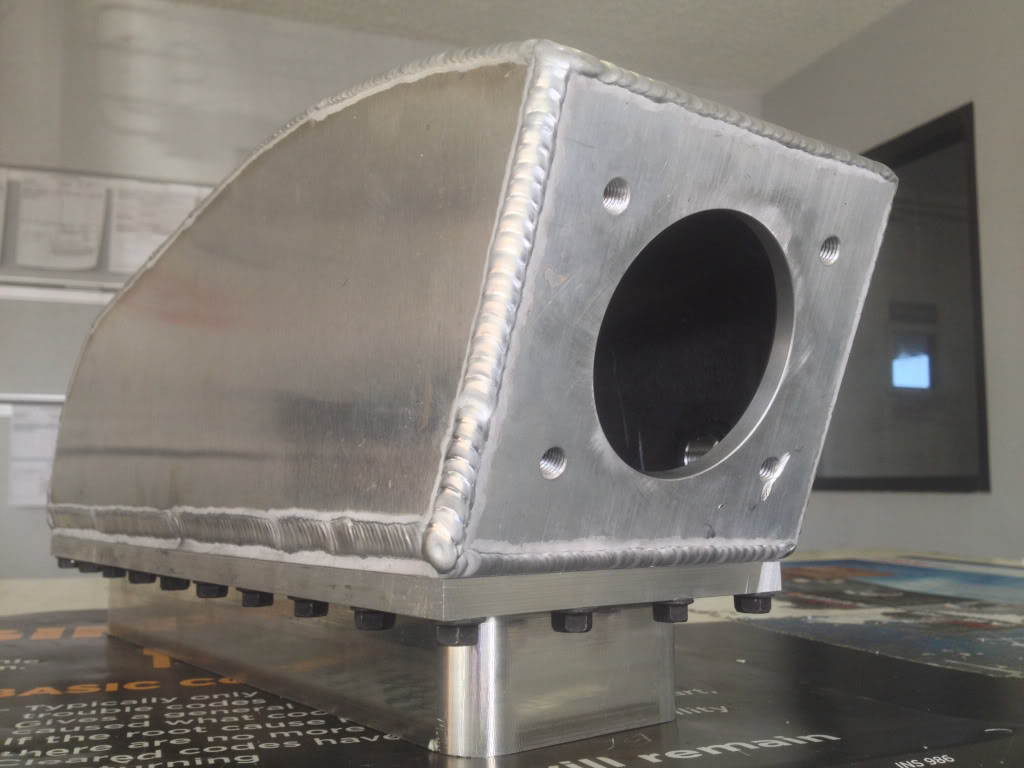
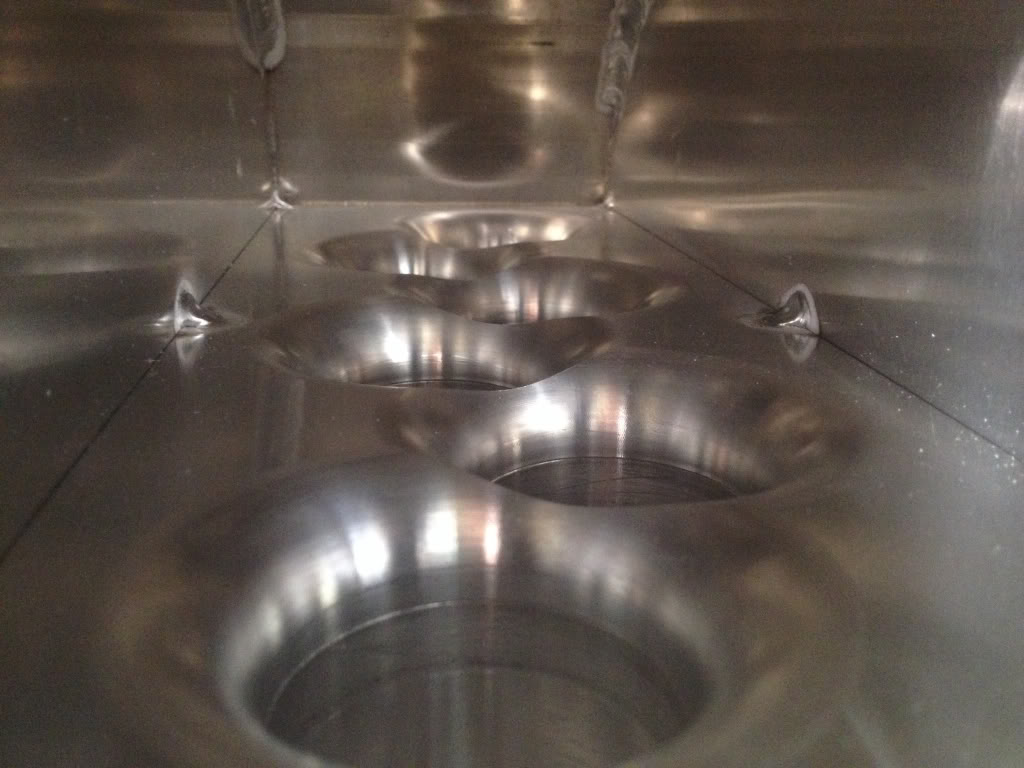
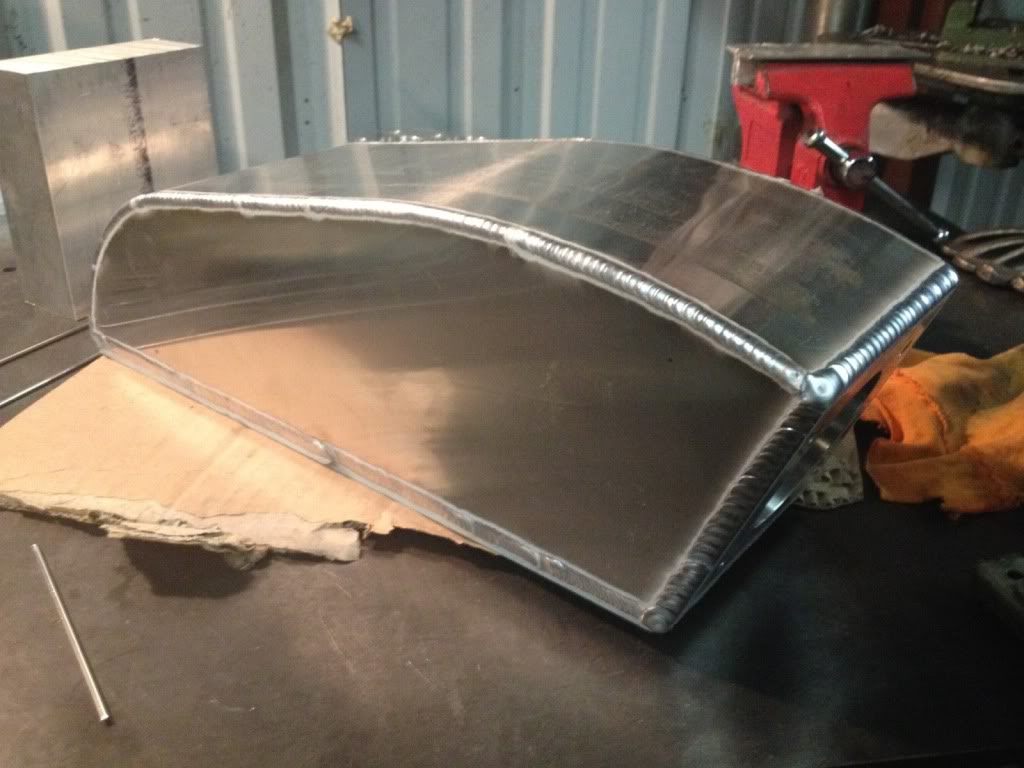
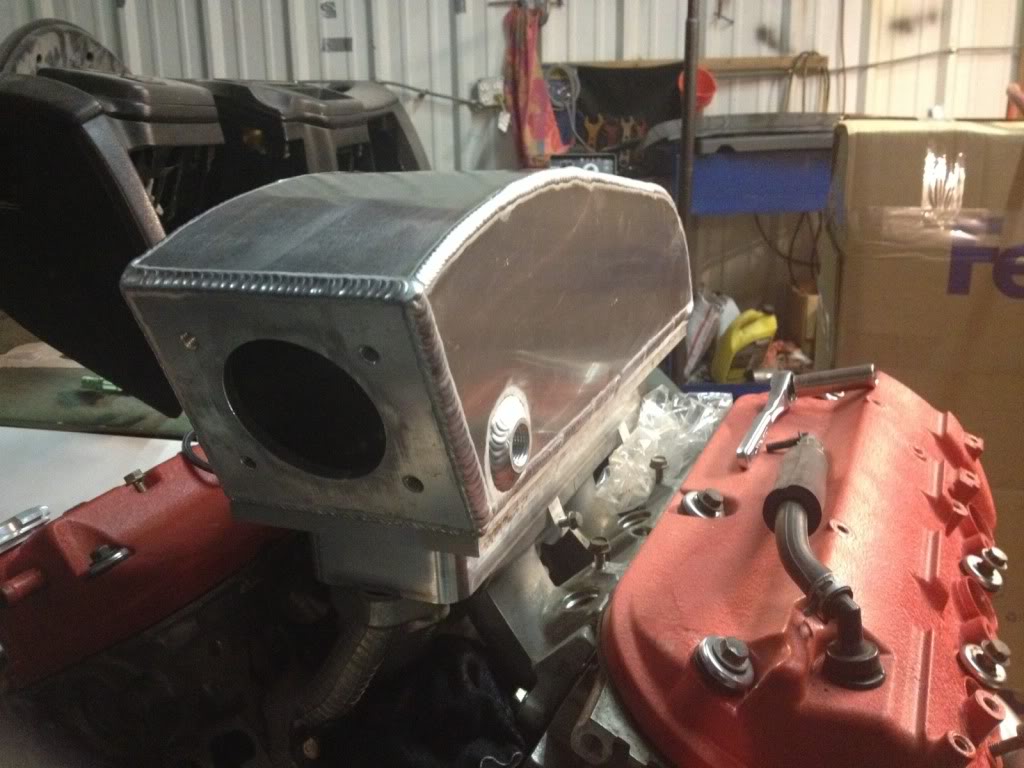
The first two pics are obviously the manifold that Hickam custom fabricated for me and did an utterly spectacular job in workmanship as usual. Every bead laid down perfectly, the CNC'd plates perfectly aligned and matched. I couldn't find ONE mistake or problem on the thing. My favorite part is the shot of the Venturi inlets on the manifold bottom from the inside. Love the smoothness and how they just make that gorgeous money shot.
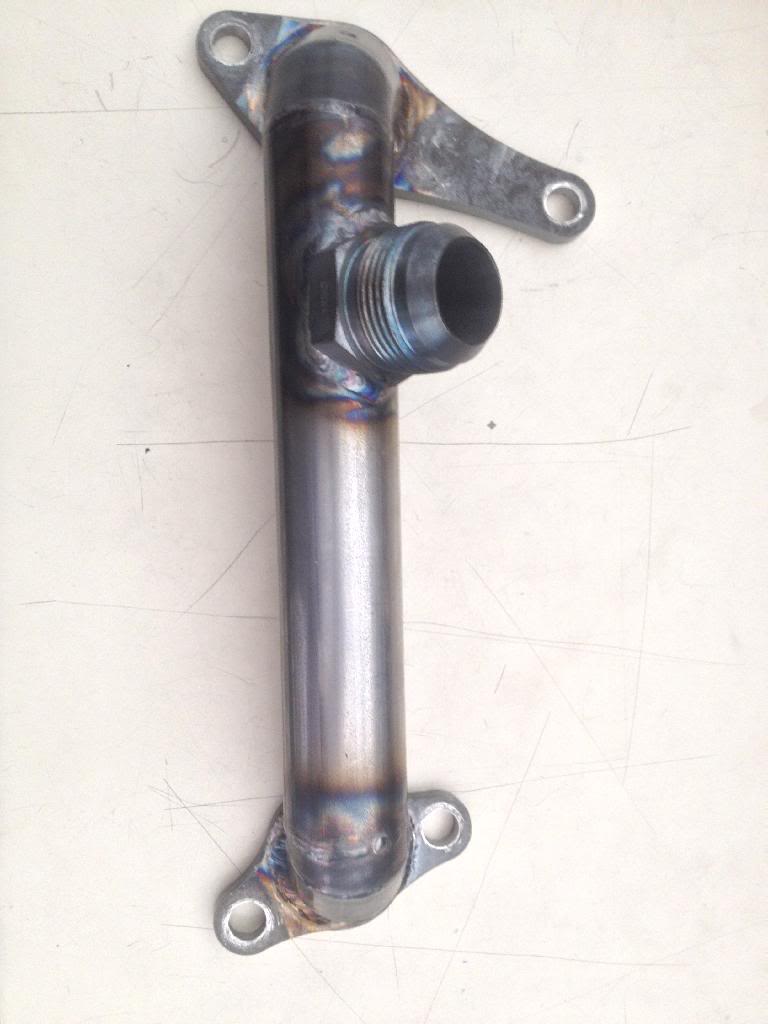
Then the last picture is my new crossover tube between the front and rear heads. No EGR, no ugly, bulky BS to work around and unnecessarily have anymore. Clean, pretty and simple. Perfect.
All of the sub wiring harnesses have been completely installed and after sorting out the power distribution circuitry between the added fuse and relay block, I should have myself an engine startup here within the next day or so. I'll keep you guys posted.
Now then, let's see some more go fast parts aye?
The first two pics are obviously the manifold that Hickam custom fabricated for me and did an utterly spectacular job in workmanship as usual. Every bead laid down perfectly, the CNC'd plates perfectly aligned and matched. I couldn't find ONE mistake or problem on the thing. My favorite part is the shot of the Venturi inlets on the manifold bottom from the inside. Love the smoothness and how they just make that gorgeous money shot.
Then the last picture is my new crossover tube between the front and rear heads. No EGR, no ugly, bulky BS to work around and unnecessarily have anymore. Clean, pretty and simple. Perfect.
All of the sub wiring harnesses have been completely installed and after sorting out the power distribution circuitry between the added fuse and relay block, I should have myself an engine startup here within the next day or so. I'll keep you guys posted.
The following 2 users liked this post by yungone501:
Corey_Straker (02-25-2014),
Marcelechka (02-25-2014)
02-25-2014, 02:48 PM
#1107
Racer
Since everyone is hitting the brakes here, I'll play along I suppose. I've already purchased a pair of almost new TLS Brembo calipers with D&S rotors. I've juggled the idea of buying some used large 6 piston NASCAR calipers alongside the custom caliper brackets that can be easily adapted to the RL steering knuckle/spindle and give me twice as much for roughly the same in cost.
Now then, let's see some more go fast parts aye?


The first two pics are obviously the manifold that Hickam custom fabricated for me and did an utterly spectacular job in workmanship as usual. Every bead laid down perfectly, the CNC'd plates perfectly aligned and matched. I couldn't find ONE mistake or problem on the thing. My favorite part is the shot of the Venturi inlets on the manifold bottom from the inside. Love the smoothness and how they just make that gorgeous money shot.
Then the last picture is my new crossover tube between the front and rear heads. No EGR, no ugly, bulky BS to work around and unnecessarily have anymore. Clean, pretty and simple. Perfect.
All of the sub wiring harnesses have been completely installed and after sorting out the power distribution circuitry between the added fuse and relay block, I should have myself an engine startup here within the next day or so. I'll keep you guys posted.
Now then, let's see some more go fast parts aye?
The first two pics are obviously the manifold that Hickam custom fabricated for me and did an utterly spectacular job in workmanship as usual. Every bead laid down perfectly, the CNC'd plates perfectly aligned and matched. I couldn't find ONE mistake or problem on the thing. My favorite part is the shot of the Venturi inlets on the manifold bottom from the inside. Love the smoothness and how they just make that gorgeous money shot.
Then the last picture is my new crossover tube between the front and rear heads. No EGR, no ugly, bulky BS to work around and unnecessarily have anymore. Clean, pretty and simple. Perfect.
All of the sub wiring harnesses have been completely installed and after sorting out the power distribution circuitry between the added fuse and relay block, I should have myself an engine startup here within the next day or so. I'll keep you guys posted.
02-25-2014, 02:53 PM
#1108
takin care of Business in
iTrader: (5)
Join Date: Jan 2008
Location: Kansas City, MO
Age: 40
Posts: 30,994
Received 4,732 Likes
on
4,064 Posts
 02-26-2014, 12:19 AM
#1109
***UPDATE***
I have a staggering update to make on the Accord. The wiring will be once again ripped out and redone. LET ME EXPLAIN:
Sitting on top, beside, underneath and inside my car sits a vast array of oem electronic modules and ecu's that I have plans on of installing into the Accord as time carries on. Because of this, I've redecided on taking a different approach to the current plan and although this does mean LOTS of wasted time and effort into my nearly completed harness it will be much better (and easier) in the end.
The plan is actually very simple: use ALL oem/factory wiring harness that have not been altered, modified or cut in any way and install them into the car. To give you an idea of why I'm doing this, here's a list of things I'll be using from the 08 TL-S in the Accord:
- J35A8 ECM
- Type S cluster
- multiplex integrated control unit (MICU) aka: interior fuse block
- engine fuse block w/multiplex integration
- Type S navigation system
- Type S audio and HVAC system
- tire pressure monitoring system w/sensors added to wheels
To add these things without using the factory wiring harnesses would be an utterly stupid thing to do and because I've already acquired all the parts listed, its not like I can just change my mind....not when scrapping the custom harness and installing an oem harness is a much easier thing to do.
Dash harness was ordered today ($816!) and is pretty much all I need to do nearly 90% of the listed components installed and working when the time comes. It will be worth the $800 bucks in due time. Until next time...
03-01-2014, 01:21 PM
#1110
Insane Robert!
03-04-2014, 08:50 PM
#1111

Hey Robert! This is Jarrett who bought the J35A3 shortblock from you last weekend. I just wanted to say that I finally read your entire thread the whole way through and am even more impressed than I was when I saw the car. I guess at the time there were so many things to take in and much of it was unassuming enough to be missed.
03-04-2014, 10:36 PM
#1112
Word.
I think I myself forget the amount of work that's went into this car. Not to mention how much money, and time, and thought, and heartache...lol.
It was good to talk with you about your upcoming project as well man. Btw, if you're still interested in the j37 crank, let me know. I decided on doing the 2.8 build which is basically a 90mm bore (3.7 block) and a 71.6mm stroke (2.5 crank) so I won't be needing it. You still have my number I'm sure so let me know.
Hey Robert! This is Jarrett who bought the J35A3 shortblock from you last weekend. I just wanted to say that I finally read your entire thread the whole way through and am even more impressed than I was when I saw the car. I guess at the time there were so many things to take in and much of it was unassuming enough to be missed.
It was good to talk with you about your upcoming project as well man. Btw, if you're still interested in the j37 crank, let me know. I decided on doing the 2.8 build which is basically a 90mm bore (3.7 block) and a 71.6mm stroke (2.5 crank) so I won't be needing it. You still have my number I'm sure so let me know.
03-05-2014, 01:39 AM
#1113
Originally Posted by yungone501
I decided on doing the 2.8 build which is basically a 90mm bore (3.7 block) and a 71.6mm stroke (2.5 crank) so I won't be needing it.
03-05-2014, 07:21 AM
#1114
6 speed...ing tickets

Join Date: Mar 2014
Location: 605/701
Posts: 8
Likes: 0
Received 0 Likes
on
0 Posts
03-05-2014, 09:21 AM
#1115
The j25a is a JDM market only v6 that was used from 98-03 and should get give me the high rev range I'm looking for to make some awesome power with a bigger turbo. Remember, this is the BIG build I've been talking about for some time and will be using the j37a2 dual VTEC heads I had. The billet cams are gonna cost me an arm and a leg but this motor should flyyyyyyyy.
03-05-2014, 01:53 PM
#1116
03-05-2014, 04:47 PM
#1117
Interesting. What rods are you using in that J28?
03-05-2014, 11:45 PM
#1118
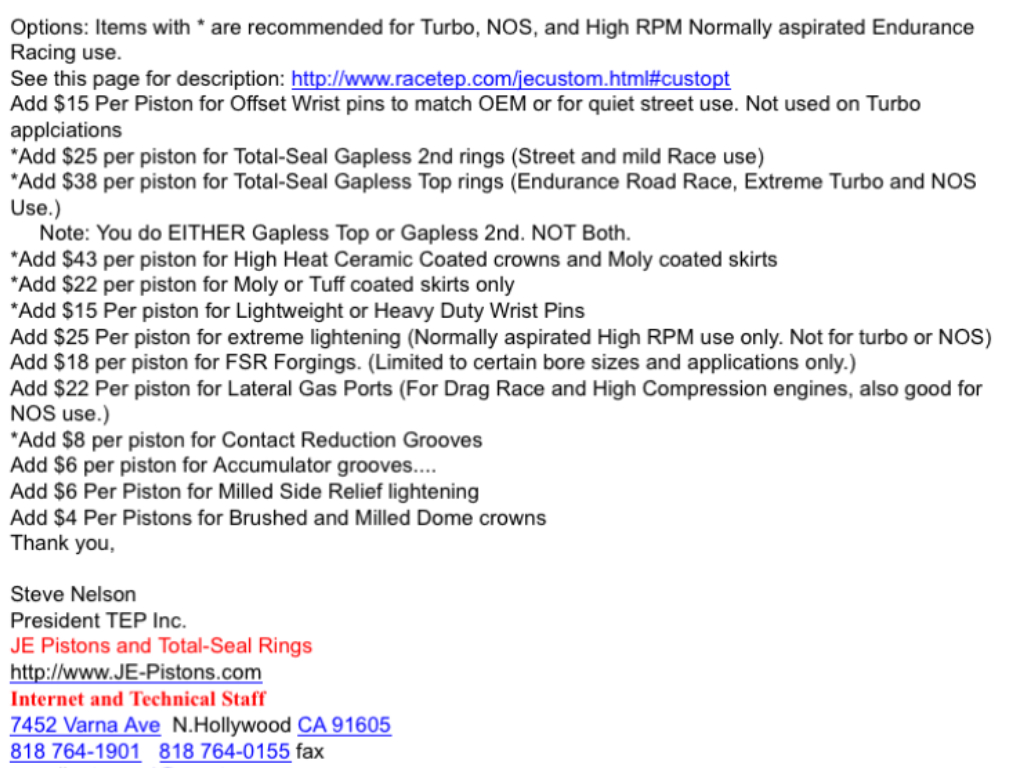
I found a company that will have Pauter make a set of billet rods and JE make the forged pistons for just over $2k. That's any specs I want on both the rods and the pistons and the options list on the pistons was mind boggling. Here's a screenshot of the email showing that list:
Btw, anyone who thinks its as easy as buying the crankshaft from the j25a, good luck. I searched for days on locating the JDM part and even after finding the part number, nobody or place could help me locate the crank. That's why I resorted to purchasing the entire engine. Which probably was cheaper because the list for the j25a crank was damn near $1k. And remember, I bought the low mileage angina for $400. Lmao
03-06-2014, 05:09 PM
#1119
I remember seeing the 2.5 and was wondering if anyone thought.about destroking a j..... was curious about it in a j30a4
03-07-2014, 10:26 AM
#1120
Such a short stroke in a 60-degree "v" configuration will rev effortlessly. I know custom-made parts eliminate most of the worries of finding the appropriate cross compatabilities with parts designed for other models, but... if the J25A uses the same 30mm compression height as the rest of the J-series then couldn't you just buy some 90mm K-series pistons? The only thing I'd ask about is the 1mm pin offset designed in the K-series piston that favors toward the intake valves pockets.
I'll text you later about the J37 rotating assembly. Short answer: yes.
I'll text you later about the J37 rotating assembly. Short answer: yes.