
'04 to '08 front lower control arm bushing failure - please read and look


Burning Brakes
Joined: Sep 2011
Posts: 1,138
Likes: 78
^ i'm curious if the TL OEM bushing will work with the bolt going through the hole because,, the hole is not in the center.
so the sockets won't be aligned easily?? i was thinking of buying the bushing press tool for $120 but it got me thinking.. hmmmmmmm.
anyone has real experience with those?? how about mr. heeltoe??
so the sockets won't be aligned easily?? i was thinking of buying the bushing press tool for $120 but it got me thinking.. hmmmmmmm.
anyone has real experience with those?? how about mr. heeltoe??
Race Director
Joined: Dec 2003
Posts: 12,521
Likes: 1,824
From: MAGA country
^ i'm curious if the TL OEM bushing will work with the bolt going through the hole because,, the hole is not in the center.
so the sockets won't be aligned easily?? i was thinking of buying the bushing press tool for $120 but it got me thinking.. hmmmmmmm.
anyone has real experience with those?? how about mr. heeltoe??
so the sockets won't be aligned easily?? i was thinking of buying the bushing press tool for $120 but it got me thinking.. hmmmmmmm.
anyone has real experience with those?? how about mr. heeltoe??
My bushings will be here tomorrow and I'll be trying to make a homemade tool. Will post up results when/if it comes together. This video gave me some ideas:
I think the hardest part is going to be sourcing a 73mm O.D. coupling. A 3" I.D. galvanized steel coupling will work on the other side. More to come, stay tuned....
Last edited by nfnsquared; Feb 13, 2013 at 10:09 PM.

Racer
Joined: Dec 2012
Posts: 294
Likes: 21
From: Pa
Do you have factory replacements? Or are they like those blue ones listed earlier? Usually the performance ones will give you a little castor. The factory bushings from the pictures look dead center.
Race Director
Joined: Dec 2003
Posts: 12,521
Likes: 1,824
From: MAGA country
FYI, the outside diameter of a 2 1/8" socket sold at Tractor Supply fits perfectly to push out the bushing and a 3" ID galvanized plumbing coupling works for the receiver. My homemade tool is coming together for about $25 
Burning Brakes
Joined: Sep 2011
Posts: 1,138
Likes: 78
that's nice.
i'm thinking of pushing out other bushings too so i guess i'll need more in fo but the $25 bushing press is a sunshine for people who need to replace failed compliance bushing

7th Gear
Joined: Jun 2012
Posts: 7
Likes: 0
undecided between the OEM or the Fastline PCI bushings... not sure how much longer I am going to keep the car (04 TL base, 110k)... I believe this will solve my clunking noise and I do NOT want to ever hear/feel/experience that again lol
Burning Brakes
Joined: Sep 2011
Posts: 1,138
Likes: 78
same. i need a guarantee that Fastline will last twice as long as OEM lol
mine are halfway cracked (still usable) @ 115k miles.
oem $30 + labor $260 = 290. 290 x2 = 580
Fastline $300 + labor $260 = 560 soo.. yeah.
Race Director
Joined: Dec 2003
Posts: 12,521
Likes: 1,824
From: MAGA country
I'm going with OEM this time. If the FastLine bushings had more miles on them, I might have gone with them. I really want to know that they don't have corrosion issues over time.
I also will be curious to see if the theory of improper torqueing at the factory is responsible for the tears. Really interested to see if using the proper torqueing procedure will make a difference on how long the new OEM bushings last.
I also will be curious to see if the theory of improper torqueing at the factory is responsible for the tears. Really interested to see if using the proper torqueing procedure will make a difference on how long the new OEM bushings last.
Racer
Joined: Dec 2012
Posts: 294
Likes: 21
From: Pa
I'm going with OEM this time. If the FastLine bushings had more miles on them, I might have gone with them. I really want to know that they don't have corrosion issues over time.
I also will be curious to see if the theory of improper torqueing at the factory is responsible for the tears. Really interested to see if using the proper torqueing procedure will make a difference on how long the new OEM bushings last.
I also will be curious to see if the theory of improper torqueing at the factory is responsible for the tears. Really interested to see if using the proper torqueing procedure will make a difference on how long the new OEM bushings last.
#1 Super Guy!
Joined: May 2007
Posts: 2,337
Likes: 512
Yeah, torque can't harm the bushings in any way. The only possible damage from over-torquing would be to the bolt being torqued (over stretched).
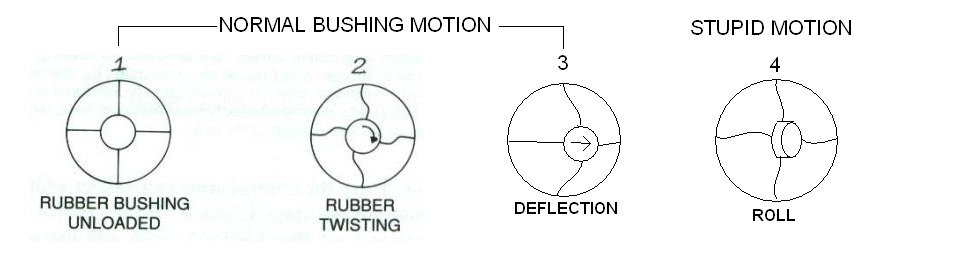
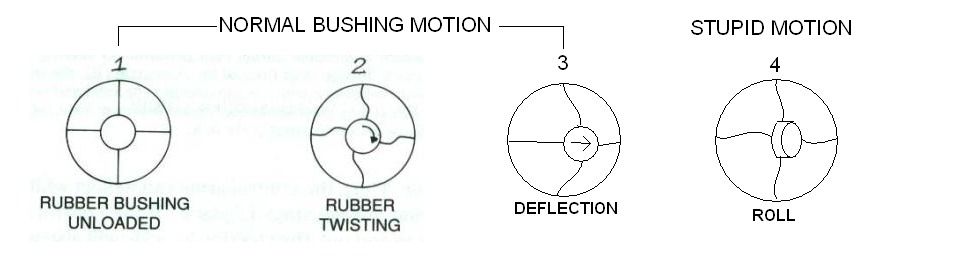
Here is a quick comparison of bushing motions to help illustrate the problem. The spherical bearing really is the best solution in this location, but it would really nice if it had rubber covers to help weatherproof it.
Here is a quick comparison of bushing motions to help illustrate the problem. The spherical bearing really is the best solution in this location, but it would really nice if it had rubber covers to help weatherproof it.


Racer
Joined: Dec 2012
Posts: 294
Likes: 21
From: Pa
Yeah, torque can't harm the bushings in any way. The only possible damage from over-torquing would be to the bolt being torqued (over stretched).
Here is a quick comparison of bushing motions to help illustrate the problem. The spherical bearing really is the best solution in this location, but it would really nice if it had rubber covers to help weatherproof it.
Here is a quick comparison of bushing motions to help illustrate the problem. The spherical bearing really is the best solution in this location, but it would really nice if it had rubber covers to help weatherproof it.
Believe it or not.. I had clunking noises that I thought came from the bushings but it actually came from the side engine mount. Check your side engine mount and make sure it's not broken.
#1 Super Guy!
Joined: May 2007
Posts: 2,337
Likes: 512

Radical Member
Joined: Jan 2010
Posts: 797
Likes: 16
From: Roseburg, Oregon
Never mind, I found it.
Nevermind. Found some interesting info.
First, the '07-'08 TLs use a softer compliance bushing for ride comfort. This is published in many magazines. I checked part numbers and the TL-S uses the same part number as the later TLs. The '04-'06 uses a different part number and it's slightly more expensive.
Anyone with an '07-'08 base and TL-S wanting a small upgrade may want to get the '04-'06 compliance bushing.
Radical Member
Joined: Jan 2010
Posts: 797
Likes: 16
From: Roseburg, Oregon
Joined: Sep 2008
Posts: 78,234
Likes: 20,190
Well, IF the older ones would last longer for being stiffer, it's not obvious since they're, you know, older. BUT, maybe the softer rubber allows for more movement without ripping?
My side engine mount was toast too...pretty easy to swap out though.
My side engine mount was toast too...pretty easy to swap out though.
Radical Member
Joined: Jan 2010
Posts: 797
Likes: 16
From: Roseburg, Oregon
I work at as a salesman at a Honda dealership, so i get a pretty good discount on parts. I think I am going to go with the 2007+ bushings, and if i dont like them, I will go back to the 2004+
Racer
Joined: Dec 2012
Posts: 294
Likes: 21
From: Pa
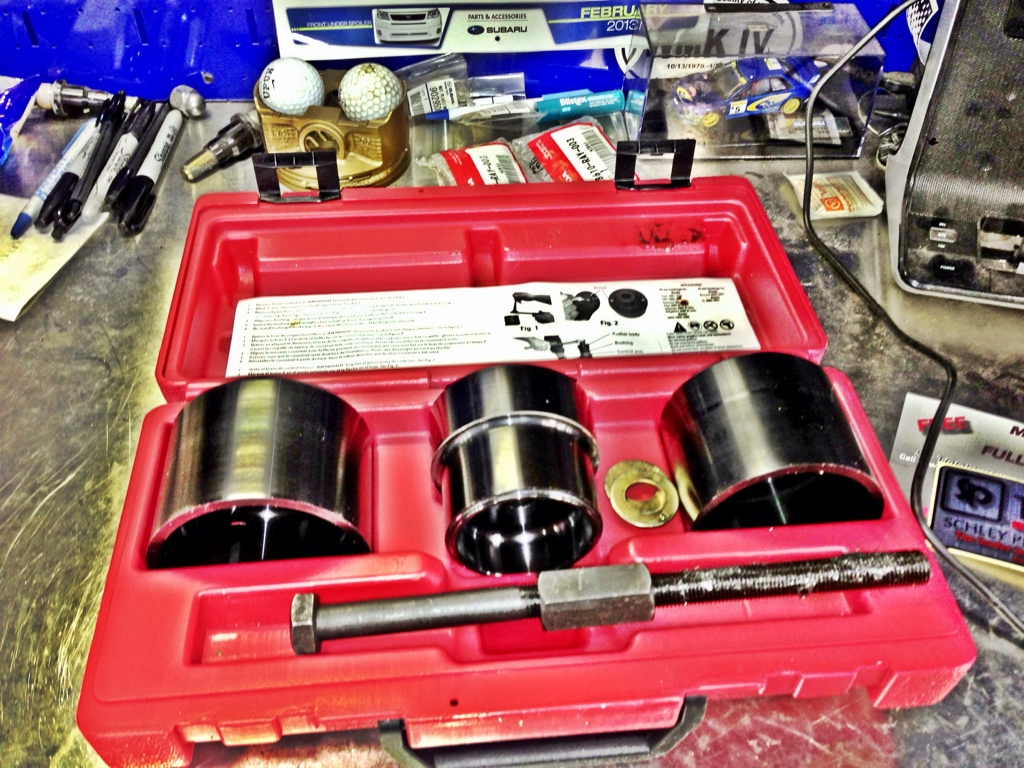
Got the tool in the mail yesterday. I was a little surprised at the screw being so tiny but I'm sure it'll be fine. I did some super cool editing to the picture of the tool to make it look important. Lol. I'll probably do the main bushing next week and see how it goes. I'm not sure if the smaller bushing generally tears or not. If it doesn't then I'm not gonna bother with it.
Race Director
Joined: Dec 2003
Posts: 12,521
Likes: 1,824
From: MAGA country
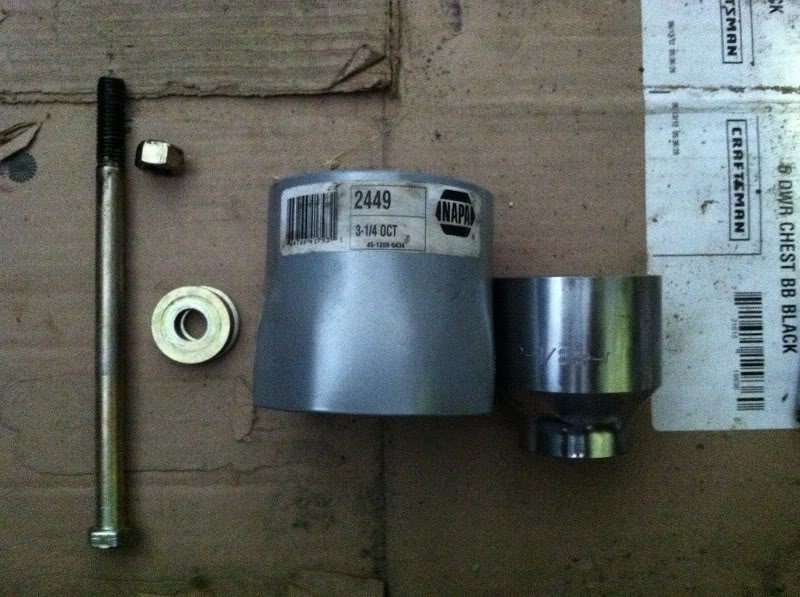
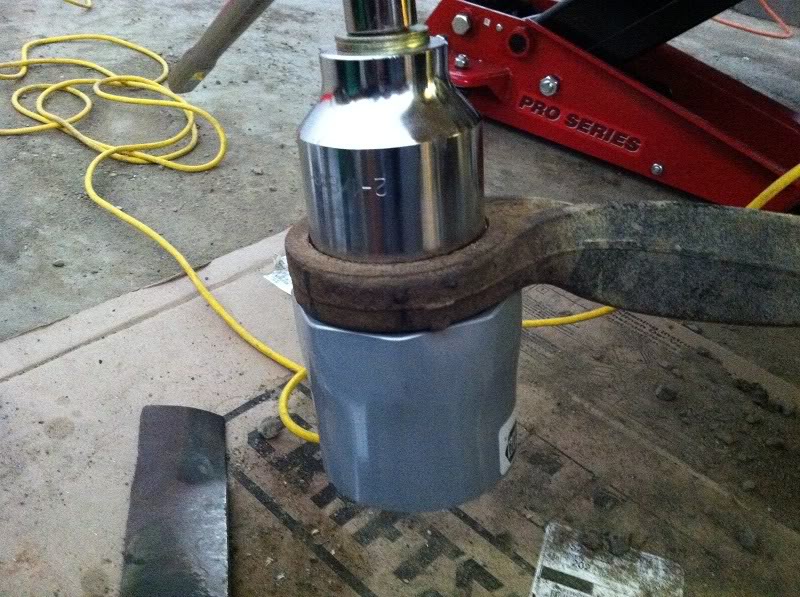
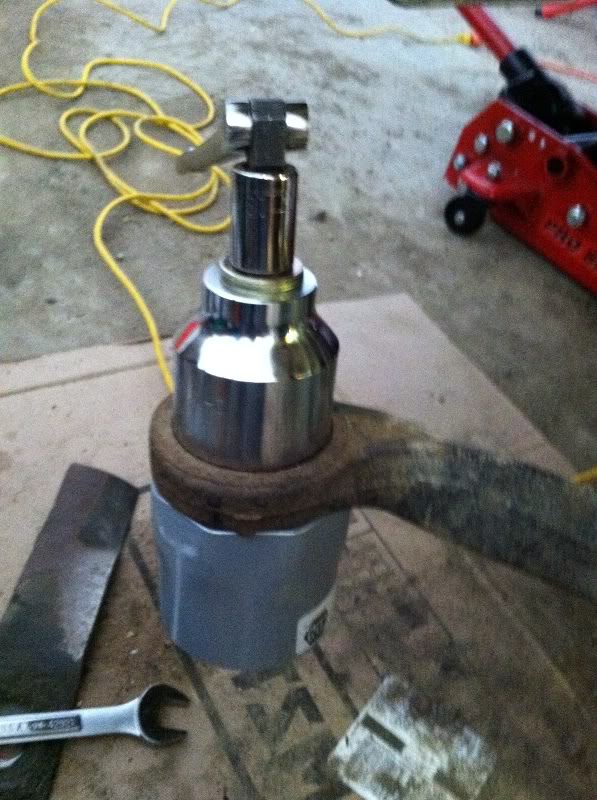
I can confirm what MLue1 posted in #650 and #651: There is plenty of room to press out all 3 bushings with the control arm still on the car (still attached via the ball joint). If you have the tool or a homemade tool like I made, there is absolutely no reason to mess with the ball joint. My homemade tool cost me about $50 after taxes and military discounts:
A. 1/2" x 8" Grade 5 bolt (press out)
B. 1/2" x 9"" Grade 5 bolt (press in) (10" will work if you can't find a 9", also, the 8" will work, but you'll have to manually tap the bushing in about 3/8" to have enough threads for the nut to catch)
C. Grade 5 1/2" washers and nuts
D. 3 1/4" socket from Napa ($35)
E. 2 1/8" socket from Tractor Supply ($15)
Notes:
1. I did freeze the bushings as previously suggested. They went in very easy.
2. Lightly sanded the inside of the control arm and put a light coat of grease on it and the bushing.
3. You'll want to use a cheater/breaker bar. I used the jack handle. Slid right over my 1/2" Craftsman socket wrench.
Works perfectly!! (And yes, I need to sweep my garage. Having no floor drains in a heated garage sucks!!)
Last edited by nfnsquared; Feb 22, 2013 at 11:44 AM.

Instructor
Joined: Apr 2007
Posts: 118
Likes: 0
From: Toms River, NJ
Awesome reply nfnsquared. I've been procrastinating mostly because my garage is NOT heated  I've had these bushings laying around for months now.
I might just piece together the tool also. Where did you pick up the bolts and washers from? Does Home Depot or Lowes have them?
I googled the 3 1/4" Socket you got from Napa and found this on Amazon, would this work? I can't tell if it's the same type from the pics. It's half the price.
http://www.amazon.com/OTC-1908-6-poi.../dp/B00063YJ4O
I've had these bushings laying around for months now. I might just piece together the tool also. Where did you pick up the bolts and washers from? Does Home Depot or Lowes have them?
I googled the 3 1/4" Socket you got from Napa and found this on Amazon, would this work? I can't tell if it's the same type from the pics. It's half the price.
http://www.amazon.com/OTC-1908-6-poi.../dp/B00063YJ4O
Instructor
Joined: Apr 2007
Posts: 118
Likes: 0
From: Toms River, NJ
Also, did you pick up the 2-1/8" socket locally from Tractor Supply? They don't have any stores nearby me and I can't seem to locate the socket on their site. I can order one from Sears or Northern Tool has one on ebay for $20 shipped. I'm just not sure if the OD will be the same as the one from Tractor Supply.
Last edited by SLAYER6669; Feb 24, 2013 at 01:09 PM.
Race Director
Joined: Dec 2003
Posts: 12,521
Likes: 1,824
From: MAGA country
Awesome reply nfnsquared. I've been procrastinating mostly because my garage is NOT heated I've had these bushings laying around for months now.
I might just piece together the tool also. Where did you pick up the bolts and washers from? Does Home Depot or Lowes have them?
I googled the 3 1/4" Socket you got from Napa and found this on Amazon, would this work? I can't tell if it's the same type from the pics. It's half the price.
http://www.amazon.com/OTC-1908-6-poi.../dp/B00063YJ4O
I've had these bushings laying around for months now. I might just piece together the tool also. Where did you pick up the bolts and washers from? Does Home Depot or Lowes have them?
I googled the 3 1/4" Socket you got from Napa and found this on Amazon, would this work? I can't tell if it's the same type from the pics. It's half the price.
http://www.amazon.com/OTC-1908-6-poi.../dp/B00063YJ4O
I did get the 2 1/8" socket locally from Tractor Supply. Any socket with an outside diameter of 72-73mm should work fine, but there's no way of knowing if another 2 1/8" socket will work without actually measuring it.
And I picked up the Grade 5 hardware from Mac's, but any decent hardware store/home supply store will have Grade 5 hardware. And I forgot to add: put a coat of grease on the bolt threads...
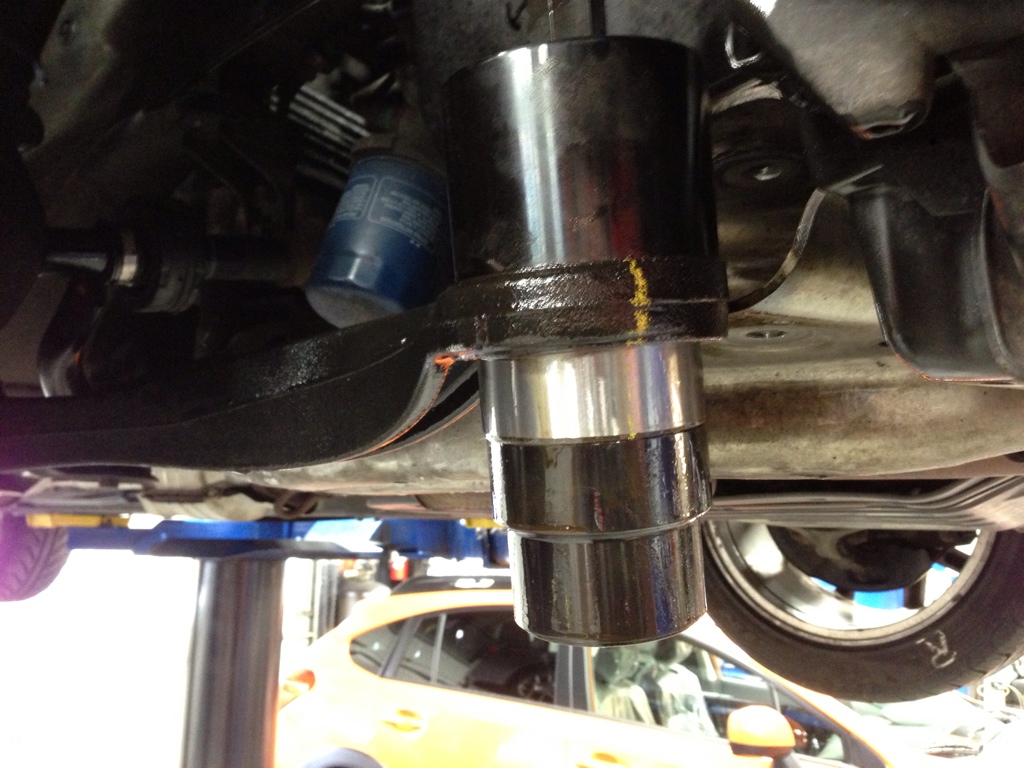
The tool makes this such an easy job to do in-house. And now that the tool can be made for about $35 makes it a "no brainer" IMO. It's so easy, just 4 bolts and swing the control arm out, press the bushing out/in, reverse the previous steps, done. No pitman puller required!! FYI, you don't need to undo the top fork bolt. Leave it in.
The arm comes out easily but you'll need to do some light manhandling to get that sucker back in and the bolt holes aligned. A 4lb sledge and a little prying with a 1/2" breaker bar did the trick.
Last edited by nfnsquared; Feb 24, 2013 at 06:39 PM.
Instructor
Joined: Apr 2007
Posts: 118
Likes: 0
From: Toms River, NJ
Perfect. I'm going to order it right now. Since the $16.43 isn't enough for free supersaver shipping, I trolled Amazon a bit more and found a
for $17.49. I'm gonna take a shot in the dark and hope the OD is close enough. Total cost for both is $33.92. The best part is, I have $14.12 worth of points on my Amazon Visa! I'll check out Ace Hardware for the bolts/nuts/washers.
Last edited by SLAYER6669; Feb 24, 2013 at 08:11 PM.
Race Director
Joined: Dec 2003
Posts: 12,521
Likes: 1,824
From: MAGA country
Perfect. I'm going to order it right now. Since the $16.43 isn't enough for free supersaver shipping, I trolled Amazon a bit more and found a socket there in that size by Powerbuilt for $17.49. I'm gonna take a shot in the dark and hope the OD is close enough. Total cost for both is $33.92. The best part is, I have $14.12 worth of points on my Amazon Visa! I'll check out Ace Hardware for the bolts/nuts/washers.
Instructor
Joined: Apr 2007
Posts: 118
Likes: 0
From: Toms River, NJ
My only concern would be that 3/4" is too large of an opening to support that kind of pressure on the washers. Adding a couple of extra washers may work in that case, but then you may also run out of threads. It depends on how deep that socket is vice the one from TS.
Joined: Sep 2008
Posts: 78,234
Likes: 20,190
NFN, I'm sorry we bumped heads before. We're clearly both in the business of trying new things and sharing them with members. Great job...great to know that next time I attempt to tackle this, I can do it on the car.

J.
J.


Racer
Joined: Dec 2012
Posts: 294
Likes: 21
From: Pa
Lol, thanks. There is a golf course right next to us. People like to launch balls into the dealer. Luckily non of my cars have gotten hit yet but some have and even blown out a few windows.
Anyway did mine today. Mine didn't seem like they were that torn but I can honestly say the ride quality has improved. Mainly how the front took certain bumps in the road. Now for a cour pictures.

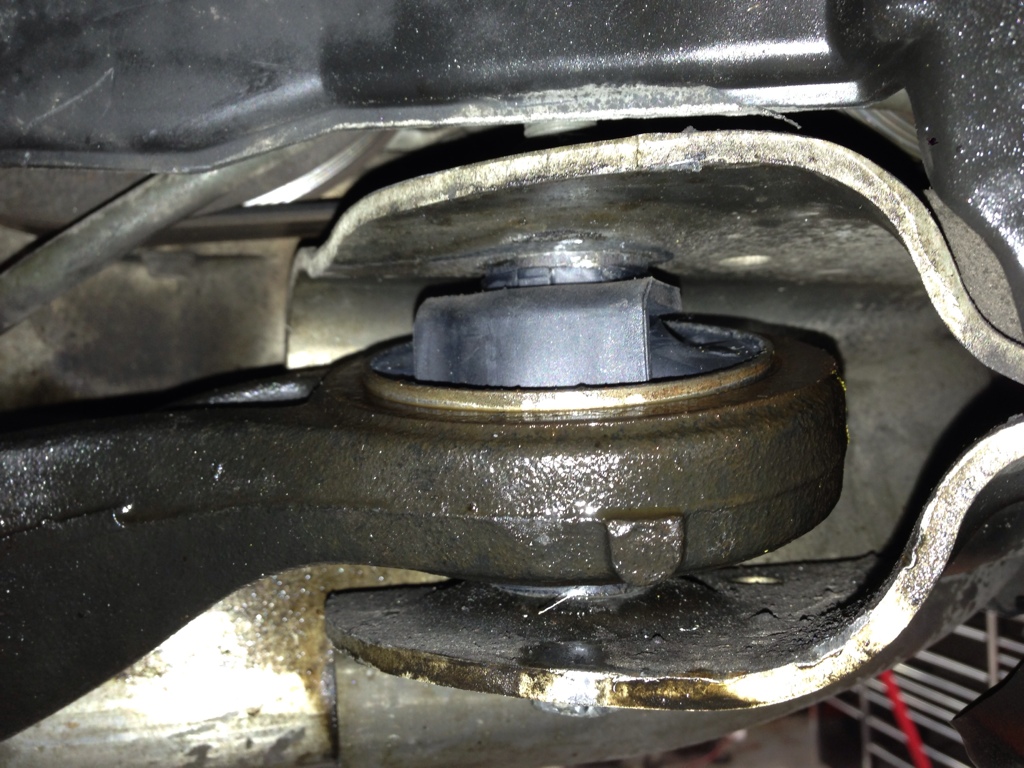
As for the kit it did a great job. By what was labeled all over the kit it said not to use an impact....well I don't listen. It seemed to take at least the first set. We'll see how it lasts. I only removed the 19mm through the bushing, the 17 mm bolt, and the 14 mm on the swaybar endlinks so I could slide it out just enough to get the tool on.
Anyway did mine today. Mine didn't seem like they were that torn but I can honestly say the ride quality has improved. Mainly how the front took certain bumps in the road. Now for a cour pictures.
As for the kit it did a great job. By what was labeled all over the kit it said not to use an impact....well I don't listen. It seemed to take at least the first set. We'll see how it lasts. I only removed the 19mm through the bushing, the 17 mm bolt, and the 14 mm on the swaybar endlinks so I could slide it out just enough to get the tool on.