When you click on links to various merchants on this site and make a purchase, this can result in this site earning a commission. Affiliate programs and affiliations include, but are not limited to, the eBay Partner Network.
I would like to hear from those who have removed your roof racks. What did you do to cover up the gaps? Include pics to if possible. Need to figure this out asap, thanks.
I know of one... Blanking on who... But he was able to get a piece of that rubber trim that went the whole length of the channel. It was a Honda/Acura part for another vehicle.
Roof rack removed took longer than expected and will need more time to clean it up.
I purchased a small roof molding strip from the dealer cut it to size.
The issue is there are two thread studs at each location so you cant just put in the molding. I drilled out holes but be careful not to go all the way through. Bumps can be seen if you look but really isn't that bad. I will remove the entire strip and wrap it once i redo my window trim.
Late response, but I am currently doing this to mine. Did you add any type of silicone to keep the molding down? Any issue with water leaks? I appreciate any feedback. Thank you
Both 30 and 28 slides out but I had to use a wedge tool for 28 to help it slide out
Bumping an old thread and thanks for the diagram @cu2wagon . I'm trying to remove my rails to paint them. So I just basically pry/shove the end caps outward (front toward front, rear toward rear) and they'll pop off? Mine are pretty solidly in place. Can you clarify how you used a wedge tool @chuonthis (assuming you're still on the forum)?
After reading your update in the other topic, I'm guessing you were able to get part #28 off? How are those end caps retained or removed?
They're retained through hatred, spite, and demon magic. That's my best guess because I broke 3 of the 4 top retaining clips/snaps trying to get them off In all seriousness, the best I could figure out (and I managed to save the 4th and final piece with this technique), the procedure is along these lines:
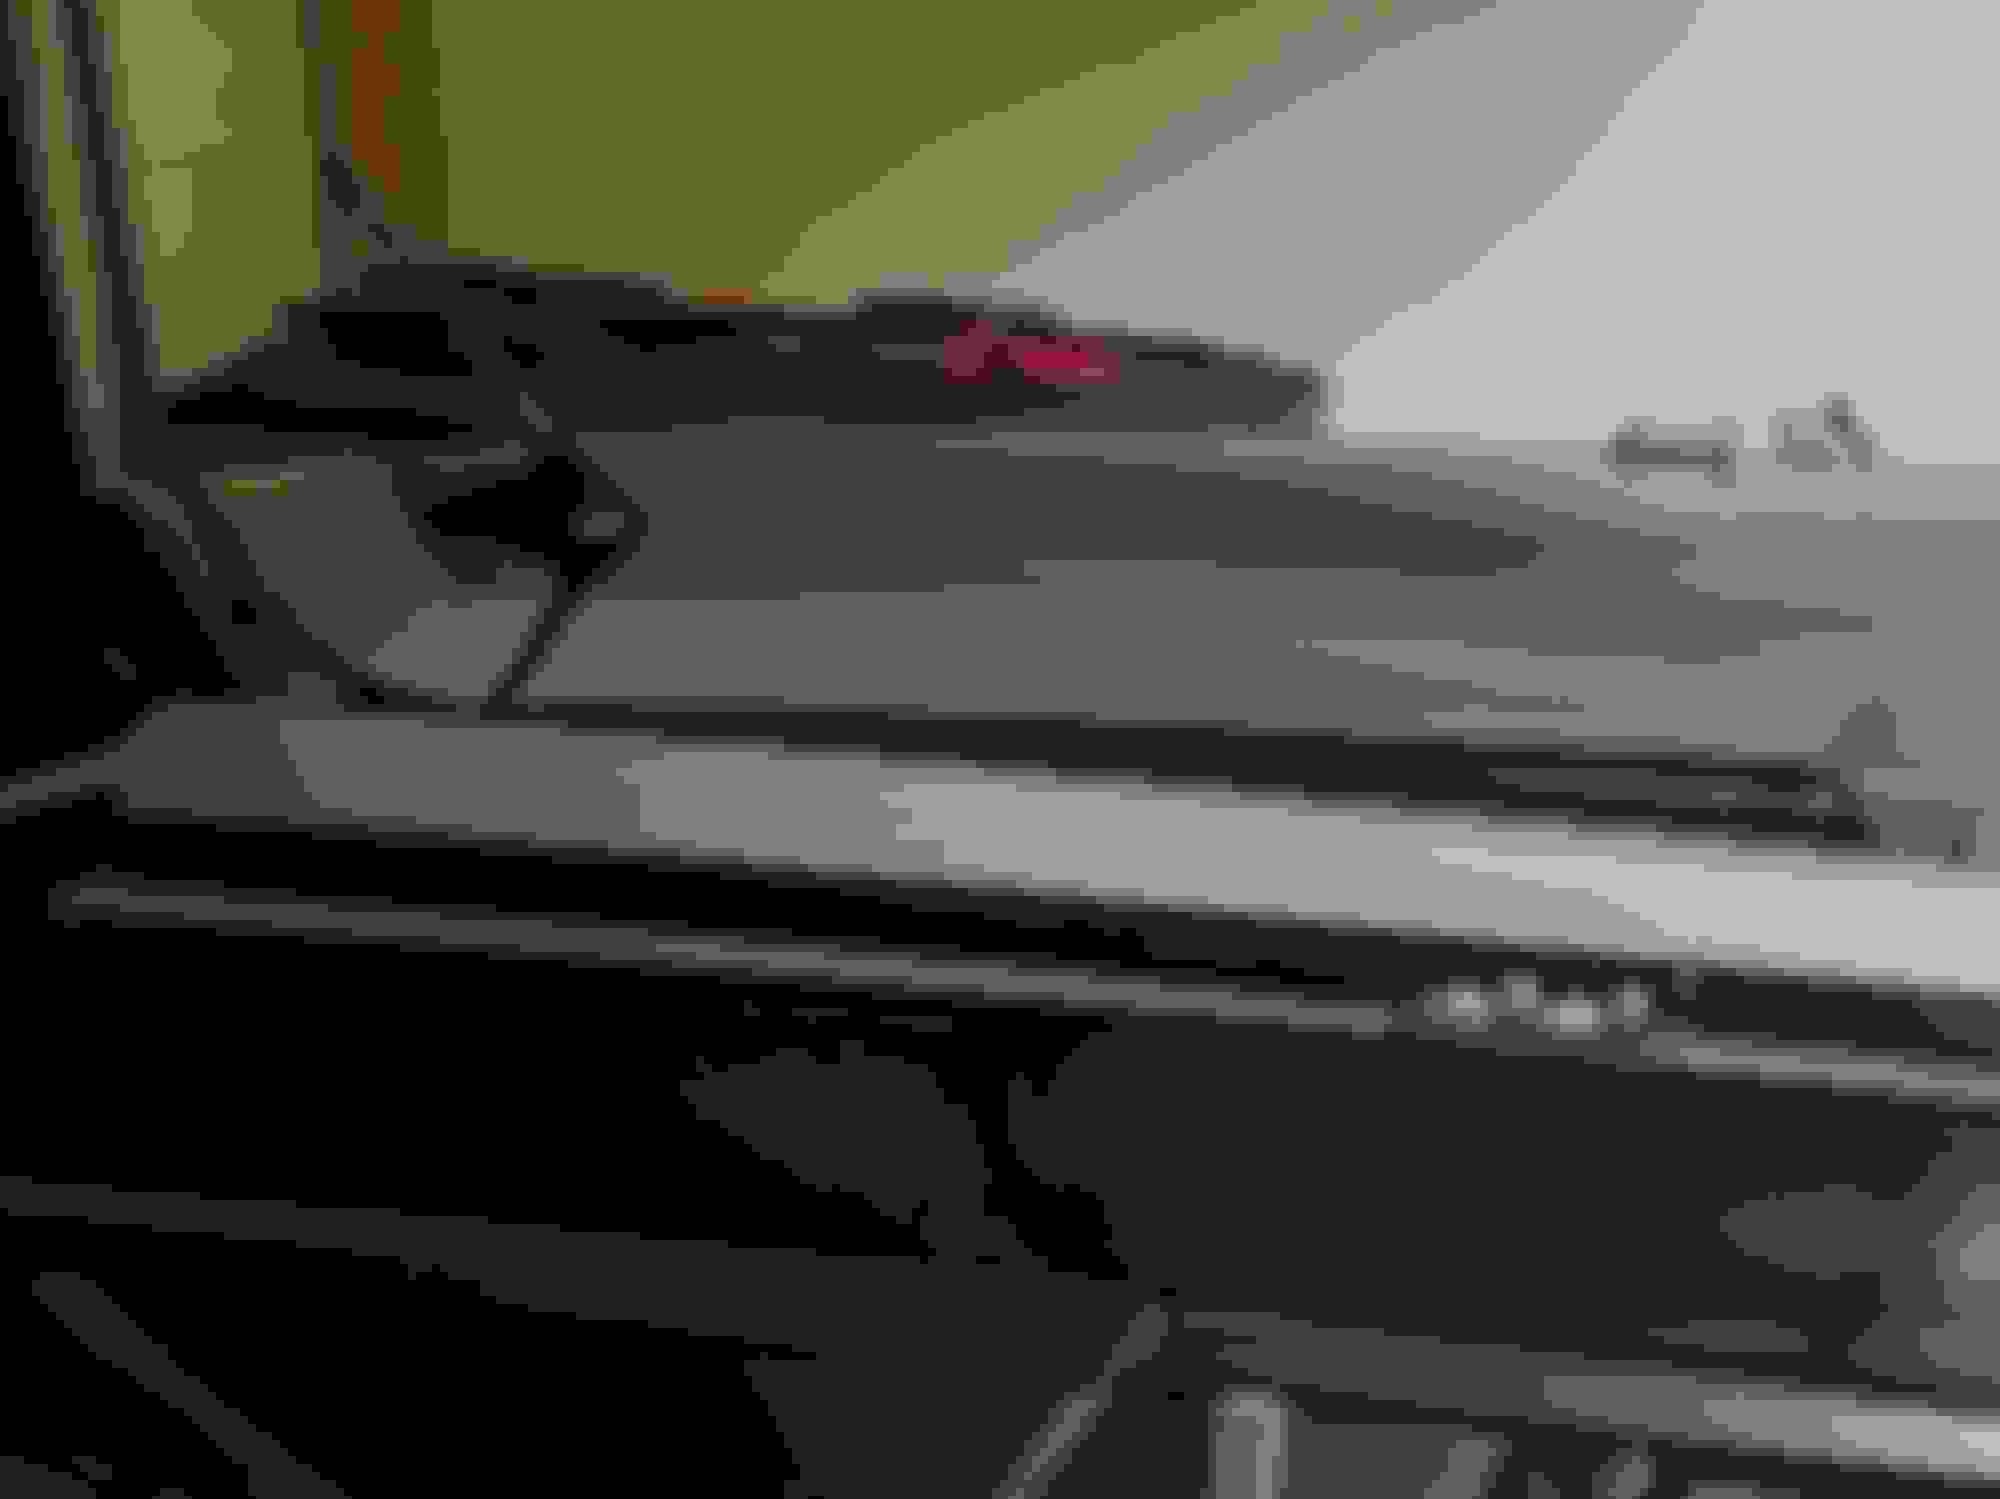
1) Start at the rear end cap (i.e. #30 or #36). The concept is that the piece is on a tab + L-slot snap. The bottom black piece bolted to the roof has the "L" slot. The top plastic end piece has the tabs. If you can just manage to wiggle it enough to slide rearward by about a half to 3/4 inch, then you can lift up and it's free. Problem is mine would NOT budge. I smacked it, wiggled it, pulled on it, pushed on it, called it names and nothing. Although the second photo is of the front end cap #28, the concept is the same. After breaking a couple, I learned the one actual retaining clip/snap in the "rearward" direction is on the very top of the rail (blue arrow below), in the crack between the Aluminum top rail and the plastic #30. Press firmly down with a small screwdriver (cover tip in painters tape) to try to depress that snap, while you again, smack it, wiggle it, pull on it, push on it, and call it names. A helper to push the clip while you do that would be huge. I was doing this at 1a.m. so no helpers.
L-slot in base. Use a small screwdriver to press down on top clip at seam between Aluminum top rail and plastic end cap (wrap in painters tape any spot on the roof rail pieces or adjacent painted surfaces where you're prying or using a trim tool). While a helper presses down on the clip with the screwdriver, you go to town on trying to slide the end cap off. In this photo you can see I've already broken the plastic snap, but the blue arrow indicates where I SHOULD have been pressing to release the clip.
End cap with tabs. Although the pic is the front end cap #28, the concept and tabs are the same on the rear piece.
2) If all that fails, use a trim removal tool or other plastic wedge to try to pry in between the black base piece and silver top piece (#30). Once you can wedge something in there, I was able to pop the L taps and lift it off. At this point the top snap referred to in step 1 had STILL not come loose, so I ended up breaking it while lifting #30 off.
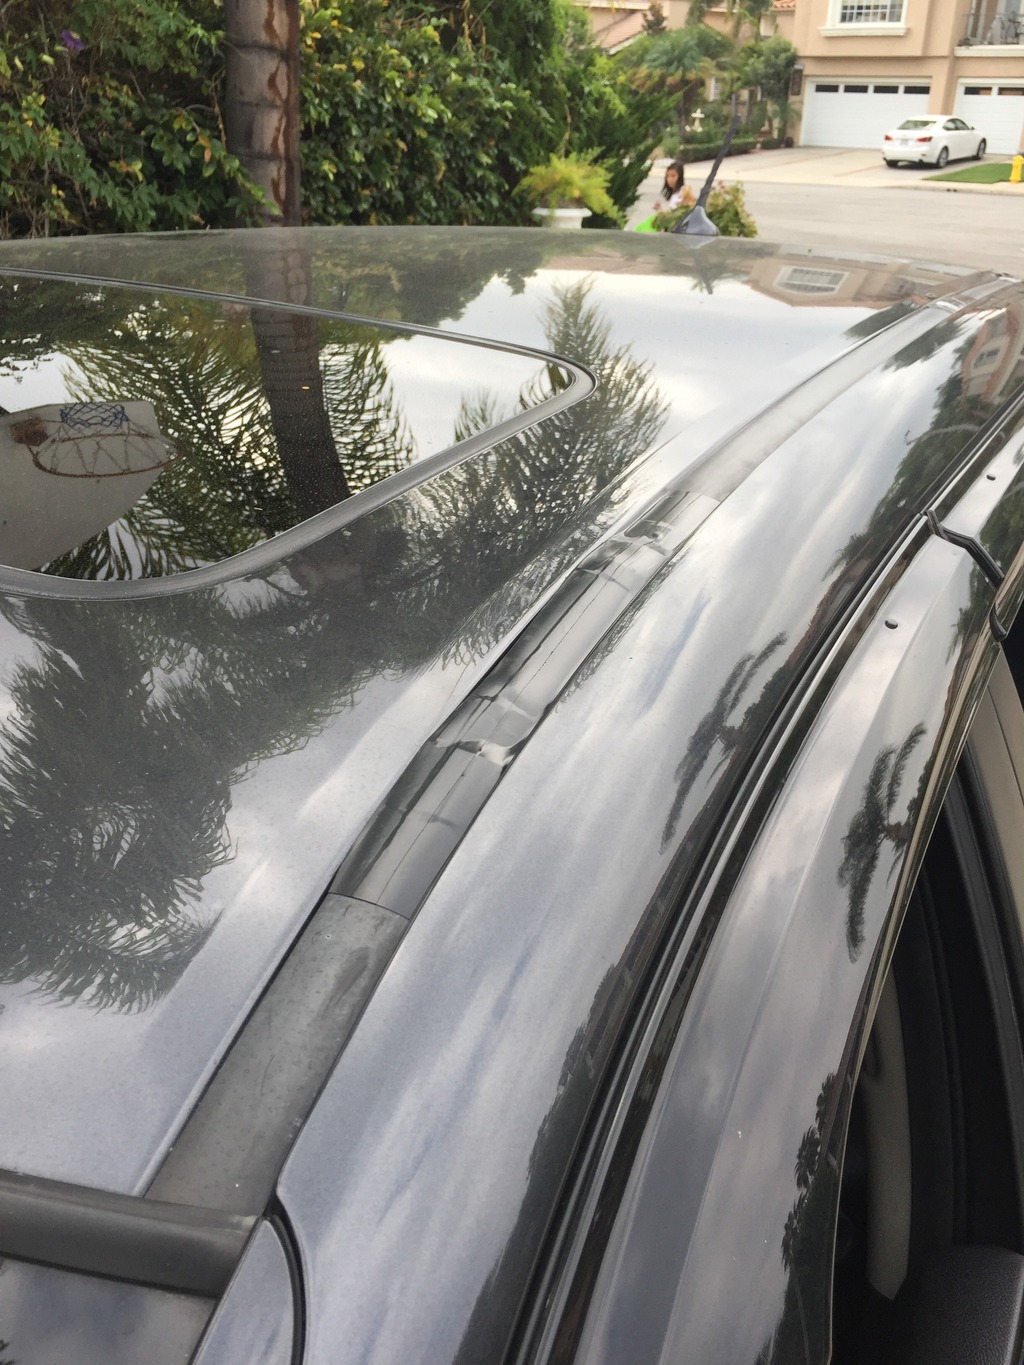
The photo below is of piece #34, and it's the only one I manged to get off without breaking the top plastic snap that mates with the top clip.
3) After you've removed the rear end caps #30 and #36 take out the two bolts holding the rear mount to the roof. Now you can wiggle that black rear mount off the roof and off the end of the aluminum top rail.
4) In the center mounting point of the roof rack, you can pop the bottom black "U" piece off by prying with a trim tool on the inside between the metal and plastic. After that, remove the two side facing bolts behind the coverup.
5) wiggle the top Aluminum rail rearward until it slides out of the front mount endcap. Be VERY careful not to ding your roof with the rail when it comes loose. putting a towel on the roof or something to protect it is a good idea.
6) Repeat steps 1 and 2 again for the front end caps, except sliding the end cap frontward.
From there, follow best practices for pre-clean, tapeoff/prep, sanding, and painting. After 8-12 hours or so of curing, you can reassemble the top rails to the car in reverse order.
In reverse order, when putting the cover back on (front one for example), do you set it straight down and then slid rearward so the tabs on the cover piece get retained in the lower slots, and the clip at the top of the rail snaps up to hold the cover in place?
In reverse order, when putting the cover back on (front one for example), do you set it straight down and then slid rearward so the tabs on the cover piece get retained in the lower slots, and the clip at the top of the rail snaps up to hold the cover in place?
I think that's what I'm interpreting.
Exactly right. I know it's hard to explain, but sounds like you got the basic gist.
I'll be referring to this post while I inspect why I have a water stain on the headliner just behind the driver side passenger door. Hopefully I don't break any tabs lol
They're retained through hatred, spite, and demon magic. That's my best guess because I broke 3 of the 4 top retaining clips/snaps trying to get them off In all seriousness, the best I could figure out (and I managed to save the 4th and final piece with this technique), the procedure is along these lines:
1) Start at the rear end cap (i.e. #30 or #36). The concept is that the piece is on a tab + L-slot snap. The bottom black piece bolted to the roof has the "L" slot. The top plastic end piece has the tabs. If you can just manage to wiggle it enough to slide rearward by about a half to 3/4 inch, then you can lift up and it's free. Problem is mine would NOT budge. I smacked it, wiggled it, pulled on it, pushed on it, called it names and nothing. Although the second photo is of the front end cap #28, the concept is the same. After breaking a couple, I learned the one actual retaining clip/snap in the "rearward" direction is on the very top of the rail (blue arrow below), in the crack between the Aluminum top rail and the plastic #30. Press firmly down with a small screwdriver (cover tip in painters tape) to try to depress that snap, while you again, smack it, wiggle it, pull on it, push on it, and call it names. A helper to push the clip while you do that would be huge. I was doing this at 1a.m. so no helpers.
L-slot in base. Use a small screwdriver to press down on top clip at seam between Aluminum top rail and plastic end cap (wrap in painters tape any spot on the roof rail pieces or adjacent painted surfaces where you're prying or using a trim tool). While a helper presses down on the clip with the screwdriver, you go to town on trying to slide the end cap off. In this photo you can see I've already broken the plastic snap, but the blue arrow indicates where I SHOULD have been pressing to release the clip.
End cap with tabs. Although the pic is the front end cap #28, the concept and tabs are the same on the rear piece.
2) If all that fails, use a trim removal tool or other plastic wedge to try to pry in between the black base piece and silver top piece (#30). Once you can wedge something in there, I was able to pop the L taps and lift it off. At this point the top snap referred to in step 1 had STILL not come loose, so I ended up breaking it while lifting #30 off.
The photo below is of piece #34, and it's the only one I manged to get off without breaking the top plastic snap that mates with the top clip.
3) After you've removed the rear end caps #30 and #36 take out the two bolts holding the rear mount to the roof. Now you can wiggle that black rear mount off the roof and off the end of the aluminum top rail.
4) In the center mounting point of the roof rack, you can pop the bottom black "U" piece off by prying with a trim tool on the inside between the metal and plastic. After that, remove the two side facing bolts behind the coverup.
5) wiggle the top Aluminum rail rearward until it slides out of the front mount endcap. Be VERY careful not to ding your roof with the rail when it comes loose. putting a towel on the roof or something to protect it is a good idea.
6) Repeat steps 1 and 2 again for the front end caps, except sliding the end cap frontward.
From there, follow best practices for pre-clean, tapeoff/prep, sanding, and painting. After 8-12 hours or so of curing, you can reassemble the top rails to the car in reverse order.
Never went to take a look at my rails till a leak got worse from them. I found the easiest and maybe only method is to start from the rear and work your way forward. Pop up the back cap and unbolt the base. Pop off the center and unbolt the two bolts facing out and then you can lift up enough to fit a small screwdriver or anything into one of the holes on the underside of the rail near the front or rear base. press in and the rail slides out easily. After you remove the rear then do the same to the front and you can then pry up on the top tab of the font cap to slide it forward. I tried to find that tab you circled but that didn't work out because that tab is actually too far under the cap to access. I think I felt some of your frustration with this though lol
I have been having A pillar leaking for quite a while. I've ruled out any leaks from the sunroof and using the information provided by Wagonfanatic, today I pulled off the left front roofrack bracket cover. I noted a couple of things that should be added to the knowledge base of things to do to get these off:
First - I do not think the tab on the top of the cover, where it connects to the rail, locks. It just locates the cover better. I did the recommended pushing with a round putty knife and wound up cutting this tab right off. But, I looked at the part and it does not appear to lock into anything. There is some friction tension from the stainless spring beneth it, but no lock.
Second - A good spray of some kind of lubricant (I used Fluid Film) around the base of the cover will help it slide into position where it can be successfully pulled out of the L-bracket slots.
I've put some butyl caulk around the bolts. Once my A-pillar is dry, I'll create some heavy rain and post if this repair worked. Roofrack Bracket Cover and Tab A Pillar Leaking
Last edited by PopaOmero; Mar 20, 2022 at 04:16 PM.
They're retained through hatred, spite, and demon magic. That's my best guess because I broke 3 of the 4 top retaining clips/snaps trying to get them off In all seriousness, the best I could figure out (and I managed to save the 4th and final piece with this technique), the procedure is along these lines:
1) Start at the rear end cap (i.e. #30 or #36). The concept is that the piece is on a tab + L-slot snap. The bottom black piece bolted to the roof has the "L" slot. The top plastic end piece has the tabs. If you can just manage to wiggle it enough to slide rearward by about a half to 3/4 inch, then you can lift up and it's free. Problem is mine would NOT budge. I smacked it, wiggled it, pulled on it, pushed on it, called it names and nothing. Although the second photo is of the front end cap #28, the concept is the same. After breaking a couple, I learned the one actual retaining clip/snap in the "rearward" direction is on the very top of the rail (blue arrow below), in the crack between the Aluminum top rail and the plastic #30. Press firmly down with a small screwdriver (cover tip in painters tape) to try to depress that snap, while you again, smack it, wiggle it, pull on it, push on it, and call it names. A helper to push the clip while you do that would be huge. I was doing this at 1a.m. so no helpers.
L-slot in base. Use a small screwdriver to press down on top clip at seam between Aluminum top rail and plastic end cap (wrap in painters tape any spot on the roof rail pieces or adjacent painted surfaces where you're prying or using a trim tool). While a helper presses down on the clip with the screwdriver, you go to town on trying to slide the end cap off. In this photo you can see I've already broken the plastic snap, but the blue arrow indicates where I SHOULD have been pressing to release the clip.
End cap with tabs. Although the pic is the front end cap #28, the concept and tabs are the same on the rear piece.
2) If all that fails, use a trim removal tool or other plastic wedge to try to pry in between the black base piece and silver top piece (#30). Once you can wedge something in there, I was able to pop the L taps and lift it off. At this point the top snap referred to in step 1 had STILL not come loose, so I ended up breaking it while lifting #30 off.
The photo below is of piece #34, and it's the only one I manged to get off without breaking the top plastic snap that mates with the top clip.
3) After you've removed the rear end caps #30 and #36 take out the two bolts holding the rear mount to the roof. Now you can wiggle that black rear mount off the roof and off the end of the aluminum top rail.
4) In the center mounting point of the roof rack, you can pop the bottom black "U" piece off by prying with a trim tool on the inside between the metal and plastic. After that, remove the two side facing bolts behind the coverup.
5) wiggle the top Aluminum rail rearward until it slides out of the front mount endcap. Be VERY careful not to ding your roof with the rail when it comes loose. putting a towel on the roof or something to protect it is a good idea.
6) Repeat steps 1 and 2 again for the front end caps, except sliding the end cap frontward.
From there, follow best practices for pre-clean, tapeoff/prep, sanding, and painting. After 8-12 hours or so of curing, you can reassemble the top rails to the car in reverse order.
@wagonfanatic Thanks for posting these pics and tips! Picked up my wagon last month and have been looking into how to dechrome the car lol


 In all seriousness, the best I could figure out (and I managed to save the 4th and final piece with this technique), the procedure is along these lines: