
CCColtsicehockey's Home Projects Thread


Ex-OEM King


Joined: Dec 2013
Posts: 17,880
Likes: 7,026
From: Minnesnowta
Haha fair point.
I will make a mockup of what I am talking about with some scrap wood. To you point about the grain and the direction it expands the issue is I would be building a rectangle frame to go around the cabinet opening to increase the height of the cabinet. I get adding something like that is not really ideal and had I made it correctly to start with would have been best. Right now when the lid closes though it doesn't sit on anything to support it where as it used to touch all the way around so I would be trying to add that back. Again, I will make a mockup though so it is easier to understand.
Yeah not sure my level is up to sliding dovetails yet
Thread Starter
Moderator
Regional Coordinator (Southeast)
Regional Coordinator (Southeast)


Joined: Dec 2003
Posts: 44,123
Likes: 4,433
From: Mooresville, NC
Well, the house is getting a new garage door so that everything matches. I am doing high lift track in there as well since the garage being 10ft 6in would fit a stacker if I so wanted to as well someday. Moving to a jack shaft opener as well as I might put a hoist for my roof box in the middle of the house bay and this would make it easier since it would shorten the amount of the door that takes up ceiling space.
One thing I needed to do was get power to the side corner of the garage for the new opener. I had originally planned to do this with conduit as I hate drywall work. Some friends convinced me to do it the right way and that I won't be happy with the conduit with the rest of the house garage already finished.
Part of the area above the garage is a bedroom and a closet the other is insulated storage.

Pulled a bunch of staples and I was able to get into the rest of the attic.

There was a lot more room up there than I had expected. Thankfully no blocking in between the ceiling joists so I was easily able to run the wire from near the existing opener outlet in the middle of the garage into this unfinished area.

I did have to cut one 6x6in access hole to get the wire up there and also feed it into the existing box for the connection. I also ran addition line to splice into the existing opener control wire so that we can use the rest of the wire behind the drywall.

Drilled down into the wall

Wires both run


The garage has peculiar construction with the sheeting on the inside so had to cut through both drywall and OSB.

Made my hole just slightly wider for the new work box and brought the open control line out beside it. Then notched the face plate for it to come out cleanly.

They are still set to start Monday or Tuesday on all of the garage doors.
One thing I needed to do was get power to the side corner of the garage for the new opener. I had originally planned to do this with conduit as I hate drywall work. Some friends convinced me to do it the right way and that I won't be happy with the conduit with the rest of the house garage already finished.
Part of the area above the garage is a bedroom and a closet the other is insulated storage.
Pulled a bunch of staples and I was able to get into the rest of the attic.
There was a lot more room up there than I had expected. Thankfully no blocking in between the ceiling joists so I was easily able to run the wire from near the existing opener outlet in the middle of the garage into this unfinished area.
I did have to cut one 6x6in access hole to get the wire up there and also feed it into the existing box for the connection. I also ran addition line to splice into the existing opener control wire so that we can use the rest of the wire behind the drywall.
Drilled down into the wall
Wires both run
The garage has peculiar construction with the sheeting on the inside so had to cut through both drywall and OSB.
Made my hole just slightly wider for the new work box and brought the open control line out beside it. Then notched the face plate for it to come out cleanly.
They are still set to start Monday or Tuesday on all of the garage doors.
Thread Starter
Moderator
Regional Coordinator (Southeast)
Regional Coordinator (Southeast)
Joined: Dec 2003
Posts: 44,123
Likes: 4,433
From: Mooresville, NC
I worked on a few more things yesterday. Installed my matte gray outlets by Square D for the garage door opener as well as the matching blank plate for the opener wires to come through. The color is very close for something that wasn't actually custom matched.

Once the opener is installed the wires will get wrapped in this loom. Will be using the same loom but smaller size for the sensors for the door as well.

I also started on painting the speakers for the storage garage so that they will match the same color as the recessed lights. Still need to give them another coat or two later today.


The garage door company is here to get to work on the first door today.
Once the opener is installed the wires will get wrapped in this loom. Will be using the same loom but smaller size for the sensors for the door as well.
I also started on painting the speakers for the storage garage so that they will match the same color as the recessed lights. Still need to give them another coat or two later today.
The garage door company is here to get to work on the first door today.
Thread Starter
Moderator
Regional Coordinator (Southeast)
Regional Coordinator (Southeast)
Joined: Dec 2003
Posts: 44,123
Likes: 4,433
From: Mooresville, NC
The garage door work has been going on for two days now. Yesterday they came and got started and took down the first temporary all and started installing that garage door. When they left that is when the problems were noticed.
These doors are from CHI and their special Woodtones finish collection in which actual wood grains have been scanned and then layouts are carefully made so that the pattern does not have any repeating boards in it. Because of this each door has a number and each panel has a number so as not to be mixed up from door print to door print.
Look for it and you will see it

If you look above and figure out that panels 2 and 4 are exactly the same. Well, this is because they apparently didn't know what they were doing or just didn't care. I am pretty sure the numbers given to the full doors themselves are just the day's production number but the panel numbers are actually written on with a marker.
Below you can see they used door 15 panel 4 and 14 panel 4 in the same door.


Here is the actual layout of the door they installed on the first day listed from top to bottom.
Door 15 Panel 5
Door 14 Panel 4
Door 15 Panel 2
Door 15 Panel 4
Door 14 Panel 1Needless to say the entire door except the bottom panel had to be taken out. Technically that should have been taken out as well since the doors were 13, 14, and 15 meaning essentially you were reading right to left as 13 is the different size door for the house.
The one positive for yesterday is I was super happy with how the black powder coated hardware came out.

Fast forward to today. The door gets fixed as far as panel order and correctness go but new issues emerge. The top glass panel is severely creased in multiple places around the glass openings. Likely sometime during transport or shipping it was handled incorrectly and bent. If you look closely you can see the spots in the sun's reflection.

Close ups


Turns out this happened to both top panels so they are both getting replaced.
But like an infomercial, wait there's more.
The end plate of two panels is not attached right. This is the worst of the two. Speculation is that insulation has pushed them out too far when the panels were filled with the foam insulation.
How it should look

How it looks


Because of this issue they will not make this door operational under the replacement panels arrive as for fear of it damaging the powder coated track.
The door also has grease marks from the manufacturing equipment that just will not seem to come off.

So between the damaged panels, the foam issue, and the grease marks the one door is getting entirely replaced by CHI along with the glass panel on the second door.
They will be back to finish the install on the one door tomorrow and then do then tear out the house door and install that door on Thursday.
After all of that though I love the door choice that I made and the give the property the look I was going for. So at least no regret there. Once the issues are resolved things will be good.


These doors are from CHI and their special Woodtones finish collection in which actual wood grains have been scanned and then layouts are carefully made so that the pattern does not have any repeating boards in it. Because of this each door has a number and each panel has a number so as not to be mixed up from door print to door print.
Look for it and you will see it
If you look above and figure out that panels 2 and 4 are exactly the same. Well, this is because they apparently didn't know what they were doing or just didn't care. I am pretty sure the numbers given to the full doors themselves are just the day's production number but the panel numbers are actually written on with a marker.
Below you can see they used door 15 panel 4 and 14 panel 4 in the same door.
Here is the actual layout of the door they installed on the first day listed from top to bottom.
Door 15 Panel 5
Door 14 Panel 4
Door 15 Panel 2
Door 15 Panel 4
Door 14 Panel 1Needless to say the entire door except the bottom panel had to be taken out. Technically that should have been taken out as well since the doors were 13, 14, and 15 meaning essentially you were reading right to left as 13 is the different size door for the house.
The one positive for yesterday is I was super happy with how the black powder coated hardware came out.
Fast forward to today. The door gets fixed as far as panel order and correctness go but new issues emerge. The top glass panel is severely creased in multiple places around the glass openings. Likely sometime during transport or shipping it was handled incorrectly and bent. If you look closely you can see the spots in the sun's reflection.
Close ups
Turns out this happened to both top panels so they are both getting replaced.
But like an infomercial, wait there's more.
The end plate of two panels is not attached right. This is the worst of the two. Speculation is that insulation has pushed them out too far when the panels were filled with the foam insulation.
How it should look
How it looks
Because of this issue they will not make this door operational under the replacement panels arrive as for fear of it damaging the powder coated track.
The door also has grease marks from the manufacturing equipment that just will not seem to come off.
So between the damaged panels, the foam issue, and the grease marks the one door is getting entirely replaced by CHI along with the glass panel on the second door.
They will be back to finish the install on the one door tomorrow and then do then tear out the house door and install that door on Thursday.
After all of that though I love the door choice that I made and the give the property the look I was going for. So at least no regret there. Once the issues are resolved things will be good.
Hope you are enjoying a few beverages and cigars on the weekends after dealing with this project! The CHI Doors look great and glad they are fixing the issues, with no questions asked I hope. They aren't cheap!
Originally when my neighbor gave me his old CHI door, I want to have my door painted a wood tone but after a couple years of it installed, the solid color has grown on me. I do want new window inserts though. It is amazing how much an insulated door does in the hot/cold.
Do you have a date for the driveway to be poured yet? You have to be getting pretty close to that I would think.


Thread Starter
Moderator
Regional Coordinator (Southeast)
Regional Coordinator (Southeast)
Joined: Dec 2003
Posts: 44,123
Likes: 4,433
From: Mooresville, NC
Hope you are enjoying a few beverages and cigars on the weekends after dealing with this project! The CHI Doors look great and glad they are fixing the issues, with no questions asked I hope. They aren't cheap!
Originally when my neighbor gave me his old CHI door, I want to have my door painted a wood tone but after a couple years of it installed, the solid color has grown on me. I do want new window inserts though. It is amazing how much an insulated door does in the hot/cold.
Do you have a date for the driveway to be poured yet? You have to be getting pretty close to that I would think.
Originally when my neighbor gave me his old CHI door, I want to have my door painted a wood tone but after a couple years of it installed, the solid color has grown on me. I do want new window inserts though. It is amazing how much an insulated door does in the hot/cold.
Do you have a date for the driveway to be poured yet? You have to be getting pretty close to that I would think.
Thread Starter
Moderator
Regional Coordinator (Southeast)
Regional Coordinator (Southeast)
Joined: Dec 2003
Posts: 44,123
Likes: 4,433
From: Mooresville, NC
More progress yesterday. It was a very busy day on site with 3 different trades here at once.
The garage door crew was back, ripped out the existing house garage door, and got the new one hung and sliding. Still needs the opener and seals installed today.

With the house door in, it gives the first look at the garage doors with the full height of stone that will eventually be everywhere once the new driveway is poured.

It is amazing how much larger the house garage feels now without the center mount opener and the addition of high lift tracks. I wish we would have gone a little higher with the tracks but for some reason, this company was against a radius that put the tracks closer than 1ft to the ceiling. An extra 4-6in would have been really nice for clearance but I still don't think there will be any issues putting a single stacker in the house garage.

The trim crew arrived yesterday as well to start on the wood walls. He is telling me they will have it all wrapped up by the end of next week.

The parts for the railing finally came in and so they got started with the railing on the deck first. The stair railing will go on today. I really like the industrial feel the railing has.


The garage door crew was back, ripped out the existing house garage door, and got the new one hung and sliding. Still needs the opener and seals installed today.
With the house door in, it gives the first look at the garage doors with the full height of stone that will eventually be everywhere once the new driveway is poured.
It is amazing how much larger the house garage feels now without the center mount opener and the addition of high lift tracks. I wish we would have gone a little higher with the tracks but for some reason, this company was against a radius that put the tracks closer than 1ft to the ceiling. An extra 4-6in would have been really nice for clearance but I still don't think there will be any issues putting a single stacker in the house garage.
The trim crew arrived yesterday as well to start on the wood walls. He is telling me they will have it all wrapped up by the end of next week.
The parts for the railing finally came in and so they got started with the railing on the deck first. The stair railing will go on today. I really like the industrial feel the railing has.

Thread Starter
Moderator
Regional Coordinator (Southeast)
Regional Coordinator (Southeast)
Joined: Dec 2003
Posts: 44,123
Likes: 4,433
From: Mooresville, NC
Crews were all back on Friday. The garage doors that could be are finished. Two of the three openers were installed and all doors were trimmed out.


The house has the 98022

The new garage I went with the heavier duty 98032

Trim guys finished the up stairs wall and made a good bit of progress downstairs


They attempted to finish up the deck. The return was glued on. It is not perfect but so far my only nit pick with the work. They installed the stair railing posts only to discover the top rails of the railing that were sent were wrong. It appears it will be another 3-4 weeks until the correct product arrives.


I had some time to get some of the remaining exterior lights mounted. Both rear person door lights and the two lights over the garage doors. The only exterior lights left are 2 spot lights.


In contrast to the gray outlets I am using on the gray walls I have decided to go with black on the wood. The gray ones looked off on the wood as the gray in the wood was a different shade than the gray outlets.


I also ran some wire in the wall before they close it up for an outlet above the door in the bathroom. I am considering putting a light up sign in that area and it would allow me to drill a hole through the wall and put keep the outlet off the wood wall side.

Decided to be extra safe and put in some blocking for the eventual barn door for the bathroom.

The house has the 98022
The new garage I went with the heavier duty 98032
Trim guys finished the up stairs wall and made a good bit of progress downstairs
They attempted to finish up the deck. The return was glued on. It is not perfect but so far my only nit pick with the work. They installed the stair railing posts only to discover the top rails of the railing that were sent were wrong. It appears it will be another 3-4 weeks until the correct product arrives.
I had some time to get some of the remaining exterior lights mounted. Both rear person door lights and the two lights over the garage doors. The only exterior lights left are 2 spot lights.
In contrast to the gray outlets I am using on the gray walls I have decided to go with black on the wood. The gray ones looked off on the wood as the gray in the wood was a different shade than the gray outlets.
I also ran some wire in the wall before they close it up for an outlet above the door in the bathroom. I am considering putting a light up sign in that area and it would allow me to drill a hole through the wall and put keep the outlet off the wood wall side.
Decided to be extra safe and put in some blocking for the eventual barn door for the bathroom.
Ex-OEM King
Joined: Dec 2013
Posts: 17,880
Likes: 7,026
From: Minnesnowta
That black even looks kind of out of place but I like it better than what I'd imagine brown to look like...
Got any more of that wood left over? I know a guy with a CNC that could make some matching face covers for you...
Great idea adding all that blocking now, that's one of the things I seriously wish I would have done when I did my basement. It's cheap and easy to do now and will pay big dividends in the future.
Thread Starter
Moderator
Regional Coordinator (Southeast)
Regional Coordinator (Southeast)
Joined: Dec 2003
Posts: 44,123
Likes: 4,433
From: Mooresville, NC
That black even looks kind of out of place but I like it better than what I'd imagine brown to look like...
Got any more of that wood left over? I know a guy with a CNC that could make some matching face covers for you...
Great idea adding all that blocking now, that's one of the things I seriously wish I would have done when I did my basement. It's cheap and easy to do now and will pay big dividends in the future.
Got any more of that wood left over? I know a guy with a CNC that could make some matching face covers for you...
Great idea adding all that blocking now, that's one of the things I seriously wish I would have done when I did my basement. It's cheap and easy to do now and will pay big dividends in the future.
The only reason I feel the black looks better is because of all the black lights, garage door tracks, and the frame for the glass walls will also be black.
Ex-OEM King
Joined: Dec 2013
Posts: 17,880
Likes: 7,026
From: Minnesnowta
I know a guy with a planer and jointer that could easily thin that ish down on either side in about 5 minutes.
I think the black looks better because it looks like you were intentionally NOT hiding the outlets and making them a feature rather than poorly trying to make them match.
I think the black looks better because it looks like you were intentionally NOT hiding the outlets and making them a feature rather than poorly trying to make them match.
Thread Starter
Moderator
Regional Coordinator (Southeast)
Regional Coordinator (Southeast)
Joined: Dec 2003
Posts: 44,123
Likes: 4,433
From: Mooresville, NC
I know a guy with a planer and jointer that could easily thin that ish down on either side in about 5 minutes.
I think the black looks better because it looks like you were intentionally NOT hiding the outlets and making them a feature rather than poorly trying to make them match.
I think the black looks better because it looks like you were intentionally NOT hiding the outlets and making them a feature rather than poorly trying to make them match.
I like the black outlets. I think it brings the color of the exterior fixtures inside. Will there be any other black on the inside? Railing for the stairs?
One thing after having my house re-sided and seeing this project and now the hand railing. How can people just say "that looks good enough"? I would be embarrassed to leave something so half assed.
One thing after having my house re-sided and seeing this project and now the hand railing. How can people just say "that looks good enough"? I would be embarrassed to leave something so half assed.
Thread Starter
Moderator
Regional Coordinator (Southeast)
Regional Coordinator (Southeast)
Joined: Dec 2003
Posts: 44,123
Likes: 4,433
From: Mooresville, NC
I like the black outlets. I think it brings the color of the exterior fixtures inside. Will there be any other black on the inside? Railing for the stairs?
One thing after having my house re-sided and seeing this project and now the hand railing. How can people just say "that looks good enough"? I would be embarrassed to leave something so half assed.
One thing after having my house re-sided and seeing this project and now the hand railing. How can people just say "that looks good enough"? I would be embarrassed to leave something so half assed.
Yes there is plenty of black elsewhere. Kind of the primary accent color of the garage. You have all the black recessed lights, black fans, and black garage door tracks. The stair railling will be black as well as the metal frame that holds the glass walls. The cabinets in the working garage will be black. Upstairs I will have a black fan as well most likely, black hanging pendant lights going up the stairs, black granite counters, black cabinet hardware, and black faucet on the wet bar.
Thread Starter
Moderator
Regional Coordinator (Southeast)
Regional Coordinator (Southeast)
Joined: Dec 2003
Posts: 44,123
Likes: 4,433
From: Mooresville, NC
The finish carpenters finished up the wood walls inside as well as the beam that was needed for the eventual matching glass door for the glass walls. They also finished the wall and access panel to the understairs storage/water heater access/fiber termination area.
The work of these guys completely out did my expectations.


Went with flush trim here because the bathroom will get a split sliding barn door so as to not have a door open in the narrow corner hallway. I like the flush trim so much I am debating on having them to it on the rest of the doors on the wood walls.

I was expecting a panel made from leftover boards for the door. Had no idea he was going to make it all with full boards and then cut it out and trim it then so the boards followed.

Continued attention to detail on the stair landing nose


The second attempt at ordering my cabinet for the network and audio gear showed up this time. Thankfully this one was spotless with no dents.


The work of these guys completely out did my expectations.
Went with flush trim here because the bathroom will get a split sliding barn door so as to not have a door open in the narrow corner hallway. I like the flush trim so much I am debating on having them to it on the rest of the doors on the wood walls.
I was expecting a panel made from leftover boards for the door. Had no idea he was going to make it all with full boards and then cut it out and trim it then so the boards followed.
Continued attention to detail on the stair landing nose
The second attempt at ordering my cabinet for the network and audio gear showed up this time. Thankfully this one was spotless with no dents.


Thread Starter
Moderator
Regional Coordinator (Southeast)
Regional Coordinator (Southeast)
Joined: Dec 2003
Posts: 44,123
Likes: 4,433
From: Mooresville, NC
Tuesday night I was able to get a little work in the garage done. I installed the workshop speakers and knocked out all the rest of the outlets installed in the walls and ceiling in the wood shop.


Finding 20amp 250v outlets in the big box stores was difficult. Not a fan of these so they are going back. Found some that are actually in the decora form factor so everything can match. They should be here this weekend.

We had another issue last week with the deck guy figuring out the railing system I had selected. He got a rep out from the company that makes the railing yesterday and was able to get that sorted. Hopefully, the extra parts show up in the next week or two so that project can get wrapped up.
Finding 20amp 250v outlets in the big box stores was difficult. Not a fan of these so they are going back. Found some that are actually in the decora form factor so everything can match. They should be here this weekend.
We had another issue last week with the deck guy figuring out the railing system I had selected. He got a rep out from the company that makes the railing yesterday and was able to get that sorted. Hopefully, the extra parts show up in the next week or two so that project can get wrapped up.
Thread Starter
Moderator
Regional Coordinator (Southeast)
Regional Coordinator (Southeast)
Joined: Dec 2003
Posts: 44,123
Likes: 4,433
From: Mooresville, NC
Ex-OEM King
Joined: Dec 2013
Posts: 17,880
Likes: 7,026
From: Minnesnowta
Do you have an outlet or two on the ceiling? If not, I'd recommend trying to get one up there to hang an air filter or something.
Looks awesome though! For my miter saw station, I didn't do outlets up high. Instead I did normal outlets inside the cabinets and then attached a power strip underneath the upper cabinet to prevent sawdust from going in there. For the miter saw, I just ran the cord underneath to the normal outlet spot.
Looks awesome though! For my miter saw station, I didn't do outlets up high. Instead I did normal outlets inside the cabinets and then attached a power strip underneath the upper cabinet to prevent sawdust from going in there. For the miter saw, I just ran the cord underneath to the normal outlet spot.
Thread Starter
Moderator
Regional Coordinator (Southeast)
Regional Coordinator (Southeast)
Joined: Dec 2003
Posts: 44,123
Likes: 4,433
From: Mooresville, NC
Do you have an outlet or two on the ceiling? If not, I'd recommend trying to get one up there to hang an air filter or something.
Looks awesome though! For my miter saw station, I didn't do outlets up high. Instead, I did normal outlets inside the cabinets and then attached a power strip underneath the upper cabinet to prevent sawdust from going in there. For the miter saw, I just ran the cord underneath to the normal outlet spot.
Looks awesome though! For my miter saw station, I didn't do outlets up high. Instead, I did normal outlets inside the cabinets and then attached a power strip underneath the upper cabinet to prevent sawdust from going in there. For the miter saw, I just ran the cord underneath to the normal outlet spot.
I might end up putting some outdoor covers on most of the outlets in the end that are above the counter. To start with I plan to build open work benches in there for the first year or two so I can get things up and running. I will worry about enclosed cabinets in there after that. Outlets in the cabinets would be nice for sure. One of the reason though that I went with the wood on the walls is so I can open them down the road to move stuff like that around.
Thread Starter
Moderator
Regional Coordinator (Southeast)
Regional Coordinator (Southeast)
Joined: Dec 2003
Posts: 44,123
Likes: 4,433
From: Mooresville, NC

Here is a picture of the ceiling outlets.
Blue and green are for the four planned cord reels. Blue is one circuit and green is another. That way if using two tools at once you are never using two cords on the same circuit no mater what side of the table you are on in the middle of the room. The table will also have two power circuits on it eventually as well.
Red and orange are the two outlets for the eventual dust filtration unit. Currently, the plan is to put on the red outlet with the intake end facing the person door in that picture. I would then build a filter box on top of the mini split as well and set the exhaust of the mini split angled to the windows with the hope of creating a rotational air flow to help better extra the dust from the air between the two units.
Filter box for mini split
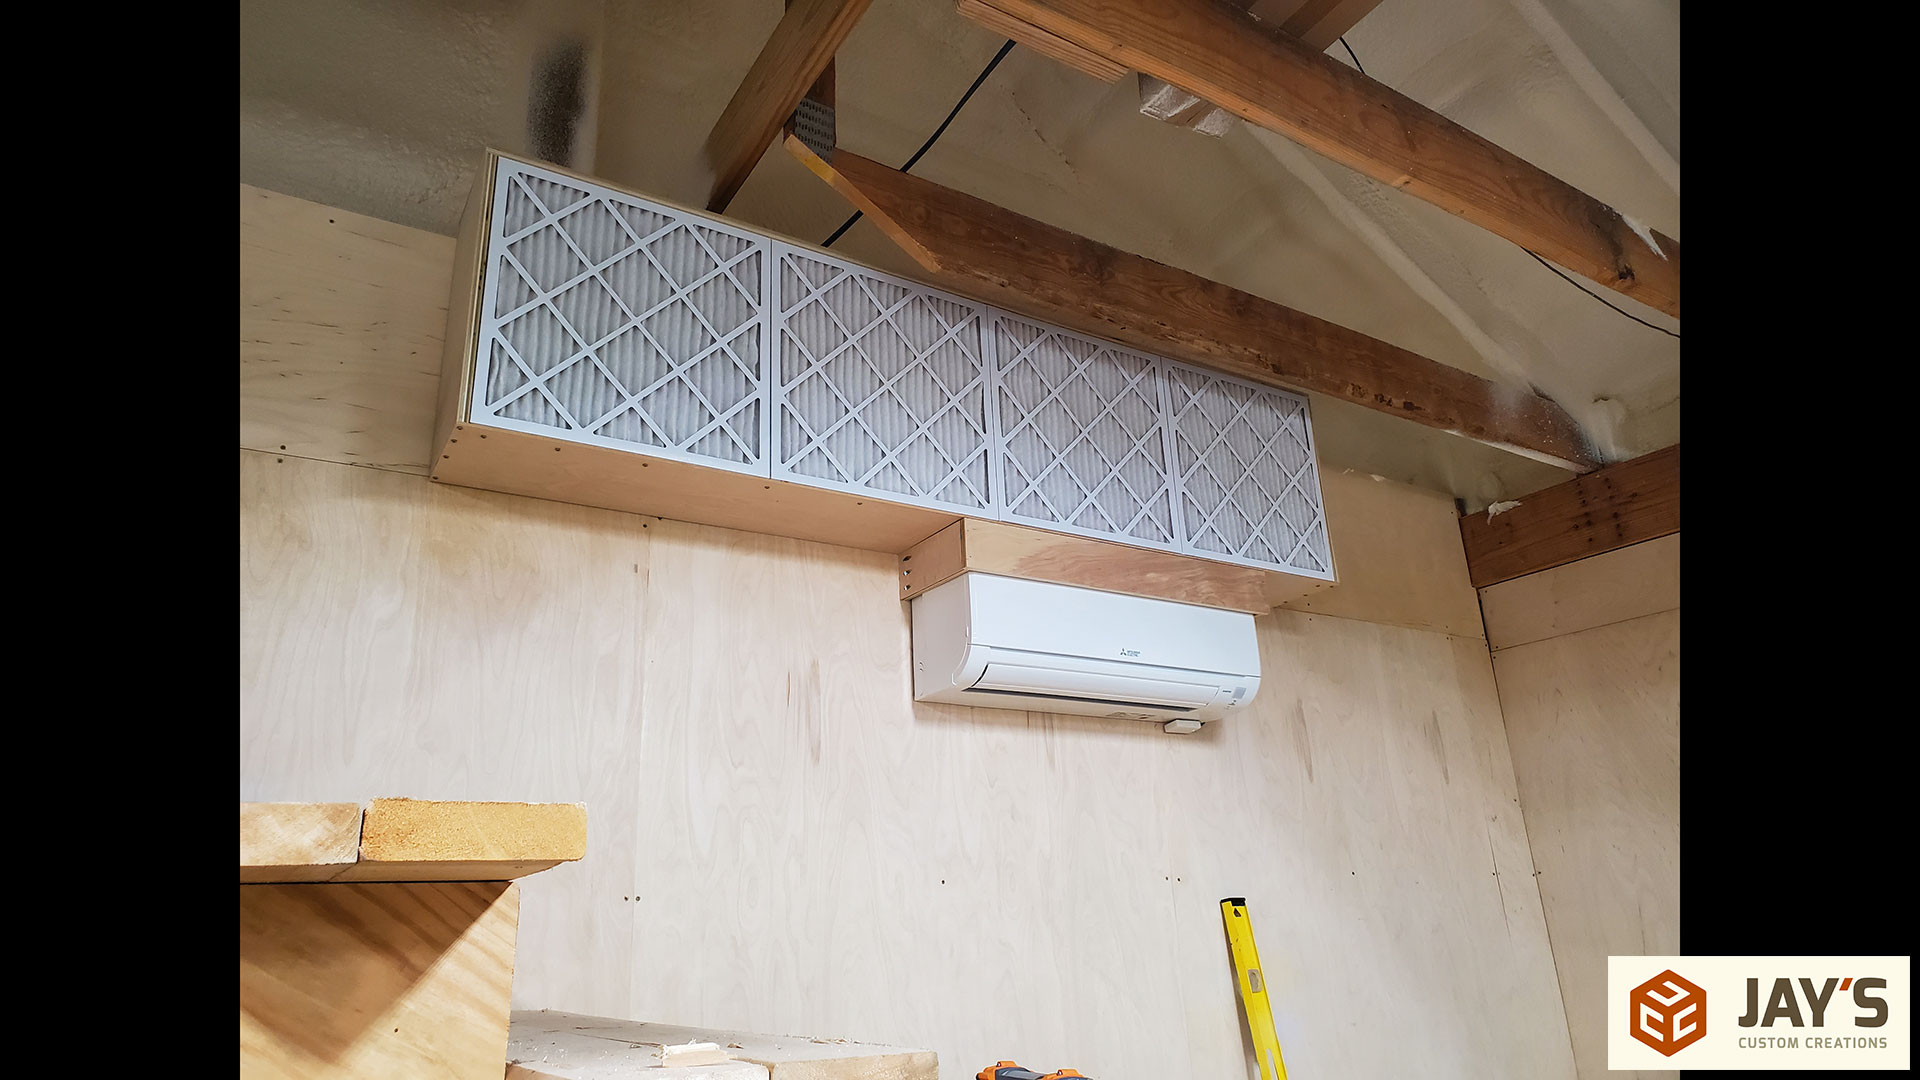
I am leaning towards the JET unit for the dedicated air filtration unit.
Ex-OEM King
Joined: Dec 2013
Posts: 17,880
Likes: 7,026
From: Minnesnowta
Just as an FYI I just saw that Rockler is releasing their own ceiling mounted dust filtration system that's considerably cheaper than Jet's, might be something to think about. I think I'm going to go down that path myself.
They have also (and so did harbor freight) release a HEPA dust extractor for $300 that's WAY WAY cheaper than the equivalent Festool one. I'm not sure of what performance differences there are but that might also be something to consider as lower priced options.
They have also (and so did harbor freight) release a HEPA dust extractor for $300 that's WAY WAY cheaper than the equivalent Festool one. I'm not sure of what performance differences there are but that might also be something to consider as lower priced options.
Thread Starter
Moderator
Regional Coordinator (Southeast)
Regional Coordinator (Southeast)
Joined: Dec 2003
Posts: 44,123
Likes: 4,433
From: Mooresville, NC
Just as an FYI I just saw that Rockler is releasing their own ceiling mounted dust filtration system that's considerably cheaper than Jet's, might be something to think about. I think I'm going to go down that path myself.
They have also (and so did harbor freight) release a HEPA dust extractor for $300 that's WAY WAY cheaper than the equivalent Festool one. I'm not sure of what performance differences there are but that might also be something to consider as lower priced options.
They have also (and so did harbor freight) release a HEPA dust extractor for $300 that's WAY WAY cheaper than the equivalent Festool one. I'm not sure of what performance differences there are but that might also be something to consider as lower priced options.
Will be interesting also to see the performance of ther Rockler and Harbor freight dust collectors. You have me convinced for at least one station in the shop to just use my current shop vac. I will want two though as I will want one for the workbench station and another for the center of the room table. Cheaper is better in the interim for sure to get as many things up and running right away.
Thread Starter
Moderator
Regional Coordinator (Southeast)
Regional Coordinator (Southeast)
Joined: Dec 2003
Posts: 44,123
Likes: 4,433
From: Mooresville, NC
Making some more progress that is getting it to look more and more finished. I guess the tile guy is doing this job as a favor to the builder. He came and got started on the weekend.


Tile is a bluestone look. I am thinking of using a lighter grout to be a mortar like color.


The first pictures were down in the garage bay using the recessed lights which really won't get what the tile has showing on it. Took some of the colors I was leaning towards up to the loft in the natural light and amazing how much things change.

My 250v Decora outlets showed up. They unfortunately are still glossy finish which I didn't realize from the pictures. At least I can use them with the existing matching plates though. Either way looks much better than the other ones. And I know, it is just the shop, does it really matter.

I also installed the charging station outlet for when I wall mount the EGO blower for cleaning out the garage and drying cars with. However, I am questioning whether I just want to put all of that in a cabinet now instead.

Tile is a bluestone look. I am thinking of using a lighter grout to be a mortar like color.
The first pictures were down in the garage bay using the recessed lights which really won't get what the tile has showing on it. Took some of the colors I was leaning towards up to the loft in the natural light and amazing how much things change.
My 250v Decora outlets showed up. They unfortunately are still glossy finish which I didn't realize from the pictures. At least I can use them with the existing matching plates though. Either way looks much better than the other ones. And I know, it is just the shop, does it really matter.
I also installed the charging station outlet for when I wall mount the EGO blower for cleaning out the garage and drying cars with. However, I am questioning whether I just want to put all of that in a cabinet now instead.
Thread Starter
Moderator
Regional Coordinator (Southeast)
Regional Coordinator (Southeast)
Joined: Dec 2003
Posts: 44,123
Likes: 4,433
From: Mooresville, NC
They finished laying the tile upstairs yesterday.


I also finally picked a grout color. It is a beige gray color. There are tan spots in the bluestone tile and I figure this color should help hide a bit more dirt than the lighter gray I had been looking at. I couldn't bring myself though to do a dark gray of black.

They have started putting the tile down in the bathroom as well starting the grout upstairs.
I also finally picked a grout color. It is a beige gray color. There are tan spots in the bluestone tile and I figure this color should help hide a bit more dirt than the lighter gray I had been looking at. I couldn't bring myself though to do a dark gray of black.
They have started putting the tile down in the bathroom as well starting the grout upstairs.


