
CCColtsicehockey's Home Projects Thread


Thread Starter
Moderator
Regional Coordinator (Southeast)
Regional Coordinator (Southeast)


Joined: Dec 2003
Posts: 44,123
Likes: 4,434
From: Mooresville, NC
Thread Starter
Moderator
Regional Coordinator (Southeast)
Regional Coordinator (Southeast)
Joined: Dec 2003
Posts: 44,123
Likes: 4,434
From: Mooresville, NC
Some more items got checked off the list last week. The exterior finally look as complete as it can get until the concrete is in.
The dryer vent pipe was figured out and installed. It will vent under the breezeway roof and I found a flapper vent to use in that orientation to keep animals out.

The staining on the cedar shake was finished. It unfortunately turned out a bit more grey than my samples did but not enough I can point a finger at it being wrong. It still has a brown tint to it in the sun just not really when it is overcast out.


The exterior of the house is also finally fully painted so the only damage left to be fixed from the water issue on the front is having my front porch put back together. I also full decided on no posts anymore on my front porch so all the remaining trim for that was ripped out and the header beam painted.

Spent a little time on the weekend doing some grading with leftover soil from the garage project to fill in and level places from when we dug up the existing house drainage pipe to connect the new ones.

Also did some on the back side of the yard that has washed away or worn away from the dogs using it is their main walking path.

I knew this tree was going to come down. In fact about two weeks ago I noticed it was caught in another tree. I guess I gave it more credit for how well it was caught up than it really was. I was working on a project out front when I heard it come down Sunday night. I did not have 'on roof of shed with my chain saw' on my bingo card yesterday.

The dryer vent pipe was figured out and installed. It will vent under the breezeway roof and I found a flapper vent to use in that orientation to keep animals out.
The staining on the cedar shake was finished. It unfortunately turned out a bit more grey than my samples did but not enough I can point a finger at it being wrong. It still has a brown tint to it in the sun just not really when it is overcast out.
The exterior of the house is also finally fully painted so the only damage left to be fixed from the water issue on the front is having my front porch put back together. I also full decided on no posts anymore on my front porch so all the remaining trim for that was ripped out and the header beam painted.
Spent a little time on the weekend doing some grading with leftover soil from the garage project to fill in and level places from when we dug up the existing house drainage pipe to connect the new ones.
Also did some on the back side of the yard that has washed away or worn away from the dogs using it is their main walking path.
I knew this tree was going to come down. In fact about two weeks ago I noticed it was caught in another tree. I guess I gave it more credit for how well it was caught up than it really was. I was working on a project out front when I heard it come down Sunday night. I did not have 'on roof of shed with my chain saw' on my bingo card yesterday.
958 & 991

Joined: Dec 2000
Posts: 9,926
Likes: 1,292
From: South Florida
I think part of what Breezy and I are reacting to is this...
In the winter, we drive around and pick up a ton of snow and slush in our wheel wells. In the garage, that slush will drop out of the wheel well and onto the floor, where it freezes into a solid chunk of steely hard ice. Sometimes before backing out your car, you have to shovel or remove those pieces of ice from the floor. With the trax system, that chunk of ice would literally freeze into the tiles and be unmovable. If you're lucky enough to have a heated garage, some of that can be mitigated.
The other part is the amount of sand you pick up around here in the winter. It wouldn't surprise me in the least if I'm removing 20lbs of sand from the garage floor throughout a bad winter.

Thread Starter
Moderator
Regional Coordinator (Southeast)
Regional Coordinator (Southeast)
Joined: Dec 2003
Posts: 44,123
Likes: 4,434
From: Mooresville, NC
Small garage update. Not much got done on the garage but they did wrap up the breezeway ceiling and fix the one trim piece around the garage door light mount that didn't line up correctly with the siding.

Close up of the hanging flap dryer vent cover. Hopefully, no animals will be able to get in it. I think being on a ceiling that should be almost impossible except for maybe a bird.

Now just need to wait for the painters to come back and paint this and the siding under the breezeway then I can start getting the rest of the exterior lights put up.

Close up of the hanging flap dryer vent cover. Hopefully, no animals will be able to get in it. I think being on a ceiling that should be almost impossible except for maybe a bird.
Now just need to wait for the painters to come back and paint this and the siding under the breezeway then I can start getting the rest of the exterior lights put up.

Ex-OEM King


Joined: Dec 2013
Posts: 17,880
Likes: 7,027
From: Minnesnowta
That's awesome, love the wood look underneath. Why didn't you vent that out the top of the breezeway?
Should probably put a metal cage over it to prevent a bird from going in... Either that or a small cage-ish type of thing that sits behind the flapper.
Should probably put a metal cage over it to prevent a bird from going in... Either that or a small cage-ish type of thing that sits behind the flapper.
Thread Starter
Moderator
Regional Coordinator (Southeast)
Regional Coordinator (Southeast)
Joined: Dec 2003
Posts: 44,123
Likes: 4,434
From: Mooresville, NC
That's awesome, love the wood look underneath. Why didn't you vent that out the top of the breezeway?
Thanks. I have always wanted to do a wood porch roof on my house with my parents having them on their porches. Extremely happy with how it came out.
Should probably put a metal cage over it to prevent a bird from going in... Either that or a small cage-ish type of thing that sits behind the flapper.
I looked it up again and it has a lip to prevent it from being pushed in when not in use.
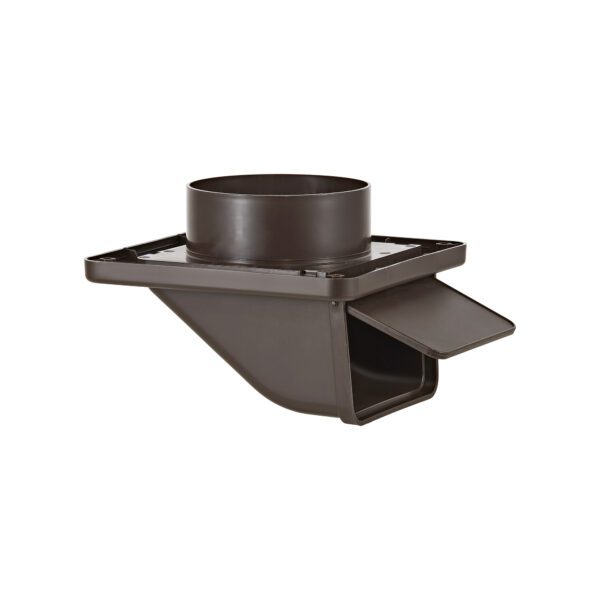
I also have this as a backup option but didn't like the look of it as much. It is pretty much impossible for anything to get into. It actually has two covers per vent slot and is targeted at keeping pests out.

Ex-OEM King
Joined: Dec 2013
Posts: 17,880
Likes: 7,027
From: Minnesnowta
Ah, the internal lip will probably make it ok and agreed that other option looks like poo haha.
If you need something more and want a 3D printed solution, let me know. Happy to print something for you.
If you need something more and want a 3D printed solution, let me know. Happy to print something for you.
Thread Starter
Moderator
Regional Coordinator (Southeast)
Regional Coordinator (Southeast)
Joined: Dec 2003
Posts: 44,123
Likes: 4,434
From: Mooresville, NC

Thread Starter
Moderator
Regional Coordinator (Southeast)
Regional Coordinator (Southeast)
Joined: Dec 2003
Posts: 44,123
Likes: 4,434
From: Mooresville, NC


A lot of areas don't allow dryer vents to exit through the roof due to fire concerns. Even soffit exit isn't recommended.
Just make sure you clean the duct 2x a year and you should be ok.
Just make sure you clean the duct 2x a year and you should be ok.
Thread Starter
Moderator
Regional Coordinator (Southeast)
Regional Coordinator (Southeast)
Joined: Dec 2003
Posts: 44,123
Likes: 4,434
From: Mooresville, NC
The soffit duct I can see being a little questionable since you add an extra 90 to it but otherwise the air flow out of it seems really strong. Tried to clean it out a bit before they did it and didn't get much to come out surprisingly. I expected all the dog hair to clog things up.
Thread Starter
Moderator
Regional Coordinator (Southeast)
Regional Coordinator (Southeast)
Joined: Dec 2003
Posts: 44,123
Likes: 4,434
From: Mooresville, NC
There is not much new to report on the garage's progress. The pump station was delivered to pump the waste up to the septic system.

I finally decided on the outdoor lights for the garage after ordering more of them than I care to admit to see in person. I went with the same light for the front and back of the house. The breezeway ones are one size up compared to the ones I will use on the back side of the house. I think the larger size is good since I went with such a large light over the garage door.


Tropical Storm Helene though brought lots of rain and wind. The garage flooded again but I still think this is because we still have a drainage plan that is not fully complete and really won't be until the driveway is in, unfortunately. I hope I am correct on that and this is not a long term issue. That said it is the most rain we have received in a 36hr period since I have started tracking it. We had 5in of rain in that 36hr period. We got off light though compared to what Western NC and Eastern, TN as well as South Carolina, Georgia, and Florida got so thankful for that. Crazy to see the damage this storm has brought on areas I was just in a week ago for our dragon trip.
I did have one tree come down. I was actually out of town for the entire storm. I was in PA playing a golf tournament with my father. My neighbor called to tell me about the downed tree and that I should buy some lottery tickets after where it fell vs could have fallen.


Putting the tractor to use to hold the tree in place while I cleared out all the limbs

These bolt on forks keep proving that they were worth it. Made 3 piles of branches and was able to pick them up and move them easily.

They are renovating the local dump so had to store this stuff temporarily or else I would have just put it on the trailer to take over there. I don't mind burning pine but the branches are awful in a fire pit as the risk of embers flying out with all the needles is just too great.

Going to have to line up an afternoon to get some new firewood split.

This is the only casualty from the downed tree. I know plants are resiliant and maybe had I been in town I would feel better about it returning to form but not sure with the tree laying on it for 3 days if it will return to shape. I think the weight may have ripped it out of the ground a bit.


Once I cleared everything out I found this guy hanging out on the side of the house. Wonder if he was in the tree or the bush when it fell.

I finally decided on the outdoor lights for the garage after ordering more of them than I care to admit to see in person. I went with the same light for the front and back of the house. The breezeway ones are one size up compared to the ones I will use on the back side of the house. I think the larger size is good since I went with such a large light over the garage door.
Tropical Storm Helene though brought lots of rain and wind. The garage flooded again but I still think this is because we still have a drainage plan that is not fully complete and really won't be until the driveway is in, unfortunately. I hope I am correct on that and this is not a long term issue. That said it is the most rain we have received in a 36hr period since I have started tracking it. We had 5in of rain in that 36hr period. We got off light though compared to what Western NC and Eastern, TN as well as South Carolina, Georgia, and Florida got so thankful for that. Crazy to see the damage this storm has brought on areas I was just in a week ago for our dragon trip.
I did have one tree come down. I was actually out of town for the entire storm. I was in PA playing a golf tournament with my father. My neighbor called to tell me about the downed tree and that I should buy some lottery tickets after where it fell vs could have fallen.
Putting the tractor to use to hold the tree in place while I cleared out all the limbs
These bolt on forks keep proving that they were worth it. Made 3 piles of branches and was able to pick them up and move them easily.
They are renovating the local dump so had to store this stuff temporarily or else I would have just put it on the trailer to take over there. I don't mind burning pine but the branches are awful in a fire pit as the risk of embers flying out with all the needles is just too great.
Going to have to line up an afternoon to get some new firewood split.
This is the only casualty from the downed tree. I know plants are resiliant and maybe had I been in town I would feel better about it returning to form but not sure with the tree laying on it for 3 days if it will return to shape. I think the weight may have ripped it out of the ground a bit.
Once I cleared everything out I found this guy hanging out on the side of the house. Wonder if he was in the tree or the bush when it fell.


Thread Starter
Moderator
Regional Coordinator (Southeast)
Regional Coordinator (Southeast)
Joined: Dec 2003
Posts: 44,123
Likes: 4,434
From: Mooresville, NC
Thread Starter
Moderator
Regional Coordinator (Southeast)
Regional Coordinator (Southeast)
Joined: Dec 2003
Posts: 44,123
Likes: 4,434
From: Mooresville, NC
Not a ton has happened in the last two weeks but things are still moving.
Since I had finally decided on the exterior lights the rest showed up. I got the other light in the breezeway mounted.

With both mounted, I am really happy with my choice.

I also have a wire pulled for two recessed lights in the breezeway for anytime I might need some more light for something. I couldn't make up my mind without a test on using 4in (5in with trim) or 6in (7in with trim) lights. In the end I decided the 4in look too small so ordered the 6in lights.


Last weekend I made it up to State College, PA for my first Penn State game of the year.

I also got to check out my brothers new house which is about 30min outside of State College. Him and his family are leaving Vermont to come back to PA closer to family now that my nephew was born 2 months ago.


While I was gone they came and finished up the exterior painting.

The end of this past week they finally got underway on the deck.


Really happy with the color choice now that I finally get to see it together.

Since I had finally decided on the exterior lights the rest showed up. I got the other light in the breezeway mounted.
With both mounted, I am really happy with my choice.
I also have a wire pulled for two recessed lights in the breezeway for anytime I might need some more light for something. I couldn't make up my mind without a test on using 4in (5in with trim) or 6in (7in with trim) lights. In the end I decided the 4in look too small so ordered the 6in lights.
Last weekend I made it up to State College, PA for my first Penn State game of the year.
I also got to check out my brothers new house which is about 30min outside of State College. Him and his family are leaving Vermont to come back to PA closer to family now that my nephew was born 2 months ago.
While I was gone they came and finished up the exterior painting.
The end of this past week they finally got underway on the deck.
Really happy with the color choice now that I finally get to see it together.
Thread Starter
Moderator
Regional Coordinator (Southeast)
Regional Coordinator (Southeast)
Joined: Dec 2003
Posts: 44,123
Likes: 4,434
From: Mooresville, NC
Needed to make an upgrade to a project I built 4 years ago at the house, the actuator lift TV cabinet. I made a design choice back that was based on a thought I never should have had. "I will never want to go bigger than a 55in TV" Well I did and thus something had to give. I needed a TV for the garage and a TV at the firepit will actually get more use than the garage working area TV. I decided I should upgrade to a larger and brighter TV outdoors at that time.
I am glad I made this cabinet with removal side panels so it is easier to work on the things inside

Helpers always looking on


The new TV was exactly 3/16in narrower than the opening at the top inside of the cabinet. I decided an additional 1/2in on each side would be sufficient.

So out came the router

Made some guide blocks although forgot to take the picture till I had one of them already off

Fits like a glove

I can get the tip of my knife under it on the bottom. I might have to increase the top with a spacer so I can get it a bit more off the bottom of the cabinet. The old TV had about 3/8in.

I of course had to test it out that night

The real improvement though was the daytime viewing. Didn't matter how bright the sun was. The new brightness and reflection handling of the new TV made the picture always perfect.

I am glad I made this cabinet with removal side panels so it is easier to work on the things inside
Helpers always looking on
The new TV was exactly 3/16in narrower than the opening at the top inside of the cabinet. I decided an additional 1/2in on each side would be sufficient.
So out came the router
Made some guide blocks although forgot to take the picture till I had one of them already off
Fits like a glove
I can get the tip of my knife under it on the bottom. I might have to increase the top with a spacer so I can get it a bit more off the bottom of the cabinet. The old TV had about 3/8in.
I of course had to test it out that night
The real improvement though was the daytime viewing. Didn't matter how bright the sun was. The new brightness and reflection handling of the new TV made the picture always perfect.
Ex-OEM King
Joined: Dec 2013
Posts: 17,880
Likes: 7,027
From: Minnesnowta
Awesome work on the cabinet, routers are both the best and most scary tool to use lol. Can you not just route a groove in the bottom to add some space for the TV instead of raising the top?
I've been jonesing to get back into the wood shop but work has been insane and I've been travelling a lot more than I'd like lately.
I've been jonesing to get back into the wood shop but work has been insane and I've been travelling a lot more than I'd like lately.
Thread Starter
Moderator
Regional Coordinator (Southeast)
Regional Coordinator (Southeast)
Joined: Dec 2003
Posts: 44,123
Likes: 4,434
From: Mooresville, NC
Awesome work on the cabinet, routers are both the best and most scary tool to use lol. Can you not just route a groove in the bottom to add some space for the TV instead of raising the top?
I've been jonesing to get back into the wood shop but work has been insane and I've been travelling a lot more than I'd like lately.
I've been jonesing to get back into the wood shop but work has been insane and I've been travelling a lot more than I'd like lately.
I hear you. I am ready to get in and work on this place as soon as they are done here.
Haha good catch. Those are not actually lights but just card board cutouts I used to decide on the size. They were not perfectly centered.
Thread Starter
Moderator
Regional Coordinator (Southeast)
Regional Coordinator (Southeast)
Joined: Dec 2003
Posts: 44,123
Likes: 4,434
From: Mooresville, NC
Things are starting to pick up here finally or at least some big items are getting worked on/scheduled.
The wood for the remaining interior wall finishes was delivered today. It arrived in a 13ft pallet crate for protection. There was no real way to unload that from the truck so we had to unload it by hand. All 245 boards and 1 6x6 post. The finished carpenter is scheduled to start on the 24th so that will give the wood about 10 days to adjust to the space.


The deck is moving along as well. Finished up the top of the deck and all of the kick panels and facia for the stairs today.


I also dropped off all the angle iron for the garage door track mounts at the powder coater today. They are set to begin installation of the garage doors next Monday.
The wood for the remaining interior wall finishes was delivered today. It arrived in a 13ft pallet crate for protection. There was no real way to unload that from the truck so we had to unload it by hand. All 245 boards and 1 6x6 post. The finished carpenter is scheduled to start on the 24th so that will give the wood about 10 days to adjust to the space.
The deck is moving along as well. Finished up the top of the deck and all of the kick panels and facia for the stairs today.
I also dropped off all the angle iron for the garage door track mounts at the powder coater today. They are set to begin installation of the garage doors next Monday.
Ex-OEM King
Joined: Dec 2013
Posts: 17,880
Likes: 7,027
From: Minnesnowta
I could route a groove I guess but I would rather not open the bottom of the cabinet to animals and insects. The base plate is only 1/4in ply. I need to build a new lid anyways since that was my first experience making something flat and I had all the grain of the wood going the same direction so it curved so I can make the trim on the down edge of the lid longer. That said I do have a question for you. If I were to make a collar on the inside of the cabinet to expended the height inside the lid so I can also add a rubber seal. What would be the best way to attach that to the lower base so it doesn't warp/move. I know preventing wood completely from moving is impossible. Basically just need it to look decent and not come out of some sort of alignment. It could actually allow me to make a new flat panel I guess as a trim panel to hide the wiring and everything below.
Haha good catch. Those are not actually lights but just card board cutouts I used to decide on the size. They were not perfectly centered.
Haha good catch. Those are not actually lights but just card board cutouts I used to decide on the size. They were not perfectly centered.
I'm not 100% sure on what you're asking here (pics would be good to see what you're after) but wood will only expand/contract perpendicular to the grain direction so whatever pieces you have going parallel to the grain with the same grain direction is fine. For pieces going the other way, the best way to attach is with slotted holes and use screws with a washer under the screw head.
For making sure the top stays flat I'd put some pieces running perpendicular across the panel to hold it flat. Attach with slotted holes and screws, should work great. Either that or sliding dovetails, but that's a lot of fucking work lol.
Last edited by SamDoe1; Oct 16, 2024 at 11:24 AM.
Thread Starter
Moderator
Regional Coordinator (Southeast)
Regional Coordinator (Southeast)
Joined: Dec 2003
Posts: 44,123
Likes: 4,434
From: Mooresville, NC
I figured those were a mock up, you weren't going to have those not centered unless there was a damn good reason for it.
I'm not 100% sure on what you're asking here (pics would be good to see what you're after) but wood will only expand/contract perpendicular to the grain direction so whatever pieces you have going parallel to the grain with the same grain direction is fine. For pieces going the other way, the best way to attach is with slotted holes and use screws with a washer under the screw head.
For making sure the top stays flat I'd put some pieces running perpendicular across the panel to hold it flat. Attach with slotted holes and screws, should work great. Either that or sliding dovetails, but that's a lot of fucking work lol.
I will make a mockup of what I am talking about with some scrap wood. To you point about the grain and the direction it expands the issue is I would be building a rectangle frame to go around the cabinet opening to increase the height of the cabinet. I get adding something like that is not really ideal and had I made it correctly to start with would have been best. Right now when the lid closes though it doesn't sit on anything to support it where as it used to touch all the way around so I would be trying to add that back. Again, I will make a mockup though so it is easier to understand.
Yeah not sure my level is up to sliding dovetails yet
Thread Starter
Moderator
Regional Coordinator (Southeast)
Regional Coordinator (Southeast)
Joined: Dec 2003
Posts: 44,123
Likes: 4,434
From: Mooresville, NC
The stairs for the deck were finished yesterday. The railing would have been started today however in checking all the part inventory that was sent yesterday it was discovered they sent us two inner corner facia brackets instead of two outer corner facia brackets. Unfortunately, this wasn't verified when the railing was picked up late last week. The vendor is expediting the correct part to the distributor but I don't have an ETA on when that is here so not exactly sure when the railing will go on. I am hoping next week though.
Regardless though here are some pictures of what is complete. I love how the colors blends with the structure. Railing will be black horizontal rail to give it a bit of a modern touch without being the cost of a cable rail.


A good look of what the entire structure looks like in a finish state minus the railing with the deck on and the walls finished. I need to get some drone shots again as well.

Regardless though here are some pictures of what is complete. I love how the colors blends with the structure. Railing will be black horizontal rail to give it a bit of a modern touch without being the cost of a cable rail.
A good look of what the entire structure looks like in a finish state minus the railing with the deck on and the walls finished. I need to get some drone shots again as well.