


CCColtsicehockey's Home Projects Thread


By the end of the day, they had the entire garage area done as well as most of the stone work on the house garage to match. It doesn't look complete as they are leaving the bottom 12in or so clear until after the concrete is poured. Then they will be back to do that amount. They also still have to install the watertable ledge at the top of the stone where it meets the siding.


Thread Starter
Moderator
Regional Coordinator (Southeast)
Regional Coordinator (Southeast)


Joined: Dec 2003
Posts: 44,129
Likes: 4,436
From: Mooresville, NC
They were back working on the stone again today. I thought they would have it all done today but I think removing the stone off the front was a lot more work than I gave it credit for.
They got a start on the water table ledge for on the garage and finished up the stone on the house garage except for the ledge


They got all the stone removed on my office and started on the prep work

The electricians were by to get the recessed light holes cut. I guess the preferred way to do this is before paint and then pull them back out, bag them, and then paint. Woodshop workbench lights.

One garage bay done. Other one still to go.

They won't power the circuits till all the lights are in but I am impatient. I am sure the electricians will love this.

I am worried it isn't enough light with only 10 recessed lights. This isn't working light just hangout. I did expect it to be brighter and this is just with primer before I paint the garage much darker. It might give it a lounge feel though when I don't have the work lights on. Hopefully, I don't end up needing to redo this part and do 6 on each slope and 2 in on the flat down the road. They don't make any brighter recessed lights.

They got a start on the water table ledge for on the garage and finished up the stone on the house garage except for the ledge
They got all the stone removed on my office and started on the prep work
The electricians were by to get the recessed light holes cut. I guess the preferred way to do this is before paint and then pull them back out, bag them, and then paint. Woodshop workbench lights.
One garage bay done. Other one still to go.
They won't power the circuits till all the lights are in but I am impatient. I am sure the electricians will love this.
I am worried it isn't enough light with only 10 recessed lights. This isn't working light just hangout. I did expect it to be brighter and this is just with primer before I paint the garage much darker. It might give it a lounge feel though when I don't have the work lights on. Hopefully, I don't end up needing to redo this part and do 6 on each slope and 2 in on the flat down the road. They don't make any brighter recessed lights.




Joined: Sep 2008
Posts: 78,249
Likes: 20,202
What a YUGE but rewarding project, Jason...you're going to have the car guy's dream and you'll be able to enjoy it for the next 100 years.
Good for you not backing down from the challenge.
Good for you not backing down from the challenge.

Thread Starter
Moderator
Regional Coordinator (Southeast)
Regional Coordinator (Southeast)
Joined: Dec 2003
Posts: 44,129
Likes: 4,436
From: Mooresville, NC
So with final drywall touch up supposed to be this week I wanted to get all my holes cut in the drywall I needed to do for my in ceiling speakers.
I bought the first of 2 Craftsman dremel kits in highschool. The first one lasted me a few years until I had the smart idea while building my first fiberglass molded sub boxes that a dremel was the right tool to trim them. Yeah, let me tell you, it was not. I only got one of two trimmed and burned the motor up in the process.
This second one though has lasted me since then. I obviously don't put it through as much abuse to keep it going but it still says Sears Roebuck on it which I find interesting.
I had never in my life used the circle attachment either cause I knew it was never powerful enough for wood and never needed to cut drywall until this point in my life thankfully. It was perfect though and I had the first two speakers up in no time.


Then it was on to the next two speakers in the wood shop. I bought these huge in ceiling 10in speakers hoping that they would have more bass and I wouldn't need to build in ceiling boxes well that was wrong. I will still need to eventually build boxes.
On a side note though. I was also measuring and verifying the locations of the wires for the 16 strip lights in the garage. It turns out that a couple were off and I moved those. The bigger problem is though I found my first mistake I had made on my wiring in this project. I some how only rang the 0-10v dimming wire for 15 out of 16 strip lights. I apparently was living right though as the light that I missed whas in the row with the speaker between the lights and I was able to just tap into the line path with some extra wire. There is just an extra hole the drywallers will need to patch now.

When I mentioned these speakers were big I was serious. The hole cut jig for the dremel only does up to 12in. I need a 12 5/8in hole for these. I had to cut them by hand. The outside with the speaker grill attached is 14in.


For reference those are 6in can lights

Stone work also continued yesterday. They started on the area outside of my office as well as finished all of the watertable ledge except for under the office window.


Really happy I decided to strip the siding here to make the house garage match the new garage. It was not in the original plans.

The horseshoe as I have been calling it is done except for the stone work they will come back to do after the concrete is poured

This is how the rest of the stonework will look once the concrete is poured and they can come back and finish it.

The hardscape guys showed up late yesterday to walk down the job and roughly set the line for the two sections of retaining wall going in. There will just be walls around the corners and the back deck area. The rest will just be a swail to push water into the french drain.


I bought the first of 2 Craftsman dremel kits in highschool. The first one lasted me a few years until I had the smart idea while building my first fiberglass molded sub boxes that a dremel was the right tool to trim them. Yeah, let me tell you, it was not. I only got one of two trimmed and burned the motor up in the process.
This second one though has lasted me since then. I obviously don't put it through as much abuse to keep it going but it still says Sears Roebuck on it which I find interesting.
I had never in my life used the circle attachment either cause I knew it was never powerful enough for wood and never needed to cut drywall until this point in my life thankfully. It was perfect though and I had the first two speakers up in no time.
Then it was on to the next two speakers in the wood shop. I bought these huge in ceiling 10in speakers hoping that they would have more bass and I wouldn't need to build in ceiling boxes well that was wrong. I will still need to eventually build boxes.
On a side note though. I was also measuring and verifying the locations of the wires for the 16 strip lights in the garage. It turns out that a couple were off and I moved those. The bigger problem is though I found my first mistake I had made on my wiring in this project. I some how only rang the 0-10v dimming wire for 15 out of 16 strip lights. I apparently was living right though as the light that I missed whas in the row with the speaker between the lights and I was able to just tap into the line path with some extra wire. There is just an extra hole the drywallers will need to patch now.
When I mentioned these speakers were big I was serious. The hole cut jig for the dremel only does up to 12in. I need a 12 5/8in hole for these. I had to cut them by hand. The outside with the speaker grill attached is 14in.
For reference those are 6in can lights
Stone work also continued yesterday. They started on the area outside of my office as well as finished all of the watertable ledge except for under the office window.
Really happy I decided to strip the siding here to make the house garage match the new garage. It was not in the original plans.
The horseshoe as I have been calling it is done except for the stone work they will come back to do after the concrete is poured
This is how the rest of the stonework will look once the concrete is poured and they can come back and finish it.
The hardscape guys showed up late yesterday to walk down the job and roughly set the line for the two sections of retaining wall going in. There will just be walls around the corners and the back deck area. The rest will just be a swail to push water into the french drain.
Thread Starter
Moderator
Regional Coordinator (Southeast)
Regional Coordinator (Southeast)
Joined: Dec 2003
Posts: 44,129
Likes: 4,436
From: Mooresville, NC
Stone guys wrapped up everything yesterday. They got all the mortar done on the stone work so it is good to go until the concrete is done now. Really happy with how it turned out.


The landscapers got underway on the wall yesterday as well.


They wanted to do 3 course here and I wasn't sure I liked it that high as I wanted more of a tiered look.

I later realized we had another issue. The caps are 4in thick and they wouldn't clear the stone. It looks close in this picture but it is really like 3/4in and the stone itself is actually right where the foundation/framing transfer is. I would rather have the stone come a bit lower.

Last night I played around with it some and came up with this. 3 block high on the main wall. 2 block high for the step down and then just after the intersection point a little further back it will jump to 4block high looks wise even though it is only 2 block high.

They are also working on pointing up the drywall inside with plans to paint next week. There were several places where the initial wiring was pulled through the drywall and it was off so they had to patch a bunch of holes for that. Also getting the final coats on the wall inside the house. Would love to put that piece of this project to bed.

The landscapers got underway on the wall yesterday as well.
They wanted to do 3 course here and I wasn't sure I liked it that high as I wanted more of a tiered look.
I later realized we had another issue. The caps are 4in thick and they wouldn't clear the stone. It looks close in this picture but it is really like 3/4in and the stone itself is actually right where the foundation/framing transfer is. I would rather have the stone come a bit lower.
Last night I played around with it some and came up with this. 3 block high on the main wall. 2 block high for the step down and then just after the intersection point a little further back it will jump to 4block high looks wise even though it is only 2 block high.
They are also working on pointing up the drywall inside with plans to paint next week. There were several places where the initial wiring was pulled through the drywall and it was off so they had to patch a bunch of holes for that. Also getting the final coats on the wall inside the house. Would love to put that piece of this project to bed.

Joined: Jan 2005
Posts: 92,776
Likes: 4,687
From: ShitsBurgh
Love the stone work on the house, looks awesome!
And good choice on the Versalok blocks, I used the same exact ones when I did my retaining wall at my last house
And good choice on the Versalok blocks, I used the same exact ones when I did my retaining wall at my last house
Thread Starter
Moderator
Regional Coordinator (Southeast)
Regional Coordinator (Southeast)
Joined: Dec 2003
Posts: 44,129
Likes: 4,436
From: Mooresville, NC
A pretty good amount of work got done last week. The wall was finished. Well or so they thought. They definitely rushed the caps and will have to be back to fix that. Thankfully I had told them to glue any of them down as I will be adding lights to the wall later and then I will glue them down at that time.


I have honestly never seen caps installed this way before but I actually really like it. Gives it a much more modern look I feel.
That said. Come on at least make things even.

The back wall also is complete but they really seem to have rushed it. It is 2in out every 6 feet as you go down the deck posts where as it was supposed to be 22in away from the posts the entire length of the wall. Currently they are 20, 22, and 24 at each post. They also stopped the wall 3 blocks short after the last post. Based on my cameras as I was not home. It was clearly 3pm on Friday and they were getting the heck out of there fast.


That said once they redo that back section and fix the issues of the cap not always following the same contour as the wall curves we will be good.
The wall accomplished multiple needed things but one maybe overlooked aspect is I really feel it helps make the garage feel more as part of the property by directing sight lines on that side.

We finally have our first coat of paint as well. They have to come back and do the second coat this week still as well as all of the trim.
At first, I thought this color I went with was too dark when only part of the building was painted.


It's even darker when you switch the work light off and the recessed on.

However, once the entire space had its first coat and there was no more white left it actually seemed to feel like it was lighter.


They missed the wall where my samples were. The sample paint only came in satin and I went with a matte finish for the wall. Didn't realize they had planned two coats at the time though.

Likely should have used a lighter color in the storage room with only 1 window and 2 lights planned. I will just make sure the lights are extra bright.

I did go with the lighter of my two colors in the wood shop since it will only really get morning sun and even then the windows are under the deck.

The bathroom finally has paint as well. I am tempted at this point to get my network cabinet ordered and some of that stuff installed but I likely should wait a bit longer.

The only other hesitation I have that the walls are a tad dark is I had planned to use the back middle color as my primary floor tile color. It might be too close to the wall color now.

I have honestly never seen caps installed this way before but I actually really like it. Gives it a much more modern look I feel.
That said. Come on at least make things even.
The back wall also is complete but they really seem to have rushed it. It is 2in out every 6 feet as you go down the deck posts where as it was supposed to be 22in away from the posts the entire length of the wall. Currently they are 20, 22, and 24 at each post. They also stopped the wall 3 blocks short after the last post. Based on my cameras as I was not home. It was clearly 3pm on Friday and they were getting the heck out of there fast.
That said once they redo that back section and fix the issues of the cap not always following the same contour as the wall curves we will be good.
The wall accomplished multiple needed things but one maybe overlooked aspect is I really feel it helps make the garage feel more as part of the property by directing sight lines on that side.
We finally have our first coat of paint as well. They have to come back and do the second coat this week still as well as all of the trim.
At first, I thought this color I went with was too dark when only part of the building was painted.
It's even darker when you switch the work light off and the recessed on.
However, once the entire space had its first coat and there was no more white left it actually seemed to feel like it was lighter.
They missed the wall where my samples were. The sample paint only came in satin and I went with a matte finish for the wall. Didn't realize they had planned two coats at the time though.
Likely should have used a lighter color in the storage room with only 1 window and 2 lights planned. I will just make sure the lights are extra bright.
I did go with the lighter of my two colors in the wood shop since it will only really get morning sun and even then the windows are under the deck.
The bathroom finally has paint as well. I am tempted at this point to get my network cabinet ordered and some of that stuff installed but I likely should wait a bit longer.
The only other hesitation I have that the walls are a tad dark is I had planned to use the back middle color as my primary floor tile color. It might be too close to the wall color now.
Retaining wall looks great! Love the color of the brick. I personally like how the caps were put down.
I like the paint choice as well. Looks really good in the photos. As for the tile color, I would not go with your initial choice (back mid). That would blend too much with the walls. Are you planning on a design for the floor? I can't remember if you were or not.
I like the paint choice as well. Looks really good in the photos. As for the tile color, I would not go with your initial choice (back mid). That would blend too much with the walls. Are you planning on a design for the floor? I can't remember if you were or not.
Thread Starter
Moderator
Regional Coordinator (Southeast)
Regional Coordinator (Southeast)
Joined: Dec 2003
Posts: 44,129
Likes: 4,436
From: Mooresville, NC
Retaining wall looks great! Love the color of the brick. I personally like how the caps were put down.
I like the paint choice as well. Looks really good in the photos. As for the tile color, I would not go with your initial choice (back mid). That would blend too much with the walls. Are you planning on a design for the floor? I can't remember if you were or not.
I like the paint choice as well. Looks really good in the photos. As for the tile color, I would not go with your initial choice (back mid). That would blend too much with the walls. Are you planning on a design for the floor? I can't remember if you were or not.
The other idea is just to do the standard picture frame that everyone seems to do. Except I wouldn't start it till it clears all of the cabinets in different locations.
The back right gray color is a bit too much of a cool tone to go with the warmer gray wall tone. The reason I like the back middle is it has like a pearl effect. The really light gray/silver color in the front has that as well but I figure it would be so dirty and I am not sure how I feel about floors lighter than my walls either.
Thread Starter
Moderator
Regional Coordinator (Southeast)
Regional Coordinator (Southeast)
Joined: Dec 2003
Posts: 44,129
Likes: 4,436
From: Mooresville, NC
Besides loving the look of Swisstrax it doesn't trap moisture since it is vented. Not only that because of the vented tiles it drains great. That means you can wash cars inside and not stand in puddles of water. I do plan to seal the concrete using a densifier first. If you still spill anything through the tiles like oil or anything else other than water you can easily pull a couple tires up in seconds and clean it up.
It does trap dirt to an extent but you can also vacuum up a good bit of that dirt since the tiles are vented as well. A lot of guys will pull up large section and wash under it every 18-24 months but you rarely see the dirt in the garage since it drops through the floor tiles.
Thread Starter
Moderator
Regional Coordinator (Southeast)
Regional Coordinator (Southeast)
Joined: Dec 2003
Posts: 44,129
Likes: 4,436
From: Mooresville, NC
The cost of a professional epoxy coating and the cost of the floor tiles are about the same. Obviously, one is being installed for you and the other you are doing yourself. Would have to dig up my last quote but it was under $4 a sqft I believe.
I will only be doing floor tiles in the garage. The woodshop will just have densifier and nothing else applied.
I will only be doing floor tiles in the garage. The woodshop will just have densifier and nothing else applied.

Ex-OEM King


Joined: Dec 2013
Posts: 17,889
Likes: 7,029
From: Minnesnowta
The cost of a professional epoxy coating and the cost of the floor tiles are about the same. Obviously, one is being installed for you and the other you are doing yourself. Would have to dig up my last quote but it was under $4 a sqft I believe.
I will only be doing floor tiles in the garage. The woodshop will just have densifier and nothing else applied.
I will only be doing floor tiles in the garage. The woodshop will just have densifier and nothing else applied.
Any thoughts on how the tiles would do for that purpose?
Any pics?
Thread Starter
Moderator
Regional Coordinator (Southeast)
Regional Coordinator (Southeast)
Joined: Dec 2003
Posts: 44,129
Likes: 4,436
From: Mooresville, NC
There are tons of guys on garage journal out west who swear by them for the winter. The snow melts down into them and you don't have puddles in the garage. They do say you happen to clean under them a little more often in a winter climate do to cinders that get caught in the snow build up on the cars. Most seem to think it is worth it to have a dry garage floor surface.

Racer
Joined: Oct 2003
Posts: 341
Likes: 273
From: MN
I like the ease with which I can simply blow out all the sand and salt dust from the bare floor with a leaf blower in the winder. Think about how much you pick up each time it snows around here. And how often do you go out to the garage and actually shovel out all the snow and ice that drops. I have to do that every major snow we drive in.
Thread Starter
Moderator
Regional Coordinator (Southeast)
Regional Coordinator (Southeast)
Joined: Dec 2003
Posts: 44,129
Likes: 4,436
From: Mooresville, NC
I was thinking the exact opposite. While they are vented, there's no way that moisture doesn't evaporate more slowly when it's trapped in the tile crevasses, especially at the points where the tile meets the floor. On the ultra cold days, I don't want slush dropping from the car and then potentially refreezing in the tiles on the floor. What doesn't reach the actual concrete is definitely going to melt more slowly. They look great for a show garage, but I can't wrap my head around their everyday use in a typical use or working garage.
I like the ease with which I can simply blow out all the sand and salt dust from the bare floor with a leaf blower in the winder. Think about how much you pick up each time it snows around here. And how often do you go out to the garage and actually shovel out all the snow and ice that drops. I have to do that every major snow we drive in.
I like the ease with which I can simply blow out all the sand and salt dust from the bare floor with a leaf blower in the winder. Think about how much you pick up each time it snows around here. And how often do you go out to the garage and actually shovel out all the snow and ice that drops. I have to do that every major snow we drive in.
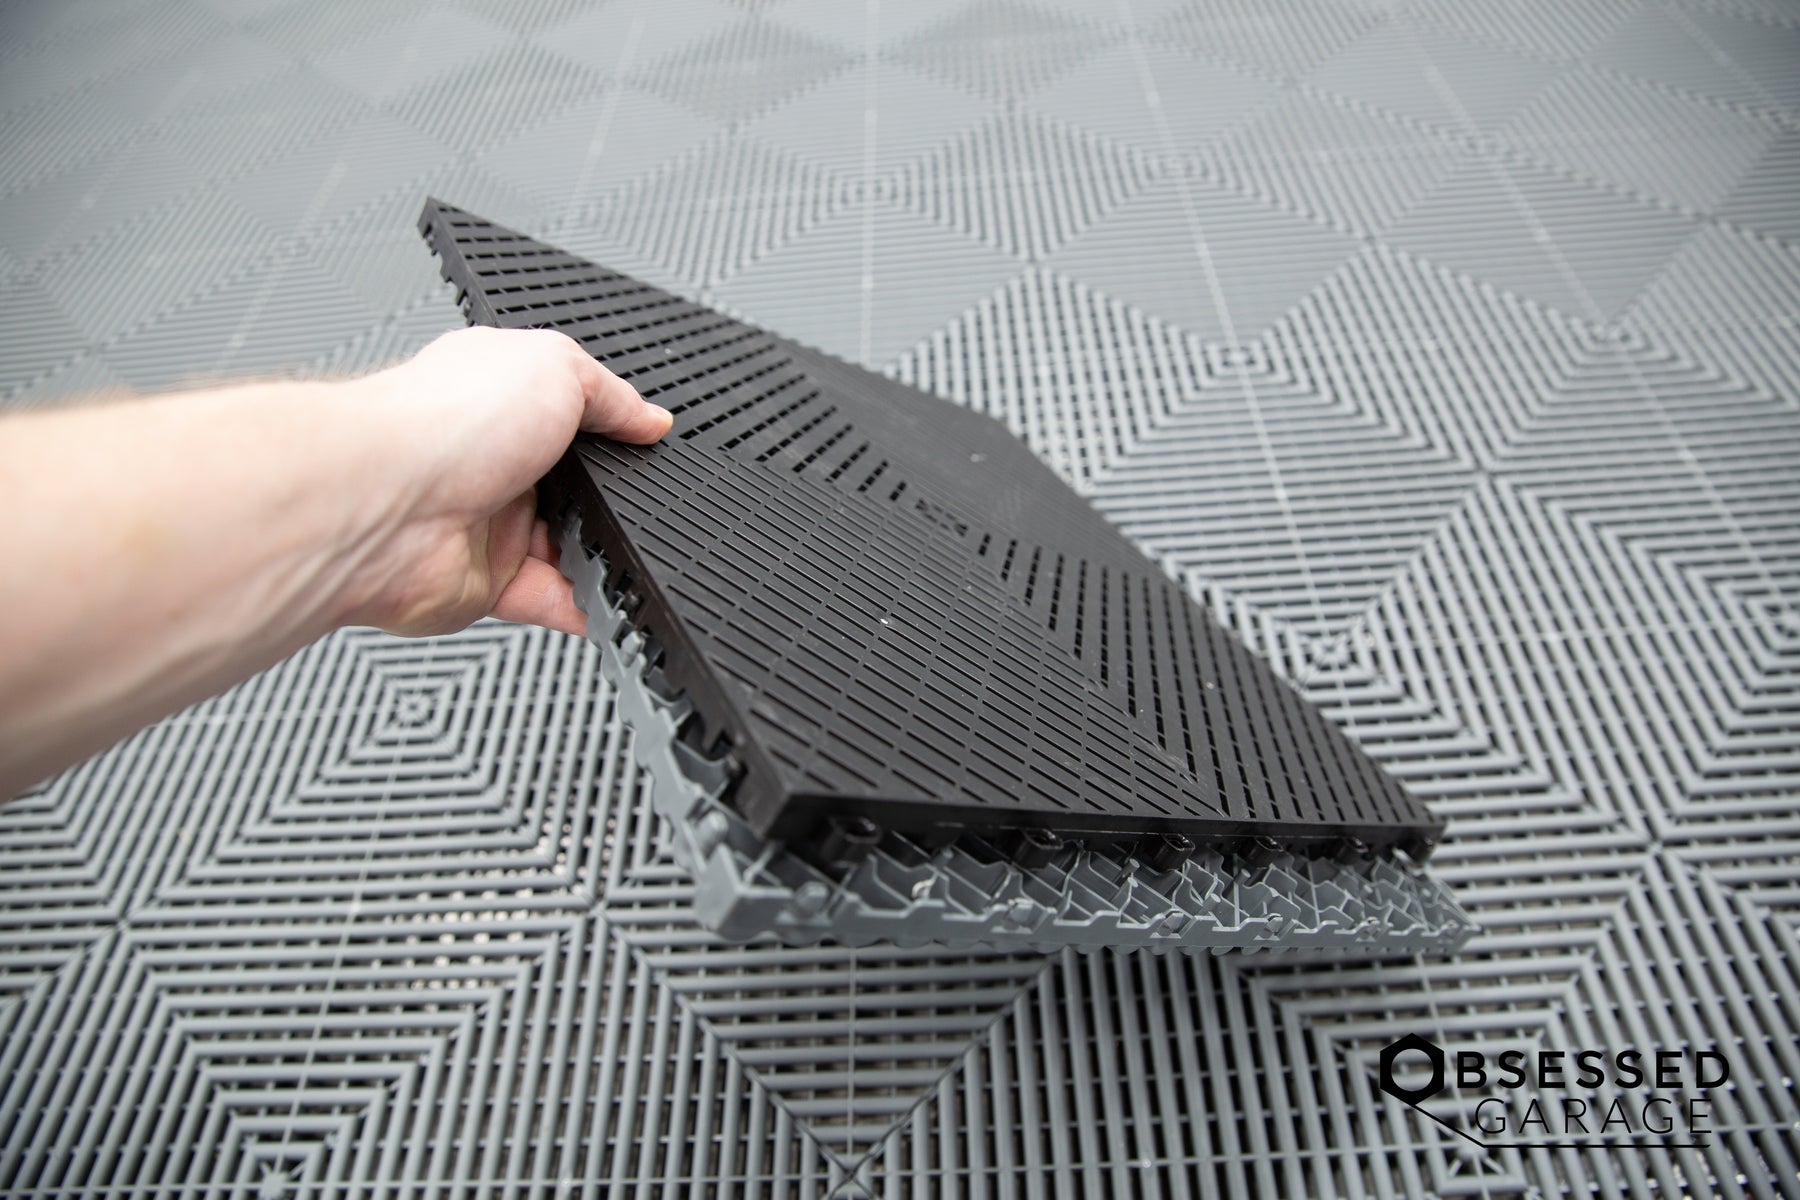
Ignore the smooth tile on the top the small edge of the underside of the bottom tile is the same as the tiles I was showing. They are very open underneath as well. I would argue anything suspended in the tile should melt easier as it should have air movement all around it. Either way, I think it would create a less slick surface than say an epoxy floor with snow melting on it in the winter.
The one change I have thought about and have not decided on yet is some guys actually use the solid not vented tiles under their lift bay for when they are working on things so fluids do not leak through. The snap together is apparently really tight and liquids don't really get through with the solid tiles.
I get they seem more show garage use to some but all the negatives of the that epoxy have I just don't want to deal with vs replacing a tile here for there.
I'm with Gryphon on this one. In a show garage, hell ya they would look sweet. In an every day shit weather climate over winter, hell no! Having a shit garage floor that can be blown out or swept, in no time, sure beats having to pick up each tile to achieve the same duty of cleaning. Plus the little divots in my shit concrete add traction! I do think I would choose epoxy over tiles if I ever had the opportunity to do it. Maybe seeing them first hand would change my opinion. CCC, let us know when we can come see them!
Thread Starter
Moderator
Regional Coordinator (Southeast)
Regional Coordinator (Southeast)
Joined: Dec 2003
Posts: 44,129
Likes: 4,436
From: Mooresville, NC
I'm with Gryphon on this one. In a show garage, hell ya they would look sweet. In an every day shit weather climate over winter, hell no! Having a shit garage floor that can be blown out or swept, in no time, sure beats having to pick up each tile to achieve the same duty of cleaning. Plus the little divots in my shit concrete add traction! I do think I would choose epoxy over tiles if I ever had the opportunity to do it. Maybe seeing them first hand would change my opinion. CCC, let us know when we can come see them!
Racer
Joined: Oct 2003
Posts: 341
Likes: 273
From: MN
I think part of what Breezy and I are reacting to is this...
In the winter, we drive around and pick up a ton of snow and slush in our wheel wells. In the garage, that slush will drop out of the wheel well and onto the floor, where it freezes into a solid chunk of steely hard ice. Sometimes before backing out your car, you have to shovel or remove those pieces of ice from the floor. With the trax system, that chunk of ice would literally freeze into the tiles and be unmovable. If you're lucky enough to have a heated garage, some of that can be mitigated.
The other part is the amount of sand you pick up around here in the winter. It wouldn't surprise me in the least if I'm removing 20lbs of sand from the garage floor throughout a bad winter.
In the winter, we drive around and pick up a ton of snow and slush in our wheel wells. In the garage, that slush will drop out of the wheel well and onto the floor, where it freezes into a solid chunk of steely hard ice. Sometimes before backing out your car, you have to shovel or remove those pieces of ice from the floor. With the trax system, that chunk of ice would literally freeze into the tiles and be unmovable. If you're lucky enough to have a heated garage, some of that can be mitigated.
The other part is the amount of sand you pick up around here in the winter. It wouldn't surprise me in the least if I'm removing 20lbs of sand from the garage floor throughout a bad winter.
Ex-OEM King
Joined: Dec 2013
Posts: 17,889
Likes: 7,029
From: Minnesnowta
I think part of what Breezy and I are reacting to is this...
In the winter, we drive around and pick up a ton of snow and slush in our wheel wells. In the garage, that slush will drop out of the wheel well and onto the floor, where it freezes into a solid chunk of steely hard ice. Sometimes before backing out your car, you have to shovel or remove those pieces of ice from the floor. With the trax system, that chunk of ice would literally freeze into the tiles and be unmovable. If you're lucky enough to have a heated garage, some of that can be mitigated.
The other part is the amount of sand you pick up around here in the winter. It wouldn't surprise me in the least if I'm removing 20lbs of sand from the garage floor throughout a bad winter.
In the winter, we drive around and pick up a ton of snow and slush in our wheel wells. In the garage, that slush will drop out of the wheel well and onto the floor, where it freezes into a solid chunk of steely hard ice. Sometimes before backing out your car, you have to shovel or remove those pieces of ice from the floor. With the trax system, that chunk of ice would literally freeze into the tiles and be unmovable. If you're lucky enough to have a heated garage, some of that can be mitigated.
The other part is the amount of sand you pick up around here in the winter. It wouldn't surprise me in the least if I'm removing 20lbs of sand from the garage floor throughout a bad winter.


Ex-OEM King
Joined: Dec 2013
Posts: 17,889
Likes: 7,029
From: Minnesnowta
It can, especially by the garage door. If your garage isn't insulated (like my old house) then it will absolutely freeze in there. New house has an insulated garage and will generally stay above freezing unless you're by the garage door.

Moderator


Joined: Aug 2010
Posts: 29,765
Likes: 6,539
From: Spring, TX
Though I had little trouble getting around in our last couple freezes & did fine with 2wd when we were in Denver for Christmas a couple years ago.
Thread Starter
Moderator
Regional Coordinator (Southeast)
Regional Coordinator (Southeast)
Joined: Dec 2003
Posts: 44,129
Likes: 4,436
From: Mooresville, NC
Probaly should have an insulated garage door then. I assume since you mentioned the garage is insulated that you have one of those then.
Thread Starter
Moderator
Regional Coordinator (Southeast)
Regional Coordinator (Southeast)
Joined: Dec 2003
Posts: 44,129
Likes: 4,436
From: Mooresville, NC
Another good week of work getting completed.
All of the soffits, siding, and most of the ceiling work outside has been finished. The only reason it isn't finished is we are waiting on a soffit style dryer vent as I need to vent my dryer out the bottom of the breezeway roof.

Other than paint and the front porch being poured again this wraps up the repair from the water damage.

With the soffits being back up I could mount my deck speakers again. I was really missing those and the end of the day when I was having a beer or bourbon on the back porch.

The last of the work to finish up the exterior siding by the stone was completed as well.


I was going to do this porch ceiling afterward myself to match the breezeway ceiling but figured we had torn the porch apart enough just to have them do it now. I will still take on the project of doing the back porch myself.


Unfortunately, where the breezeway roof is, it has consumed the dryer vent in the process. We will be ducting it out the bottom with a side venting soffit style flapper cover. Hopefully, the heat will not ruin the cedar.

They were also back to take care of the list of items for the retaining wall and do final grading out back. I am happy with the outcome of the wall now.

Under the deck got dug out. It was a lot more dirt than I expected really.


I also got around to getting the garage bay ceiling fans installed. This was an ordeal but one I had planned for. I really like Minka Aire fans and believe they are a good deal. Their Quality Control though unfortunately is terrible. Knowing this I ordered 3 fans when I only needed 2. I installed two fans and powered them up and they didn't spin at the same speed. One fan on Max (Speed 6), was like Speed 4 on the other fan. So I took that fan down and installed the spare I had ordered. It was better but still slightly slower. I don't have the luxury of waiting for another as the lift is leaving this week so I ended up switching the two fans since the faster fan was in the storage bay and not the working bay.

They are mounted rather high so don't provide a super heavy breeze down below but had to do that because of the lift and also didn't want shadows from lights. The blades are at 17ft from the ground and the eventual lift will top out at 15ft high as I will be getting the post extension so even if I have a box or rooftop tent on a vehicle I can still lift it all the way up.

All of the soffits, siding, and most of the ceiling work outside has been finished. The only reason it isn't finished is we are waiting on a soffit style dryer vent as I need to vent my dryer out the bottom of the breezeway roof.
Other than paint and the front porch being poured again this wraps up the repair from the water damage.
With the soffits being back up I could mount my deck speakers again. I was really missing those and the end of the day when I was having a beer or bourbon on the back porch.
The last of the work to finish up the exterior siding by the stone was completed as well.
I was going to do this porch ceiling afterward myself to match the breezeway ceiling but figured we had torn the porch apart enough just to have them do it now. I will still take on the project of doing the back porch myself.
Unfortunately, where the breezeway roof is, it has consumed the dryer vent in the process. We will be ducting it out the bottom with a side venting soffit style flapper cover. Hopefully, the heat will not ruin the cedar.
They were also back to take care of the list of items for the retaining wall and do final grading out back. I am happy with the outcome of the wall now.
Under the deck got dug out. It was a lot more dirt than I expected really.
I also got around to getting the garage bay ceiling fans installed. This was an ordeal but one I had planned for. I really like Minka Aire fans and believe they are a good deal. Their Quality Control though unfortunately is terrible. Knowing this I ordered 3 fans when I only needed 2. I installed two fans and powered them up and they didn't spin at the same speed. One fan on Max (Speed 6), was like Speed 4 on the other fan. So I took that fan down and installed the spare I had ordered. It was better but still slightly slower. I don't have the luxury of waiting for another as the lift is leaving this week so I ended up switching the two fans since the faster fan was in the storage bay and not the working bay.
They are mounted rather high so don't provide a super heavy breeze down below but had to do that because of the lift and also didn't want shadows from lights. The blades are at 17ft from the ground and the eventual lift will top out at 15ft high as I will be getting the post extension so even if I have a box or rooftop tent on a vehicle I can still lift it all the way up.
Ex-OEM King
Joined: Dec 2013
Posts: 17,889
Likes: 7,029
From: Minnesnowta
Damn that is crazy. I know it gets colder up there but even growing up in PA I don't remember anything ever refreezing in our garage even in the coldest winters back when we actually got big snow falls.
Probaly should have an insulated garage door then. I assume since you mentioned the garage is insulated that you have one of those then.
Probaly should have an insulated garage door then. I assume since you mentioned the garage is insulated that you have one of those then.
Many people will also heat their garage for the winter but I don't really see the value in that given it's all gone the moment you open the garage door lol.
Awesome progress on the new place. I'm so jealous, it would be an absolute dream to have a place like that.
Thread Starter
Moderator
Regional Coordinator (Southeast)
Regional Coordinator (Southeast)
Joined: Dec 2003
Posts: 44,129
Likes: 4,436
From: Mooresville, NC
Overall the paint work has been good but I have to say the painting work on the trim painting leaves a lot to be desired. They didn't mask anything and the detail work is honestly terrible.


On Saturday they came and started staining the cedar shake. Not sure what they were thinking only coming with only 1 gal but they only got the shake on the garage done. They chose to also spray it on instead of brush it on like I had been doing in my samples so not sure about doing a second coat even though the product states you need 2 thin coats to get it to last. The color is spot on right now I think and I really don't want it to darken. They did appear to put it on a bit too heavy to the right of the window though.

This weekend I got all the work lights installed in the garage bay. I had been planning these for a while and wanted them to have quick connects in case I ever need to replace them I won't need to take down the slope ceiling mounts.
I used waterproof screw connectors for the power and then some automotive waterproof


I used mesh loom and heat shrink on the connecting cable for the down rod since the dimmer wire only comes in white.

I used ceiling fan slop adapters for the lights as any other setup didn't work on a 12/12 pitch ceiling. An interesting fact is that even the most complete slope adapter kits still don't come with all the parts. Seems really weird this one came with everything but the pin for the down rod. Nothing some M6 bolts cut up couldn't fit.


Really happy with how the mounting solution came out instead of using cables to hang them.

These things are extremely bright. This was the first time I had all 4 in one bay. It is definitely like a surgical room in there.

The 0-10v dimming though is cool. This is my first experience with it and it is really cool how low it can go. This is all the way down.

On Saturday they came and started staining the cedar shake. Not sure what they were thinking only coming with only 1 gal but they only got the shake on the garage done. They chose to also spray it on instead of brush it on like I had been doing in my samples so not sure about doing a second coat even though the product states you need 2 thin coats to get it to last. The color is spot on right now I think and I really don't want it to darken. They did appear to put it on a bit too heavy to the right of the window though.
This weekend I got all the work lights installed in the garage bay. I had been planning these for a while and wanted them to have quick connects in case I ever need to replace them I won't need to take down the slope ceiling mounts.
I used waterproof screw connectors for the power and then some automotive waterproof
I used mesh loom and heat shrink on the connecting cable for the down rod since the dimmer wire only comes in white.
I used ceiling fan slop adapters for the lights as any other setup didn't work on a 12/12 pitch ceiling. An interesting fact is that even the most complete slope adapter kits still don't come with all the parts. Seems really weird this one came with everything but the pin for the down rod. Nothing some M6 bolts cut up couldn't fit.
Really happy with how the mounting solution came out instead of using cables to hang them.
These things are extremely bright. This was the first time I had all 4 in one bay. It is definitely like a surgical room in there.
The 0-10v dimming though is cool. This is my first experience with it and it is really cool how low it can go. This is all the way down.
