CCColtsicehockey's Home Projects Thread
 09-04-2019, 01:05 PM
#841
Senior Moderator
Oh I didn't see that you installed two 2x4 blocking right under where the mount sits. If that's the case, then lag screws (3-4") should suffice. Similar to the lag screws that come with TV mounts into studs.

The following users liked this post:
CCColtsicehockey (09-04-2019)
09-04-2019, 01:14 PM
#842
Moderator
Regional Coordinator (Southeast)
Regional Coordinator (Southeast)
Thread Starter
Join Date: Dec 2003
Location: Mooresville, NC
Age: 38
Posts: 43,593
Received 3,789 Likes
on
2,555 Posts
Oh yes I reinforced the area. It is not just screwed into the plywood. If I just used the plywood it would be bolt, washer, plywood, washer, nut for sure. I only used 1.5in screws right now but was going to replace with 2.5in lag screws used for TV mounts like you mentioned.
 09-04-2019, 01:20 PM
#843
Senior Moderator
Yeah.. those 1.5" screws look terrifyingly undersized..
09-05-2019, 06:24 AM
#844
Moderator
Regional Coordinator (Southeast)
Regional Coordinator (Southeast)
Thread Starter
Join Date: Dec 2003
Location: Mooresville, NC
Age: 38
Posts: 43,593
Received 3,789 Likes
on
2,555 Posts
Super tiny update. Picked up another stack of wood last night. They didn't have much that was flat and not crazy warped. Managed to find enough to build my top and probably two side panels. Will need a bunch more to build the front and back though still. Also grabbed three 4ft sections of pipe and one 3ft section of pipe for my pipe clamps. Last of all after all the comments about the hardware for the lift I made that change with some longer lag screws and two lag bolts. The whole cabinet will fall over now before the lift moves.
Wagon doing wagon work again

2.5in lag screws and 2in lag bolts.


Back countersunk for the bolts since the outside panels will go flush over these supports

Thinking of breaking out the dremel and trimming these bolts shorter so they don't stick out as much to grab cables while the lift is going up and down.

Wagon doing wagon work again
2.5in lag screws and 2in lag bolts.
Back countersunk for the bolts since the outside panels will go flush over these supports
Thinking of breaking out the dremel and trimming these bolts shorter so they don't stick out as much to grab cables while the lift is going up and down.
The following users liked this post:
CCColtsicehockey (09-05-2019)
09-05-2019, 09:31 AM
#846
Senior Moderator
Regional Coordinator
(Mid-Atlantic)
Regional Coordinator
(Mid-Atlantic)
iTrader: (6)
Hope it's Dorian proof 
09-05-2019, 10:39 AM
#847
Senior Moderator
What's with the black steel? You pulling some gas lines
09-05-2019, 11:58 AM
#848
Moderator
Regional Coordinator (Southeast)
Regional Coordinator (Southeast)
Thread Starter
Join Date: Dec 2003
Location: Mooresville, NC
Age: 38
Posts: 43,593
Received 3,789 Likes
on
2,555 Posts
The black steel is the pipe to use for my pipe clamps when I glue the wood top and wood side panels together.
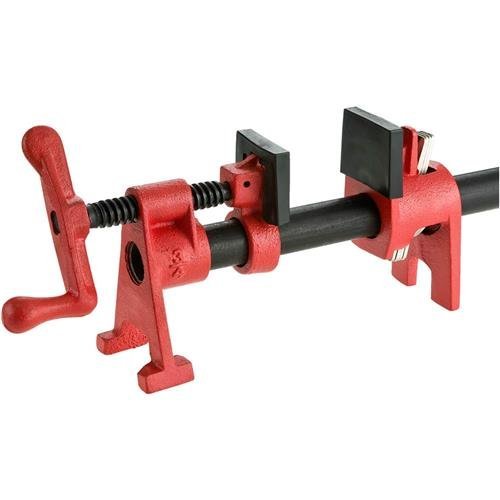
Sam mentioned these and they seem like a great idea rather than spending the crazy money for large wood working clamps. I was able to make 4 of these for less than the price of 2 quality 48in clamps. They are going to weight a good bit more probably then the other clamps but for as little as I will use them this seems like a much better deal. Thanks again Sam.
Sam mentioned these and they seem like a great idea rather than spending the crazy money for large wood working clamps. I was able to make 4 of these for less than the price of 2 quality 48in clamps. They are going to weight a good bit more probably then the other clamps but for as little as I will use them this seems like a much better deal. Thanks again Sam.
09-05-2019, 12:03 PM
#849
Moderator
Regional Coordinator (Southeast)
Regional Coordinator (Southeast)
Thread Starter
Join Date: Dec 2003
Location: Mooresville, NC
Age: 38
Posts: 43,593
Received 3,789 Likes
on
2,555 Posts
This storm is definitely making me think more about figuring out how to anchor it to the ground. I mean the cabinet itself when closed I think should be realatively sturdy. The lift itself weights 55lbs, the TV weights 40lbs, The top lid if thy calculation of ceder deck boards weight should be around 22-26lbs. So you are already over 100lbs and I haven't even calculated the weight of the wood frame made from 4x4 posts and the wood exterior panels to make as well. I imagine the think will weigh in at 175-200lbs when finished with a 62x23 footprint and the cabinet will only be 38in high when closed. That all being said I obviouisly never want it to get blown over.
09-05-2019, 12:07 PM
#850
Senior Moderator
Ohhh gotcha, i missed that conversation 
Pro tip for pipe clamps: painters tape or a quick coat of paste wax on the pipes themselves prior to working will make glue drip cleanup a lot easier!
Pro tip for pipe clamps: painters tape or a quick coat of paste wax on the pipes themselves prior to working will make glue drip cleanup a lot easier!
The following 3 users liked this post by thoiboi:
09-05-2019, 12:15 PM
#851
Moderator
Regional Coordinator (Southeast)
Regional Coordinator (Southeast)
Thread Starter
Join Date: Dec 2003
Location: Mooresville, NC
Age: 38
Posts: 43,593
Received 3,789 Likes
on
2,555 Posts
Never thought of that good to know. I did ready while doing a little pipe clamp research it was suggested to use the black pipes which I got but to put tape on them to prevent the black coating from dying the wood. Would have gotten the galvenized pipes but read about those slipping so went with the black ones.
09-05-2019, 12:18 PM
#852
Senior Moderator
That's another added benefit!
09-05-2019, 05:22 PM
#853
Ex-OEM King

If you clean them off with acetone, it removes the black shit from the outside of the clamp. It's a messy process but well worth it if you don't have a planer to take the stain off in a hurry. If you do remove the black coating, make sure to wax the shit out of it otherwise it'll rust in no time. Wood glue won't stick to metal so you can just pop it off after you're done. That said, I'd still put tape on the clamps just to make your life easier.
09-06-2019, 10:10 AM
#854
Senior Moderator
Regional Coordinator
(Mid-Atlantic)
Regional Coordinator
(Mid-Atlantic)
iTrader: (6)
This storm is definitely making me think more about figuring out how to anchor it to the ground. I mean the cabinet itself when closed I think should be realatively sturdy. The lift itself weights 55lbs, the TV weights 40lbs, The top lid if thy calculation of ceder deck boards weight should be around 22-26lbs. So you are already over 100lbs and I haven't even calculated the weight of the wood frame made from 4x4 posts and the wood exterior panels to make as well. I imagine the think will weigh in at 175-200lbs when finished with a 62x23 footprint and the cabinet will only be 38in high when closed. That all being said I obviouisly never want it to get blown over.
Doesn't matter how heavy it is when the wind is whipping, it just makes for a heavier projectile. If I were you I would definitely find a way to anchor it down, it would be a shame to do all that work and have a gust of wind knock it over.
09-06-2019, 01:29 PM
#855
Null and proud of it
That could totally get blown over if it's just sitting on the ground.
It doesn't matter much if the wind is there.
During hurricane Isaac in 2012, our 16" boat on a trailer spun around into our driveway, and that was just the beginning of a cat 1.
Not to mention what a microburst can do as well.
I don't think there's anything you cab do about a tornado sadly.
It doesn't matter much if the wind is there.
During hurricane Isaac in 2012, our 16" boat on a trailer spun around into our driveway, and that was just the beginning of a cat 1.
Not to mention what a microburst can do as well.
I don't think there's anything you cab do about a tornado sadly.
09-06-2019, 09:25 PM
#856
Moderator
Regional Coordinator (Southeast)
Regional Coordinator (Southeast)
Thread Starter
Join Date: Dec 2003
Location: Mooresville, NC
Age: 38
Posts: 43,593
Received 3,789 Likes
on
2,555 Posts
So last night I got the inner wall where I will mount all of the electronics and junction boxes to installed. I wanted to make sure it was flush with the frame so I custom some extra 2x4 stock down to 1x1.5in so that the 1/2in pressure treated plywood was still smooth with the frame.
1x1.5in mounting points. These are glued and screwed down. Overkill probably but as is everything in this build.


Both supports installed

Plywood installed to mount the electronics on. Will be using stainless steel 1/2in screws to mount everything to this.


Also started ripping down the 5/4x6x8 cedar deck boards in order to make my top. Once I started ripping them I didn't like a couple of them when I started laying them together so stopped for the night. I picked up two more today to replace the two lighter ones.

Today I began working on the patio surface for the cabinet to sit on. My driveway is in direct sun for most of the day so was much better to work on the patio in the shade during the primary hours of the day.
Began by finishing digging out the area I needed to level off for the pavers. I had somewhat marked this area off before but never leveled it.

After that I laid down some weed barrier

Then I put down 5 bags of sand to put a 1/2 to 3/4in layer of sand across the surface

I forgot to take a picture but next I laid the PaverBase foam tiles. These things make life so much easier. I have done a regular paver install years ago with my Dad for my sister at her house. It sucked digging everything out super deep for crushed stone and then sand and then the pavers. This stuff you just dig down the dirt a little, put down 1/4/ - 1/2in of sand and then the foam tiles, and then the pavers.
Here are the pavers laid on top of the tiles.


I had trimmed a hole in one of the tiles for the conduit to come through.

Made sure to pack extra sand in that area to not leave an area for water to pool up.

At this point, I needed to cut one of the pavers to fit around the conduit.

I tried to go old school and use a chisel.

This was a big mistake

I tried to piece it all together but my OCD would never let that happen


Back to the store I went for a new paver and a diamond blade for my angle grinder. I know this isn't safe to use without the shield but I never opened the box on the angle grinder I bought two Amazon prime days ago. It is missing the adapter plate for non-offset discs. I was not about to wait for order that piece. I am not that patient. I knew they made cutting blades for concrete but I had not idea they worked so well and so fast. This thing cut concrete much faster than I ever expected.

Cut out the large piece from the stone and then notched the piece I cut out so I could put it back around the pipes.

Everything put back together. I have installed the plastic edging around all the pavers to hold them in place after this. The pavers will also be glued together using polymeric sand as well. I will grab some daylight pictures tomorrow.


1x1.5in mounting points. These are glued and screwed down. Overkill probably but as is everything in this build.
Both supports installed
Plywood installed to mount the electronics on. Will be using stainless steel 1/2in screws to mount everything to this.
Also started ripping down the 5/4x6x8 cedar deck boards in order to make my top. Once I started ripping them I didn't like a couple of them when I started laying them together so stopped for the night. I picked up two more today to replace the two lighter ones.
Today I began working on the patio surface for the cabinet to sit on. My driveway is in direct sun for most of the day so was much better to work on the patio in the shade during the primary hours of the day.
Began by finishing digging out the area I needed to level off for the pavers. I had somewhat marked this area off before but never leveled it.
After that I laid down some weed barrier
Then I put down 5 bags of sand to put a 1/2 to 3/4in layer of sand across the surface
I forgot to take a picture but next I laid the PaverBase foam tiles. These things make life so much easier. I have done a regular paver install years ago with my Dad for my sister at her house. It sucked digging everything out super deep for crushed stone and then sand and then the pavers. This stuff you just dig down the dirt a little, put down 1/4/ - 1/2in of sand and then the foam tiles, and then the pavers.
Here are the pavers laid on top of the tiles.
I had trimmed a hole in one of the tiles for the conduit to come through.
Made sure to pack extra sand in that area to not leave an area for water to pool up.
At this point, I needed to cut one of the pavers to fit around the conduit.
I tried to go old school and use a chisel.
This was a big mistake
I tried to piece it all together but my OCD would never let that happen
Back to the store I went for a new paver and a diamond blade for my angle grinder. I know this isn't safe to use without the shield but I never opened the box on the angle grinder I bought two Amazon prime days ago. It is missing the adapter plate for non-offset discs. I was not about to wait for order that piece. I am not that patient. I knew they made cutting blades for concrete but I had not idea they worked so well and so fast. This thing cut concrete much faster than I ever expected.
Cut out the large piece from the stone and then notched the piece I cut out so I could put it back around the pipes.
Everything put back together. I have installed the plastic edging around all the pavers to hold them in place after this. The pavers will also be glued together using polymeric sand as well. I will grab some daylight pictures tomorrow.
Last edited by CCColtsicehockey; 09-06-2019 at 09:30 PM.
The following 4 users liked this post by CCColtsicehockey:
00TL-P3.2 (09-09-2019),
civicdrivr (09-10-2019),
Midnight Mystery (09-06-2019),
rockstar143 (09-07-2019)
The following users liked this post:
CCColtsicehockey (09-07-2019)
The following users liked this post:
CCColtsicehockey (09-09-2019)
The following users liked this post:
CCColtsicehockey (09-09-2019)
The following users liked this post:
CCColtsicehockey (09-09-2019)
09-09-2019, 08:46 AM
#861
Senior Moderator

 09-09-2019, 09:22 AM
#862
Moderator
Regional Coordinator (Southeast)
Regional Coordinator (Southeast)
Thread Starter
Join Date: Dec 2003
Location: Mooresville, NC
Age: 38
Posts: 43,593
Received 3,789 Likes
on
2,555 Posts
 #whatisosha
09-09-2019, 09:24 AM
#whatisosha
09-09-2019, 09:24 AM
#863
Moderator
Regional Coordinator (Southeast)
Regional Coordinator (Southeast)
Thread Starter
Join Date: Dec 2003
Location: Mooresville, NC
Age: 38
Posts: 43,593
Received 3,789 Likes
on
2,555 Posts
 09-09-2019, 09:27 AM
#864
Senior Moderator
Regional Coordinator
(Mid-Atlantic)
Regional Coordinator
(Mid-Atlantic)
iTrader: (6)
Nice man
The following users liked this post:
CCColtsicehockey (09-09-2019)
09-09-2019, 09:53 AM
#865
Moderator
Regional Coordinator (Southeast)
Regional Coordinator (Southeast)
Thread Starter
Join Date: Dec 2003
Location: Mooresville, NC
Age: 38
Posts: 43,593
Received 3,789 Likes
on
2,555 Posts
So got some more done Saturday and Sunday but not as much as I wanted do to other plans we had and well football being back and getting in the way of my productivity.
Grabbed some daylight pictures of the paver pad install.
Dog checking it out. Already caught them using it to lay on. They will be disappointed possibly when there is a large cabinet on it soon.

They say you only need stakes every 18-20in on straights. I may have gone overboard I think this is like every 9in.

Closer look at the cut job


Got started on the glue-up of the lid for the cabinet. Cut all the boards down to about 18in longer than the amount I need.

Marked them with a U shape mark so as to be able to line them back up after figuring out the layout I liked best.

Getting ready for glue. Started with only two clamps to get them lined up and glued on a raised work surface.

Moved it to the floor to add the remaining clamps along with shims to keep from indents in the edge. Was able to line the boards up pretty well on the floor so should have minimal sanding to make the surface relatively flat. It is cabinet top and not a table so not super concerned though.

While that dried I decided to start work on the tongue and groove boards for one side to figure out things for the first time. After buying a good quality tongue and groove bit set I figured this would be pretty easy. Not so much. Turns out those bits are huge and need to be spun at a slower speed. My cheap router kit is a single speed just on and off so I can't use them with it as it would spin the bits 11k RPM faster than they can be used. So some quick research on an alternative and decided to go about it manually using two regular cutting bits.
Decided a 1/4in deep by 1/4in wide tongue and groove joint. I used this 1/4in bit to cut the groove.

This 1/2in bit I used to cut the tongue having to cut one side first and flip the board over to cut the other.

I had to do a little bit of filing on two of the tongues since the boards were not exactly all uniform thickness but overall worked really well. I feel comfortable enough at this point to return the expensive bit set and proceed with this method.

Here is the test fit of the one panel. Trying to decide if I want to chamfer all of the vertical boards or if I want to just do the middle three and leave the outer ones part of like a frame.

Here is a shot of the unclamped top. Hopefully, I won't have any issues of it separating. I finally have a crack after this past week of high heat in my egg tabletop that I glued and screwed down to my table. So it looks like I will need to make a replacement top for that sooner than expected. I also have to figure out if I am going to attach the lip to the outside of the top or underneath it. If I am going to do underneath as I had originally designed I am going to need to figure out how to rip the 13/16 cedar stock to 11/16 thick because that is what I used in my calculations. I believe Lowe's wood measurements instead of taking my own. Stupid I know The lip will only be 1.5in tall so I figure I can cut it down to that size and then rip it verital from 13/16 thick to 11/16 on the table saw since I don't have a planer.

Grabbed some daylight pictures of the paver pad install.
Dog checking it out. Already caught them using it to lay on. They will be disappointed possibly when there is a large cabinet on it soon.
They say you only need stakes every 18-20in on straights. I may have gone overboard I think this is like every 9in.
Closer look at the cut job
Got started on the glue-up of the lid for the cabinet. Cut all the boards down to about 18in longer than the amount I need.
Marked them with a U shape mark so as to be able to line them back up after figuring out the layout I liked best.
Getting ready for glue. Started with only two clamps to get them lined up and glued on a raised work surface.
Moved it to the floor to add the remaining clamps along with shims to keep from indents in the edge. Was able to line the boards up pretty well on the floor so should have minimal sanding to make the surface relatively flat. It is cabinet top and not a table so not super concerned though.
While that dried I decided to start work on the tongue and groove boards for one side to figure out things for the first time. After buying a good quality tongue and groove bit set I figured this would be pretty easy. Not so much. Turns out those bits are huge and need to be spun at a slower speed. My cheap router kit is a single speed just on and off so I can't use them with it as it would spin the bits 11k RPM faster than they can be used. So some quick research on an alternative and decided to go about it manually using two regular cutting bits.
Decided a 1/4in deep by 1/4in wide tongue and groove joint. I used this 1/4in bit to cut the groove.
This 1/2in bit I used to cut the tongue having to cut one side first and flip the board over to cut the other.
I had to do a little bit of filing on two of the tongues since the boards were not exactly all uniform thickness but overall worked really well. I feel comfortable enough at this point to return the expensive bit set and proceed with this method.
Here is the test fit of the one panel. Trying to decide if I want to chamfer all of the vertical boards or if I want to just do the middle three and leave the outer ones part of like a frame.
Here is a shot of the unclamped top. Hopefully, I won't have any issues of it separating. I finally have a crack after this past week of high heat in my egg tabletop that I glued and screwed down to my table. So it looks like I will need to make a replacement top for that sooner than expected. I also have to figure out if I am going to attach the lip to the outside of the top or underneath it. If I am going to do underneath as I had originally designed I am going to need to figure out how to rip the 13/16 cedar stock to 11/16 thick because that is what I used in my calculations. I believe Lowe's wood measurements instead of taking my own. Stupid I know
The lip will only be 1.5in tall so I figure I can cut it down to that size and then rip it verital from 13/16 thick to 11/16 on the table saw since I don't have a planer.
The following 3 users liked this post by CCColtsicehockey:
09-09-2019, 09:57 AM
#866
Ex-OEM King
If you're going to chamfer two of them, chamfer them all.
Also, if you want to take off 2/16" just use a sander or pick up a hand plane. That amount of material is minimal.
Rest of the build looks awesome!
Also, if you want to take off 2/16" just use a sander or pick up a hand plane. That amount of material is minimal.
Rest of the build looks awesome!
The following users liked this post:
CCColtsicehockey (09-09-2019)
The following users liked this post:
CCColtsicehockey (09-09-2019)
09-09-2019, 10:04 AM
#868
Senior Moderator
Regional Coordinator
(Mid-Atlantic)
Regional Coordinator
(Mid-Atlantic)
iTrader: (6)
Looking good buddy
The following users liked this post:
CCColtsicehockey (09-09-2019)
09-09-2019, 10:55 AM
#869
Senior Moderator
09-09-2019, 08:21 PM
#870
Moderator
Regional Coordinator (Southeast)
Regional Coordinator (Southeast)
Thread Starter
Join Date: Dec 2003
Location: Mooresville, NC
Age: 38
Posts: 43,593
Received 3,789 Likes
on
2,555 Posts
Yeah it is just 2/16 but don't have a hand plane and I need to do two 64in boards and two 23in boards so that seems like a lot of sanding for something I could put through the table saw quickly. The only thought is how safely can I do it. There won't be a thin piece to get kicked in my face since the blade itself will be the 2/16. I figure if I use feather board and a push stick it should be pretty safe. I am sure I have done dumber things in my life.
09-09-2019, 08:22 PM
#871
Senior Moderator
2/16" = 1/8" boys 
The following users liked this post:
civicdrivr (09-10-2019)
09-09-2019, 08:23 PM
#872
Moderator
Regional Coordinator (Southeast)
Regional Coordinator (Southeast)
Thread Starter
Join Date: Dec 2003
Location: Mooresville, NC
Age: 38
Posts: 43,593
Received 3,789 Likes
on
2,555 Posts
And to note what is taking so long sadly I don't know how much more I will get done in the next two weeks sadly. Still shooting for my September 26th finish so I can watch that football game.
Last edited by CCColtsicehockey; 09-09-2019 at 08:28 PM.
09-09-2019, 08:26 PM
#873
Moderator
Regional Coordinator (Southeast)
Regional Coordinator (Southeast)
Thread Starter
Join Date: Dec 2003
Location: Mooresville, NC
Age: 38
Posts: 43,593
Received 3,789 Likes
on
2,555 Posts
:rofl I get what you were getting at. I work in an industry that takes safety overly serious in my opinion. To the detriment of productivity sometimes I feel. So I definitely make fun of it when I do things that would never fly at work and probably shouldn't fly period. I get the dangers of using the angle grinder without the shield but was annoyed at that time.
09-09-2019, 08:29 PM
#874
Moderator
Regional Coordinator (Southeast)
Regional Coordinator (Southeast)
Thread Starter
Join Date: Dec 2003
Location: Mooresville, NC
Age: 38
Posts: 43,593
Received 3,789 Likes
on
2,555 Posts
 09-09-2019, 10:31 PM
#875
Ex-OEM King
That is what I am leaning towards. After mocking up one panel not really a fan of the full flat look. Already used to doing the chamfered edge I can just wait till all my boards to make my panels are cut and set up the router to do that and run them through fast.
Yeah it is just 2/16 but don't have a hand plane and I need to do two 64in boards and two 23in boards so that seems like a lot of sanding for something I could put through the table saw quickly. The only thought is how safely can I do it. There won't be a thin piece to get kicked in my face since the blade itself will be the 2/16. I figure if I use feather board and a push stick it should be pretty safe. I am sure I have done dumber things in my life.
Yeah it is just 2/16 but don't have a hand plane and I need to do two 64in boards and two 23in boards so that seems like a lot of sanding for something I could put through the table saw quickly. The only thought is how safely can I do it. There won't be a thin piece to get kicked in my face since the blade itself will be the 2/16. I figure if I use feather board and a push stick it should be pretty safe. I am sure I have done dumber things in my life.
I'm now going to do everything in 16ths just for thoi.
It's also 0.125" too.
09-10-2019, 06:22 AM
#876
Moderator
Regional Coordinator (Southeast)
Regional Coordinator (Southeast)
Thread Starter
Join Date: Dec 2003
Location: Mooresville, NC
Age: 38
Posts: 43,593
Received 3,789 Likes
on
2,555 Posts
There will be two pieces of 64in x 1.5in x 13/16in and two pieces of around 24in x 1.5in x 13/16in. So they will be shorter than the height of the blade on a single pass at least. Doing it would also allow me to remove the rough cut side from these pieces of cedar to maybe create a smoother surface for the opening and closing of the lid.
The following users liked this post:
civicdrivr (09-10-2019)
09-10-2019, 08:10 AM
#878
Honestly, I did think it would work. I watched probably 10-15 different YouTube videos of people cutting pavers that way. I didn't go fast and before it cracked back it actually started to crack down the line I was trying for and then it went all wrong. That all being said the diamond blade on the angle grinder cut line butter it was crazy. I will never go any other way.
And to note what is taking so long sadly I don't know how much more I will get done in the next two weeks sadly. Still shooting for my September 26th finish so I can watch that football game.
And to note what is taking so long sadly I don't know how much more I will get done in the next two weeks sadly. Still shooting for my September 26th finish so I can watch that football game.
09-10-2019, 09:55 AM
#880
Whats up with RDX owners?
iTrader: (9)

 Eye ball everything. I've got the accuracy down to about 3/4". Wood putty the rest.