
CCColtsicehockey's Home Projects Thread
 08-27-2019, 11:54 AM
#801
Senior Moderator
Regional Coordinator
(Mid-Atlantic)
Regional Coordinator
(Mid-Atlantic)
iTrader: (6)
Awesome stuff man

The following users liked this post:
CCColtsicehockey (08-27-2019)
08-27-2019, 12:42 PM
#802
Moderator
Regional Coordinator (Southeast)
Regional Coordinator (Southeast)
Thread Starter
Join Date: Dec 2003
Location: Mooresville, NC
Age: 38
Posts: 43,628
Received 3,842 Likes
on
2,575 Posts
My September and October are fairly busy so I am extremely motivated right now to get this done as fast as possible if I have any hope of being able to watch college football on it this year. I also have trouble putting a project down once I start it which is both a good and a bad thing.
08-27-2019, 12:43 PM
#803
Moderator
Regional Coordinator (Southeast)
Regional Coordinator (Southeast)
Thread Starter
Join Date: Dec 2003
Location: Mooresville, NC
Age: 38
Posts: 43,628
Received 3,842 Likes
on
2,575 Posts
Did you lube before pulling? https://www.homedepot.com/p/Klein-To...6117/100660155
Never pull dry... that causes chafing
Never pull dry... that causes chafing
08-27-2019, 01:49 PM
#804
Senior Moderator
Lube. 
 08-27-2019, 01:57 PM
#805
Senior Moderator
Regional Coordinator
(Mid-Atlantic)
Regional Coordinator
(Mid-Atlantic)
iTrader: (6)
No lube? Ouch...
08-27-2019, 04:52 PM
#806
Needs more Lemon Pledge
Wow, that work looks awesome! Nicely done.
08-29-2019, 07:26 AM
#808
Moderator
Regional Coordinator (Southeast)
Regional Coordinator (Southeast)
Thread Starter
Join Date: Dec 2003
Location: Mooresville, NC
Age: 38
Posts: 43,628
Received 3,842 Likes
on
2,575 Posts
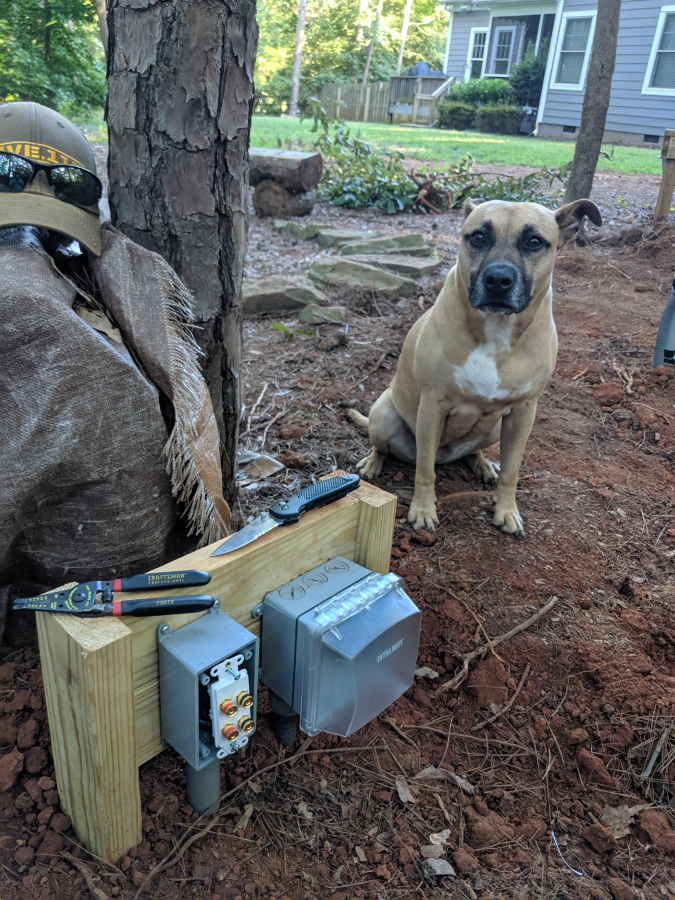
Didn't get much work done on it last night. Got the boxes by the tree wired up but didn't get a chance to finish the other end unfortunately.
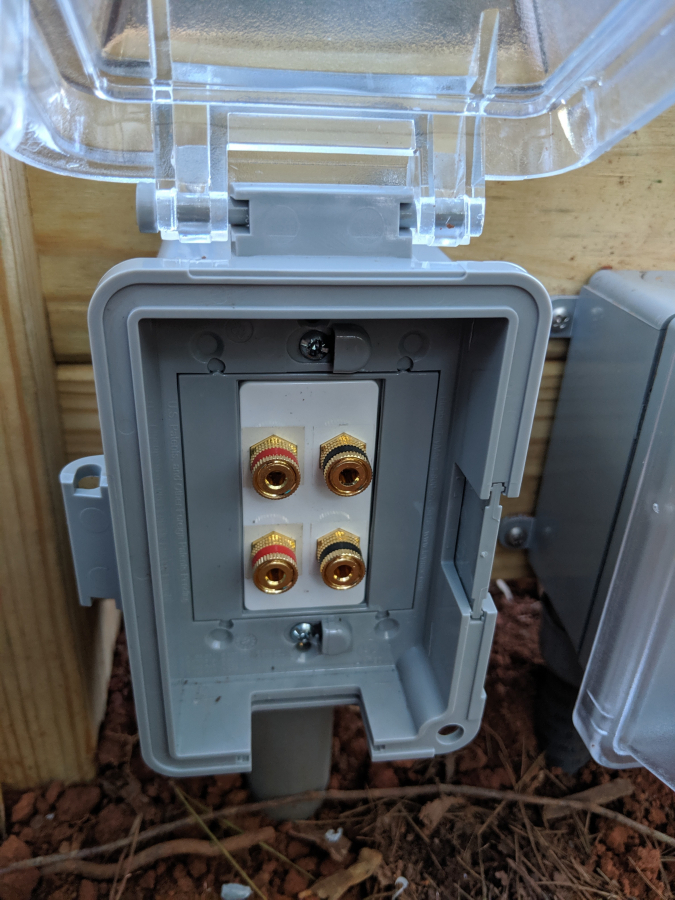
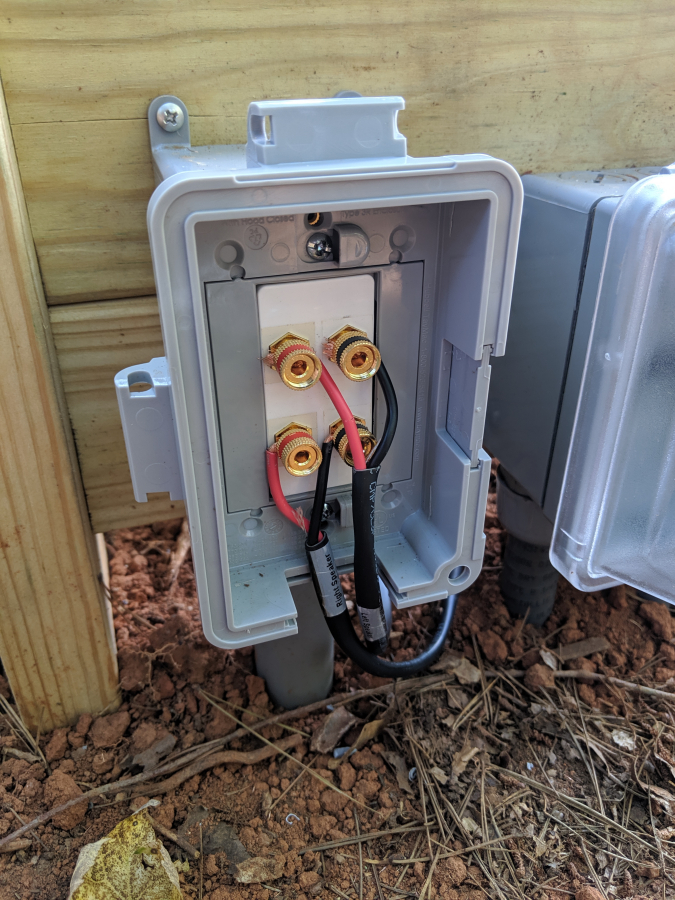
Nothing special on the power box. Only used a double gang box because of the second piece of conduit feeding out to the TV cabinet.
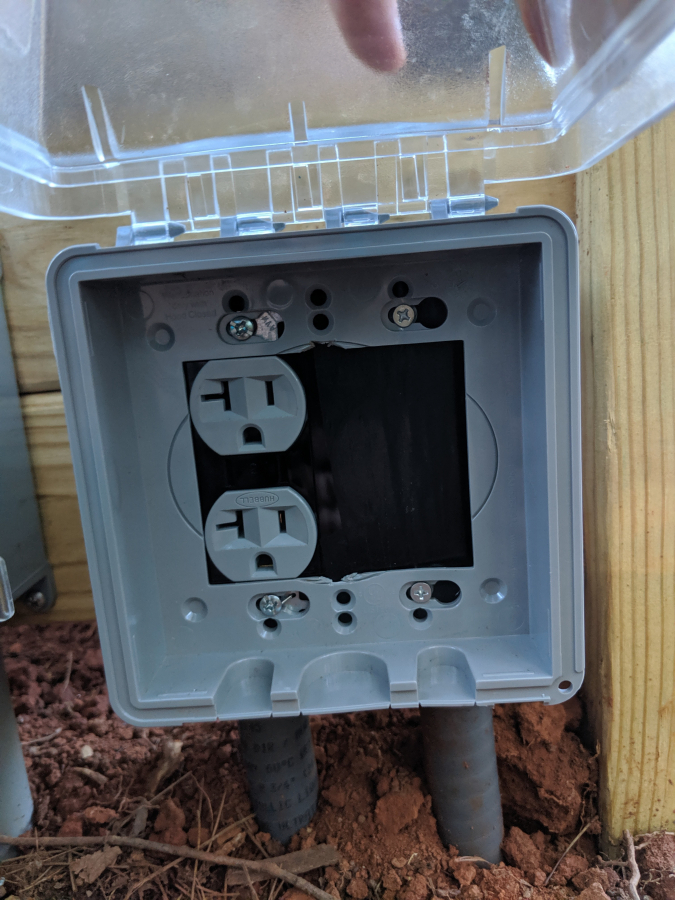
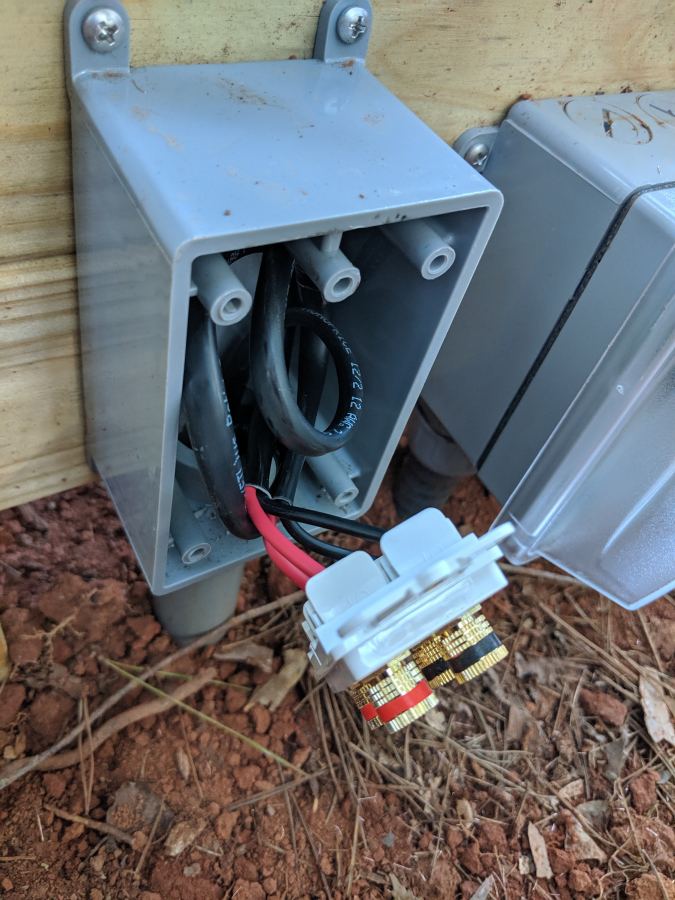
Ran 12/2 speaker wire and it is probably overkill. Had to keep less slack than I had planned because of how stiff it is to run.
I had a helper hanging out with me.
The speaker terminal plates are thicker than an outlet so they didn't let the waterproof outlet cover sit tight to the box. I had to end up trimming the little mounting posts so that it would sit deeper inside.
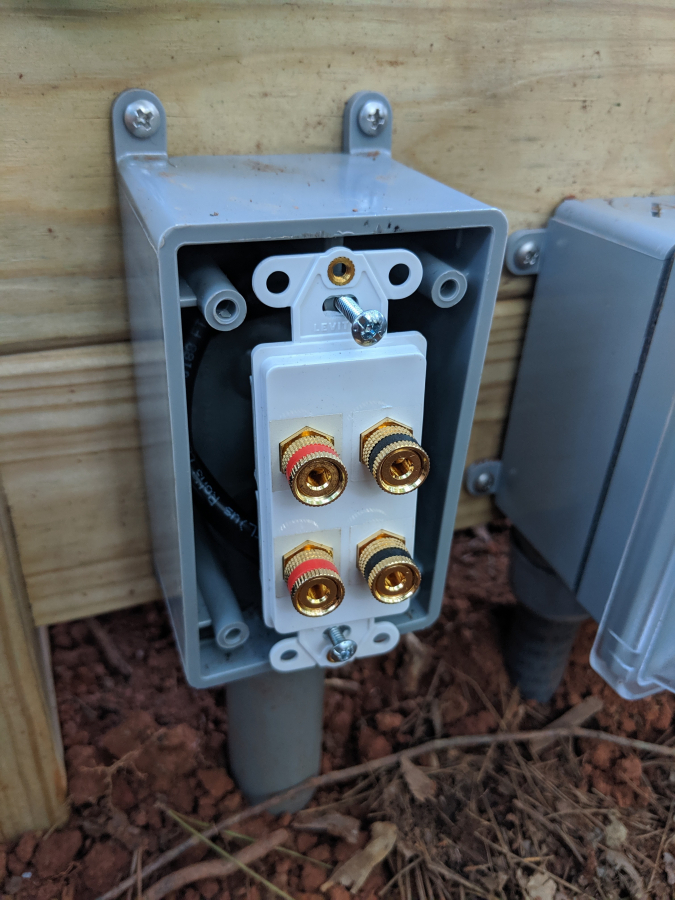
No clue how well this will stay sealed and keep a good connection for the speakers but we shall see. I didn't want to go with a full cable run from the shed to the speakers incase the exposed pieces deteriorated faster than expected over time.
Nothing special on the power box. Only used a double gang box because of the second piece of conduit feeding out to the TV cabinet.
Ran 12/2 speaker wire and it is probably overkill. Had to keep less slack than I had planned because of how stiff it is to run.
I had a helper hanging out with me.
The speaker terminal plates are thicker than an outlet so they didn't let the waterproof outlet cover sit tight to the box. I had to end up trimming the little mounting posts so that it would sit deeper inside.
No clue how well this will stay sealed and keep a good connection for the speakers but we shall see. I didn't want to go with a full cable run from the shed to the speakers incase the exposed pieces deteriorated faster than expected over time.
The following 2 users liked this post by CCColtsicehockey:
97BlackAckCL (08-29-2019),
Yumcha (08-29-2019)

The following 2 users liked this post by rockstar143:
97BlackAckCL (08-29-2019),
CCColtsicehockey (08-29-2019)
08-29-2019, 09:43 AM
#810
Senior Moderator
Regional Coordinator
(Mid-Atlantic)
Regional Coordinator
(Mid-Atlantic)
iTrader: (6)
Awesome work Jason
08-29-2019, 10:41 AM
#811
Senior Moderator
Looks amazing.
Need more pics of your dog too.
Need more pics of your dog too.
The following users liked this post:
97BlackAckCL (08-29-2019)
08-29-2019, 11:07 AM
#812
Needs more Lemon Pledge
So is the plan to connect the outdoor speaker wire banana plugs to the junction box only when you need to use them?
Or are you going to leave them connected and run their wires out the side port on the waterproof box?
Or are you going to leave them connected and run their wires out the side port on the waterproof box?
08-29-2019, 12:25 PM
#813
Moderator
Regional Coordinator (Southeast)
Regional Coordinator (Southeast)
Thread Starter
Join Date: Dec 2003
Location: Mooresville, NC
Age: 38
Posts: 43,628
Received 3,842 Likes
on
2,575 Posts
Haven't decided if I will use the screw terminals direct to the wire or order some banana plugs instead.
The following users liked this post:
stogie1020 (08-29-2019)
08-29-2019, 12:41 PM
#814
Senior Moderator
Regional Coordinator
(Mid-Atlantic)
Regional Coordinator
(Mid-Atlantic)
iTrader: (6)
The following users liked this post:
00TL-P3.2 (08-29-2019)
09-03-2019, 08:09 AM
#816
Moderator
Regional Coordinator (Southeast)
Regional Coordinator (Southeast)
Thread Starter
Join Date: Dec 2003
Location: Mooresville, NC
Age: 38
Posts: 43,628
Received 3,842 Likes
on
2,575 Posts
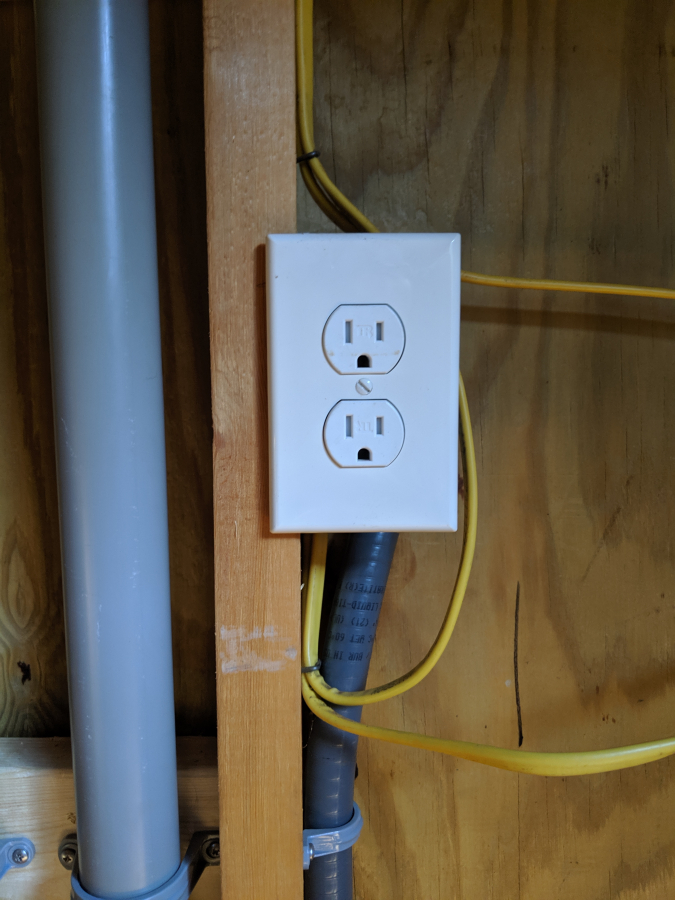
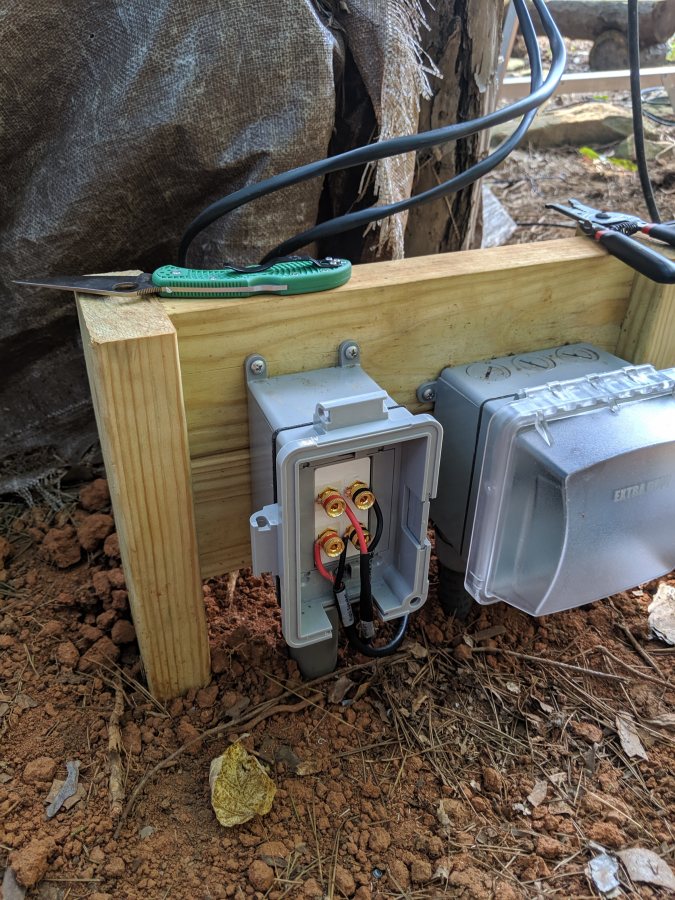
So got some more work done yesterday after my company left. Knocked out the wiring in the morning. Got the speakers wires run and the power wire hooked up. Nice not to have the wires running through the trees anymore.
I had always wondered why I didn't have a GFI in my shed and had completely forgotten you can have GFI breakers. That is apparently exactly why I don't have a GFI.
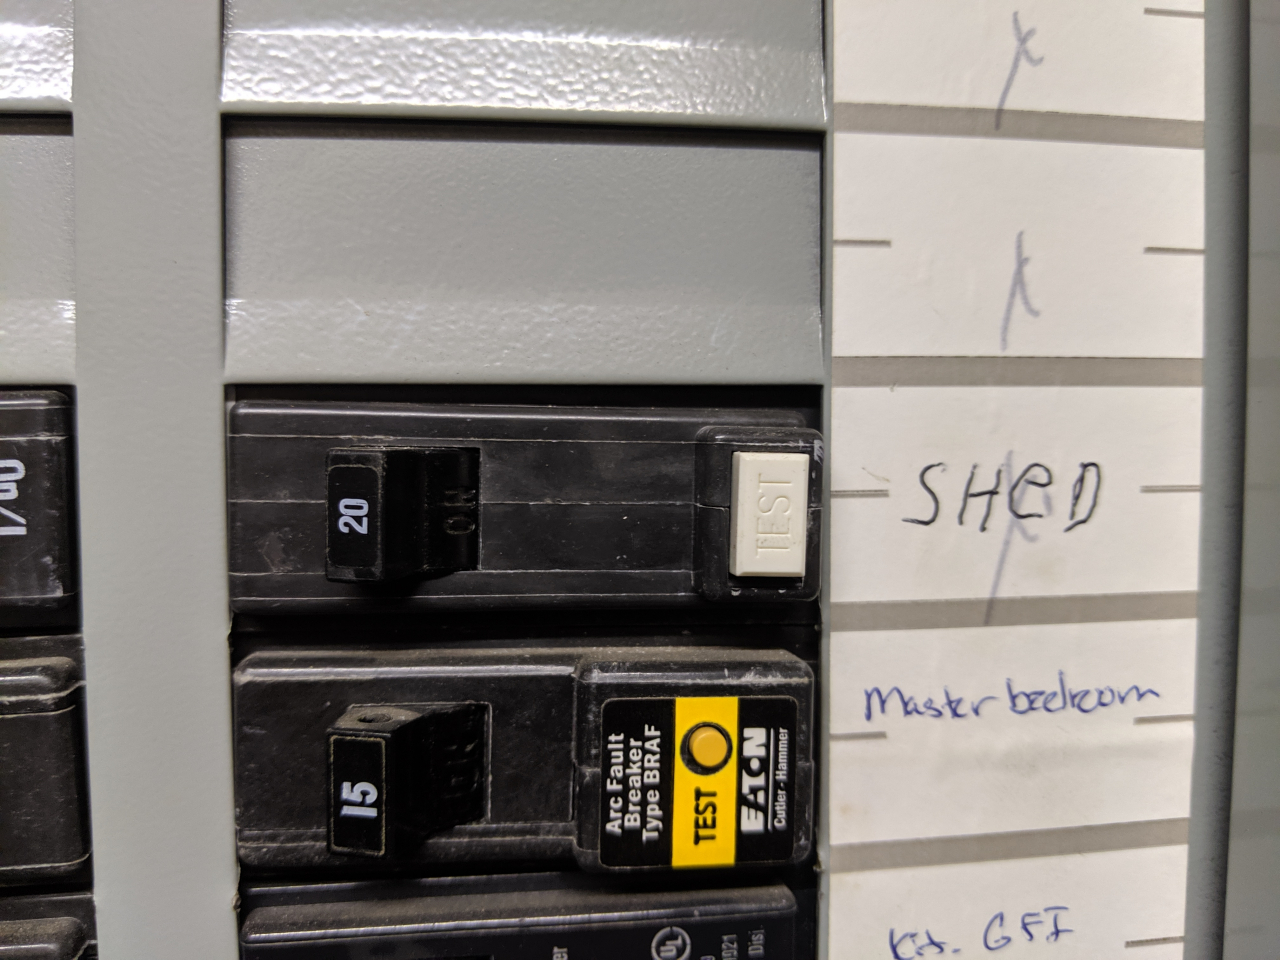
Power tapped off one of the outlets in the circuit. Would have preferred to connect it to the last outlet but it was not in as good of a location to do so. So I used the second to last outlet in the circuit.
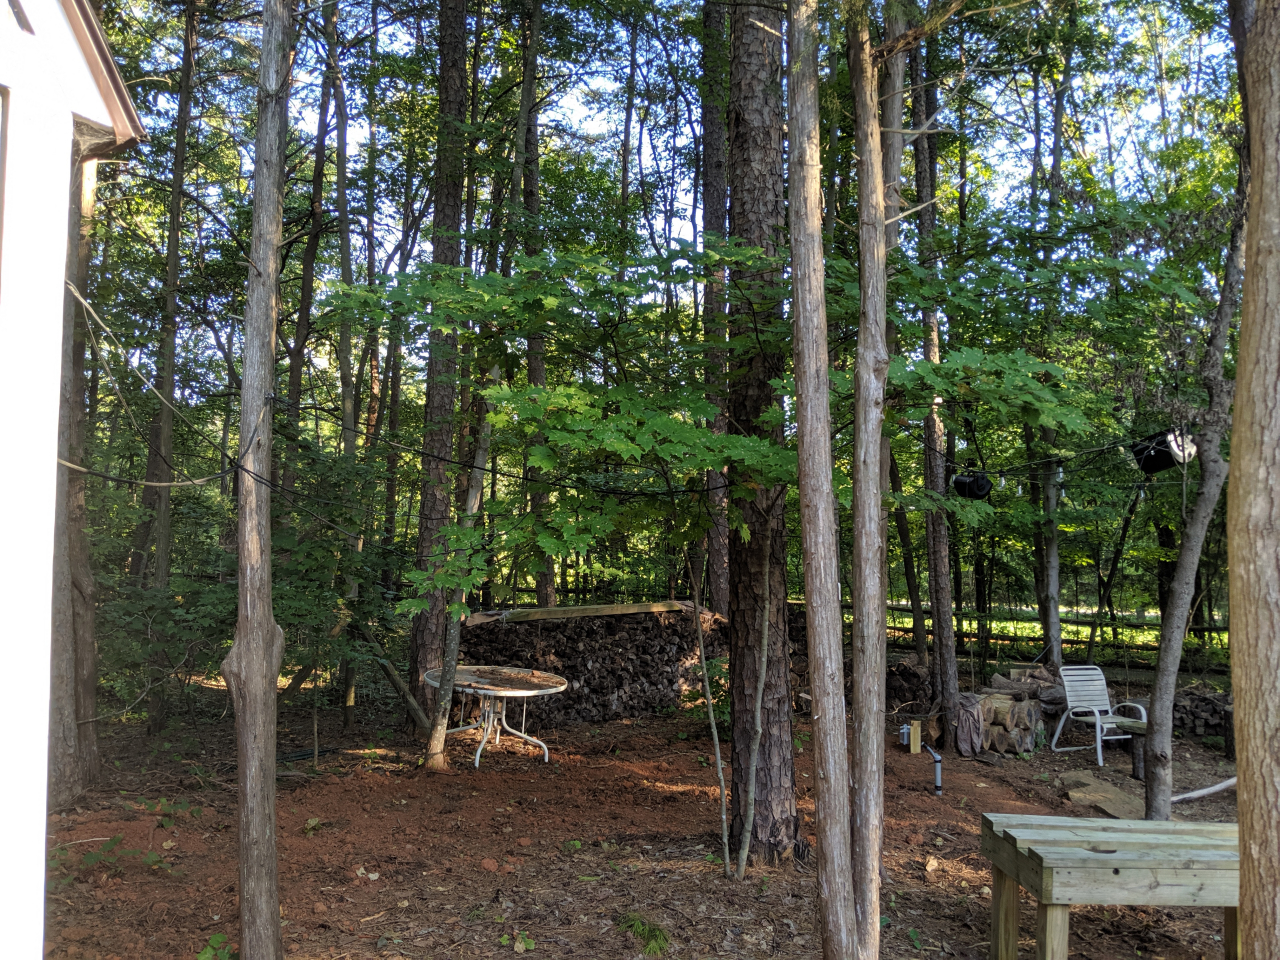
Last photo of the wires running through my trees
Speaker cable and power wire finished and plugged up
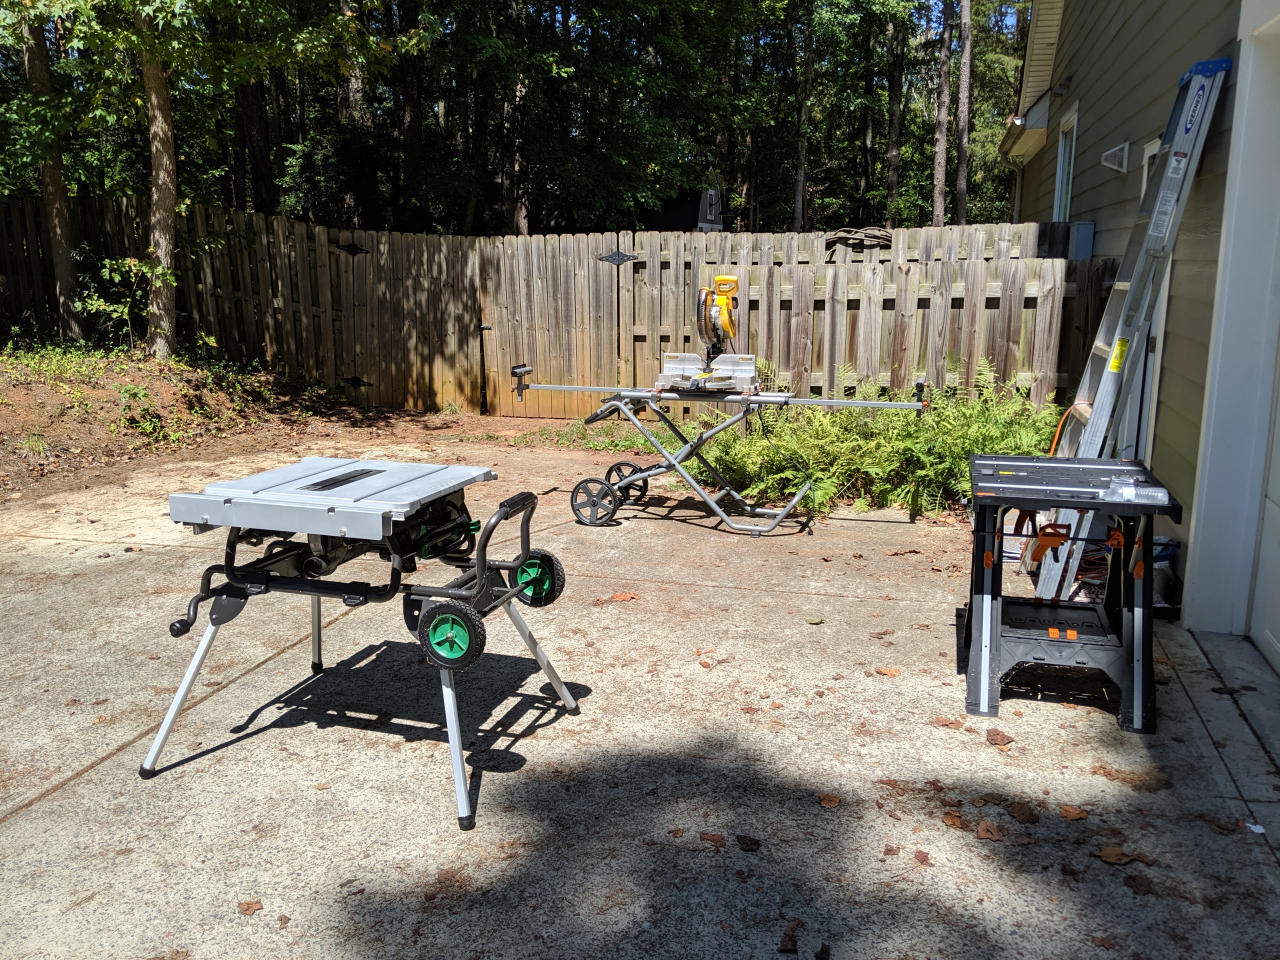
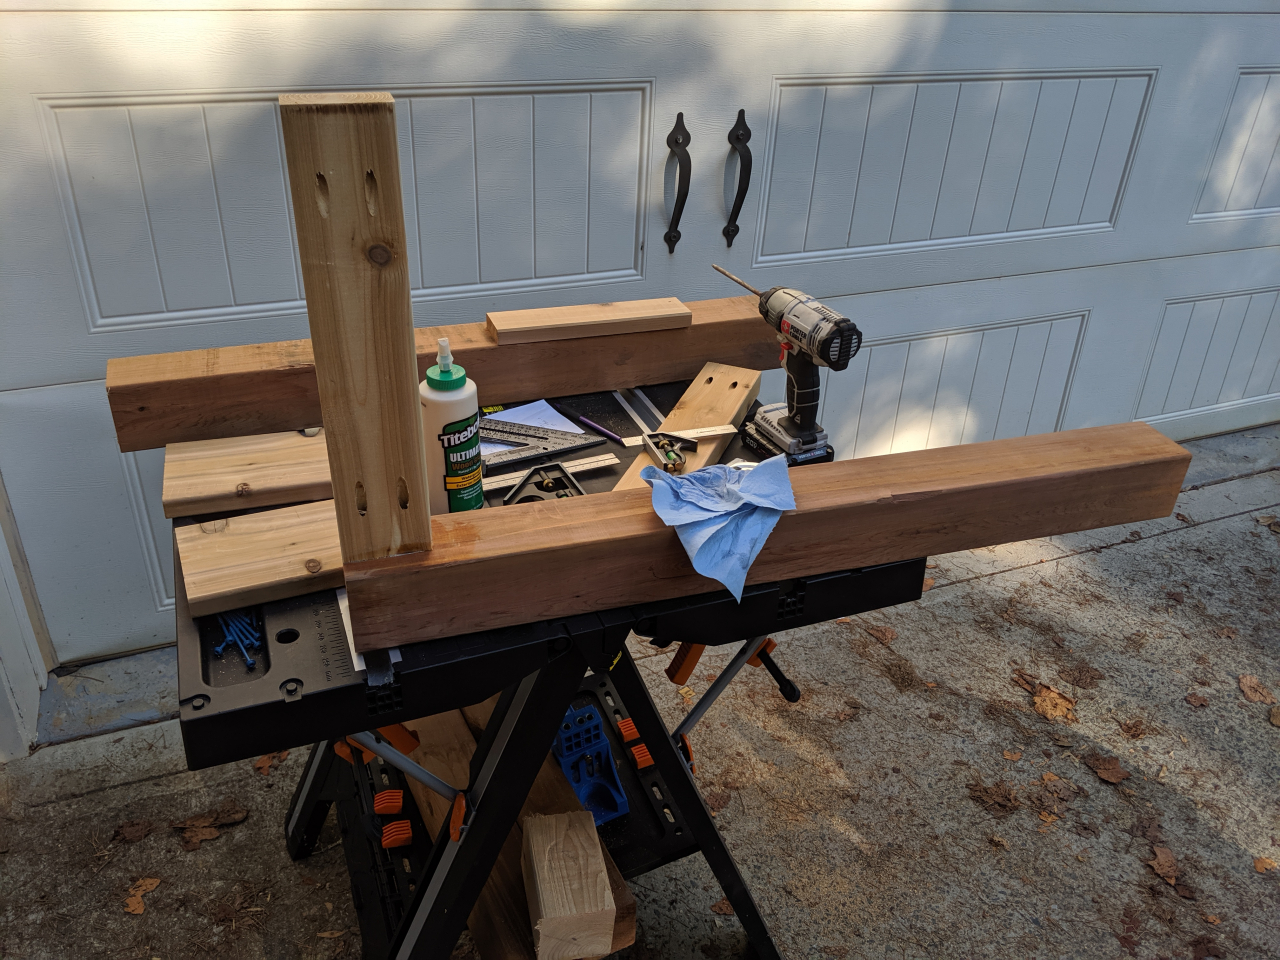
On to building the cabinet frame. Work area all setup.
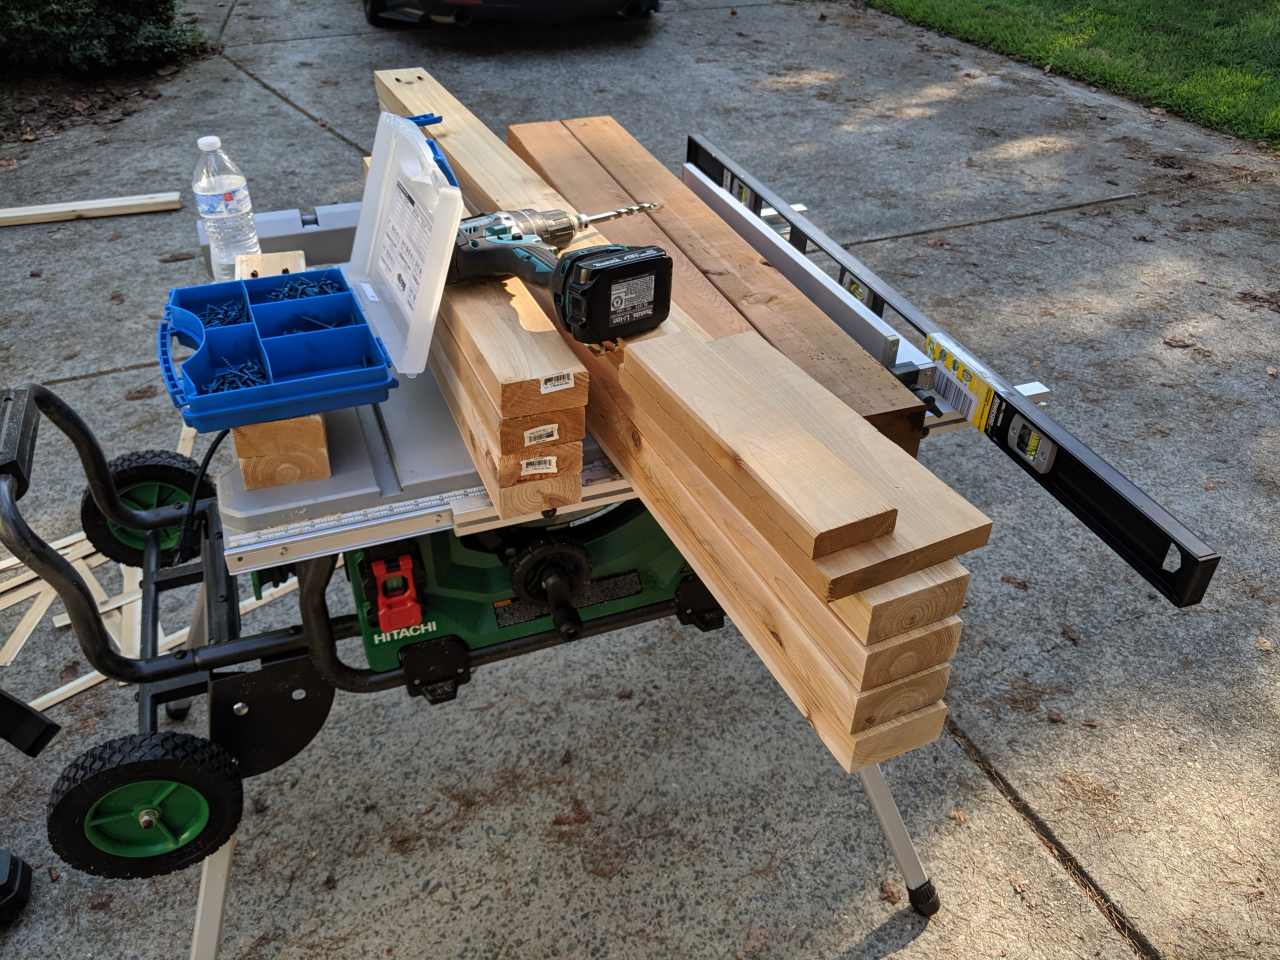
Boards all cut to length and one side of the 2x4 I trimmed the rounded edges off to make them more square. Don't have a joiner so it was just done on the table but at least it gives things a more finished look. The other side will be hidden so didn't bother with it.
Assembly started. I have changed my design to build flat panels with tongue and groove as Sam suggested. This will be the first time I am doing it so we will see how it goes.
One end finished
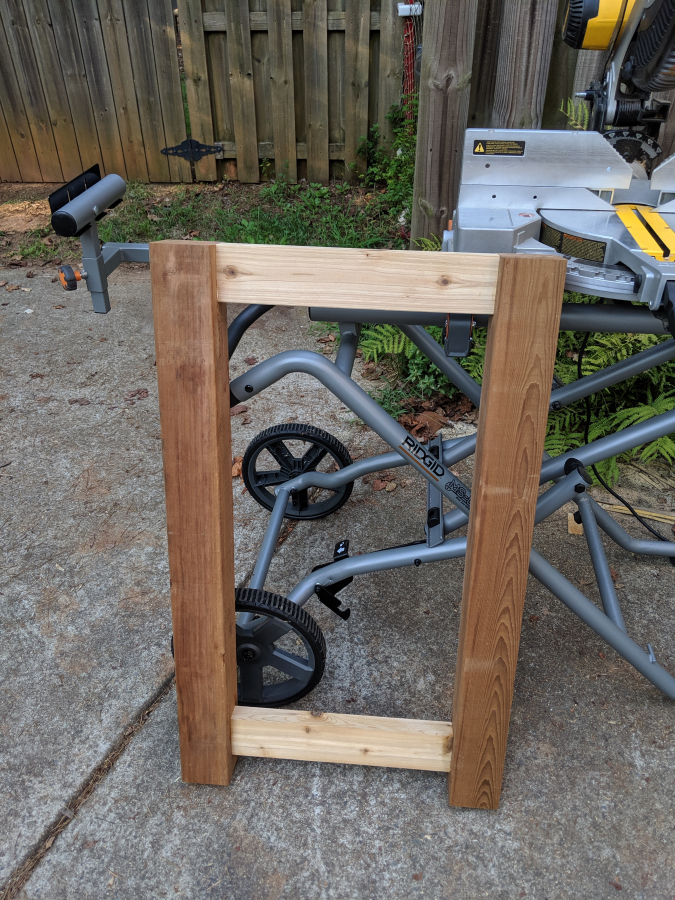
The other end finished
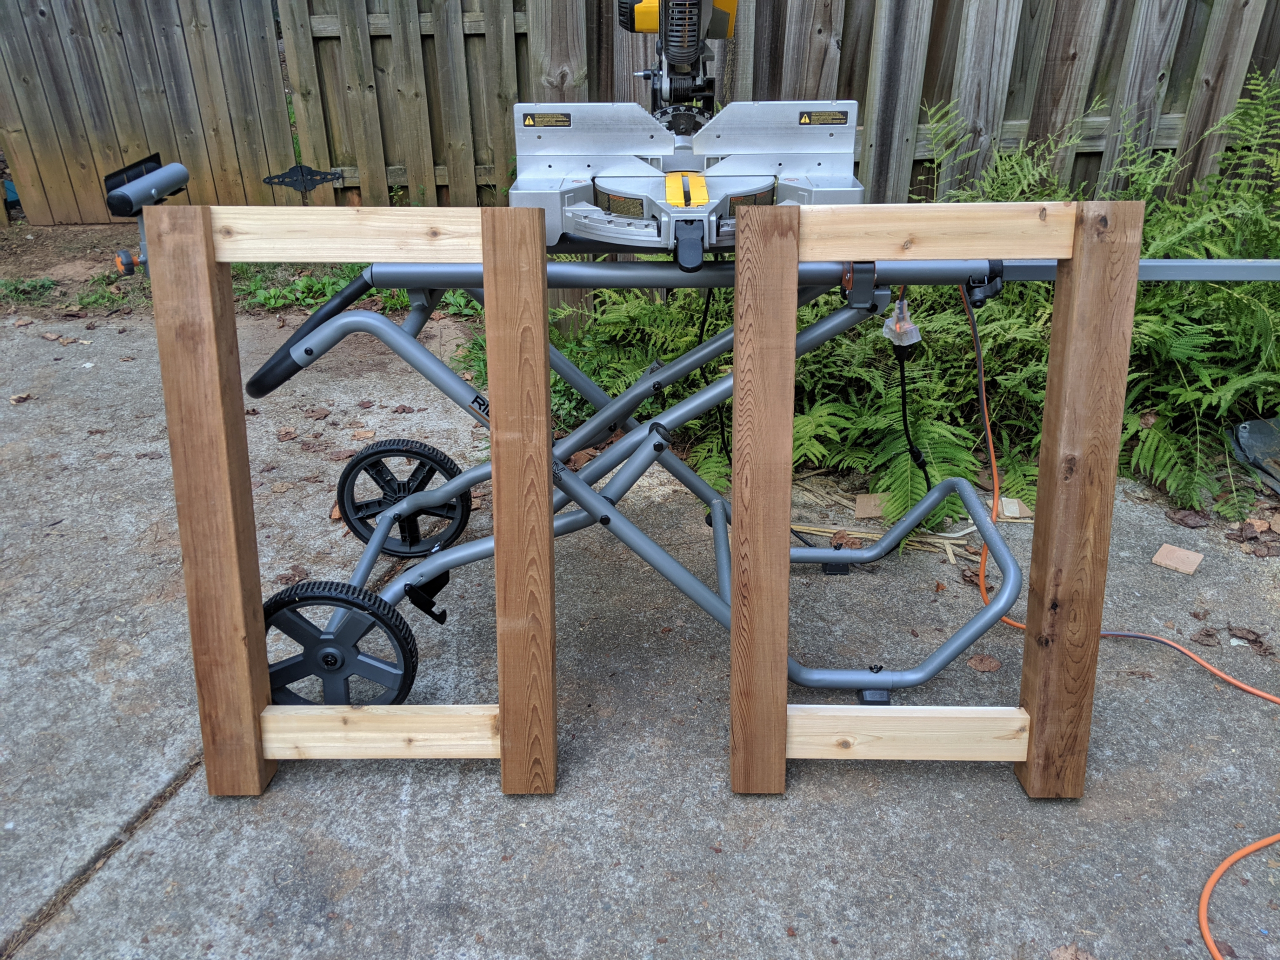
Almost finished connecting the ends together.
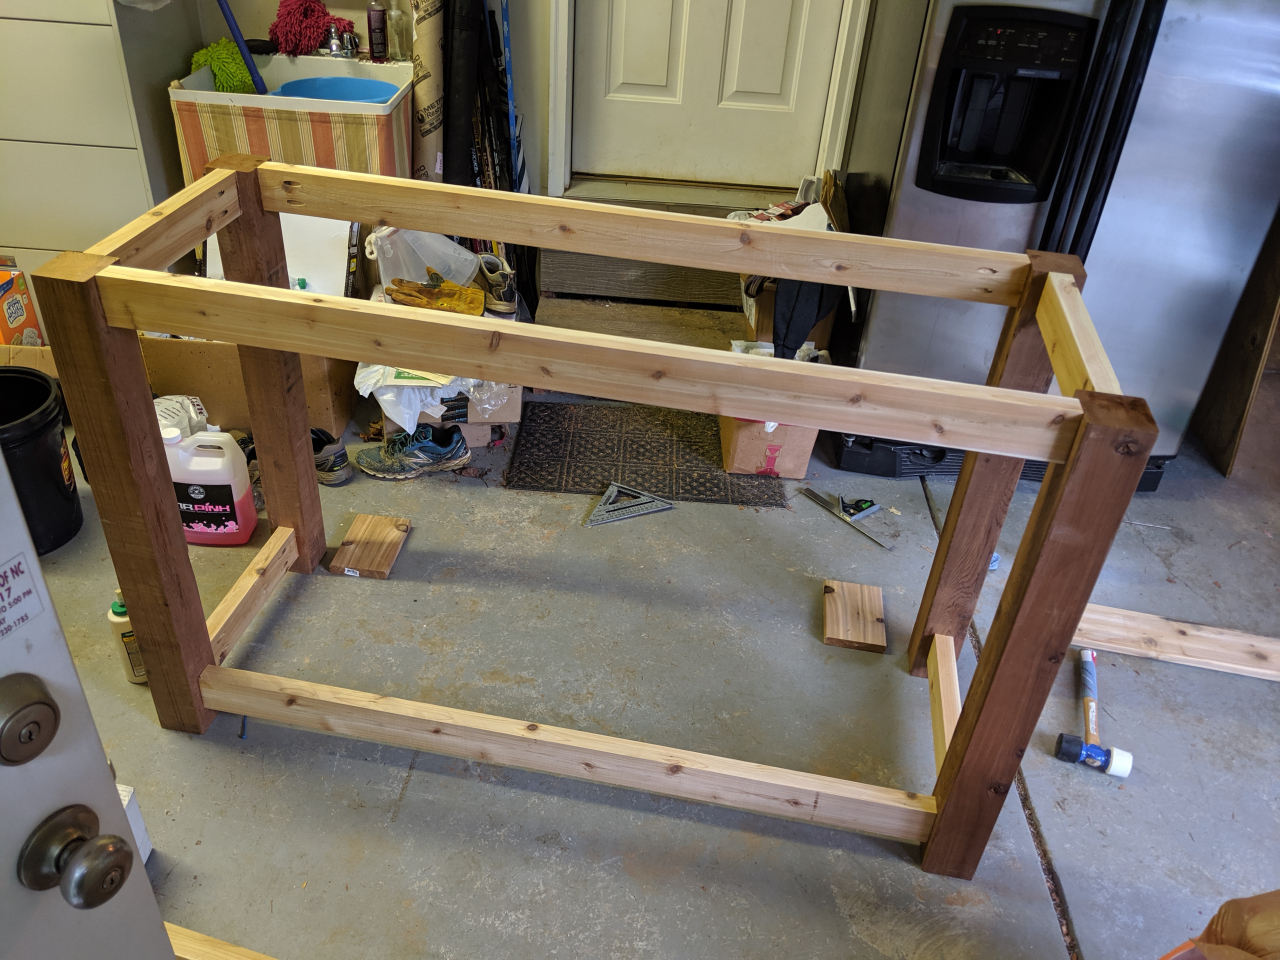
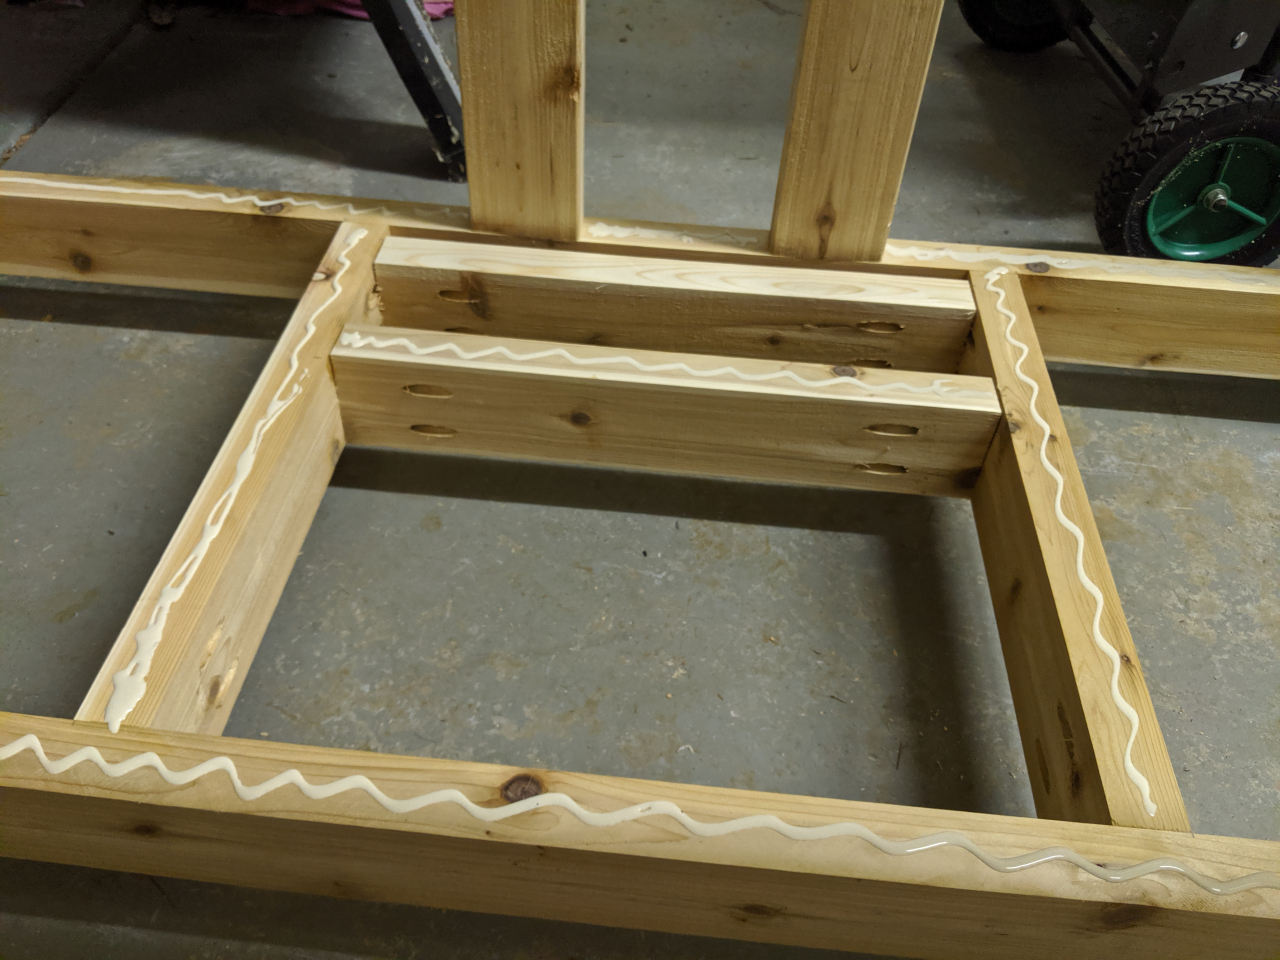
Two additional floor braces
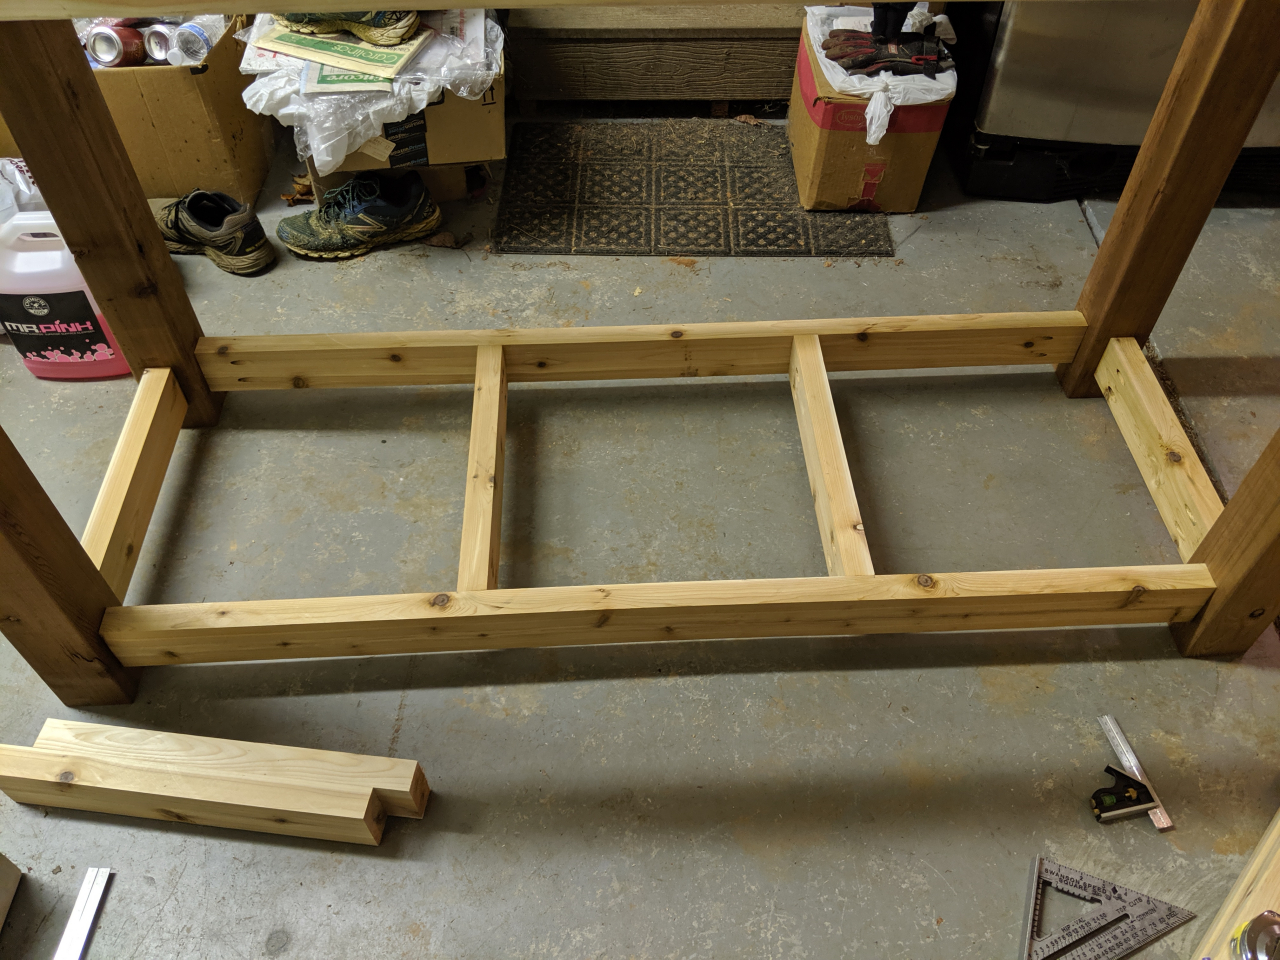
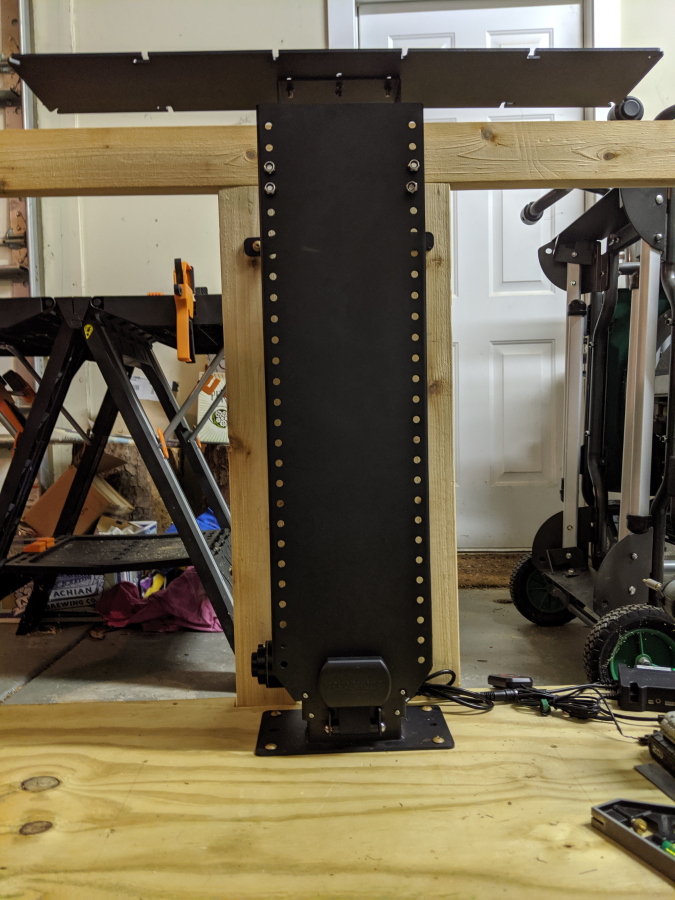
These supports are where the base of the lift will bolt to. I plan to use threaded wood lag bolts to bolt it down.
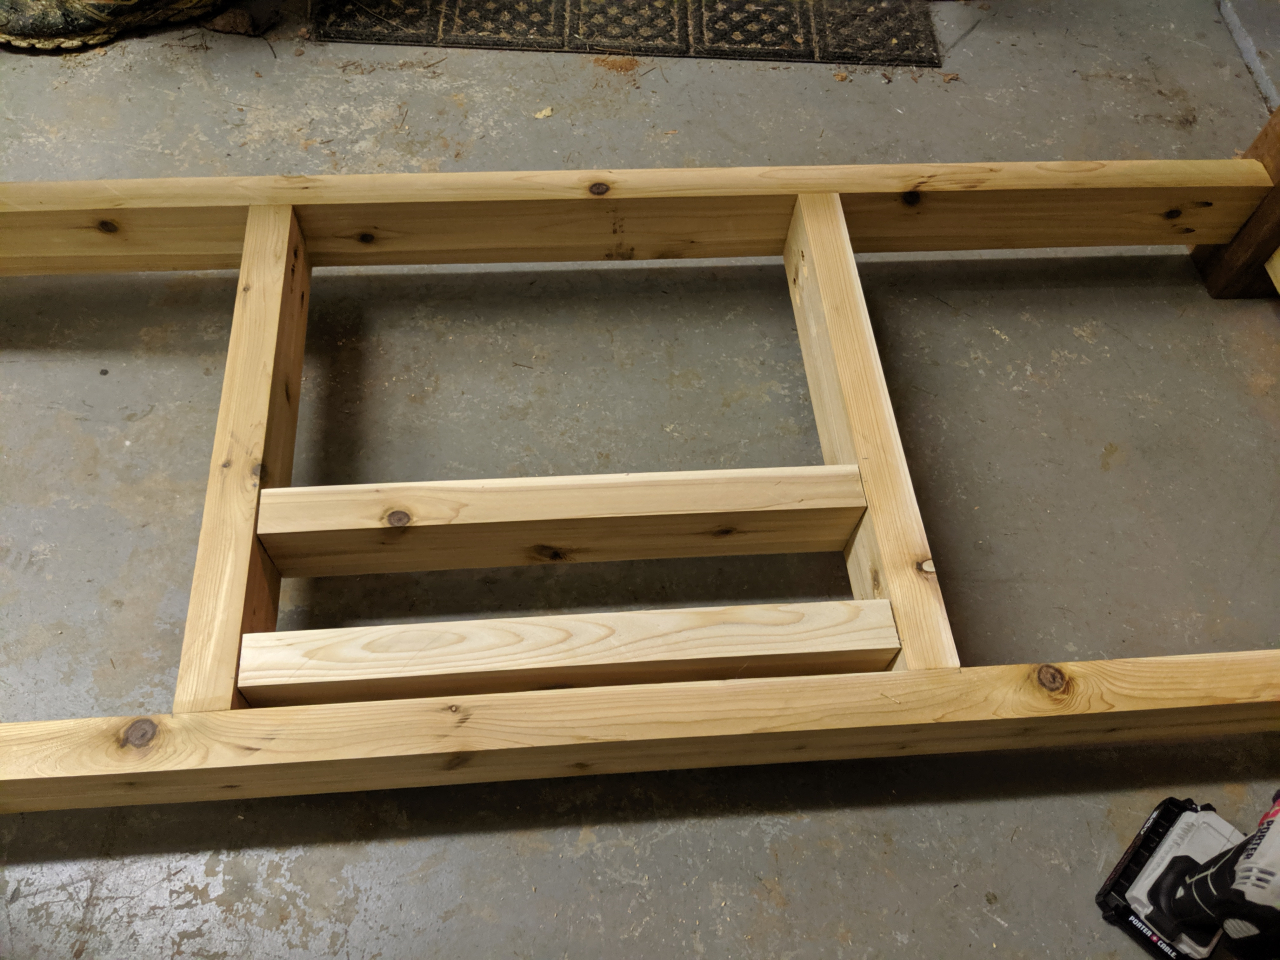
These vertical braces are where the top brackets of the lift will bolt to.
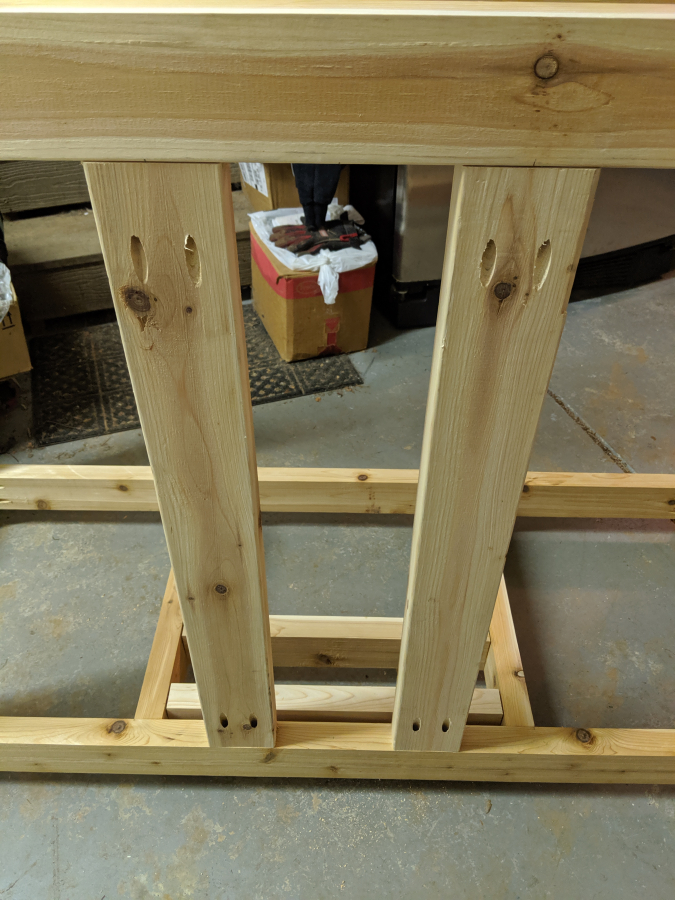
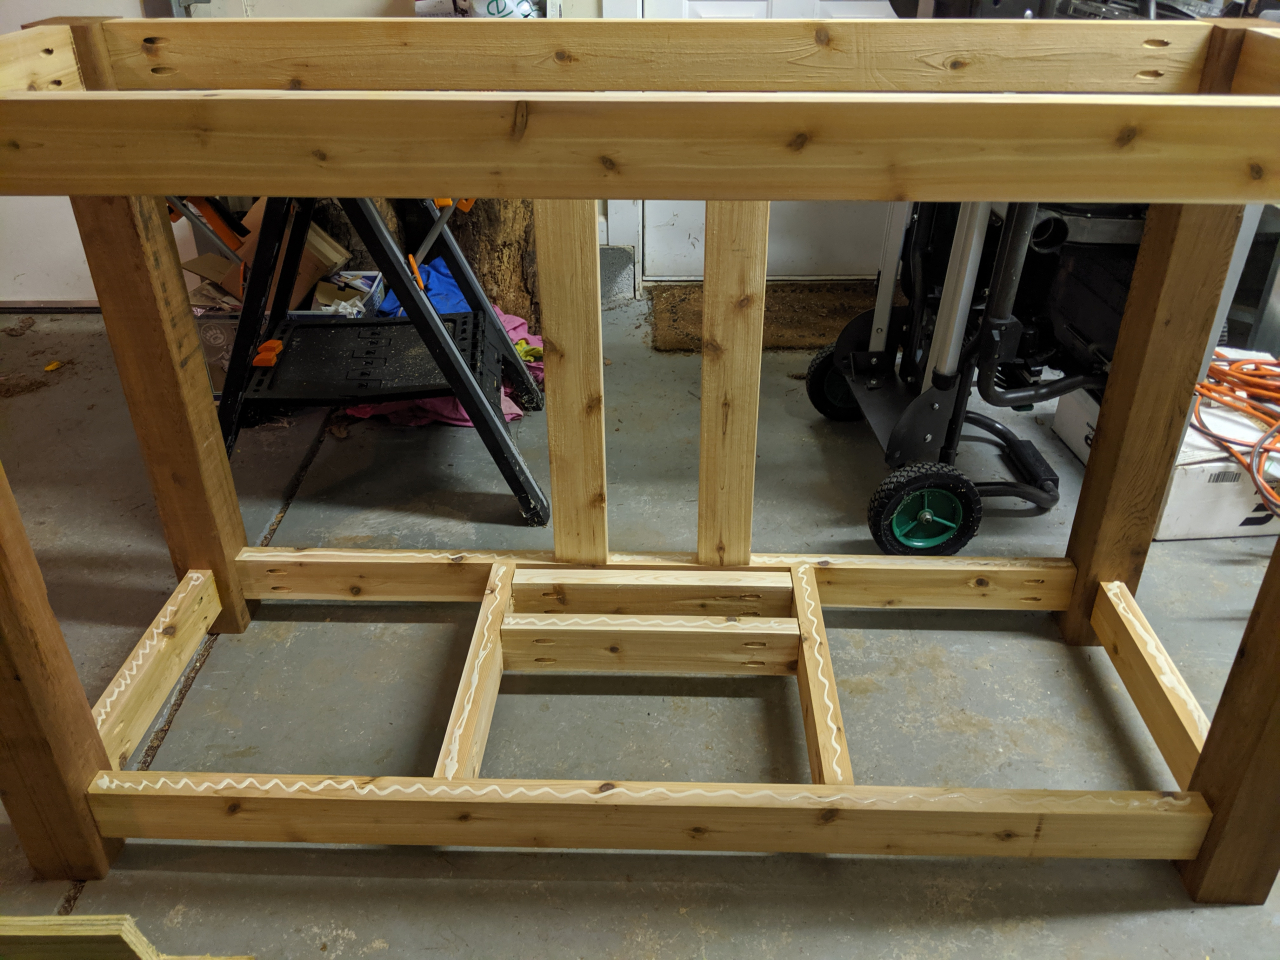
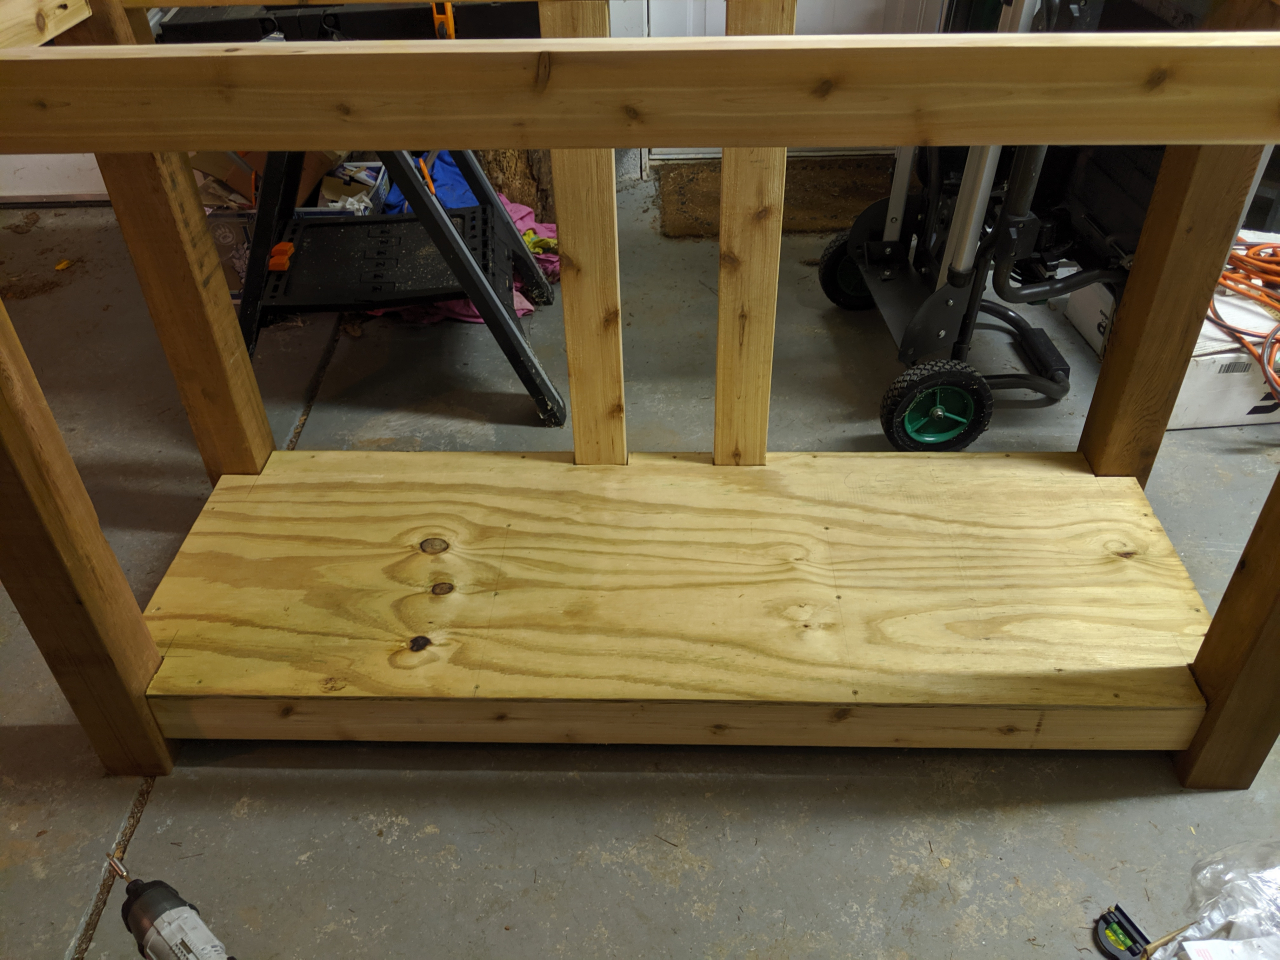
Framing all finished. Tip to notch out the floor panel.
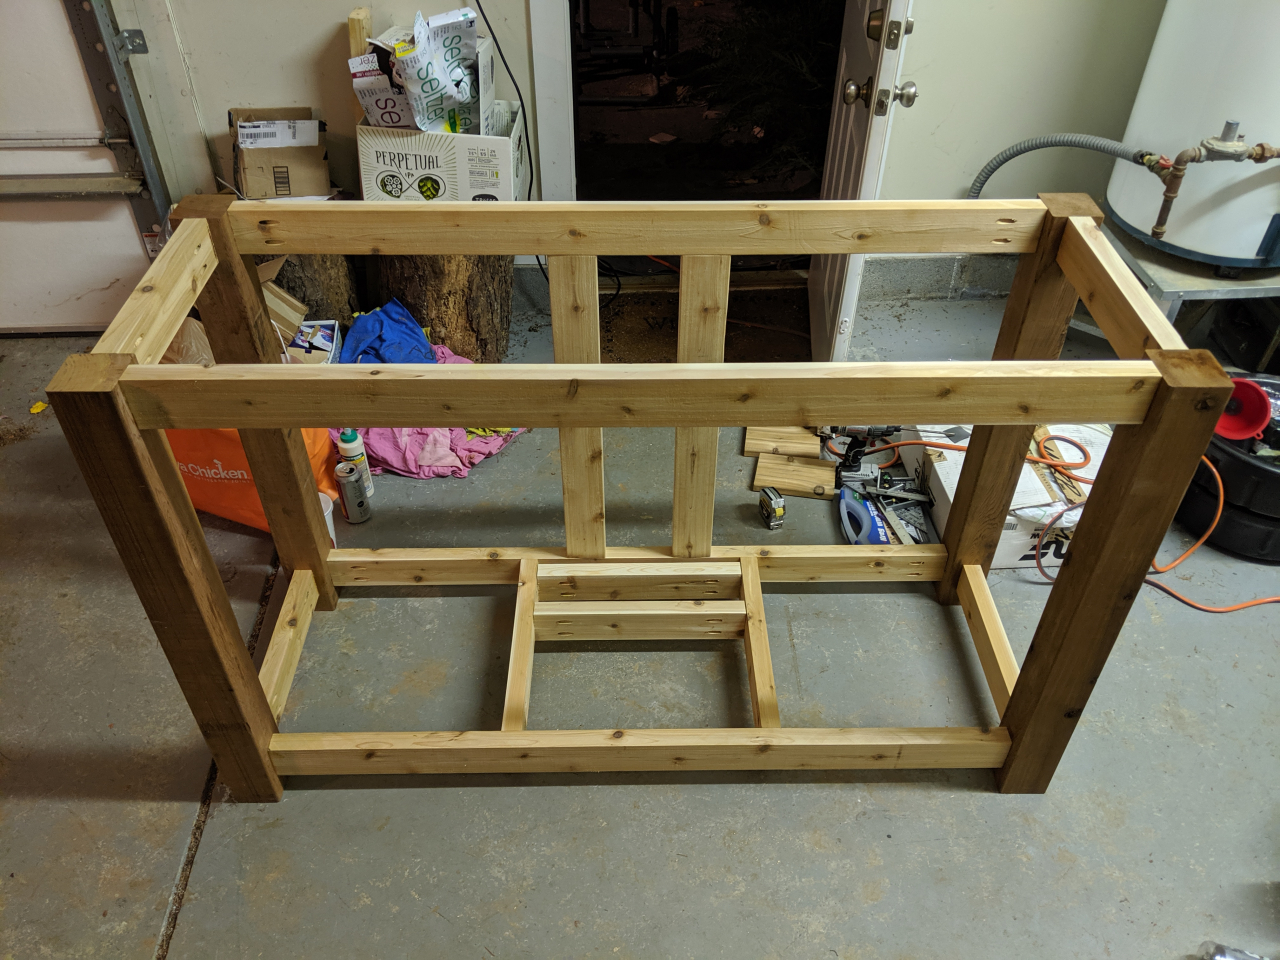
Floor panel all finished. The notches are not super tight so thinking of using either silicon or wood glue mixed with cedar sawdust to fill them up. Called it a night at this point.
I have a very ambitious deadline I am trying to make of finishing it by the end of this coming weekend. We will see how much I can get done. I still have to go buy all the wood for the sides and top yet. I need to figure out how to do my tongue and groove side panels as well. Not sure if I am just going to do tongue and groove on the top and bottom of each board and leave the sides just but up against each other or if I am going to do all four sides. That seems awfully complicated even to me. I also want to chamfer the edges of each board like I did the sides on my egg table so not sure how I would do that with tongue and groove on all sides. If I just but them up against each other I could buy some Tyvek and line the inside of each panel with it to help keep any water out even more.
I had always wondered why I didn't have a GFI in my shed and had completely forgotten you can have GFI breakers. That is apparently exactly why I don't have a GFI.
Power tapped off one of the outlets in the circuit. Would have preferred to connect it to the last outlet but it was not in as good of a location to do so. So I used the second to last outlet in the circuit.
Last photo of the wires running through my trees
Speaker cable and power wire finished and plugged up
On to building the cabinet frame. Work area all setup.
Boards all cut to length and one side of the 2x4 I trimmed the rounded edges off to make them more square. Don't have a joiner so it was just done on the table but at least it gives things a more finished look. The other side will be hidden so didn't bother with it.
Assembly started. I have changed my design to build flat panels with tongue and groove as Sam suggested. This will be the first time I am doing it so we will see how it goes.
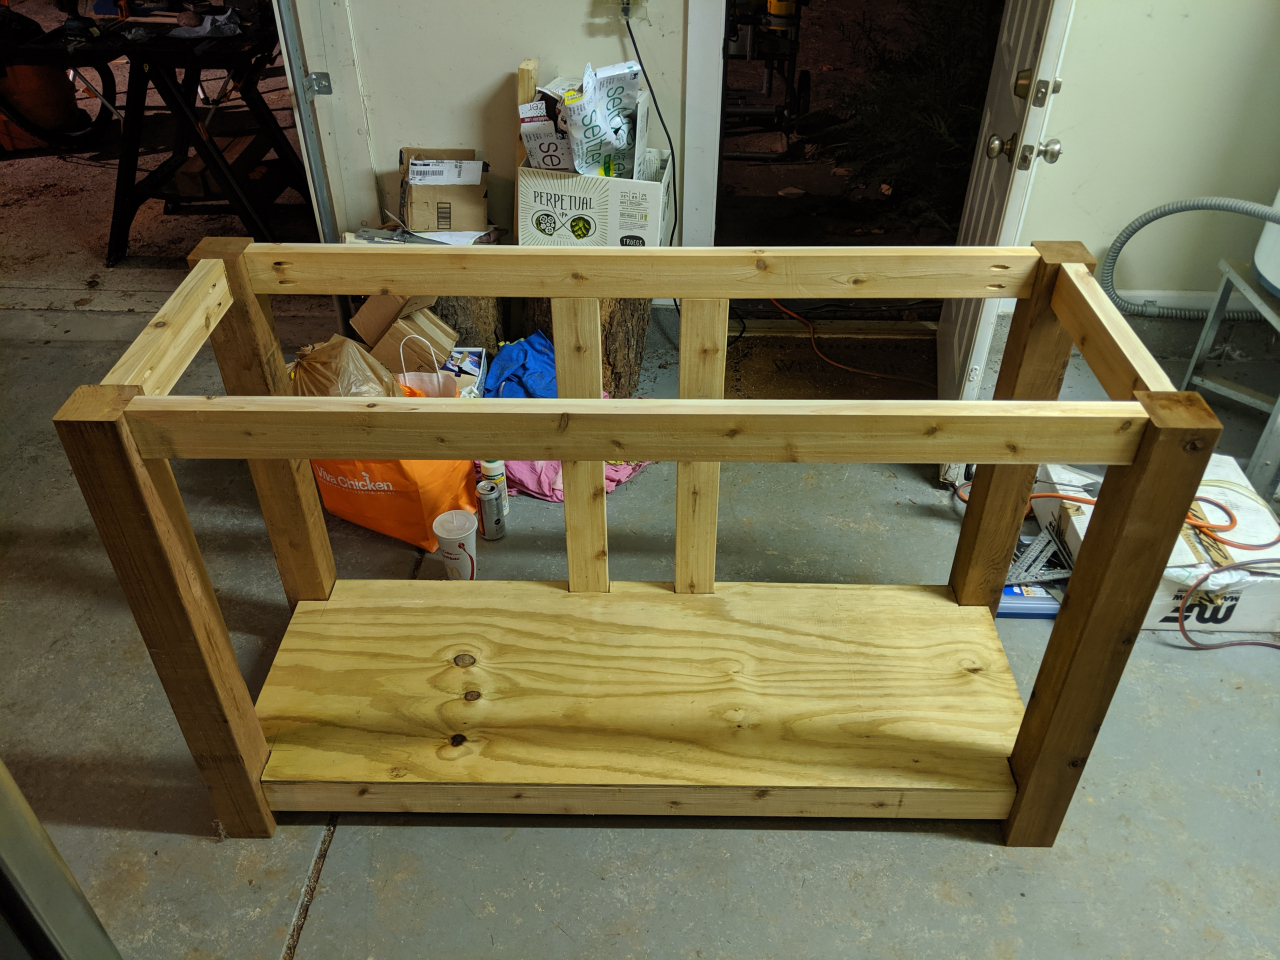
One end finished
The other end finished
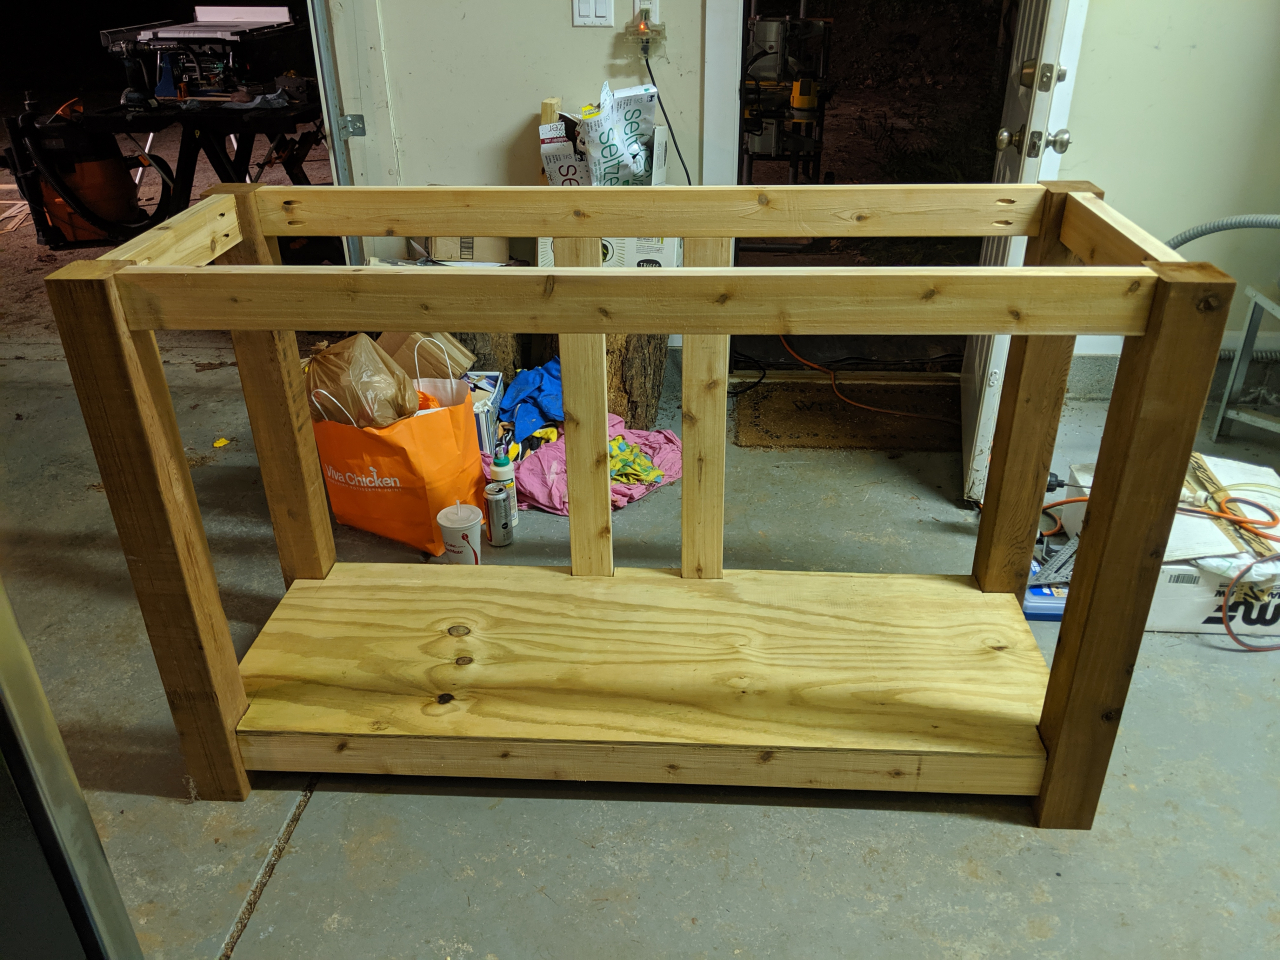
Almost finished connecting the ends together.
Two additional floor braces
These supports are where the base of the lift will bolt to. I plan to use threaded wood lag bolts to bolt it down.
These vertical braces are where the top brackets of the lift will bolt to.
Framing all finished. Tip to notch out the floor panel.
Floor panel all finished. The notches are not super tight so thinking of using either silicon or wood glue mixed with cedar sawdust to fill them up. Called it a night at this point.
I have a very ambitious deadline I am trying to make of finishing it by the end of this coming weekend. We will see how much I can get done. I still have to go buy all the wood for the sides and top yet. I need to figure out how to do my tongue and groove side panels as well. Not sure if I am just going to do tongue and groove on the top and bottom of each board and leave the sides just but up against each other or if I am going to do all four sides. That seems awfully complicated even to me. I also want to chamfer the edges of each board like I did the sides on my egg table so not sure how I would do that with tongue and groove on all sides. If I just but them up against each other I could buy some Tyvek and line the inside of each panel with it to help keep any water out even more.
09-03-2019, 10:25 AM
#817
Ex-OEM King

Instead of T/G you could just glue/screw all the boards on with a ~1/16-1/8 gap in between them and put a black painted tyvek panel behind as the main waterproofing mechanism.
09-03-2019, 12:11 PM
#818
Senior Moderator
Regional Coordinator
(Mid-Atlantic)
Regional Coordinator
(Mid-Atlantic)
iTrader: (6)
 09-03-2019, 12:16 PM
#819
Needs more Lemon Pledge
Damn, looks really nice so far!
What's the largest screen the cabinet will be able to house?
What's the largest screen the cabinet will be able to house?
The following users liked this post:
CCColtsicehockey (09-03-2019)
09-03-2019, 12:40 PM
#820
Moderator
Regional Coordinator (Southeast)
Regional Coordinator (Southeast)
Thread Starter
Join Date: Dec 2003
Location: Mooresville, NC
Age: 38
Posts: 43,628
Received 3,842 Likes
on
2,575 Posts
With all that being said how were you originally recommending the tongue and groove? Just on the top and bottom or on all 4 sides of the vertial slats?
09-03-2019, 12:43 PM
#821
Moderator
Regional Coordinator (Southeast)
Regional Coordinator (Southeast)
Thread Starter
Join Date: Dec 2003
Location: Mooresville, NC
Age: 38
Posts: 43,628
Received 3,842 Likes
on
2,575 Posts
I am hoping as I finish building the cabinet it gets a lot heavier because right now I am worried that if it is Windy out could it blow the cabinet over. the foot print is 62x23in. I won't know if I made it deep enough now for when the TV is extended. Might end up bolting it to the pavers.
The following users liked this post:
97BlackAckCL (09-03-2019)
09-03-2019, 01:35 PM
#823
It is built to hold a 55in TV. It would also be able to hold a 60in as well. I probably should have made it 1-2in bigger and then it could some day have held a 65in which is the max size the lift is capable. The other main issue is weight. The lift can only hold 75lbs including the cabinet top that the lift with also raise up as it will be mounted above the TV.
I am hoping as I finish building the cabinet it gets a lot heavier because right now I am worried that if it is Windy out could it blow the cabinet over. the foot print is 62x23in. I won't know if I made it deep enough now for when the TV is extended. Might end up bolting it to the pavers.
I am hoping as I finish building the cabinet it gets a lot heavier because right now I am worried that if it is Windy out could it blow the cabinet over. the foot print is 62x23in. I won't know if I made it deep enough now for when the TV is extended. Might end up bolting it to the pavers.
09-03-2019, 02:04 PM
#824
Moderator
Regional Coordinator (Southeast)
Regional Coordinator (Southeast)
Thread Starter
Join Date: Dec 2003
Location: Mooresville, NC
Age: 38
Posts: 43,628
Received 3,842 Likes
on
2,575 Posts
That wouldn't be a bad idea. Will depend on what method I go with for getting the conduit through the pavers. If I go with concrete hole saw then I could just cut a few more. If I notch a paver with a corner cut maybe not then.
09-03-2019, 03:44 PM
#825
Senior Moderator
"If the answer involves buying more power tools, that's typically the right answer..."

-Thoiboi
-Thoiboi
The following 4 users liked this post by thoiboi:
00TL-P3.2 (09-03-2019),
97BlackAckCL (09-04-2019),
CCColtsicehockey (09-04-2019),
civicdrivr (09-04-2019)
09-03-2019, 04:20 PM
#826
Ex-OEM King
Can't do that I need to be able to have easy access to the cabinet to fix anything if need be so at a minimum the front needs to be removable. I had planned to make the front and both sides removable originally. With now putting the sides of the frame in the middle of the posts instead of the inside edge of the posts I can't go back and use a single top and bottom board to mount all the vertical pieces to unless I were to put that board on the inside instead of the outside.
With all that being said how were you originally recommending the tongue and groove? Just on the top and bottom or on all 4 sides of the vertial slats?
With all that being said how were you originally recommending the tongue and groove? Just on the top and bottom or on all 4 sides of the vertial slats?
My original recommendation was just top and bottom T/G but that would definitely not have been waterproof.
The following users liked this post:
CCColtsicehockey (09-04-2019)
09-04-2019, 07:02 AM
#827
Moderator
Regional Coordinator (Southeast)
Regional Coordinator (Southeast)
Thread Starter
Join Date: Dec 2003
Location: Mooresville, NC
Age: 38
Posts: 43,628
Received 3,842 Likes
on
2,575 Posts
Your not going to get any arguement from me on that. I always love an excuse to add new tools. Almost tried to justify a planner into this project cost but decided I was already going over budget enough.
09-04-2019, 07:17 AM
#828
Moderator
Regional Coordinator (Southeast)
Regional Coordinator (Southeast)
Thread Starter
Join Date: Dec 2003
Location: Mooresville, NC
Age: 38
Posts: 43,628
Received 3,842 Likes
on
2,575 Posts
Yeah it won't be fully waterproof but won't be any worse than my egg table since those are just butted together as well. Only difference there I think is since they are screwed in they can't move as much as tongue and groove would allow.
Would tongue and groove on all 4 sides of the slats be that much better than just stapling tyvek to the inside of the panels?
Also as far as clamps go was looking at one of these two sets. The one has rubber covers don't know if that matters or I can just use small pieces of wood probably to protect the surface.
https://www.lowes.com/pd/IRWIN-1-2-i...amp/1000235631
That basically lets me have 3 48in clamps for $60. Is 3 enough for a 63in top or do I need a 4th?
Also is something like this that much better than those pipe clamps? https://www.lowes.com/pd/IRWIN-48-in...amp/1000235609
This also looked like the best tongue and groove bit set without spending a small fortune.
09-04-2019, 07:33 AM
#829
Moderator
Regional Coordinator (Southeast)
Regional Coordinator (Southeast)
Thread Starter
Join Date: Dec 2003
Location: Mooresville, NC
Age: 38
Posts: 43,628
Received 3,842 Likes
on
2,575 Posts
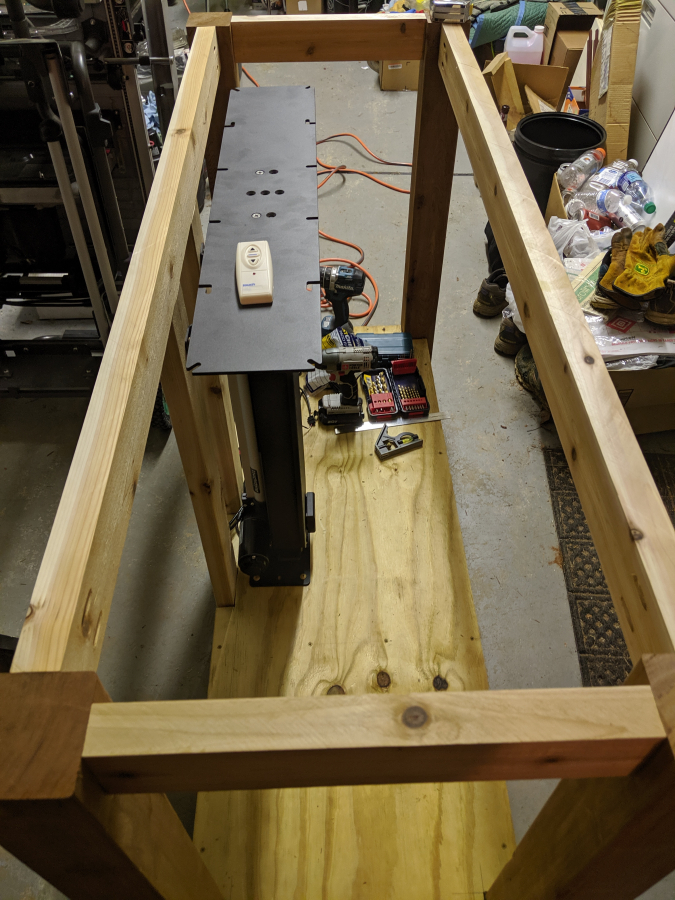
So didn't get a whole lot done last night. At least not as much as I would have liked. I was able to get the floor glued and screwed down to the frame as well as getting the lift installed. I had hoped to get the vertical sheet of plywood installed on the right hand side of the lift where I will mount all the electronics to but that didn't happen.
Waterproof woodglue all over the place
Screwed down in addition to the glue
Lining up the lift

I used these lag screws same as the ones I used to hold the feet on my egg table. Think 6 of them should be more than enough to hold the lift in place. Although I have thought of getting some stainless tee nuts and bolts to hold the vertical part in place.

Mounted in place. I know it isn't centered but that is the way most of the installation pictures show it on the companies site and a few of those are lifting stone or tile lids so can't imagine my wood lid will be any heavier to hold offcenter.
I hate vertical filmed video clips but I couldn't get far enough back in the garage to record this going up
Waterproof woodglue all over the place
Screwed down in addition to the glue
Lining up the lift
I used these lag screws same as the ones I used to hold the feet on my egg table. Think 6 of them should be more than enough to hold the lift in place. Although I have thought of getting some stainless tee nuts and bolts to hold the vertical part in place.
Mounted in place. I know it isn't centered but that is the way most of the installation pictures show it on the companies site and a few of those are lifting stone or tile lids so can't imagine my wood lid will be any heavier to hold offcenter.
I hate vertical filmed video clips but I couldn't get far enough back in the garage to record this going up
The following 2 users liked this post by CCColtsicehockey:
00TL-P3.2 (09-04-2019),
97BlackAckCL (09-04-2019)
09-04-2019, 09:22 AM
#830
Senior Moderator
Regional Coordinator
(Mid-Atlantic)
Regional Coordinator
(Mid-Atlantic)
iTrader: (6)
Dude, this is awesome. Nice to see it coming together
09-04-2019, 09:33 AM
#831
Moderator
Looking good.
I 2nd the earlier recommendation to anchor it to the ground somehow. I imagine that TV will be like a sail in anything more than a light breeze.
I 2nd the earlier recommendation to anchor it to the ground somehow. I imagine that TV will be like a sail in anything more than a light breeze.
09-04-2019, 09:40 AM
#832
Moderator
Regional Coordinator (Southeast)
Regional Coordinator (Southeast)
Thread Starter
Join Date: Dec 2003
Location: Mooresville, NC
Age: 38
Posts: 43,628
Received 3,842 Likes
on
2,575 Posts
Thanks bud.
Just ordered the last remaining things I need besides the wood for the sides and top. Thanks to Amazon should have it all tomorrow. Will finally be able to start putting all the electronics in place tomorrow once everything arrives.
Last thing to figure out is some stainless steel furniture bolts to hold the sides on. I think I am going to use tee nuts on the inside of the 2x4s. Four bolts for the end panels and 6 bolts for the front panel. The back panel I will screw on from inside as I don't plan on removing it.
Been looking for something like this but can't find anything long enough. Needs to be about 2-2.5in long.
or this

Also, thinking that just maybe come lag bolts with a but head and a washer and give it a more rustic rather than finished look.
Just ordered the last remaining things I need besides the wood for the sides and top. Thanks to Amazon should have it all tomorrow. Will finally be able to start putting all the electronics in place tomorrow once everything arrives.
Last thing to figure out is some stainless steel furniture bolts to hold the sides on. I think I am going to use tee nuts on the inside of the 2x4s. Four bolts for the end panels and 6 bolts for the front panel. The back panel I will screw on from inside as I don't plan on removing it.
Been looking for something like this but can't find anything long enough. Needs to be about 2-2.5in long.
or this
Also, thinking that just maybe come lag bolts with a but head and a washer and give it a more rustic rather than finished look.
The following users liked this post:
97BlackAckCL (09-04-2019)
09-04-2019, 09:54 AM
#833
Ex-OEM King
Yeah I want something nicer looking that just plywood for the sides that is why I want to do vertical boards trimmed out.
Yeah it won't be fully waterproof but won't be any worse than my egg table since those are just butted together as well. Only difference there I think is since they are screwed in they can't move as much as tongue and groove would allow.
Would tongue and groove on all 4 sides of the slats be that much better than just stapling tyvek to the inside of the panels?
Also as far as clamps go was looking at one of these two sets. The one has rubber covers don't know if that matters or I can just use small pieces of wood probably to protect the surface.
https://www.amazon.com/Bessey-BPC-H1...mp%2Caps%2C169
https://www.lowes.com/pd/IRWIN-1-2-i...amp/1000235631
That basically lets me have 3 48in clamps for $60. Is 3 enough for a 63in top or do I need a 4th?
Also is something like this that much better than those pipe clamps? https://www.lowes.com/pd/IRWIN-48-in...amp/1000235609
This also looked like the best tongue and groove bit set without spending a small fortune. https://www.amazon.com/Freud-Adjusta...s%2C183&sr=8-3
I'd honestly just do pipe clamps. Parallel clamps are what you see all the high end woodworkers using but many of them are sponsored and get them for free. I personally only use pipe clamps and they are just fine for all my purposes. Also, you can just swap pipes which are much cheaper than getting a whole different clamp for a different desired length. You for sure need 4 clamps. Whenever gluing up a top you want to alternate clamps up and down to avoid the set up from bowing. Alternating clamps will do that for you. This reminds me I need to buy some more clamps...
Don't do T/G with a router, setting those up is a total nightmare. Look into making a tenoning jig for your table saw and go that route. Much faster and cheaper. The time to do T/G with a router is if you're doing really long lengths like floor boards.
Edit: Don't do lag bolts, the other ones you posted are a LOT more polished looking. I'll be on here criticizing your fastener choice all day if you go lag bolts.
If you can't find what you're looking for on Amazon, try McMaster Carr, they sell literally every fastener ever invented by mankind.
Last edited by SamDoe1; 09-04-2019 at 09:58 AM.
09-04-2019, 10:21 AM
#834
Moderator
Regional Coordinator (Southeast)
Regional Coordinator (Southeast)
Thread Starter
Join Date: Dec 2003
Location: Mooresville, NC
Age: 38
Posts: 43,628
Received 3,842 Likes
on
2,575 Posts
ah sorry, i don't think i explained it right. What i was saying is get some exterior (or tyvek lined) plywood, paint it black, and glue/screw your cedar boards to that without doing t/g. You still get the exterior appearance of the vertical cedar boards but don't have to do all the joinery and get a more waterproof set up as well. You can make this entire panel removable and it'll look just like if you t/g'ed it into the thing permanently.
unfortunately we are past chance for this idea cause i already build the frame with only space for a panel thickness of 11/16 now so too late to change back to the original panel thickness of double that. For better or for worse i am committed at this point to the t/g panels. The only way to go back the other way would be to not have any edge board and only vertical slats and point the connecting boards above the floor and below the top cross piece on the insides. This though would then put all the force holding the panels onto the ends of only 3 boards essentially which doesn't seem great to me.
i'd honestly just do pipe clamps. Parallel clamps are what you see all the high end woodworkers using but many of them are sponsored and get them for free. I personally only use pipe clamps and they are just fine for all my purposes. Also, you can just swap pipes which are much cheaper than getting a whole different clamp for a different desired length. You for sure need 4 clamps. Whenever gluing up a top you want to alternate clamps up and down to avoid the set up from bowing. Alternating clamps will do that for you. This reminds me i need to buy some more clamps...
went with 3 pipe clamps in 3/4in size since they seem better from reviews than 1/2in. Sounds like i might need to order a 4th one then. I did choose the bessey ones over the ones at lowe's since they have feet on them and the rubber covers.
don't do t/g with a router, setting those up is a total nightmare. Look into making a tenoning jig for your table saw and go that route. Much faster and cheaper. The time to do t/g with a router is if you're doing really long lengths like floor boards.
wouldn't you have to do multiple passes on the table saw for that though? I don't have a dado bit as i had borrowed the one i used before from a neighbor and he has since moved. Is it still a pain to do on the router even with a router table?
edit: Don't do lag bolts, the other ones you posted are a lot more polished looking. I'll be on here criticizing your fastener choice all day if you go lag bolts. If you can't find what you're looking for on amazon, try mcmaster carr, they sell literally every fastener ever invented by mankind.
yeah i know lag bolts are a bad look. Will only do them if i have too temporarily. Did find these in 55mm which is basicall the exact thickness of the 1x4 on top of the 2x4. https://www.amazon.com/do4u-stainles...ay&sr=8-4&th=1 the tee nut will be set in a little bit too so they should be perfect.
unfortunately we are past chance for this idea cause i already build the frame with only space for a panel thickness of 11/16 now so too late to change back to the original panel thickness of double that. For better or for worse i am committed at this point to the t/g panels. The only way to go back the other way would be to not have any edge board and only vertical slats and point the connecting boards above the floor and below the top cross piece on the insides. This though would then put all the force holding the panels onto the ends of only 3 boards essentially which doesn't seem great to me.
i'd honestly just do pipe clamps. Parallel clamps are what you see all the high end woodworkers using but many of them are sponsored and get them for free. I personally only use pipe clamps and they are just fine for all my purposes. Also, you can just swap pipes which are much cheaper than getting a whole different clamp for a different desired length. You for sure need 4 clamps. Whenever gluing up a top you want to alternate clamps up and down to avoid the set up from bowing. Alternating clamps will do that for you. This reminds me i need to buy some more clamps...
went with 3 pipe clamps in 3/4in size since they seem better from reviews than 1/2in. Sounds like i might need to order a 4th one then. I did choose the bessey ones over the ones at lowe's since they have feet on them and the rubber covers.
don't do t/g with a router, setting those up is a total nightmare. Look into making a tenoning jig for your table saw and go that route. Much faster and cheaper. The time to do t/g with a router is if you're doing really long lengths like floor boards.
wouldn't you have to do multiple passes on the table saw for that though? I don't have a dado bit as i had borrowed the one i used before from a neighbor and he has since moved. Is it still a pain to do on the router even with a router table?
edit: Don't do lag bolts, the other ones you posted are a lot more polished looking. I'll be on here criticizing your fastener choice all day if you go lag bolts.
If you can't find what you're looking for on amazon, try mcmaster carr, they sell literally every fastener ever invented by mankind.yeah i know lag bolts are a bad look. Will only do them if i have too temporarily. Did find these in 55mm which is basicall the exact thickness of the 1x4 on top of the 2x4. https://www.amazon.com/do4u-stainles...ay&sr=8-4&th=1 the tee nut will be set in a little bit too so they should be perfect.
09-04-2019, 10:45 AM
#836
Moderator
Regional Coordinator (Southeast)
Regional Coordinator (Southeast)
Thread Starter
Join Date: Dec 2003
Location: Mooresville, NC
Age: 38
Posts: 43,628
Received 3,842 Likes
on
2,575 Posts
Yeah I am thinking about changing the two on the back to lag bolts instead of screws. I think the bottom ones should be fine.
09-04-2019, 10:46 AM
#837
Ex-OEM King
Wood is a lot stronger than you think. Also, this thing isn't going to be all that structural, it's a box to hold a TV so I think you might be over-engineering the thing. If you're committed to T/G then go for it.
Those are the clamps I have and love them. I need to buy more though. The number of clamps you need for any given project is one more than the number you have.
You can get a dado stack for not a lot more than that T/G bit set and use it for a lot more things in the future. I'd go that route personally. Also, yes you'd need to do multiple passes but you can set it up such that you do one pass, flip the board, and do another to get the full groove width. For the tongue, it'll take a couple passes but you can set it up, run all of the boards, adjust fence, and run them all again.
Make sure you put a dab of super glue or epoxy on the outer threads of that t-nut to make sure it holds in place through the seasons.
09-04-2019, 11:20 AM
#839
Senior Moderator
+1 on lag bolts instead of screws..
09-04-2019, 01:00 PM
#840
Moderator
Regional Coordinator (Southeast)
Regional Coordinator (Southeast)
Thread Starter
Join Date: Dec 2003
Location: Mooresville, NC
Age: 38
Posts: 43,628
Received 3,842 Likes
on
2,575 Posts

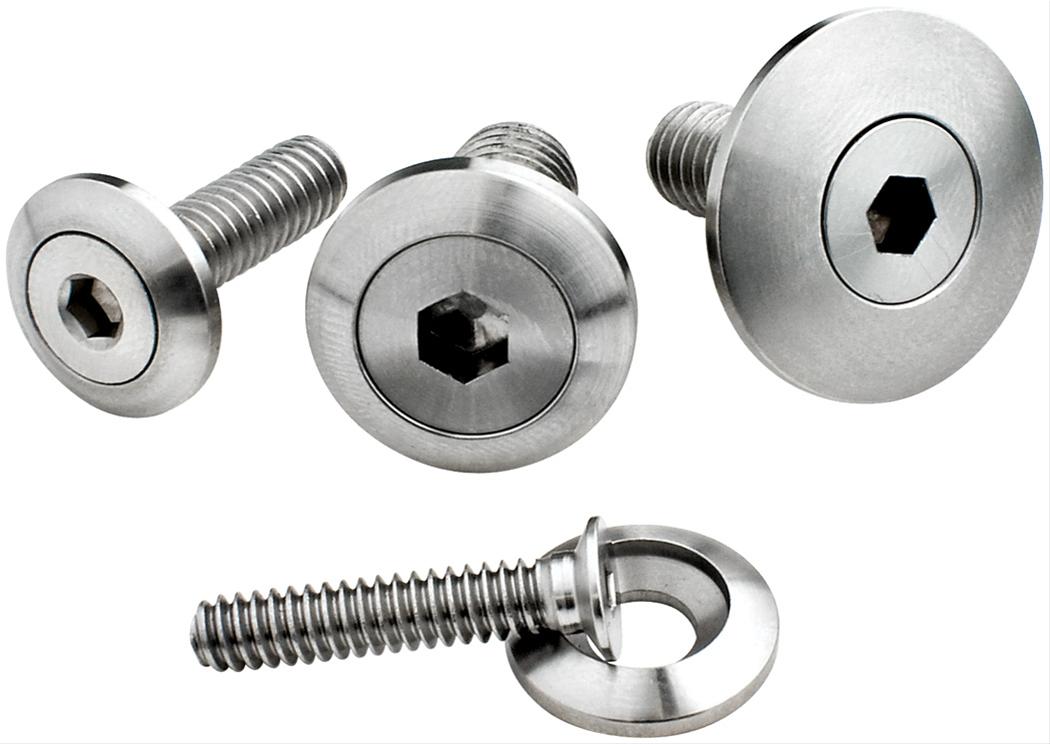
You don't think these lag screws will work?
