
CCColtsicehockey's Home Projects Thread


Ex-OEM King


Joined: Dec 2013
Posts: 17,880
Likes: 7,027
From: Minnesnowta
Still not sure why building the TV box a bit bigger and hanging the speakers either on the lift mechanism or on the side of the box would be a bad idea. Seems like this is more complicated than it needs to be.
Either that or just get some rock speakers, its not like you're going for audiophile sound outdoors.
Either that or just get some rock speakers, its not like you're going for audiophile sound outdoors.
Thread Starter
Moderator
Regional Coordinator (Southeast)
Regional Coordinator (Southeast)


Joined: Dec 2003
Posts: 44,123
Likes: 4,434
From: Mooresville, NC
Still not sure why building the TV box a bit bigger and hanging the speakers either on the lift mechanism or on the side of the box would be a bad idea. Seems like this is more complicated than it needs to be.
Either that or just get some rock speakers, its not like you're going for audiophile sound outdoors.
Either that or just get some rock speakers, its not like you're going for audiophile sound outdoors.
Null and proud of it
Joined: Mar 2016
Posts: 10,385
Likes: 904
From: Metairie, LA
Crazy idea!
But what if you got an old, rustic pickup truck, and created an entertainment center in the truck bed and have a roll-around TV stand!
Then just park it in the barn/shed when you're done!
But what if you got an old, rustic pickup truck, and created an entertainment center in the truck bed and have a roll-around TV stand!
Then just park it in the barn/shed when you're done!
Joined: Jan 2005
Posts: 92,773
Likes: 4,687
From: ShitsBurgh
Still not sure why building the TV box a bit bigger and hanging the speakers either on the lift mechanism or on the side of the box would be a bad idea. Seems like this is more complicated than it needs to be.
Either that or just get some rock speakers, its not like you're going for audiophile sound outdoors.
Either that or just get some rock speakers, its not like you're going for audiophile sound outdoors.
Ex-OEM King
Joined: Dec 2013
Posts: 17,880
Likes: 7,027
From: Minnesnowta
I think mounting the speakers on the side of a cabinet height box would look terrible. I don't want this to just be functional but actually look good as well. Since the speakers were past the return date I mounted them anyways for now but long term the best scenario might just be to switch to rock speakers so nothing else other than the TV lift is needed. The lift mechanism can only lift 100lbs so between the TV weight and the weight of the lid I think I will already be close to the weight limit. Also putting the speakers in as part of the lift means I have to open the lift even if just wanting to listen to music instead of watching TV.


Thread Starter
Moderator
Regional Coordinator (Southeast)
Regional Coordinator (Southeast)
Joined: Dec 2003
Posts: 44,123
Likes: 4,434
From: Mooresville, NC
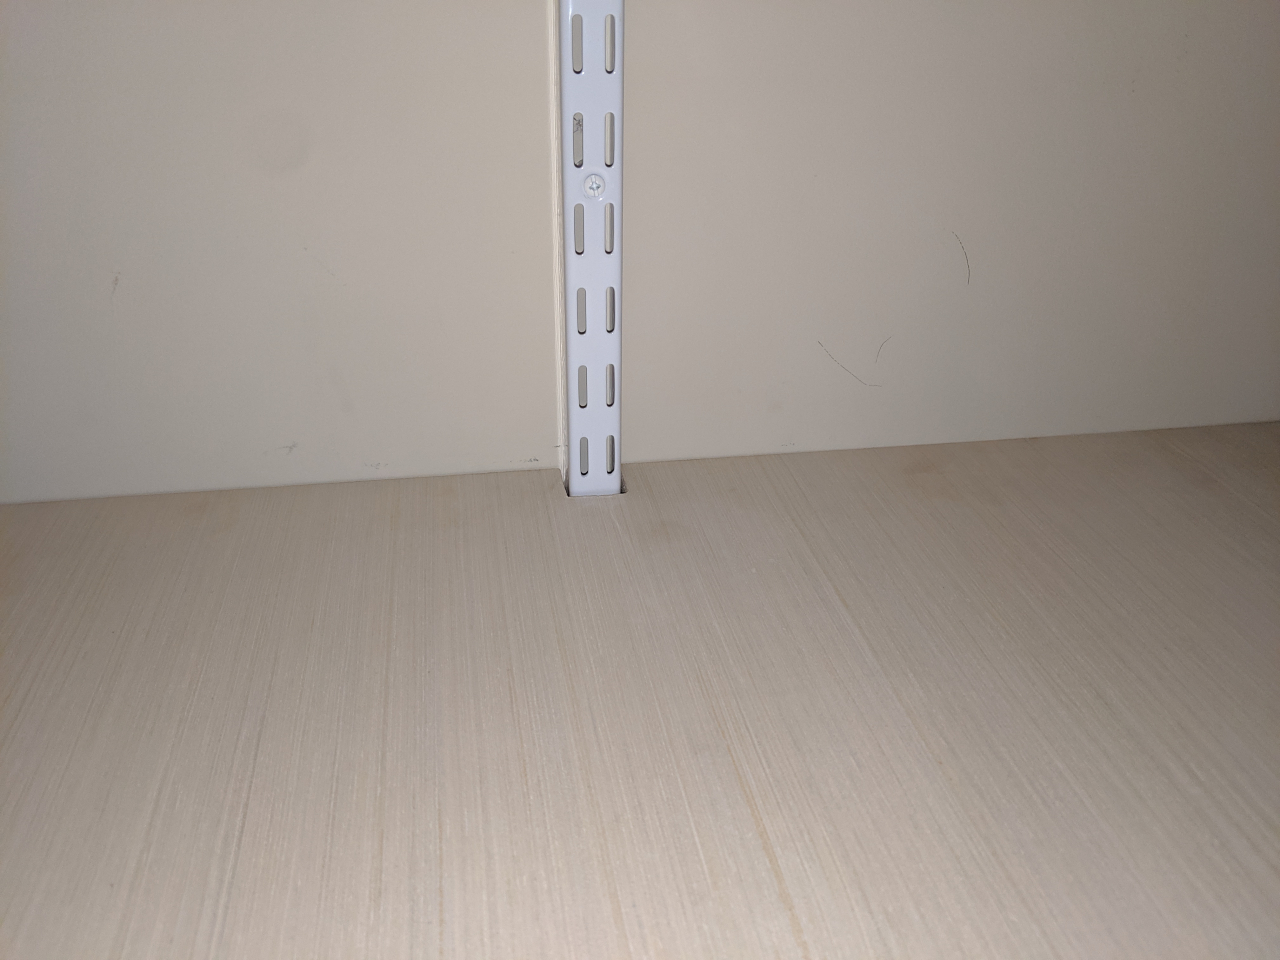
So needed to organizer my beer stash to make it easier to find things so I could actually drink it rather than let it collect dust in boxes. Tried doing the shelf liners with thick cardboard but that failed. So 1/2 white ash plywood it was.
Cardboard sagging


Once the sheets were cut to size I notched around the support and then used a router to cut 3/16 deep channels so the panels laid directly on the wire shelf and not just the 3 supports.
[img][http://jrphotodesign.net/public_phot...71109.jpg/img]


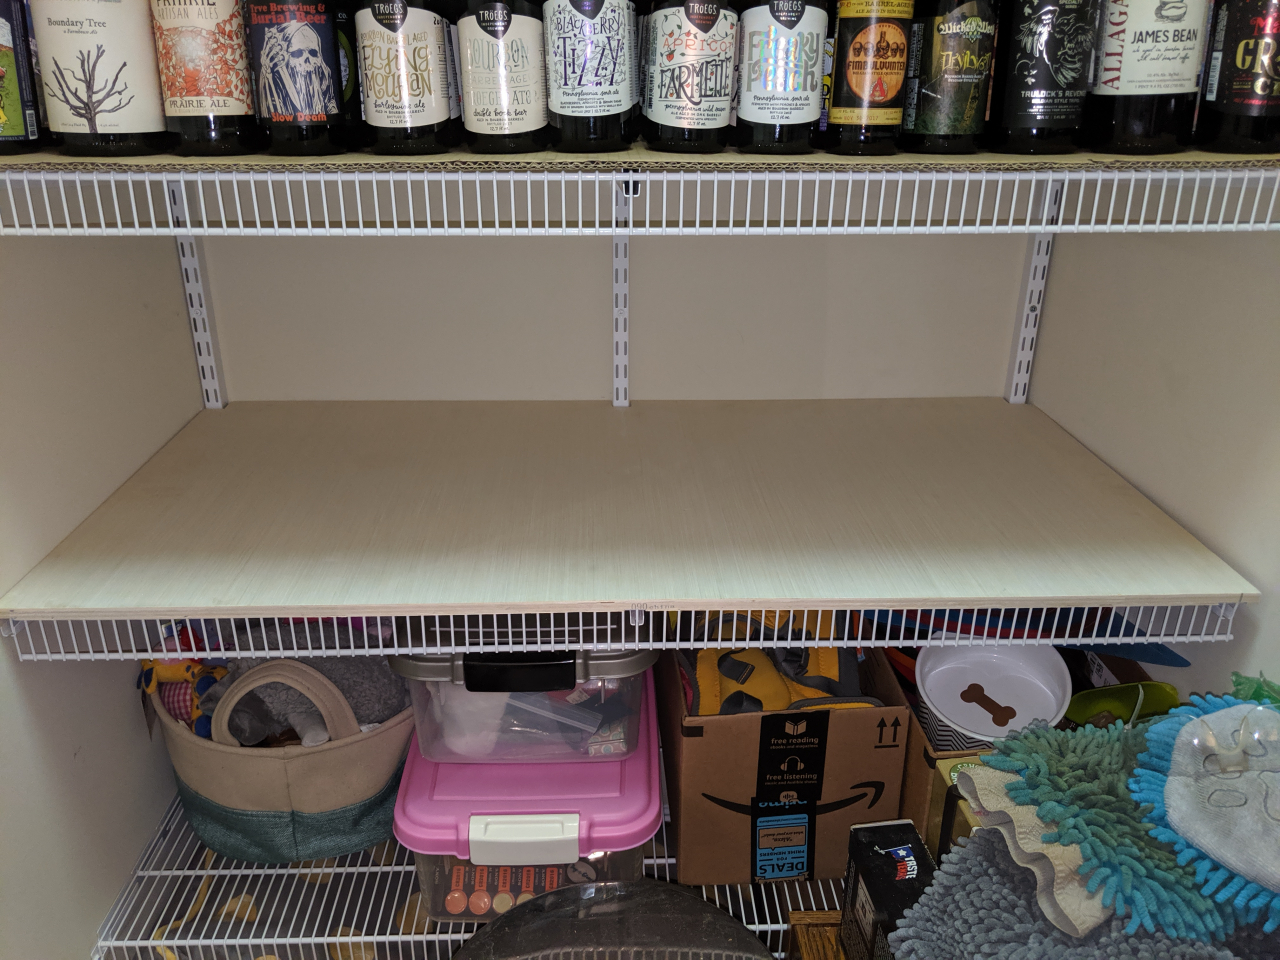
Comparison to the cardboard

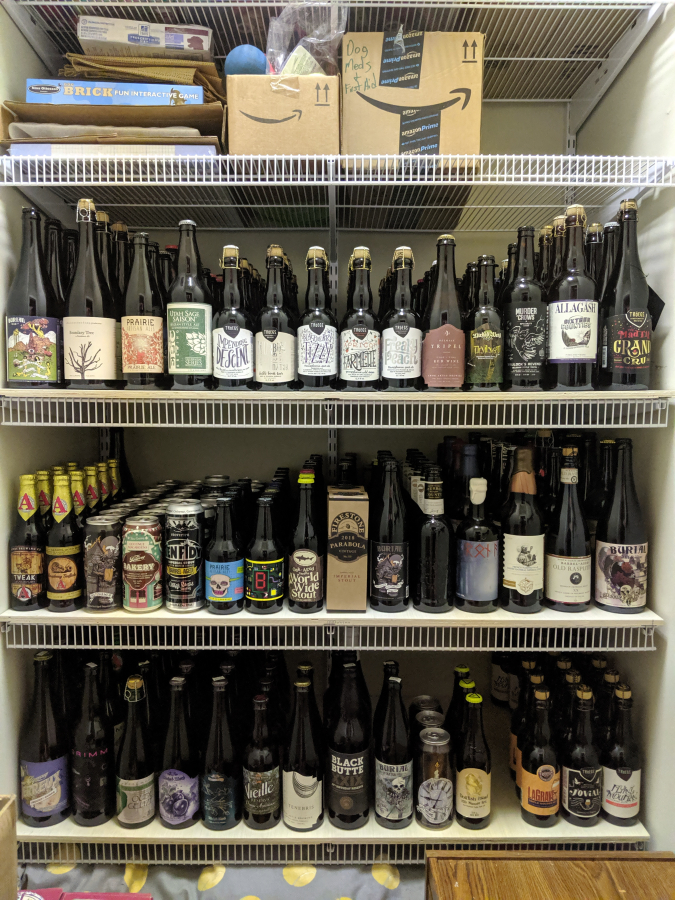
Completed and filled
Cardboard sagging
Once the sheets were cut to size I notched around the support and then used a router to cut 3/16 deep channels so the panels laid directly on the wire shelf and not just the 3 supports.
[img][http://jrphotodesign.net/public_phot...71109.jpg/img]
Comparison to the cardboard
Completed and filled
Joined: Sep 2008
Posts: 78,249
Likes: 20,202
Shit, now you need a decorative facade to nail into that top board!
Gorgeous work and your beers are safe!
I often wonder if your dogs end up with hydrogen peroxide and you end up taking tick medication by accident.
Gorgeous work and your beers are safe!
I often wonder if your dogs end up with hydrogen peroxide and you end up taking tick medication by accident.
Senior Moderator

Joined: Apr 2010
Posts: 48,313
Likes: 9,177
From: SoCal, CA


Ex-OEM King
Joined: Dec 2013
Posts: 17,880
Likes: 7,027
From: Minnesnowta

Nice work!
Thread Starter
Moderator
Regional Coordinator (Southeast)
Regional Coordinator (Southeast)
Joined: Dec 2003
Posts: 44,123
Likes: 4,434
From: Mooresville, NC
Holy crap that stuff is expensive. Definitely not worth it for some beer shelves. I will just get some wood and a little glue to trim it out if I end up even bothering with it. I can even move the air compressor into the house if I want to use a few trim nails.


Thread Starter
Moderator
Regional Coordinator (Southeast)
Regional Coordinator (Southeast)
Joined: Dec 2003
Posts: 44,123
Likes: 4,434
From: Mooresville, NC

Thread Starter
Moderator
Regional Coordinator (Southeast)
Regional Coordinator (Southeast)
Joined: Dec 2003
Posts: 44,123
Likes: 4,434
From: Mooresville, NC
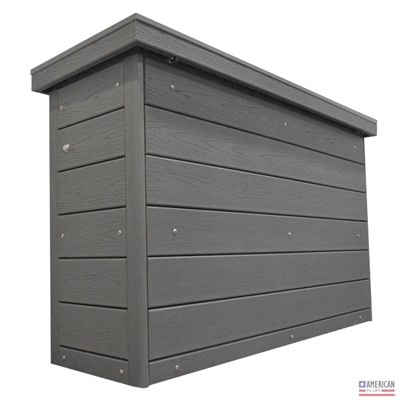
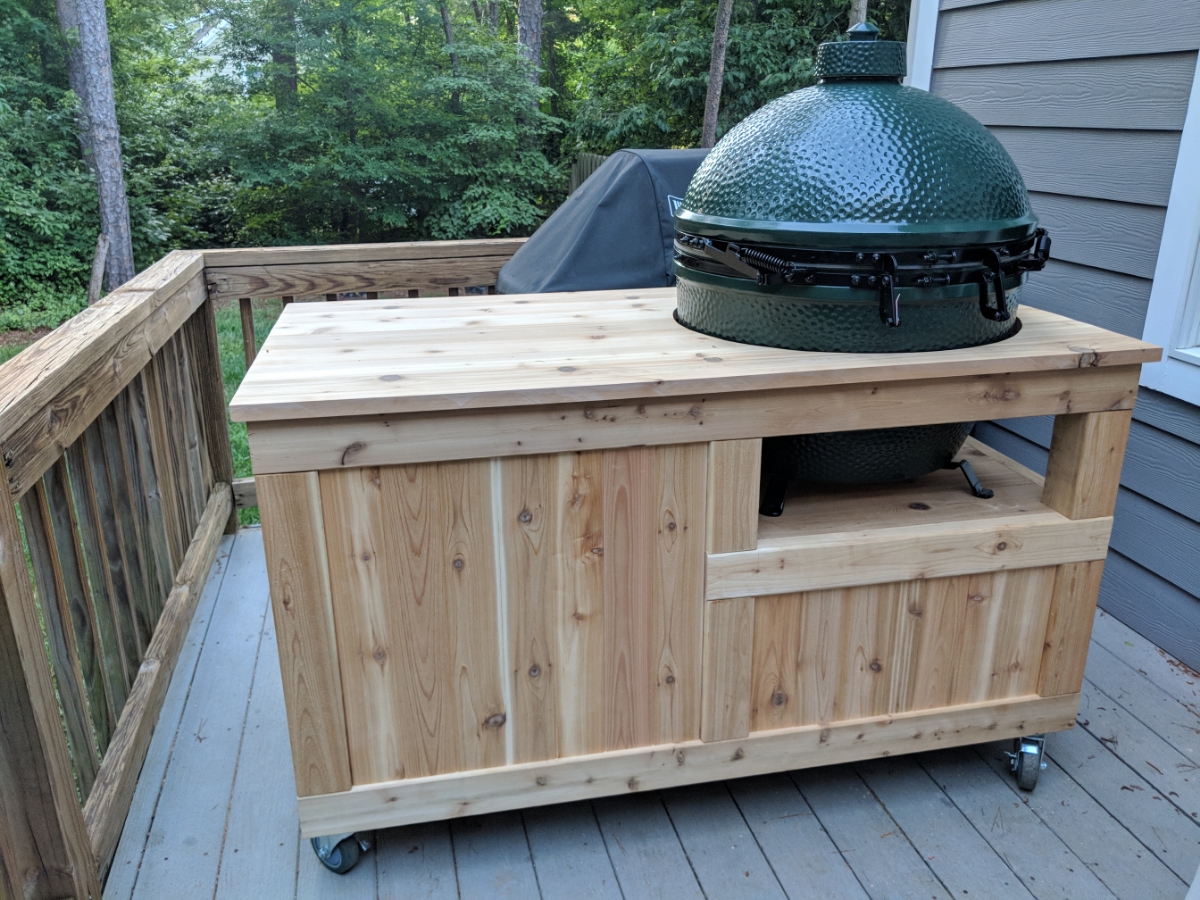
So I have finally decided a lift cabinet is definitely the way to go for this. I will be building a cedar enclosure similar to this shape but with more of a look like this deck box.
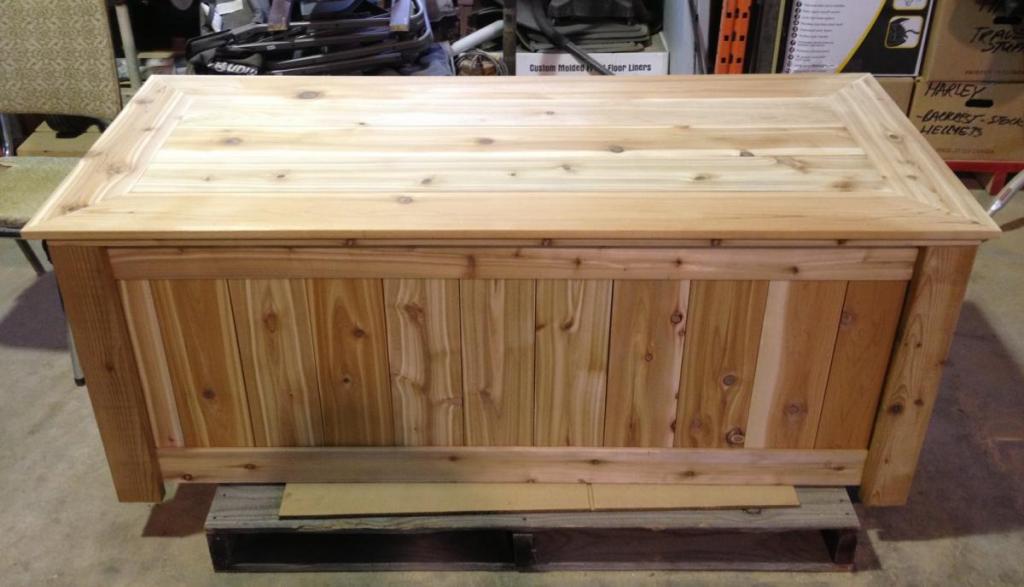
I will be making it 62x24x40. It will have 2in legs on the bottom to keep it off the ground. I think to start I will just level up 4 12x12 or 18x18 pavers for the corner legs to sit on. Will make a second part of the project to build a small pergola over the top of it to mount my speakers on. The top will also be different than that deck box because I don't use miter joints as I would be concerned they will separate. I will just glue together 5/4 x 6in deck boards that I will trim down to 4in wide to make a 62x24in top. Everything will be screwed and glued together with Titebond III due to being exposed always to the weather. Not sure if I will both with even having a cover made for the final product either. Had hoped I would have finalized this sooner so I could have bought the wood ahead of time to let it dry out first. Don't think I will get to start on it till September now so I can let the wood sit in the garage for 2 weeks first to try and prevent cracking like I ended up with on my Green Egg table.
Finishing up my more detailed drawings hopefully later on today but the gist of it will be 4x4 cedar posts with 2x4 beams between. I will put it all together with my Kreg jig and Titebond III. The total supported weight will only be about 100lbs in the in the middle so I think the outer 4 legs should be enough to support the weight. Don't think I will need to have center supports. If I end up needing them I will probably add then on rather than putting a set of center posts.
Thread Starter
Moderator
Regional Coordinator (Southeast)
Regional Coordinator (Southeast)
Joined: Dec 2003
Posts: 44,123
Likes: 4,434
From: Mooresville, NC
Spent yesterday putting together the design drawlings in SketchUp. I normally do this stuff by hand but wanted to try modeling it for once. It definitely has a bit of a learning curve and took longer than I expected but overall came out pretty good. Not everything I was able to get exactly lined up perfect and things like being off by 1/16 of an inch in places but it at least allows you to put your own measurement numbers in place after using the measure tool for when I dimension it for the building plans.
Frame

Inside Floor

Back Panel - Most likely will be making the back panel attached permanently to the frame.

Side Panels - The sides and front panels I plan to make easily removable. The current thought is to use nut sets in the frame. I would use 4 bolts to hold on each side and 6 or 8 to hold on the front. This would allow easy access into the enclosure should I ever need to work on the electronics inside.
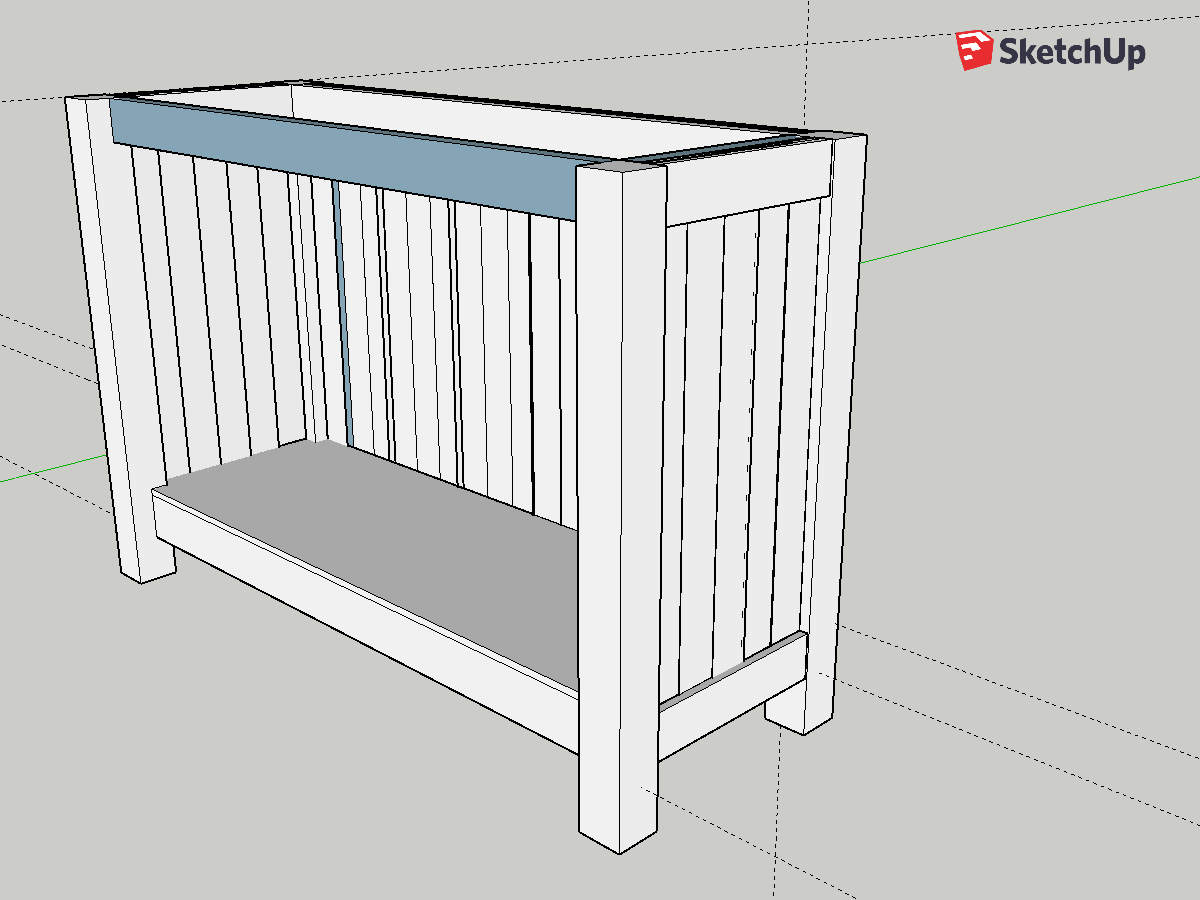
Front Panel

.png)
Enclosure fully together

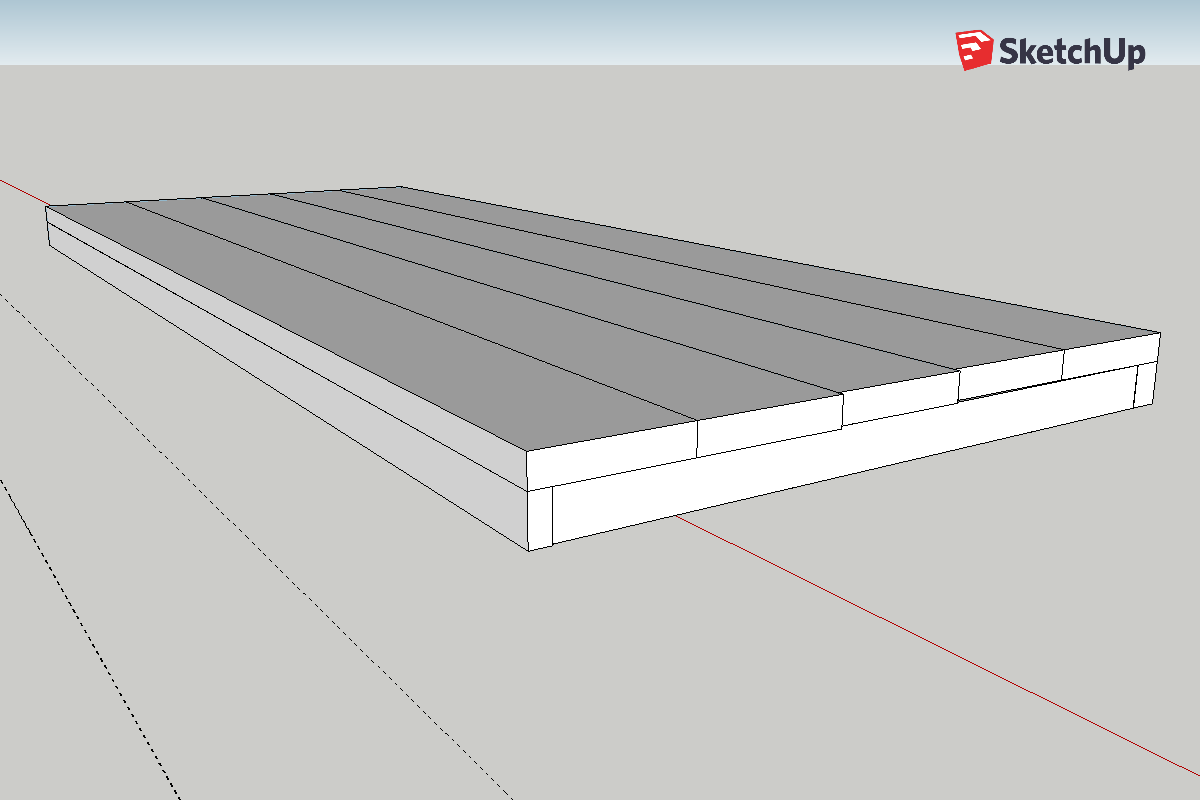
Lid - The top of the lid will be made with 5/4 Deck boards so that it is extra sturdy and can be used as a countertop if the TV is not being used. I will make them into one solid panel before adding the side trim to it.
.png)
Complete Enclosure - Closed
.png)
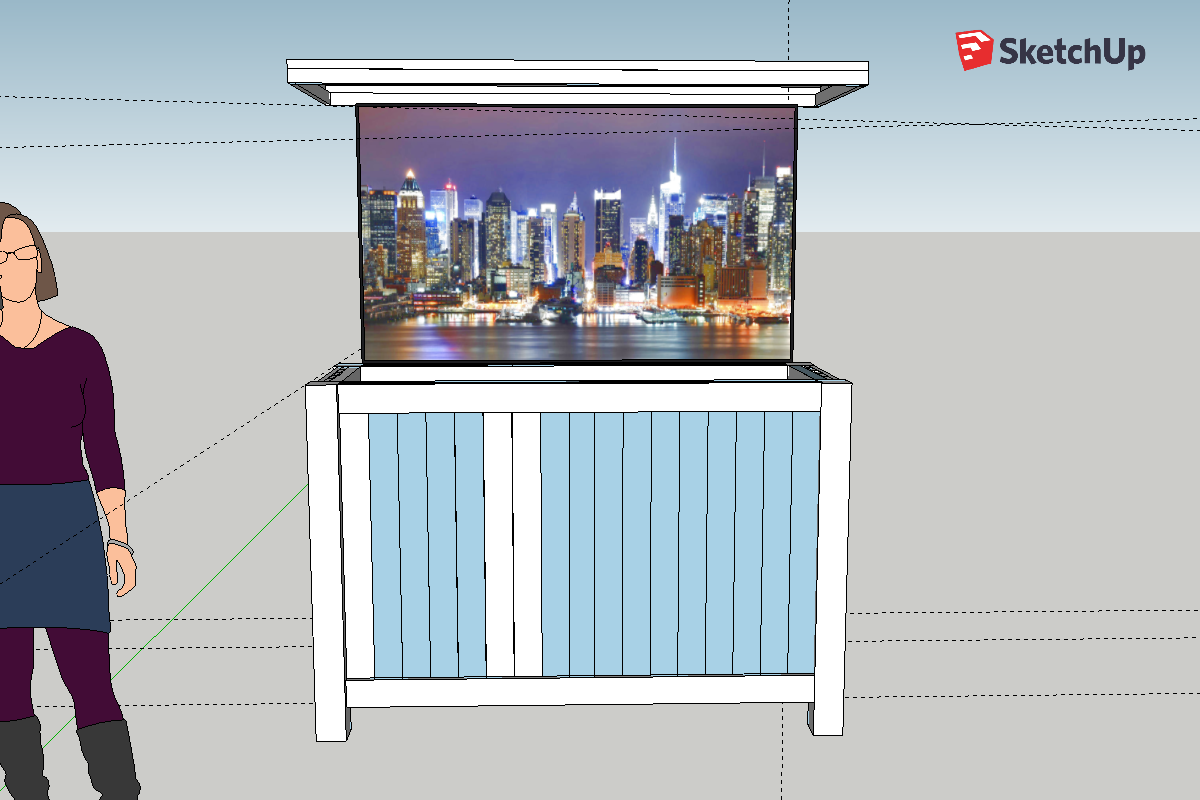
Complete Enclosure - Open
.png)
.png)
I have not yet figured a way to model the actual TV lift into the program. There are some that people have already modeled that I can use in the closed position for layout the inside wiring in the cabinet but can't find any that have been done for when the lift is up. I may just end up roughly drawing that just for visual.
Frame
Inside Floor
Back Panel - Most likely will be making the back panel attached permanently to the frame.
Side Panels - The sides and front panels I plan to make easily removable. The current thought is to use nut sets in the frame. I would use 4 bolts to hold on each side and 6 or 8 to hold on the front. This would allow easy access into the enclosure should I ever need to work on the electronics inside.
Front Panel
Enclosure fully together
Lid - The top of the lid will be made with 5/4 Deck boards so that it is extra sturdy and can be used as a countertop if the TV is not being used. I will make them into one solid panel before adding the side trim to it.
Complete Enclosure - Closed
Complete Enclosure - Open
I have not yet figured a way to model the actual TV lift into the program. There are some that people have already modeled that I can use in the closed position for layout the inside wiring in the cabinet but can't find any that have been done for when the lift is up. I may just end up roughly drawing that just for visual.

Thread Starter
Moderator
Regional Coordinator (Southeast)
Regional Coordinator (Southeast)
Joined: Dec 2003
Posts: 44,123
Likes: 4,434
From: Mooresville, NC
How did I guess that would be the first comment. It is something SketchUp puts in your drawings. I didn't look around to see if I could turn it off or not in the free version.


Ex-OEM King
Joined: Dec 2013
Posts: 17,880
Likes: 7,027
From: Minnesnowta
Love the look of this man, it'll definitely be cool when it's done.
Couple thoughts/advice for when you make this though...
- You seriously need to consider and plan for wood movement. This thing is going to be outside and go through all kinds of temperature and humidity swings and the wood WILL move. If you glue/screw this whole thing together, it's going to want to split itself apart really fast.
- For the side panels, you'll likely need to do a tongue and groove design to factor in wood movement.
- Are you intending for this to be waterproof or just a cover? If waterproof, then wood movement is even more of a thing to consider because you'll need to find a way to seal gaps that need to be there for the wood to move.
- When you join the top slats to the frame underneath, use figure 8 fasteners to mitigate wood movement. You can get them for cheap on amazon and they are easy to install.
- Instead of doing 4x4 cedar posts ($$$$$) just use two 1x4's joined together in an L shape to fake the look. It'll be plenty strong.
- 100lbs is nothing, if you're building this with 2x4's and 4x4's you could probably park your car on this thing and it would be fine. No need for a center support.
Excited to see this get built!
Thread Starter
Moderator
Regional Coordinator (Southeast)
Regional Coordinator (Southeast)
Joined: Dec 2003
Posts: 44,123
Likes: 4,434
From: Mooresville, NC
Love the look of this man, it'll definitely be cool when it's done.
Couple thoughts/advice for when you make this though...
- You seriously need to consider and plan for wood movement. This thing is going to be outside and go through all kinds of temperature and humidity swings and the wood WILL move. If you glue/screw this whole thing together, it's going to want to split itself apart really fast.
- For the side panels, you'll likely need to do a tongue and groove design to factor in wood movement.
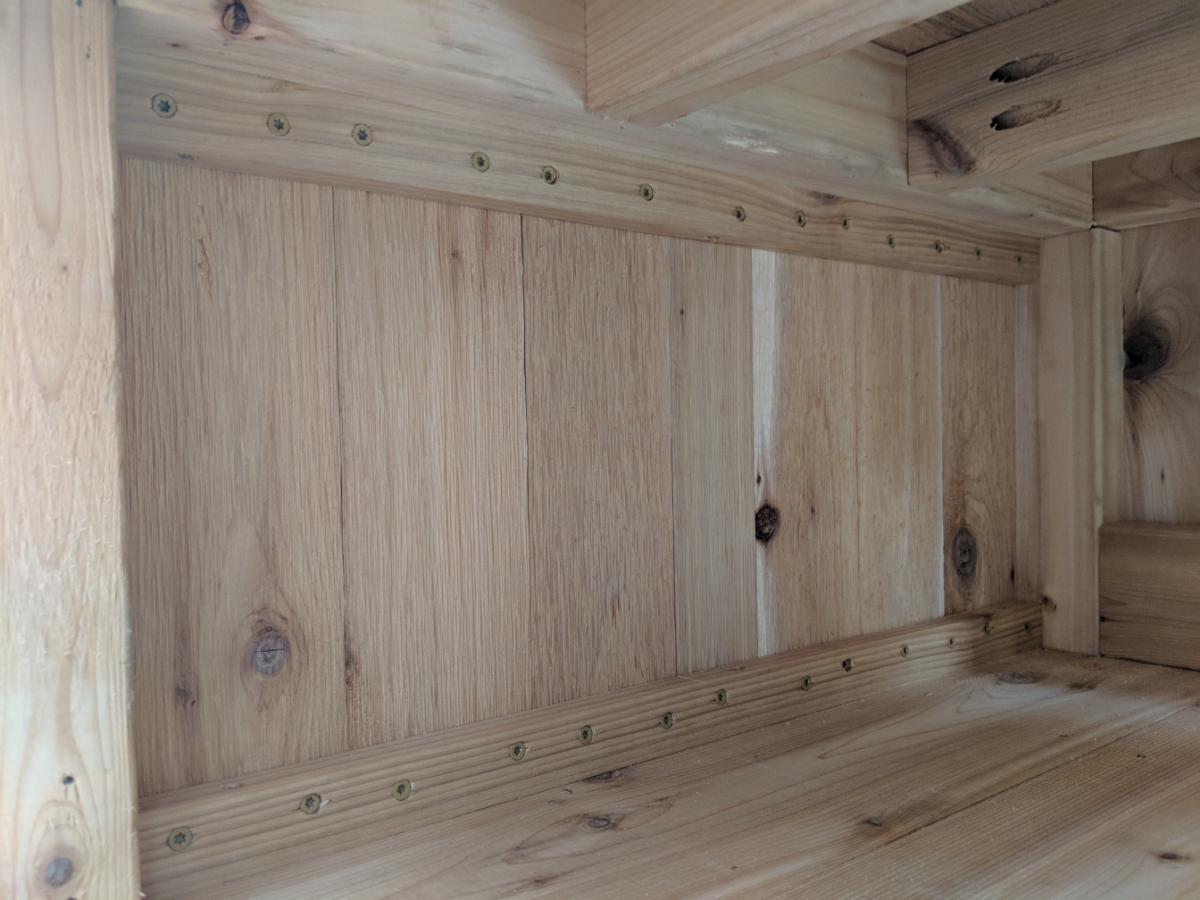
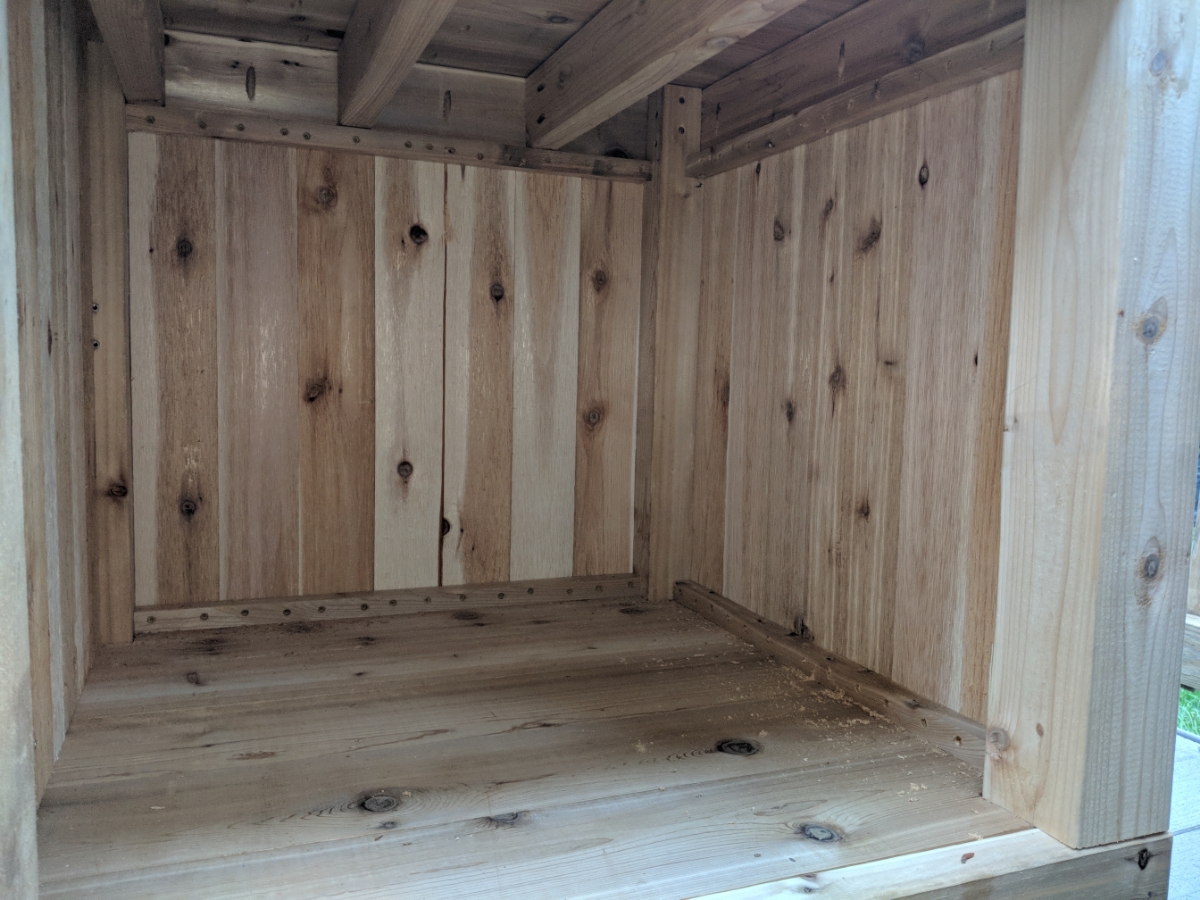
You do this a lot more that I do so I am hearing what you say but so far the only wood movement issues I have in my Green Egg table is one of the 4x4 posts has a partial split down it. None of my vertical side panels have had any issues and those are only screwed together with no glue. I do want to make sure I do it right though for sure cause I obviously want this to last for years. Should I expect this to get worse over time still? My question/concern then is if I do tongue and groove will it be strong enough since I imagine I am not gluing any of those boards in place to allow for morevment? Since I need to make the front panel and side panel removable I would only be able to make an out frame like a picture frame for those tongue and groove boards to mount into.
- Are you intending for this to be waterproof or just a cover? If waterproof, then wood movement is even more of a thing to consider because you'll need to find a way to seal gaps that need to be there for the wood to move.
I am intending this mostly to just be a cover except for the very top needs to be waterproof. The top though will all be glued together to make one longboard so that there are no seams. From my Egg table, there has been no water leakage as in puddle or direct spray though the 1x4 boards just being butted up against each other. They do leave a bit of moisture through but it is possible my deck railing shields if more than I think. Another thing I have thought of doing is doing half lap edges on all the vertical side pieces so they overlap and wouldn't leave a seem at all like below. Also, it won't fully be sealed as I plan to build an air vent on both side panels along with design a mount on the inside to hold a cut piece of washable ac vent filter to keep dust out. This will still allow airflow to help with the humidity inside of the enclosure throughout the year.

- When you join the top slats to the frame underneath, use figure 8 fasteners to mitigate wood movement. You can get them for cheap on amazon and they are easy to install.
Are you just referring to the small lip edge that goes around the top or the actual main unit frame?
- Instead of doing 4x4 cedar posts ($$$$$) just use two 1x4's joined together in an L shape to fake the look. It'll be plenty strong.
The look of that always bugs me. My OCD hates the look cause although most other people don't see the seem I always to. Maybe if I had more tools to make the seam look less noticeable It wouldn't be as big of an issue. Unless maybe I am doing it wrong.
- 100lbs is nothing, if you're building this with 2x4's and 4x4's you could probably park your car on this thing and it would be fine. No need for a center support.
I figured as much but good to hear. I did a detailed calculation last night and came up with a final weight bearing on the bottom floor of around 125-130lbs at most. The lift weights 55lbs, the TV 40lbs, and I estimate the lid of this thing will weigh between 25-30lbs tops. That is doing some really bad math as to what an average 5/4x6x16 deck board weights compared to the square footage of my lid. So who knows if the last part is correct.
Excited to see this get built!
Couple thoughts/advice for when you make this though...
- You seriously need to consider and plan for wood movement. This thing is going to be outside and go through all kinds of temperature and humidity swings and the wood WILL move. If you glue/screw this whole thing together, it's going to want to split itself apart really fast.
- For the side panels, you'll likely need to do a tongue and groove design to factor in wood movement.
You do this a lot more that I do so I am hearing what you say but so far the only wood movement issues I have in my Green Egg table is one of the 4x4 posts has a partial split down it. None of my vertical side panels have had any issues and those are only screwed together with no glue. I do want to make sure I do it right though for sure cause I obviously want this to last for years. Should I expect this to get worse over time still? My question/concern then is if I do tongue and groove will it be strong enough since I imagine I am not gluing any of those boards in place to allow for morevment? Since I need to make the front panel and side panel removable I would only be able to make an out frame like a picture frame for those tongue and groove boards to mount into.
- Are you intending for this to be waterproof or just a cover? If waterproof, then wood movement is even more of a thing to consider because you'll need to find a way to seal gaps that need to be there for the wood to move.
I am intending this mostly to just be a cover except for the very top needs to be waterproof. The top though will all be glued together to make one longboard so that there are no seams. From my Egg table, there has been no water leakage as in puddle or direct spray though the 1x4 boards just being butted up against each other. They do leave a bit of moisture through but it is possible my deck railing shields if more than I think. Another thing I have thought of doing is doing half lap edges on all the vertical side pieces so they overlap and wouldn't leave a seem at all like below. Also, it won't fully be sealed as I plan to build an air vent on both side panels along with design a mount on the inside to hold a cut piece of washable ac vent filter to keep dust out. This will still allow airflow to help with the humidity inside of the enclosure throughout the year.
- When you join the top slats to the frame underneath, use figure 8 fasteners to mitigate wood movement. You can get them for cheap on amazon and they are easy to install.
Are you just referring to the small lip edge that goes around the top or the actual main unit frame?
- Instead of doing 4x4 cedar posts ($$$$$) just use two 1x4's joined together in an L shape to fake the look. It'll be plenty strong.
The look of that always bugs me. My OCD hates the look cause although most other people don't see the seem I always to. Maybe if I had more tools to make the seam look less noticeable It wouldn't be as big of an issue. Unless maybe I am doing it wrong.
- 100lbs is nothing, if you're building this with 2x4's and 4x4's you could probably park your car on this thing and it would be fine. No need for a center support.
I figured as much but good to hear. I did a detailed calculation last night and came up with a final weight bearing on the bottom floor of around 125-130lbs at most. The lift weights 55lbs, the TV 40lbs, and I estimate the lid of this thing will weigh between 25-30lbs tops. That is doing some really bad math as to what an average 5/4x6x16 deck board weights compared to the square footage of my lid. So who knows if the last part is correct.
Excited to see this get built!
Ex-OEM King
Joined: Dec 2013
Posts: 17,880
Likes: 7,027
From: Minnesnowta
Wood will expand perpendicular to the grain direction (in general), it has minimal expansion in the direction of the grain so boards will always get wider rather than longer (giggity). If you have an time where two boards come together with perpendicular grain direction, the wood won't have anywhere to go because it's essentially stuck, hence the need for tongue and groove joints for the vertical pieces. I don't think it'll impact the strength because that strength is in the vertical direction where they can still be snugly fit to the top/bottom rails to transfer the load vertically. If you want to just be safe, then only glue in the center board and you should be fine.
Screws and nails aren't "solid" joinery and if you're using ONLY them (which you absolutely should not do), then wood movement is less of an issue. The problems start arising when you glue stuff together (which you absolutely should do) because the glue is actually stronger than the wood itself and doesn't allow for the movement. Think of it as localized holding vs holding on the entire surface. If you use only nails/screws then the joint could either loosen up over time or split or both.
The rabbet joints for the top panel to keep water out is exactly what I would do. Unless you have a jointer available to you, I'm not sure you'd get seamless joints out of deck lumber without doing a rabbet situation. You can get a router bit to easily chew through these or use your table saw.
For the legs, the way I'd do it to make it look better is take a wide 1x8 or something and cut it down the middle with your table saw blade at 45deg. Then come back and cut a matching 45 on the off cut and glue them together. This way, when you look at the side view, the grain is continuous and it doesn't look weird. Provided you have a nice straight piece and feed the wood in evenly, it'll look great. Also, a good way to hide any defects is with wood glue and sawdust from your cuts mixed together. Just a good way to save weight and money. If not, no real issue with going with 4x4's, they're just expensive. Another option is to just glue two 2x4's together, not sure if that would be cheaper or not.
The figure 8 fasteners would be to join the top assembly to the lip edge underneath. The grain direction for the end pieces is perpendicular to the top which would pose problems.
I'd consider putting the vent on the bottom rather than the side to make it look a bit more clean.

As far as your egg table...think of how much force it takes to split a 4x4... That's not insignificant. My gut is that it may not get any worse but I can't be sure without actually looking at it.
Joined: Sep 2008
Posts: 78,249
Likes: 20,202
I can't imagine a world where Sam and you were gay and lived together and planned projects together and built woods together and stuff.
I would watch for sure. The outcome would be fabulous!
I would watch for sure. The outcome would be fabulous!
even if they pretended to and just had a youtube channel together building stuff... my god that would be epic...
Ex-OEM King
Joined: Dec 2013
Posts: 17,880
Likes: 7,027
From: Minnesnowta

Thread Starter
Moderator
Regional Coordinator (Southeast)
Regional Coordinator (Southeast)
Joined: Dec 2003
Posts: 44,123
Likes: 4,434
From: Mooresville, NC
I don't really know how to bold my responses to your bold so I'm just going to start writing lol.
Wood will expand perpendicular to the grain direction (in general), it has minimal expansion in the direction of the grain so boards will always get wider rather than longer (giggity). If you have an time where two boards come together with perpendicular grain direction, the wood won't have anywhere to go because it's essentially stuck, hence the need for tongue and groove joints for the vertical pieces. I don't think it'll impact the strength because that strength is in the vertical direction where they can still be snugly fit to the top/bottom rails to transfer the load vertically. If you want to just be safe, then only glue in the center board and you should be fine.
Screws and nails aren't "solid" joinery and if you're using ONLY them (which you absolutely should not do), then wood movement is less of an issue. The problems start arising when you glue stuff together (which you absolutely should do) because the glue is actually stronger than the wood itself and doesn't allow for the movement. Think of it as localized holding vs holding on the entire surface. If you use only nails/screws then the joint could either loosen up over time or split or both.
Is it possible because I am using such narrow pieces that I am not seeing enough expansion to cause an issue? I am using Cedar 1x4 that I am them ripping down to actually be only 3 1/4in wide so that I have an exact number of almost full-size boards. The middle board of the front 17 will end up being exactly 3in wide and the 8 on each side of it end up 3 1/4.
Gluing the centerboard in place would make me feal better about the structural state of the facia panels. I would need to change the design of my frame a bit to accommodate the difference in facia panel design but wouldn't be too hard to do. The current design was to screw and glue all the vertical boards to the backside of two horizontal boards.
This is similar to how I attached my sides on the egg table. So far none of those have come loose or cracked. Not saying they won't just giving my experience.
So would a panel with just the top horizontal, each end cap, and the middle board glued in place and the other boards only being held in place with tongue and groove and no glue be strong enough? They are just going to be facia panels and not really relied on for strength. The internal frame should be dealing with all the structural support I would think.
Just trying to access how much of my plan is an issue that I need to redesign.
The rabbet joints for the top panel to keep water out is exactly what I would do. Unless you have a jointer available to you, I'm not sure you'd get seamless joints out of deck lumber without doing a rabbet situation. You can get a router bit to easily chew through these or use your table saw.
To make the top panel I will be cutting the rounded edges off the deck boards so I get a nice smooth seamless joint. I know not as good as a jointer but it worked well enough to make the top of my egg table. I didn't do rabbit joints on those but I guess I could on these.
For the legs, the way I'd do it to make it look better is take a wide 1x8 or something and cut it down the middle with your table saw blade at 45deg. Then come back and cut a matching 45 on the off cut and glue them together. This way, when you look at the side view, the grain is continuous and it doesn't look weird. Provided you have a nice straight piece and feed the wood in evenly, it'll look great. Also, a good way to hide any defects is with wood glue and sawdust from your cuts mixed together. Just a good way to save weight and money. If not, no real issue with going with 4x4's, they're just expensive. Another option is to just glue two 2x4's together, not sure if that would be cheaper or not.
Not concerned about weight for this and honestly the heavier it is the better cause I worry being stable with it being 64x24x42in. Almost wonder if I should make it deeper just because. Probably just going with the 4x4 for now since I have already designed it that way but good to know I can fake it for interior furniture. I only need 2 of them to make my 4 legs so not crazy expensive.
The figure 8 fasteners would be to join the top assembly to the lip edge underneath. The grain direction for the end pieces is perpendicular to the top which would pose problems.
Would these figure 8 facters then cause me to end up with a top that is going to always have smooth edges since it is basically floating on top of the underlying lip edge? Would I be better off then designing a top that is bigger than the underlying lip edge?
I'd consider putting the vent on the bottom rather than the side to make it look a bit more clean.
It would definitely make it cleaner looking for sure but I am not sure how well it would went from down there. I was thinking either 1/2 or 2/3 the way up the sides is where I would put either a 4x4 or 6x6 vent on each side. I have found some nice ones that are stainless or powder-coated aged bronze.
As far as your egg table...think of how much force it takes to split a 4x4... That's not insignificant. My gut is that it may not get any worse but I can't be sure without actually looking at it.