
KN_TL's Rebuild/Turbo Install thread
 07-08-2015, 09:21 PM
#321
To bad you have to cover all of that up, it's looking good
 07-10-2015, 06:56 PM
#322
takin care of Business in
iTrader: (5)
Join Date: Jan 2008
Location: Kansas City, MO
Age: 40
Posts: 30,994
Received 4,732 Likes
on
4,064 Posts
in for more Kurt!
07-13-2015, 06:23 PM
#323

Hillbilly pre-oiler put into action. Took about 30 minutes to pump 5 1/2 quarts but it worked well enough to get the oil to the cam and valvetrain.
Now I just need to figure out how to get around the timing belt tensioner bracket and I can drop it on the subframe. It's out and ready to be loaded.


Now I just need to figure out how to get around the timing belt tensioner bracket and I can drop it on the subframe. It's out and ready to be loaded.

 07-13-2015, 08:51 PM
#324
takin care of Business in
iTrader: (5)
Join Date: Jan 2008
Location: Kansas City, MO
Age: 40
Posts: 30,994
Received 4,732 Likes
on
4,064 Posts

Thats a great idea!
07-13-2015, 09:47 PM
#325
Team Owner

Speaking of valvetrain, did you add more exhaust valve clearance since its turbocharged? With all of the turbo J failures with some looking an awful lot like preignition over detonation it's probably a very good idea to add at least 20% more clearance. With the turbo alone but also with the ridiculously low timing I recently learned people are running on these engines under boost, exhaust valve clearance needs to be addressed or they will become a source of preignition.
07-14-2015, 06:20 AM
#326
When I tore the motor down, almost all of the valves were way too tight. I didn't burn any of them but I plan on running them looser than stock.
I was constantly looking at knock with the MS3 and FP and only saw an occasional spike. Also checked my plugs regularly and none of the pistons showed the kind of detonation residue that people are showing here.
Would the difference in stroke between the j32 and j35 account for any of these issues that have cropped up recently?


The following users liked this post:
yungone501 (08-03-2015)
08-04-2015, 06:42 AM
#331
Here's my version of the pump hanger. I bypassed everything and went straight from the pump to the fitting.
This is the hose I used

The clamps I used

The final assembly


I put on a new stock filter sock at the bottom and will also be running an inline filter.
Injector connectors repinned, installed.

Need to figure out where to mount the FPR then do the plumbing.
This is the hose I used

The clamps I used

The final assembly


I put on a new stock filter sock at the bottom and will also be running an inline filter.
Injector connectors repinned, installed.

Need to figure out where to mount the FPR then do the plumbing.
The following users liked this post:
KN_TL (08-04-2015)
08-04-2015, 02:09 PM
#333
08 tl
I'm new to the acura tl and not a mechanic , I bought a 2008 acura tl 100k miles and I will like gain more horse power, what are my options??????don't want to spend thousands of dollars either.....
08-08-2015, 02:34 PM
#336
Made some progress today, FPR installed next to catch can and some of the fuel system plumbed.
Need more fittings, I got a 3/8 EFI adapter and need 5/16. Using the hardline for the return.
If you are going to do AN hose ends yourself, I highly recommend the Koul Tools tool. Didn't prick myself or get a single SS sliver. Also used Russell's lube and anti-seize

Here are some pictures of the progress


 08-12-2015, 06:15 AM
#337
Anyone following this thread:
DO NOT USE OFF THE SHELF PISTONS.
I learned the hard way that there is a wrist pin offset on the K-series engines and because of the assymetrical layout of the valve reliefs, you have to flip the pistons in the front bank which resulted in a different deck clearance.
I've also learned that I was using a deck clearance of .0025" which is half of what is recommended by engine builders. I probably could have made it work with thicker head gaskets but the front bank protruded by .001". That along with the the different geometries front to back, I am going to recheck everything so the engine is coming out and back on the stand.
I'm probably looking at a pretty long delay with a custom piston order so this project may not be finished this year....
Was going to throw the towel in but was convinced to keep going. Reminded I am in this to learn and I am certainly doing that.
Stay tuned, I will post information on my findings.
The following users liked this post:
TylerT (08-14-2015)
08-12-2015, 09:42 AM
#338

Anyone following this thread:
DO NOT USE OFF THE SHELF PISTONS.
I learned the hard way that there is a wrist pin offset on the K-series engines and because of the assymetrical layout of the valve reliefs, you have to flip the pistons in the front bank which resulted in a different deck clearance.
I've also learned that I was using a deck clearance of .0025" which is half of what is recommended by engine builders. I probably could have made it work with thicker head gaskets but the front bank protruded by .001". That along with the the different geometries front to back, I am going to recheck everything so the engine is coming out and back on the stand.
I'm probably looking at a pretty long delay with a custom piston order so this project may not be finished this year....
Was going to throw the towel in but was convinced to keep going. Reminded I am in this to learn and I am certainly doing that.
Stay tuned, I will post information on my findings.
DO NOT USE OFF THE SHELF PISTONS.
I learned the hard way that there is a wrist pin offset on the K-series engines and because of the assymetrical layout of the valve reliefs, you have to flip the pistons in the front bank which resulted in a different deck clearance.
I've also learned that I was using a deck clearance of .0025" which is half of what is recommended by engine builders. I probably could have made it work with thicker head gaskets but the front bank protruded by .001". That along with the the different geometries front to back, I am going to recheck everything so the engine is coming out and back on the stand.
I'm probably looking at a pretty long delay with a custom piston order so this project may not be finished this year....
Was going to throw the towel in but was convinced to keep going. Reminded I am in this to learn and I am certainly doing that.
Stay tuned, I will post information on my findings.
08-12-2015, 10:58 AM
#339
I felt the same way after installing Bert's engine. Car was smoking, burning oil, clutch was a pain to use, tune was worse than prior to the install, turbo was leaking, the cam seized both gauges plus the methanol system was dead and I was running out of money and patience. Parking it and waiting is the smart move. I did just that and will start my engine rebuild soon. I have driven the car around a little to see if it would stop using oil and even in its imperfect state the car is stupid fast and reminds me of why I'm doing this. 18 psi
sounds pretty mean as well.
sounds pretty mean as well.
The following users liked this post:
KN_TL (08-13-2015)
08-12-2015, 09:16 PM
#340
All k24's have a piston to deck clearance of 0 they are flush and the OE head gasket that we all use is .025 there is no quench area (all domed) on our heads so they won't hit the head, that is why people have been able to use these pistons it's not right but it would run just fine just a little cylinder imbalance
08-13-2015, 11:20 AM
#341
Confirmed with Wiseco that the pin offset is .030" and the offset is to go on the opposite side of the crank rotation.
I'm going to pull the head on the rear and do some measurements before deciding if I need to drop the subframe. Maybe I can do everything with the engine in place.
So then I have to decide on what to do. I may just go and get 6 since the difference will only be about $300 and I can do some things others have done for reliability.
Stay Tuned.
08-13-2015, 01:48 PM
#342
I'ts easy to do in the car, we do piston ring recalls all the time on J's in the car, much easier than pulling the whole thing out and separating the transmission
The following users liked this post:
KN_TL (08-13-2015)
08-13-2015, 08:10 PM
#344
You could do like we did and have them make 3 pistons for the front bank that match the pistons you have, they just need the piston build number
The following users liked this post:
KN_TL (08-14-2015)
08-14-2015, 06:47 AM
#345
For $300 more (2 more pistons), I could do all 6, lower the ringlands and then sell 4 to recoup some of this expense.
If I could get $300 for 4 which is 1/2 off the usual cost, then I'll come out ahead technically, break 'even' from an additional cost view, although slipping further and further into the bottomless money pit.
08-17-2015, 08:39 PM
#346
Heads are off, one piston is out.
Verified that the pin offset is .060" to the exhaust side.
Also verified that all pistons protrude over the deck if rocked to it's extreme.
Just curious for those who did their own builds and ordered their own pistons, what did you use for the quench space?
Appears as though there's a fine line between making contact or creating a detonating monster.
08-18-2015, 06:28 PM
#348
A huge thank you to gerzand for his willingness to help me out.
Going to try and get my order in tomorrow hoping they won't take forever to produce.
I'll run the feed line for my fuel system, plumb in the filter and then idle for 3-4 weeks.
Will post information as it develops.
Going to try and get my order in tomorrow hoping they won't take forever to produce.
I'll run the feed line for my fuel system, plumb in the filter and then idle for 3-4 weeks.
Will post information as it develops.

The following users liked this post:
csmeance (08-26-2015)
The following users liked this post:
csmeance (08-29-2015)
09-04-2015, 06:10 PM
#351
Small update....Week 2 down, 2 or 3 to go.
Finished up the rear part of the fuel system. I found that with a straight bulkhead fitting on the pump hanger and using a 90 degree AN fitting sat too high to put the cover back over the hanger access. So I ended up getting a 90 degree bulkhead fitting and just using a straight AN fitting.
Located the fuel filter in front of the vapor canister and will be running the feed line down the passenger side along the body support.
Next will be flushing brake lines and bleeding clutch.
Some pictures of what I did:


 09-04-2015, 06:15 PM
#352
Nice work looks very clean
The following users liked this post:
KN_TL (09-17-2015)
09-18-2015, 11:46 PM
#354
Seems you and I are currently doing the same part on our projects.
I too am upgrading my fuel system: custom fuel pump hanger complete with AN fitting (inside and out) and new AN hoses from pump to surge tank. After this, there will be no more barbed or factory style fuel fittings. Even went with a Racetronix electrical bulkhead to ensure its done properly.
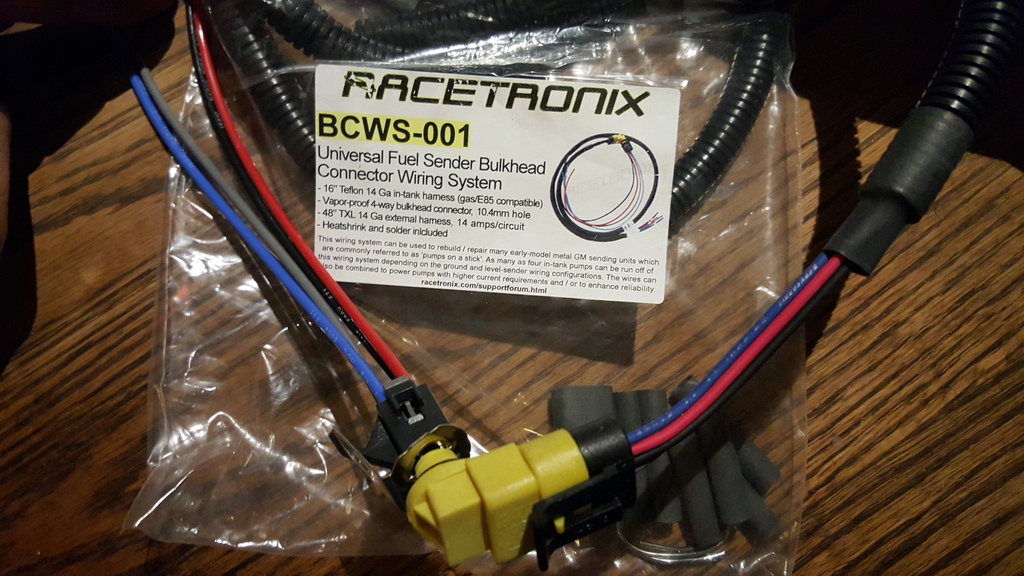
I too am upgrading my fuel system: custom fuel pump hanger complete with AN fitting (inside and out) and new AN hoses from pump to surge tank. After this, there will be no more barbed or factory style fuel fittings. Even went with a Racetronix electrical bulkhead to ensure its done properly.
09-23-2015, 05:55 PM
#357


The following users liked this post:
csmeance (09-30-2015)
 09-28-2015, 09:01 PM
#360
Piston measurements were perfect, within .0002". New block was also within .0002" so the clearances are perfect.
Used suggested ring end gaps of .0023" and .0019".
Quench space of .040" achieved.
Have a couple nights more work to get to point of starting.....closer than I have been in many months.
Used suggested ring end gaps of .0023" and .0019".
Quench space of .040" achieved.
Have a couple nights more work to get to point of starting.....closer than I have been in many months.
The following users liked this post:
csmeance (09-30-2015)