
Intake Resonator Removal Instructions


Intermediate
Joined: May 2011
Posts: 31
Likes: 7
From: West Palm Beach
I just did this last saturday. Remove left front wheel, remove enough plastic clips and 2 bolts that hold inner fender liner in place (enough to pull liner back behind rotor), drill out 2 rivets that hold plastic tube to resinator, then remove two bolts that hold reinator in place. then just pull out the pieces.
I took everything out right up to the air filter box.

I took everything out right up to the air filter box.
Last edited by catmx; Sep 7, 2012 at 08:36 PM. Reason: added picture
Bird is the Word
Joined: Nov 2011
Posts: 1,656
Likes: 975
From: Florida
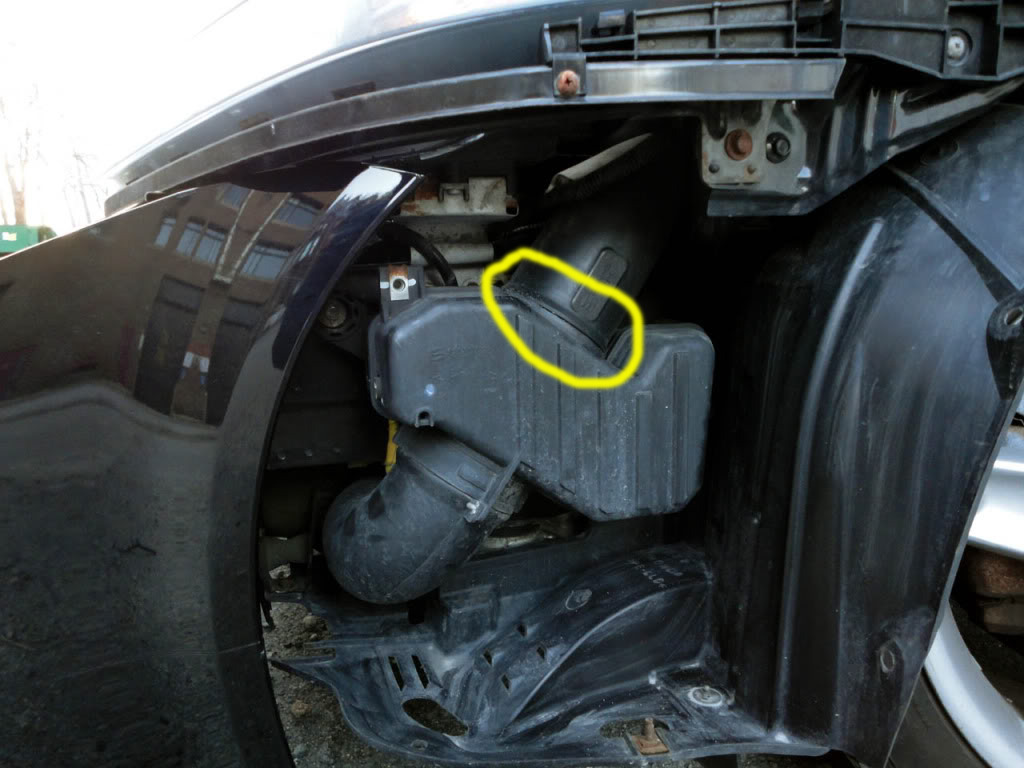
How does the resonator seperate from the intake right here? I'd like to remove the resonator and keep this pipe, or possibly even extend it a little lower. Also what's the diameter of this if I want to add something to extend it?
Remove the front bumper.
its easy, and will let you see everything.
the part you circled, its plastic molded together.
I had to take a saw to it.
my end result is like how you want it.


i used the factory piece near the battery to extend it towards the bumper.
this piece is called a velocity stack.
it is engineered to bring in the most AIR!
its easy, and will let you see everything.
the part you circled, its plastic molded together.
I had to take a saw to it.
my end result is like how you want it.
i used the factory piece near the battery to extend it towards the bumper.
this piece is called a velocity stack.
it is engineered to bring in the most AIR!
Last edited by justnspace; Sep 9, 2012 at 08:35 AM.

Three Wheelin'
Joined: Aug 2004
Posts: 1,670
Likes: 53
From: North Bergen, NJ
Remove the front bumper.
its easy, and will let you see everything.
the part you circled, its plastic molded together.
I had to take a saw to it.
my end result is like how you want it.
i used the factory piece near the battery to extend it towards the bumper.
this piece is called a velocity stack.
it is engineered to bring in the most AIR!
I think this is better then an aftermarket CAI. I have mine back to stock from K&N CAI but looking at this i might consider doing it. What i like with the K&N is the option of conversion from short ram to CAI or however they call it
 .. is that when in short ram i do notice a much more improvement in response as oppose to the CAI... but then i think heat soak, even tough i dont really can pinpoint when it happens but think it does cause it is obviously pulling air directly from the engine bay... Cai suffers in low end response and torque, no doubt.
With the stock option I like it a lot but i do miss that sound. Im wondering what kinda sound you guys are getting going that route.... I think its the best of both worlds. Good filtering, very good throttle response and im sure you get colder air .
Trending Topics
we have this awesome DIY page where it list DIY's.
https://acurazine.com/forums/3g-tl-2004-2008-93/3g-tl-garage-faq-3g-tl-newbies-553554/
FIRST thing you wanna do is take off the front bumper.
its easy and doesnt take long to do.
https://acurazine.com/forums/3g-tl-2004-2008-93/diy-video-uninstalling-oem-intake-installing-cold-air-intake-3g-garage-b-001-a-628372/
https://acurazine.com/forums/3g-tl-2004-2008-93/diy-video-updated-removing-front-bumper-3g-garage-e-080-a-628363/
facing the car head on, you'll see the resonator to the right..
or on the drivers side.
it is held in place by i believe 2 or 3 10mm bolts.
remove all bolts holding it to the frame.
Justin, the rubber looking piece connecting the stock piping to the piece you used from in front of the battery, where did you get that from? It doesn't look like anything that would have been reused off of the resonator itself based on the very first pic in this thread. Also how is it being held to each piece?
Instructor
Joined: Dec 2011
Posts: 134
Likes: 8
From: Pittsburgh, PA
I think this is better then an aftermarket CAI. I have mine back to stock from K&N CAI but looking at this i might consider doing it. What i like with the K&N is the option of conversion from short ram to CAI or however they call it .. is that when in short ram i do notice a much more improvement in response as oppose to the CAI... but then i think heat soak, even tough i dont really can pinpoint when it happens but think it does cause it is obviously pulling air directly from the engine bay... Cai suffers in low end response and torque, no doubt.
With the stock option I like it a lot but i do miss that sound. Im wondering what kinda sound you guys are getting going that route.... I think its the best of both worlds. Good filtering, very good throttle response and im sure you get colder air .
.. is that when in short ram i do notice a much more improvement in response as oppose to the CAI... but then i think heat soak, even tough i dont really can pinpoint when it happens but think it does cause it is obviously pulling air directly from the engine bay... Cai suffers in low end response and torque, no doubt.With the stock option I like it a lot but i do miss that sound. Im wondering what kinda sound you guys are getting going that route.... I think its the best of both worlds. Good filtering, very good throttle response and im sure you get colder air .
Justin, the rubber looking piece connecting the stock piping to the piece you used from in front of the battery, where did you get that from? It doesn't look like anything that would have been reused off of the resonator itself based on the very first pic in this thread. Also how is it being held to each piece?
the rubber couplers are from the stock setup.
if you remove the bumper, you can see all the pieces better.
the only part that I had to think on, was the resonator and how to cut the piece off.
I had a jigsaw, and used that.

Intermediate
Joined: Jun 2012
Posts: 28
Likes: 4
From: Charlotte, N.C.
So is the consensus to keep the stock induction system, remove the resonator, add a high flow filter? as opposed to a Cold Air induction system? I was considerating aftermarket intake. This is for my 2008 TL-S daily driver. Wanting more power. Not concerned about noise. Thanks.
^forego the cold air intake route then.
you can do what I did above, by taking off the resonator and extending the pipe to reach bumper for cool air.
our car's exhaust is pretty restrictive, so if you upgrade some of those pieces, you'll gain a lot more power than a cold air intake.
you can do what I did above, by taking off the resonator and extending the pipe to reach bumper for cool air.
our car's exhaust is pretty restrictive, so if you upgrade some of those pieces, you'll gain a lot more power than a cold air intake.
Intermediate
Joined: Jun 2012
Posts: 28
Likes: 4
From: Charlotte, N.C.
I was reading another thread about heat being a power robbing problem which makes sense. Anyone have high flow cats with a header, "J" pipe, 3rd muffler delete, and cat back system? I know some cars like some back pressure and was just thinking this may be too unrestricting. Just wanting the beat most efficient combo.
we dont have headers.
catalytic converters come off the heads.
we generally replace these cats with straight pipes(called Pre-cat-deletes or PCDs) or High flow cats(HFCs)
then upgrade to an nonrestrictive jpipe and finish it off with a catback exhaust.
catalytic converters come off the heads.
we generally replace these cats with straight pipes(called Pre-cat-deletes or PCDs) or High flow cats(HFCs)
then upgrade to an nonrestrictive jpipe and finish it off with a catback exhaust.

i used the stock filter.
and I did use a jig saw and could not cut it straight because of the way the jig saw is made.
you can use anything to "cut" or "saw" the plastic tube off from the resonator.
and I did use a jig saw and could not cut it straight because of the way the jig saw is made.
you can use anything to "cut" or "saw" the plastic tube off from the resonator.
:what:
Joined: May 2012
Posts: 1,461
Likes: 350
From: Hernando, MS
I just did this last weekend. I used a saws-all. Its easier to cut when its off the car. I also used some long heavy duty zip ties to hold all my piping where I wanted it to be and did a little trimming to the area of the bumper cover behind the vent to allow for more air to flow directly to the velocity stack. I did this and welded a strait pipe in place of the mid muffler at the same time. VERY happy with the sound and throttle response.
Racer


Joined: Dec 2016
Posts: 254
Likes: 36
From: Kansas
any pictures? I just see one picture of the factory resonator. Otheres are old and not hosted anymore. Thinking about doing this to my 08 TL-S for added noise.
So you just remove that plastic box? Do you have to add a straight pipe to fill the gap up?
EDIT: I checked the Garage FAQ and all the DIY resonator delete links direct to random offtopic threads!?!? LOL
So you just remove that plastic box? Do you have to add a straight pipe to fill the gap up?
EDIT: I checked the Garage FAQ and all the DIY resonator delete links direct to random offtopic threads!?!? LOL
Last edited by 4drturbo; May 24, 2022 at 04:10 PM.

CDM

Joined: Apr 2011
Posts: 221
Likes: 51
From: Portland, Oregon
any pictures? I just see one picture of the factory resonator. Otheres are old and not hosted anymore. Thinking about doing this to my 08 TL-S for added noise.
So you just remove that plastic box? Do you have to add a straight pipe to fill the gap up?
EDIT: I checked the Garage FAQ and all the DIY resonator delete links direct to random offtopic threads!?!? LOL
So you just remove that plastic box? Do you have to add a straight pipe to fill the gap up?
EDIT: I checked the Garage FAQ and all the DIY resonator delete links direct to random offtopic threads!?!? LOL
Racer
Joined: Dec 2016
Posts: 254
Likes: 36
From: Kansas
But doesn't that cause the induction points to be a lot higher up and not as good as OEM? Still want to retain cool air getting shoved in there and not just have a random tube sitting up high in the fender well
Safety Car

Joined: May 2007
Posts: 4,310
Likes: 860
From: At the Track
A Cold Air Intake will make a nice sound compared to OEM. The OEM intake system is pretty easy to remove, the only part that is not direct bolt off is the part circled in the above picture. You dont need to saw it off as it makes it difficult to reattach. I just pulled hard at it and the clip broke. this way I can reclip it in the future or bolt/rivot it back on.

Thread
Thread Starter
Forum
Replies
Last Post
Aretardedorange
3G TL Performance Parts & Modifications
8
Nov 1, 2011 09:35 PM