
DIY: Racing Seats

Thread Starter
Safety Car
Joined: Jan 2006
Posts: 4,442
Likes: 482
From: Houston, Texas
DIY: Racing Seats
I have been periodically receiving PM's asking about my racing seats. I receive questions regarding how to mount the seats and how to deal with the airbags (SRS System). Thus, I thought it would be of enough interest, now and in the future, to have a dedicated thread for selecting and installing racing seats in our 3G TL.
As a side note - I am *not* bothered by receiving PM. If any member wishes to remain stealthy, please feel free to inquire with a PM to me.
As a side note - I am *not* bothered by receiving PM. If any member wishes to remain stealthy, please feel free to inquire with a PM to me.
Thread Starter
Safety Car
Joined: Jan 2006
Posts: 4,442
Likes: 482
From: Houston, Texas
Warning: Tampering with oem airbags is illegal in many states.
Warning: Use of aftermarket seats and/or seatbelts can cause injury or death.
To read more on the safety aspects of the racing seats and racing harnesses, please see the thread linked below.
Safety aspects of racing seats and racing harnesses in street cars (click here)

Warning: Use of aftermarket seats and/or seatbelts can cause injury or death.
To read more on the safety aspects of the racing seats and racing harnesses, please see the thread linked below.
Safety aspects of racing seats and racing harnesses in street cars (click here)
Thread Starter
Safety Car
Joined: Jan 2006
Posts: 4,442
Likes: 482
From: Houston, Texas
***** WARNING: THE ENTIRE AIRBAG SYSTEM IS *NOT* OPERATING IF YOU SEE THE SRS WARNING LIGHT IN THE INSTRUMENT CLUSTER *****
You will need to make sure that the SRS System stays happy. To keep it happy, you must trick the SRS computer into thinking that nothing has been disconnected.
The SRS Main Unit will detect if any air bag is unplugged/missing because each air bags has a built-in internal electrical resistance. So, if any air bag connector is unplugged, the SRS unit will see the open circuit.
You will need to use an air bag simulator (module) for each airbag that is removed/disconnected. A simulator is just a resistor that mimics the internal resistance inside the air bag. The resistor is plugged into the air bag connector, and the SRS Unit sees this resistor, and the SRS unit is tricked into thinking the air bag is still there.
This is what it will look like. These are connectors with a resistor soldiered to the end of the wire. The black part is electrical shrink tubing for insulation (covering the resistor). These simulators can be plugged into the airbag connector so that the SRS unit is tricked into thinking that the airbags are there. I cut these connectors off of the airbags to make these simulators.

To make a air bag simulator, you will need a 2.0 Ohm resistor. That is 2.0 Ohm, NOT 2k Ohm.
What I did was to cut the connector off from the air bag. I had approx 3 or 4 inches of wire before the connector. I soldered the resistor to the connector. Then, just snap the connector back into the lead going to the computer.
It is a MUST to solder the resistor. Do NOT just crimp. Any slight loss of proper signal will trip the warning light.
I ordered my resistors from
www.partsexpress.com
Be warned, the shipping is more than the cost of the resistor. Oh, well.
Just go to www.partsexpress.com and search on "2.0 Ohm 1/2W Flameproof Resistor"
Please contact me for further info if you plan to remove the passenger seat too. There are more complicated parts to the passenger seat that you must deal with before the passeneger seat can be removed.
Let me know if you want info on doing this too.
***** WARNING: THE ENTIRE AIRBAG SYSTEM IS *NOT* OPERATING IF YOU SEE THE SRS WARNING LIGHT IN THE INSTRUMENT CLUSTER *****
IF you ever want to remove the ENTIRE srs system, below shows you how to do it.
The pic below show where the SRS unit is located. You will need to remove the side panels from the center console to gain access to this area.

In the pic below, this is what the SRS computer looks like.

The pic below is a close-up pic of where the SRS Unit had been. It is GONE now. Notice the three yellow connectors that had been plugged into the SRS unit.

In the pic below, PLEASE notice that there are three connector blocks -- those yellow blocks that plug into the SRS unit. They are named "CONNECTOR A", "CONNECTOR B", and "CONNECTOR C".

The pic below is the most important. Please notice that Block A has a wire #19 -AND- Block B has a #19 Too !!!! Make sure that you get the pink wire #19 on Block A.

After you find the pink #19 on Block A, you need to make a jumper wire from the cigeratte lighter (serving as a source of 12 volts with key-on only) to this pink wire #19 on Block A.
The idea is to supply 12 volts to this pink #19 on Block A. This tells the main computer that everything is OK with the SRS (lying to the main computer).
Let me know if you need more pics or for me to be more clear.
You will need to make sure that the SRS System stays happy. To keep it happy, you must trick the SRS computer into thinking that nothing has been disconnected.
The SRS Main Unit will detect if any air bag is unplugged/missing because each air bags has a built-in internal electrical resistance. So, if any air bag connector is unplugged, the SRS unit will see the open circuit.
You will need to use an air bag simulator (module) for each airbag that is removed/disconnected. A simulator is just a resistor that mimics the internal resistance inside the air bag. The resistor is plugged into the air bag connector, and the SRS Unit sees this resistor, and the SRS unit is tricked into thinking the air bag is still there.
This is what it will look like. These are connectors with a resistor soldiered to the end of the wire. The black part is electrical shrink tubing for insulation (covering the resistor). These simulators can be plugged into the airbag connector so that the SRS unit is tricked into thinking that the airbags are there. I cut these connectors off of the airbags to make these simulators.
To make a air bag simulator, you will need a 2.0 Ohm resistor. That is 2.0 Ohm, NOT 2k Ohm.
What I did was to cut the connector off from the air bag. I had approx 3 or 4 inches of wire before the connector. I soldered the resistor to the connector. Then, just snap the connector back into the lead going to the computer.
It is a MUST to solder the resistor. Do NOT just crimp. Any slight loss of proper signal will trip the warning light.
I ordered my resistors from
www.partsexpress.com
Be warned, the shipping is more than the cost of the resistor. Oh, well.
Just go to www.partsexpress.com and search on "2.0 Ohm 1/2W Flameproof Resistor"
Please contact me for further info if you plan to remove the passenger seat too. There are more complicated parts to the passenger seat that you must deal with before the passeneger seat can be removed.
Let me know if you want info on doing this too.
***** WARNING: THE ENTIRE AIRBAG SYSTEM IS *NOT* OPERATING IF YOU SEE THE SRS WARNING LIGHT IN THE INSTRUMENT CLUSTER *****
IF you ever want to remove the ENTIRE srs system, below shows you how to do it.
The pic below show where the SRS unit is located. You will need to remove the side panels from the center console to gain access to this area.
In the pic below, this is what the SRS computer looks like.
The pic below is a close-up pic of where the SRS Unit had been. It is GONE now. Notice the three yellow connectors that had been plugged into the SRS unit.
In the pic below, PLEASE notice that there are three connector blocks -- those yellow blocks that plug into the SRS unit. They are named "CONNECTOR A", "CONNECTOR B", and "CONNECTOR C".
The pic below is the most important. Please notice that Block A has a wire #19 -AND- Block B has a #19 Too !!!! Make sure that you get the pink wire #19 on Block A.
After you find the pink #19 on Block A, you need to make a jumper wire from the cigeratte lighter (serving as a source of 12 volts with key-on only) to this pink wire #19 on Block A.
The idea is to supply 12 volts to this pink #19 on Block A. This tells the main computer that everything is OK with the SRS (lying to the main computer).
Let me know if you need more pics or for me to be more clear.
Thread Starter
Safety Car
Joined: Jan 2006
Posts: 4,442
Likes: 482
From: Houston, Texas
I have questions in the mounting method that you utilized for your racing seats. From the pictures, it seems like you simply used blocks of Red Oak to mount the rear of the seats while bolting the front straight to the metal frame. With mounting the rear with the piece of strong wood, did you simply use longer bolts to be able to bolt it down through the wood and into the metal frame? Also, do these bolts simply bolt down firmly into the floor or is there actually a way to add a nut below the frame to firmly secure the bolt in place?
Sorry for the questions, but I just wanted to verify with you regarding the mounting process so that my safety isn't a risk factor after I add the racing seats!
Sorry for the questions, but I just wanted to verify with you regarding the mounting process so that my safety isn't a risk factor after I add the racing seats!
I drilled straight thru the floorboard all the way thru to the outside (see red circles in pic) after much carefully examination and forethought. Samething for the belt anchors too. However, the anti-sub belt anchors (blue arrows) does not go thru the floorboard. There is room under that tunnel to fit the load-spreading washer and locking nut.

By the way, the BEST anchors are these from www.pegasusautoracing.com (PN# 2384). They come with an EXCELLENT, thick load-speading washer. Other brands that I tried left me disappointed.

Here is the link
http://www.pegasusautoracing.com/pro....asp?RecId=630
To give you an idea, my bolts for the front two bolts were approx 3-1/2 inches long, and the rear two bolts were approx 4 inches long. Remember, these bolt lengths are approx... I don't remember the exact lengths. I had purchased a variety of lengths, and picked the length that fit the best.
You are right about the wood blocks. I drilled a hole thru the wood block. The 4" (approx) bolt extend thru the center of the block, with the washer and nut on the outside (underneath) of the floorboard.
You will want to use an extremely large flat washer. The washer should be large in diameter and extremely thick. Here is a place them sells them
http://www.pegasusautoracing.com/pro...?Product=AN970
The washers look like this one in this pic below.
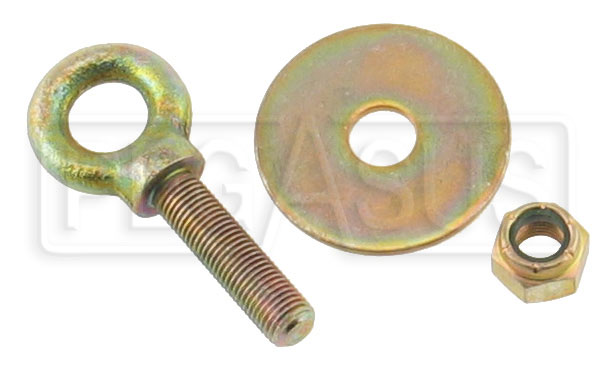
If you don't have time to order them, you might be able to find something similar at a hardware store. However, I would still order these from pegasusautoracing and replace those hardware-store washers with these pegasusautoracing washers. The pegasusautoracing washers are made with quality steel whereas the hardware-store washers are made with soft cheap steel.
As for the safety aspects, you will be ok. You begin to encounter safety issues when you mess around with the seat belts. There are four types of crashes - 1) rollover, 2) side impact, 3) rear impact, 4) frontal impact.
The seat belts are the sole player during a frontal impact. The seat itself encounters no forces during a frontal collision. To a large extent, this applies to a rollover also.
The seatbelts and seats both encounter a fair amount of forces during a side impact.
However, the seat does encounter a significant amount of force during a rear impact. So when mounting a seat, you must design the seat mounting to withstand a rear-end collision. Those front two bolts will try to be pulled thru the floorboard, while the rear of the seat will try to be pushed into (and thru) the floorboard. Thus, it is EXTREMELY IMPORTANT to use those large washers on the two front bolts. Also, it is EXTREMELY IMPORTANT to use bolts, washers, and nuts that are only Grade 8 Steel, Stainless steel 18-8, and/or Metric grade 10.9 (or 12.9).
Feel free to ask more. I am glad to help.
Very nice write up! This is completely off-topic but after reading all of this and seeing how you used the resistors to trick the SRS, do you think a resistor could be used to trick the seatbelt chime  I know it worked in my GMC Sierra to trick the automatic headlights
  lol
lol
I know it worked in my GMC Sierra to trick the automatic headlights lol
Thread Starter
Safety Car
Joined: Jan 2006
Posts: 4,442
Likes: 482
From: Houston, Texas
How much did your seats cost you? How hard is it to install? Can any seat work?
A chunk of time was used to decide which brand and model of seat to get. There many brands and styles of seats to choose among. I felt like a "kid in a candy store." After comparing, I liked the OMP brand the most. I had to spend time to find a good vendor that I could trust to order from online (including some phone screening of possible vendors). No vendors stocked the OMP seat model that I wanted. Therefore, my order was drop-shipped to me from OMP. This worked out great because I was assured of receiving fresh product straight from the OMP's warehouse in Florida. As a side note, OMP seats are made in Italy and then shipped to the OMP warehouse in Miami, Florida.
Another chunk of time was used to figure out the best way to mount the seats. Most seats have the defacto standardized mounting. Thus, once you get the brackets bolted into the car, most of the aftermarket racing seats will use the same bracket. The hardest part is getting the bracket fitted onto the car.
In the beginning of this project, I thought that I had found a bolt-in bracket for the aftermarket seat. Because our TL is the same platform as a 2003+ Accord, a bracket for the 2003+ Accord should had worked. I order just the driver-side bracket first to see if it would fit. Had to wait 4 weeks for delivery (special order item). Once it arrived, I checked the fit. Nearly fit, but no cigar if a person was looking for a true bolt-in bracket. The bracket is a half inch too short between the front bolts and the rear bolts. I don't know if the bracket was defective, or if the 2003+ Accord truly does have slightly different mounting locations. I decided to not use the bracket because it is too heavy (in addition to not fitting). It weighs 8+ pounds per each bracket.


As a side note, I noticed that the bracket had a sticker on it indicating the manufacturer (WedgeEngineering). Although I ordered it as a Sparco item, Sparco was just a middle man. So if you are interested in this bracket, I recommend directly contacting the manufacturer, WedgeEngineering (click here). For the 2003+ Accord, the part number for the driver-side bracket is PN# 1226 and the passenger-side is PN# 1227.

A chunk of time was used to trial fit the various parts as I received them. This meant several separate weekends of taking out the oem seats which is not fun when you weigh 145 pounds and the oem seat (that you must dead-lift) weighs 63 lbs. While spending one weekend to trial fit the seats (mock-up), I was using small blocks of 2x4 lumber to support the racing seat inside the car. The front half of the seat was sitting directly onto the floor pan and the rear half of the seat was being prop'ed up with the wood blocks. I looked at the wood block and thought "damn, that will work better (stronger and lighter) than the WedgeEngineering bracket". At that point, it became an obvious decision to mount straight into the floor pan and forego the WedgeEngineering bracket. With the seat mounted directly into the floor: 1) the seating height is perfect, 2) the mounting is firmer (butt connected to road feel), 3) the mounting is stronger (withstand higher force before failure according to my intuition), 4) I would not need to purchase the passenger-side WedgeEngineering bracket at over $100, 5) it would be less weight. I went to Lowe's and found a high quality and strong piece of Red Oak wood that I could use to fabricate my "custom" mounts.

With regards to using intuition to engineer this project, I offer the following. It is commonly agreed that the worst-case scenario is that the occupant will experience a 20G force during a collision (again, worst case condition). So for my 145-lb body, this would equate to a 3000 pound force during a 20G impact. From an engineering perspective, you must constantly ask yourself this question - "Will this bolt (or seat mount, belt mount, etc.) withstand the anticipated load in the anticipated direction". For example with the shoulder seatbelt mounts, could the whole car (3000 lbs) be hoisted up via those two mount ? Intuition was used to answer these questions to my satisfaction. I am confident that the FIA Homologated racing seat will break long before the mounting fails. I even purchased Grade 8 (or Grade 12.9 for metric) hardware for all fasteners (including Grade 8 nuts and Grade 8 washers). The fasteners were ordered from www.BoltDepot.com.
To further discuss the safety aspects of this particular mod, I respectfully ask that we use the supplementary thread (click here) to prevent this main thread from going too far off topic. Thanks for your cooperation.

One of the bigger obstacles in this project was removing the car's dependency to the oem seats. This reminds me of having to do surgery to separate siamese twins "connected at the wiring harness". Without the proper connections to the oem seats, annoying warning lights on the dash will be seen (including SRS) and chiming reminders will be heard to fasten your seat belt. Suffice it to say, removing the car's dependency to the seats was challenging as this picture below illustrates. However, the results are rewarding to not having to see any warning lights nor hear any reminders. Before attempting the surgery, I had studied the service manual for several nights. This included analyzing various wiring diagrams to understand how the system functioned, and then looking for ways to trick the system once the connections were lost to the oem seats. The studying of the service manual paid-off because I was able to find an eloquent solution (to me). But, it required access to the deep depths of the dash. After doing surgery for 10 hours straight on a Saturday, victory was claimed. I now have no warning chimes, no warning lights, and no MID warnings. The system is tricked into thinking that the oem seats (and the many SRS components located within the oem seats) still exist.

When first thinking about adding racing seats to my car, I had originally thought that I would use the oem seat belts. I spent many nights doing Google searches related to automotive collision protection with regards to seat design, seat belts, and air bags. I even paid to download several Technical Papers from the SAE (Society of Automotive Engineers) website. After researching the safety aspects involved with installing these seats, I learned how gravely important seat belts are to crash survival. We are all aware that we need to wear seat belts, but little do we know that seat belts are the primary survival equipment (not air bags) in all types of crashes (including rollovers). After learning the critical importance of seat belts, and after researching the advantages/disadvantages of racing harnesses, I then decided to go with a FIA-Homologated racing harness (6 point). Then, more studying was done to learn the proper method and associated safety concerns to installing the racing seats and racing harness.
To further discuss the safety aspects of this particular mod, I respectfully ask that we use the supplementary thread (click here) to prevent this main thread from going too far off topic. Thanks for your cooperation.
Here's the prices for my project
639 OMP Grip Seat (PN# HA688H-N)
639 OMP Grip Seat (PN# HA688H-N)
100 Shipping fee ($50 per seat)
134 OMP Seat Bracket (PN# HC732)
134 OMP Seat Bracket (PN# HC732)
309 OMP Racing Harness (PN# DA401E71)
110 OMP Street Harness (PN# DA507071)
100 Grade 8 fasteners and forged eyebolts
---------------------
$2165 Total


Click here to see more pics
Trending Topics


Very nice Inacc. I was just looking at racing seats the other day. But you know, you aren't doing my wallet any favors 
On the other Q about the handbrake, looks like that was one of the first terminator steps. There is a cover over where it used to be.
On the other Q about the handbrake, looks like that was one of the first terminator steps. There is a cover over where it used to be.

Thread Starter
Safety Car
Joined: Jan 2006
Posts: 4,442
Likes: 482
From: Houston, Texas
Please try this link. Click here to see more pics
Can you post up the information on the passenger seat too (or send me a PM)? Thanks!
Thread Starter
Safety Car
Joined: Jan 2006
Posts: 4,442
Likes: 482
From: Houston, Texas
For those that are unable to see the additional pics from the provided link, please go to my TL Diet thread (click here). Look at Post #349 on Page 9 of the Diet thread.
Thread Starter
Safety Car
Joined: Jan 2006
Posts: 4,442
Likes: 482
From: Houston, Texas
I am checking to see what your situation is so that I can tailor my reply to match your situation.

hey i think you need to install a harness bar to the tl incase of an accident. if there isnt a harness bar the seat belt harness would pull straight down the to seat and would damage your back i believe.
Are you planning to replace both driver and passenger seats with something else? And you want to keep the other airbags operational if you do remove the oem passenger seat?
I am checking to see what your situation is so that I can tailor my reply to match your situation.
I am checking to see what your situation is so that I can tailor my reply to match your situation.
Warning: Tampering with oem airbags is illegal in many states.
Warning: Use of aftermarket seats and/or seatbelts can cause injury or death.
To read more on the safety aspects of the racing seats and racing harnesses, please see the thread linked below.
Safety aspects of racing seats and racing harnesses in street cars (click here)
Warning: Use of aftermarket seats and/or seatbelts can cause injury or death.
To read more on the safety aspects of the racing seats and racing harnesses, please see the thread linked below.
Safety aspects of racing seats and racing harnesses in street cars (click here)
Thread Starter
Safety Car
Joined: Jan 2006
Posts: 4,442
Likes: 482
From: Houston, Texas

WARNING- Please be warned that airbags can seriously injure or kill a person. You can have static electricity that will trigger the airbag while you are near the airbag. The airbag will inflate with explosive force which can injure or kill you. Use extreme caution when working near airbags.
To learn more, click here
Thread Starter
Safety Car
Joined: Jan 2006
Posts: 4,442
Likes: 482
From: Houston, Texas

The thing that makes the passenger seat different from the driver seat is that the passenger seat has another major component to the overall SRS System. The passenger seat has the OPDS.


In the pic above, note that the OPDS is more complicated than a simple airbag to try to circumvent around. An airbag can be circumvented with using a resistor. However, the OPDS is more involved.

In the pic above, note how the OPDS has it's own power source. It communicates with the gauge cluster and communicates with the main SRS Unit.


Because I was removing my entire SRS Unit, I did not spend any time trying to eliminate the OPDS while keeping the SRS functional.
A person with the technical skills would need to experiment to see what would work best to resolve this issue.
One option might be removing the OPDS Unit from the passenger oem seat and place it on the floorboard (with wiring connected) under the aftermarket passenger seat. Above is a pic showing how to remove it.
However, it appears that it might not be this easy either. The passenger seat has weight sensors built into the seat. The OPDS must be connected to those sensors or otherwise tricked into thinking that those sensors are still present.
If this was the case that the OPDS needs the built-in sensors (which we can not transfer to the aftermarket seats), then our only avenue is to remove the OPDS entirely from the SRS system.
To remove the OPDS from the overall system, we need to worry about the two outputs from the OPDS. The OPDS outputs to the SRS Main Unit (via a single wire) and outputs to the warning light (via a single wire).
For the output to the SRS, it *might* be as easy as connecting a 12V source to one of the wires to trick the SRS into thinking that the OPDS is still there after you removed the OPDS.
For the output to the warning light, it *might* be that there is no problem with the warning light. Looking at the wiring diagram, it appears that the OPDS might just provide a ground to the warning light (Side Airbag Cutoff Indicator). With the OPDS disconnected, the warning light might be a non-issue.
This helps a lot and definitely points me in the right direction. I really appreciate all the info you've provided.
I'm planning on installing the seats in March/April so we'll see if this works. I'll post my results back on here just in case anyone else wants to replace their seats.
Thanks again Inaccurate!
I'm planning on installing the seats in March/April so we'll see if this works. I'll post my results back on here just in case anyone else wants to replace their seats.
Thanks again Inaccurate!
Thread Starter
Safety Car
Joined: Jan 2006
Posts: 4,442
Likes: 482
From: Houston, Texas
Do you still have any parts of your seatbelts still connected?
How can the factory seatbelts be removed so that the warning/reminder message does not appear and no reminder bell noises will be heard?
Warning: Tampering with seatbelts can cause injury or death.
I have nothing in my car that is related to the SRS system. No airbags, no impact sensors, no oem seatbelts, no oem seatbelt buckles, etc. Every trace of the oem SRS has been removed.
I often get questions regarding how the seatbelt nag messages and beeps can be bypassed when installing racing equipment. I find it difficult to answer this question because I removed the entire SRS in a single step. So, when someone ask how to remove the oem seatbelts while retaining the remainder of the SRS, I lack the firsthand knowledge to confidently answer the question.
Therefore, the following are just clues to assist you in your solo journey.
Each seatbelt buckle has a wiring harness (see pics below). To remove the seats from the car, these wiring harnesses will be disconnected by separating the wiring connectors. See pics below for location of the connectors.
After the seats are removed from the car, there will be one seatbelt buckle wiring harness per seat remaining in the car (which runs into a much larger wiring harness). For the driver harness, connect the Light Green wire to chassis ground. For the passenger harness, connect the Orange wire to chassis ground.
However, it appears from the schematic that the above will work only if the Seatbelt Tension Reducer Solenoid is still connected to the car.
If a person was removing the seatbelt buckles and the entire seatbelt spool assembly (aka Seatbelt Tension Reducer Solenoid), then a person could ground the respective wire coming directly out from the SRS Unit (terminal 17 & 18). At least it appear to be possible from the schematic.


ABOVE = Driver Seat

ABOVE = Passenger Seat


The Track Terror
Joined: Apr 2011
Posts: 545
Likes: 76
From: Dallas, TX
Unfortunately I do have the airbag light...I tried the resistor per Inaccurate's instructions, but to no avail...but I'm gonna still try fiddling with it.
Inaccurate - how did you come across the theory/fact that if the airbag light is on, then NONE of the airbags will work? The airbag light in my 08 Civic Si was on, yet the side curtain airbag still went off (don't ask)...maybe its a similar system for the TL?
Inaccurate - how did you come across the theory/fact that if the airbag light is on, then NONE of the airbags will work? The airbag light in my 08 Civic Si was on, yet the side curtain airbag still went off (don't ask)...maybe its a similar system for the TL?
Thread Starter
Safety Car
Joined: Jan 2006
Posts: 4,442
Likes: 482
From: Houston, Texas
Thanks for the contribution to this thread.
I had read it in the Service Manual several years ago when I was studying the manual to do my SRS Delete.
I am unable to find it at the moment. It will not be until Sunday or later before I will have the opportunity to find it. I need time to look in my hard copy (paper version) of my 2006 TL Manual. Just now, I checked my electronic version (PDF) of the 2004 TL Manual. The PDF has some missing pages in that area. Plus, perhaps the info is in the 2006 edition and not the 2004.
Are you trying to keep some airbags operational, or are ALL airbags being removed?
Last edited by Inaccurate; Dec 15, 2011 at 08:39 AM.
The Track Terror
Joined: Apr 2011
Posts: 545
Likes: 76
From: Dallas, TX
@the fenda rolla
Thank for sharing with us fender rolla; Do you track your TL? How do you like those aftermarket seat so far? Any more picture?
@phatrick
What kind of recaro did you order? Please share with us in this thread.
Thank for sharing with us fender rolla; Do you track your TL? How do you like those aftermarket seat so far? Any more picture?
@phatrick
What kind of recaro did you order? Please share with us in this thread.
The Track Terror
Joined: Apr 2011
Posts: 545
Likes: 76
From: Dallas, TX
Btw, these are Bride GIAS replicas...and they were in my race Civic Si before so I definitely missed them...
And yes, I definitely plan on tracking my TL in the spring...just waiting on engine mounts and possible Unorthodox Pulley...then fresh pads/rotors and Hankook RS-3s...and we'll see how the J&R ecu group buy turns out...
The Track Terror
Joined: Apr 2011
Posts: 545
Likes: 76
From: Dallas, TX
The Track Terror
Joined: Apr 2011
Posts: 545
Likes: 76
From: Dallas, TX
I actually used Wedge's TL brackets that I bought through Cipher Auto.com (Villo's recommendation). They are made specifically for our TL so the holes lined up to the floor perfectly. Unfortunately the holes Cipher drilled for my sliders did not line up so I just had to redrill those, but no big deal...
I will post the pic of the Wedge sticker soon (it says "Acura TL 05- 2145 PAS")
I will post the pic of the Wedge sticker soon (it says "Acura TL 05- 2145 PAS")
#1 Super Guy!
Joined: May 2007
Posts: 2,337
Likes: 512
Are you guys worried about roll-over protection when using 5-pt harnesses?
Everything I've ever researched has said they increase the likelihood of spinal injuries sustained in a rollover and must be used only in conjunction with a roll bar or roll cage. Then they go on to state that roll bars & roll cages are only to be used in conjunction with a helmet due to possible head contact. All this adds up to "4-pt+ harness is not for the street". I think most race organizations won't even let you run non OEM belts without extra rollover protection (but I'm not sure).
Also, beware of non FIA approved seats. They offer little to no protection in rear crash situations. Also be aware that even FIA ratings expire because the composite materials are not guaranteed to last. Typically aftermarket adjustable back seats break the hinge in a rear impact. Here is a test video of an expensive name brand (Bride of Japan) giving way during testing (yikes).
Even Recaro was less than admirable:
The Track Terror
Joined: Apr 2011
Posts: 545
Likes: 76
From: Dallas, TX
^^^ Just a couple things to say about those legitimate concerns, I have been in a car on a track (roadcourse) that had rolled 3 times at about 90 mph. I was in similar seats with 6 point harnesses (like mine) that also had only a harness bar. The driver and I walked away without a scratch (although my ribs were sore for a few weeks afterward which is completely understandable...). Those seats and especially those harnesses held us in completely...our helmet-covered heads never hit the roof and we did not move an inch...
Now of course every accident and every car is different, but I will never get into a racecar without seats and harnesses ever again...
One thing to add, as you can see in my setup I still have the factory seatbelts in place and I use those most of the time...
And yes, those rearend vids are definitely concerning! Very eyeopening....
Last edited by the fenda rolla; Dec 16, 2011 at 03:50 PM.