Question about the corner parking lights....
 10-27-2005, 04:38 AM
#1
Banned
Thread Starter
Join Date: Sep 2001
Location: WA State
Age: 44
Posts: 3,235
Likes: 0
Received 0 Likes
on
0 Posts
Question about the corner parking lights....
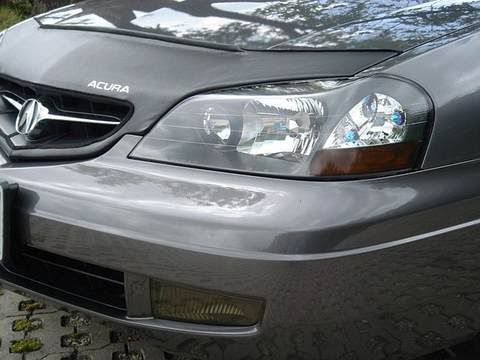
Can I clear those out, I assume so, but do I have to buy the whole headlight casing, or can I buy parts or the bulbs? Was curious if any of you did this.
 10-27-2005, 07:45 AM
#3
Team Owner
iTrader: (4)
Search is your friend.
http://www.acura-cl.com/forums/searc...searchid=80236
Good luck.
http://www.acura-cl.com/forums/searc...searchid=80236
Removing Bumper
1. Remove screw in front of each front tire.
2. Remove plastic pins from the underside of bumper.
3. Remover 10MM Bolts from underside of bumper.
4. Remove plastic clips on top of bumper.
5. Remove screws on top of bumper.
6. Unplug fog lights.
7. Remove bumper.
Removing Headlights
1. Remove Bumper
2. Remove bolts from the side of the headlight housing.
3. Remove two bolts under the headlight housings.
4. Unplug connections.
5. Remove headlights.
Clear Lights
1. Remove Headlights
2. Place headlights on a wet towel inside of an oven. Heat oven to 225 degrees. (Do not preheat)
3. After 20-25 minutes remove headlights from oven.
4. Separate headlights by hand starting from the inner corner.
5. Allow to cool for 10 minutes. Using a razor, trim excess silicone from the inside of the lens cover.
Do not remove silicone from the black portion of the housing where the sealant channel is, you will be reusing it.
6. Remove the two screws that hold the chrome housing to the lens cover.
7. You may now pop out the amber reflector by pushing a CLEAN screwdriver or any utensil for that matter through the hole for the parking light.
8. Reattach the chrome portion of the housing to the clear lens.
9. Place lens and black housing back in the oven at 225 degrees for 10 minutes. Do not reassemble yet.
10. After the stock sealant has softened remove both pieces from the oven.
11. Add a small, fresh bead of silicon to the sealant channel on the black portion of the headlight housing.
12. Beginning from the outer side of the headlight, reattach the lens portion of the housing to the black portion.
14. Tighten lens to the black housing in each corner using bar clamps.
15. Allow 24 hours for silicone to cure.
16. Cover holes with duct tape. Test for leaks in steamy bathroom.
17. Put back on car.
Good luck.
 10-27-2005, 10:53 AM
#5
Team Owner
iTrader: (4)
Originally Posted by 123456SPEED
I took an easier route, I used 35% window tint and got rid of the amber glass turn bulb.

Wow, that matches the color of your car nicely. I like that option. I wonder what it would look like with a blue CL.
 10-27-2005, 11:17 AM
#6
CLS 6MT Navi
I think it would look good on any 03, matches the blacked out headlights on the 03 anyway. The pic looks darker on my PC than it is. 35% tint is the lightest the store had, they had the darker 20% and 5%.
Trending Topics
10-27-2005, 01:30 PM
#8
CLS 6MT Navi
We'll see about the cops, they did stop me and make me put on my front license plate  (Texas), but the reflector really looks stock, and not much darker than the stock look on the new TL's I think I saw.
(Texas), but the reflector really looks stock, and not much darker than the stock look on the new TL's I think I saw.
10-27-2005, 04:30 PM
#10
CLS 6MT Navi
Yea, watch out for the 'melted headlight' syndrome, fresh from the oven. I wish the dealer would let me keep mine when I have them replaced for fogging. Had one replaced and the other one is ready now!!
One option is to buy used silver 01-02 lights on ebay (not as popular or expensive as the black 03s) and modify those, even paint em black.
One option is to buy used silver 01-02 lights on ebay (not as popular or expensive as the black 03s) and modify those, even paint em black.


Thread
Thread Starter
Forum
Replies
Last Post
DiamondJoeQuimby
Car Parts for Sale
1
09-10-2015 11:40 AM