When you click on links to various merchants on this site and make a purchase, this can result in this site earning a commission. Affiliate programs and affiliations include, but are not limited to, the eBay Partner Network.
It's time for another multi page post from me. What am I going to break this time?
First and foremost, i'm starting this thread off a bit early. I finally have a 2003 Acura CL Type S 6 Speed. For those of you who aren't interested in the story, feel free to scroll down and skip it. It's a bit long.
I have been looking left & right trying to find a 6 speed. Craigslist, Facebook Marketplace, Car-Parts, even salvaged auction sites. From a full car, wrecked or running, to just the transmission itself and just buying every piece bit by bit. At the same time, I didn't really have the money to actually buy one, but I still kept my eyes opened. Thankfully, selling parts on Ebay that I would pull from junkyard cars allowed me to save up enough money to buy this. P2R actually managed to help me out a little bit with that. Unfortunately, these cars are either in really good condition (for good reason) & out of my budget, to being too far away, or far away and not running. My plan was to find either a wrecked or in worse shape than my car.
I've seen plenty of 6 speeds come and go on FB Marketplace, but there was one that caught my eye. It was in rather good condition, being sold for $1K, and 4 hours away. The radiator was leaking out all of the fluids upon start up. I had a spare radiator, and it's an easy & quick job, but they wouldn't allow me to work on their property. They were also in a rush to sell it, and they said they would hold it if I sent them the money over the internet. Scammer alarms went off, but two days later, the car was sold. Oh well. But there was another option. A not-so-great condition 6 speed for $2100. I kept my eye on it.. They had mentioned that the clutch was beginning to slip, and the battery was bad.
About a week or two later, the price dropped down to $1700. A week or two later, I had sold some more stuff on Ebay, and I only had $1200 saved up. I decided to hit the guy up, and let him know i've been watching it for a bit. I was enthusiastic & honest about what my plans were for it, and told him how much I had saved up, but that I was working towards his price. He was willing to just take the $1200 for it, but there was a caveat (there's always a caveat..). They had lost the key, but they said it wouldn't be a big deal and they would get another one made. I had told them that they have a chip in them, so it'd be a bit more money to get it programmed. Now, they didn't know that, and they said they would have to raise the price a bit more. I think they were just trying to get a bit more money out of me, but I wasn't complaining. $1700 was already a great deal in my opinion, so we settled for $1500. Planned to go up there the following weekend on a sunday (yesterday as of this post). a 3 hour drive from Tennessee to Alabama, but which car? Rear view is hanging on my TL from ripping it off with the glass when trying to replace it, and the control arm mount is bad and causes the car to shake up & down. The CL has a lower ball joint that's on it's way out, and maybe a CV Axle since I get a single knocking sound when hard turning and accelerating. I ended up taking the CL. Then, the problems started.
Upon leaving, me and my friend went to my bank. $800 daily limit, but I could only pull out $600? Great, and the banks are closed. My buddy was helping with covering the rest of the money for his B20 that i've been building for him, so we get that, and I try another bank. Daily limit again. Gas Station ATM; declined. I knew if I hit up the guy asking if I could use Cashapp or Venmo or something, he'd think I was a scammer. Cash only he said, but I told him the situation, and we agreed on Venmo. Got some food, and we hit the highway. We showed up, and the car was next to some other totaled vehicles in this big gravel & dirt type area, in a big open lot. It was pretty cool to say the least. They had sent me videos of the car driving around to prove it was working, but I was driving and didn't get to see it. They had jumper cables on the battery when I showed up. Since it had a bad battery, I took the one out of my 3G TL to use in this one for the way home. This is a hint.
So, I immediately pull out the battery, and put it in the car, and get it hooked up. First thing I noticed, the leads were too small for one terminal, and too loose on the other. Immediately upon hooking up, the horn went off. Not like the alarm went off, but like some one was holding down the horn. They had no clue why it was doing that, so I decided to just unhook the horn. Same exact thing, but how? The horn was disconnected. They tried to crank the car, and noticed nothing was getting power. I start panicking, because I already handed over the money, and this car might not be going home with me. I check the clock fuse; burnt leads but no popped. I checked the ECU fuse, same thing. I decided to call up 619rcr and see if he could tell me what to look for. Told him the situation, and I started looking around. He said to check the 120A Battery fuse, and it looked popped. Checked the one in my CL to verify, and yeah, it was toast. Then he said it, "The polarity isn't reversed on the battery, is it?". Yeah.. yeah it absolutely was. Now i'm freaking out thinking I just fried the ECU. We head to an O'reillys down the road to get a new fuse; they're out. Call advanced out, they're out. He calls his friend at O'Reillys, and they have one. So we drive 15 minutes to go get it, and then 15 minutes back. We throw it in, I dropped a screw in that little corner by the fuse box (I've done this so many times and I still don't learn), but the one screw was enough. The clock was back on, power to the dash, we jump it, and it starts right up. I was excited, and let out a loud "YES! YEEEES!". I thank the guy a million times, he was bummed to sell the car, but I told him I would take care of it and that it was going to a good home. Apparently, all the offers he got were under $1k, with people saying they were going to gut it and turn it into a race car. I told him he could see what happens to it here on Acurazine if he's interested. For anyone that would like video updates, my Instagram is ThefireballVR.
So, that's the story. Let's see the car now.
Now, the car's not perfect, it has some issues. It's bone stock, except for the cat delete. They welded in just a straight pipe. Thankfully, we don't do emissions testing her anymore, that's not an issue. The car drives and shift perfectly fine. My friend was honestly impressed with it. Here's all the issues:
- Large crack on the windshield
- Rear view mirror is taped and maybe held on with some epoxy? Previous owner tried replacing the mirror, just like what I did on the TL.
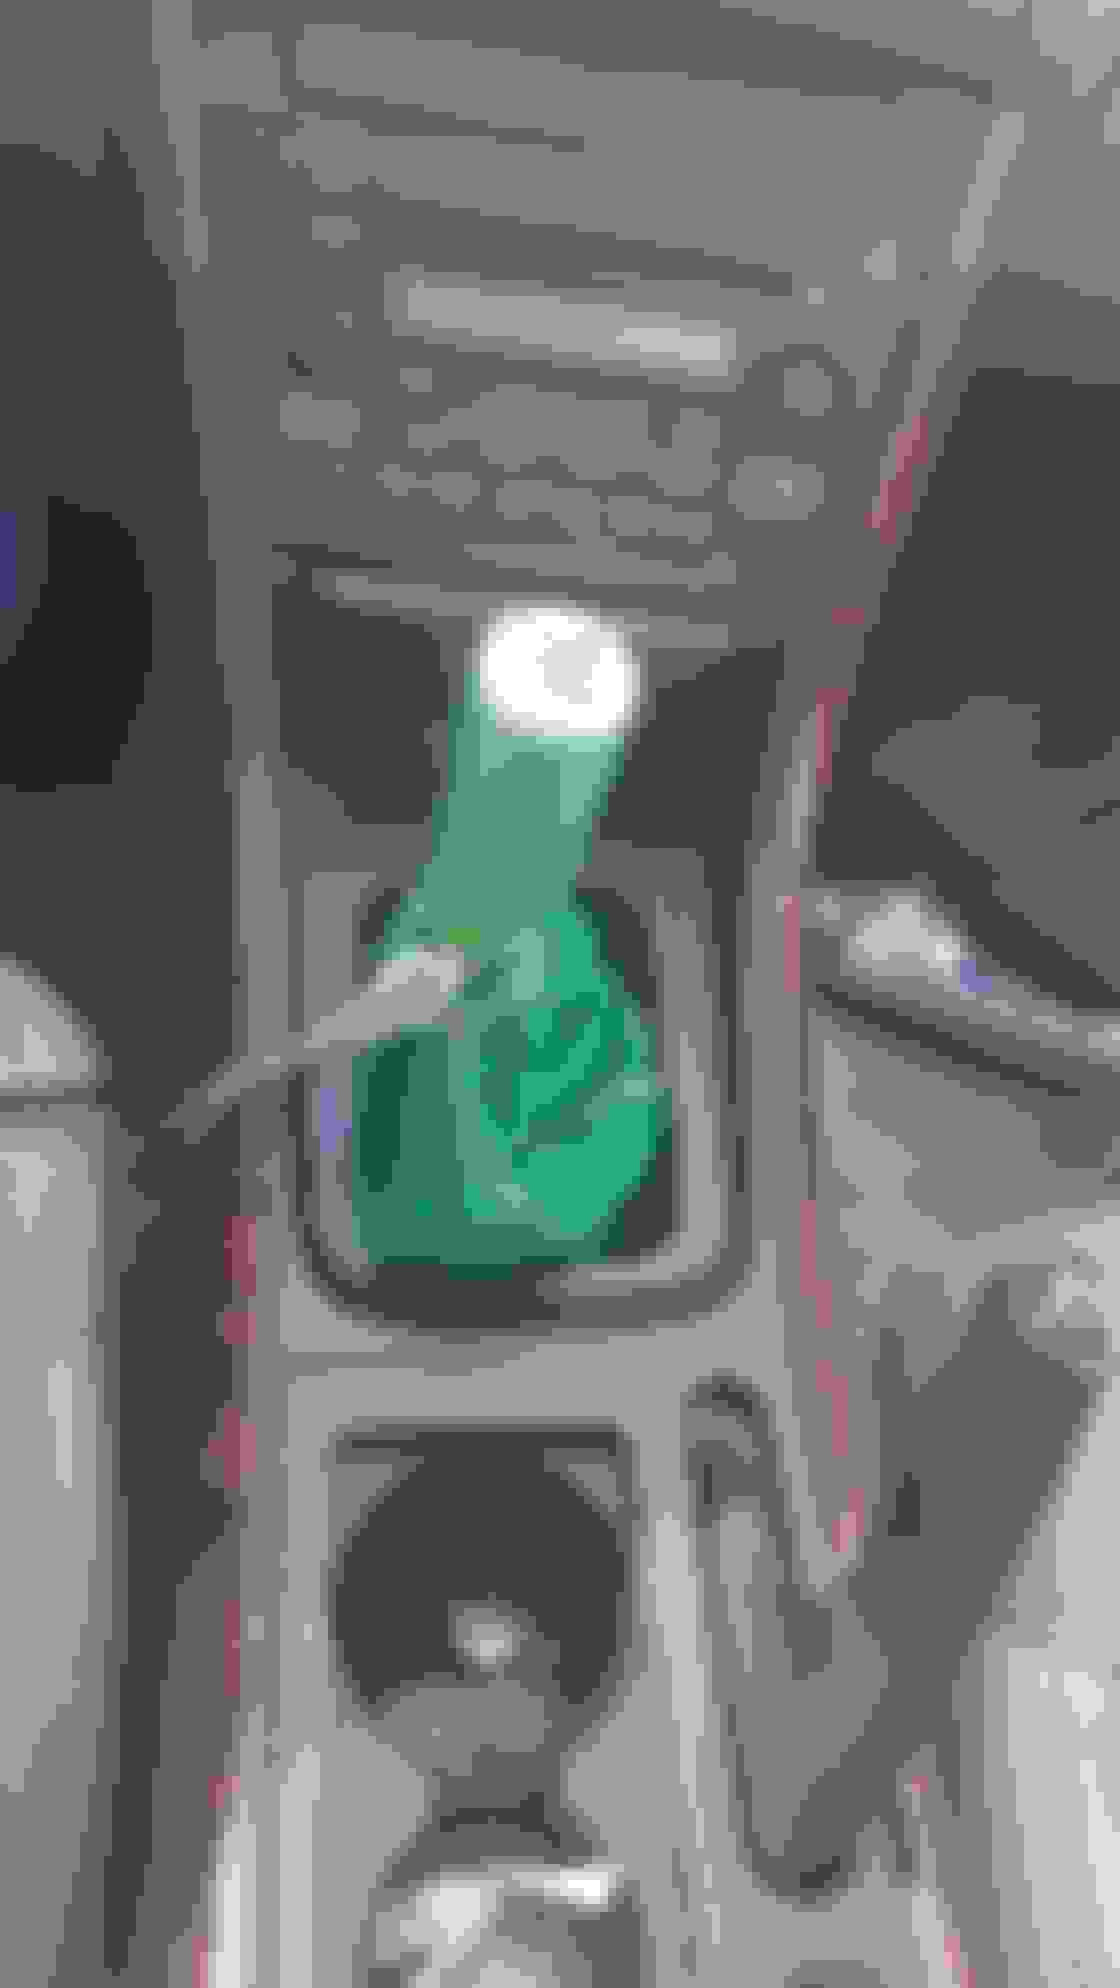
- The needle for the speedometer is past the peg. Previous owner said he had to bash it a couple of times, and eventually, bashed it so hard, it went past the peg, and spun all the way around. It's coming out anyways, i'll fix it.
- Driver side rear lights are completely out, and filled with about 1/3 of water.
- IACV is messed up, and RPMs either go up and down, or idle at about 1500.
- Some tears in the leather seating, who cares.
- Clear coat failure, which is normal.
- Rear shocks might be going out? My friend drove the car home, and when we took the back roads, it was bouncing a bit, but on the highway, when he hit bumps, it was solid. So not sure.
- Bad battery. Not so sure anymore. I think the 3 hour drive fixed it, because I can now start the car up with it just fine. It is a Honda brand battery as well.
- Valve cover gasket leak; oil on the side of the head. I have spares.
That's about it. It drives perfectly fine. It does have a CEL, and I haven't scanned it yet. Going to guess it's for the missing cat, or IACV. I'll find out later. I have it covered up with a fabric & plastic tarp behind my garage for now.
I said I started this thread off early because not only am I broke and have to save up some money, but there are somethings I need to get before I begin this swap.
- A front end suspension kit
- Since i'm doing a suspension kit, i'll be throwing on some coilovers as well
- New flywheel & clutch
- Figure out the header issue
The first two are a little obvious, so let's talk about my Exhaust. My exhaust is welded from the Y pipe to the the mufflers. It was a pain in the ass doing the engine swap with the Y pipe in the way. DC Sports won't work with the manual mounts, but I have been told I can use the automatic mounts. I might end up doing that, but I might end up going with some P2R 3 inch headers instead. There's nothing wrong with the 2.5 Inch DC Sports headers. That's a good size. Some might even say 2.5 is average. I've had a lot of fun with my 2.5 inch pipes. But how will I know if 3 Inches is better than 2.5 inches? Jokes aside, if I got this route, i'll need to get a welder, and actually learn how to weld, that way I can weld a flange to disconnect my Y pipe. I would prefer using the manual mounts. I'll figure that out when I get to it.
As for the car itself, i'm not sure if I want to keep it, or sell it. It will be getting fixed up, converted to an automatic, and made road worthy. I'm not going to restore it to look new or anything. If I do sell it, I will be making sure it goes to some one who will show the car some respect and will take care of it. Not some one looking for a car to get from Point A to point B.
Don't expect any updates any time soon. I've got money to save.
Congrats on the CL-S6 purchase. Now you have ALL of the major pieces to the swap puzzle, by far the best way is the donor car way.
Originally Posted by Thefireball
- The needle for the speedometer is past the peg. Previous owner said he had to bash it a couple of times, and eventually, bashed it so hard, it went past the peg, and spun all the way around. It's coming out anyways, i'll fix it.
Try the magnet method below for the speedo needle:
I haven't watched the video yet. Bad cell reception where I'm at, so I will later. However, the guy did mention that it spun all the way around, so I'm not sure the extent of the damage. I'll give it a try though. It does still work, it's just stuck behind the peg.
Quite the tale. Def getting more and more difficult to find complete 6 spds in decent condition for a decent price.
Now you can take your time doing the swap... GL and keep us posted.
Oh and if the magnet thing doesn't work you could disassemble the front cover and move the needle. I took the front off mine once for test fitting.
The story is only beginning. Going to be a fun time wrangling out the transmission.
That was the plan since it's coming out. I do have some powerful magnets though, so it's worth a try.
For the past 3 days, I've been working on detailing the interior of this car. It was nasty. Previous owner was clearly a smoker, what from all the ash, loose tobacco in the cup holder, cigarette burn holes in the leather in various spot, even a disposable vape pen and a full bottle of vape juice in the glove box. I just ran out of juice for my fog machine too, so nice.
Started by removing the front two seats, and gathering up all the loose change. There is a LOT of coins. I got a fat refund. Here's some before pics.
Rear seats won't really show a difference in the after pics, but I took them anyways.
I've vacuumed EVERYWHERE. The floors, the seats, behind the rear seats, inside the shifter assembly, cup holders, glove box, arm rest. What a mess. After that, I used my Bissell wet vac and cleaned these floors. I know there's proper solutions to use for this sort of thing, but I'll have got lying around is some Fabuloso, so that's what I used. As long as these floors came out cleaner than before, got some stains out, and made the car smell better, I'm happy. I even used the wet vac on the rear seats, from top to bottom. Made sure to get into the cushions.
Not all stains came out, but most did. I'm still happy, and now the car smells much better. As you can see, that water is nasty. Went in clear purple, came out brown.
As of now, I'm currently working on the floor mats.
I've already smacked them a couple of times against the wall of my garage to get as much dust & dirt off of them as I can. Vacuumed them as well. The driver side mat on the left is some.. hardened spots. Rock solid. I've taken a wire brush to it after soaking it in the Fabuloso & water mixture. It worked a little bit, but made it dirty since the brush wasn't clean. Vacuumed up the liquid, and repeated it again, this time with a wire wheel on my drill.
It did the job, for the most part. It's not perfect, but I'd say it good enough. Got some stains out of the other mats, then threw them in my washer to clean.
I'll be cleaning the dash and the rest of the trim once the seats are in. Want to get them cleaned & fixed up a bit. My girl is good at sewing, and even stitched her own CL's seats. Want to see what she can do with these seats, especially since the driver seat has a bunch of tape on it. Not a fan of seat covers, so I want to get these fixed.
Oh, and here's all the change I've found. Previous owner even left a new box of OEM Acura Wheel locks, and the shifter trim was in the back.
Reminds me of 01 Lexus GS300 used to have. Had that tan color color interior. Got it used from 2nd owner with 60k miles. Spent a lot of time shampooing carpets, washing, clay bar, wax. I had a lot of pride in that car. Up until then my neighbor side swiped it in the parking lot. lol.
Reminds me of 01 Lexus GS300 used to have. Had that tan color color interior. Got it used from 2nd owner with 60k miles. Spent a lot of time shampooing carpets, washing, clay bar, wax. I had a lot of pride in that car. Up until then my neighbor side swiped it in the parking lot. lol.
I've got a buddy with a GS300. Good, stylish cars.
No claybarring & waxing here, because of the missing clear coat. I'll just let my pressure washer do all the work lmao.
I'm actually thinking of trying my pressure washer on these floor mats. Pulling them out of the drier, they are all now darker in color, but the fabric has at least softened up. Going to bust out a big handled brush & and some dish soap if the pressure washer doesn't work. Sure hope it can hold up to the pressure, or it's off the to junkyard for new mats lol.
Welp, I've spent all day attempting to clean these mats. At some point, you've got to stop obsessing over the cleaning, and just realize they aren't going to get any cleaner.
Threw them outside on my drive way and scrubbed them vigorously with a brush & dish soap, then pressure washed them. I did this 3 times, and even used a little bit of alcohol on them as well. This is before pressure washing them, and also after they were thrown in the drier.
This is after pressure washing them.
Threw them in my drier, and then...
Well crap. They got dark again because there was dirt in the drier from the first go around. So I decided to go back over them again using the Bissell wet vac using Fabuloso again. Did this two times.
That's as good as they're gonna get. The excessive amount of cleaning has caused some of the threads around the edges to come up.
Can't say I'm too pleased with the results, but it's whatever. If I find better mats at the junkyard, I'll probably take them. At least these look cleaner than how they started, and definitely smell better.
Now it's onto the seats. That's going to be tomorrow.
First time around, I used some of this stuff on a driver side carpet pepsi soda spill stain and it did a pretty good job. It will need a second time though. Folex 36 oz. Instant Carpet Spot Remover Carpet Cleaner FSR36 - The Home Depot
It's available locally if interested. I have found that this light parchment color is going to show some dirt after cleaning, it's the nature of the beast.
Good Luck
Let's start with continuing the saga of the seat's. Tucked into the corner of my garage, for now.
This is the passenger seat. The portion where you back sits as been stitched up, and I'm happy with the results. The bottom portion on the other hand has me worried. They didn't immediately break up on sitting in the seat, but over time, they will eventually break.
This is currently the driver side. Her idea was to originally cut a new piece of leather, then glue the old leather on top.
Well, I'm not too pleased with the results. Progress has stopped here for the past few weeks. Personal life getting in the way of things, causing us to be busy, mixed with a bit of no motivation to do anything. She had gotten to sewing things, but she had been using special needs, and kept breaking them. The problem was that I was having her do the repair work with the leather still attached to the cushion. I figured, screw it, it's already apart, and if I have to get a new seat cushion anyways, I might as well take off the leather completely. I do not look forward to reinstalling those bull rings.
So, the plan now, I'll just flip the leather piece over, sew it onto the yellow cushion, then sew the two pieces onto the main leather cover, then throw the cover onto the cushion. This time, I'll be trying my hand at the sewing, as she's busy and doesn't have the time now. If things go well, I'll probably redo the passenger side. In the mean time, I've been keeping my eye on the local junkyard for a CL that I can pull a new seat cushion off of. No CLs have popped up lately, bummer.
Next up, I can't work in any space that's messy, from the kitchen to the garage. My garage has been a mess from laziness & this whole eBay side gig thing. Boxes, packing materials, ripped styrofoam balls all over the floor. So, I spent all of yesterday cleaning my garage.
I even cleaned up and organized my work bench. Bought some heaters, because working in a cold garage when it's snowing outside while using metal tools working on metal car parts; not fun. Bought 3 brand new in box, $13 a piece. Couldn't pass up the deal.
Now I just need to get this B20 that I built swapped into my friend's del sol to make even more room.
Just wanted to show off my latest achievement, because i'm kind of proud of myself on the paint job with this one. But this is an Acura forum, in the V6 section, so I'll move on.
2 out of 3 parts from my list are on the way. One of them will have to come at a later date. I'll make a post talking about that when they arrive. Pretty excited, until I check my bank account .
As a way to end this post, I have a question for everyone. I've searched the forums, and I can't seem to find a solution to my issue. The issue is this:
I have taken keyfobs from the junkyard as backups in case I needed them. This donor car that I bought did not have a keyfob. So I figured "Hey, let's program this spare key fob to the CL!" So I did. Everything went smoothly, and it works fine. Then one day, I realized my girl's trunk was opened on her CL. Then one day, I hit the unlock button, and noticed not only was the lights on the donor car lighting up, but also on my girl's CL. Turns out, the keyfob I grabbed was actually hers and not the junkyard keyfob; I mixed them up. Now one fob is programmed to two different cars. How the hell do I 'unprogram' a keyfob? When I programmed it, her car wasn't at home. I've thought maybe programming it again would fix it, but I haven't given it a try. Anyone have a solution, or should I just go ahead and smash this one to bits?
As a way to end this post, I have a question for everyone. I've searched the forums, and I can't seem to find a solution to my issue. The issue is this: I have taken keyfobs from the junkyard as backups in case I needed them. This donor car that I bought did not have a keyfob. So I figured "Hey, let's program this spare key fob to the CL!" So I did. Everything went smoothly, and it works fine. Then one day, I realized my girl's trunk was opened on her CL. Then one day, I hit the unlock button, and noticed not only was the lights on the donor car lighting up, but also on my girl's CL. Turns out, the keyfob I grabbed was actually hers and not the junkyard keyfob; I mixed them up. Now one fob is programmed to two different cars. How the hell do I 'unprogram' a keyfob? When I programmed it, her car wasn't at home. I've thought maybe programming it again would fix it, but I haven't given it a try. Anyone have a solution, or should I just go ahead and smash this one to bits?
Maybe take the specific 'junkyard' key fob spare with a good battery, leaving your girl's fob far away from the car, then perform the program process to your car once again; in turn, perhaps that will override the current key fob signal for the new junkyard one you just programmed?
After all, the car 'picked-up' the new frequency from your accidently grabbed girl's fob and was programmed to that frequency overriding the lost original fob's that came with the car.
In addition, please give a general explanation on how you are performing this key fob reprogram procedure?
Well, I programmed the junkyard keyfob, works fine, and doesn't trigger my girl's car. I then took the keyfob that's paired with both cars, and tried reprogramming it to hers again, but it didn't overwrite my car's data. I was thinking maybe it's because there's a 1 & 2 keyfob for the different seat settings, but then I remembered my main CL has 3 keys & fobs. 2 main keys for seat 1 & 2, and a valet key for seat setting 2. Maybe I need 3 or 4 keyfobs total, each for both seat settings, and then program all 4 to overwrite the data? I don't know. I suppose i'll just leave it be, because that fob is her backup anyways. As for the procedure, i'm doing exactly as the manual instructs to do:
Looking at the instructions now, I wonder if #13 is the answer. Problem is, that's storing codes and not removing them. So maybe I really do a full set of keys? I don't know..
Also just want to say that I know this is a 6 speed swap thread, and not a sewing & restoration thread. So I plan on monday to pull the car in and start getting to work, if I wake up in time. If I can't wake up at a reasonable time, then some time this upcoming week i'll start. I've been getting the itch to work on a car lately. The new leather is coming along great though. I'm almost done sewing it back together, so i'll probably update this thread with that later.
Stitching is all done. It's not perfect, but I think the seat looks way better than it did before. Didn't feel like completely fixing the corner, but I did stitch it up a little bit. I'm happy with the results.
You can see part of the bullring sticking out of the side. Oops.
Tomorrow, seats go in, car will be pulled into the garage, and I'll start getting things apart. I've been trying to figure out how to go about doing this, since I have a 1.5 car garage and can't fit both cars in at once. Subframes will have to be swapped, but I can't take it off I'm going to roll the car out, and I really don't want to pull the motor out. I'll probably just pull the motor out of the donor car, but I'll leave the motor in my main car.
I'll figure it out tomorrow when things start coming apart.
Was doing some reading on the official 2nd gen CL thread, and came across keyfob programming. Some one mentioned that the car will save the last three remotes programmed, and the fourth one programmed will erase the first remote programmed. I was too focused on figuring out to program that I didn't bother to read the text mentioning.
I hate the word program now.
Last edited by Thefireball; 11-28-2022 at 01:34 AM.
Car is on jack stands, wheels are off, wiring harness under the hood has been completely disconnected from the motor & transmission. I could have made things easier with the harness if I had removed the coolant hoses in the back, but I don't want to deal with a pool of coolant in my floor currently, and I want to see how far I can get into this without removing the motor. Wrangling those cables around the hoses was a pain though.
Does the wiring harness that I have disconnected the only one that needs to come out, or does the one on the right also need to come out? Here's a pic of the cable I'm talking about:
I'm also streaming all this work being done over on twitch if anyone wants to watch me struggle and embarass myself. Two VODs currently so see how I got here. Twitch.tv/thefirebali
^
Is this the cable you are referring to?
If so, then according to fsttyms1's parts list that is #5 below 32120-S3M-A20.
If you already ahve a Type-s you MAY Not need these???? Right side cabin to engine comp harness 32100-S3M-A12 Left side cabin to engine comp harness 32120-S3M-A20
Dash, Cup holders, arm rest, shifter assembly & cables, and ECU have been removed. I did things the hard way and pulled the cables up through the interior instead of out from underneath the car. Parking brake will be staying in as I'll need a way to stop the car when rolling it out. However, currently, the rear wheels are locked anyways. When I was originally driving the car in, the rear wheels would not spin, at least, not the rear passenger one. I'll look into later.
After taking the rest of the interior apart and getting the wiring harness out, next up on the list is removing the axles. Didn't have much time today due to me not going to sleep until 5AM and waking up late. I've got PB Blaster sitting on the axle nuts currently, as my impact is a crappy Chinese brand that wasn't able to break them loose. My friend will hopefully be bringing is heavy duty snap on impact tomorrow.
I was doing some research last night on other people's 6 speed swaps, and I noticed that no one swapped the subframes, nor was it mentioned in the lists. I thought I had to, because some one over on the 3G side said I would, but maybe that only pertains to the 3Gs. Less work for me anyways, because removing it looks like it suuuuuuuucks. Not only that, the previous owner removed the cat and had a straight pipe welded in place.
So removing the subframes would be extra difficult, nor do I have the strength or the means to actually bring it down without it tipping over.
So, for removing the transmission, I'll be doing things the way 619 recently did following some one else. I plan on getting an engine support bar to hold the engine in place, and use that as a way to lift the engine high enough to remove the rear & front mounts.
Now on to the rear engine mount. I have DC Sports headers, so obviously, they won't work with my headers. I'm going to have to either stick with the auto mount, if it works with the manual transmission, until I can get around to ordering some of P2R headers. But, I'm hoping by the time it comes to actually installing everything on my car, that I'll have the funds to order them, and I can get them installed at the same time. I've been trying to figure out a way to go about fixing the welded on headers issue though.
When I had my exhaust installed, I had asked the guy to install a flange from the Y pipe to the cat. Well, I asked after he had already cut the flange off the DC Sports. I was hoping to keep them fully intact in case I ever wanted to resale them, but there goes their value I guess. So the DC Sports are 2.5inches, I'm guessing because I've never checked, but the cat is 3 inches, and they're welded together. If I get the P2R headers, I'm wondering how well everything is going to fit, and where I'll have to cut the piping, and hoping the fitment isn't short leaving a gap between the Y pipe & cat. But that's an issue I'll have to tackle when I actually have the headers and see what needs to be done.
Oh, and I also noticed that the manual ECU only uses 3 plugs, where as the auto uses 5. 4 plugs on 1 side, 1 plug on the other. So now I'm wondering if that wiring harness on the driver side will need to come out, as that's where the 1 plug side is at on the auto ECU. Not to mention. The part numbers are different. But from what I read, and I might be mistaken here, you can keep the plug in, but I'll need to repin it. I'll figure all that out when it comes time to work on my auto.
Last edited by Thefireball; 11-29-2022 at 05:25 PM.
Does the wiring harness that I have disconnected the only one that needs to come out, or does the one on the right also need to come out? Here's a pic of the cable I'm talking about:
The one cable you can see near the clutch fluid reservoir is for the wipers. yes it has to be disconnected. Before that, you should remove the hood and wiper arms. Then remove all the clips and plastic shroud. The wiper assy is held in with 2 bolts.
There is another harness that connects to the driver underside fuse box that is harder to see. Not sure if you need that for at to mt swap. But, I got to it by removing the brake master cylinder. There is some foam under the dash that will be covering the inside end of the harness. IIRC it will have a plug for imrc under the dash as well.
Oh and for the stuck axle nuts, try popping off the wheel center caps. Then reinstall the wheel and torque. Remove the 36mm nut with the weight of the car on, 1/2" breaker-bar and fence pipe or other cheater bar slipped over the breaker.
Front end suspension kit showed up today. My main CL has been needing this done for awhile now. I get a single knocking noise when I turn & accelerate. It only knocks once, and it doesn't always do it. I also get a slight wobble in the steering wheel at about 60mph. All of the boots on the ball joints are cracked are torn on my main CL, and I figured it best to just go ahead and replace everything.
Only issue is that the lower ball joints are pressed in. I'll probably end up taking them to a shop to have the new ones pushed in. But I'm a cheap skate, and if I can DIY and save money, I will. I've read a couple posts on here of people saying they simply 'wacked' the old ones out. But they never say how they got the new ones in. How difficult would it be to put the new ones in without a press?
Anyways, all I've managed to do is remove the spindles, the passenger side axle, and drain the transmission fluid.
I spent way too much time trying to figure out how to remove the spindles, and trying to wack the ball joints out. The lower one wouldn't come out, so I had to go and buy a pickle fork, and I also bought a C clamp type thing to also use, in case the pickle fork didn't work. The clamp worked in combination with the fork to hold the clamp in place, because it kept slipping off. All the ball joint boots are still intact, and are actually in good shape. I might just swap the whole spindle to get around the ball joint pressing issue.
But since I spent so much time trying to remove the spindles, and then the stupid 3 bolt axle mount (I REALLY WISH I COULD REMOVE THAT Y PIPE ON EITHER OF MY CARS), I ran out of time to remove the other axle. I'll do it tomorrow; it shouldn't take long.
Originally Posted by 619rcr
The one cable you can see near the clutch fluid reservoir is for the wipers. yes it has to be disconnected. Before that, you should remove the hood and wiper arms. Then remove all the clips and plastic shroud. The wiper assy is held in with 2 bolts.
There is another harness that connects to the driver underside fuse box that is harder to see. Not sure if you need that for at to mt swap. But, I got to it by removing the brake master cylinder. There is some foam under the dash that will be covering the inside end of the harness. IIRC it will have a plug for imrc under the dash as well.
Oh and for the stuck axle nuts, try popping off the wheel center caps. Then reinstall the wheel and torque. Remove the 36mm nut with the weight of the car on, 1/2" breaker-bar and fence pipe or other cheater bar slipped over the breaker.
Greeeeat, more work. I'll have to remove the hood at some point to remove the transmission anyways. Wipers won't be hard, thankfully.
Thankfully, my friend came through with his snap on impact, and it zipped those axle nuts right off. Unfortunately, it was no match for the mighty crank bolt that I forgot to break loose before disconnecting everything. Even hotwiring a battery to the starter didn't work. So I used my arm's length of a breaker bar + the full length of my jack's handle to break it free. Nothing like bending metal with the fear of it snapping and the thought of something breaking and flying right at your face.
I do have a question though, but i'm not sure there's a confident answer in this. The 'brother' technique you used to remove the transmission; will that possibly work with the automatic transmission as well? I plan on giving it a try at the very least.
Wiring harness, starter, radiator, front & rear engine dampers have all been removed. Slave cylinder has been disconnected from the transmission, but is still attached, just out of the way. Hoping to remove the transmission tomorrow, but not sure if I'll have time. So maybe Saturday.
Driver side axle I pulled out last night before bed. The passenger side came out real easily, but the driver side was being difficult. Wiggling the flat head in there back & forth did nothing. I was trying to be careful not to damage the seal. Ended up using my newly acquired pickle fork by wedging it in there, then lightly tapping the end with a hammer. Broke it free, and it slid right out. The seals are perfectly intact, and the axles are in good condition. I might swap the axles into my main CL, because I'm not sure if they're good or not. I'll find out when I get there.
I do have a question though, but i'm not sure there's a confident answer in this. The 'brother' technique you used to remove the transmission; will that possibly work with the automatic transmission as well? I plan on giving it a try at the very least.
Would be interesting to hear if it will work for the auto trans. At the least, if it works, it would demonstrate another avenue for those, like me, who may need to swap an AV6 in the future.
I do have a question though, but i'm not sure there's a confident answer in this. The 'brother' technique you used to remove the transmission; will that possibly work with the automatic transmission as well? I plan on giving it a try at the very least.
Originally Posted by zeta
Would be interesting to hear if it will work for the auto trans. At the least, if it works, it would demonstrate another avenue for those, like me, who may need to swap an AV6 in the future.
I don't see why it wouldn't. The main difference, would be that you would either have to 1) remove the torque converter with the trans or 2) unbolt and try to tilt the trans sideways enough to lift out the converter from between the trans bellhousing and motor. The flex plate isn't very thick, but it might help to unbolt that as well.
Only issue is that the lower ball joints are pressed in. I'll probably end up taking them to a shop to have the new ones pushed in. But I'm a cheap skate, and if I can DIY and save money, I will. I've read a couple posts on here of people saying they simply 'wacked' the old ones out. But they never say how they got the new ones in. How difficult would it be to put the new ones in without a press?
You could try renting a ball joint press from autozone or another parts store. Basically like a big c clamp. Believe mine has 7/8 or 22mm hex on the top. Not very strong though and it needs a lot of torque to turn a ball joint. I used it a few times on upper ball joints with my 1/2 24volt impact.
With presses, the hardest part is the setup to get just the right clearance. Lower ball joints in particular are tricky to setup just right. Even with a 20T press at my disposal, I have avoided replacing lowers on a few cars. New boots and repacking in grease has been my temp fixes.
I've come to the conclusion that i'll be pulling the engine out with the transmission on the donor car. Sure, it'll make some things easier, but the motor needs some things fixed on it. I've noticed on these engines that it's common for the oil pan gasket to fail, just like this one has. The oil pan and everywhere around it is covered in oil, and the original owner said it had an oil leak. If I plan to sell the car, well I'd like it to be fixed up where it can be, and unless some one were to cut the exhaust piping, they'd have to pull the motor out to remove the oil pan.
As for my main CL, I don't want to pull the engine out. But I'll figure that out, again, when it comes time. Oh, and I just learned today that there's a nipple on the back of the engine to drain the coolant from the block. Wish I knew about that in the past.
Originally Posted by 619rcr
You could try renting a ball joint press from autozone or another parts store. Basically like a big c clamp. Believe mine has 7/8 or 22mm hex on the top. Not very strong though and it needs a lot of torque to turn a ball joint. I used it a few times on upper ball joints with my 1/2 24volt impact.
With presses, the hardest part is the setup to get just the right clearance. Lower ball joints in particular are tricky to setup just right. Even with a 20T press at my disposal, I have avoided replacing lowers on a few cars. New boots and repacking in grease has been my temp fixes.
I'm considering renting one, but I think I'm going to try with what I have first. I have 3 different clamps; a regular ol' big C clamp, a clamp used for removing valve springs which would work well as the fitting could go right around the stud, and a new clamp I just used to remove the ball joints from the control arm. I've got big enough sockets that should work, but I'm worried the clamps won't be able to handle the amount of force needed to push them in/out, and there's no way to attach an impact to them.
If I can't do it with what I have, then I'll rent some tools. If all else fails, then off to a shop they go.
How bad of an idea would it be to wack it out with a hammer like others have?
Last edited by Thefireball; 12-01-2022 at 08:59 PM.
Replaced the lower ball joints just a month ago. Used air hammer and they came right out. Pressed in with ball joint tool. Honda adapter kit is needed. Borrowed from O'Reilly's. I used the hardrace roll centers. I highly recommend it helps with bump steer. Also lowers the front so had to adjust coils
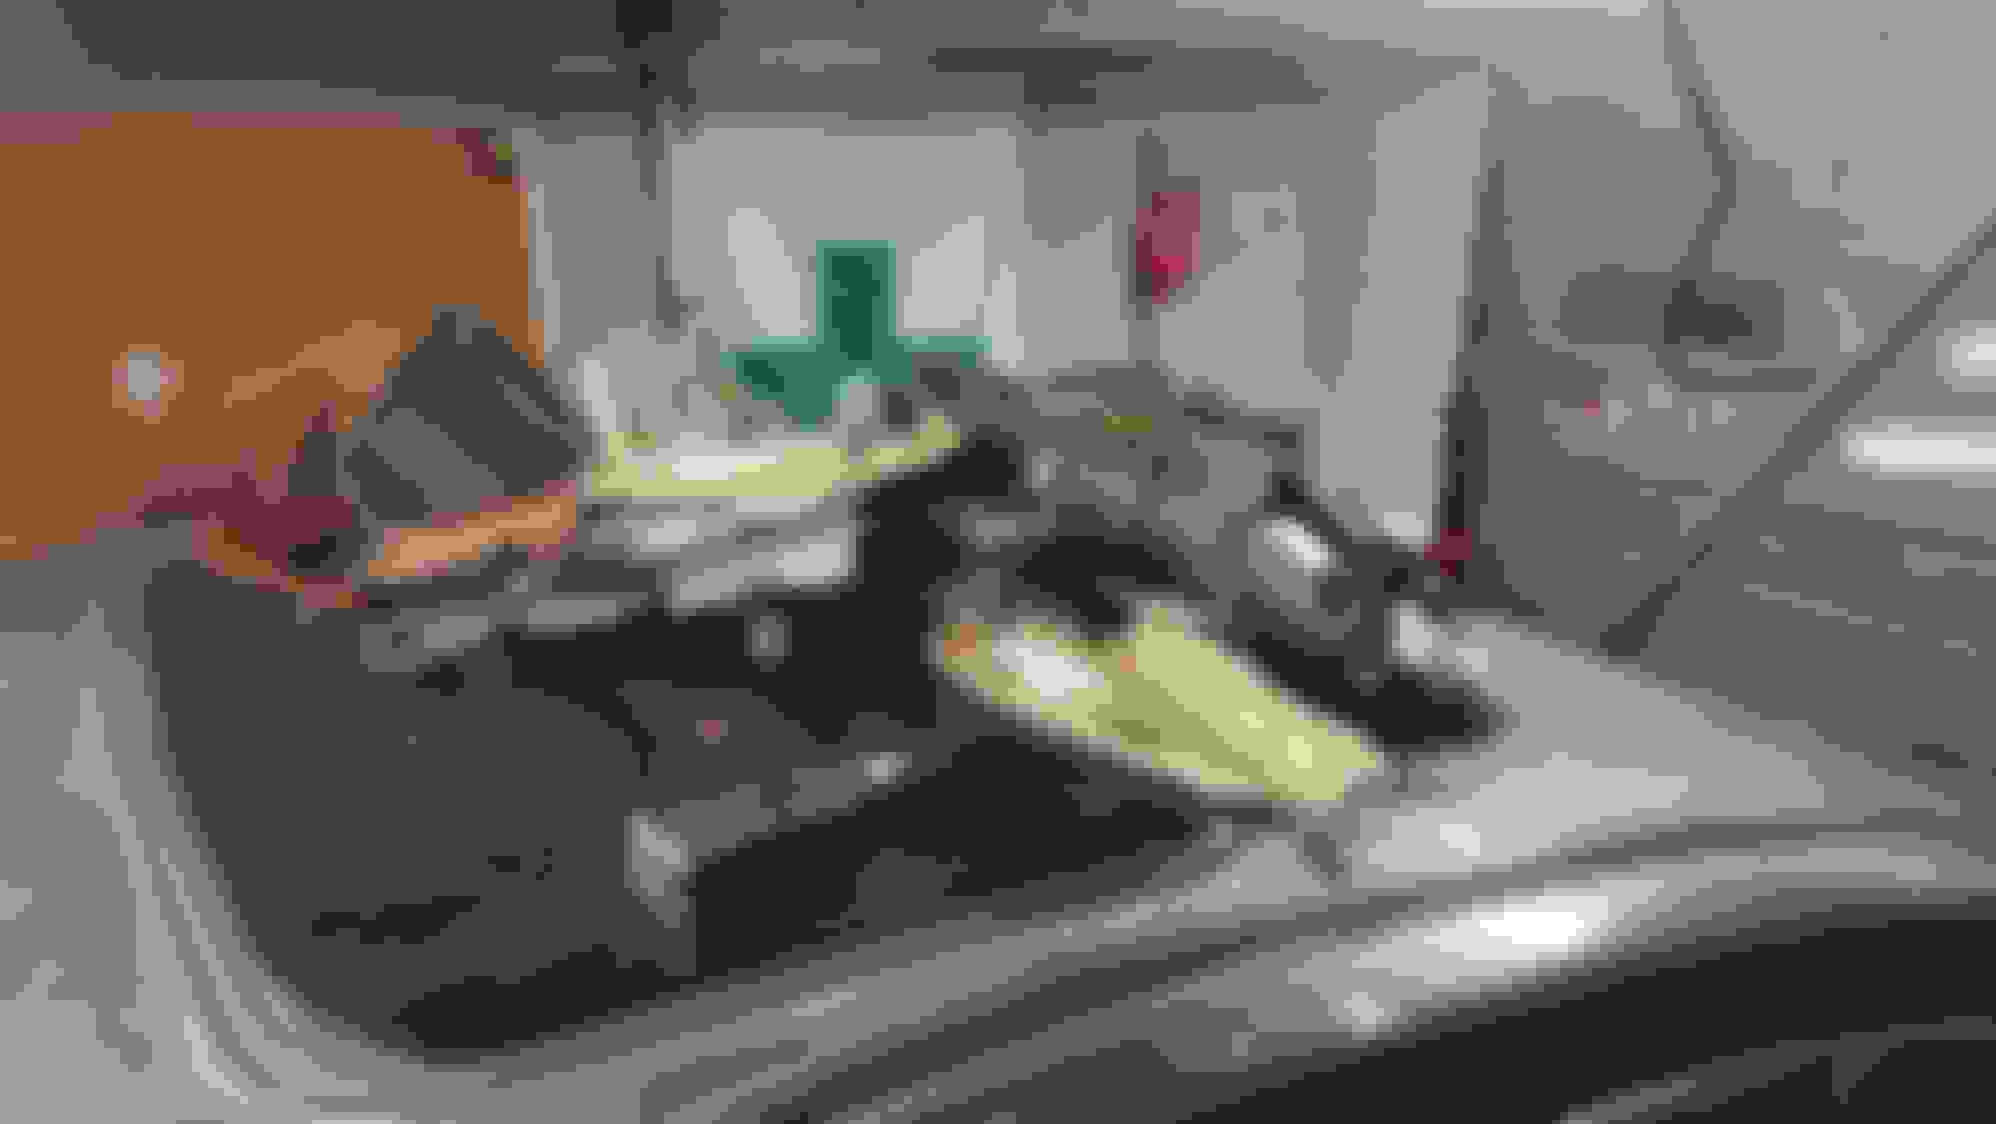
Wow, you are really moving along! MaxBeast4Z would potentially give his left orchid for those items circled in yellow.
In addition, that red arrow rear 6MT mount retails for around $610.78 before shipping.
Wow, you are really moving along! MaxBeast4Z would potentially give his left orchid for those items circled in yellow.
In addition, that red arrow rear 6MT mount retails for around $610.78 before shipping.
I could have had it out in a day or two, but I prefer taking my time. I had my hoist set to 500lb, because that's as short as I can make it if I want it to reach the motor. How much does the motor & transmission weigh? Like around 650lb? I was nervous as hell trying to maneuver my hoist around. The top of the hoist kept hitting the beam in my garage, so I also had to figure that out. Next time, I'm shortening the chain.
Thankfully, all the mounts seem to be in good shape. Are the ones circled in yellow the ones that are discontinued? And $600 for a mount? Can't you just buy aftermarket stiffer mounts for cheaper? Might as well just take the $600, buy the stiffer mounts, and then use the rest to buy P2Rs headers. Unless I saw wrong and the mounts were for somewhere else.
Are the ones circled in yellow the ones that are discontinued?
Originally Posted by Thefireball
And $600 for a mount? Can't you just buy aftermarket stiffer mounts for cheaper? Might as well just take the $600, buy the stiffer mounts, and then use the rest to buy P2Rs headers. Unless I saw wrong and the mounts were for somewhere else.
The vendor is doing us a favor and marking it down from $841.30.
That's why I picked this one up, years ago, so that when the day came to replace that mount I'd use this $100 XLR8 one in its stead.
It will probably stiffen things up and cause a little more 'in cabin' vibration though.
The vendor is doing us a favor and marking it down from $841.30.
That's why I picked this one up, years ago, so that when the day came to replace that mount I'd use this $100 XLR8 one in its stead.
It will probably stiffen things up and cause a little more 'in cabin' vibration though.
'a favor'.
Nothing wrong with a little back massage while your cruisin'.
you'll actually only get the massage while idling...cruising you probably won't notice a difference.
Well, I couldn't sleep...got some car related shit going on early tomorrow morning and my mind was racing a bit...
glad I stumbled on this thread. Words and sentences into complete thoughts that are part of a story seem like a thing
of the past...but not for me, I still enjoy seeing it all come together in real time. So thank you for that and I'll be in here and
there to see how things are going.
Pardon my ignorance, but why didn't you just opt to spruce up the already 6MT you are using as your donor to be the main car?
Meaning, address the paint and just keep a 6MT that came from factory that way, intact. Just curious, I'm a 3G TL guy and that swap
is a fucking nightmare for us.
Well the CL is my weekend car at this point. My stock 3G TL is my daily get around grocery getter lol. Some vibrations won't bother me, until things start falling off, like the darn passenger side pillar in the corner.
And here I thought I talked too much and everyone thought I was annoying. Glad to hear some one appreciates my wall of text.
I considered it, but there's a couple different reasons. I prefer the blue Aegean pearl, even if my clear coat is failing. Second, I prefer the black interior over the ugly tan interior. My main 5 speed CL is in much better condition than this one, and it also doesn't have a cracked windshield with a rear view mirror that is taped on like this one.
The exhaust is also completely welded on it. Removing it would be a pain, if even possible without cutting it. I originally wasn't going to remove the engines, and so I figured if I wanted to fix this 6 speed, I'd have to pull out the engine all over again.
On top of all that, my auto CL holds some sentimental value for me. It's my first car I really started working on. I came to these forums when I owned my '99 CL not knowing a thing about cars. So it's thanks to everyone on here with their posts, old & new, that allowed me to learn how to do things, and grow with my car. I'll never sell my main CL.
Plus, in the end, I get to learn how everything goes together & works, furthering my knowledge on these cars even more.
As for stock 6MT mounts and dampeners, threw mine in scrap parts pile after installing 75A mounts and haven't looked back.
Just make sure to do them all together if you do go aftermarket... Front, rear and side.
Why the dampers? Are they really not needed? I've been wondering how the rear one bolts into the subframe as well. I noticed on the Auto that there is two rubber squares where the damper goes. But i'm unsure if there's a bracket for the bolt to go.

 10-17-2022, 04:06 PM


 It will need a second time though.


 .
.