
Why you should run a dash camera

_


Joined: Nov 2006
Posts: 19,335
Likes: 3,438
If not too much trouble, could you post up videos to compare 1920x1080 @ 30fps with 1280�720 @30fps when you do your daytime test?
 Curious about quality difference.
takin care of Business in
iTrader: (5)
Joined: Jan 2008
Posts: 30,994
Likes: 4,733
From: Kansas City, MO
^^^ 1920x1080 is higher resolution so if a 32GB card can hold 10 hours of that, then it can hold approximately 13-14 hours of 1280x720....
more the pixels better the clarity
more the pixels better the clarity

I got some footage on the way to work today, I cant upload it to YouTube here though because the network is too slow. Ill post it tonight when I get home.
mmmmmm....
Joined: Sep 2005
Posts: 20,524
Likes: 95
From: Glendale, CA

 that's how I get to work.
If you want a compression, I can also try to post 1920 x 1080 vs. 1280 x720.
I honestly don't think you would need 32gb memory card.
16gb (total time is about 3 hr 30min)
Recording mode (1080p with 30fps):
- 114 min, up to 38 files
motion sensor mode (1080p with 30fps):
- 88 min up to 150 files
E mode (1080p with 30fps):
- 8 min up to 8 files
Picture mode (1080p with 30fps):
- 100-200 files, no time
32gb (total time is about 6 hr 50 min)
Recording mode (1080p with 30fps):
- 222 min, up to 74 files
motion sensor mode (1080p with 30fps):
- 175 min, up to 300 files
E mode (1080p with 30fps):
- 8 min, up to 8 files
Picture mode (1080p with 30fps):
- 100-200 files, no time
I think getting 32gb is bit of waste of money, at least for me. I don't drive long distance enough to have to run it at 6 hrs or more. If you have a extra 32gb memory card laying around, then sure why not, but no need spend extra to get the 32gb in my opinion.
Last edited by S14 n Tsx; Mar 16, 2012 at 05:07 PM.
mmmmmm....
Joined: Sep 2005
Posts: 20,524
Likes: 95
From: Glendale, CA
I honestly haven't ran the 1280x720 yet, but I think running at 1280x720 won't lose that much of quality in video.
If weather was clear like my sample, running at 720p won't affect anything... still should able to identify plate number, color of vehicle, etc etc.
I can't wait to see how camera would do at night... If my turns out be similar (hopefully better) to civic, then I will be pretty damn happy with the result.
If weather was clear like my sample, running at 720p won't affect anything... still should able to identify plate number, color of vehicle, etc etc.
I can't wait to see how camera would do at night... If my turns out be similar (hopefully better
) to civic, then I will be pretty damn happy with the result.
Last edited by S14 n Tsx; Mar 16, 2012 at 05:12 PM.
Yea, I dont see a benefit to running a 32gb card either since these record in a loop. Im not sure what the write speed is on these cameras, so who knows if upgrading from the Class 6 to a 10 is beneficial, but it can help transfer speeds from the card onto the computer/phone.

I'm in the same boat. I decided to just pass. I simply can't justify the cost vs benefit right now. If I start making long commutes or something, then I'll look into one...

Sorry, I had an emergency with my dog and had to take him to the hospital yesterday. Hes good though.
I need to either mount the camera at a different angle or play with the setting a bit. I kept getting a reflection of my dash from the window so it looked like you were looking through a fish bowl. Or maybe I could figure out some sort of polarizing lens
Ill post what I have up in a few. Gotta go through it again and upload it.

 your car is very quick bro....

Moderator
Regional Coordinator (Southeast)
Regional Coordinator (Southeast)

Joined: Dec 2003
Posts: 44,120
Likes: 4,430
From: Mooresville, NC
With averaging 30-35k miles a year I am definitely looking to get one of these. Very interested in seeing the night video comparison as most of my long trips from NC to PA and back happen mostly at night.

Three Wheelin'
Joined: Jul 2006
Posts: 1,878
Likes: 38
From: New York,NY
Wish I had bought a dash cam. On my way home during rush hour yesterday some idiot in a truck infront of the suv I followed yesterday kept swerving like it was on purpose. We were on the left lane doing about 50ish MPH and the raised (hillbilly) pick up truck kept on hitting the median gutter with debris flying, then straightens out then back to swerving, then all of a sudden seconds later a buncha of debris flew my way hitting my windshield. I dont know what it was but just saw a black object flying at me hitting my driver side windshield, I think it was some piece of wood about 8-10 inches long. I changed to the middle lane and took a picture of the truck with my phone. Sorry it was blurry.

Uploaded with ImageShack.us

Uploaded with ImageShack.us
That sucks. I hate inattentive drivers.
I haven't driven my car much this week, but I wish I was in it today. I got pulled over for speeding, and my camera wouldve refuted the entire thing
I haven't driven my car much this week, but I wish I was in it today. I got pulled over for speeding, and my camera wouldve refuted the entire thing

 I don't know why that fool was laughing.
Wow guys, take it a little more seriously please.
My car wasn't damaged and nothing was stolen so I got lucky and I'm very thankful. Plus I got a ticket back in November, so I'm not rubbing the ticket in Morgan's face. Shit happens in life and sometimes all you can do is laugh about it
My car wasn't damaged and nothing was stolen so I got lucky and I'm very thankful. Plus I got a ticket back in November, so I'm not rubbing the ticket in Morgan's face. Shit happens in life and sometimes all you can do is laugh about it
Last edited by CLtotheTL32; Mar 23, 2012 at 02:20 PM.
Yea, I havent gotten off my ass to do that yet either. Ill probably do it tomorrow.
My official review isnt ready yet. I want to get a bit more time with the camera so I can post an accurate review.
My official review isnt ready yet. I want to get a bit more time with the camera so I can post an accurate review.
Intermediate
Joined: Mar 2012
Posts: 37
Likes: 4
From: Dallas, TX
So, here's a video I took tonight to illustrate a variety of night time lighting conditions from side streets with little light to highway with full over head lights.
Disclaimer: The video is long! A bit over 8 minutes so please don't waste your time and watch all of it, I just wanted to quickly upload something with different lighting and didn't want to spend any time editing something together.
Disclaimer: The video is long! A bit over 8 minutes so please don't waste your time and watch all of it, I just wanted to quickly upload something with different lighting and didn't want to spend any time editing something together.
Alright, so I've finally gotten enough time with the BlackVue DR400G-HD to write a review with some decent info (hopefully). This a pretty lengthy review, and I tried to touch on most topics. If there is anything you'd like answered, just ask.
Most of you already know the specs on it, but I'll post them here anyway:
-2MP CMOS sensor
-Supports up to a 32GB micro SD card
-120* diagonal/98* horizontal/55* vertical viewing angle
-Built in GPS, G sensor, and microphone
It also has a few different settings for resolution which are configurable in the BlackVue software (more on that later). They are:
-1920�1080 at 30fps
-1920�1080 at 15fps
-1280�720 at 30fps
-1280�720 at 15fps
-720�480 at 30fps
So far I�ve done all recordings in 1920�1080p at 30fps. Now to the unboxing.


The holder has a spring loaded locking tab on it so the camera won't pop out.

As for size, here it is compared to the GoPro HeroHD and an iPod Video:

Included in the box:
-Camera
-Holder with double sided tape already applied
-13' (4m) power cord
-Micro SD card
-Micro SD to SD card adapter
-USB SD card reader
-Two video output cables
-An extra piece of double sided tape for the holder
-Four wire clips
-User manual and Quick Start Guide
Unfortunately, the manual and quick start guide were not in English, but it is available from www.blackvue.co.kr/en
BlackVue Program -
The BlackVue program does not need to be installed onto your computer, but you do have that option. The BlackVueSetup(HD).exe installer is located on the SD card in the Software folder. If you just want to run the application off of the SD card, you can find the BlackVue.exe in the Application folder.
All the camera settings are handled within the BlackVue application. If your camera is a Korean version, then the application will also be in Korean. However, I decided to be a nice guy and upload the English version of the application, installer, and manual here:
Installer:
http://dl.dropbox.com/u/49146812/BlackVueSetup(HD).exe
Application:
http://dl.dropbox.com/u/49146812/BlackVue.exe
Manual:
http://dl.dropbox.com/u/49146812/Bla...Manual_Eng.pdf
I've replaced the corresponding Korean files with the English files on the SD card after I updated the firmware. You don't need to do that, but it makes it easier for me since I use a few computers.
The program itself is very easy to use. In the right pane you will see a list of your recordings. Double clicking them will start playback. If you double click on the playback screen, the video will go into full screen mode. You can use your mouse scroll wheel to zoom in/out or right click to zoom to 100%.
There is also a Map tab on the right side of the window that will show the location of the recording. On the top bar you will notice four icons. From left to right, they are MyWay Viewer, Capture, Print, and Settings. MyWay Viewer opens another window with a map in it along with coordinates for the videos current location. Capture saves the current frame as a JPEG file. Print, well, prints the current frame. Settings is self explanatory.
Make sure you have the SD card in your computer if you are changing any settings, as they are saved directly to the card.
Firmware Updates -
The firmware is not loaded directly to the camera, but to the SD card instead. Whenever you load new firmware, it formats the SD card. If you have any video files on it that you want to keep, go into the Record sub-folder and copy them to your computer.
IMPORTANT - This is something that took a bit of digging for me to figure out. I bought my camera from a seller in Korea. The camera came preinstalled with Korean firmware. Cameras shipped with Korean firmware cannot be updated using English firmware (and vice versa).
The English firmware is found at www.blackvue.co.kr/en in the Downloads section. The Korean firmware is found at www.blackbue.co.kr, click the third tab from the left in the top bar, then when that page loads, select F/W from the drop down menu. Click the link that matches your model type.
Once the download completes, connect your SD card to your computer and make a note of the drive letter (in my case, it was drive H: ). Double click the file that you've downloaded and follow the prompts. Once it finishes, install the card back into the camera and power the camera up. Do not remove the card or power off the camera until the firmware finishes updating. You will know it has finished when the camera reboots.
Installation -
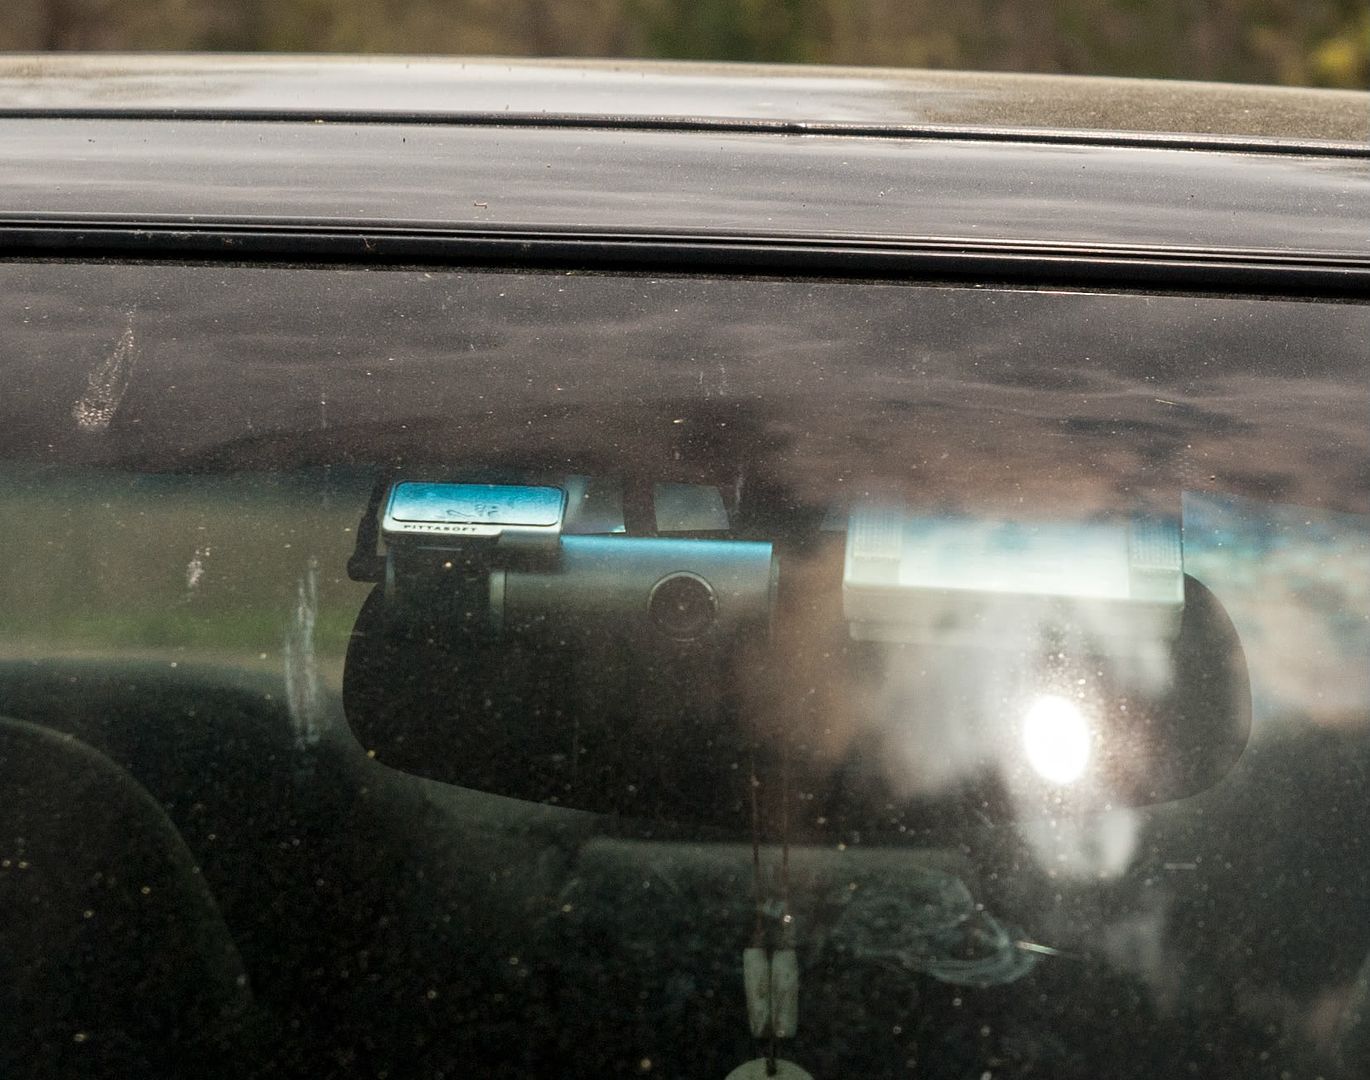
The Camera comes with a holder and very strong 3M double sided tape. I placed my camera in front of the rear view mirror so it does not interfere with my line of sight.
You have two options for power � use the cigarette lighter adapter or hardwire it. For testing, I had it plugged into the adapter, however I wanted a more permanent solution, so I decided to hardwire it to a constant power source. If you are doing the same, please remember that I am in no way, shape or form responsible if you screw up.
With that out of the way, you'll need to pick up an add-a-circuit at you local parts store (my interior fuse box uses ATM fuses, check what yours uses before buying) as well as a package of fuses if you don't already have them. I am running it on a 7.5amp fuse, but you should be able to get away with a 5amp fuse.
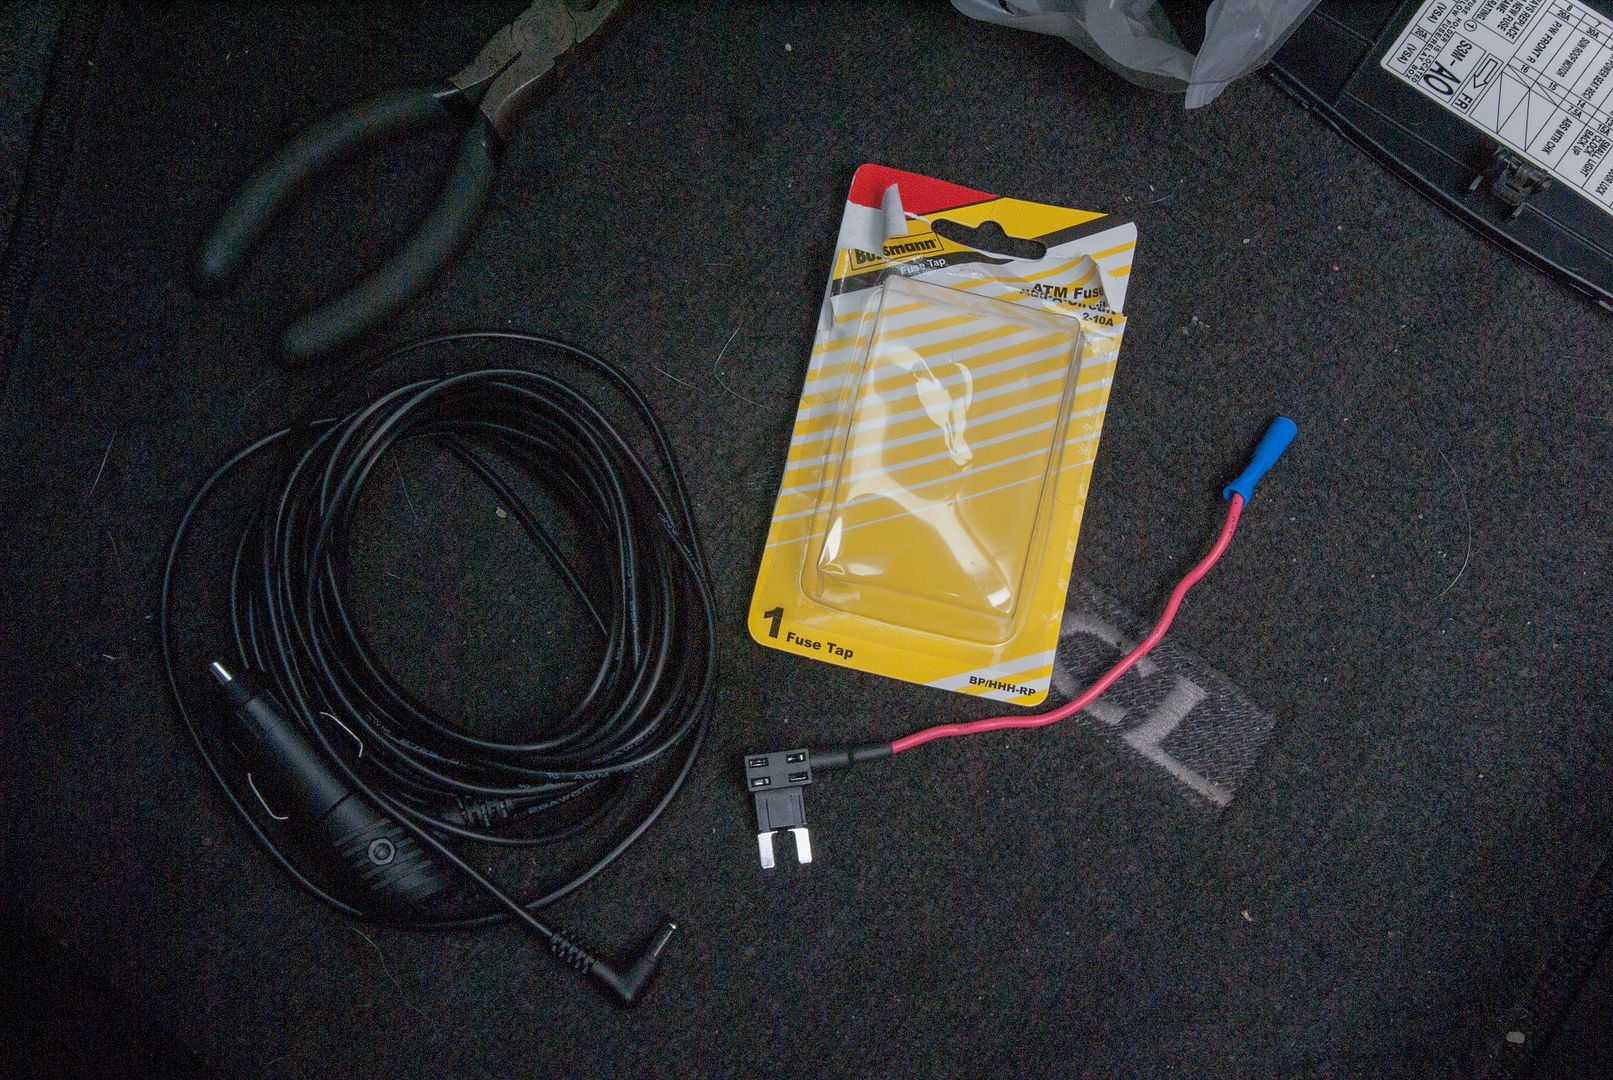
Tools needed:
-Wire snips
-Crimp tool
-Electrical tape
-Razor blade
-Whatever tools required to remove interior panels
The first thing to do is mount the camera to the windshield if you haven't already.

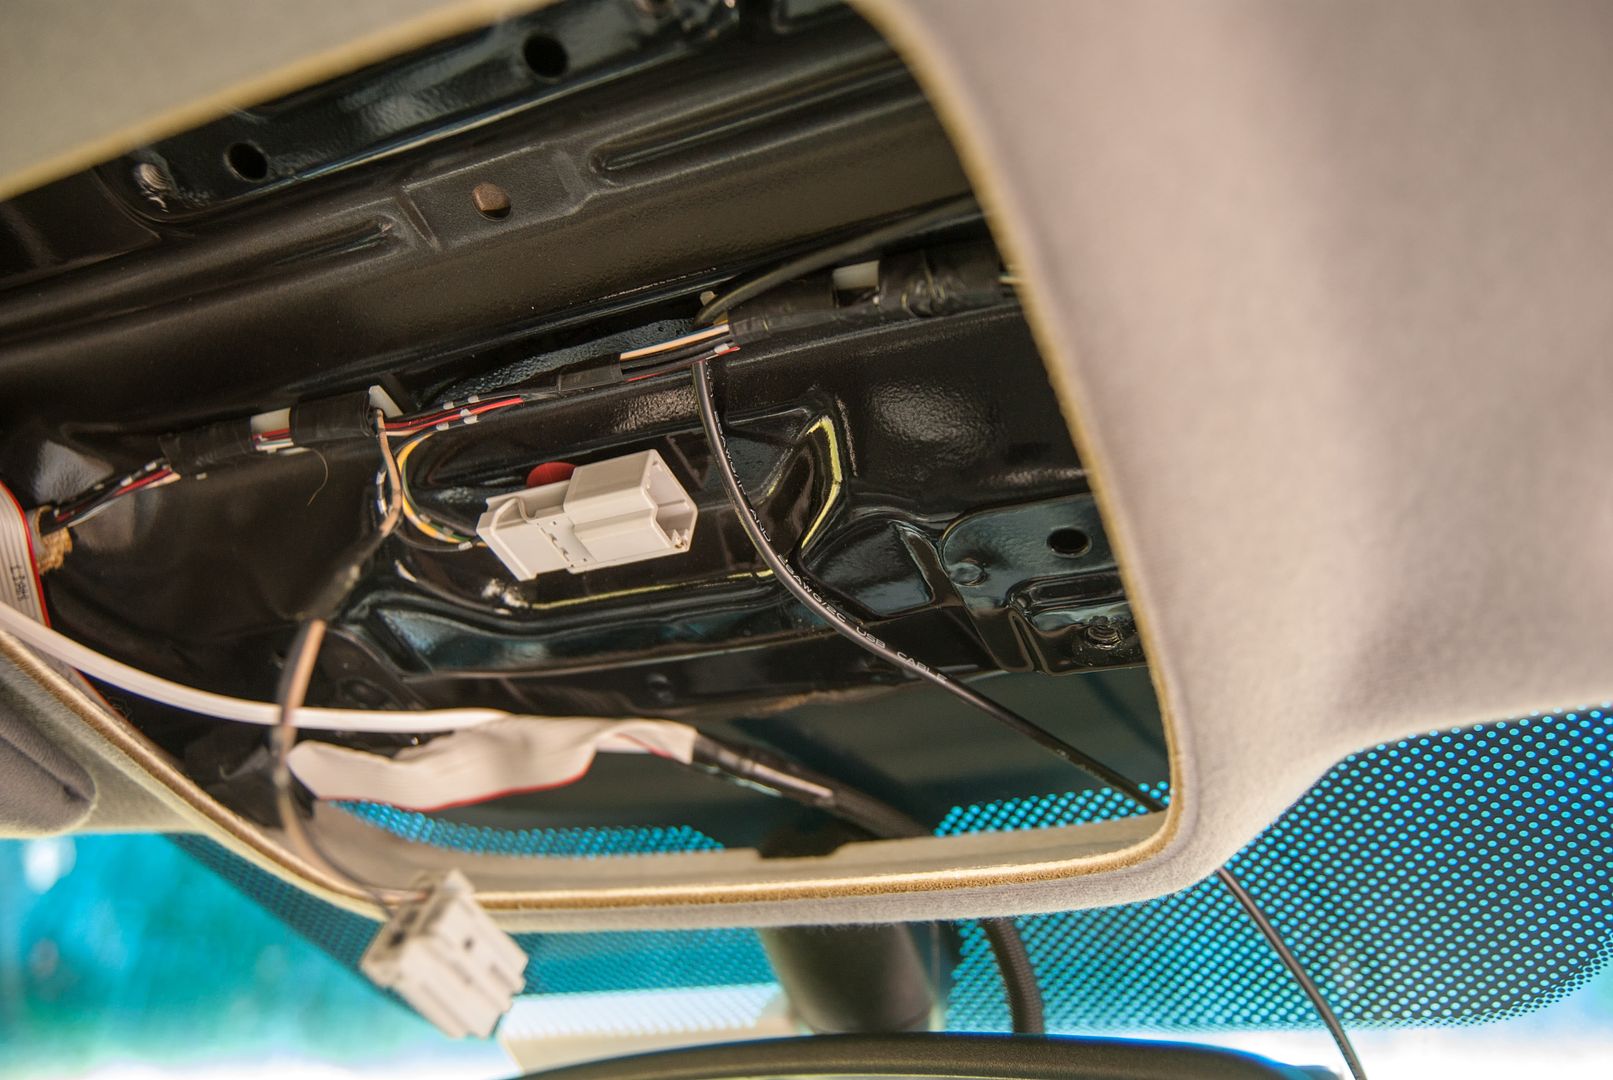
Next figure out the best route for the power wire to the fuse box. My car has two fuse boxes, I chose the passenger side since I already had a few wires running down the driver side A-pillar. I looked at all the circuits and decided to tap into the overhead light circuit, the 7.5amp fuse in #11.

Remove the interior panels that are in the way. In my case, it was the A-pillar, sun visor, sun visor stay, HomeLink, and passenger grab handle (not needed but it allowed me to drop the headliner just a bit more).

Next step, cut off the end of the power cable that connects to the cigarette lighter adapter.

Route the cable through the headliner and down whichever pillar you chose.


Now this is the tricky part. The insulation is pretty thick, the wires inside are not. What I did was place the blade flat on top the wire and lightly applied pressure while pulling the wire towards it. It may take a few passes to get enough of the insulation off, but I found it to be the easiest way. Unfortunately, I didn't take any pictures of that step as I was busy not trying to cut through the wires or my hands. Once you are done, you should see this:

Once you have the insulation stripped away, you need to strip the wires themselves. These wires have maybe 6 copper strands in them, so they are very easy to break off. Once again, take your time stripping them.

Since they were such a thin gauge wire, I stripped them of about 3-4 inches of the insulation � that way I could fold the wire over itself to bulk it up. Once you do that, gently place it into the butt connector and crimp it shut.
Next, find a bolt to use as a ground. I used an existing ground location that was right in front of the fuse box. Install the fuse into the add-a-circuit, and plug it into the fuse box. Note � I only had one fuse in the add-a-circuit when this picture was taken. The fuse nearest the fusebox is used for the original circuit; in my case, the overhead lights. The output we need runs through the second fuse location. Without a fuse there, the device will not get power.


Once you attach the fuse, the device should begin to power on. Now, when you park the car, the shock sensor will monitor for any movement for 10 minutes, then enter Parking mode. Reinstall all interior pieces that you removed and clean up.

Camera -
Using the camera is easy � just connect it to power. Any time power is supplied to the camera, it is recording. It does take about 15 seconds to initialize before it starts recording. I usually let the car warm up for 30 seconds or so, so the delay doesn't affect me. The camera only has one button, and that is used to enter Event mode.
By the time the camera is initialized, it already has a GPS fix. I live in a relatively rural area, so the GPS fix times may be a bit different for someone in, say, Manhattan. If you have it connected to power, you'll get a GPS fix even faster.
There are two notification LEDs, one for recording and another for GPS (green). The recording led color is configurable. There are three recording modes. Normal, Event, and Parking mode. Normal mode is self explanatory. In Normal mode, the recording led is solid. The camera also has an Event mode - if you hit the button or if it reaches the shock threshold, Event mode will save those recordings and not allow them to be overwritten (unless you change that in settings). The threshold is adjustable, I am still tweaking it to my liking. Due to the stiff suspension in my car, almost all of the recordings are in Event mode. When the camera is in event mode, the recording led will blink.
If you have the camera connected to a constant power supply, it will enter Parking mode if no movement is detected by the G sensor for 10 minutes. If the camera detects motion or shock, it will automatically record. One thing I wish this camera had is the ability to set the Parking mode and Event mode shock thresholds independently. In my case, I have to live with the camera recording in event mode most of the time just so it will pick up any shock while in parking mode.
The camera does have voice prompts as well. You can turn them down in the settings menu, which is something I did since my camera speaks Korean
The best part about this camera is that it has loop recording. When the SD card fills up, it will delete the oldest recording (unless setup differently) so it has space. BlackVue does recommend formatting the SD card once a week to keep the camera operating at peak performance. Whenever you format the card, you will need to push the latest firmware to the card.
Now, on to the important stuff � videos.
All videos are straight off the camera, no editing at all. They were all shot at 1920�1080p at 30fps.
I've noticed that the internal microphone is pretty sensitive, hence the clipping. I'm not blasting the radio either. It doesn't bother me a whole lot though.
The white balance is good at times, bad at others. As you can see in Day Test #2, when the sun crosses into the center portion of the screen at 15 seconds, the edges get very dark. When the sun settles onto the left side of the screen, the view brightens up again. Its not ideal, but I've seen worse.
The camera is also picking up a glare from the dashboard off of the windshield. I think that has a lot to do with the rake of my windshield more then anything. It's not blocking anything important, just the view of the hood.
You'll notice that if the right amount of light hits the lens, the screen will flicker. BlackVue is aware of this and addressed it somewhat on the latest (as of this writing) firmware, but they haven't eliminated it.
BlackVue support is also very responsive. I emailed them regarding the firmware issue and got a response within an hour. They are very helpful, and that definitely makes me more comfortable owning one of their products.
Overall, I'm very impressed with this camera. I'm happy I made the purchase, especially for the added insurance in case of an accident. If you've been looking at picking up a dashcam, definitely consider the DR400G-HD.
Most of you already know the specs on it, but I'll post them here anyway:
-2MP CMOS sensor
-Supports up to a 32GB micro SD card
-120* diagonal/98* horizontal/55* vertical viewing angle
-Built in GPS, G sensor, and microphone
It also has a few different settings for resolution which are configurable in the BlackVue software (more on that later). They are:
-1920�1080 at 30fps
-1920�1080 at 15fps
-1280�720 at 30fps
-1280�720 at 15fps
-720�480 at 30fps
So far I�ve done all recordings in 1920�1080p at 30fps. Now to the unboxing.
The holder has a spring loaded locking tab on it so the camera won't pop out.
As for size, here it is compared to the GoPro HeroHD and an iPod Video:
Included in the box:
-Camera
-Holder with double sided tape already applied
-13' (4m) power cord
-Micro SD card
-Micro SD to SD card adapter
-USB SD card reader
-Two video output cables
-An extra piece of double sided tape for the holder
-Four wire clips
-User manual and Quick Start Guide
Unfortunately, the manual and quick start guide were not in English, but it is available from www.blackvue.co.kr/en
BlackVue Program -
The BlackVue program does not need to be installed onto your computer, but you do have that option. The BlackVueSetup(HD).exe installer is located on the SD card in the Software folder. If you just want to run the application off of the SD card, you can find the BlackVue.exe in the Application folder.
All the camera settings are handled within the BlackVue application. If your camera is a Korean version, then the application will also be in Korean. However, I decided to be a nice guy and upload the English version of the application, installer, and manual here:
Installer:
http://dl.dropbox.com/u/49146812/BlackVueSetup(HD).exe
Application:
http://dl.dropbox.com/u/49146812/BlackVue.exe
Manual:
http://dl.dropbox.com/u/49146812/Bla...Manual_Eng.pdf
I've replaced the corresponding Korean files with the English files on the SD card after I updated the firmware. You don't need to do that, but it makes it easier for me since I use a few computers.
The program itself is very easy to use. In the right pane you will see a list of your recordings. Double clicking them will start playback. If you double click on the playback screen, the video will go into full screen mode. You can use your mouse scroll wheel to zoom in/out or right click to zoom to 100%.
There is also a Map tab on the right side of the window that will show the location of the recording. On the top bar you will notice four icons. From left to right, they are MyWay Viewer, Capture, Print, and Settings. MyWay Viewer opens another window with a map in it along with coordinates for the videos current location. Capture saves the current frame as a JPEG file. Print, well, prints the current frame. Settings is self explanatory.
Make sure you have the SD card in your computer if you are changing any settings, as they are saved directly to the card.
Firmware Updates -
The firmware is not loaded directly to the camera, but to the SD card instead. Whenever you load new firmware, it formats the SD card. If you have any video files on it that you want to keep, go into the Record sub-folder and copy them to your computer.
IMPORTANT - This is something that took a bit of digging for me to figure out. I bought my camera from a seller in Korea. The camera came preinstalled with Korean firmware. Cameras shipped with Korean firmware cannot be updated using English firmware (and vice versa).
The English firmware is found at www.blackvue.co.kr/en in the Downloads section. The Korean firmware is found at www.blackbue.co.kr, click the third tab from the left in the top bar, then when that page loads, select F/W from the drop down menu. Click the link that matches your model type.
Once the download completes, connect your SD card to your computer and make a note of the drive letter (in my case, it was drive H: ). Double click the file that you've downloaded and follow the prompts. Once it finishes, install the card back into the camera and power the camera up. Do not remove the card or power off the camera until the firmware finishes updating. You will know it has finished when the camera reboots.
Installation -
The Camera comes with a holder and very strong 3M double sided tape. I placed my camera in front of the rear view mirror so it does not interfere with my line of sight.
You have two options for power � use the cigarette lighter adapter or hardwire it. For testing, I had it plugged into the adapter, however I wanted a more permanent solution, so I decided to hardwire it to a constant power source. If you are doing the same, please remember that I am in no way, shape or form responsible if you screw up.
With that out of the way, you'll need to pick up an add-a-circuit at you local parts store (my interior fuse box uses ATM fuses, check what yours uses before buying) as well as a package of fuses if you don't already have them. I am running it on a 7.5amp fuse, but you should be able to get away with a 5amp fuse.
Tools needed:
-Wire snips
-Crimp tool
-Electrical tape
-Razor blade
-Whatever tools required to remove interior panels
The first thing to do is mount the camera to the windshield if you haven't already.
Next figure out the best route for the power wire to the fuse box. My car has two fuse boxes, I chose the passenger side since I already had a few wires running down the driver side A-pillar. I looked at all the circuits and decided to tap into the overhead light circuit, the 7.5amp fuse in #11.
Remove the interior panels that are in the way. In my case, it was the A-pillar, sun visor, sun visor stay, HomeLink, and passenger grab handle (not needed but it allowed me to drop the headliner just a bit more).
Next step, cut off the end of the power cable that connects to the cigarette lighter adapter.
Route the cable through the headliner and down whichever pillar you chose.
Now this is the tricky part. The insulation is pretty thick, the wires inside are not. What I did was place the blade flat on top the wire and lightly applied pressure while pulling the wire towards it. It may take a few passes to get enough of the insulation off, but I found it to be the easiest way. Unfortunately, I didn't take any pictures of that step as I was busy not trying to cut through the wires or my hands. Once you are done, you should see this:
Once you have the insulation stripped away, you need to strip the wires themselves. These wires have maybe 6 copper strands in them, so they are very easy to break off. Once again, take your time stripping them.
Since they were such a thin gauge wire, I stripped them of about 3-4 inches of the insulation � that way I could fold the wire over itself to bulk it up. Once you do that, gently place it into the butt connector and crimp it shut.
Next, find a bolt to use as a ground. I used an existing ground location that was right in front of the fuse box. Install the fuse into the add-a-circuit, and plug it into the fuse box. Note � I only had one fuse in the add-a-circuit when this picture was taken. The fuse nearest the fusebox is used for the original circuit; in my case, the overhead lights. The output we need runs through the second fuse location. Without a fuse there, the device will not get power.
Once you attach the fuse, the device should begin to power on. Now, when you park the car, the shock sensor will monitor for any movement for 10 minutes, then enter Parking mode. Reinstall all interior pieces that you removed and clean up.
Camera -
Using the camera is easy � just connect it to power. Any time power is supplied to the camera, it is recording. It does take about 15 seconds to initialize before it starts recording. I usually let the car warm up for 30 seconds or so, so the delay doesn't affect me. The camera only has one button, and that is used to enter Event mode.
By the time the camera is initialized, it already has a GPS fix. I live in a relatively rural area, so the GPS fix times may be a bit different for someone in, say, Manhattan. If you have it connected to power, you'll get a GPS fix even faster.
There are two notification LEDs, one for recording and another for GPS (green). The recording led color is configurable. There are three recording modes. Normal, Event, and Parking mode. Normal mode is self explanatory. In Normal mode, the recording led is solid. The camera also has an Event mode - if you hit the button or if it reaches the shock threshold, Event mode will save those recordings and not allow them to be overwritten (unless you change that in settings). The threshold is adjustable, I am still tweaking it to my liking. Due to the stiff suspension in my car, almost all of the recordings are in Event mode. When the camera is in event mode, the recording led will blink.
If you have the camera connected to a constant power supply, it will enter Parking mode if no movement is detected by the G sensor for 10 minutes. If the camera detects motion or shock, it will automatically record. One thing I wish this camera had is the ability to set the Parking mode and Event mode shock thresholds independently. In my case, I have to live with the camera recording in event mode most of the time just so it will pick up any shock while in parking mode.
The camera does have voice prompts as well. You can turn them down in the settings menu, which is something I did since my camera speaks Korean
The best part about this camera is that it has loop recording. When the SD card fills up, it will delete the oldest recording (unless setup differently) so it has space. BlackVue does recommend formatting the SD card once a week to keep the camera operating at peak performance. Whenever you format the card, you will need to push the latest firmware to the card.
Now, on to the important stuff � videos.
All videos are straight off the camera, no editing at all. They were all shot at 1920�1080p at 30fps.
I've noticed that the internal microphone is pretty sensitive, hence the clipping. I'm not blasting the radio either. It doesn't bother me a whole lot though.
The white balance is good at times, bad at others. As you can see in Day Test #2, when the sun crosses into the center portion of the screen at 15 seconds, the edges get very dark. When the sun settles onto the left side of the screen, the view brightens up again. Its not ideal, but I've seen worse.
The camera is also picking up a glare from the dashboard off of the windshield. I think that has a lot to do with the rake of my windshield more then anything. It's not blocking anything important, just the view of the hood.
You'll notice that if the right amount of light hits the lens, the screen will flicker. BlackVue is aware of this and addressed it somewhat on the latest (as of this writing) firmware, but they haven't eliminated it.
BlackVue support is also very responsive. I emailed them regarding the firmware issue and got a response within an hour. They are very helpful, and that definitely makes me more comfortable owning one of their products.
Overall, I'm very impressed with this camera. I'm happy I made the purchase, especially for the added insurance in case of an accident. If you've been looking at picking up a dashcam, definitely consider the DR400G-HD.


Yea, I actually posted a DIY that is more tailored for the CL over there.
Its pretty much universal. If whatever your device is has a negative and positive wires, you can install it that way. Though, I would be hesitant to install anything that requires over 10amps. For that, Id rather get power straight from the battery and run a full harness with relay.