
Well, the TSX needed new wheels....ISF is back (Page 64)
 09-28-2016, 10:31 AM
#1121
Moderator
Regional Coordinator (Southeast)
Regional Coordinator (Southeast)
Thread Starter
Join Date: Dec 2003
Location: Mooresville, NC
Age: 38
Posts: 43,640
Received 3,860 Likes
on
2,580 Posts

 09-28-2016, 10:33 AM
#1122
Moderator
Regional Coordinator (Southeast)
Regional Coordinator (Southeast)
Thread Starter
Join Date: Dec 2003
Location: Mooresville, NC
Age: 38
Posts: 43,640
Received 3,860 Likes
on
2,580 Posts
 09-28-2016, 10:36 AM
#1123
Moderator
Join Date: Aug 2014
Location: Dirty H-Town, Amerikkka
Posts: 28,432
Received 7,772 Likes
on
5,045 Posts

I've found that only about 10% of the puns actually get noticed.
Although, one time I wanted to get confirmation so I put 10 puns in a post and none of them got picked up on.
Seriously, no pun in ten did.
The following users liked this post:
cu2wagon (09-28-2016)

The following users liked this post:
KaMLuNg (09-30-2016)
The following users liked this post:
rockstar143 (09-30-2016)
 09-30-2016, 10:31 PM
#1128
Moderator
Regional Coordinator (Southeast)
Regional Coordinator (Southeast)
Thread Starter
Join Date: Dec 2003
Location: Mooresville, NC
Age: 38
Posts: 43,640
Received 3,860 Likes
on
2,580 Posts
 10-01-2016, 10:29 AM
#1130
Moderator
Regional Coordinator (Southeast)
Regional Coordinator (Southeast)
Thread Starter
Join Date: Dec 2003
Location: Mooresville, NC
Age: 38
Posts: 43,640
Received 3,860 Likes
on
2,580 Posts
Yesterday was Friday. The exhaust got installed but I haven't had time to do my normal detailed right up on the install yet.
10-02-2016, 08:58 AM
#1132
Moderator
iTrader: (3)
 10-02-2016, 09:41 PM
#1134
Moderator
Regional Coordinator (Southeast)
Regional Coordinator (Southeast)
Thread Starter
Join Date: Dec 2003
Location: Mooresville, NC
Age: 38
Posts: 43,640
Received 3,860 Likes
on
2,580 Posts
Well was just working on a long post. Was half way through a post that will have 50 plus photos and a lot of text with more than half of it written too and my browser just closed on me. Guess I will start over again with it in the morning now instead. 
10-02-2016, 09:45 PM
#1135
Chapter Leader (Southern Region)
How about 2 or 3 photos, 1 or 2 videos and no 

10-03-2016, 07:35 AM
#1136
Dude, I absolutely HATE when that happens Jastin
LOL...
Actually, when I'm putting together a really large post like that, I'll do it in Word since it has that recovery feature. Then I'll copy and paste into a post.
LOL...
Actually, when I'm putting together a really large post like that, I'll do it in Word since it has that recovery feature. Then I'll copy and paste into a post.
The following users liked this post:
KaMLuNg (10-03-2016)
10-03-2016, 07:55 AM
#1137
Moderator
Regional Coordinator (Southeast)
Regional Coordinator (Southeast)
Thread Starter
Join Date: Dec 2003
Location: Mooresville, NC
Age: 38
Posts: 43,640
Received 3,860 Likes
on
2,580 Posts
I used to do that but forgot to with this one. It has been a while since I made a really long post with lots of pictures. Luckily it appears some forums have autosave features now. I just couldn't see that from my tablet I was writing it on. It was still there this morning when I accessed it on my computer. It is finally complete though now. Just waiting for the videos to upload to youtube and then I will get it all posted.
The following users liked this post:
rockstar143 (10-03-2016)
10-03-2016, 08:26 AM
#1138
Moderator
Regional Coordinator (Southeast)
Regional Coordinator (Southeast)
Thread Starter
Join Date: Dec 2003
Location: Mooresville, NC
Age: 38
Posts: 43,640
Received 3,860 Likes
on
2,580 Posts
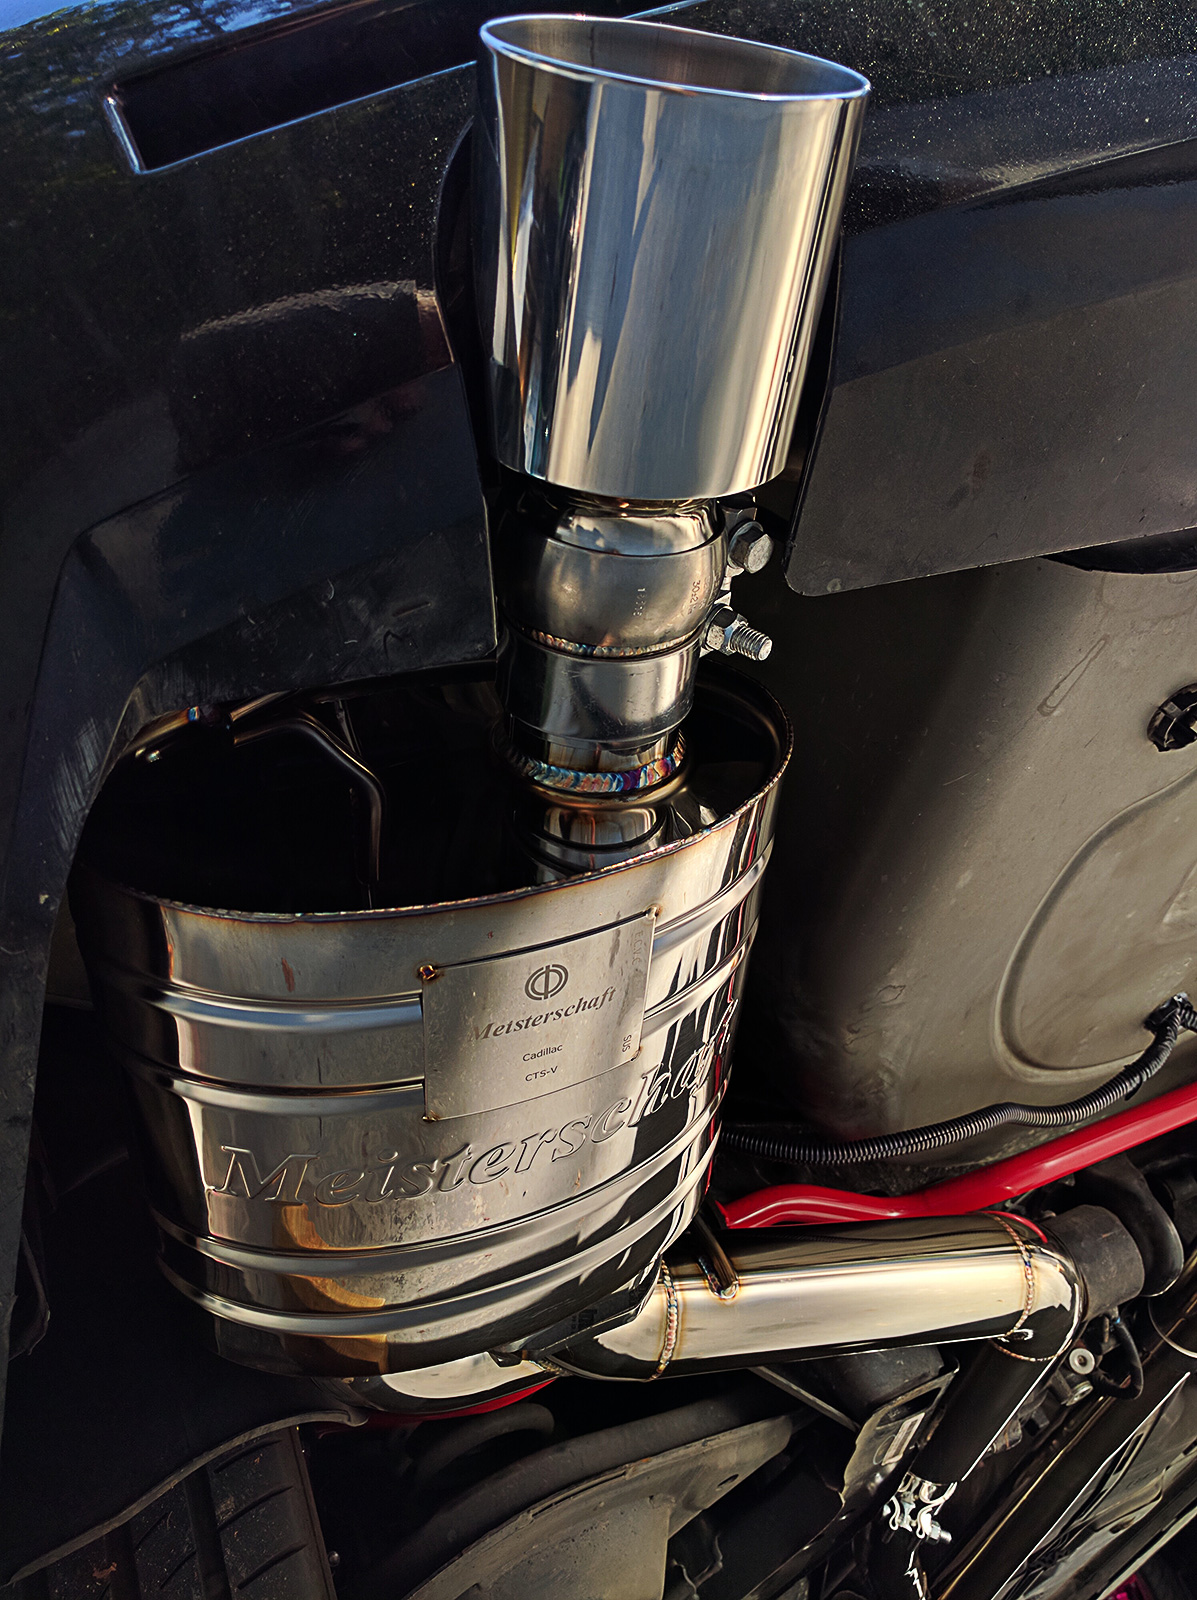
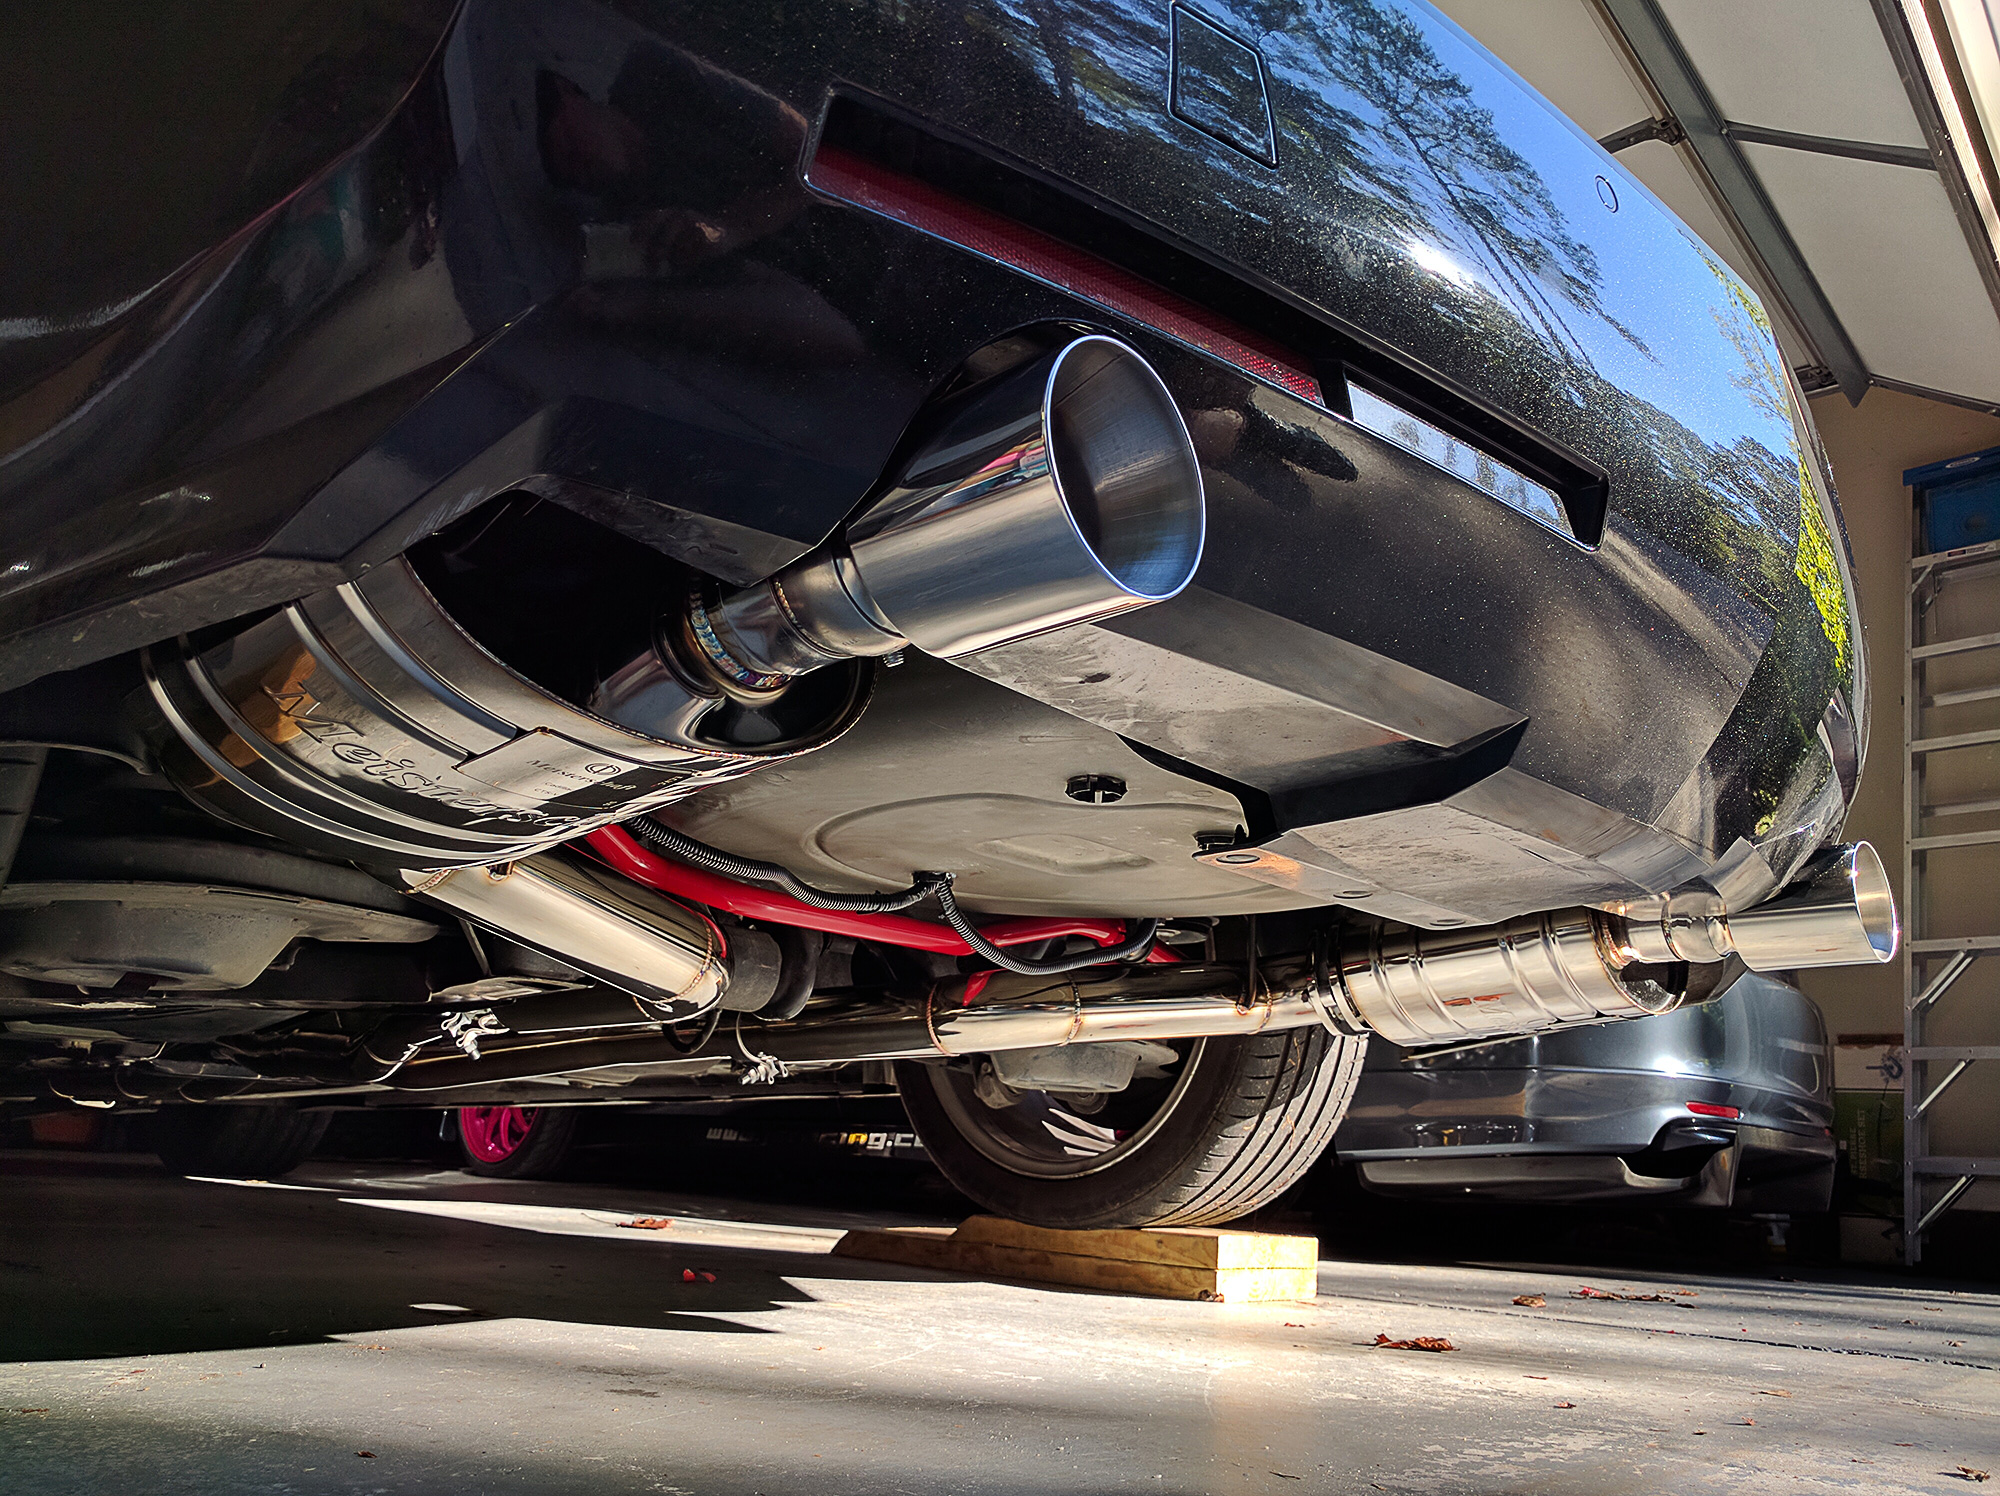
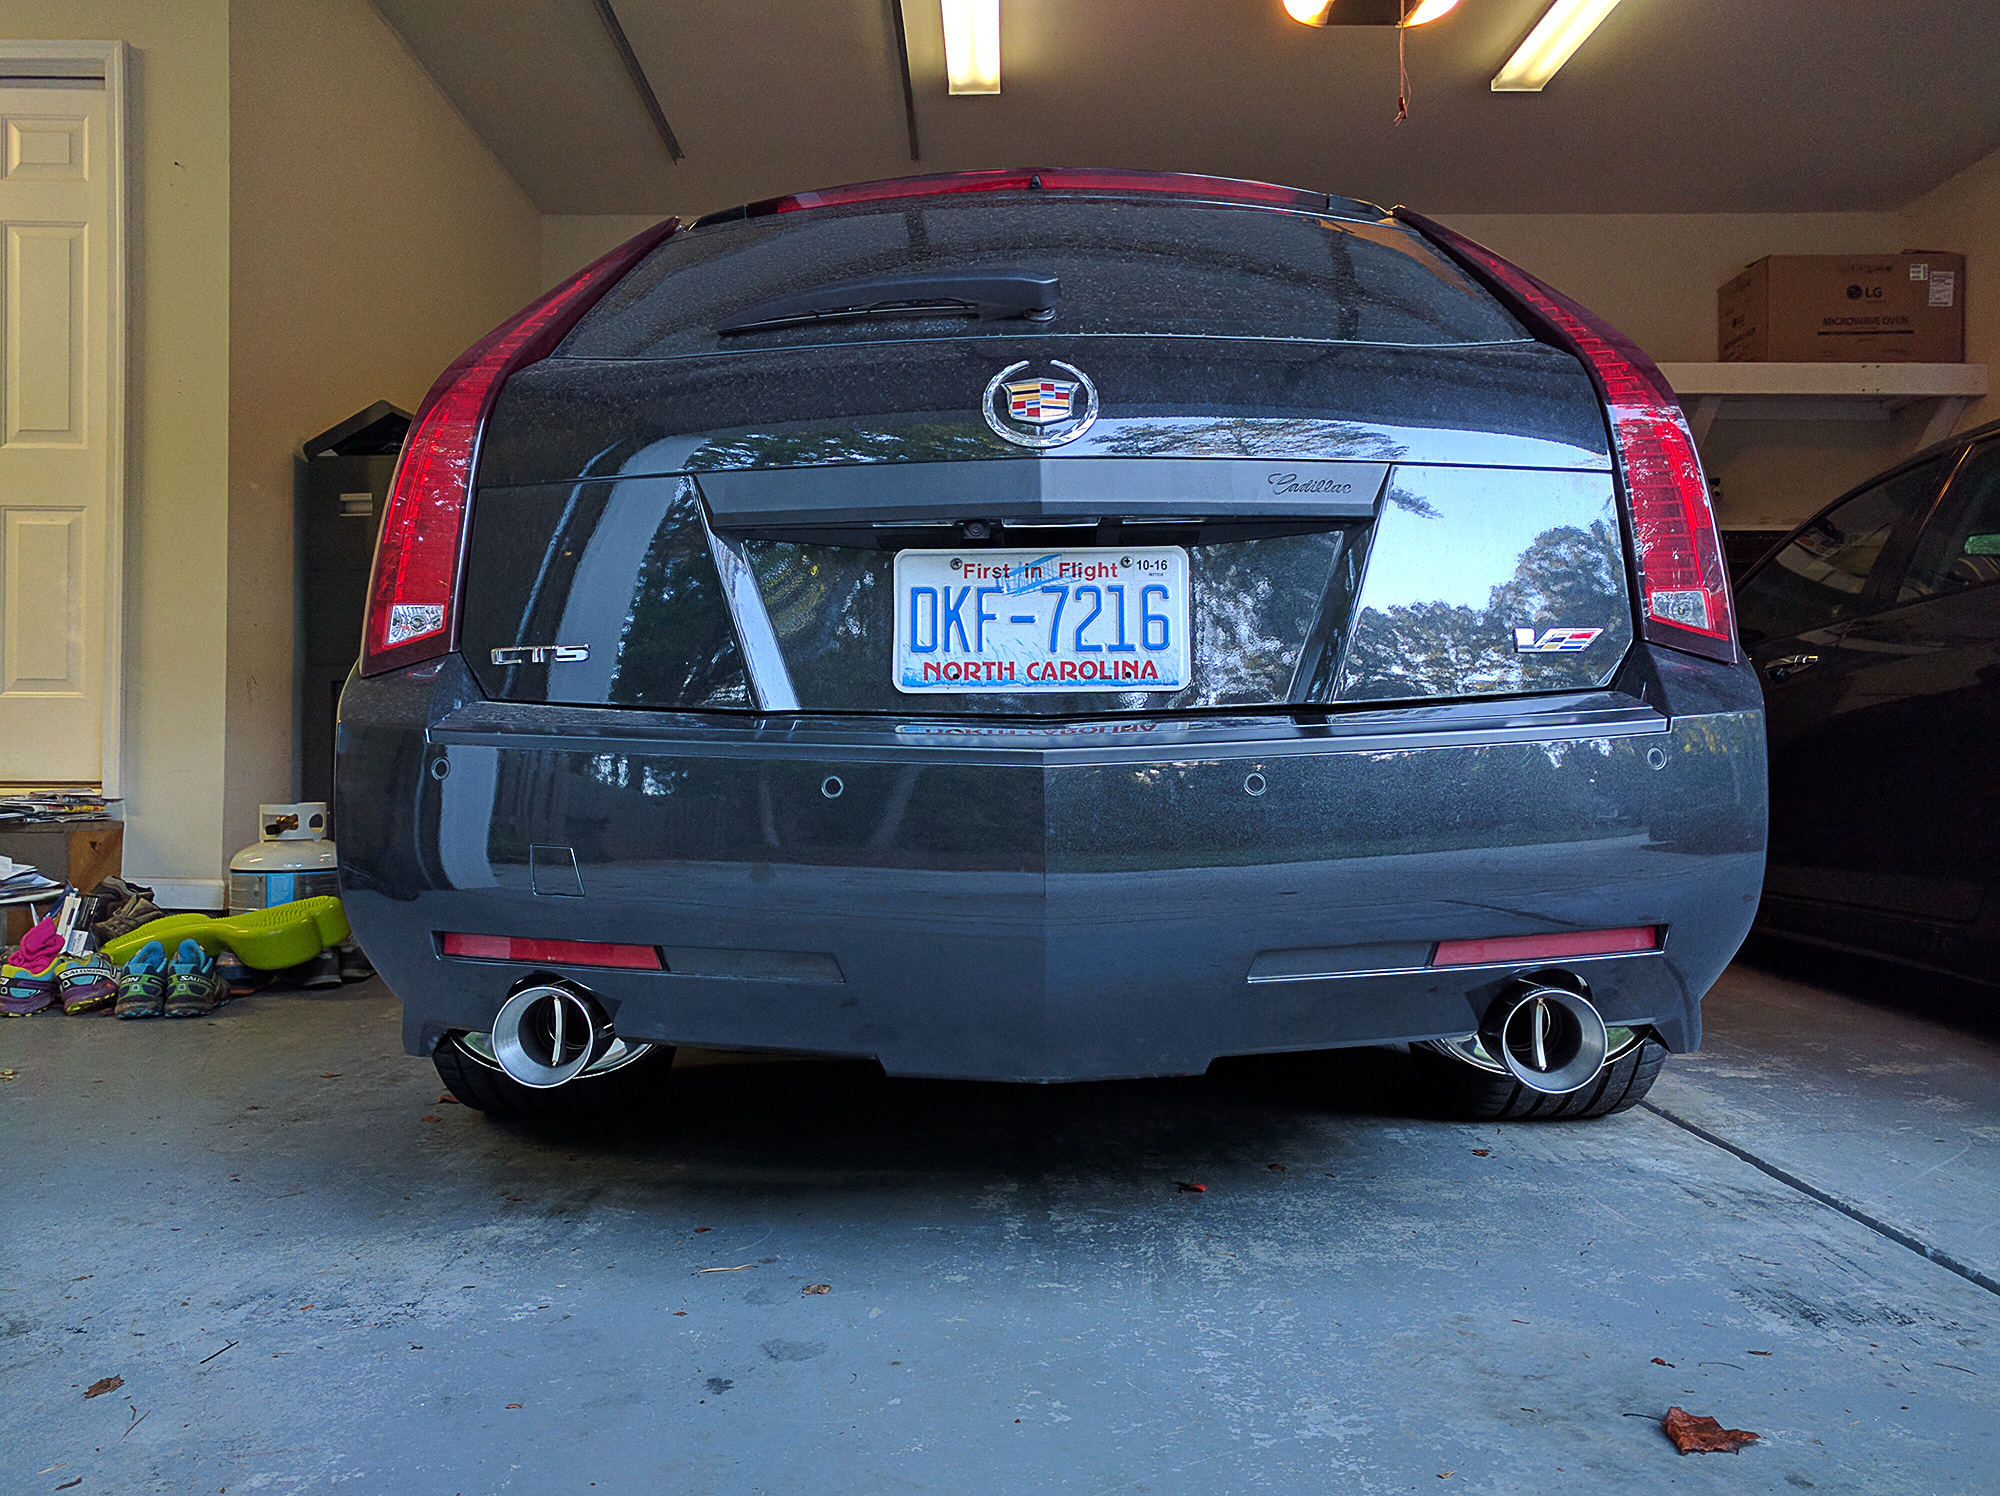
Its finally done. I have wanted some better handling and a louder exhaust for a while now. Jumped in a a group buy on a ctsv forum for some sways and those came about two and a half months ago. I ordered an exhaust all the way back in March and it only showed up last monday. It took over 30 weeks to arrive. If anyone ever buys a Meisterschaft exhaust don't expect it to be quick. The wait has been long but I can say they sound great and look amazing and were well worth the wait. I am extremely happy with the sound of the exhaust having only been able to hear one set of videos of it before ordereing it.
At 30 weeks to receive I have received custom one off carbon fiber parts for other cars quicker than this exhaust but it did finally show up.
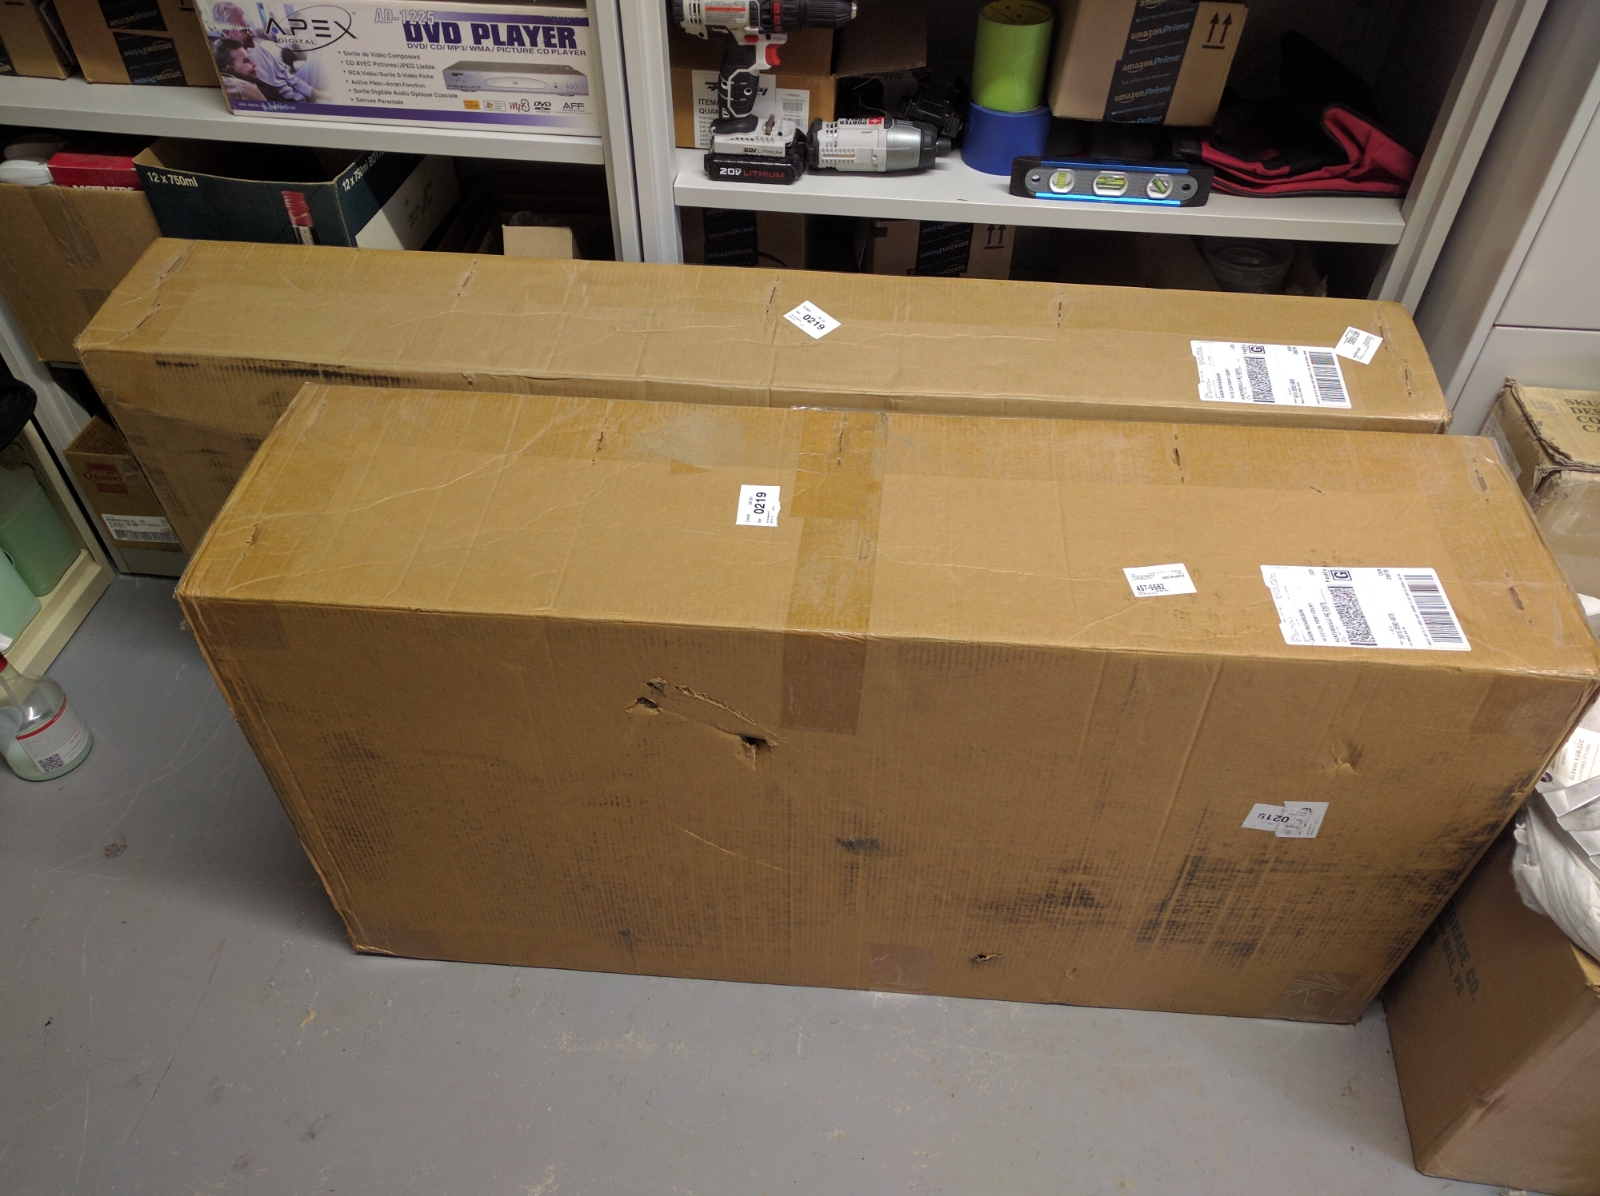
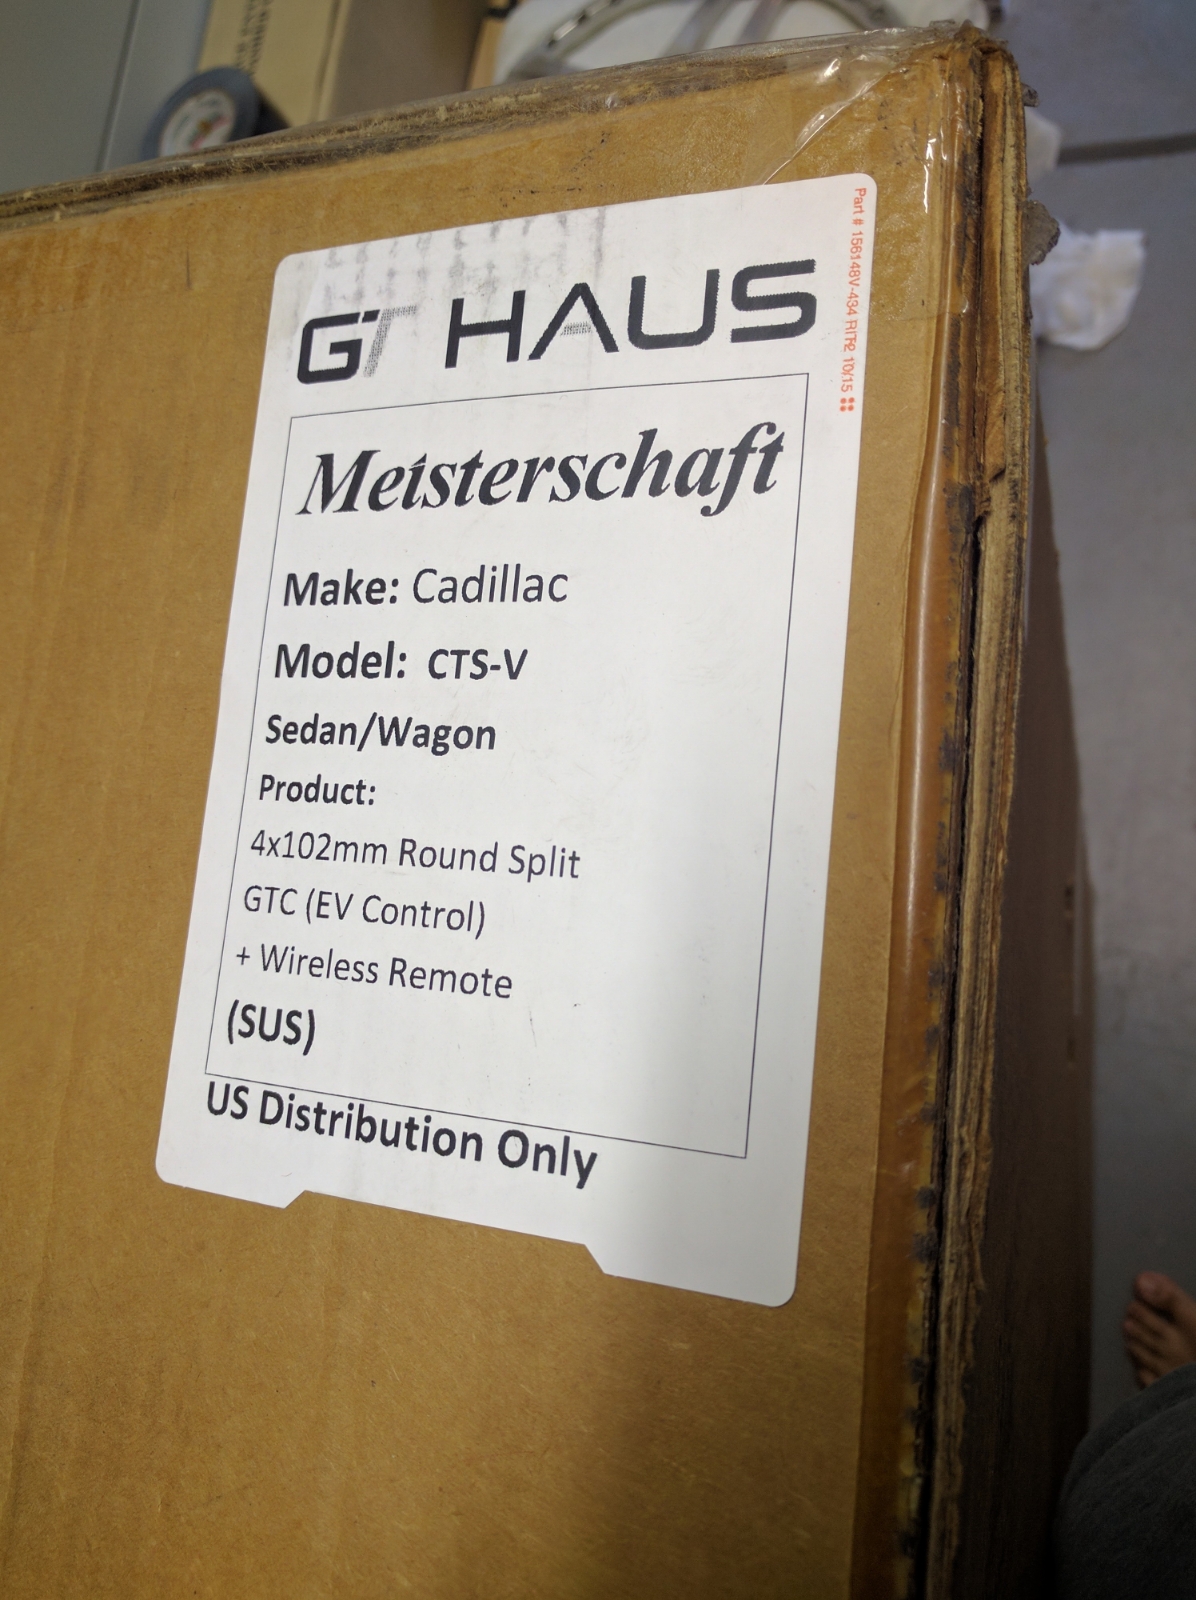
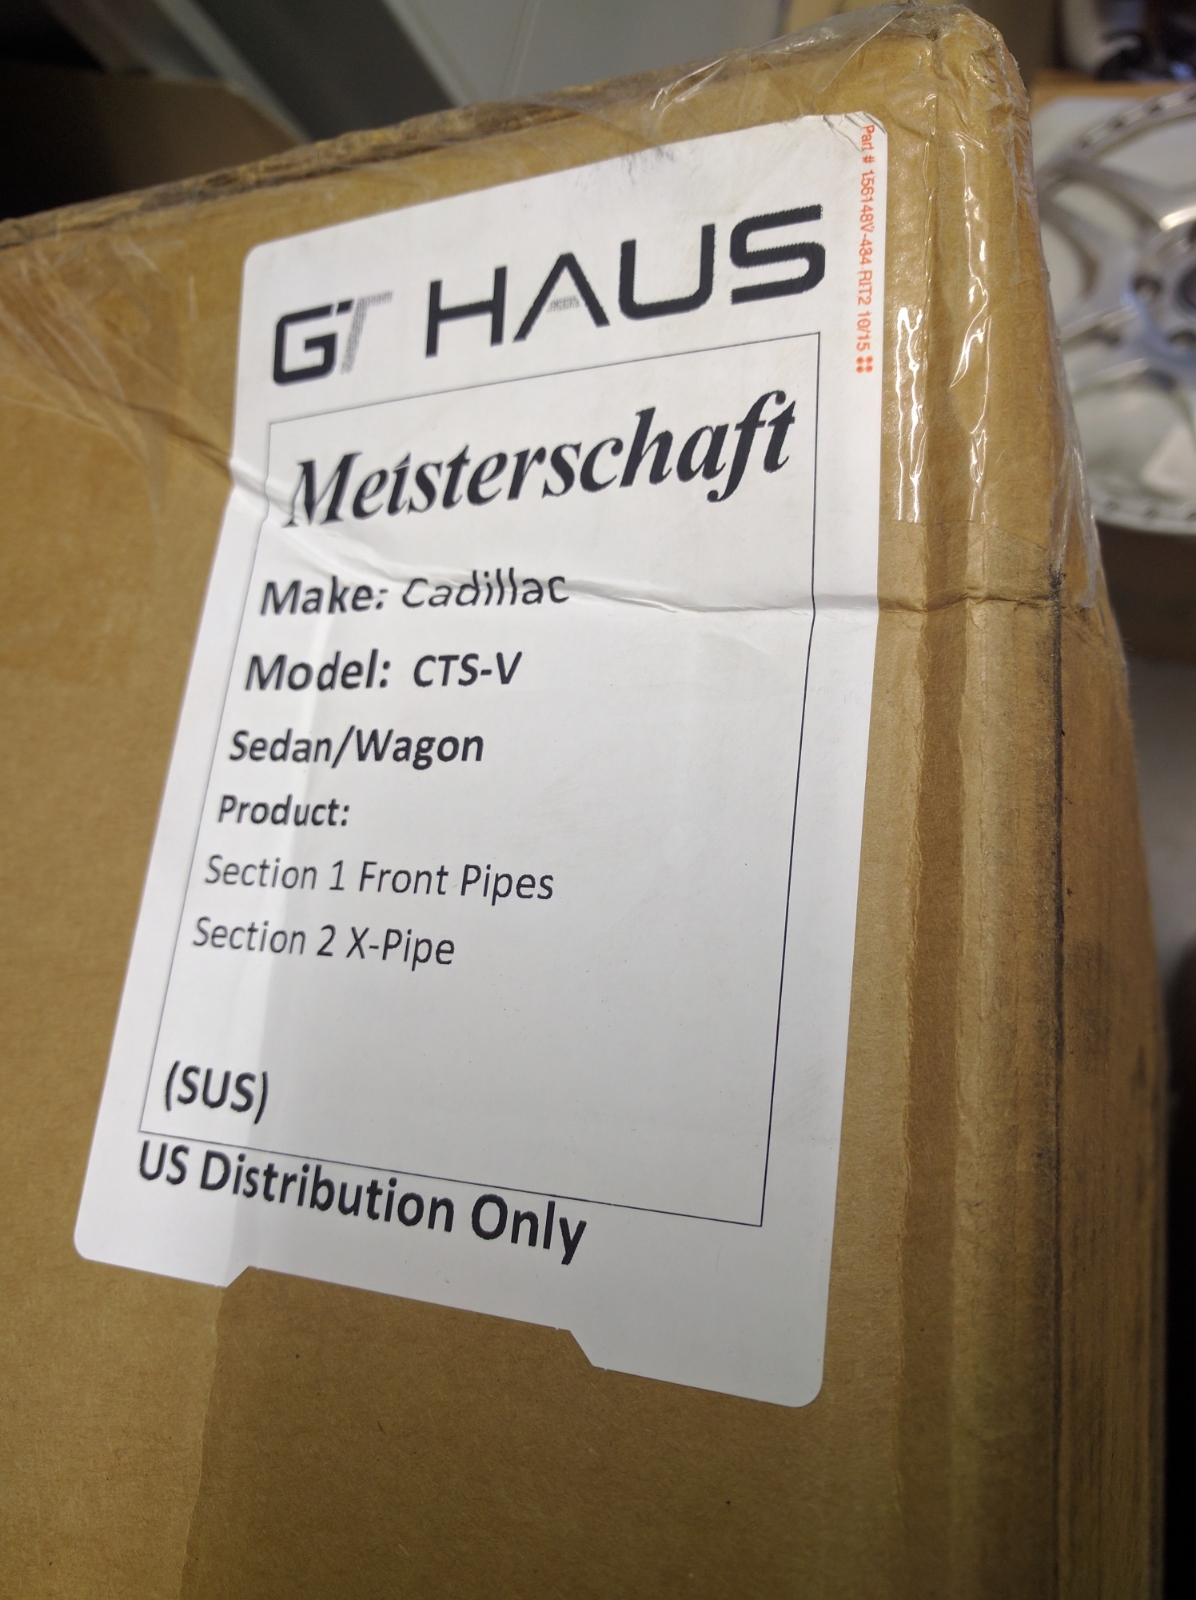
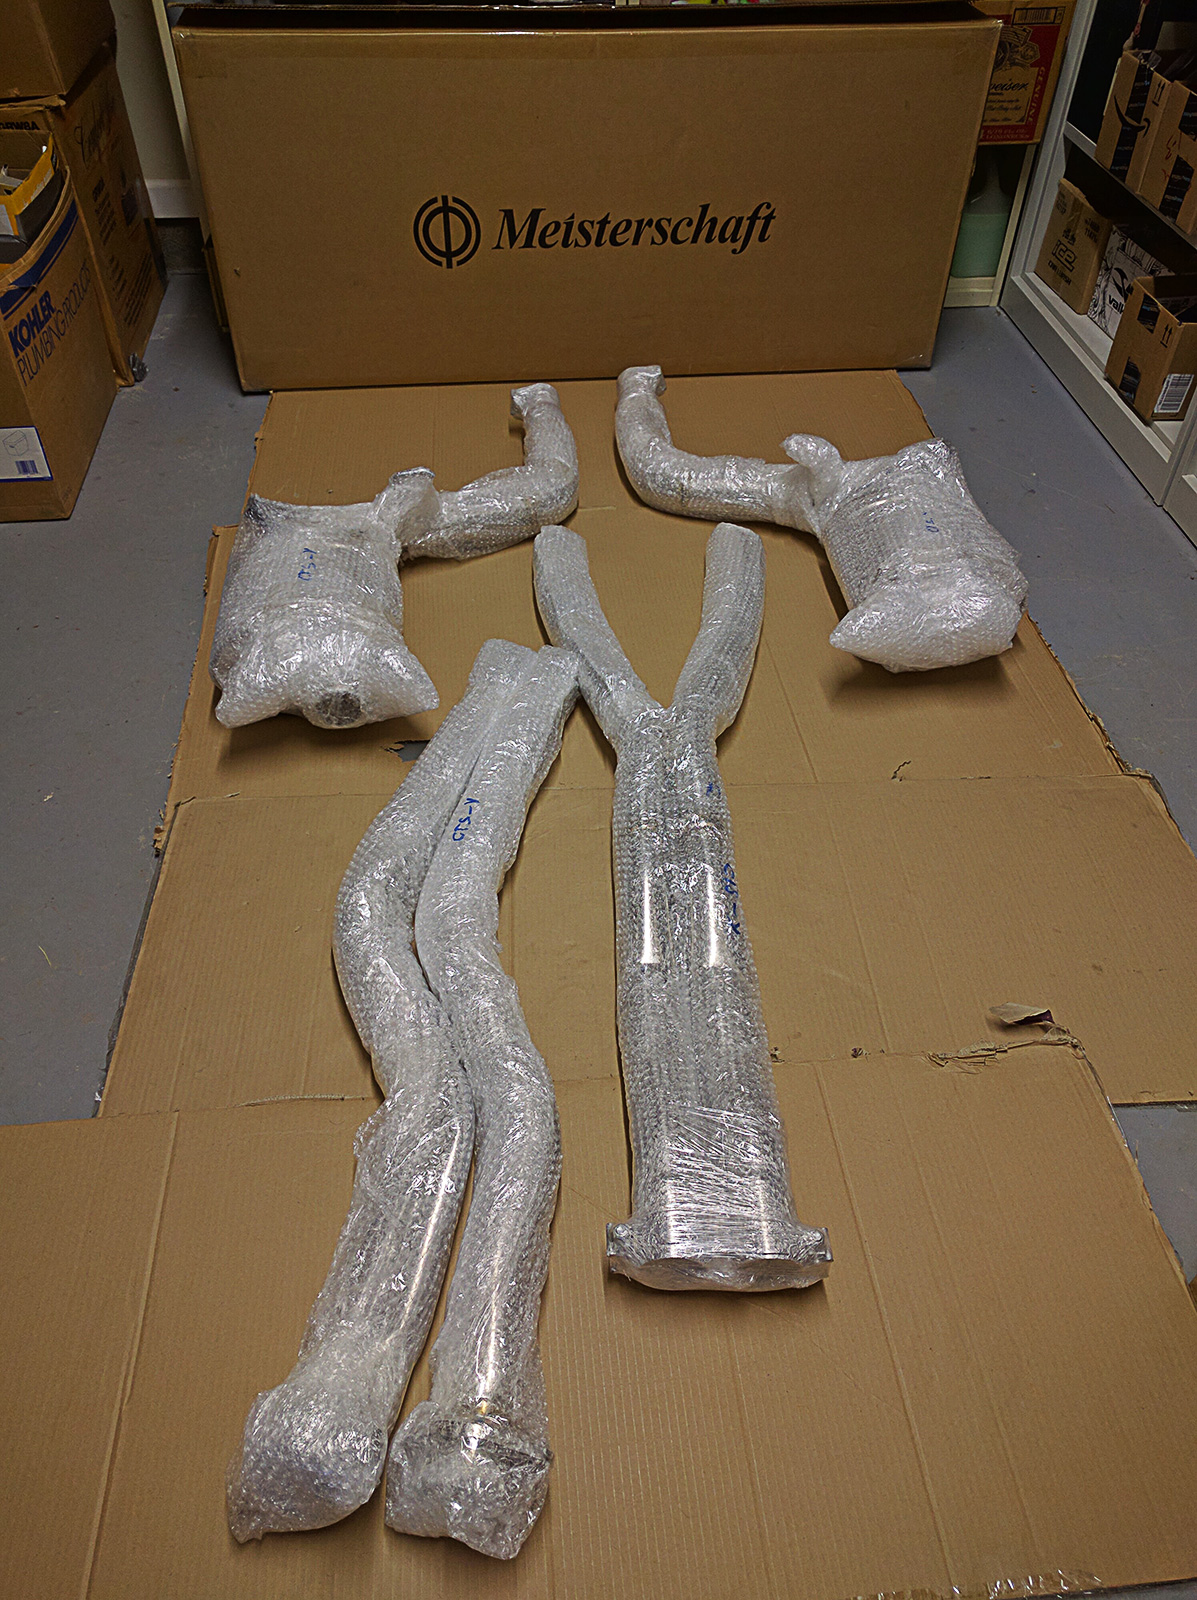
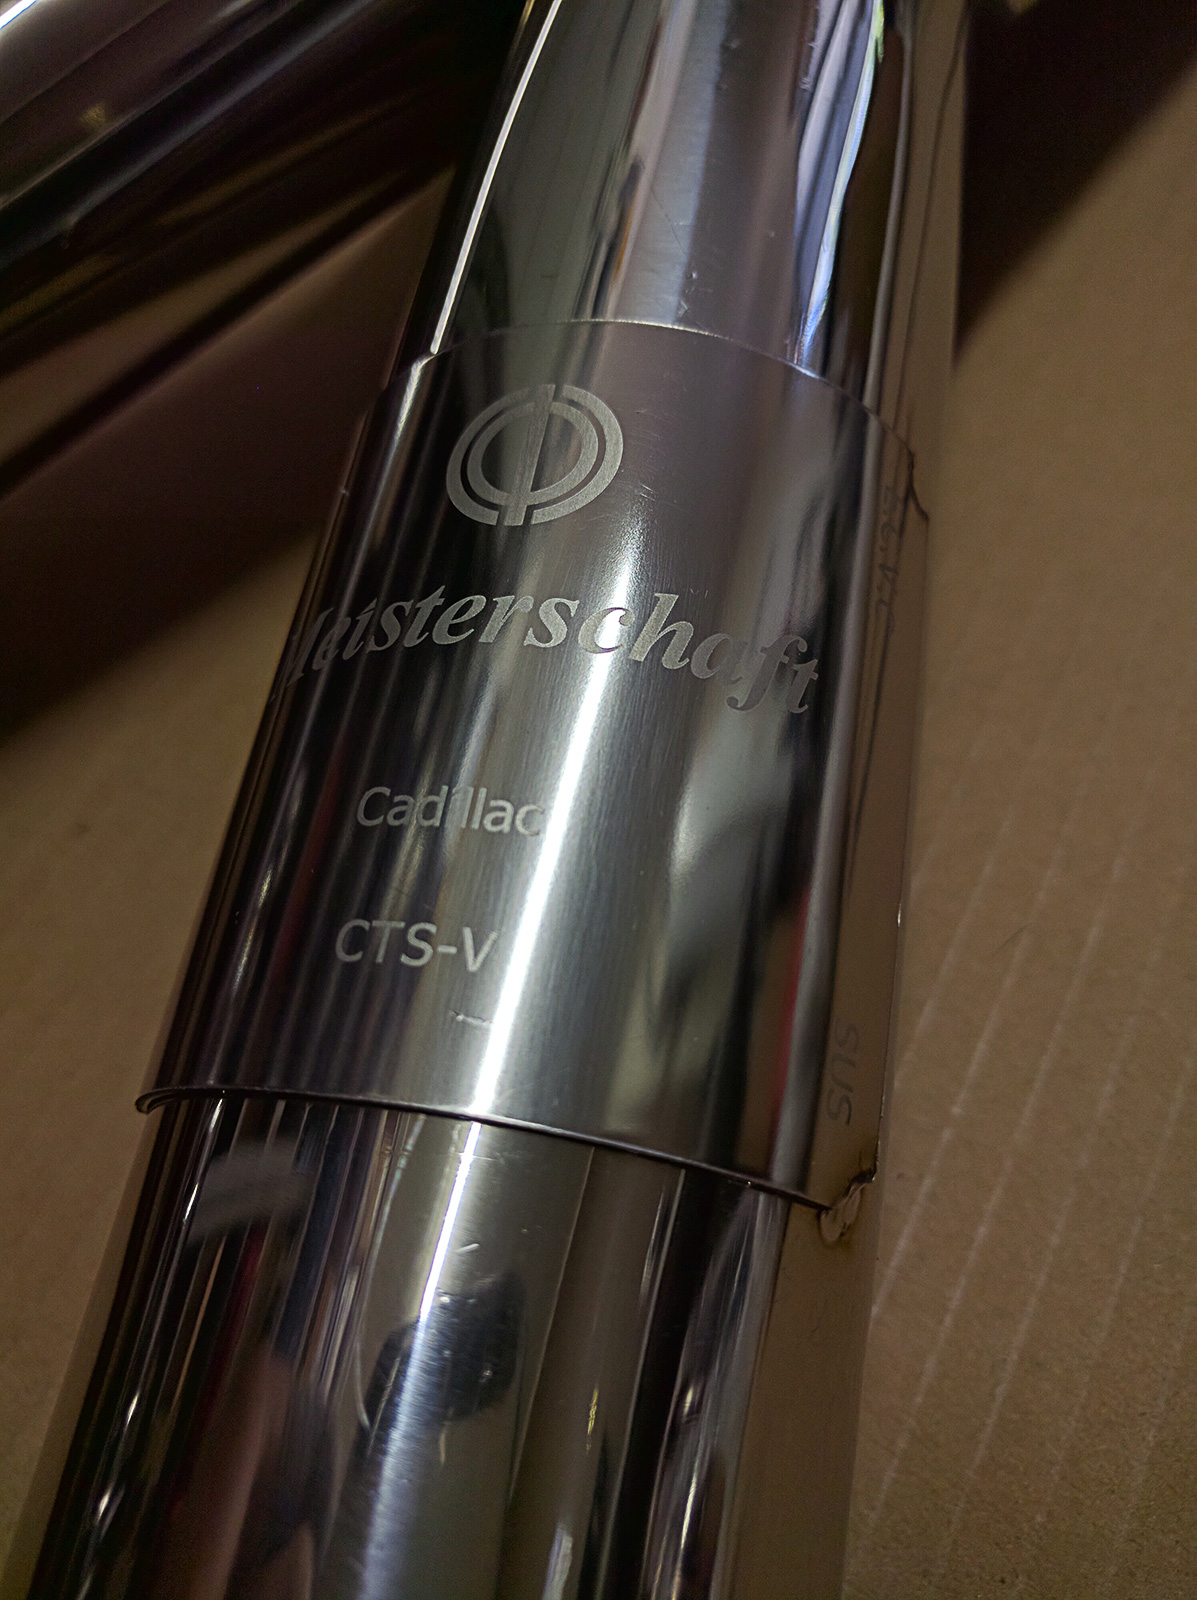
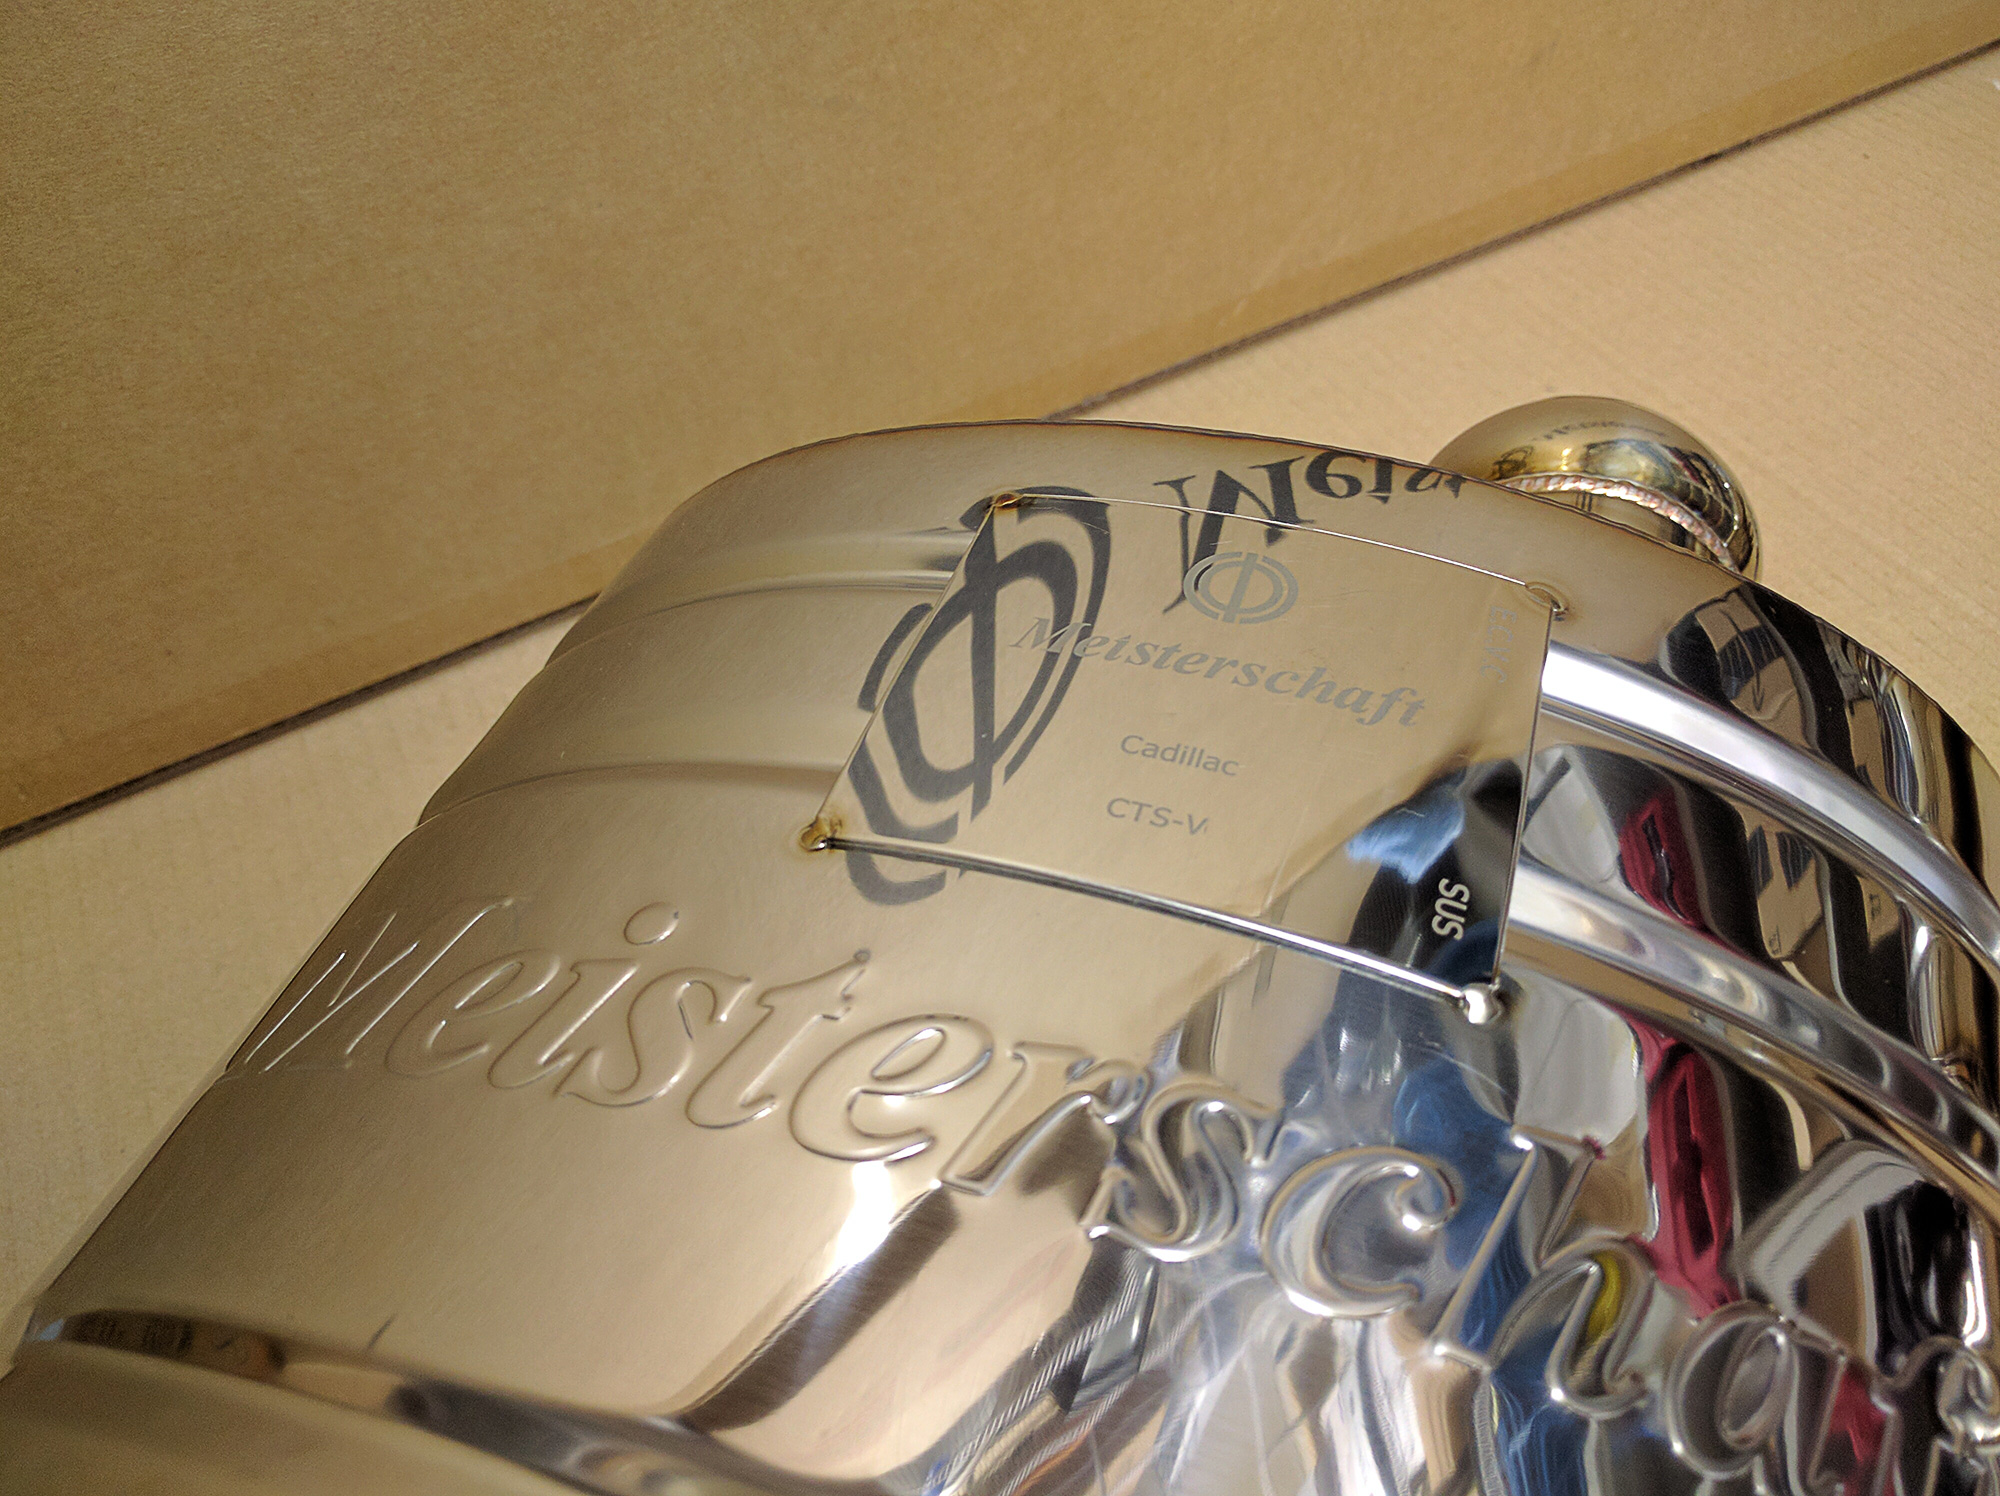
The exhaust is a work of art. It almost should be hung on a wall it looks so good. They even badge each section of the exhaust with their name and car make and model.
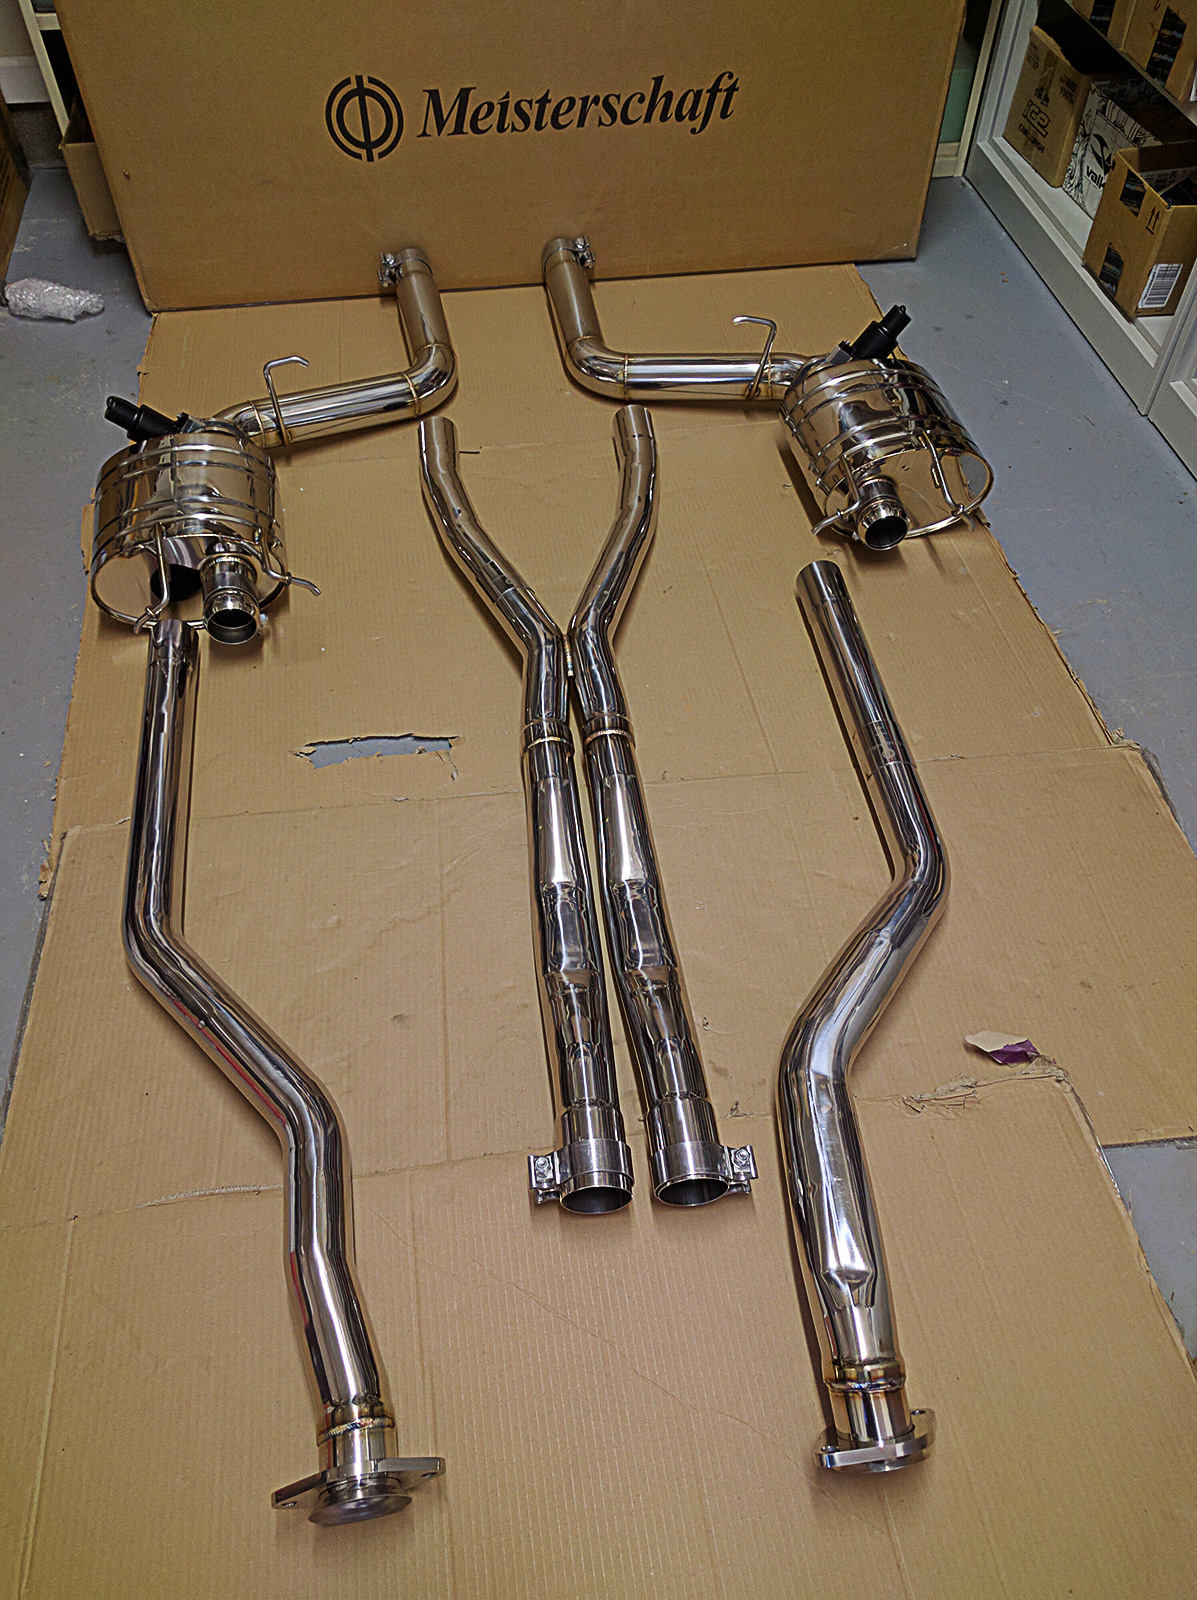
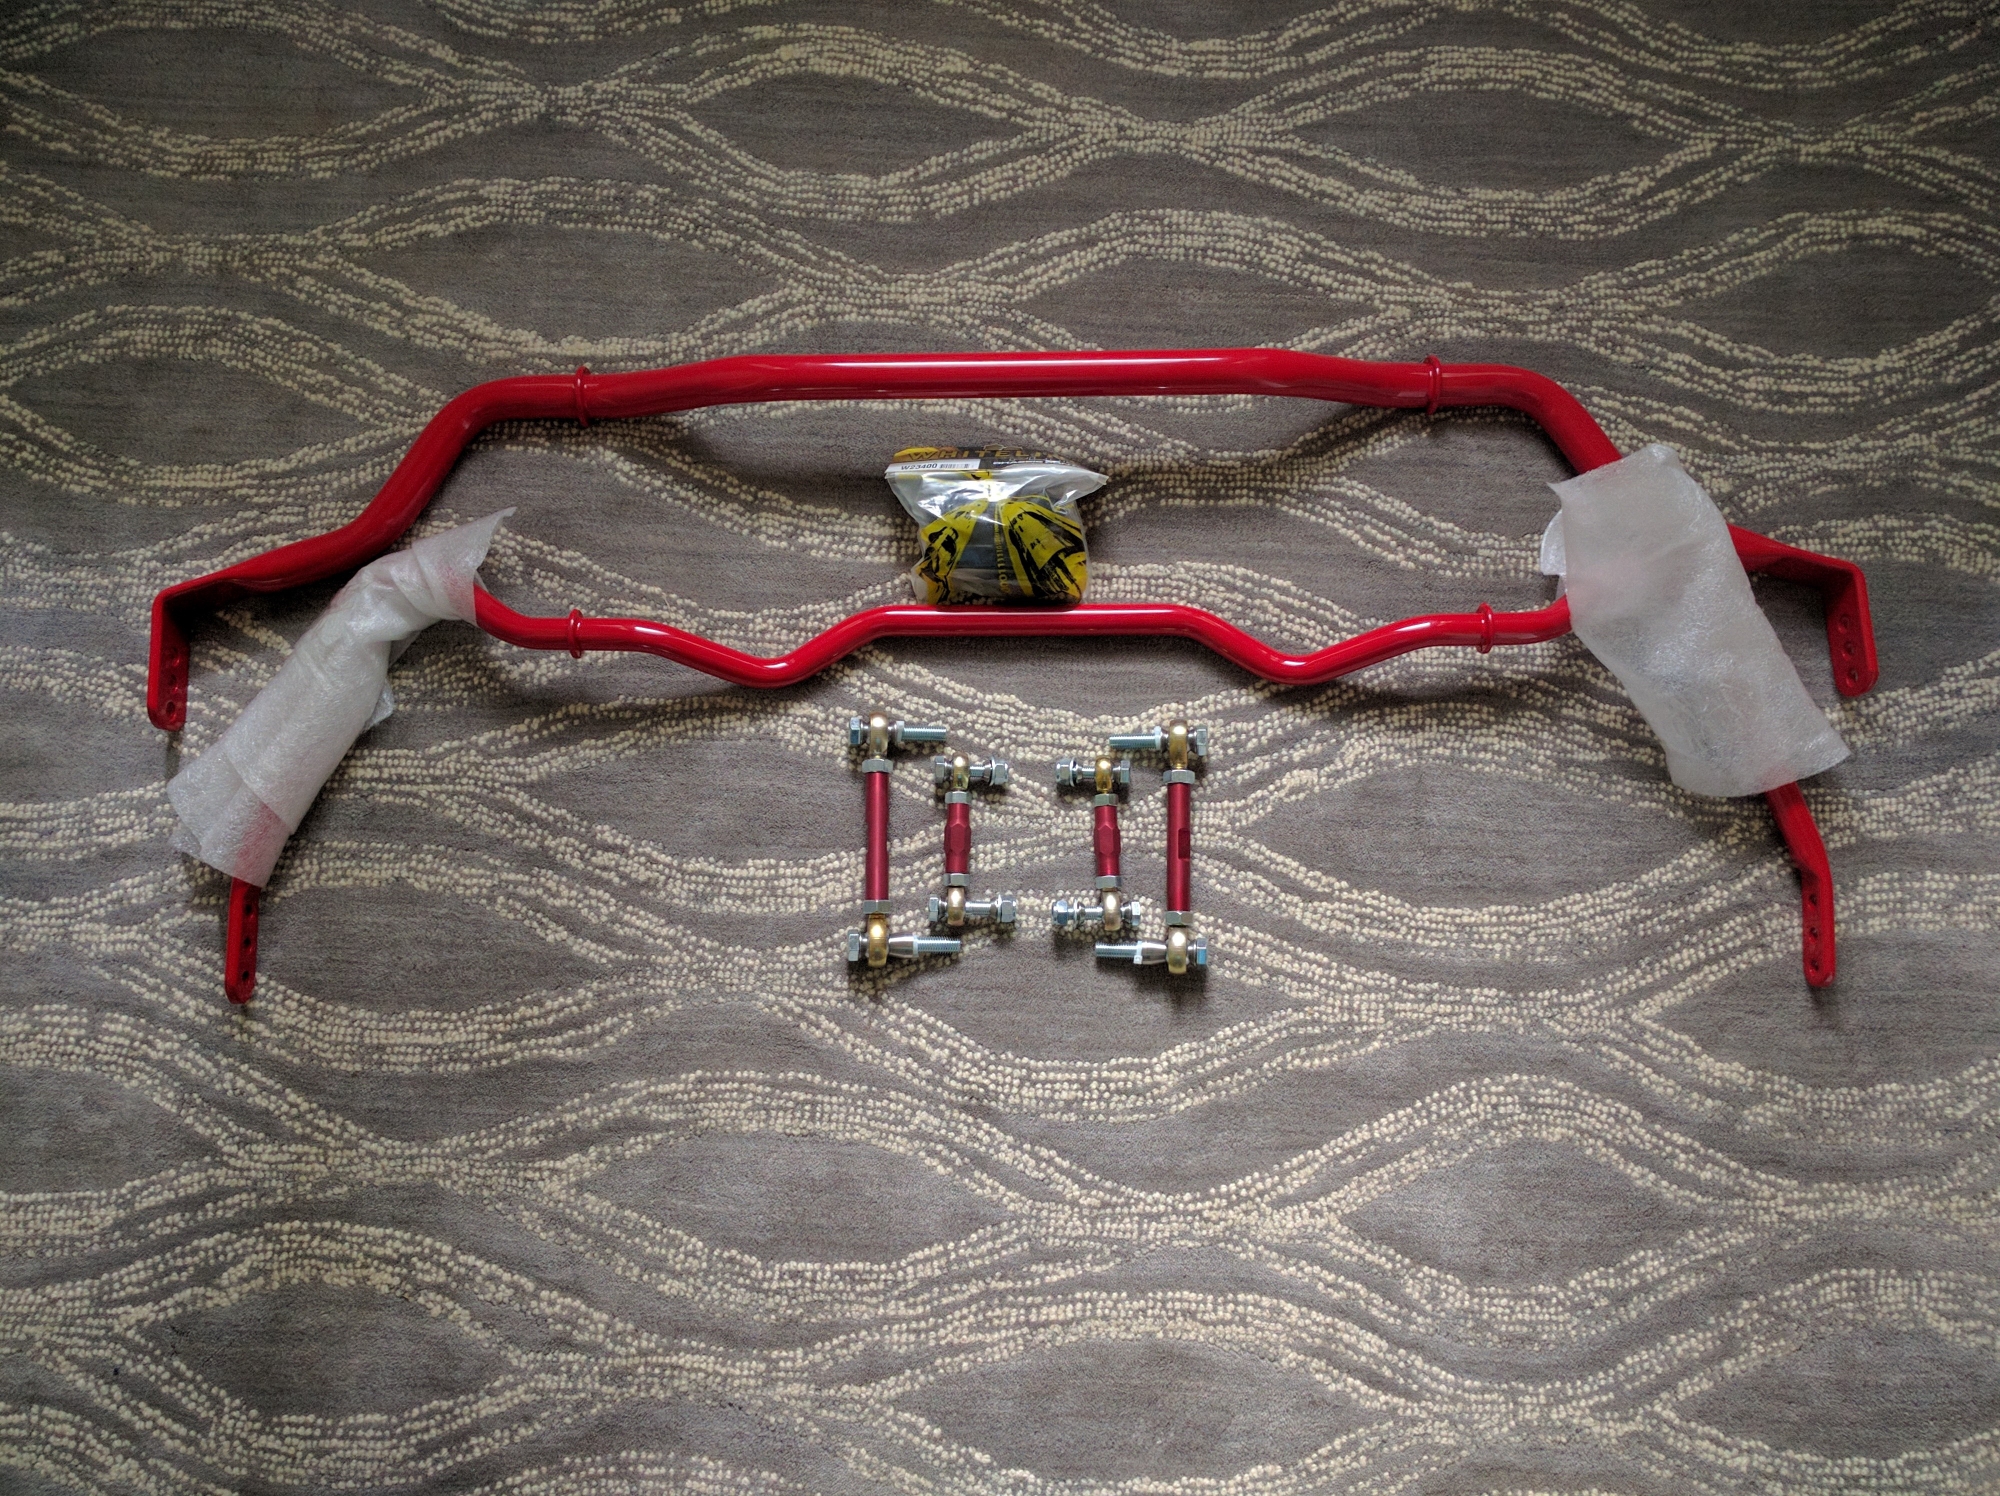
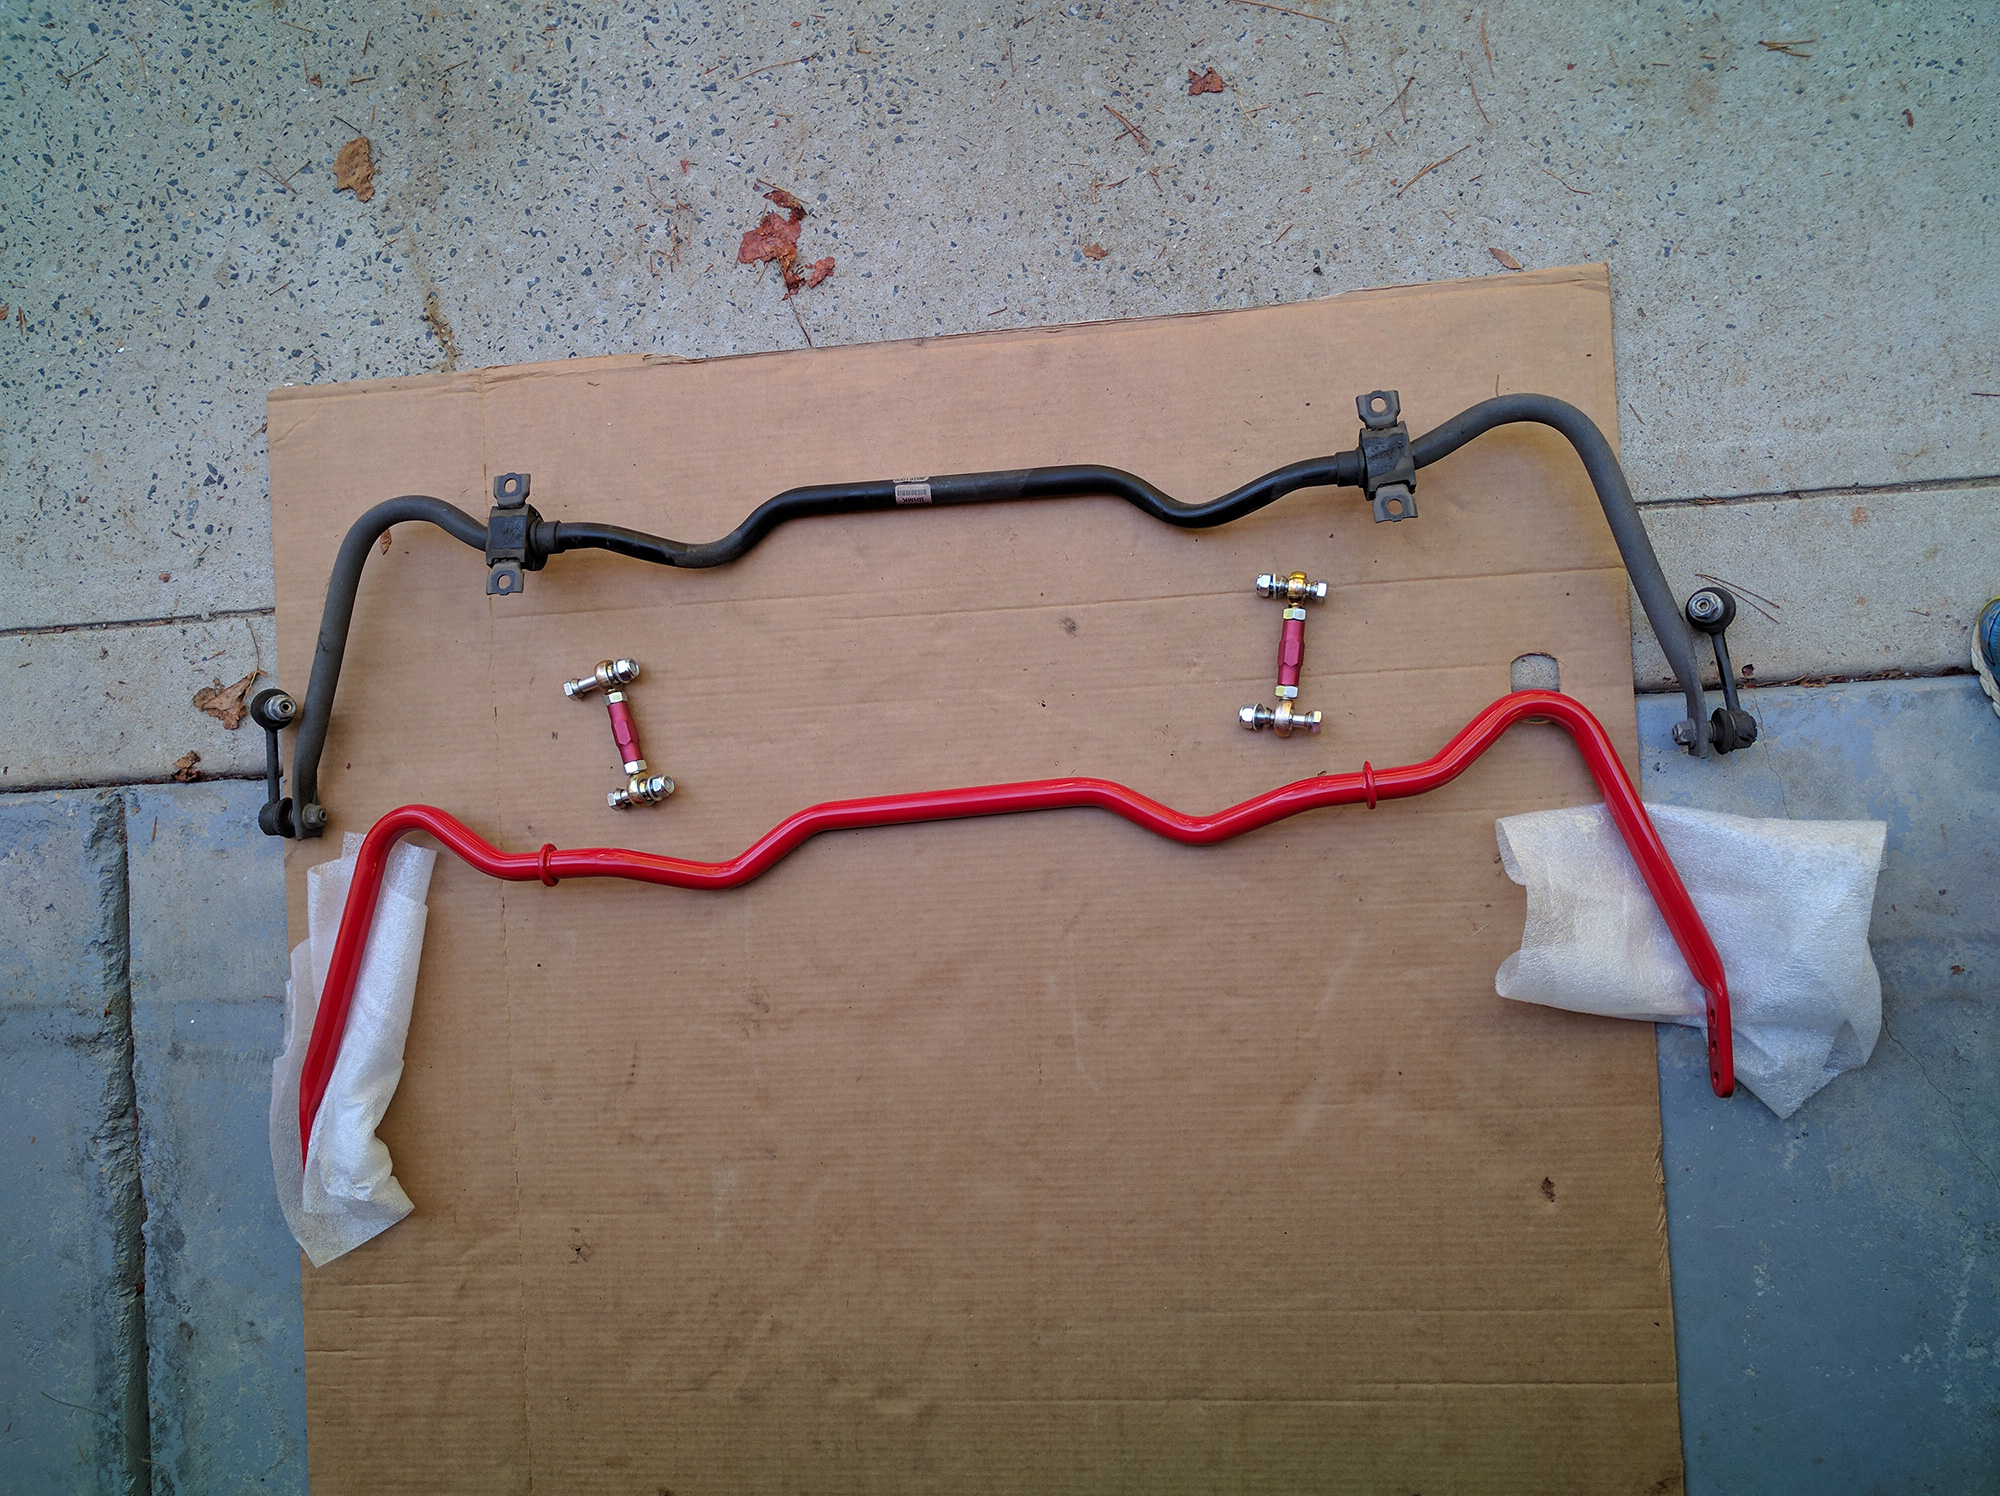
The sway bars and new beefy adjustable endlinks to go with them.
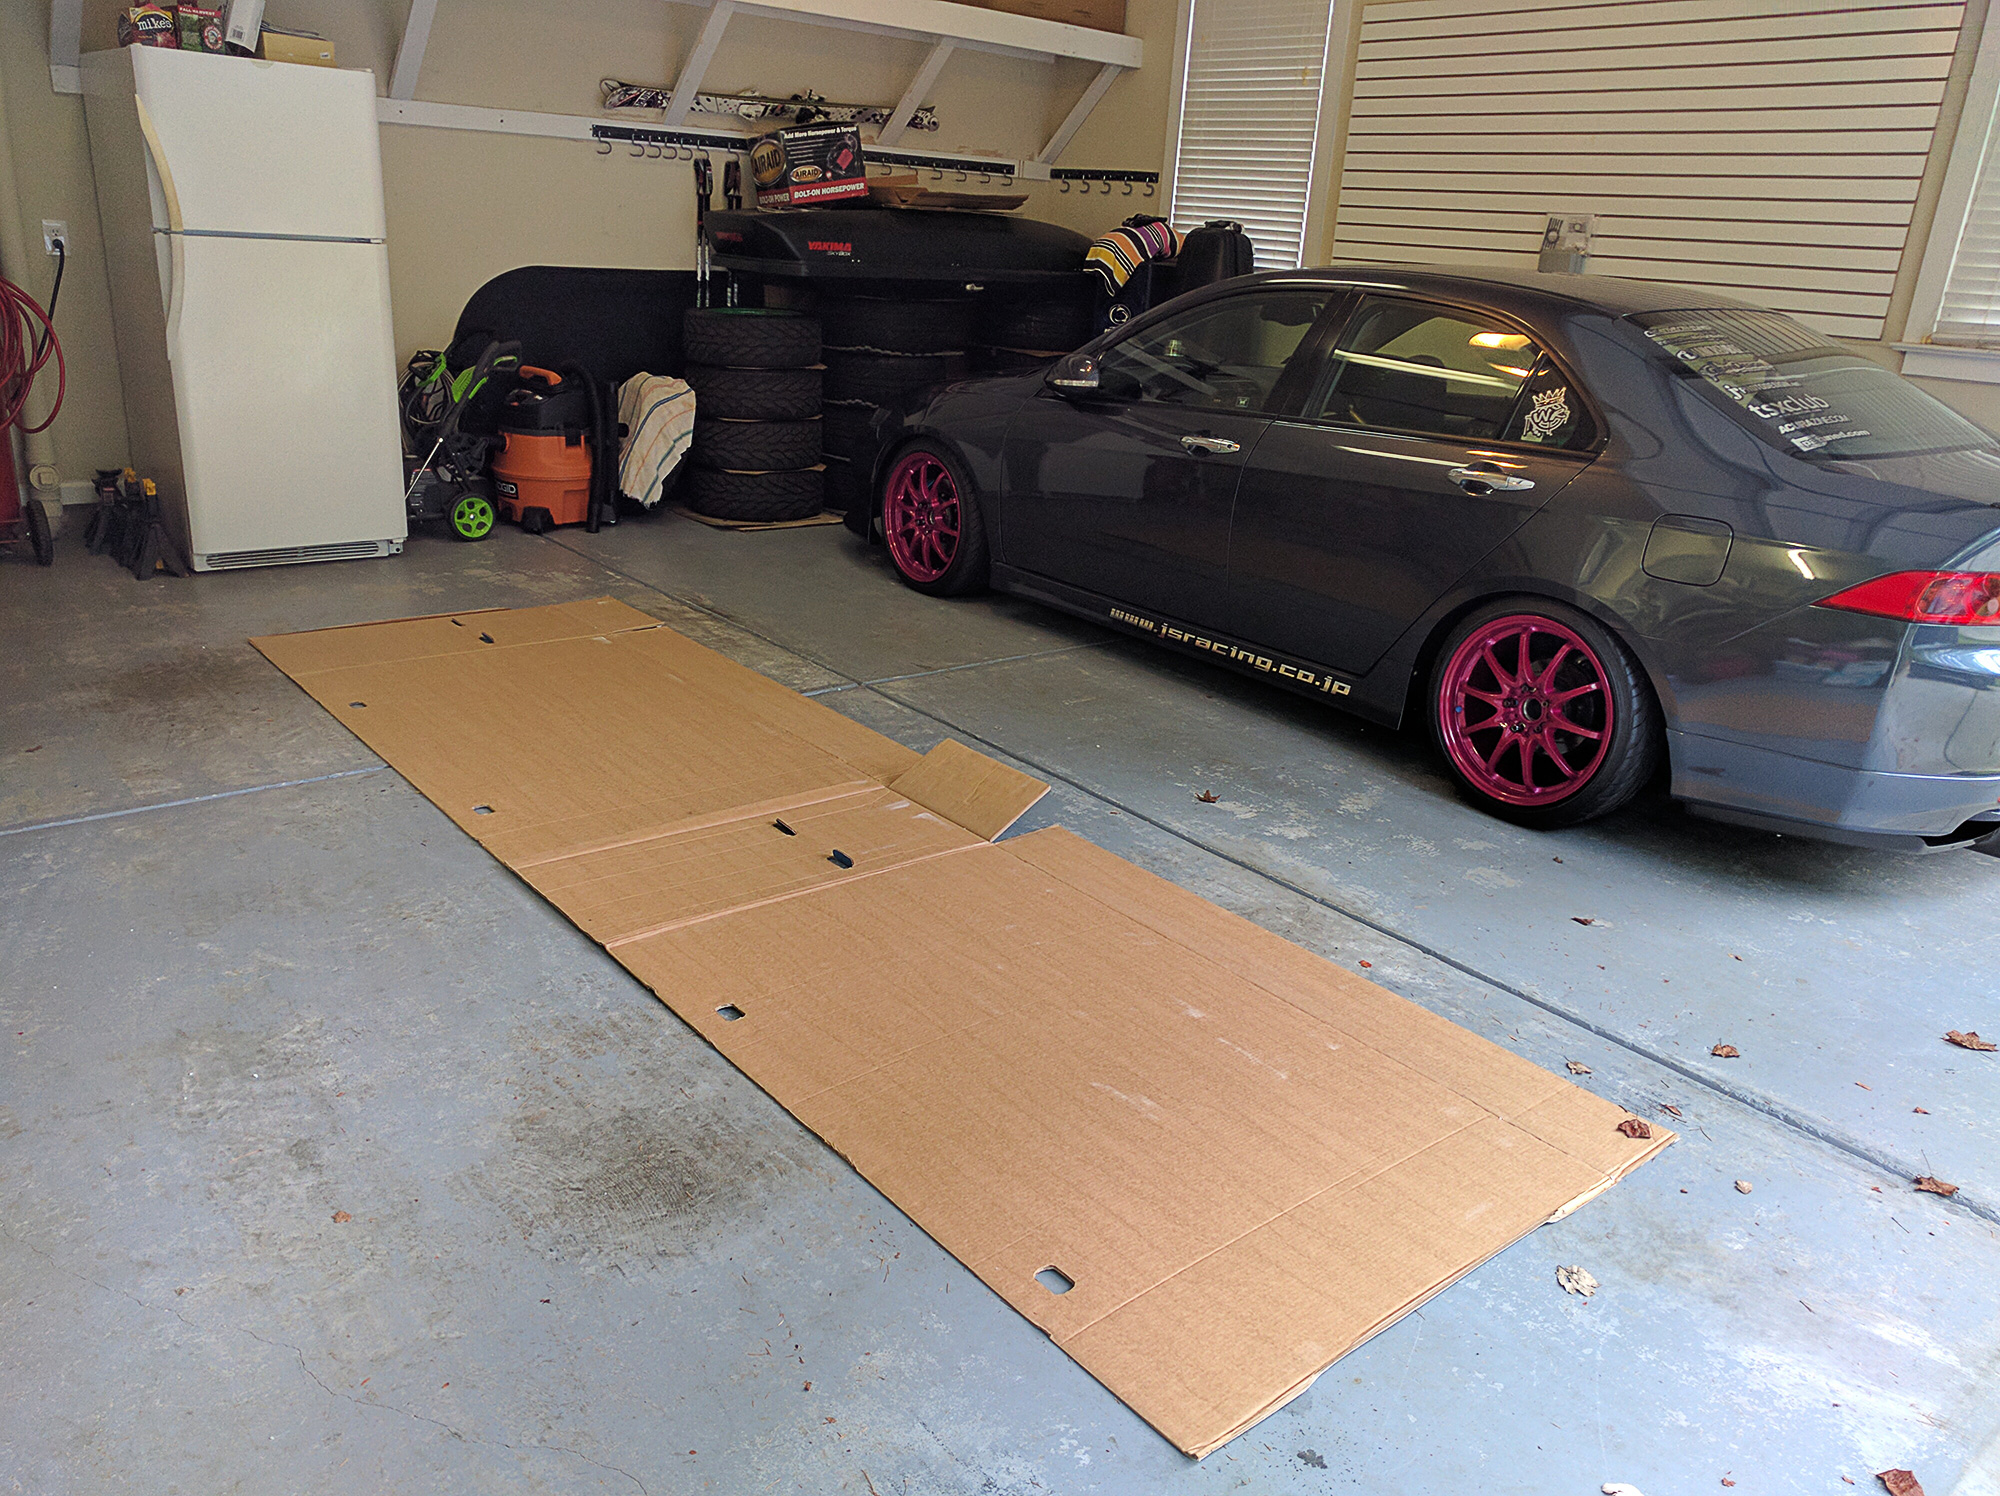
Got a big piece of cardboard to move around and and also so I don't scratch up the new exhaust while installing it under the car.
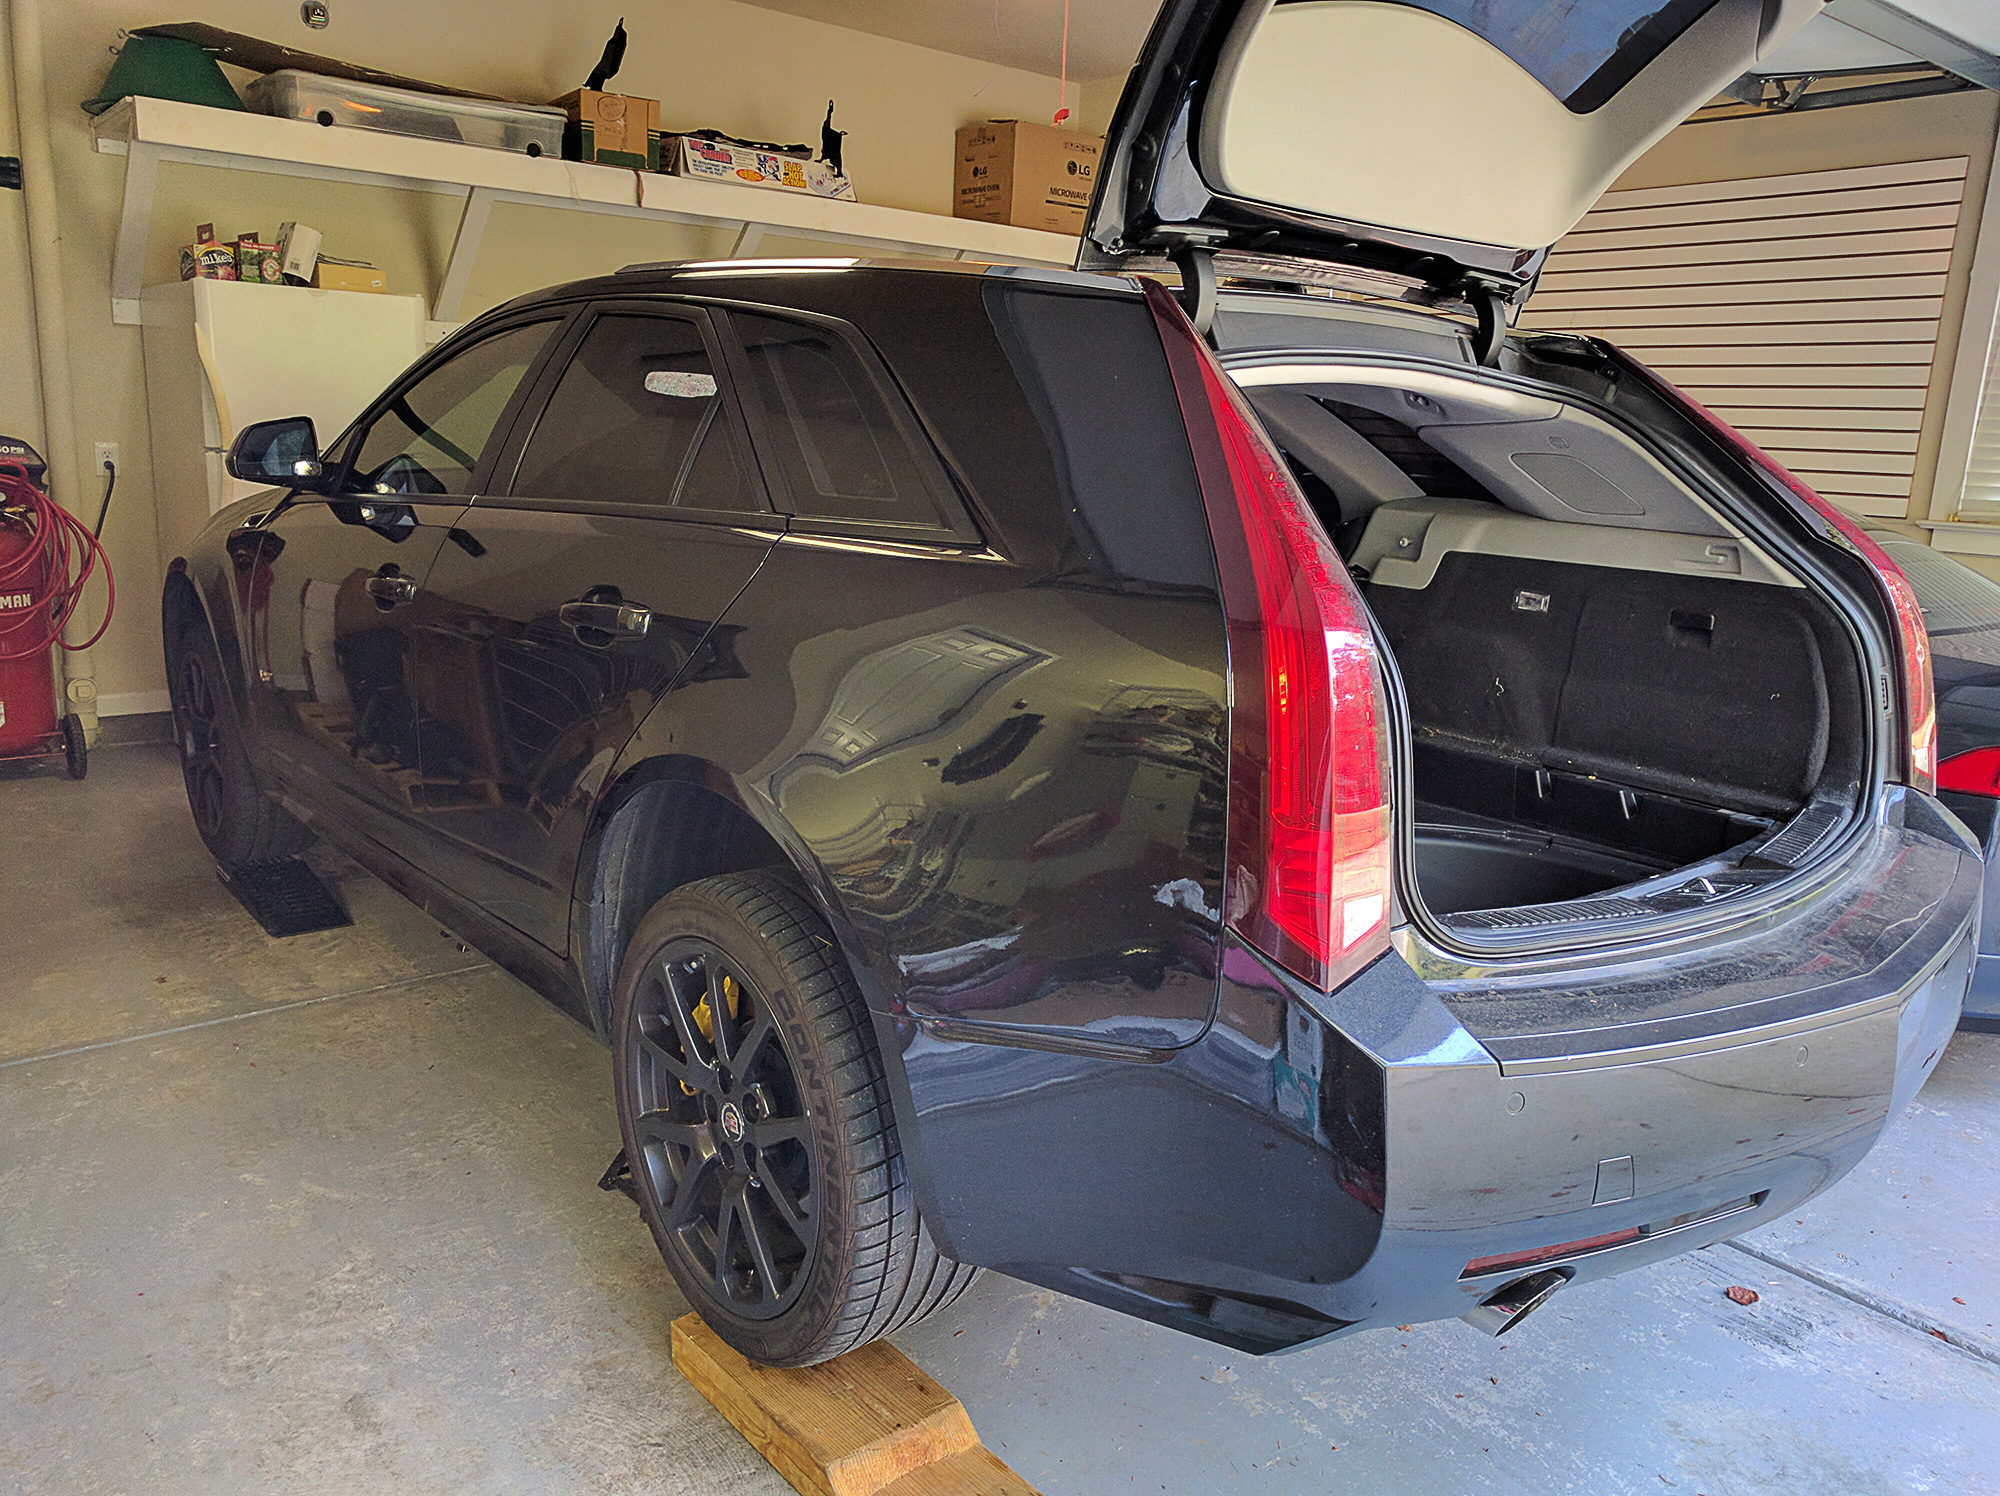
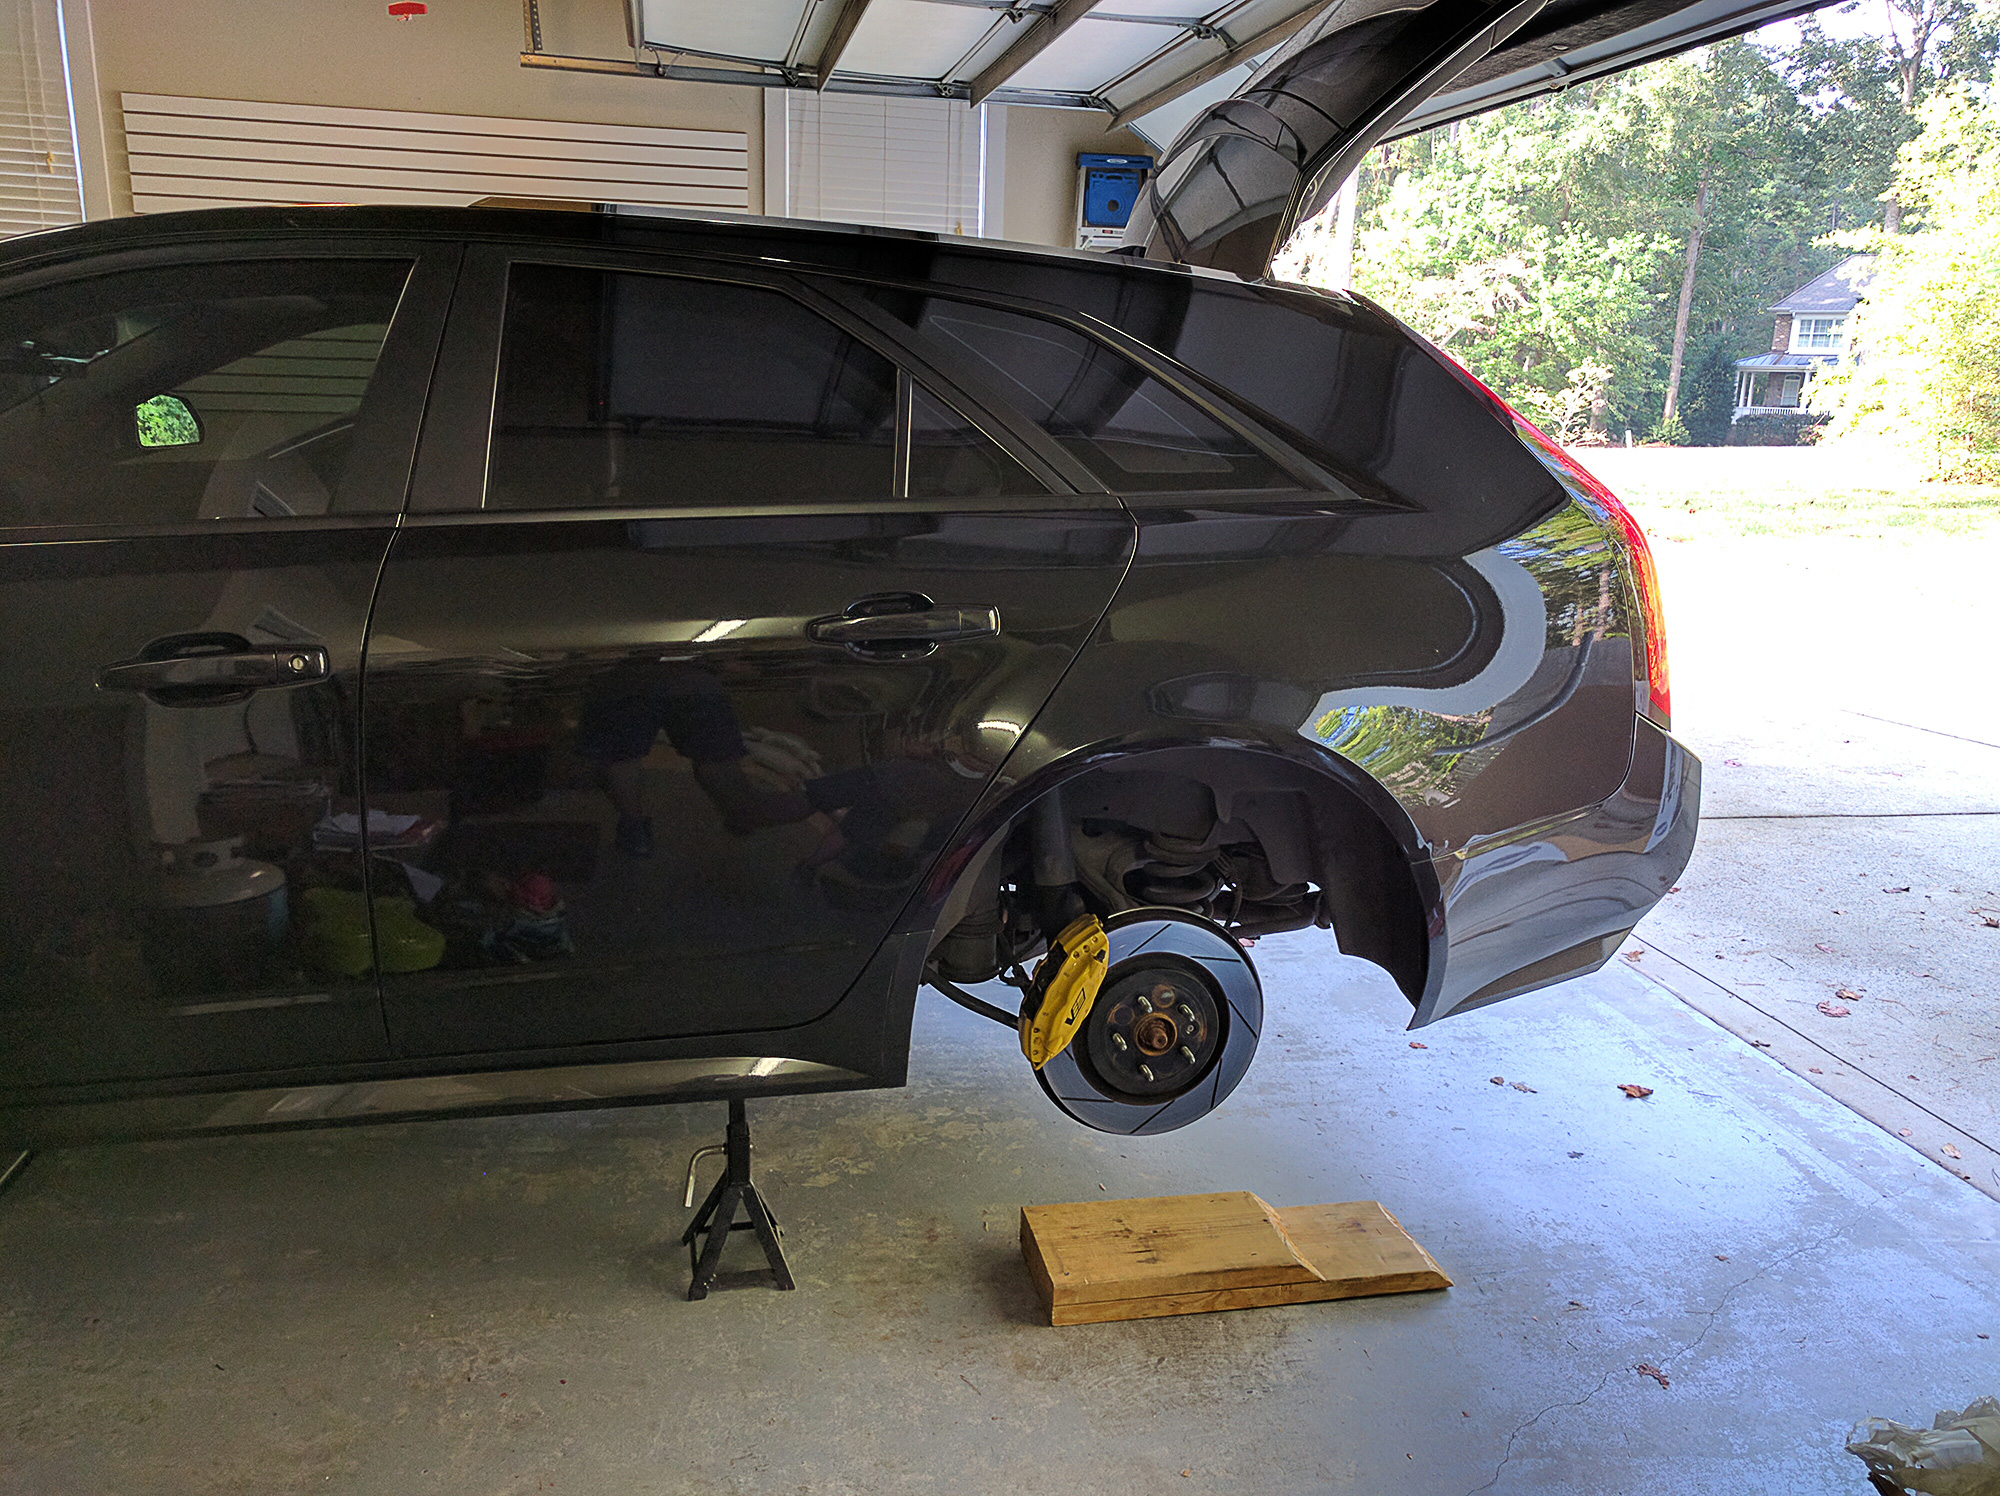
Then got the car up on the stands and ready to go.
Tear down begins. I documented pretty much everything of the tear down but not much of putting it back together since you obvioiusly just reverse it.
Remove the under brace
Loosen but don't remove right away the bolts that hold the exhaust pipes on. This was also the first exhaust install I have done while having air and man did that make things so much faster.
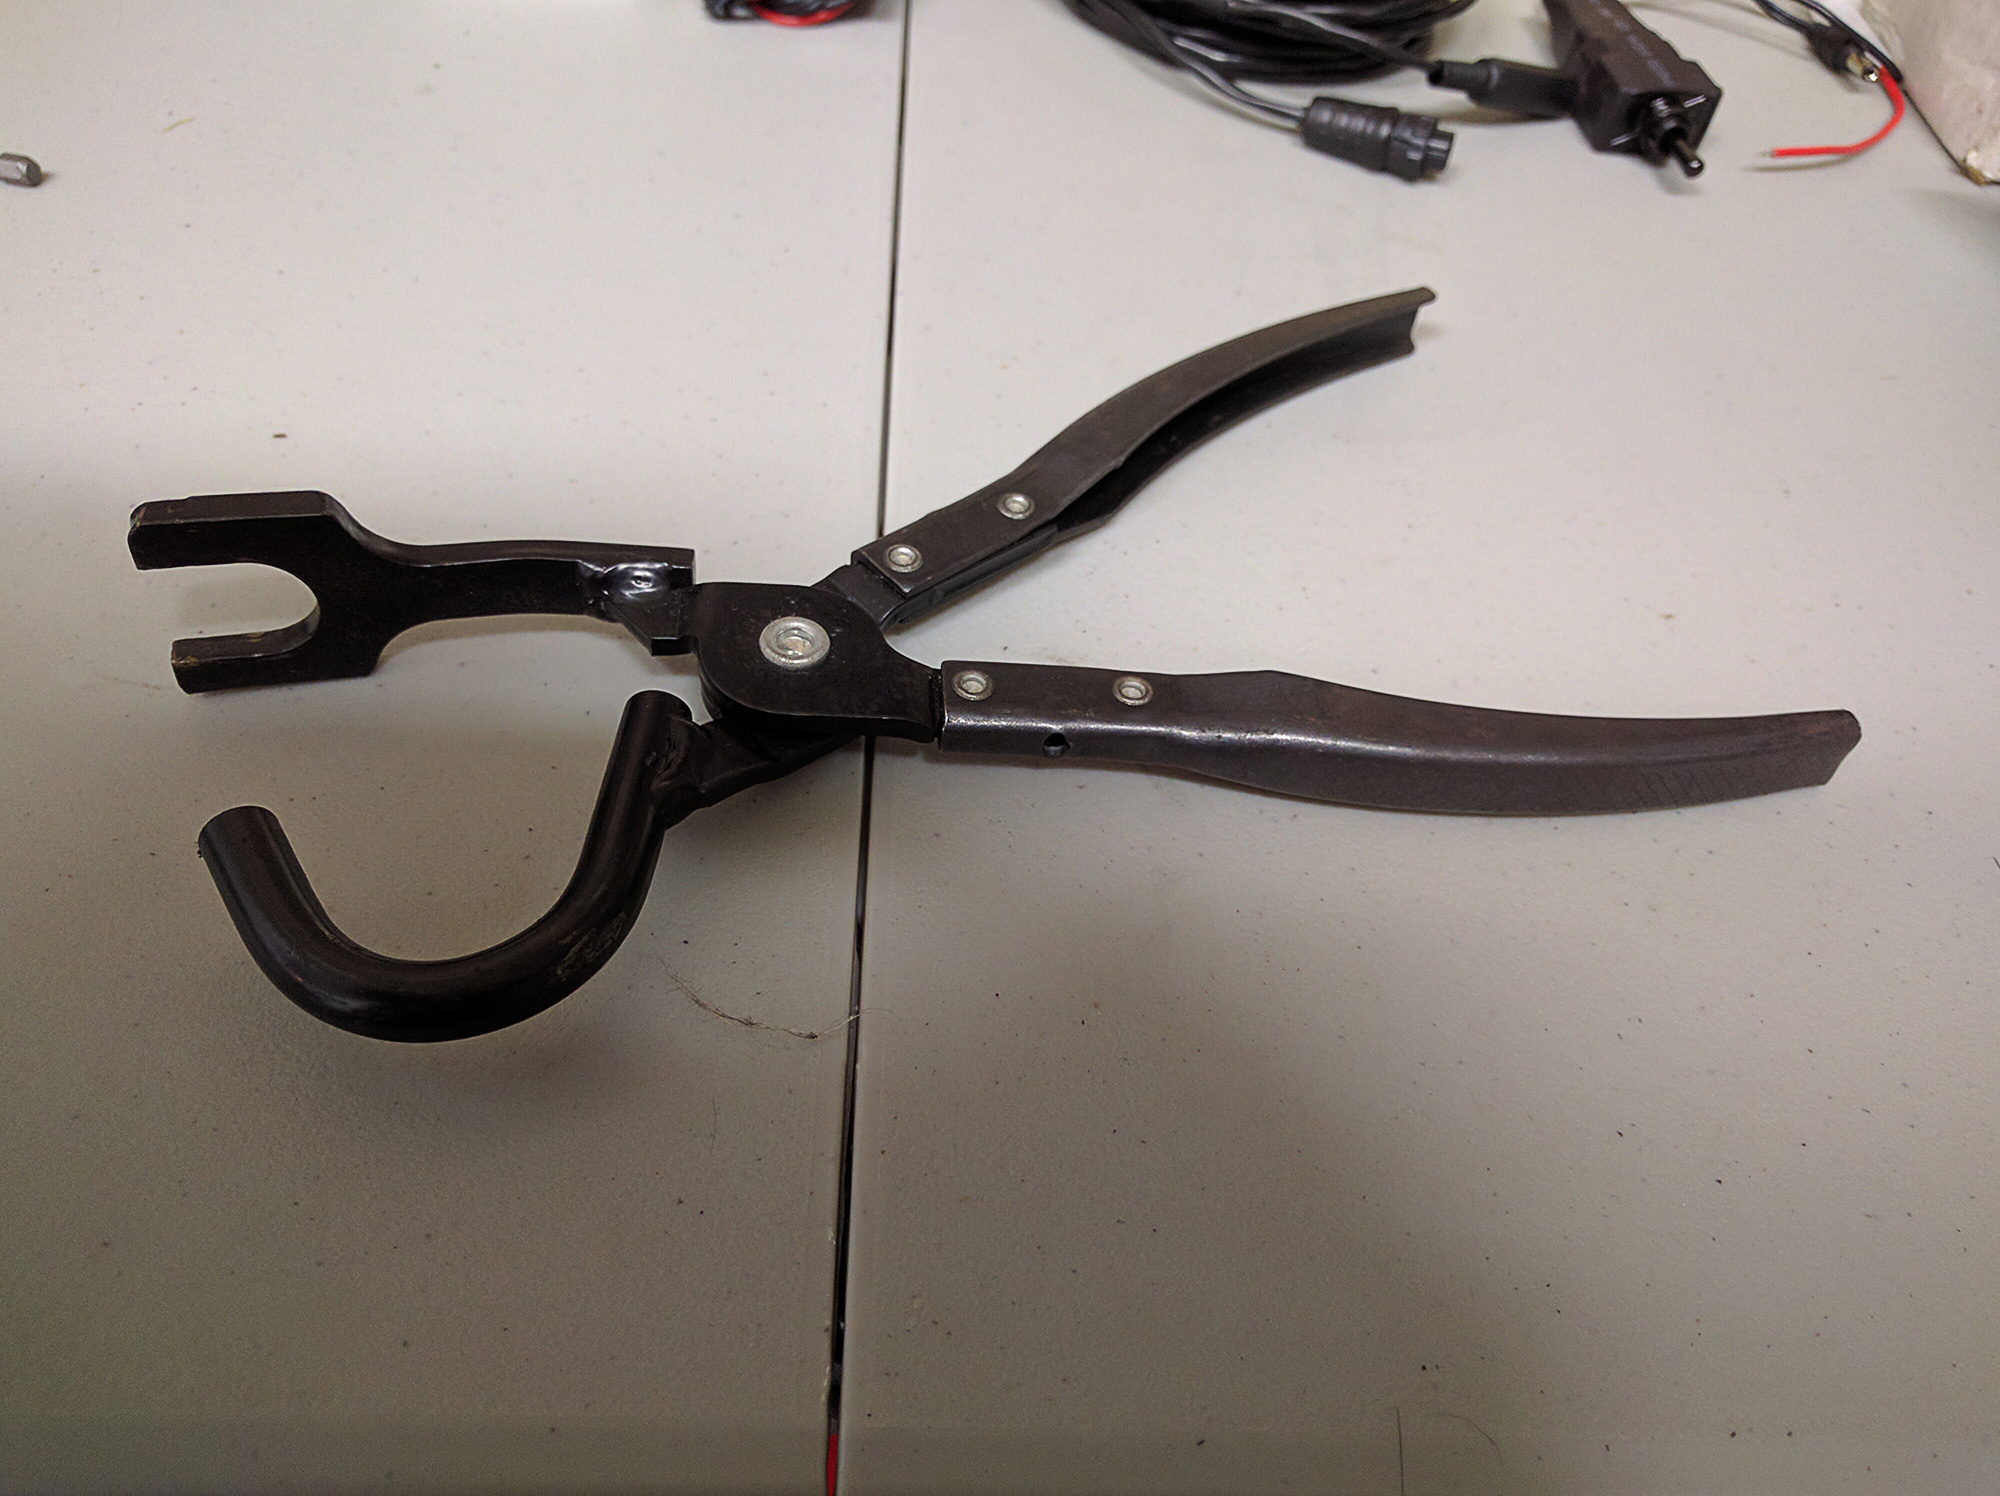
If you have never removed an exhaust before be sure to get yourself a pair of these as they are a great tool to have to get the rubber hangers off the exhaust. I have had them since the first exhaust I ever did and they make like so easy.
Once you get the hangers off you can lower the exhaust down a little with a jack. don't drop it completely though till you remove the nuts will holding it on up front.
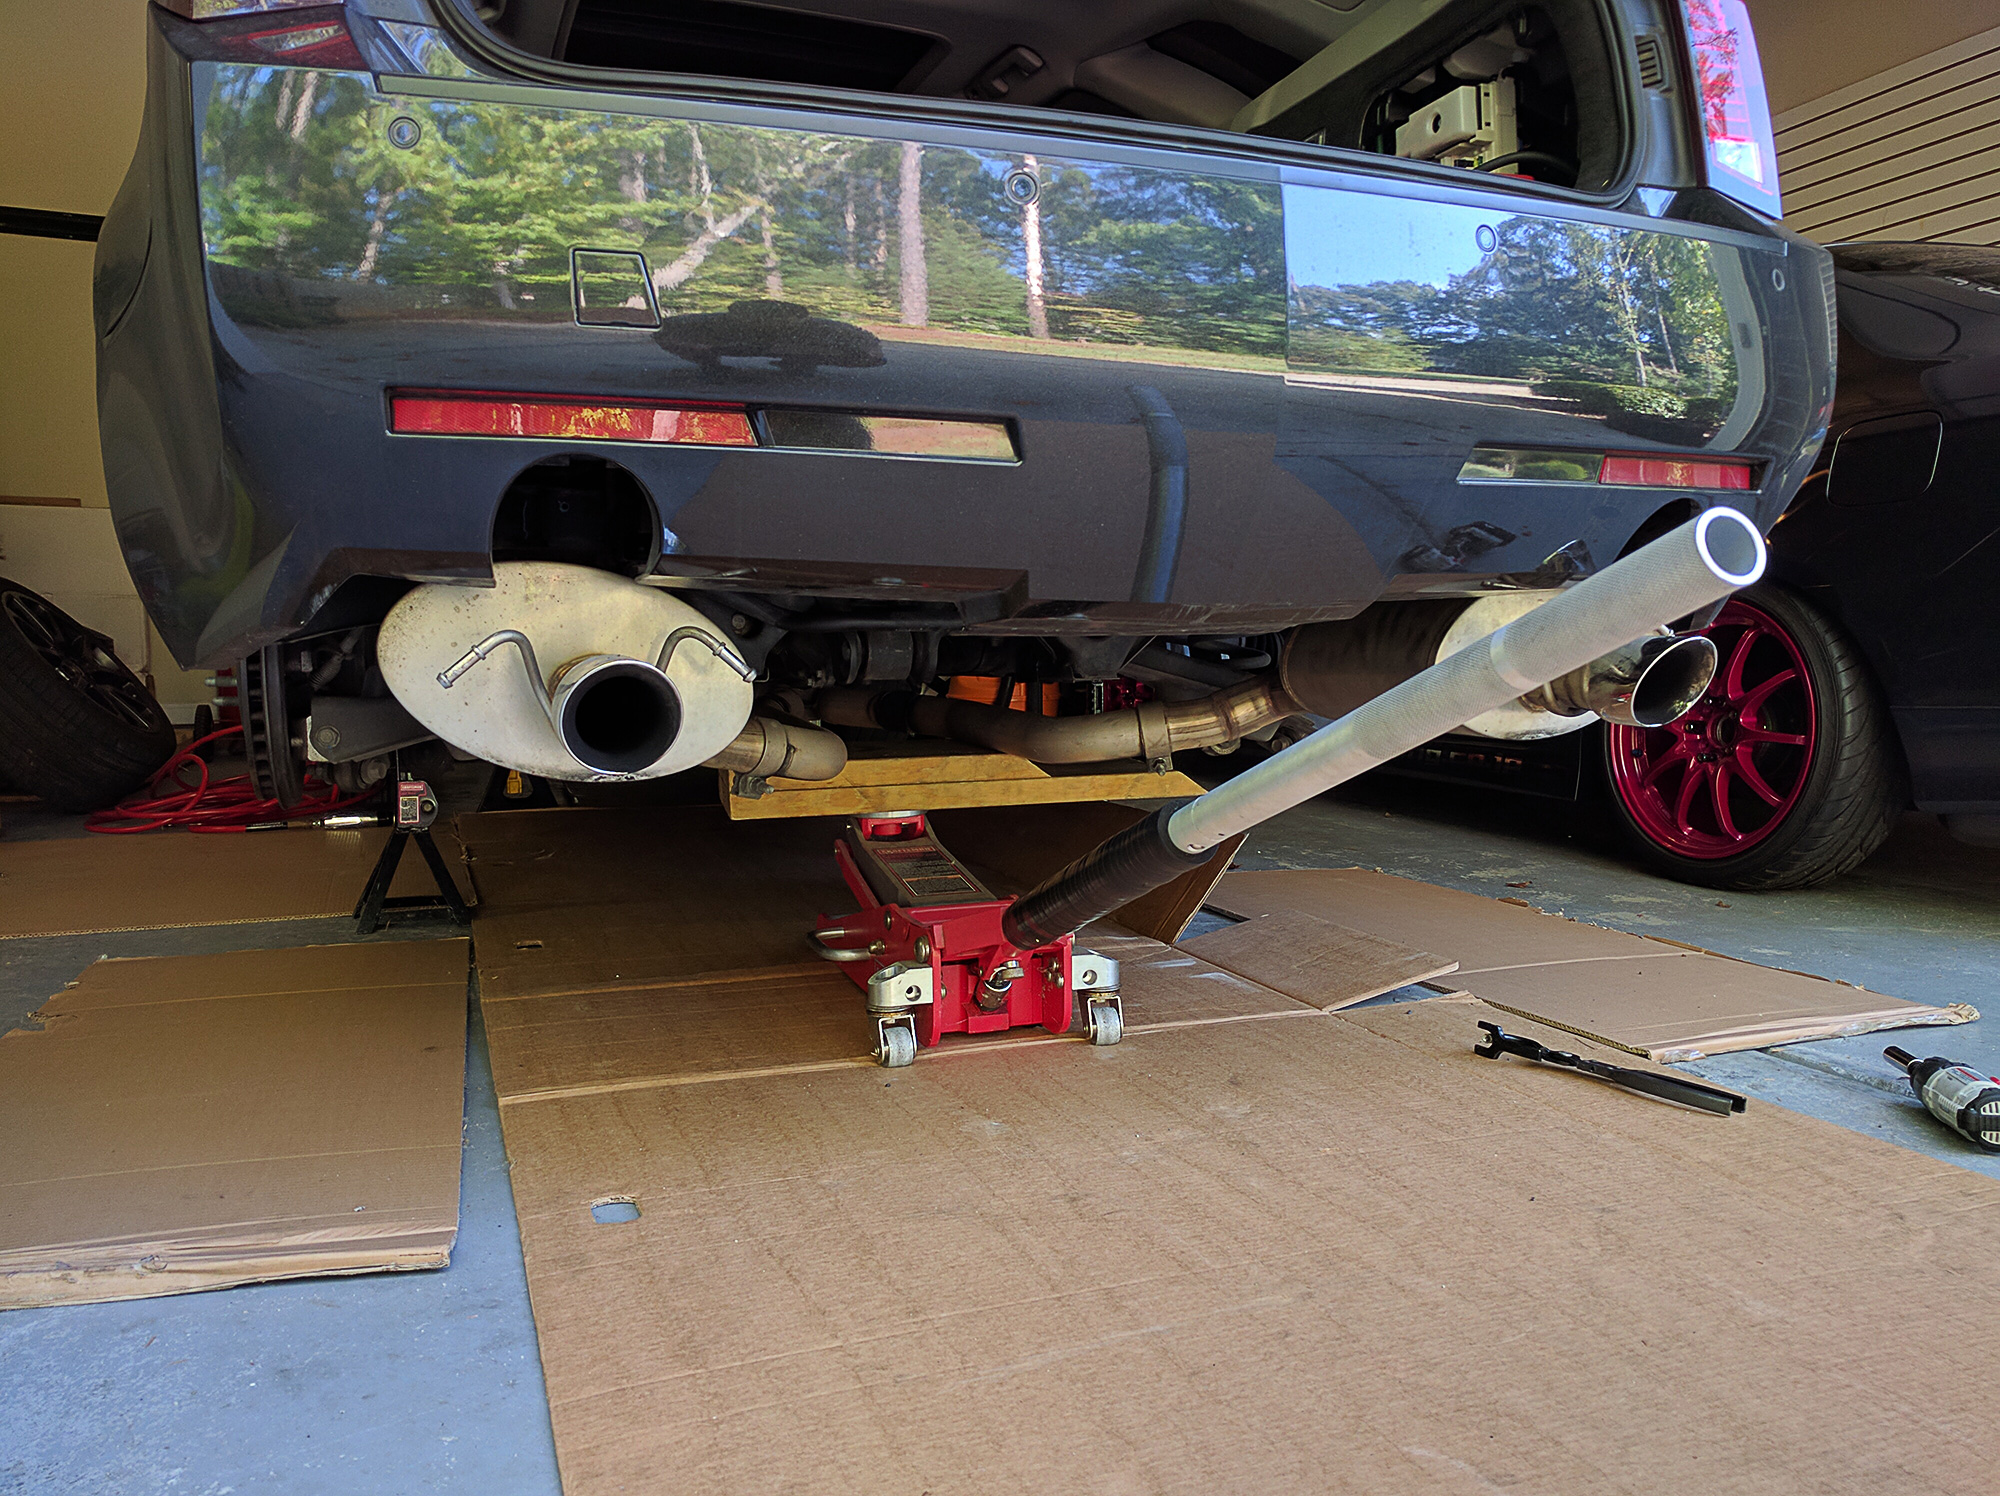
Then you can just slide it straight back nice and easily.

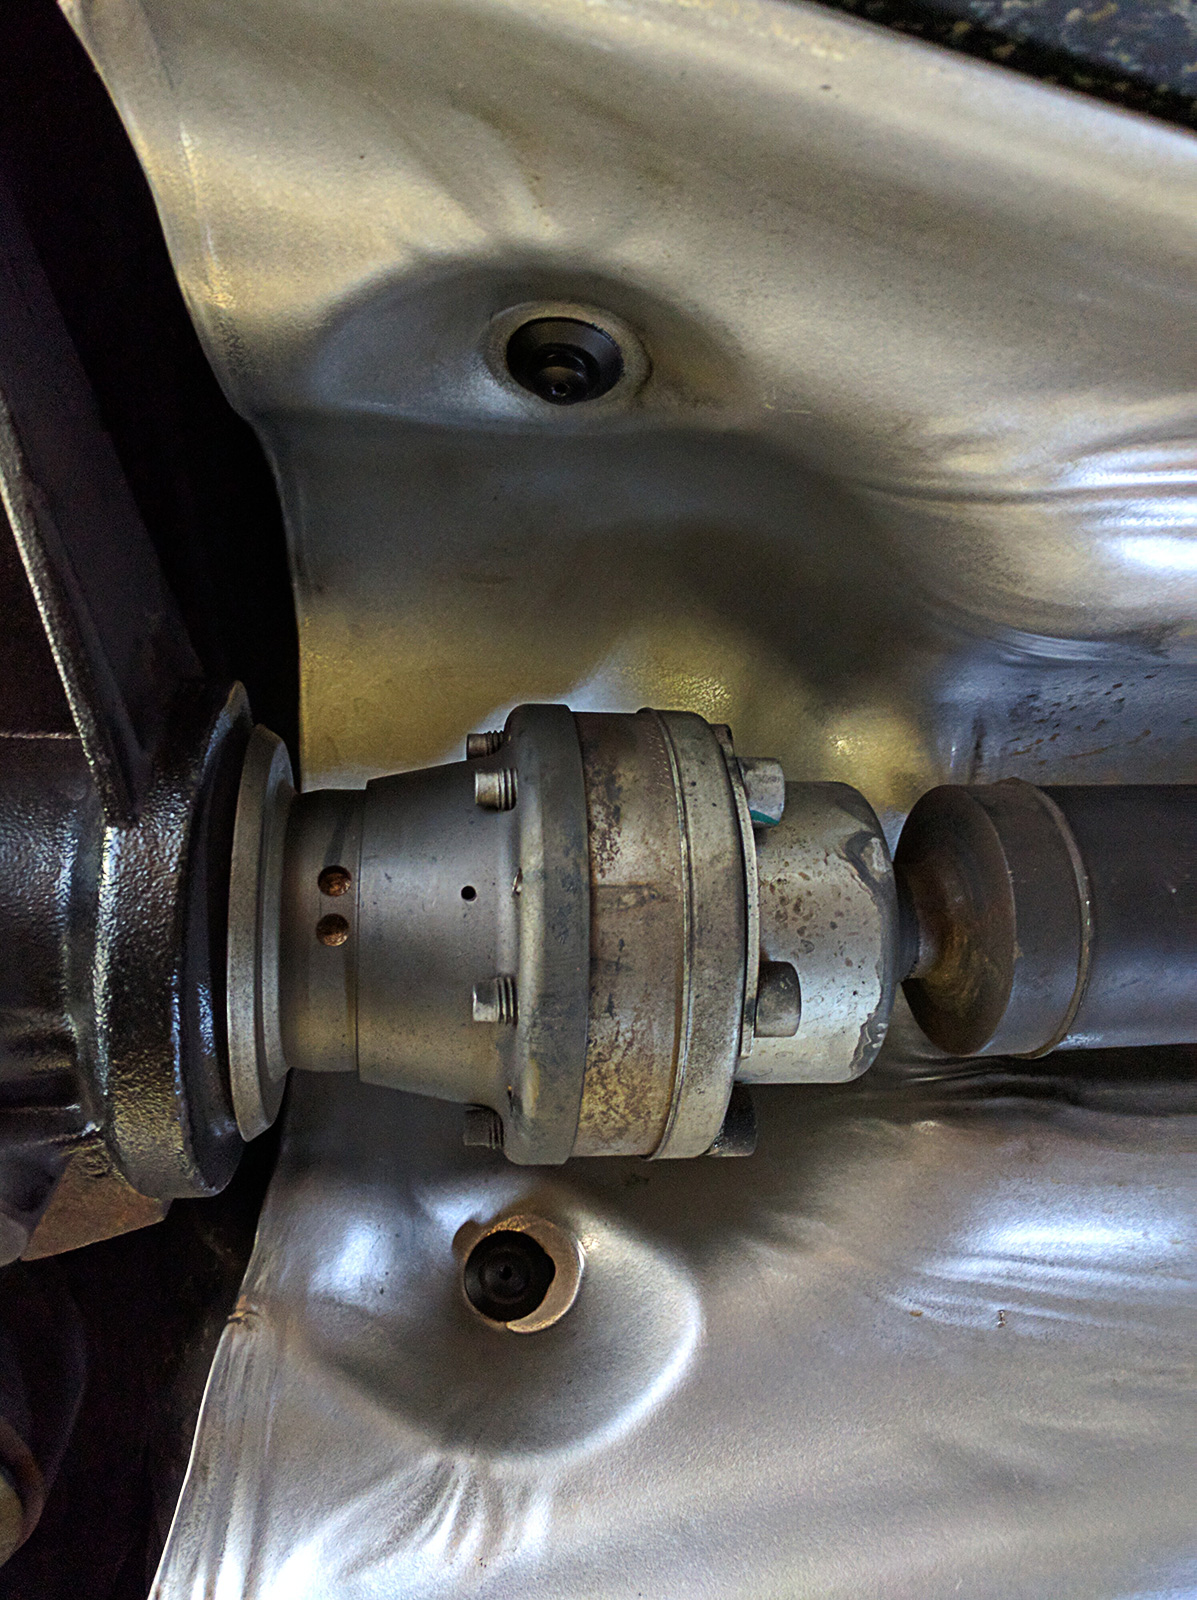
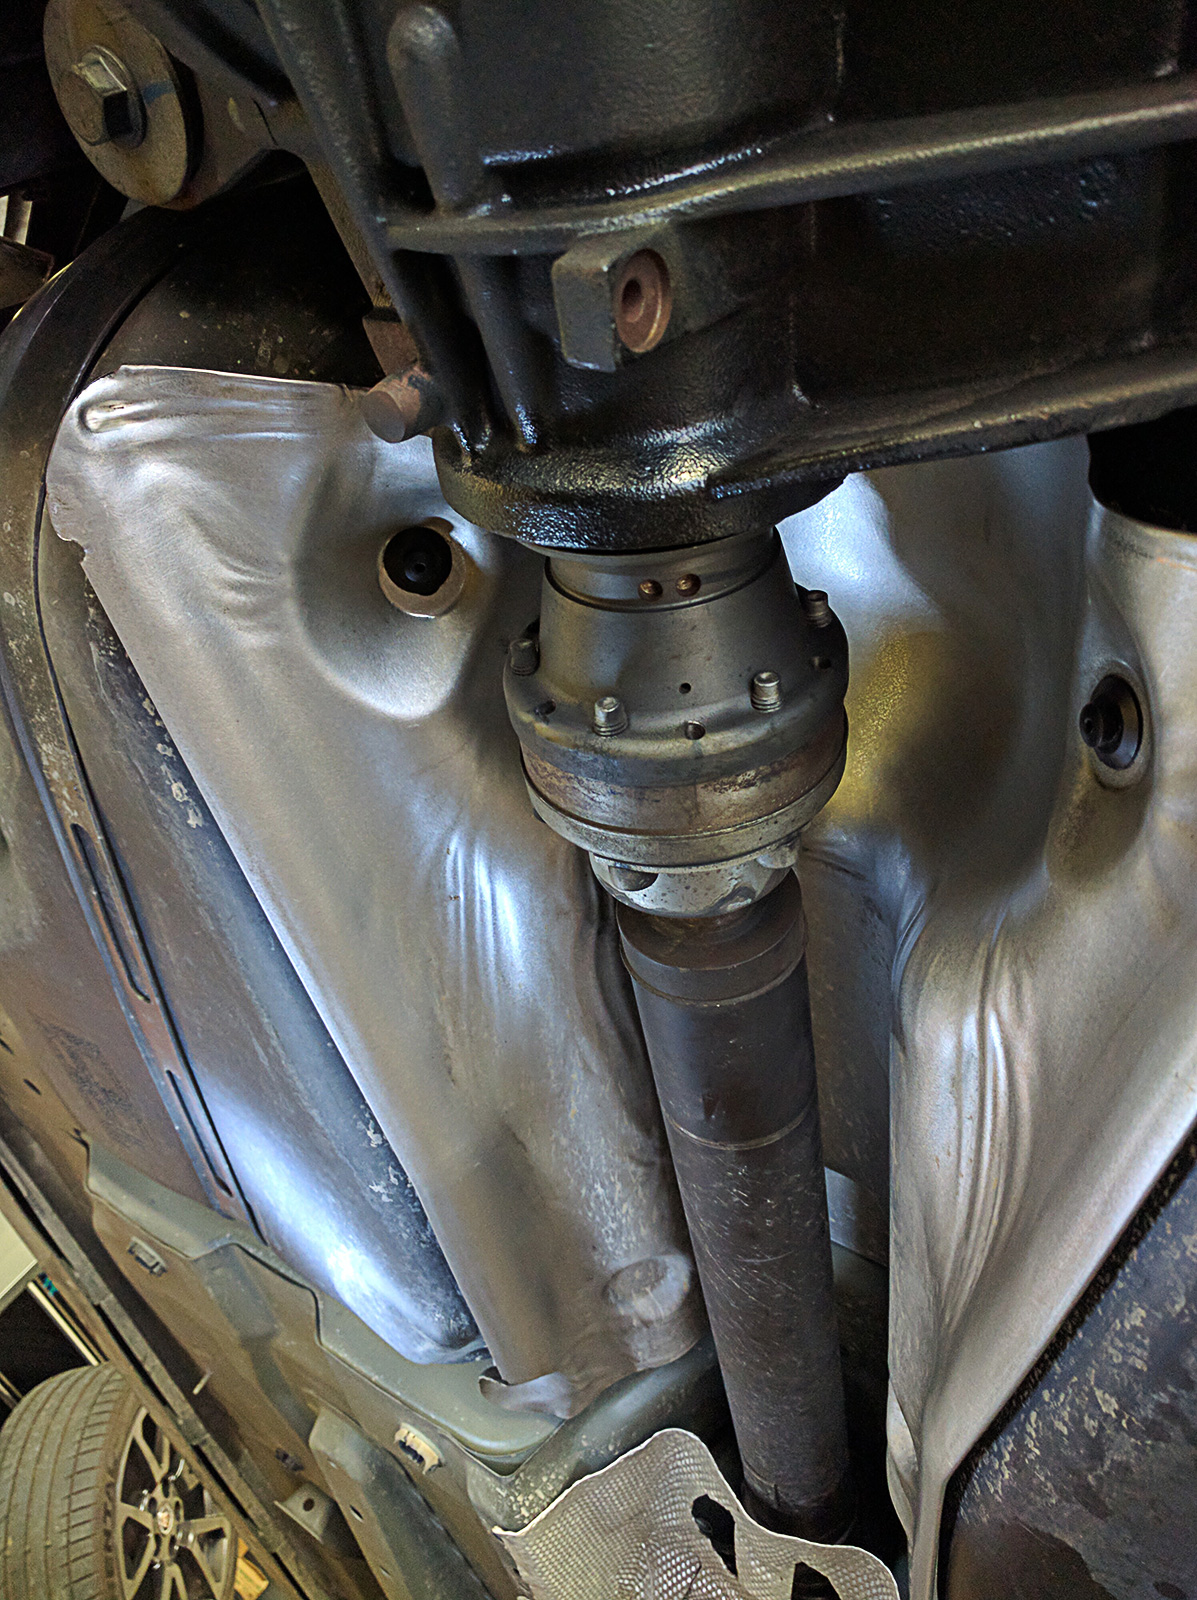
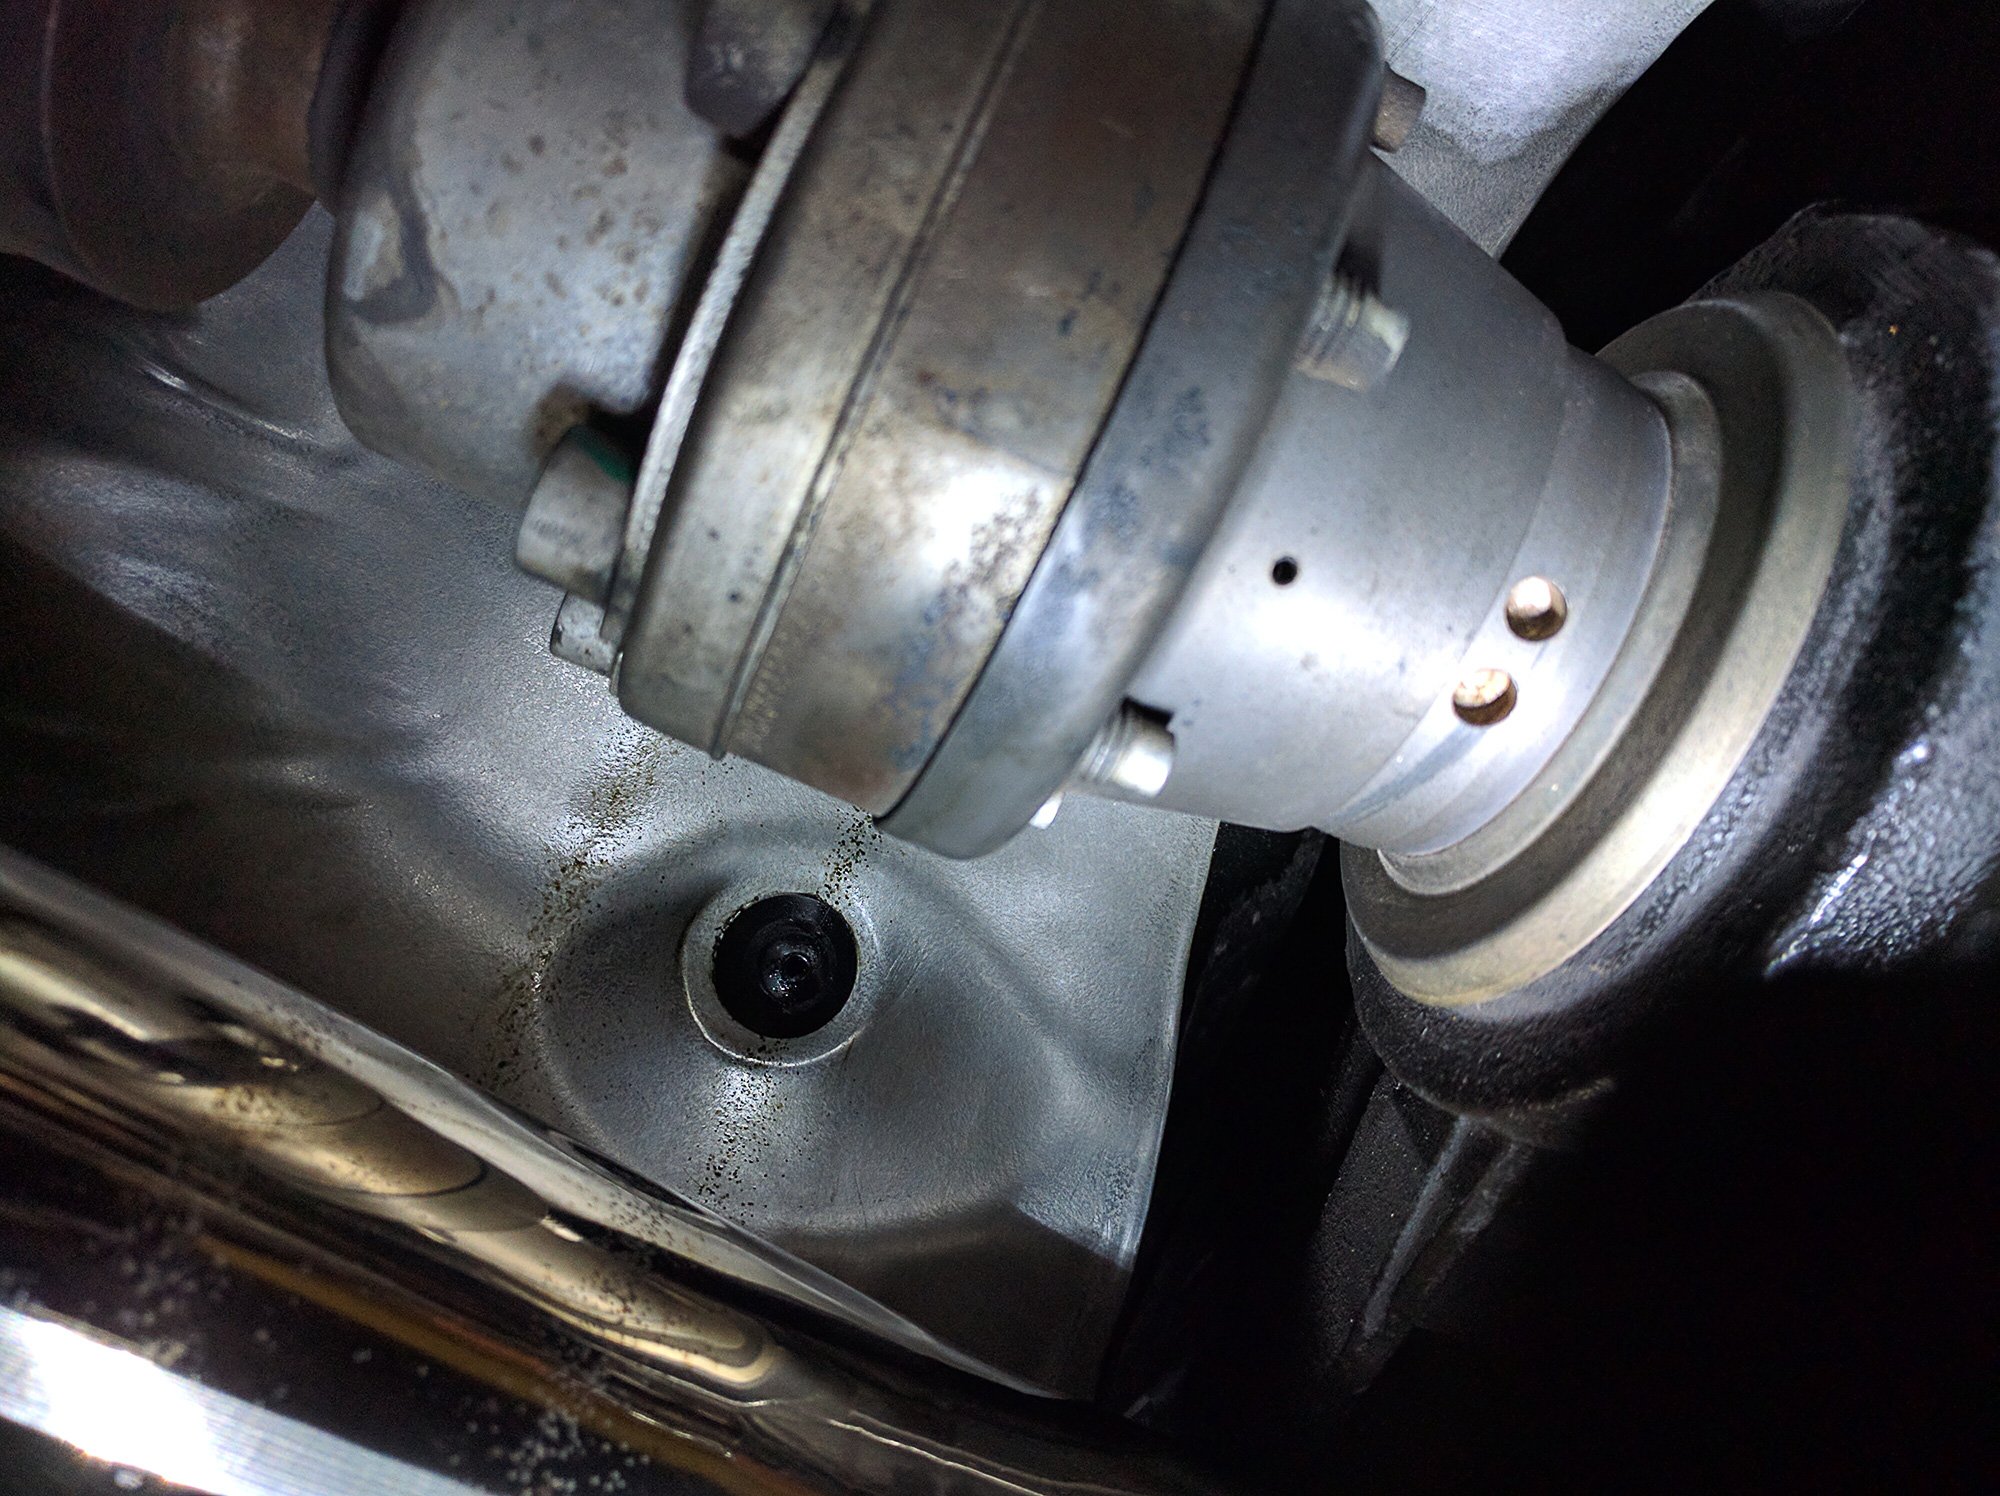
I had all sorts of grease and road dirty up on the heat shield above the driveshaft connection to the rear diff. I cleaned it up nice with having easy access with the exhaust off. We shall see if anything comes back which would mean I might have diff or driveshaft issues. Lets home not.
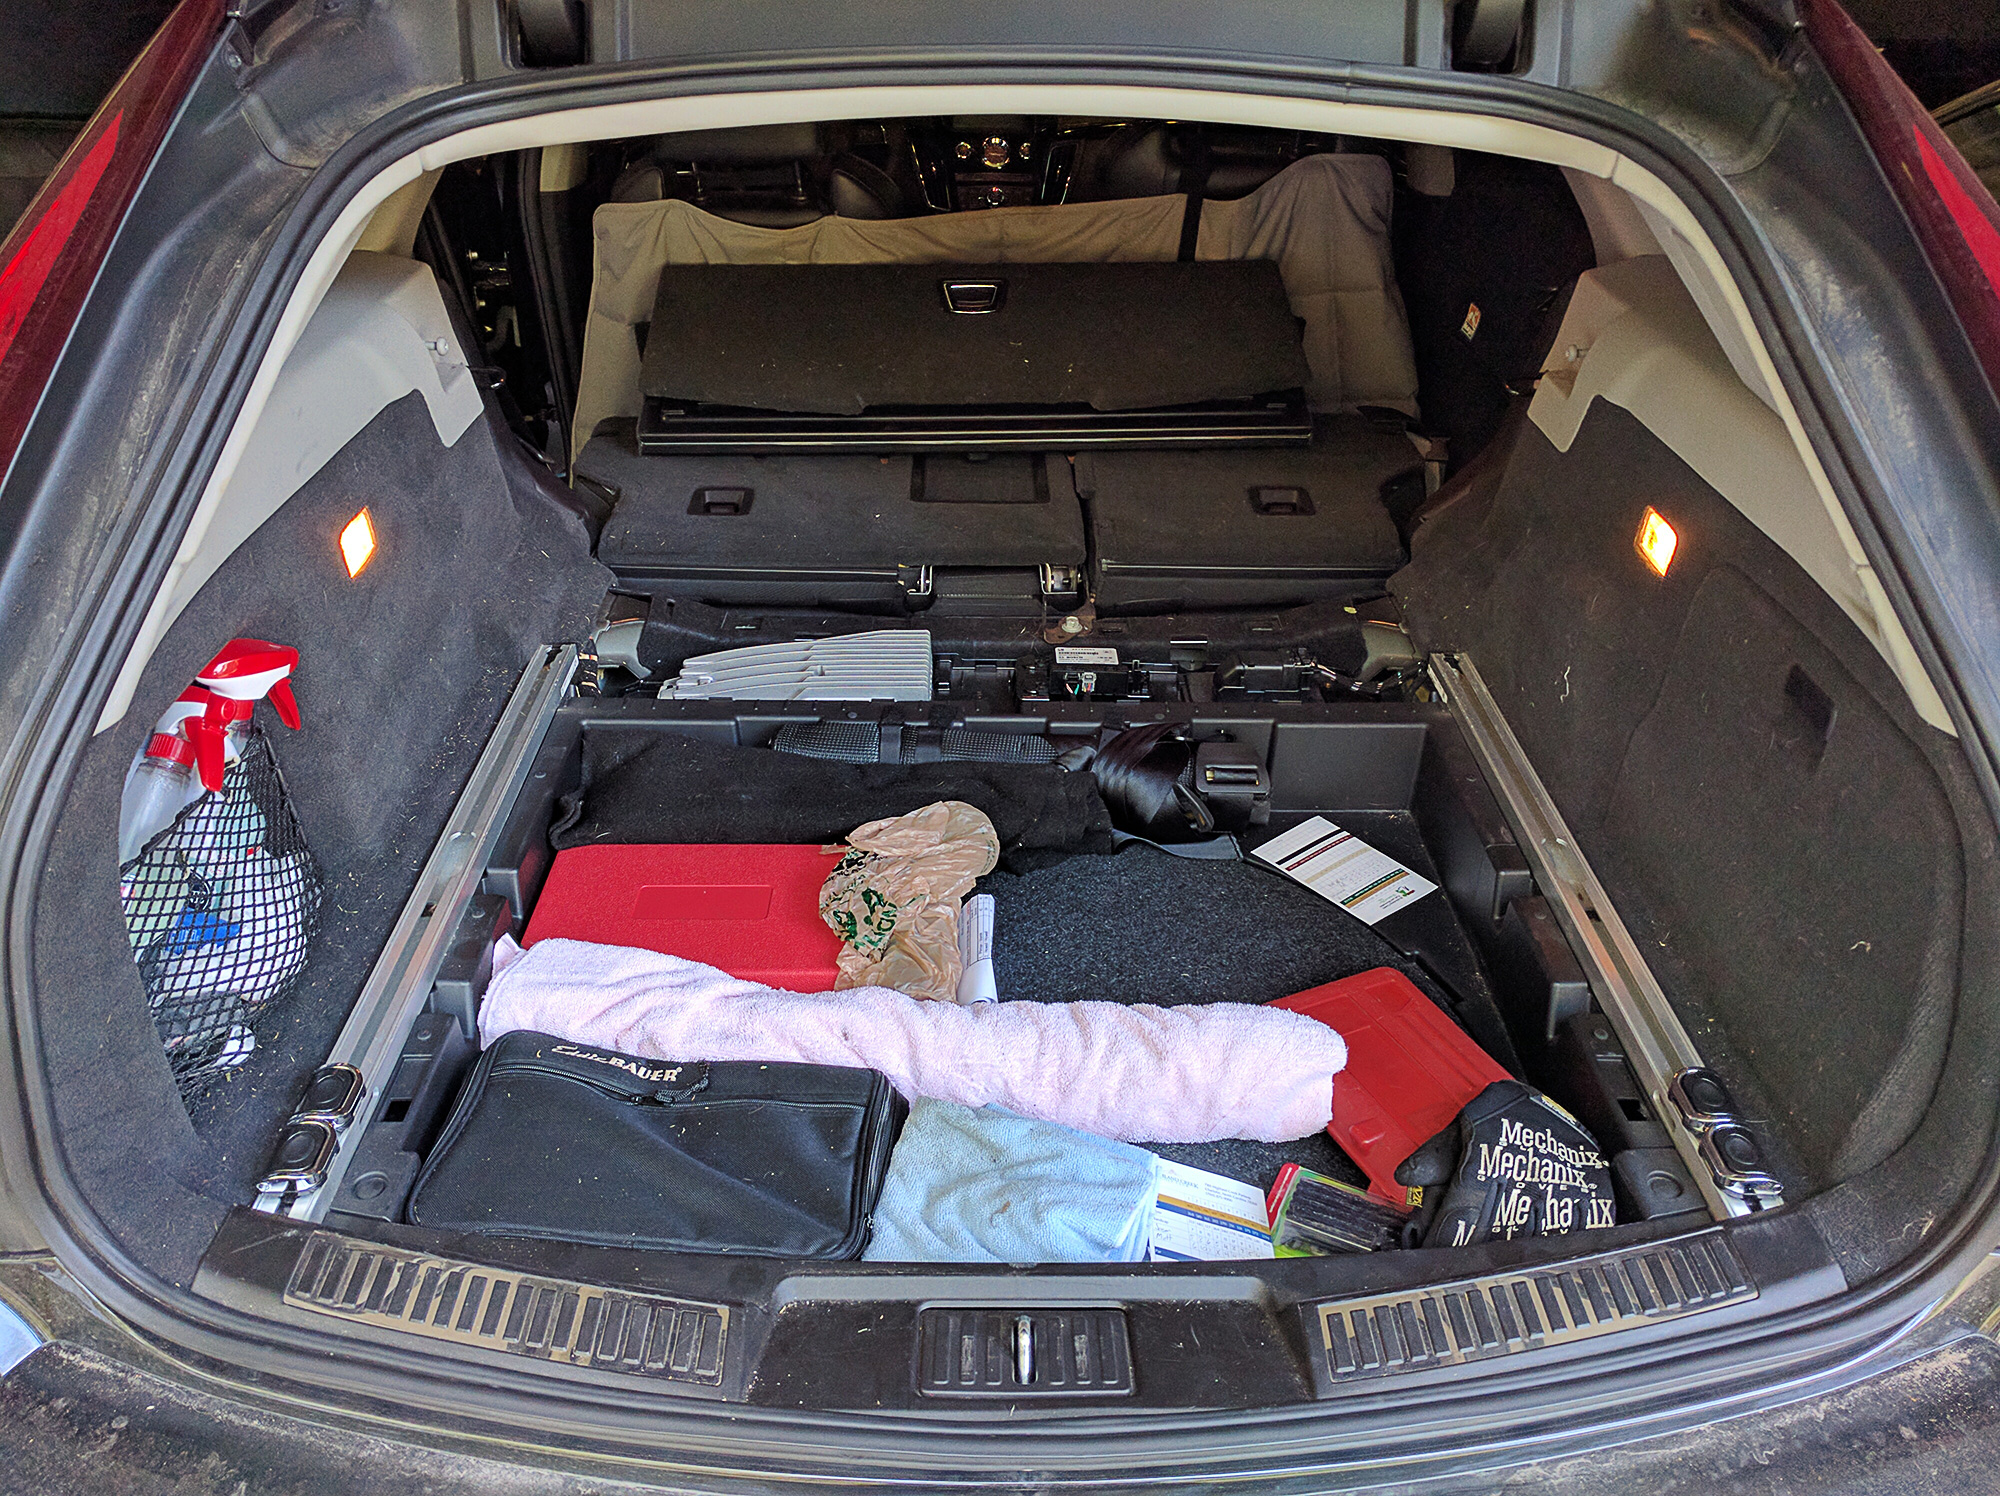
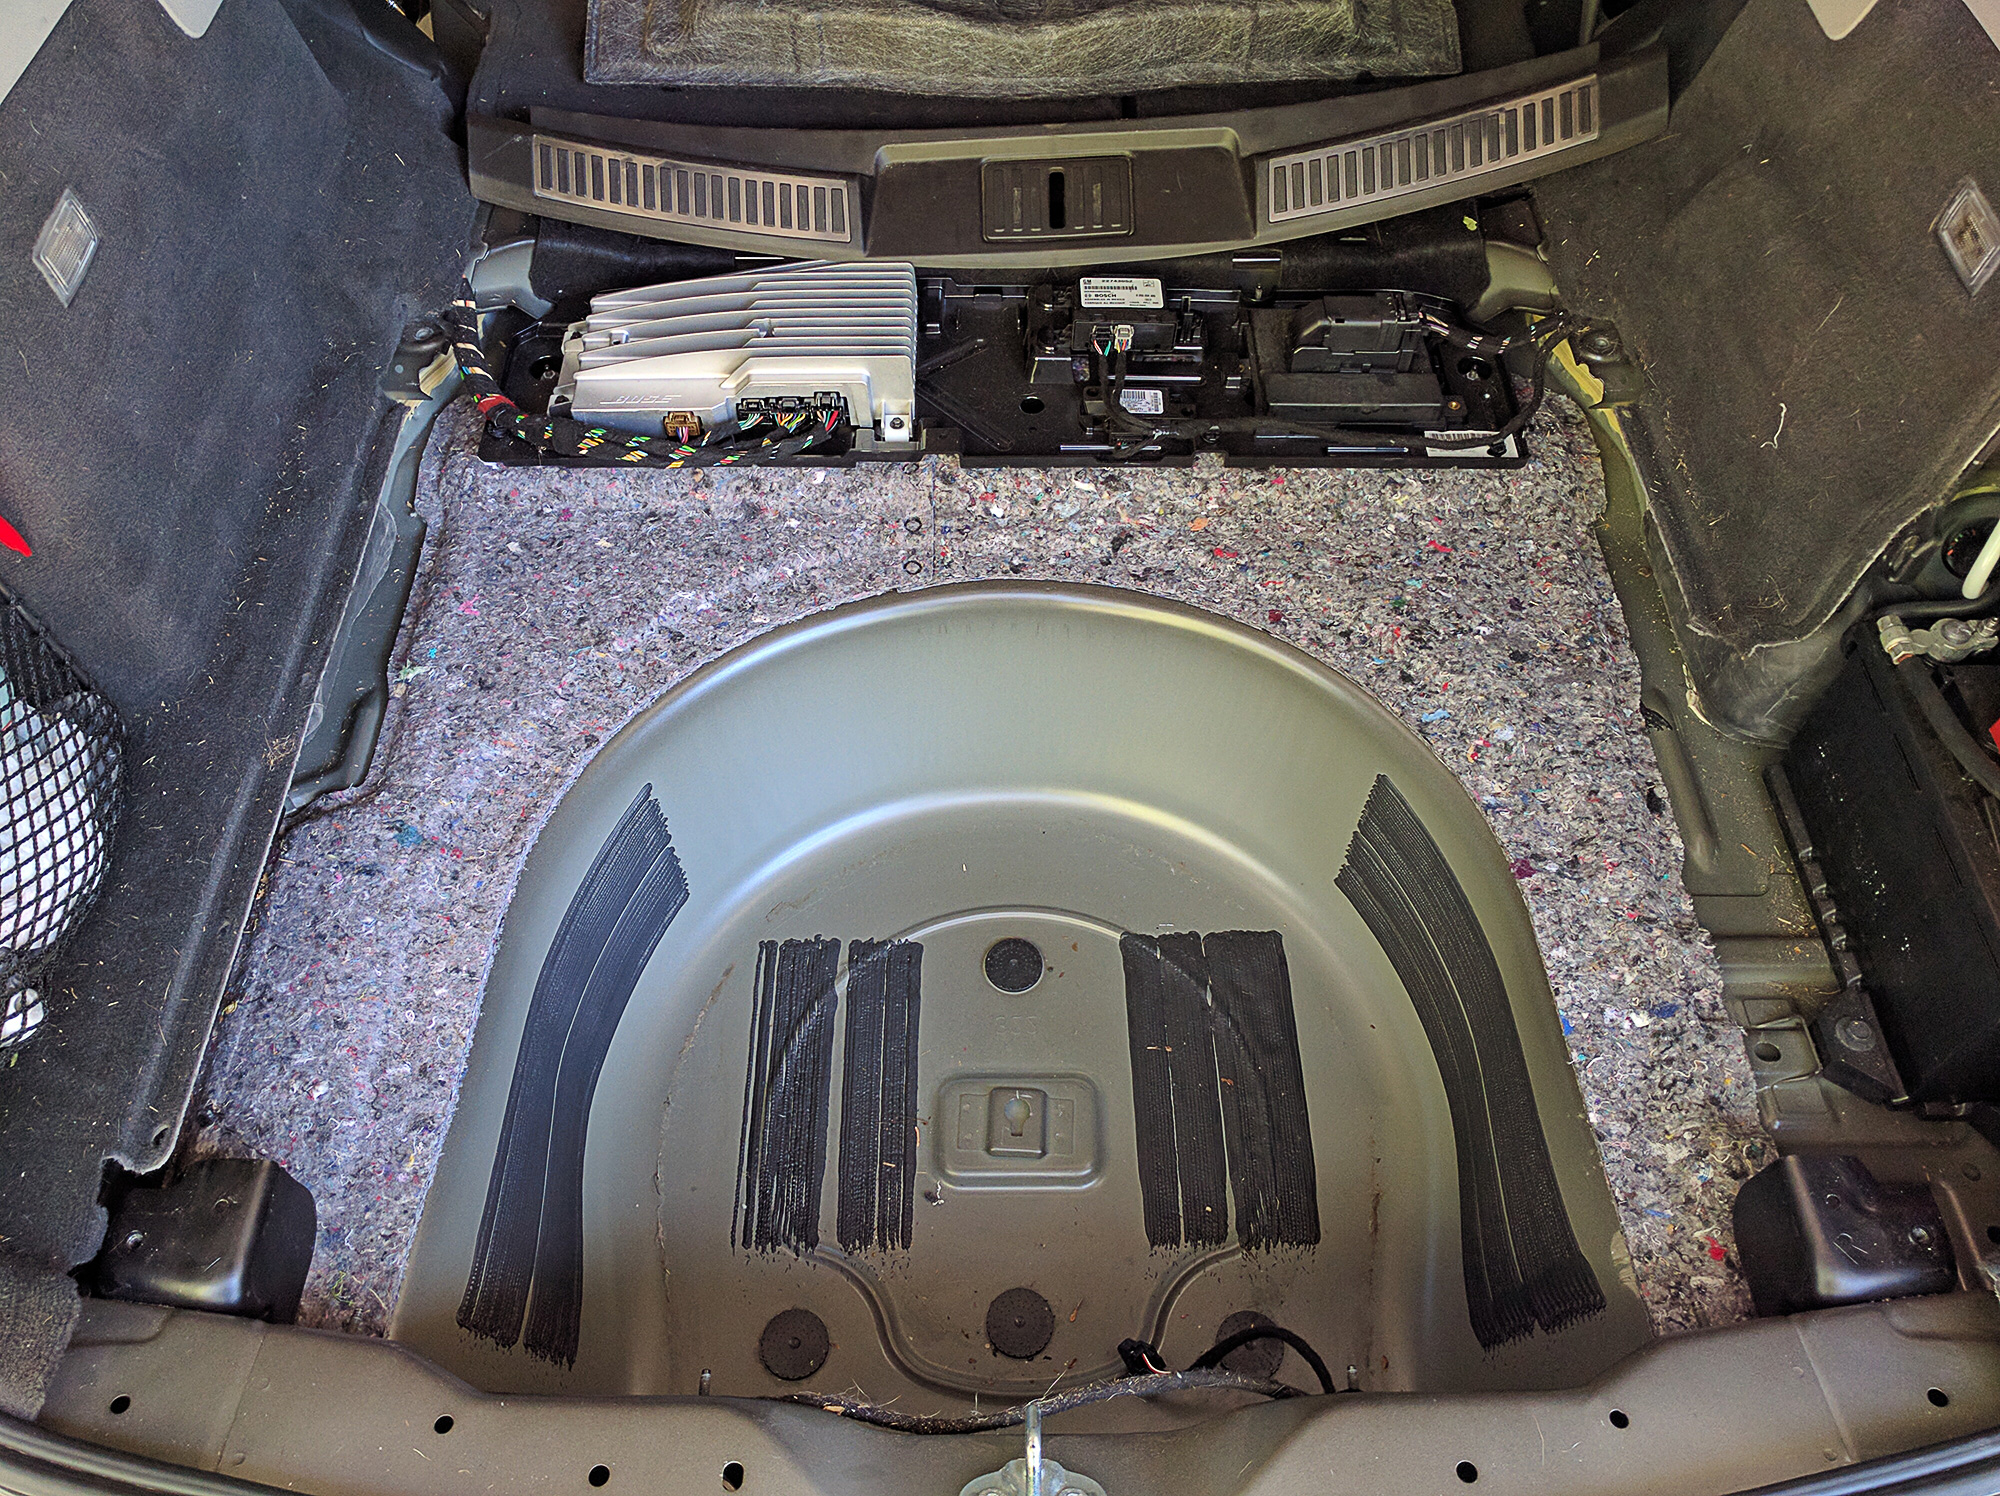
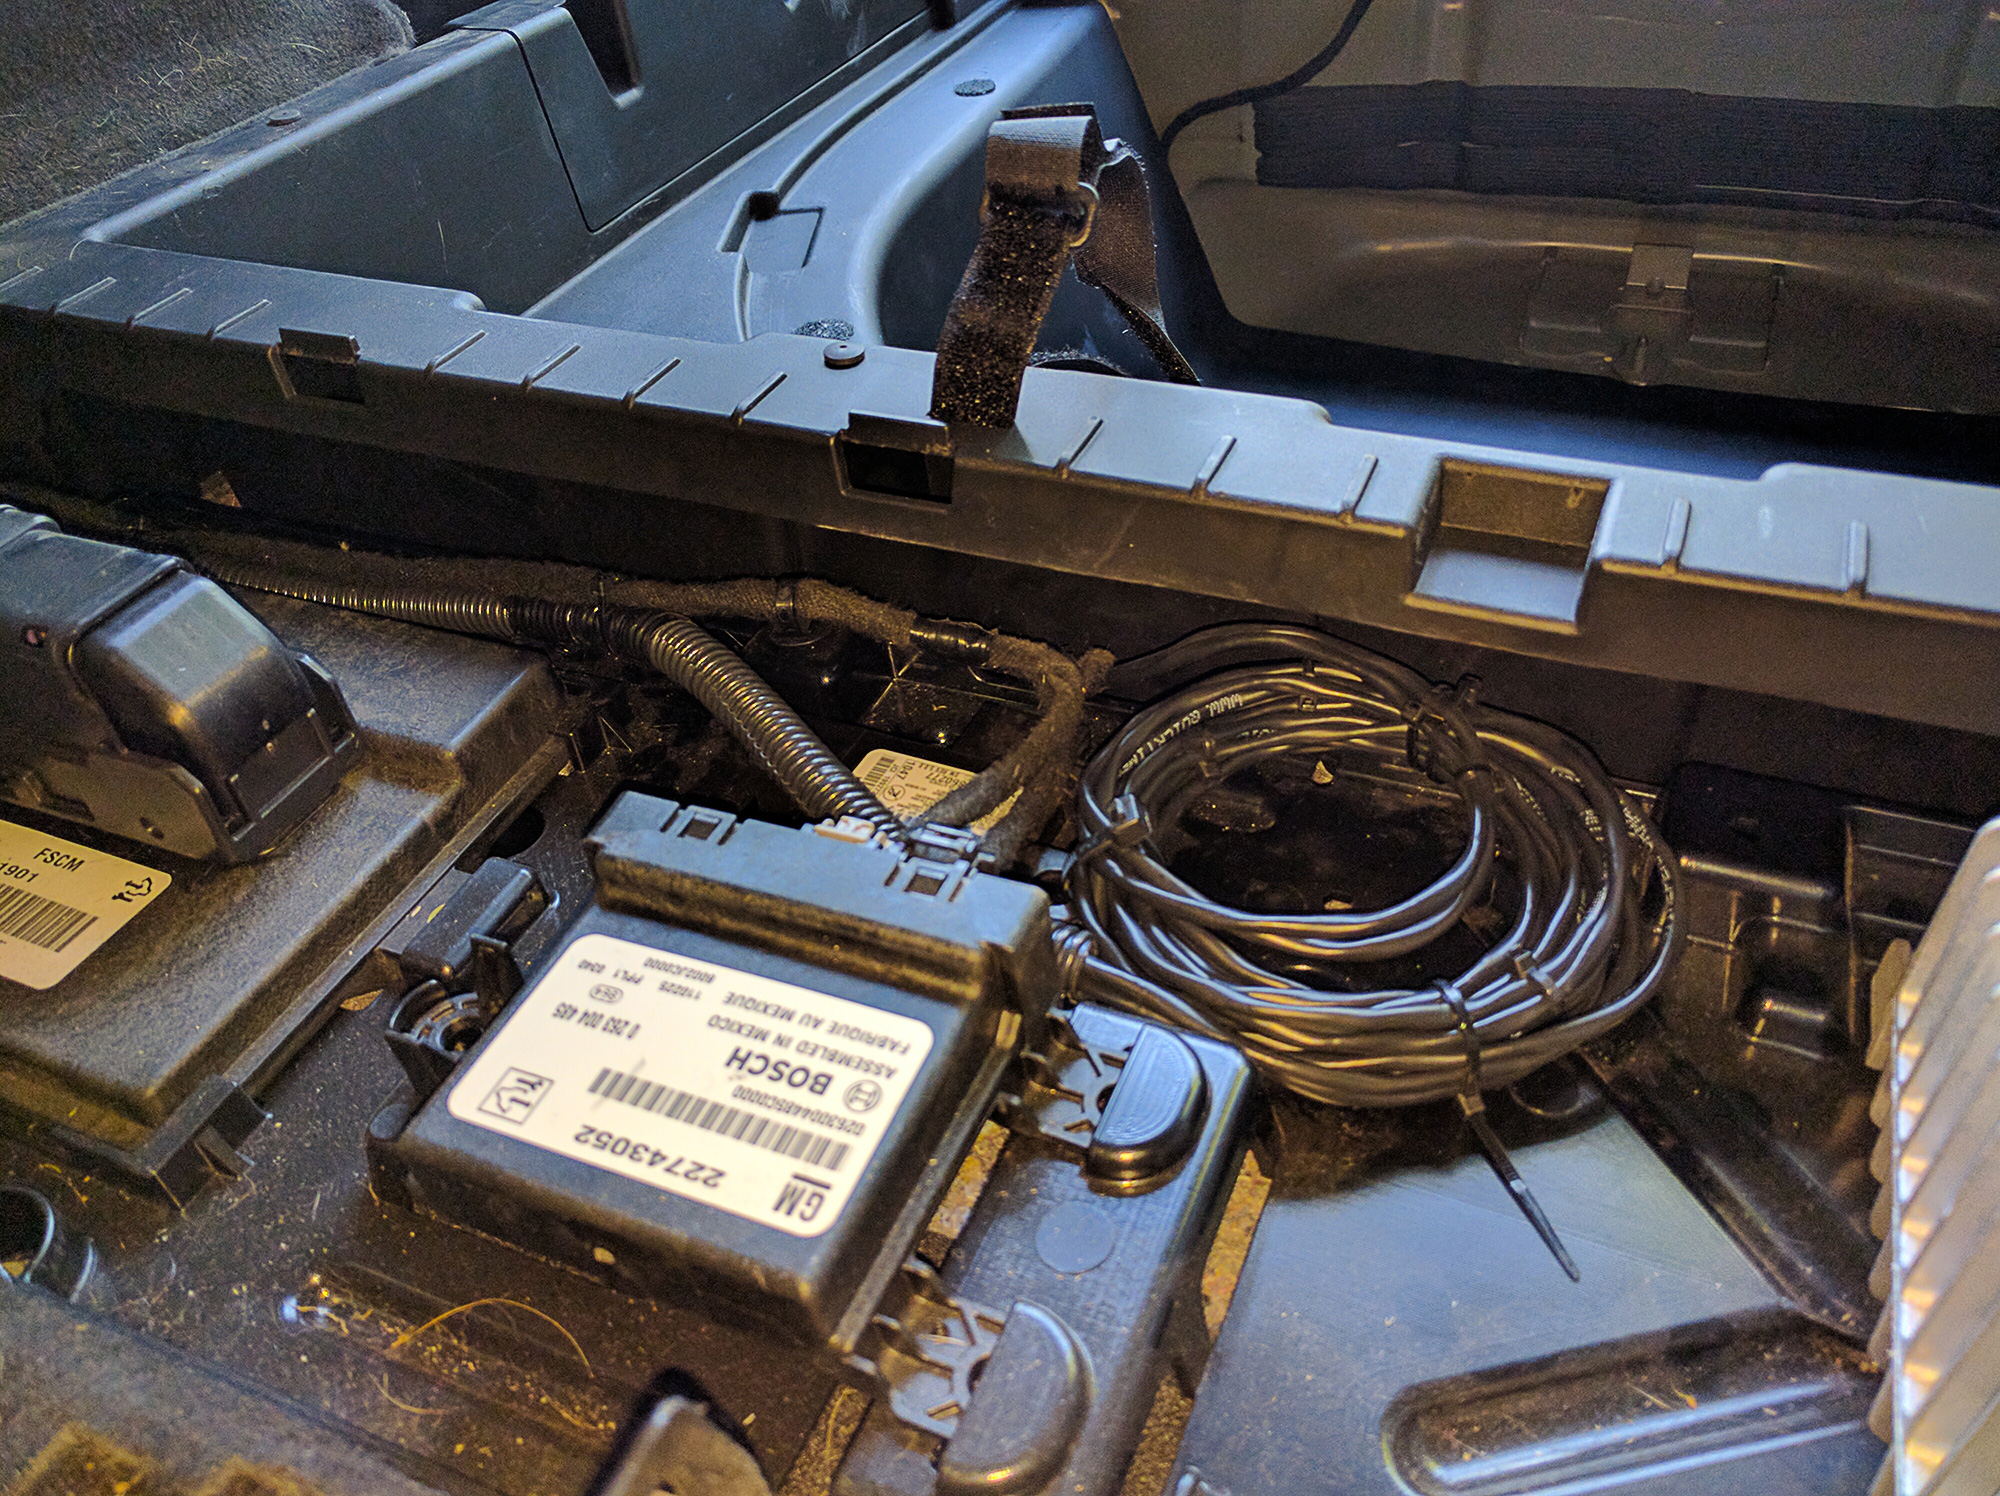
Moved onto the interior tear down for running the wires for the rear valves. Removed the rear floor cover. I love the little space below the main back floor on the wagon. It is so great for carrying all sorts of things for traveling you might need. I have a scissor jack, tire plug kit, breaker bar, torque wrench, a set of sockets, window cleaner, gloves, and a first aid kit in mine.
Remove the sub and the air compressor
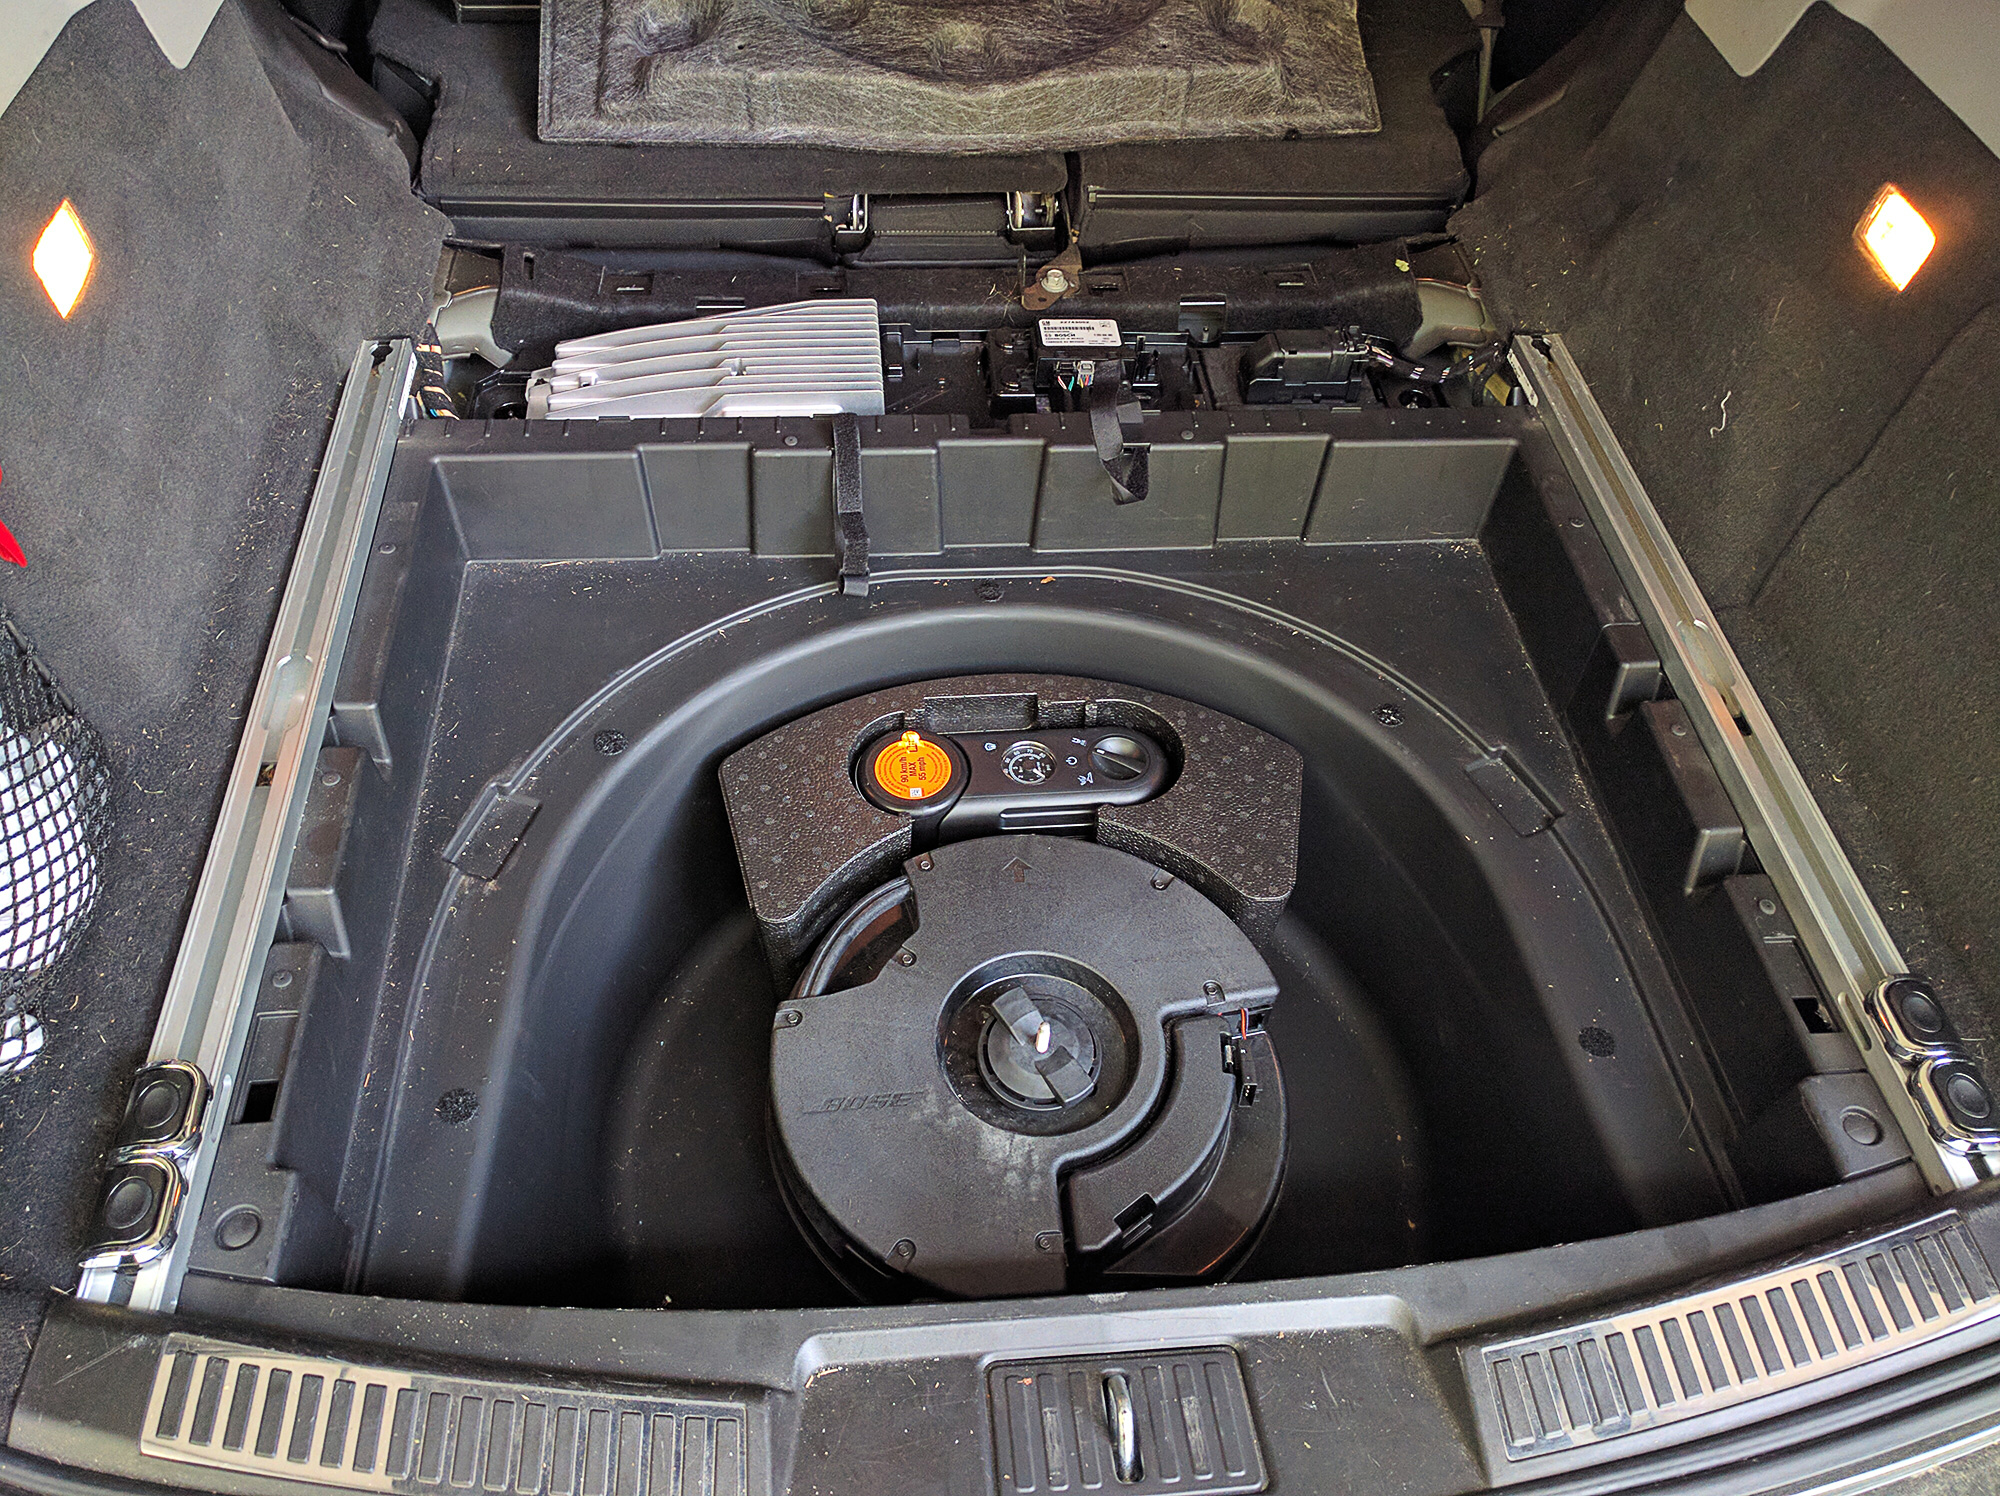
Thanks to ruskiyab for some information on the tear out of the rear part of the wagon that I would need to remove to run the wires for the valves on the exhaust. Was a good help to know what I was getting into ahead of time.
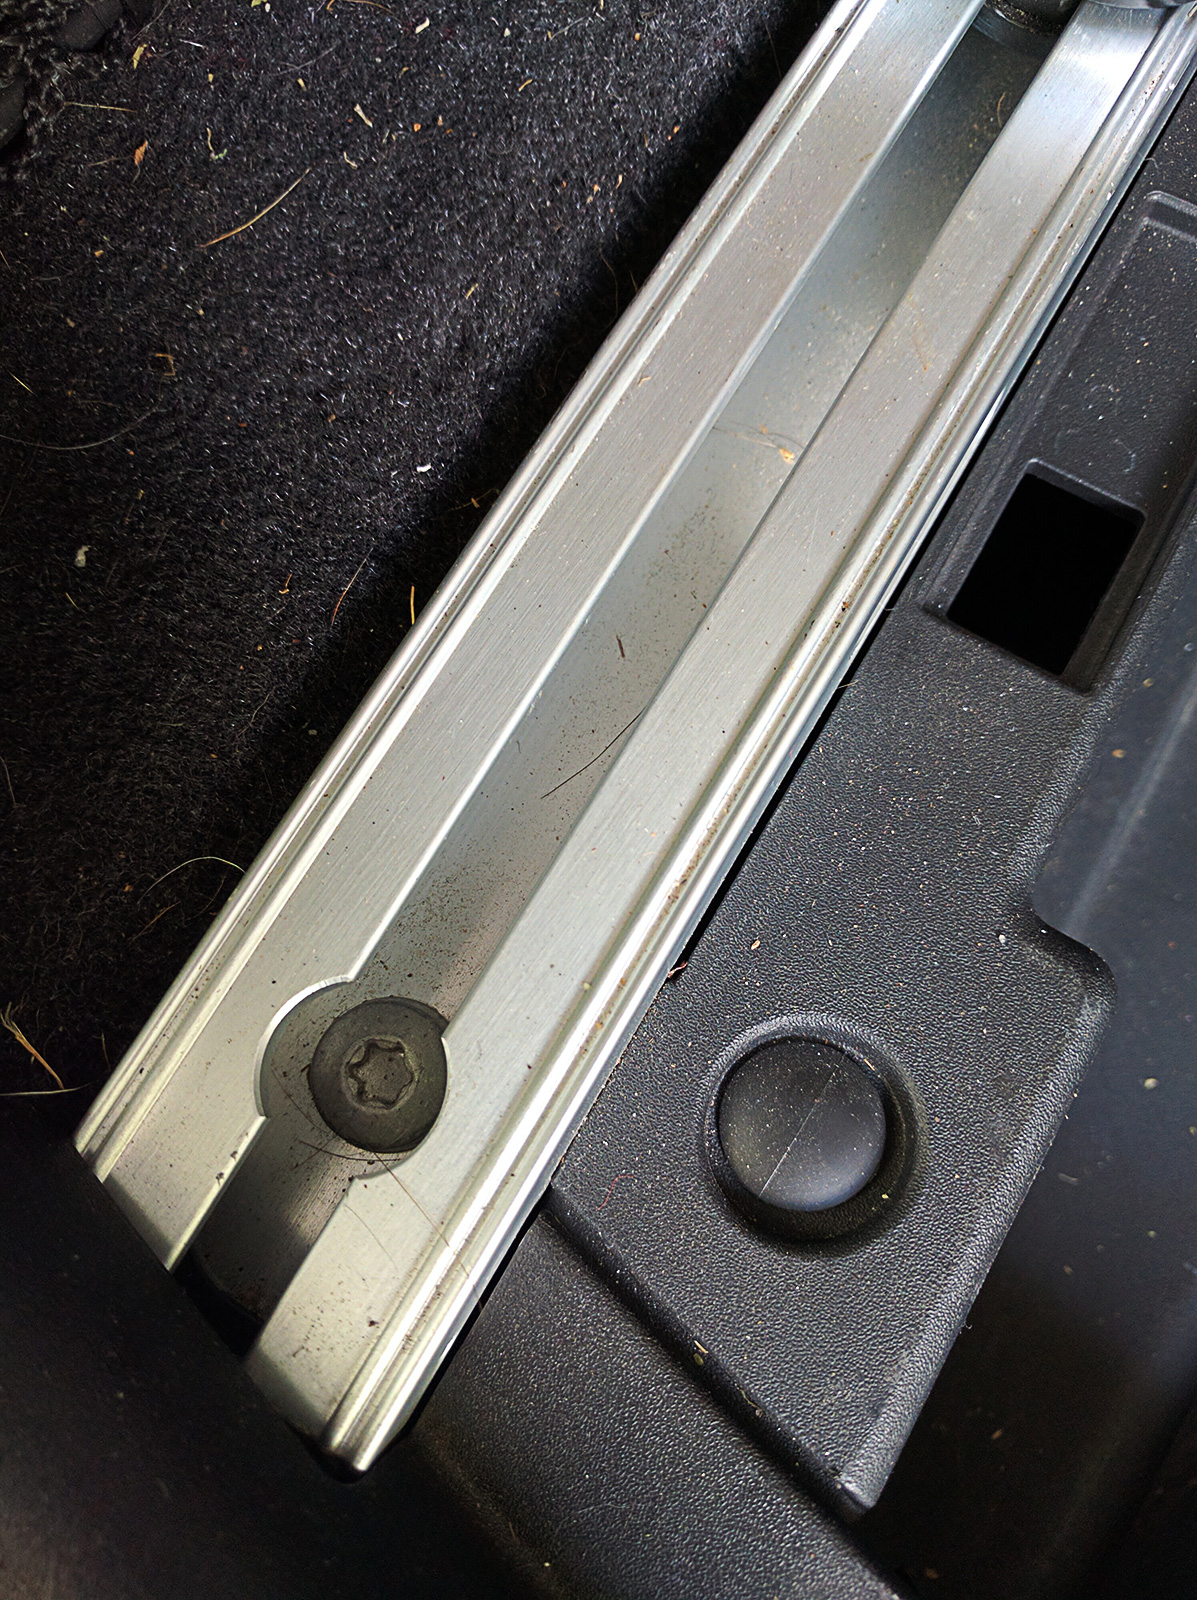
Remove the side tie down rails. They use T40 torx bits.
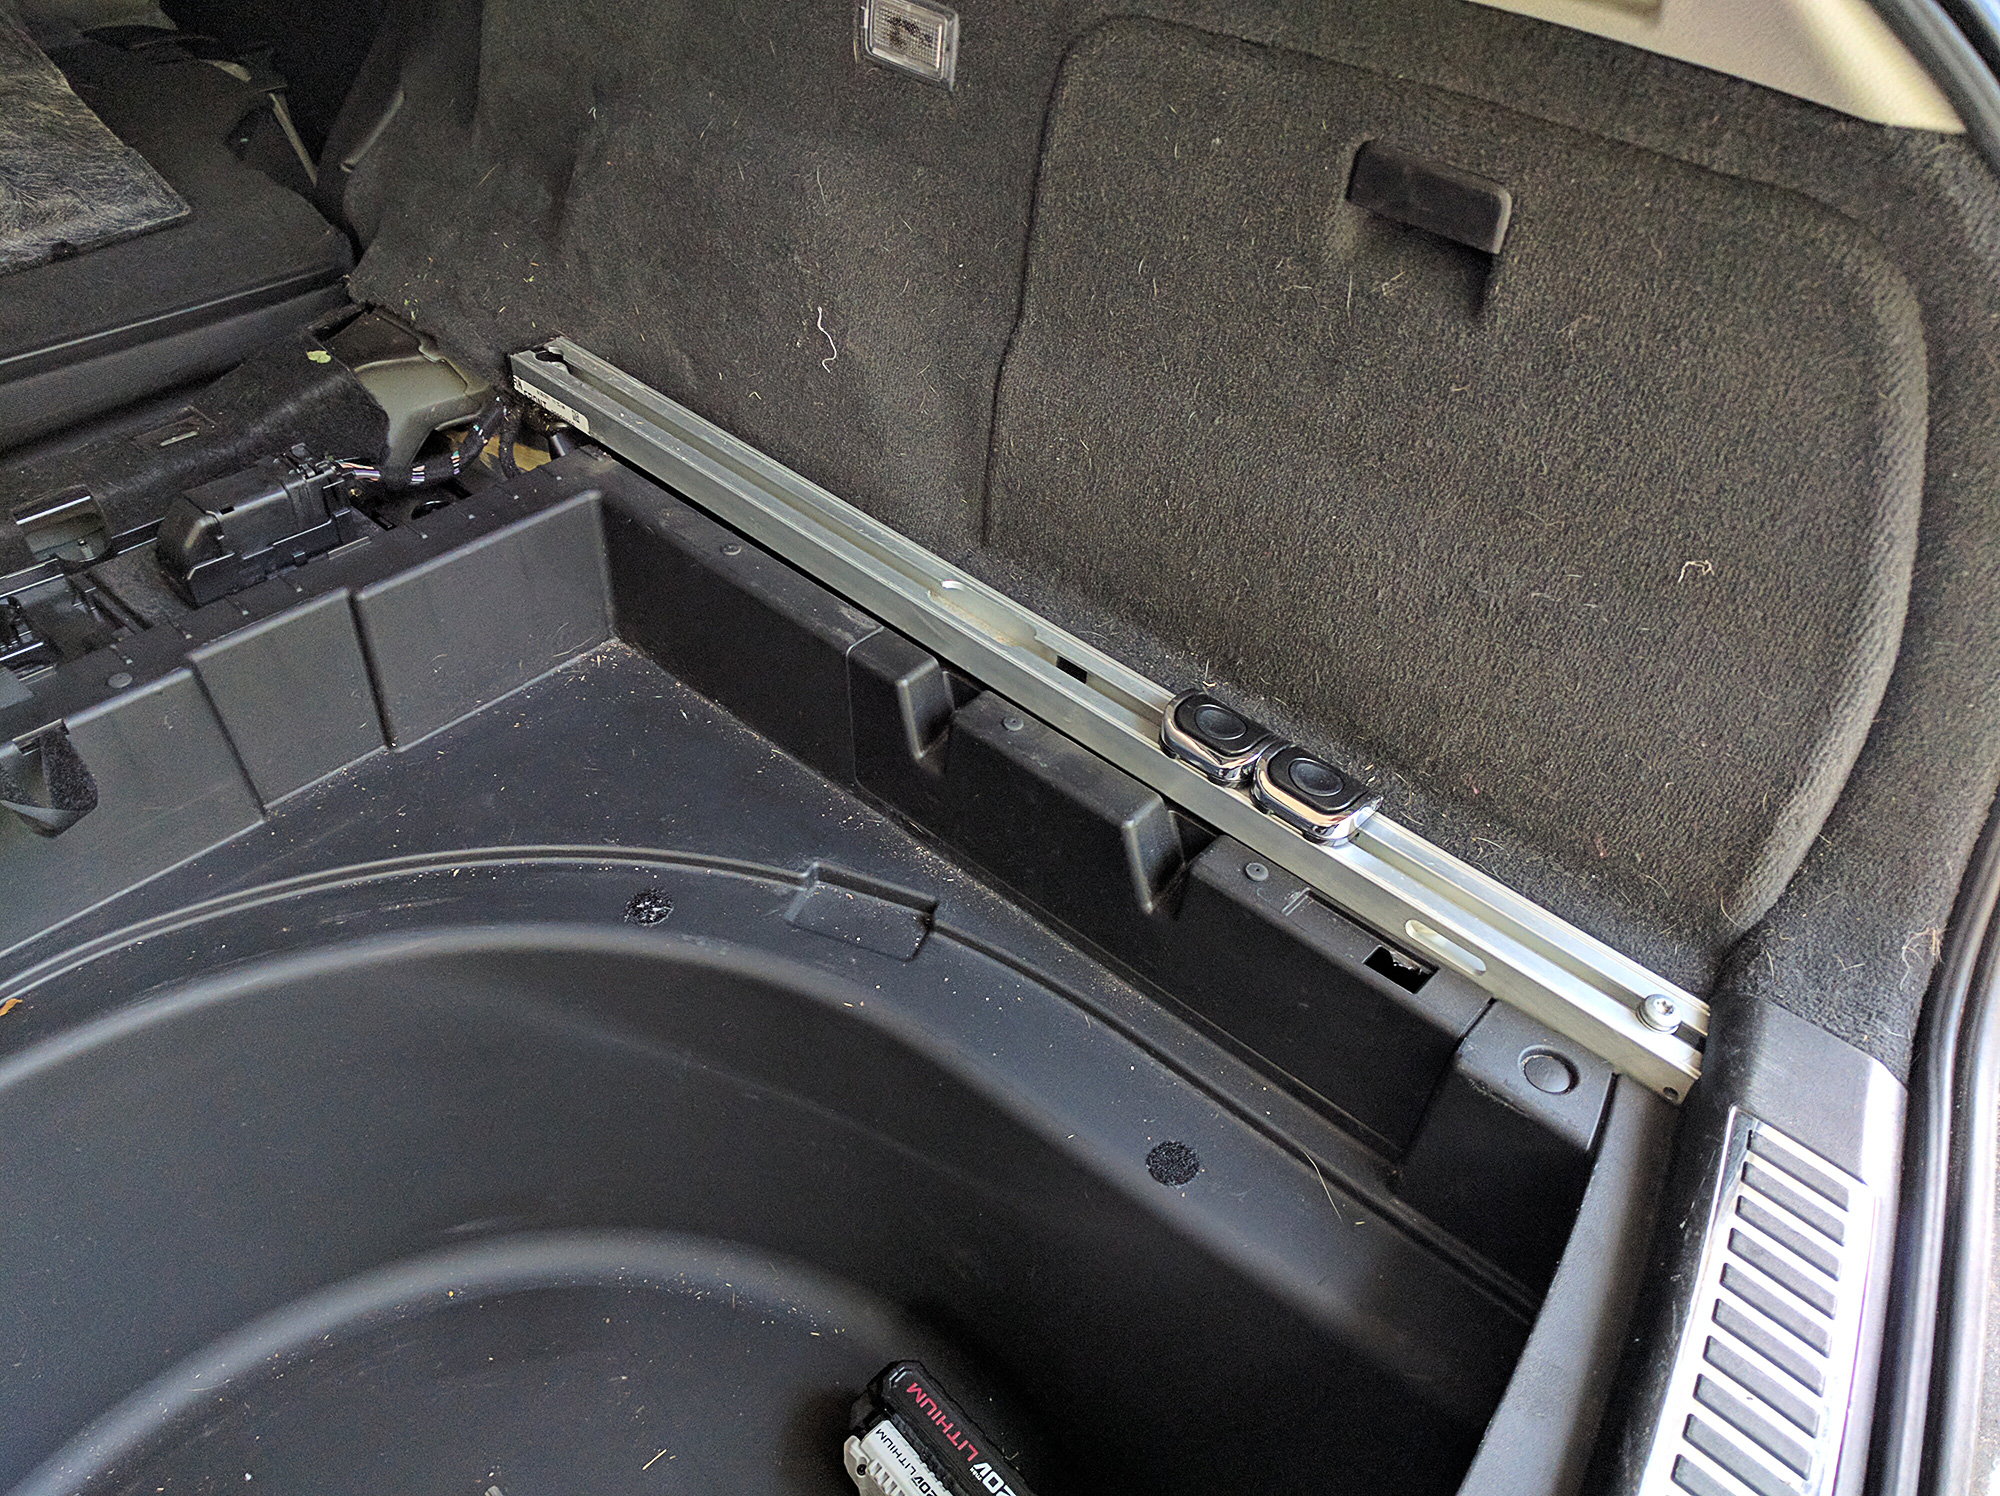
Then remove the trim at the edge of the trunk opening. Also remove the two panel clips closest to you on the tub.
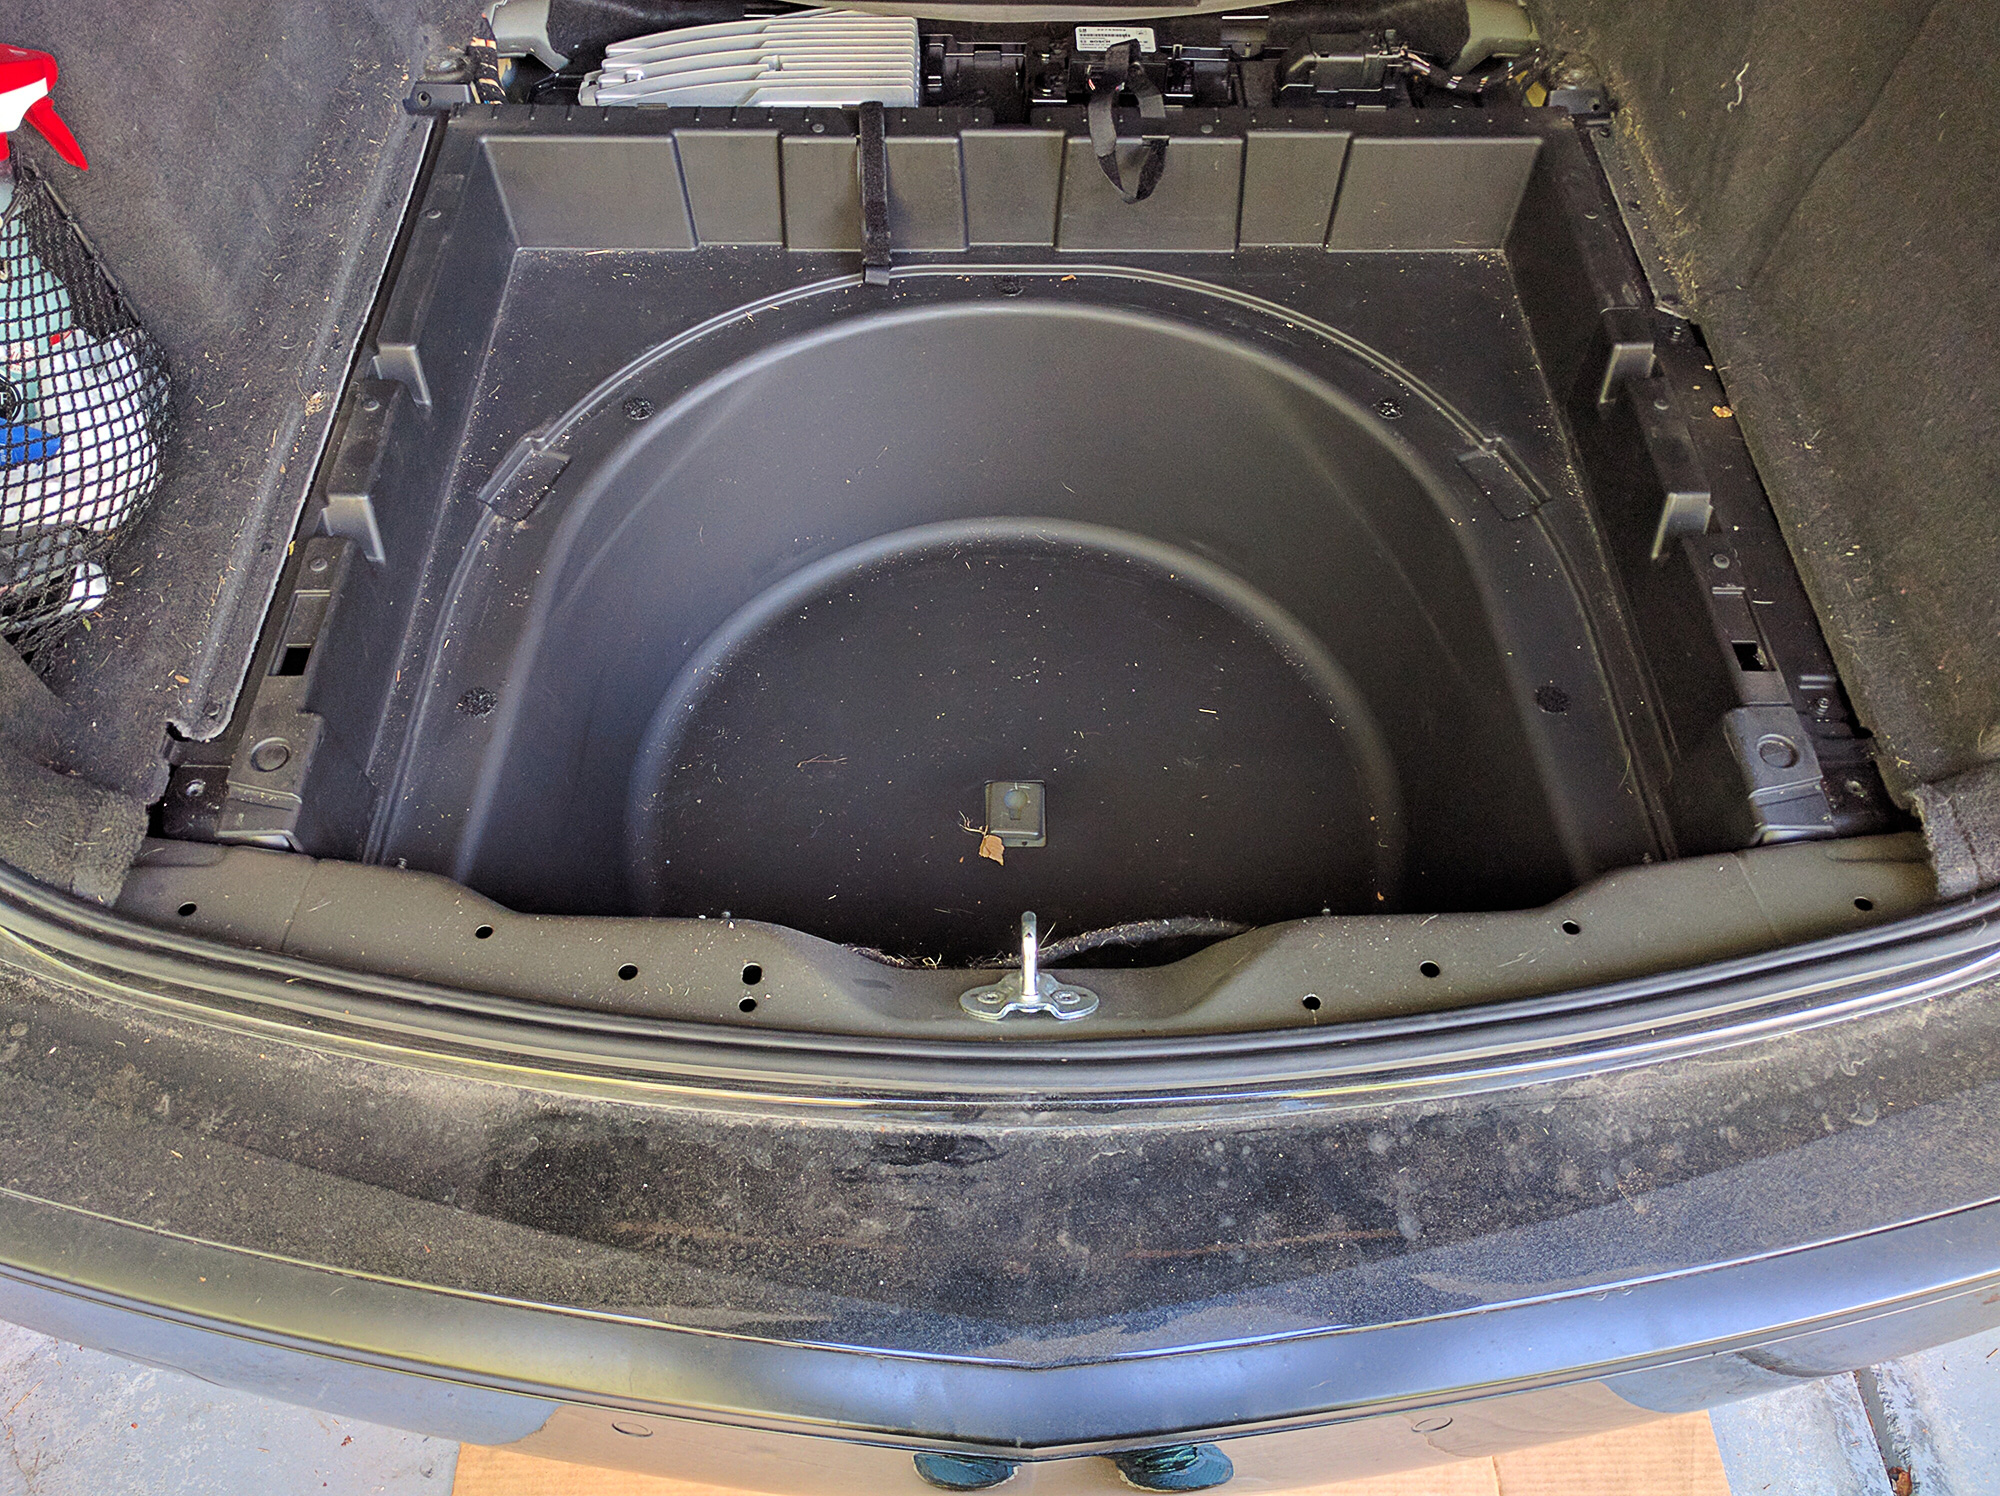
After that starting on the passenger side begin to remove the tub. You will need something to pry back the think molded carpet panels on the sides to get it out. When I removed mine I had a bit of a surprise. I had moisture down in and around the area of the tub. The padding on the back side of the tub was actually wet. So it was set out to bake in the sun for several hours before I put it back in later on so it would dry out.
The stock endlinks and rear sway to be removed.
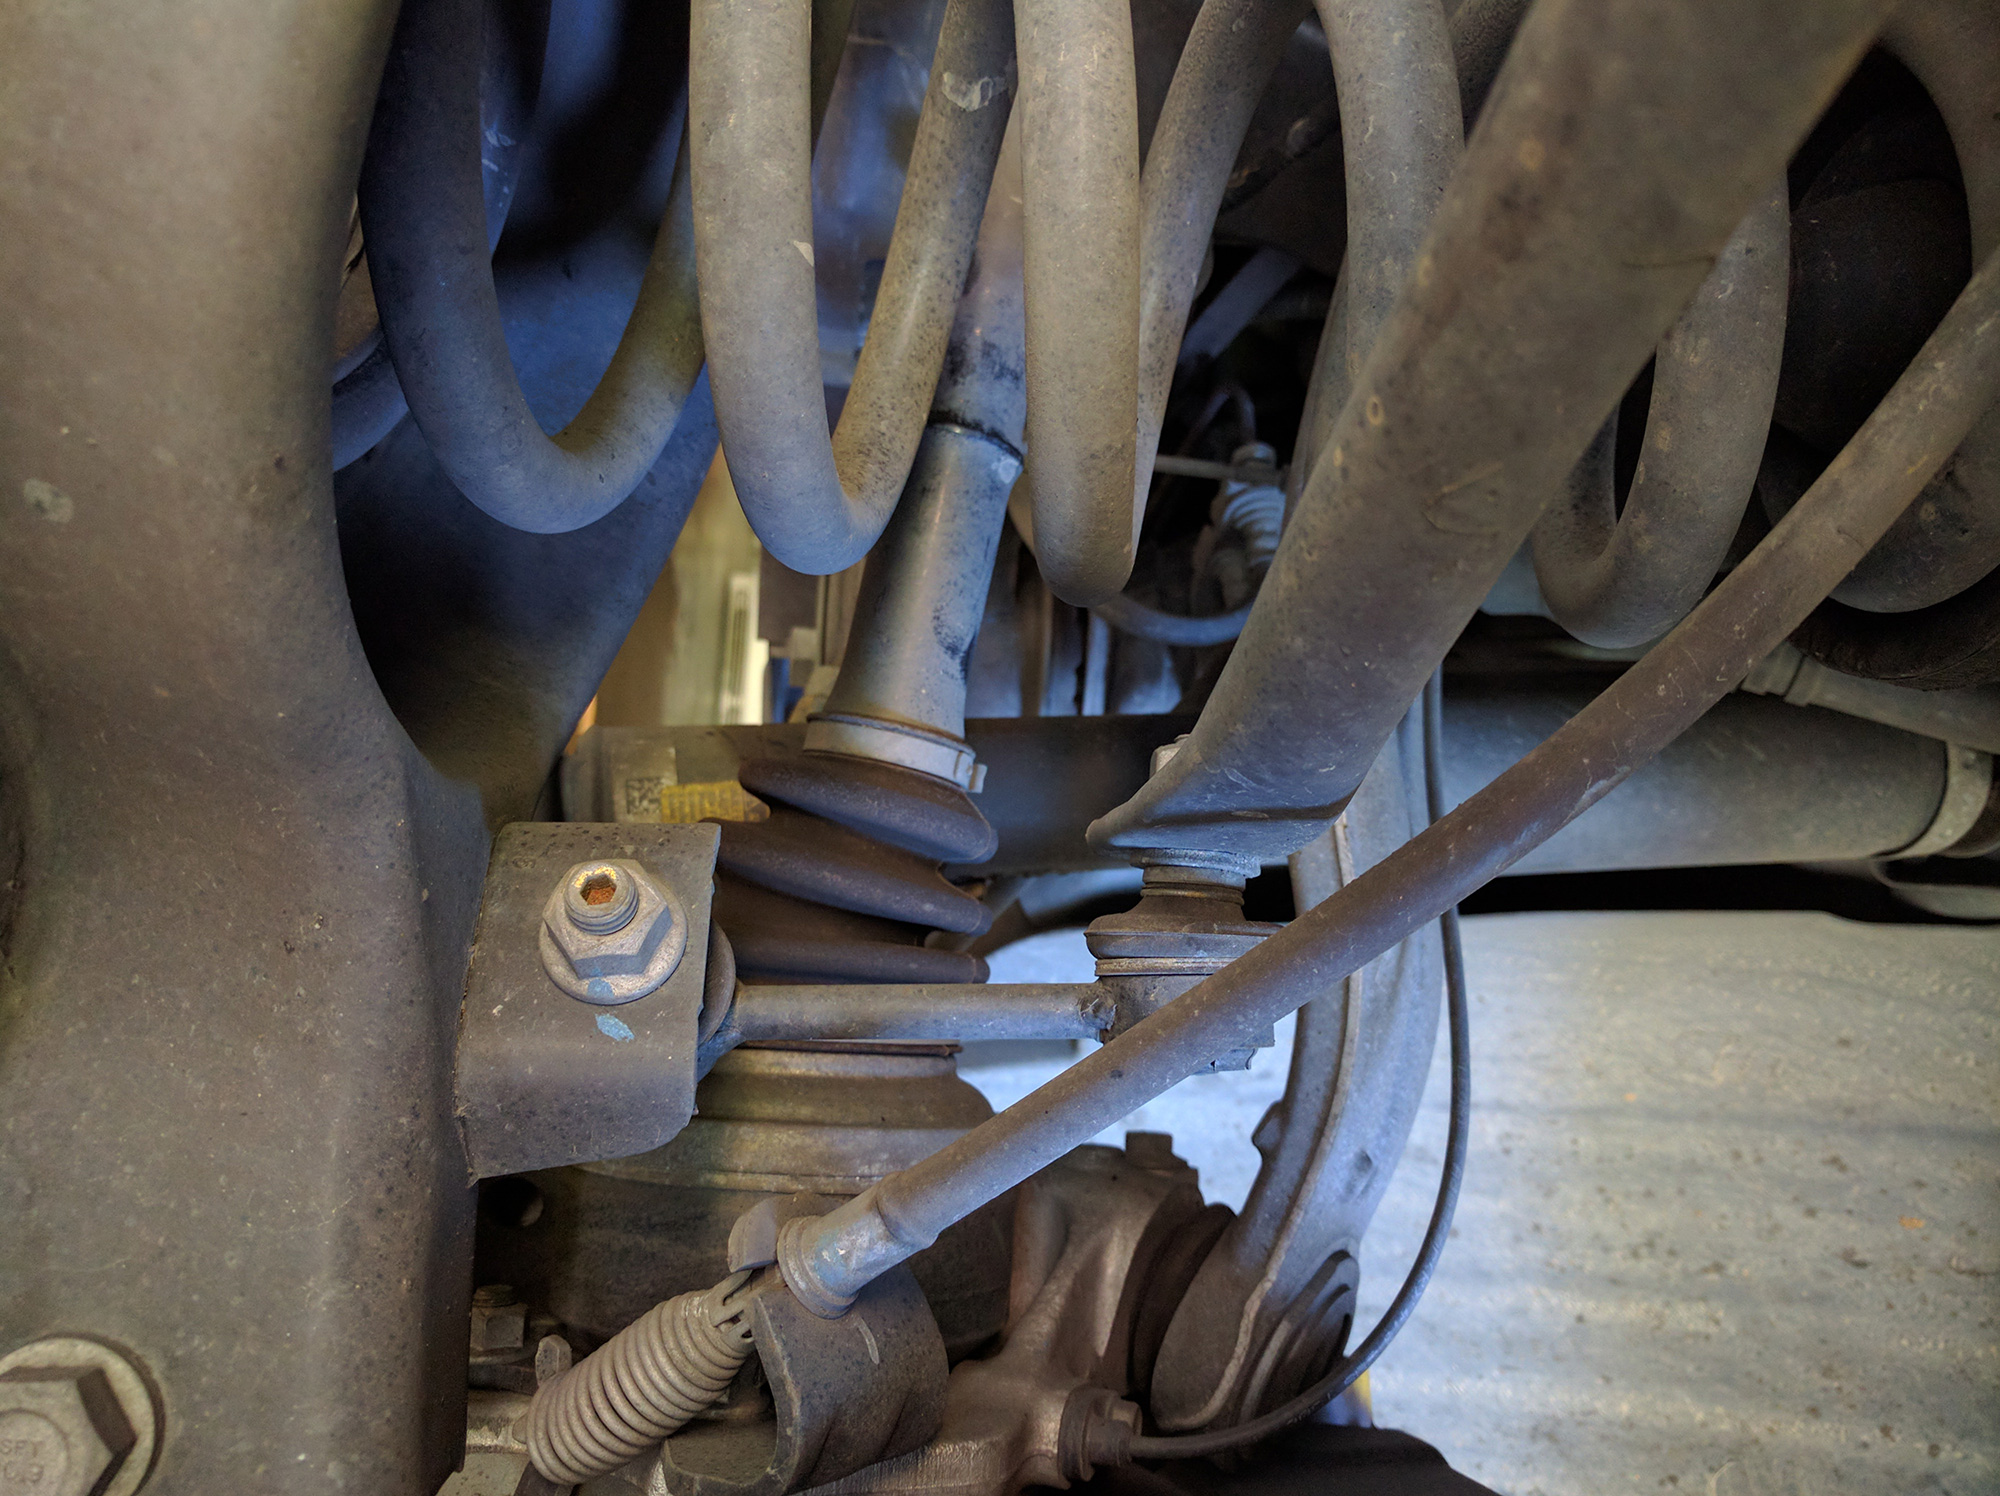
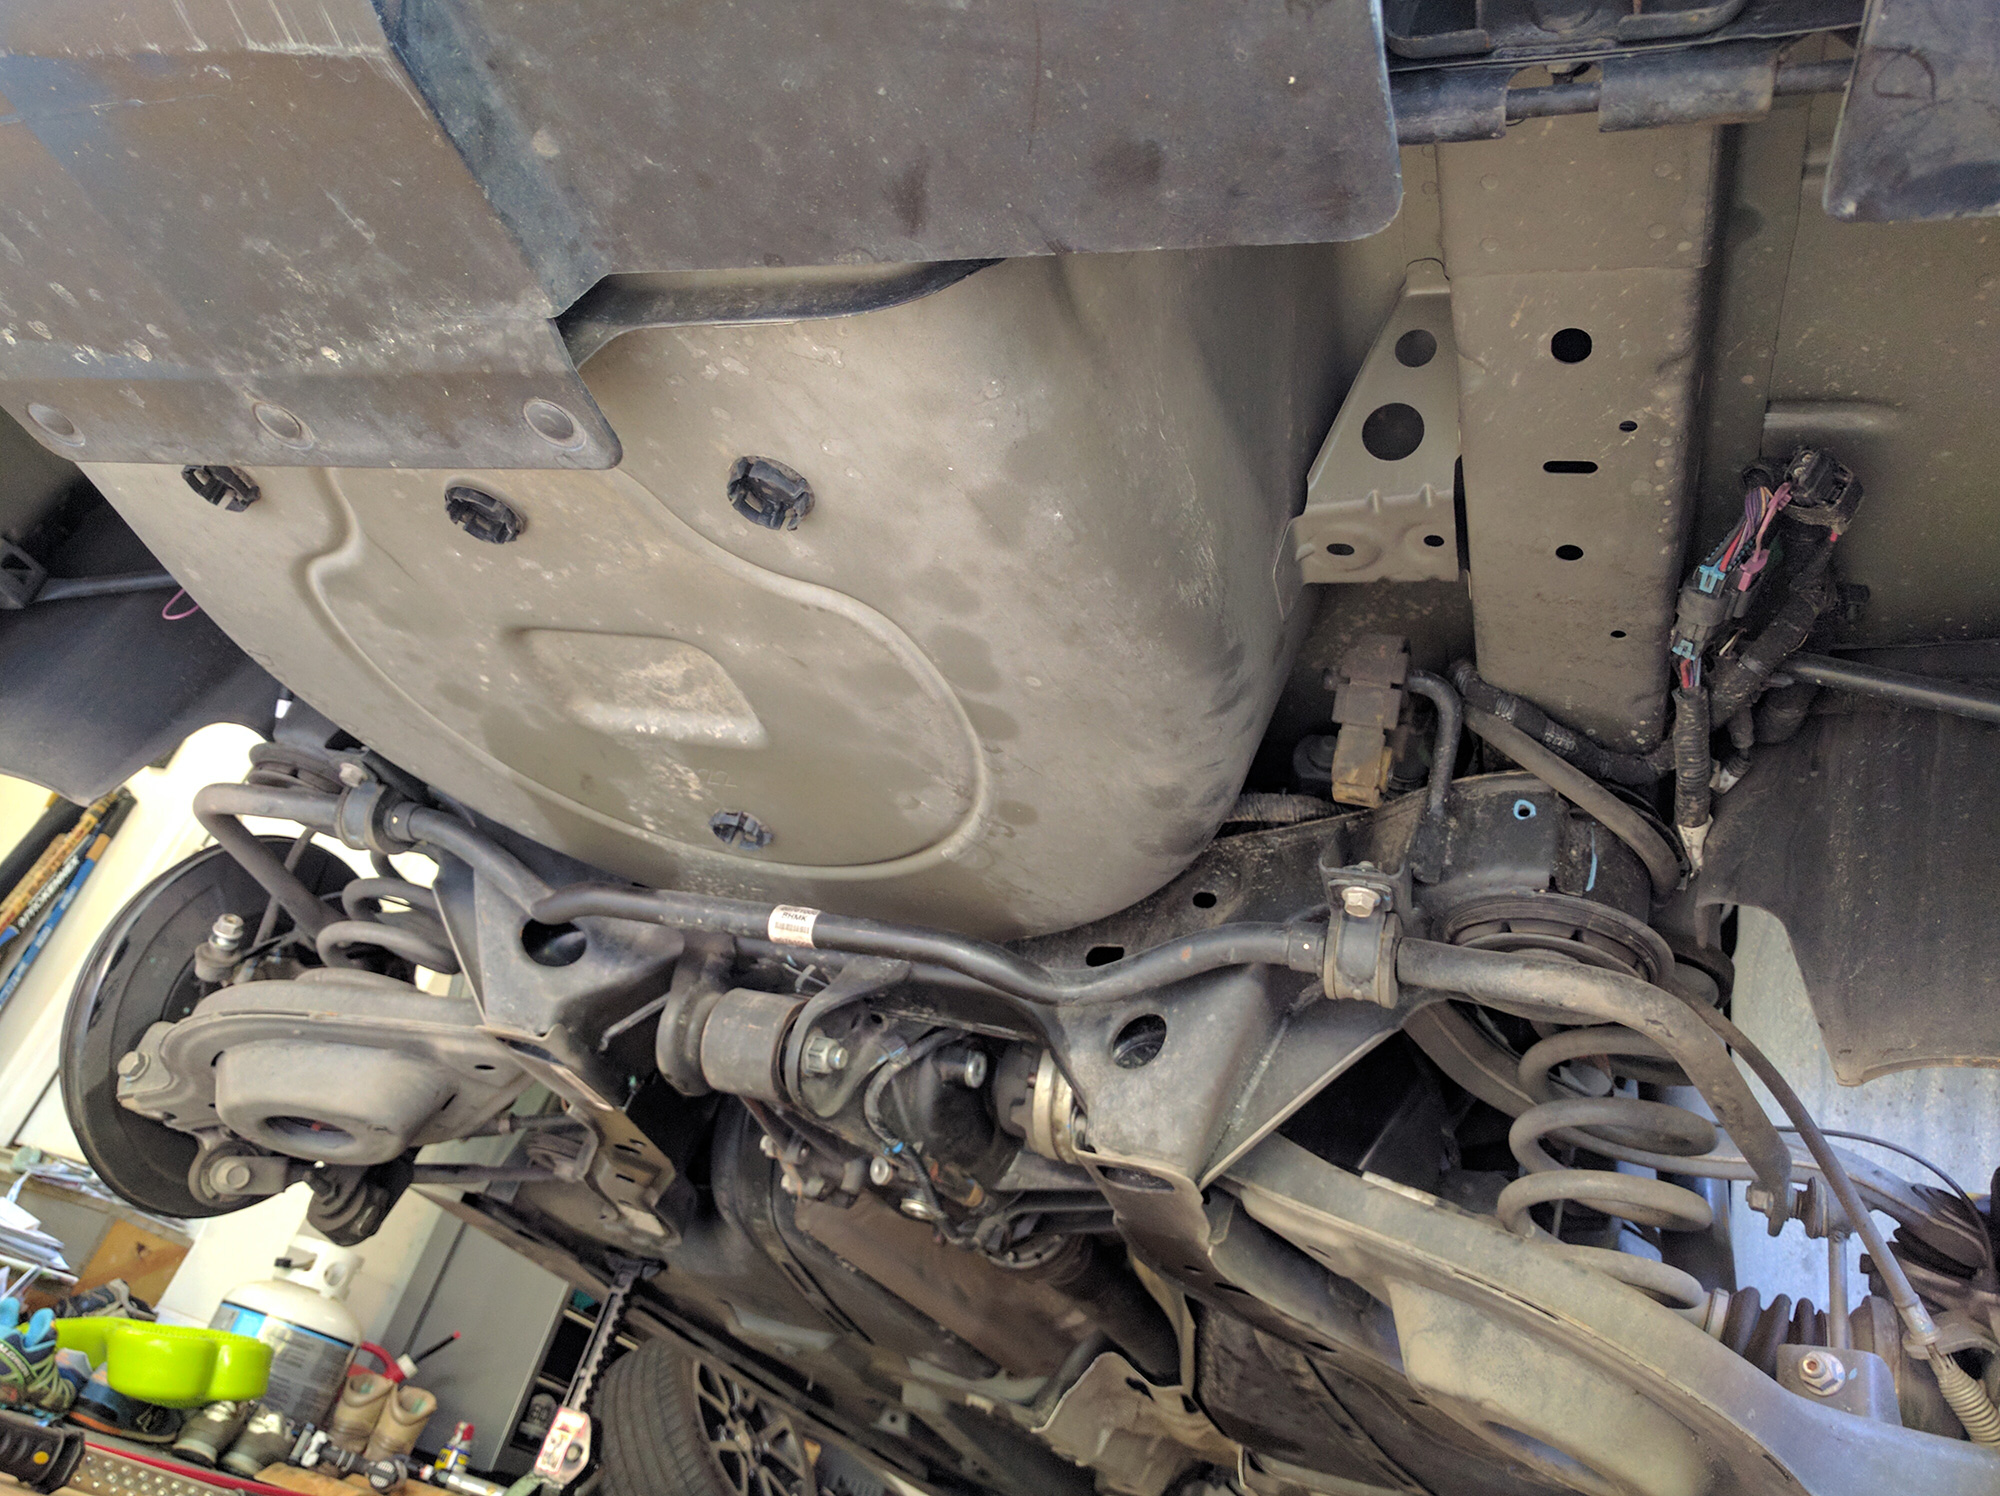
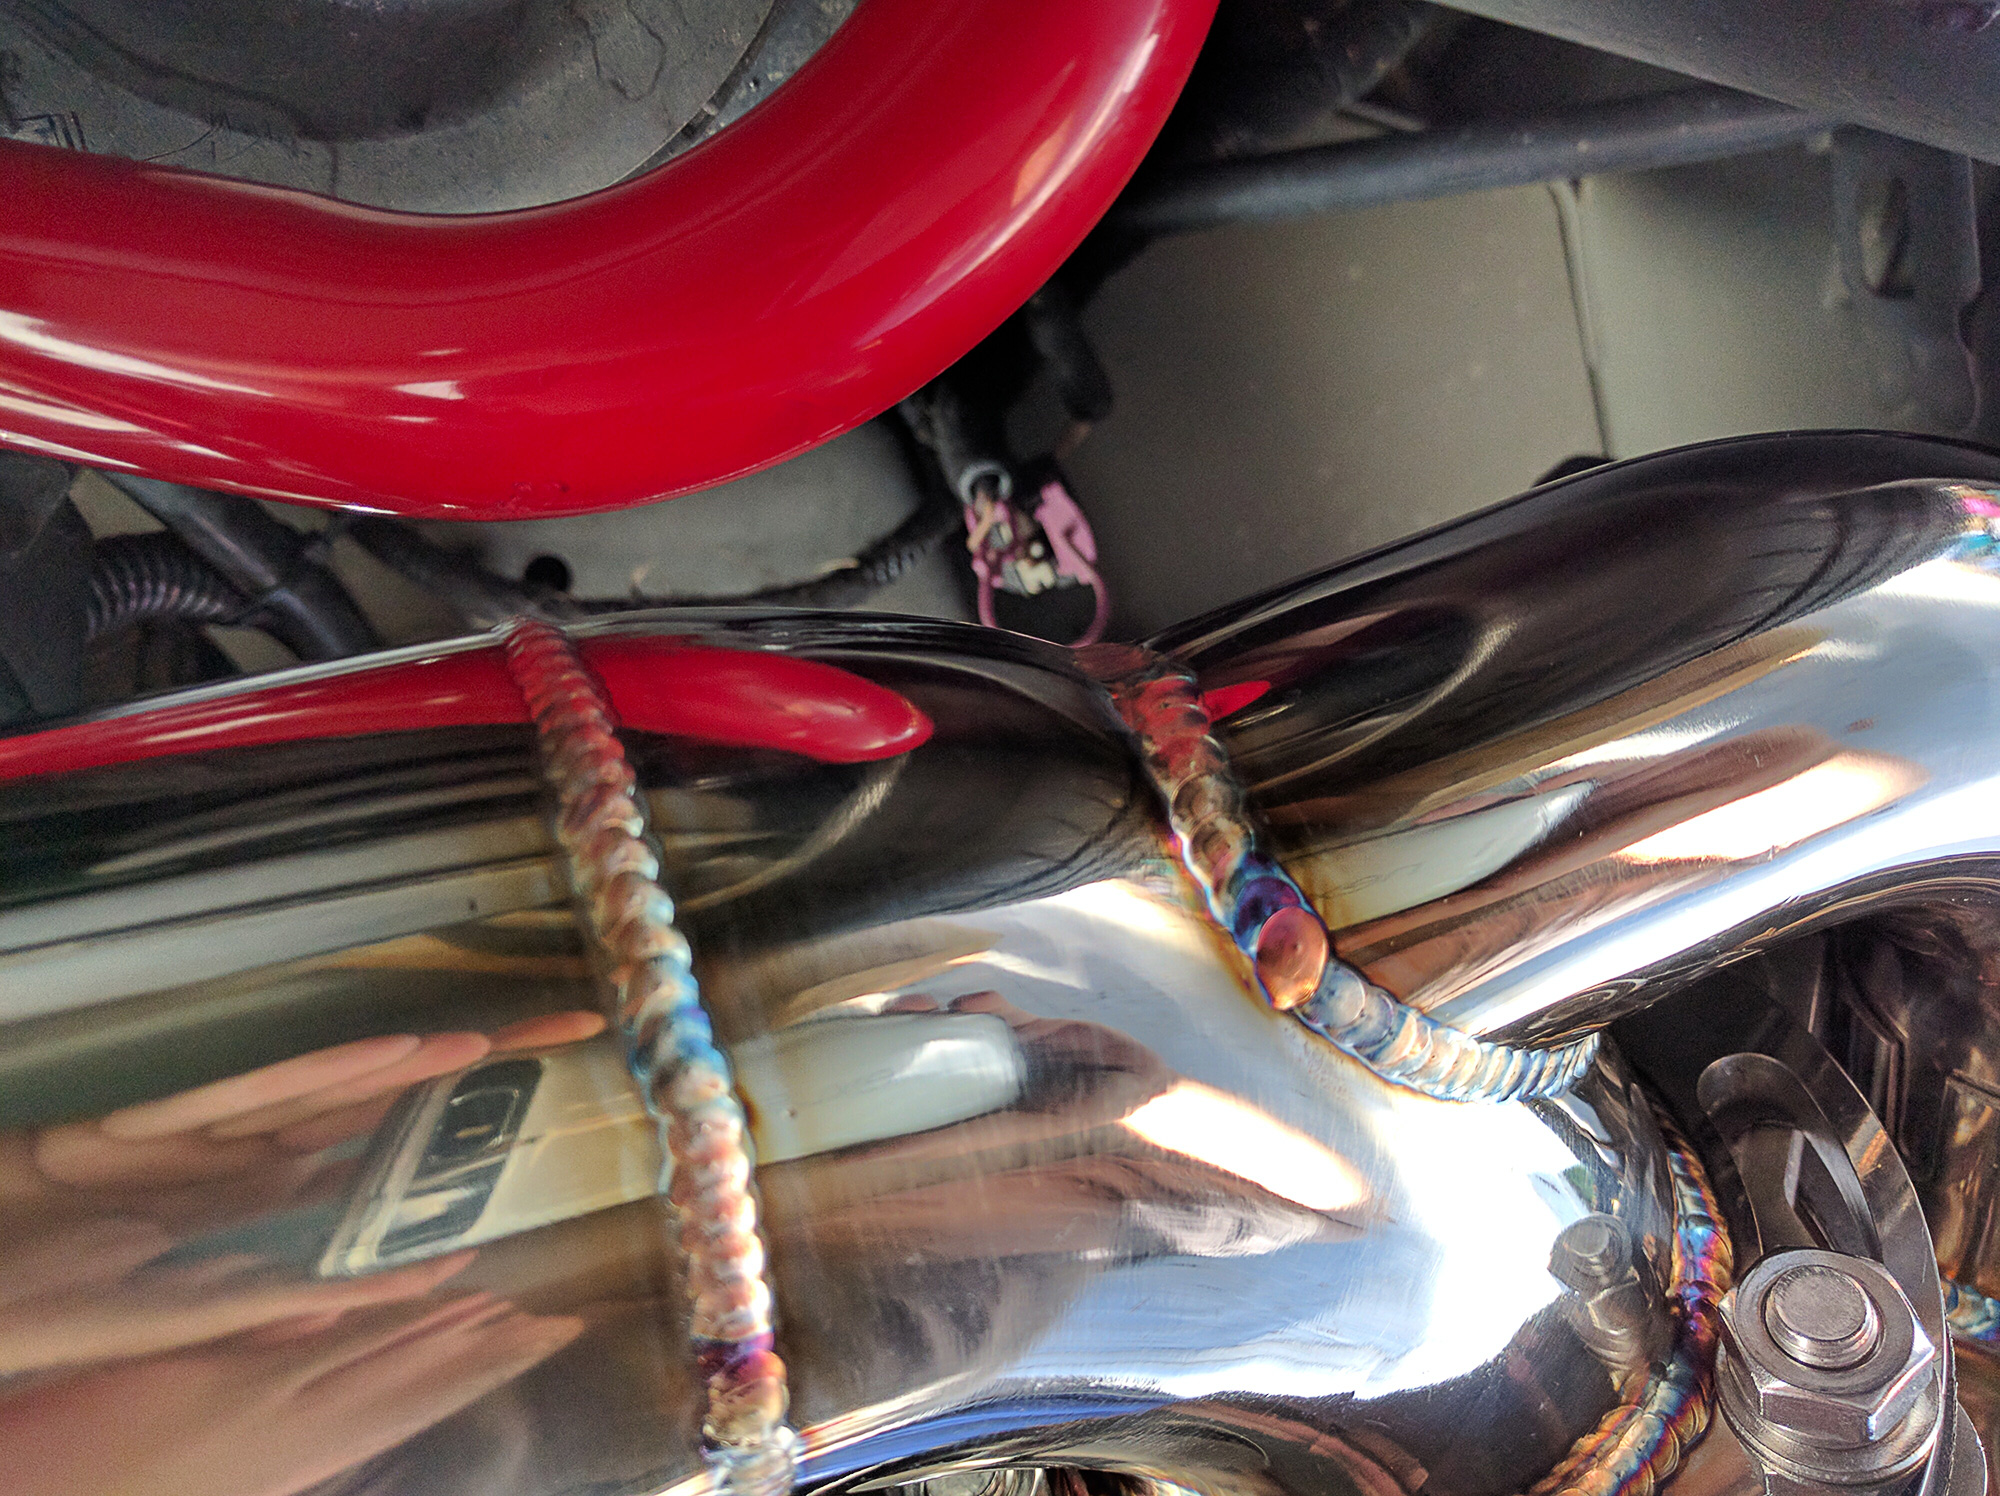
Rear sway comparion. Most exhaust shouldn't be an issue I would imagine but with the valves built into the backside of the Meistershaft and the dual piping going into the muffler it gets awfully close with the extra the sway curves towards the back.
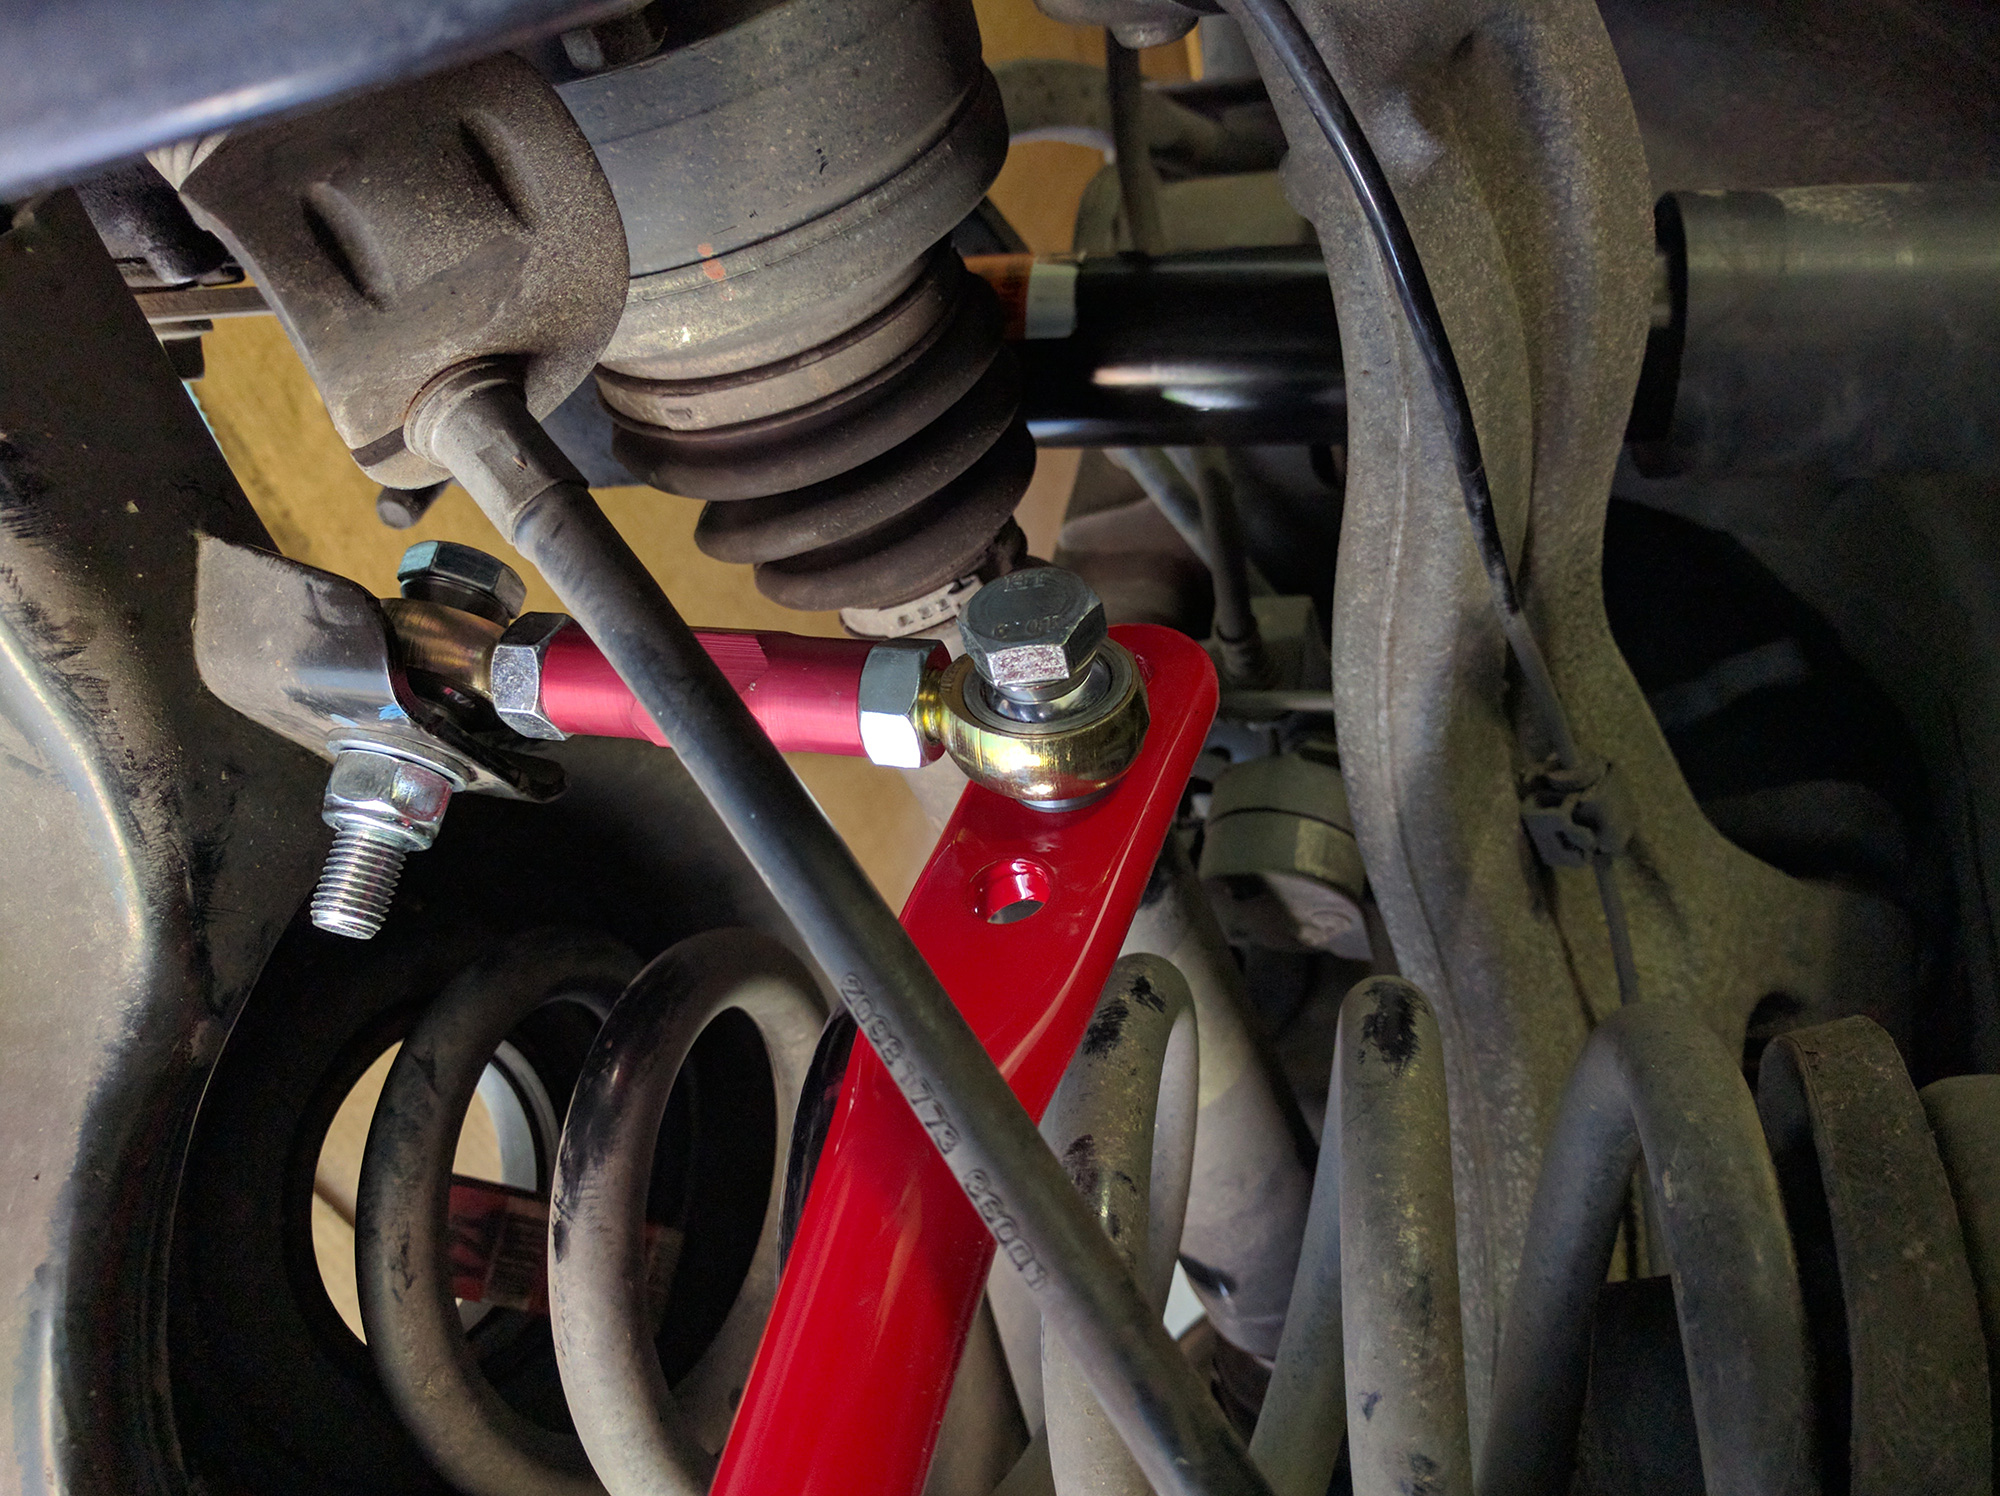
New endlinks and rear sway installed.

Once that was done I moved onto running the wires for the valves. There was a nice spot next to the amp to coil up the excess wire and then I wire loomed any wire that went behind other panels. The rear tub though fits snug enough that I left the loom off as it seem like it wouldn't sit right with it on.
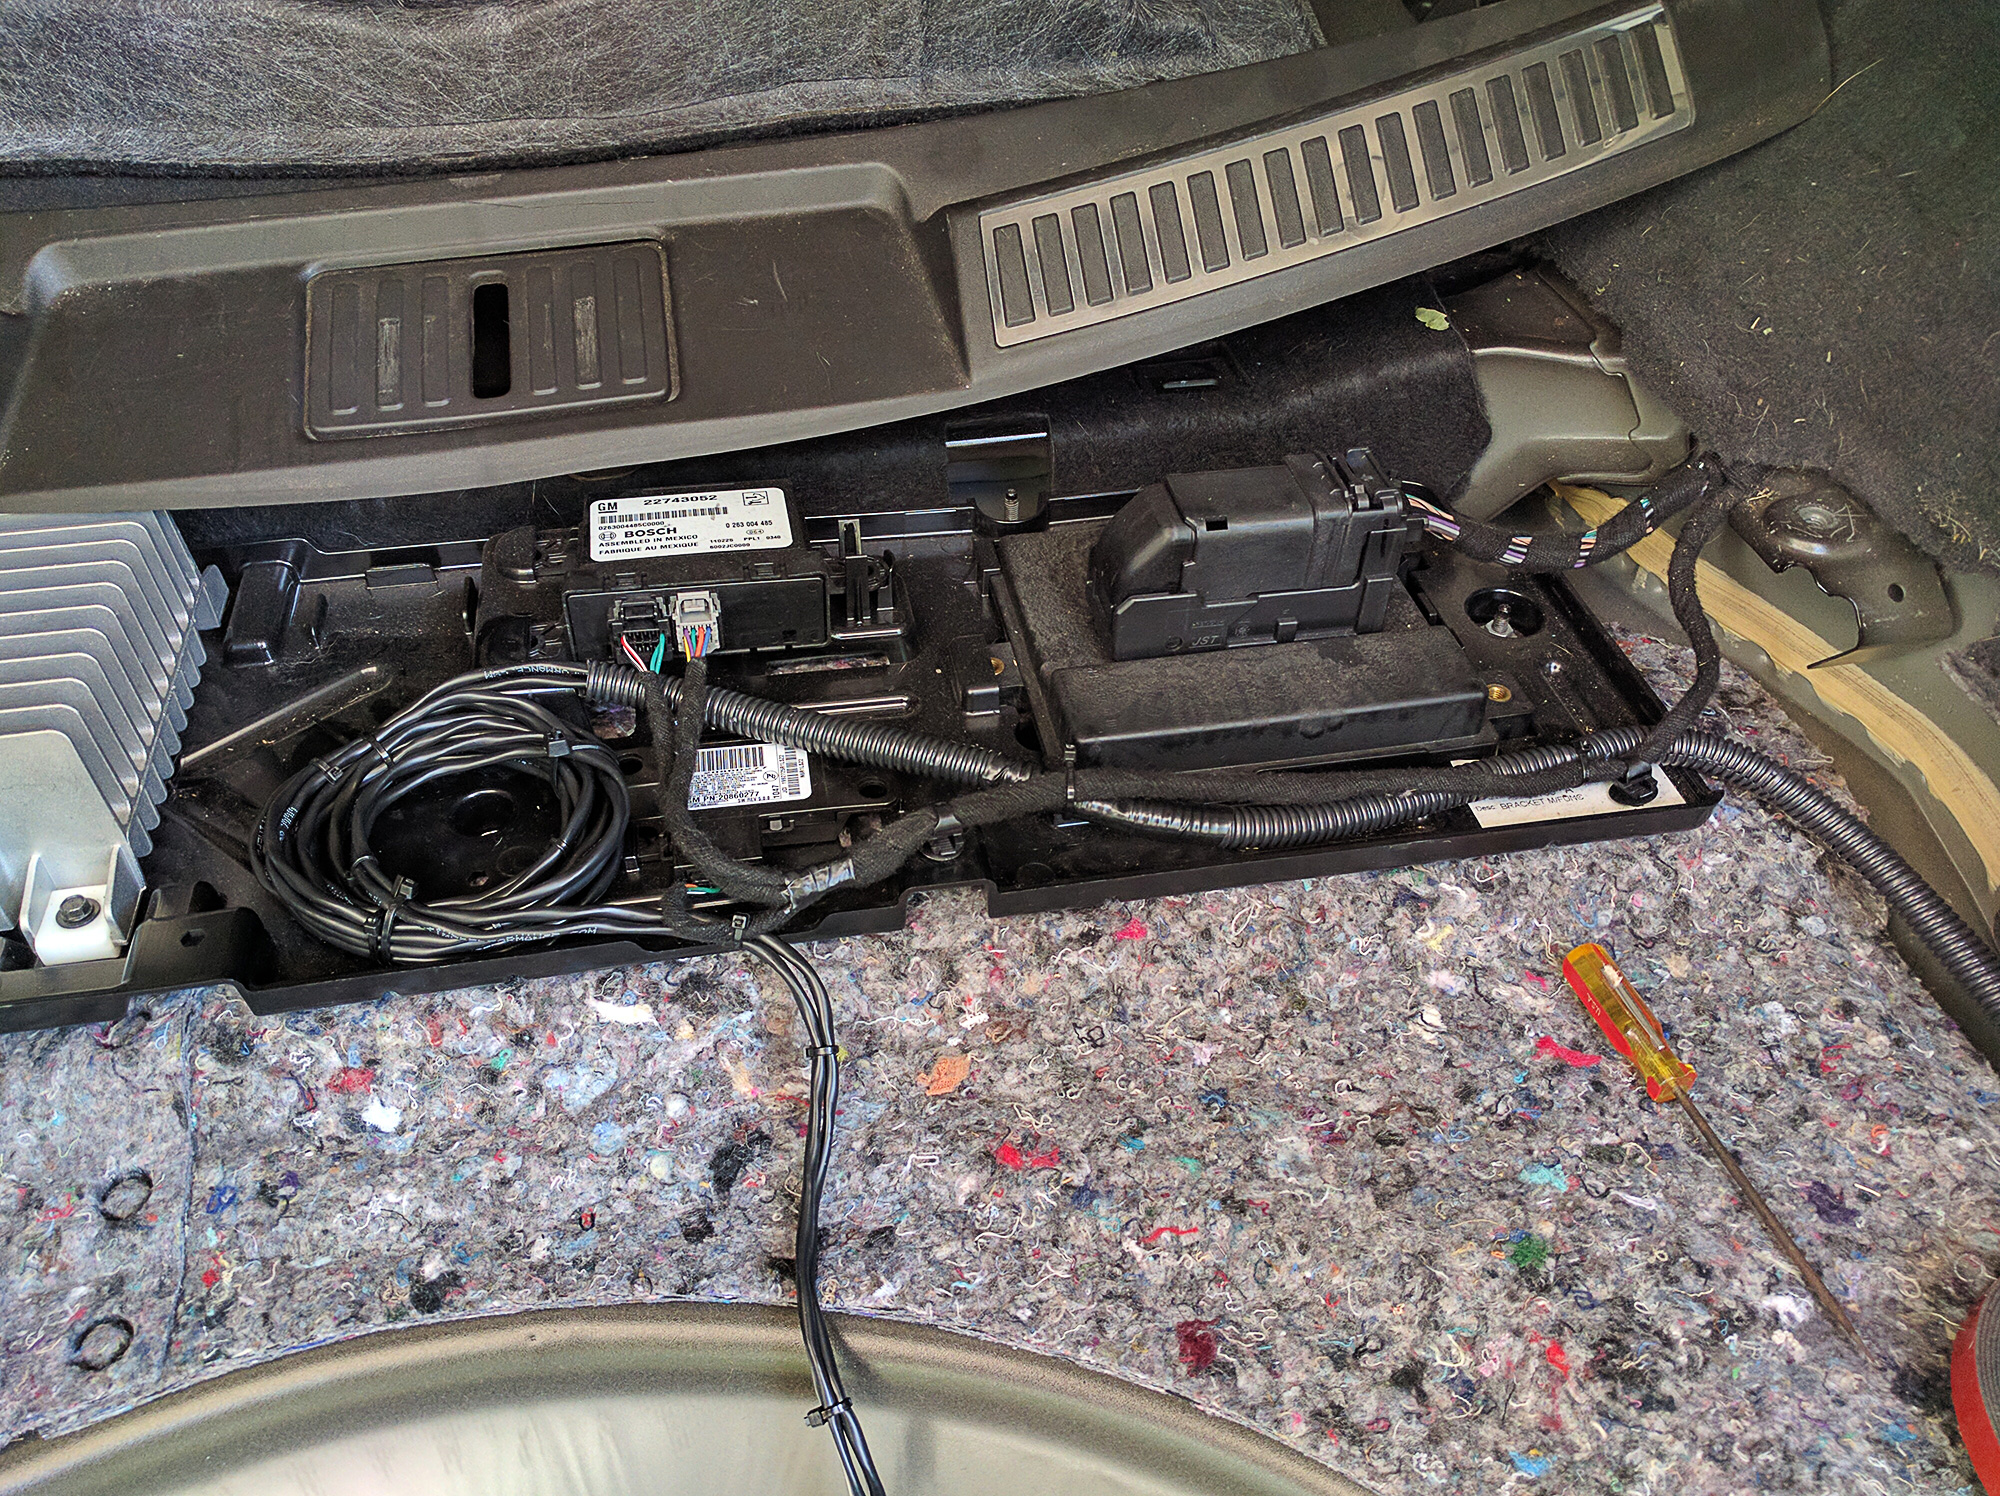
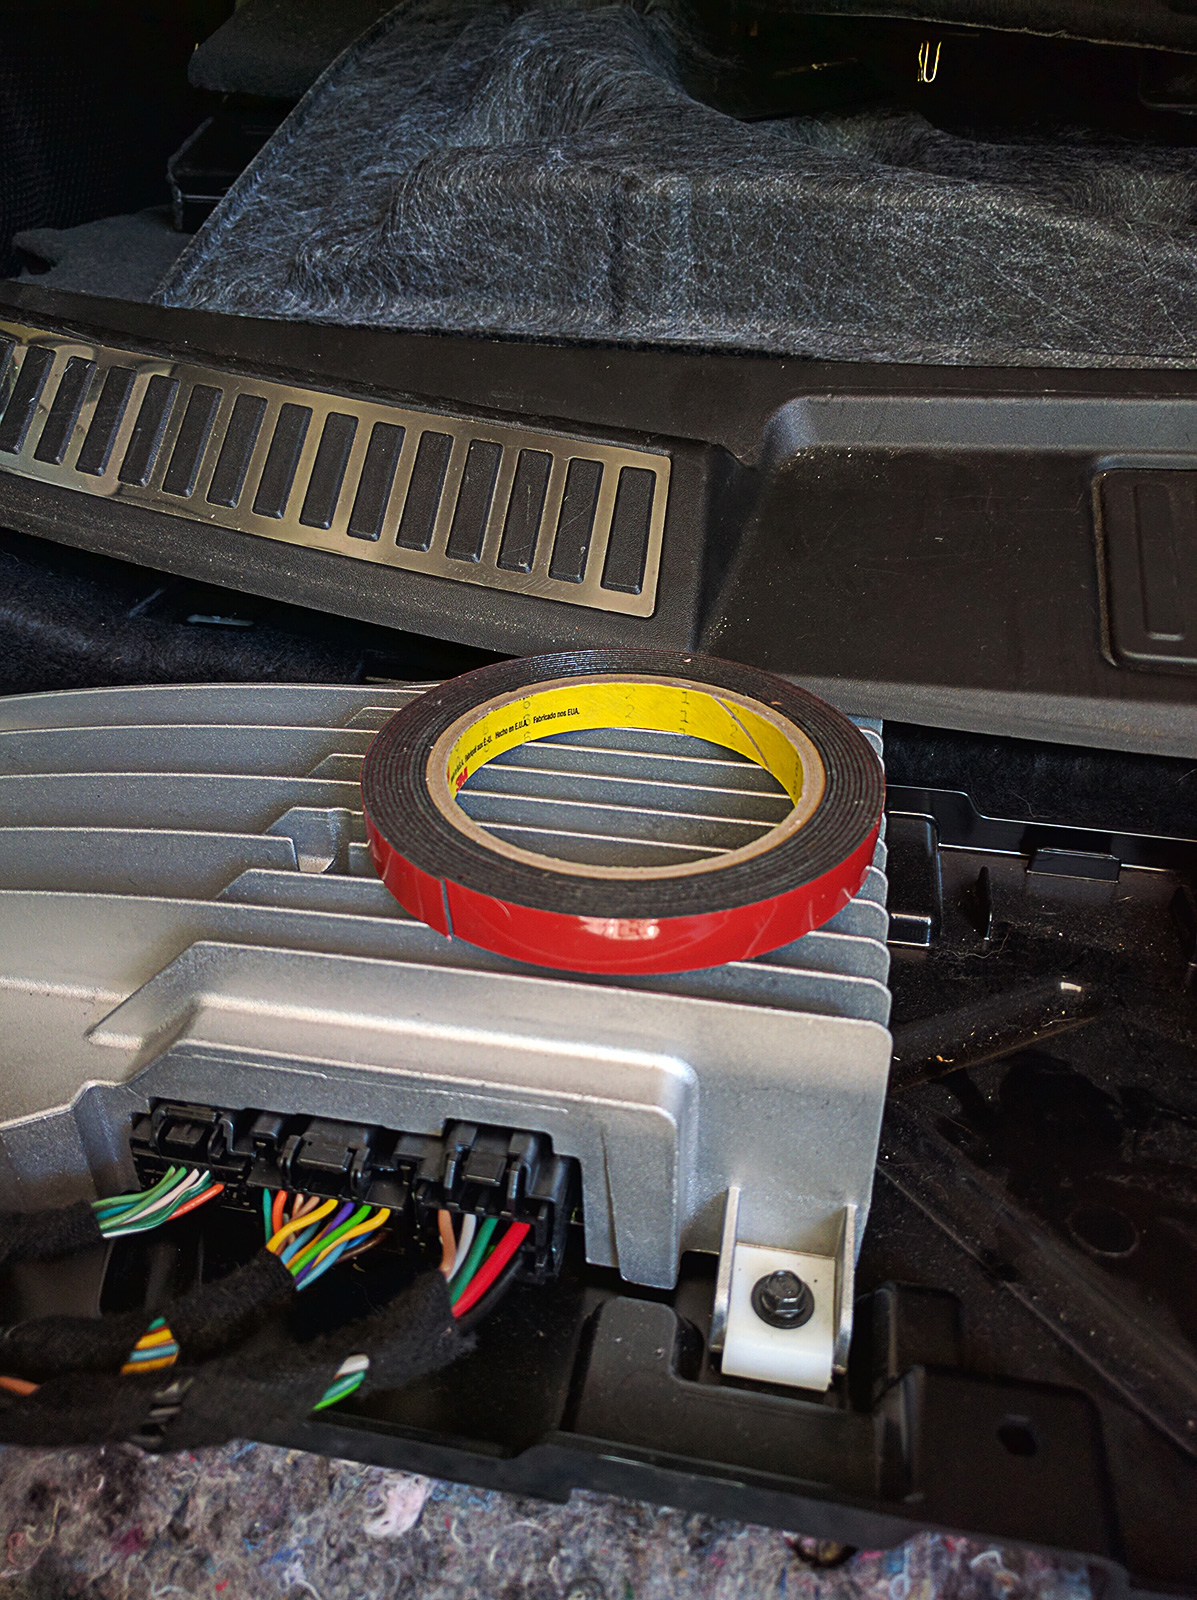
Used some 3M double sided body tape to mount the wireless control box behind the fuse panel.

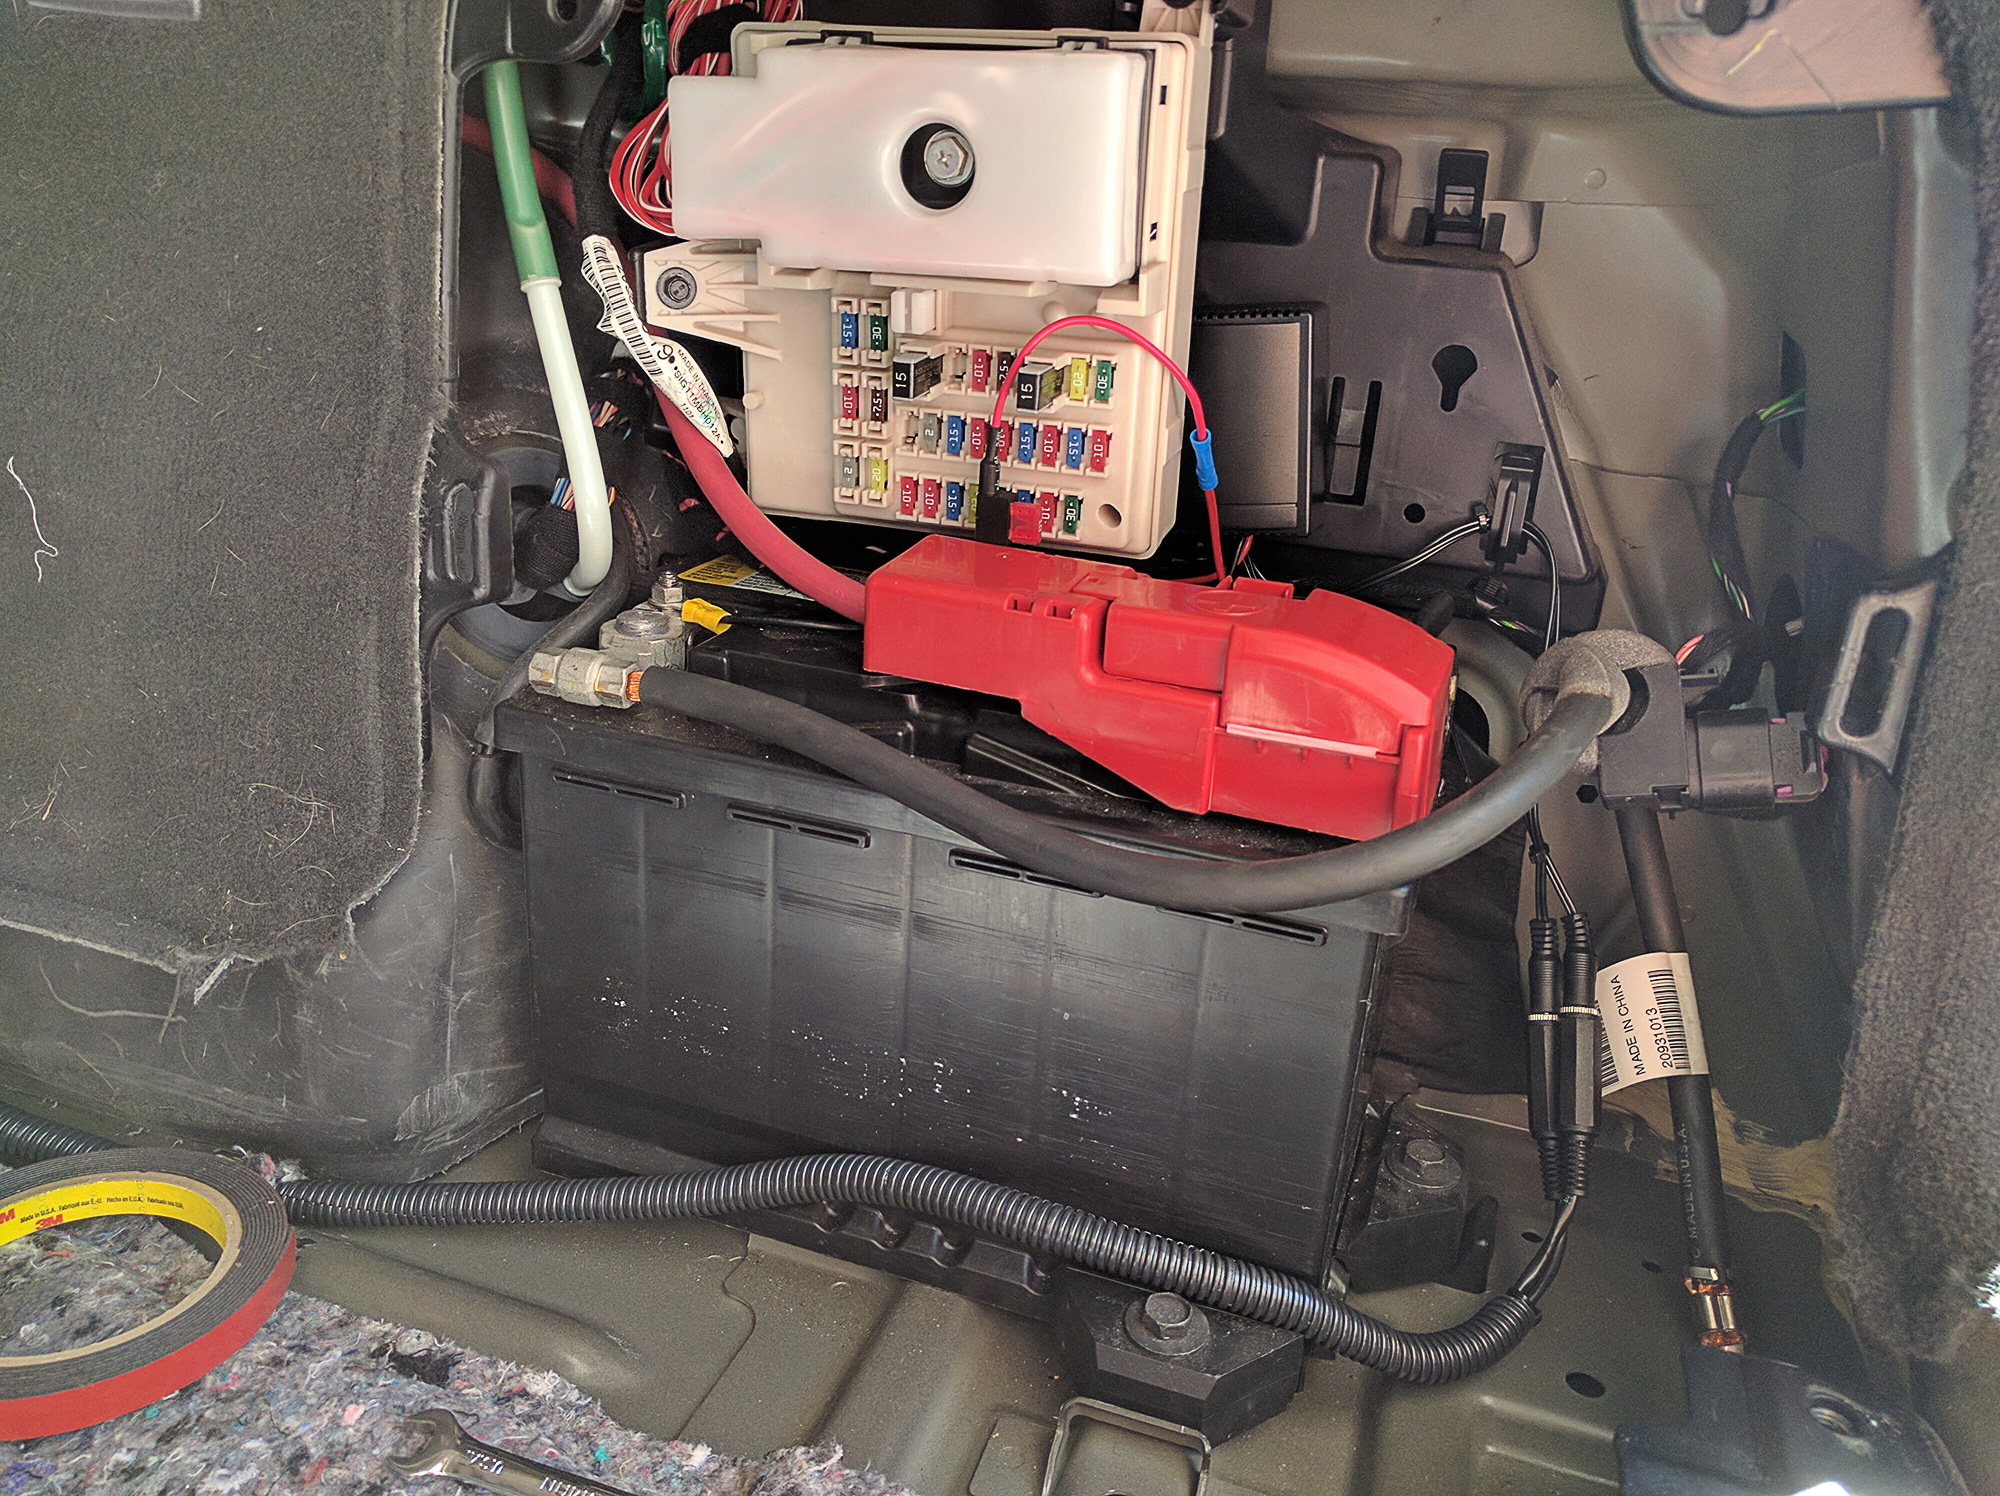
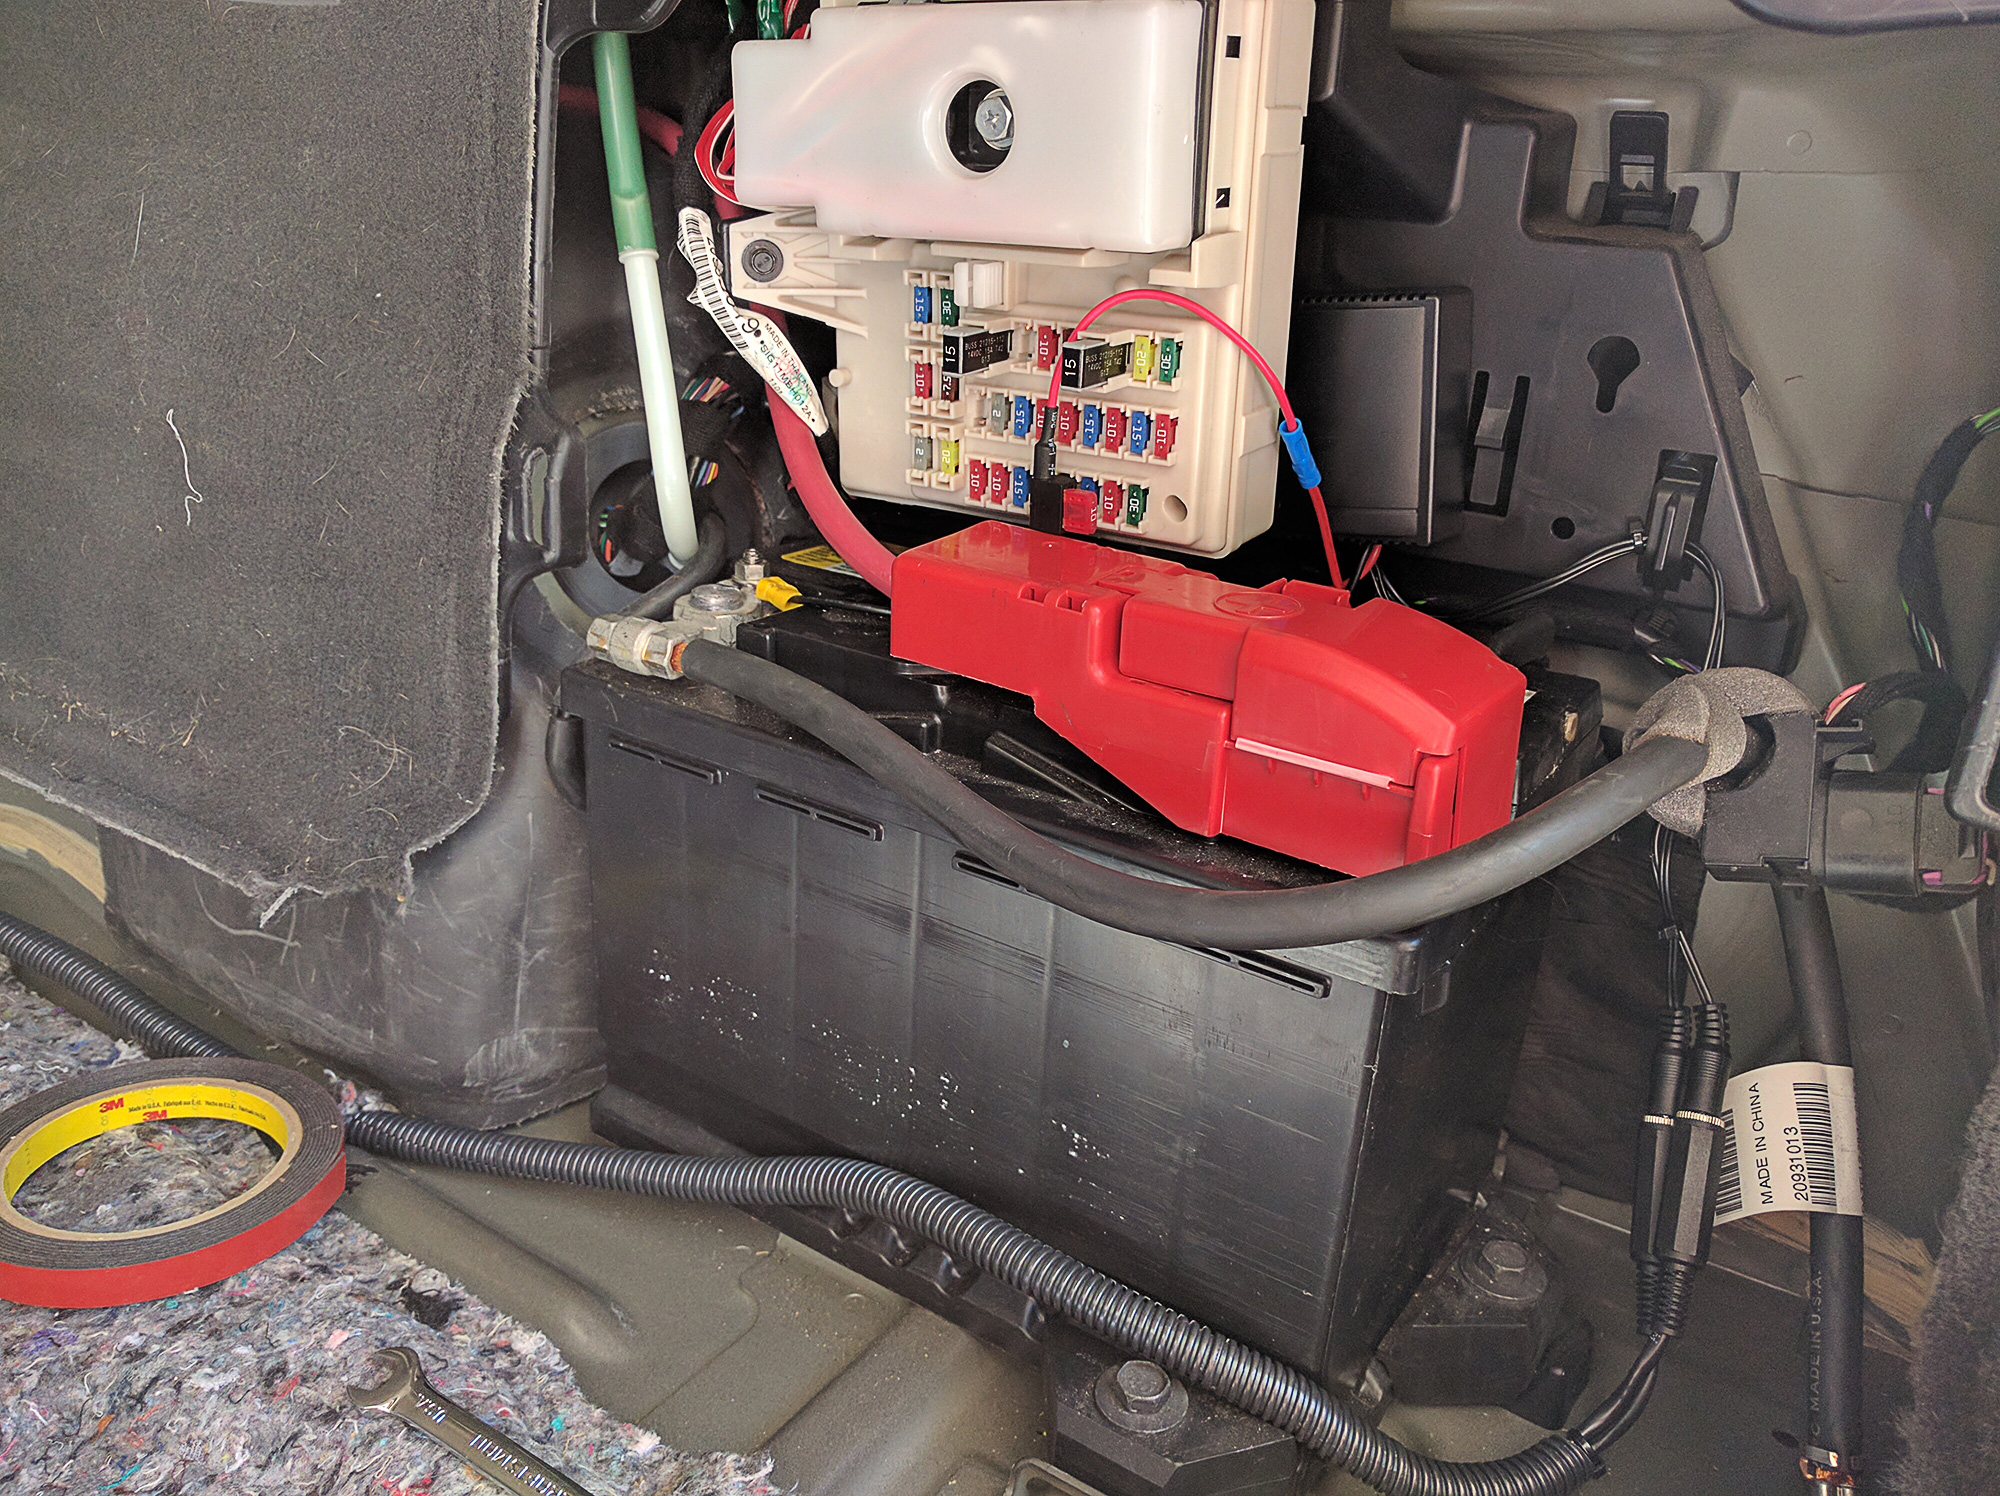
Little better view of how the wires tucked in once the tub was back in.

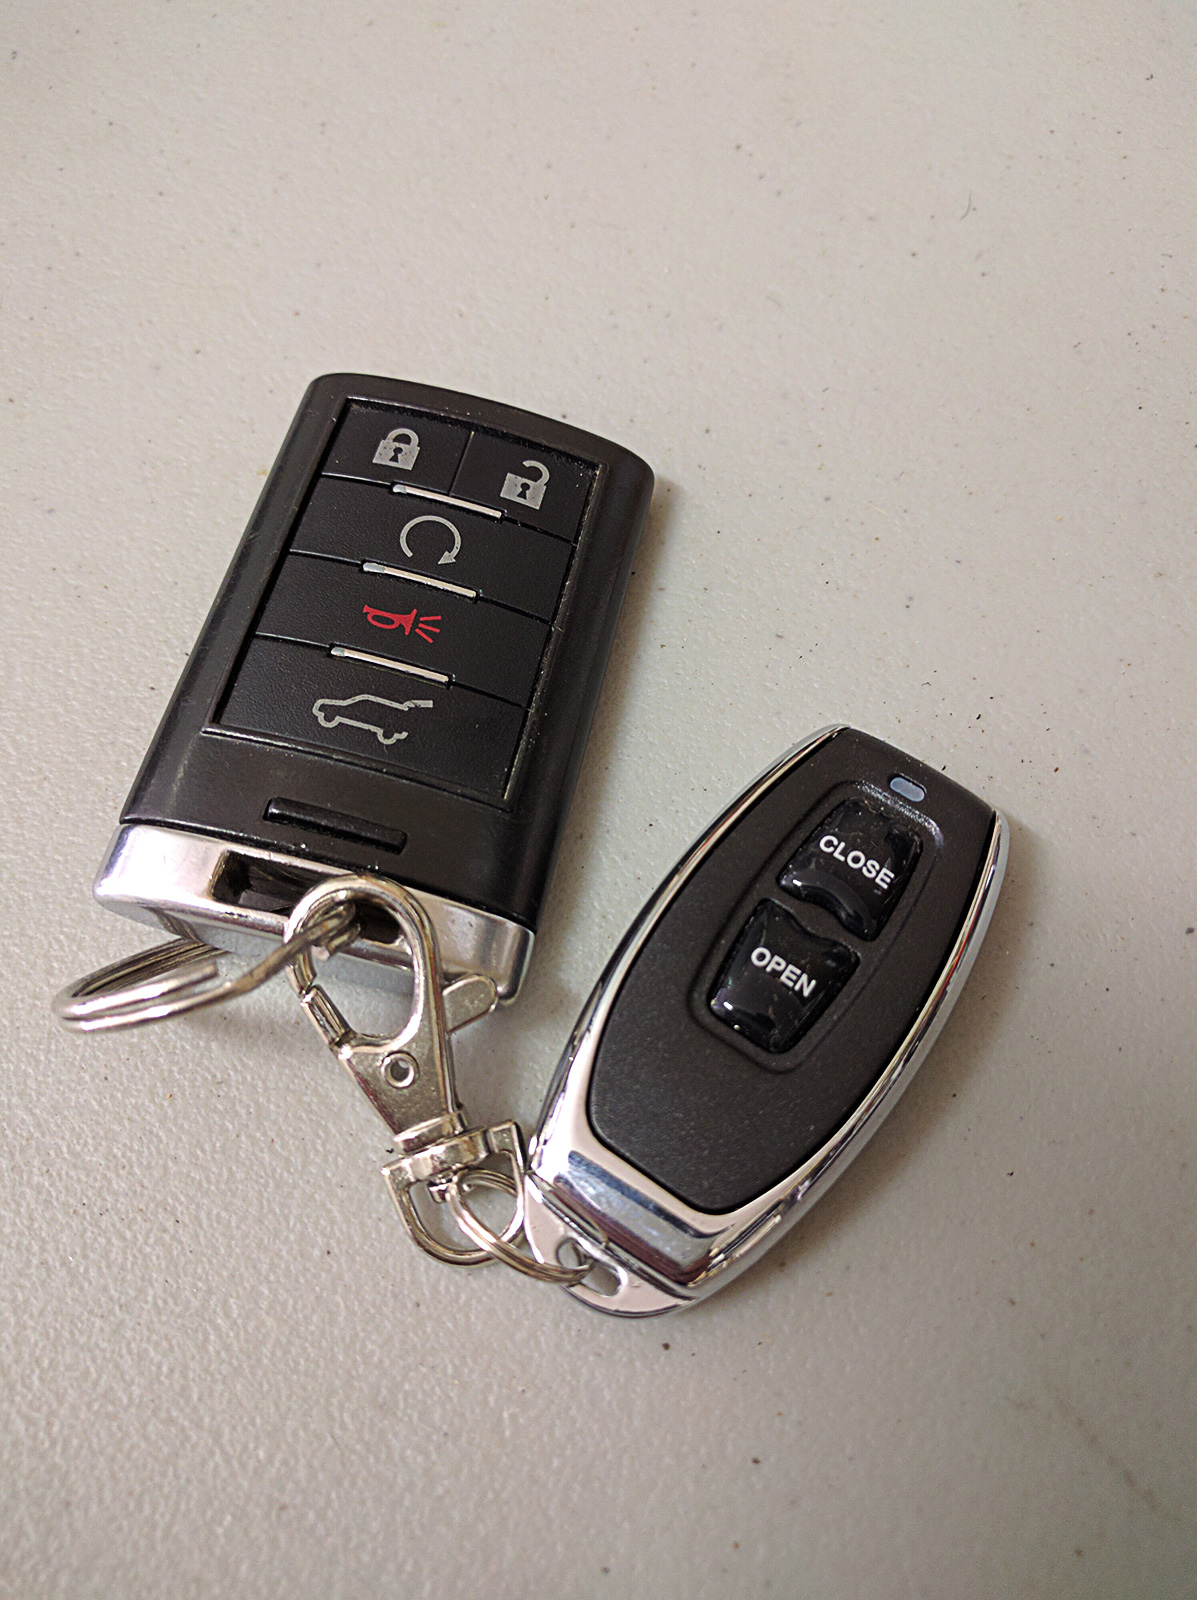
The wireless remote for the valves matches the Cadillac key pretty well.
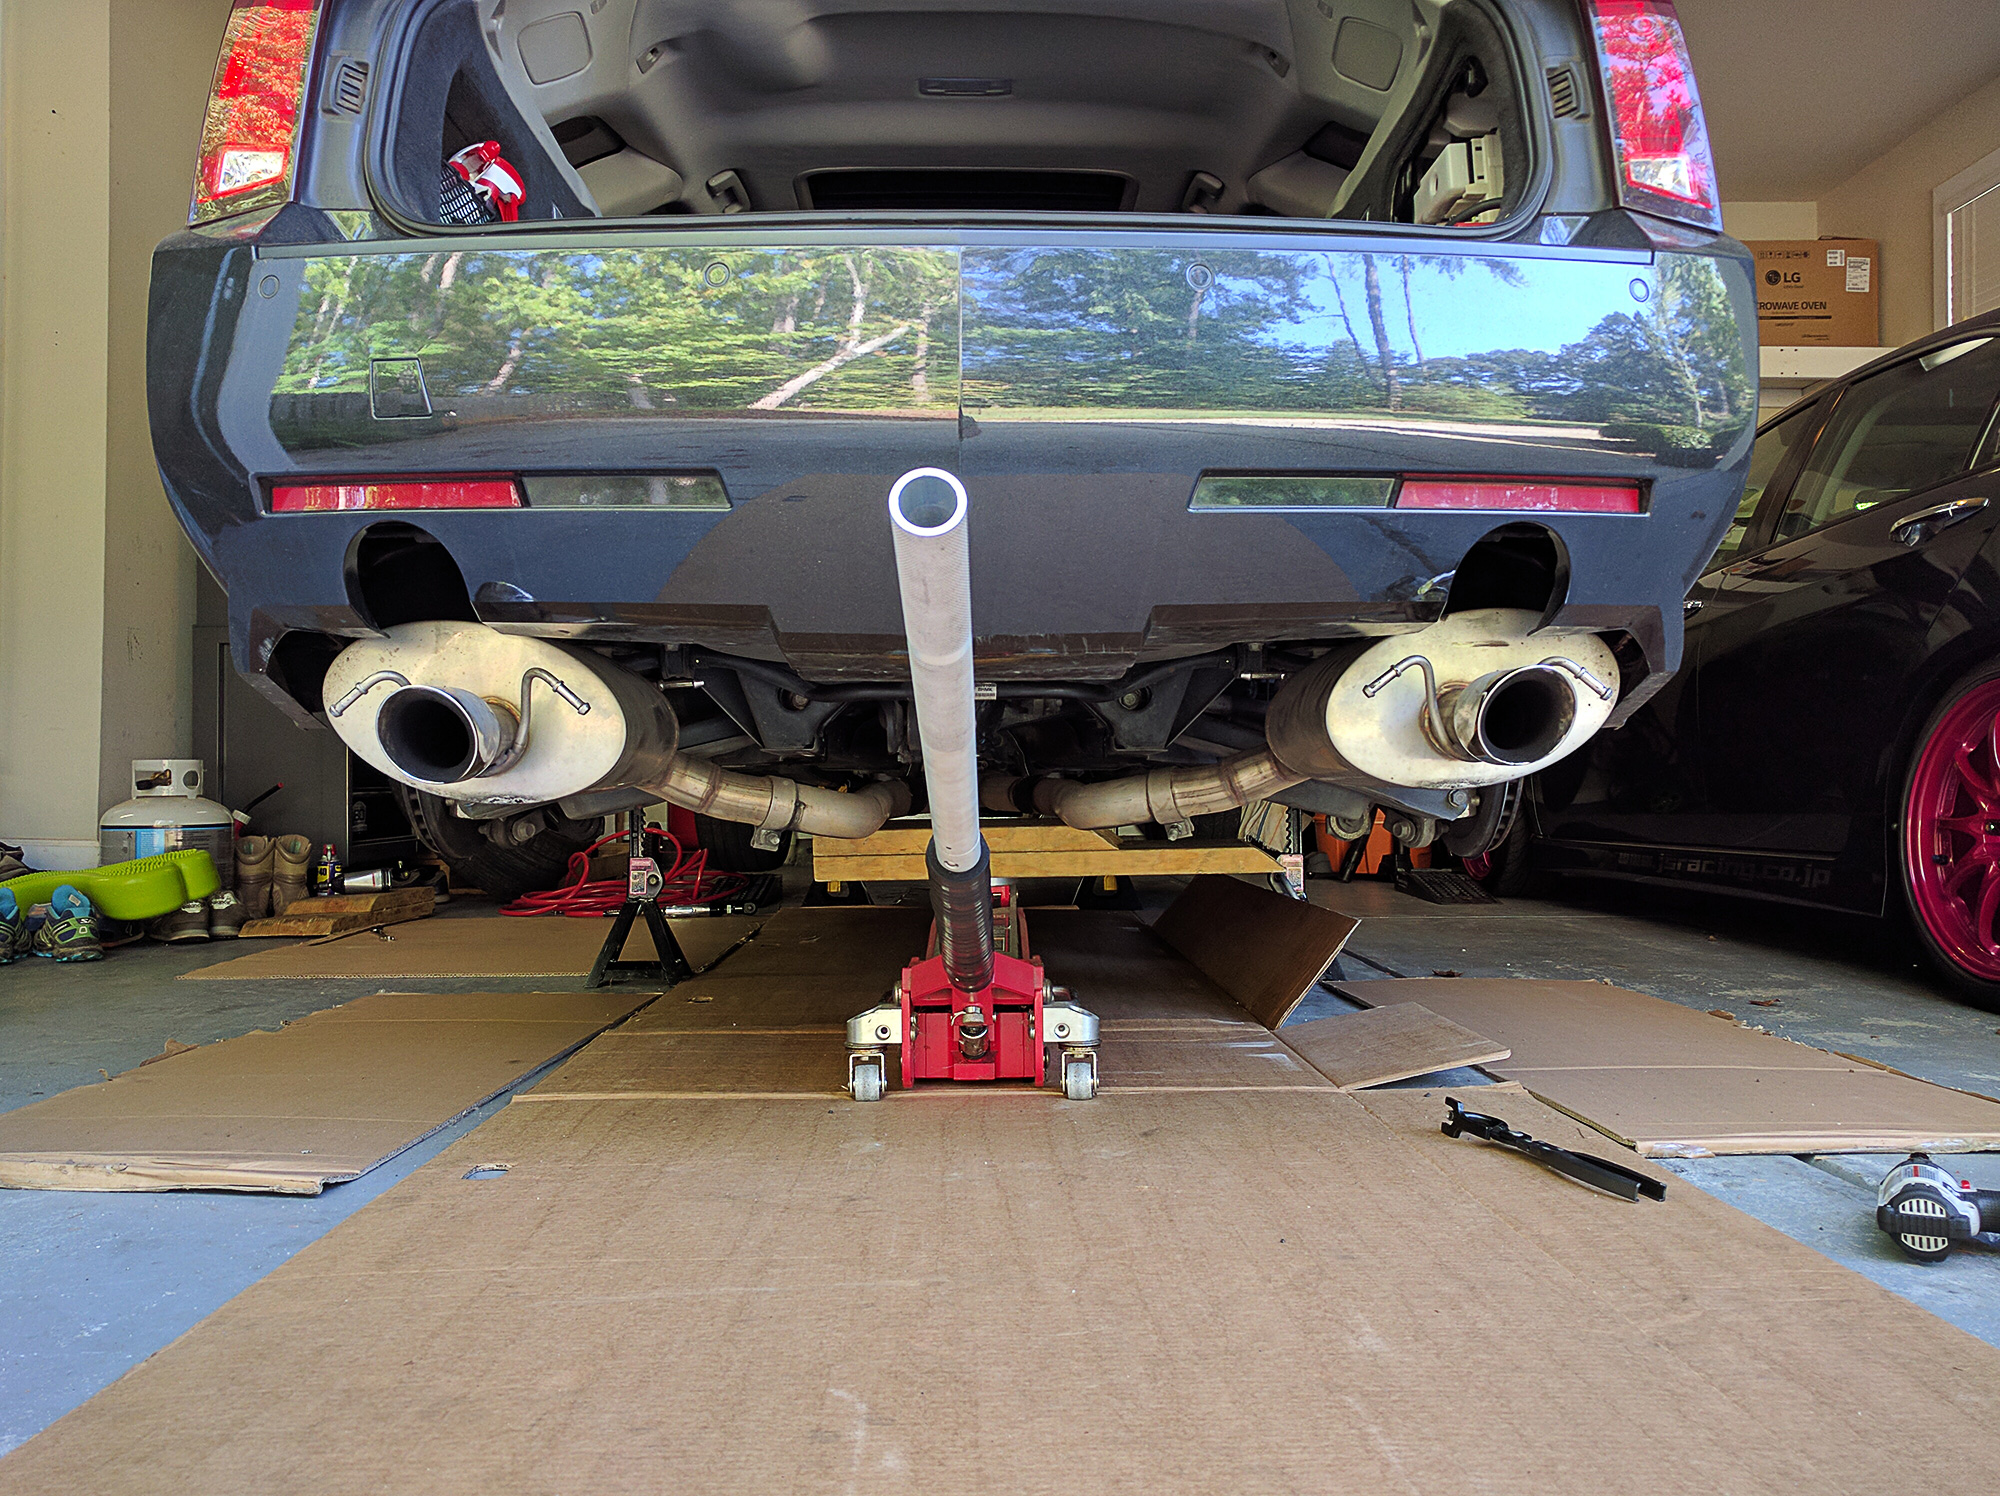
The passenger side muffler went on super easy but for some reason the drivers so muffler just did not want to fit. It was an absolute pain to get it on. I think the rear issue is the exhaust could use hangers that are 1/4-3/8 in longer. No idea how I will find a set but I really need to find some.
They look and sound amazing on the car though. They also have the most adjustable exhaust tip I have ever sean on an exhaust. It allows you to adjust how far the tip sticks out as was as angle it a little to get it perfectly lined up and center. Very cool system.
I think finished running the wires to each of the valves safetly and in some wireloom. Then silicone sealed the whole I had drilled in the bottom plastic plug.
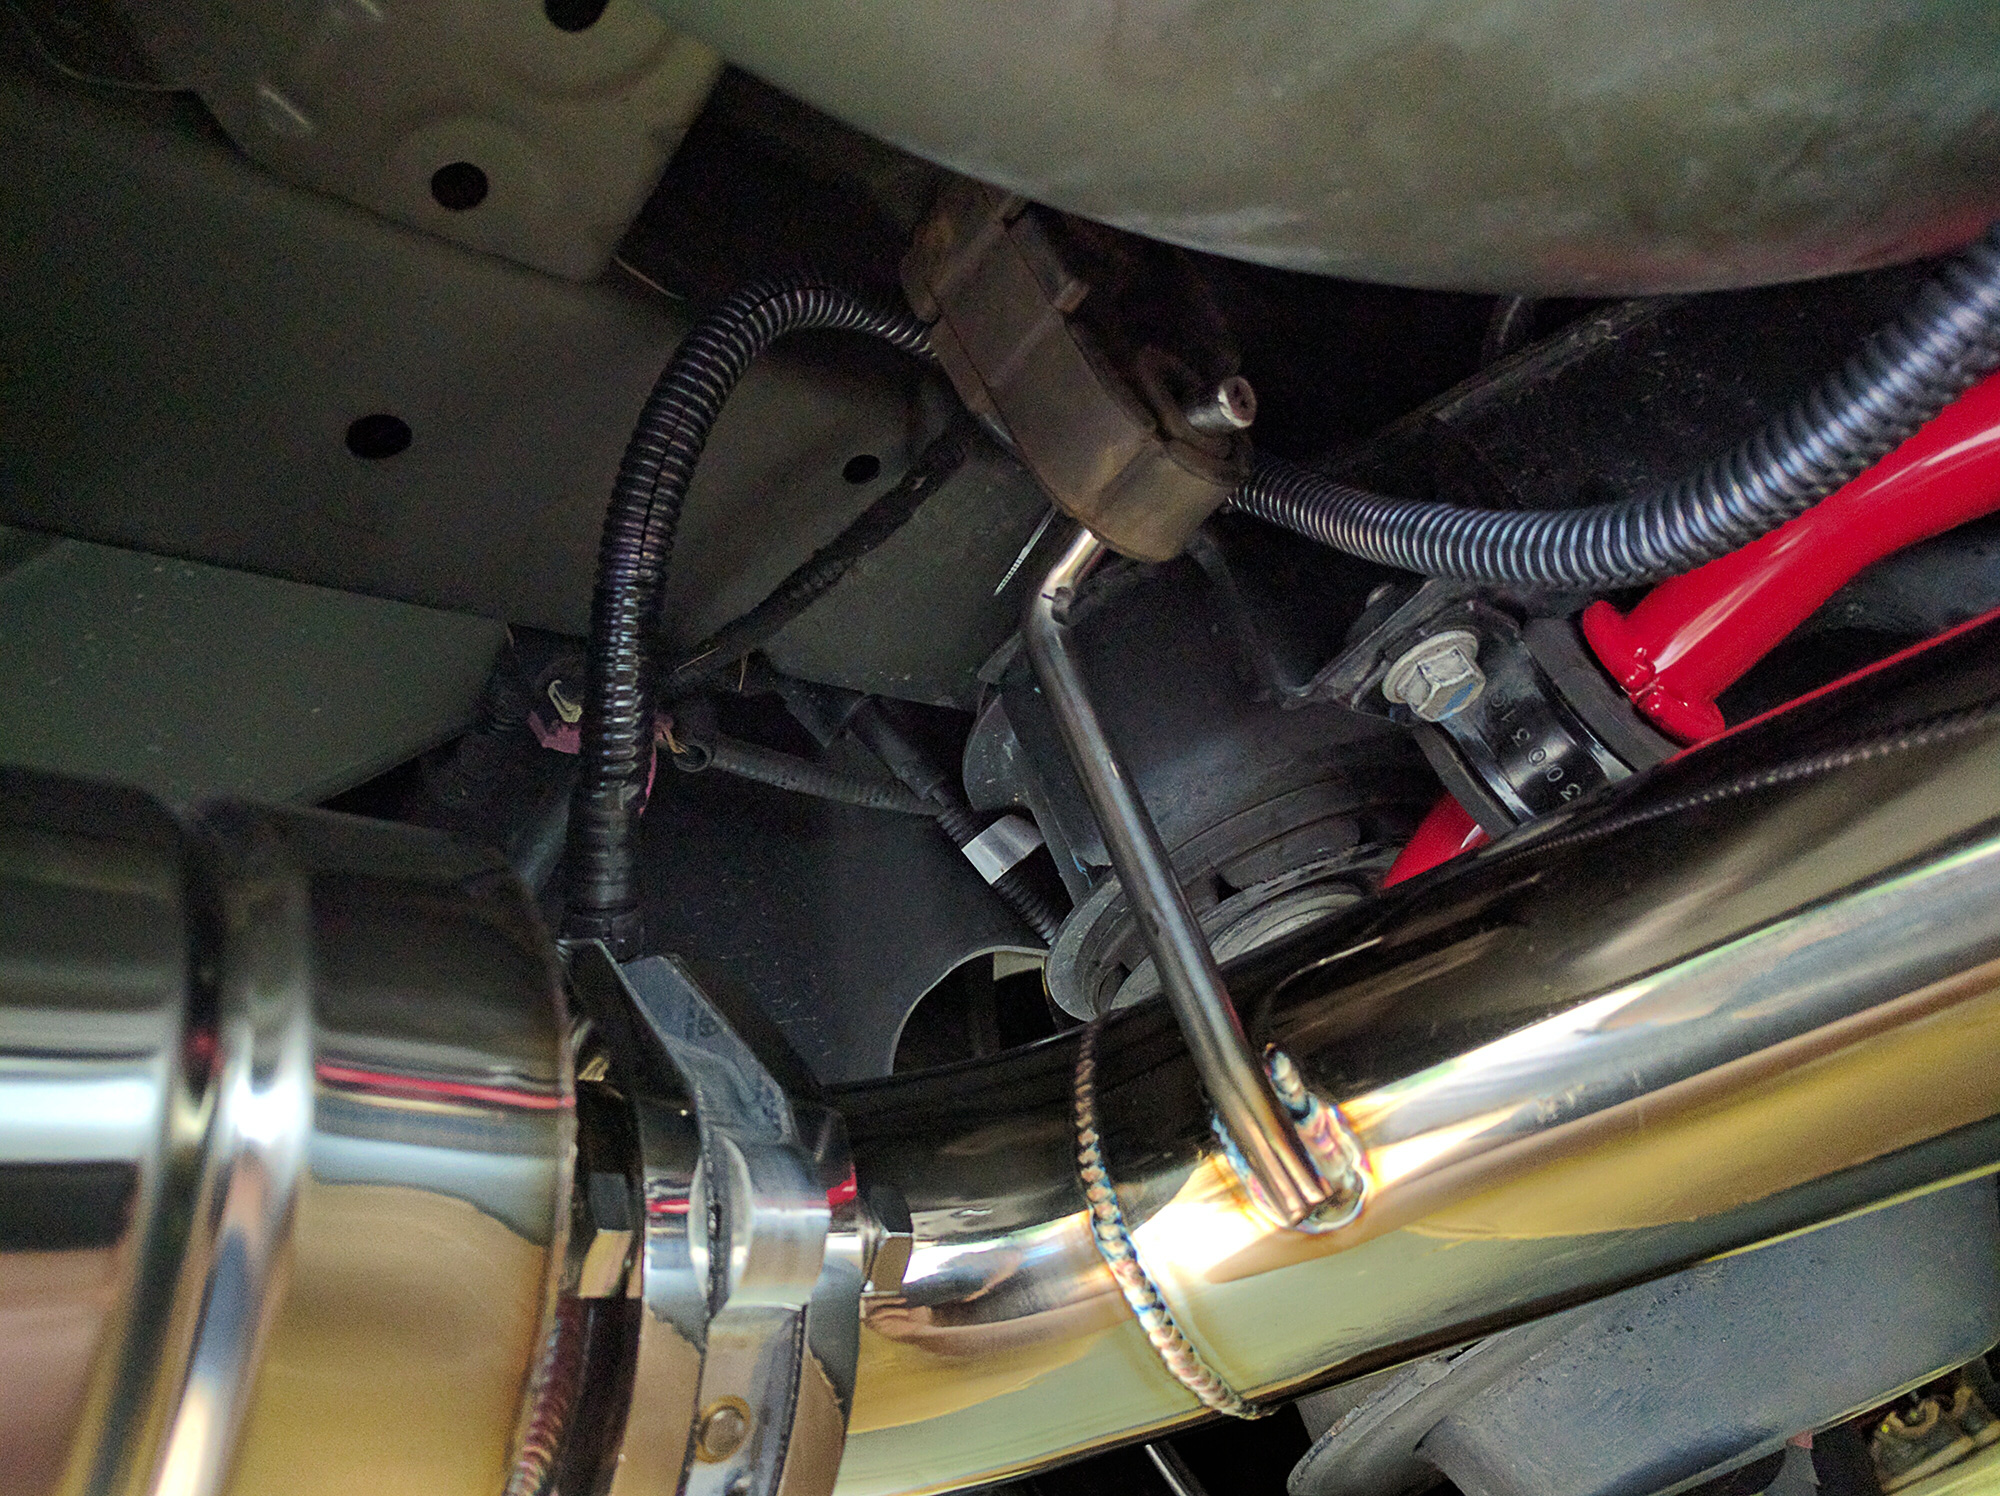
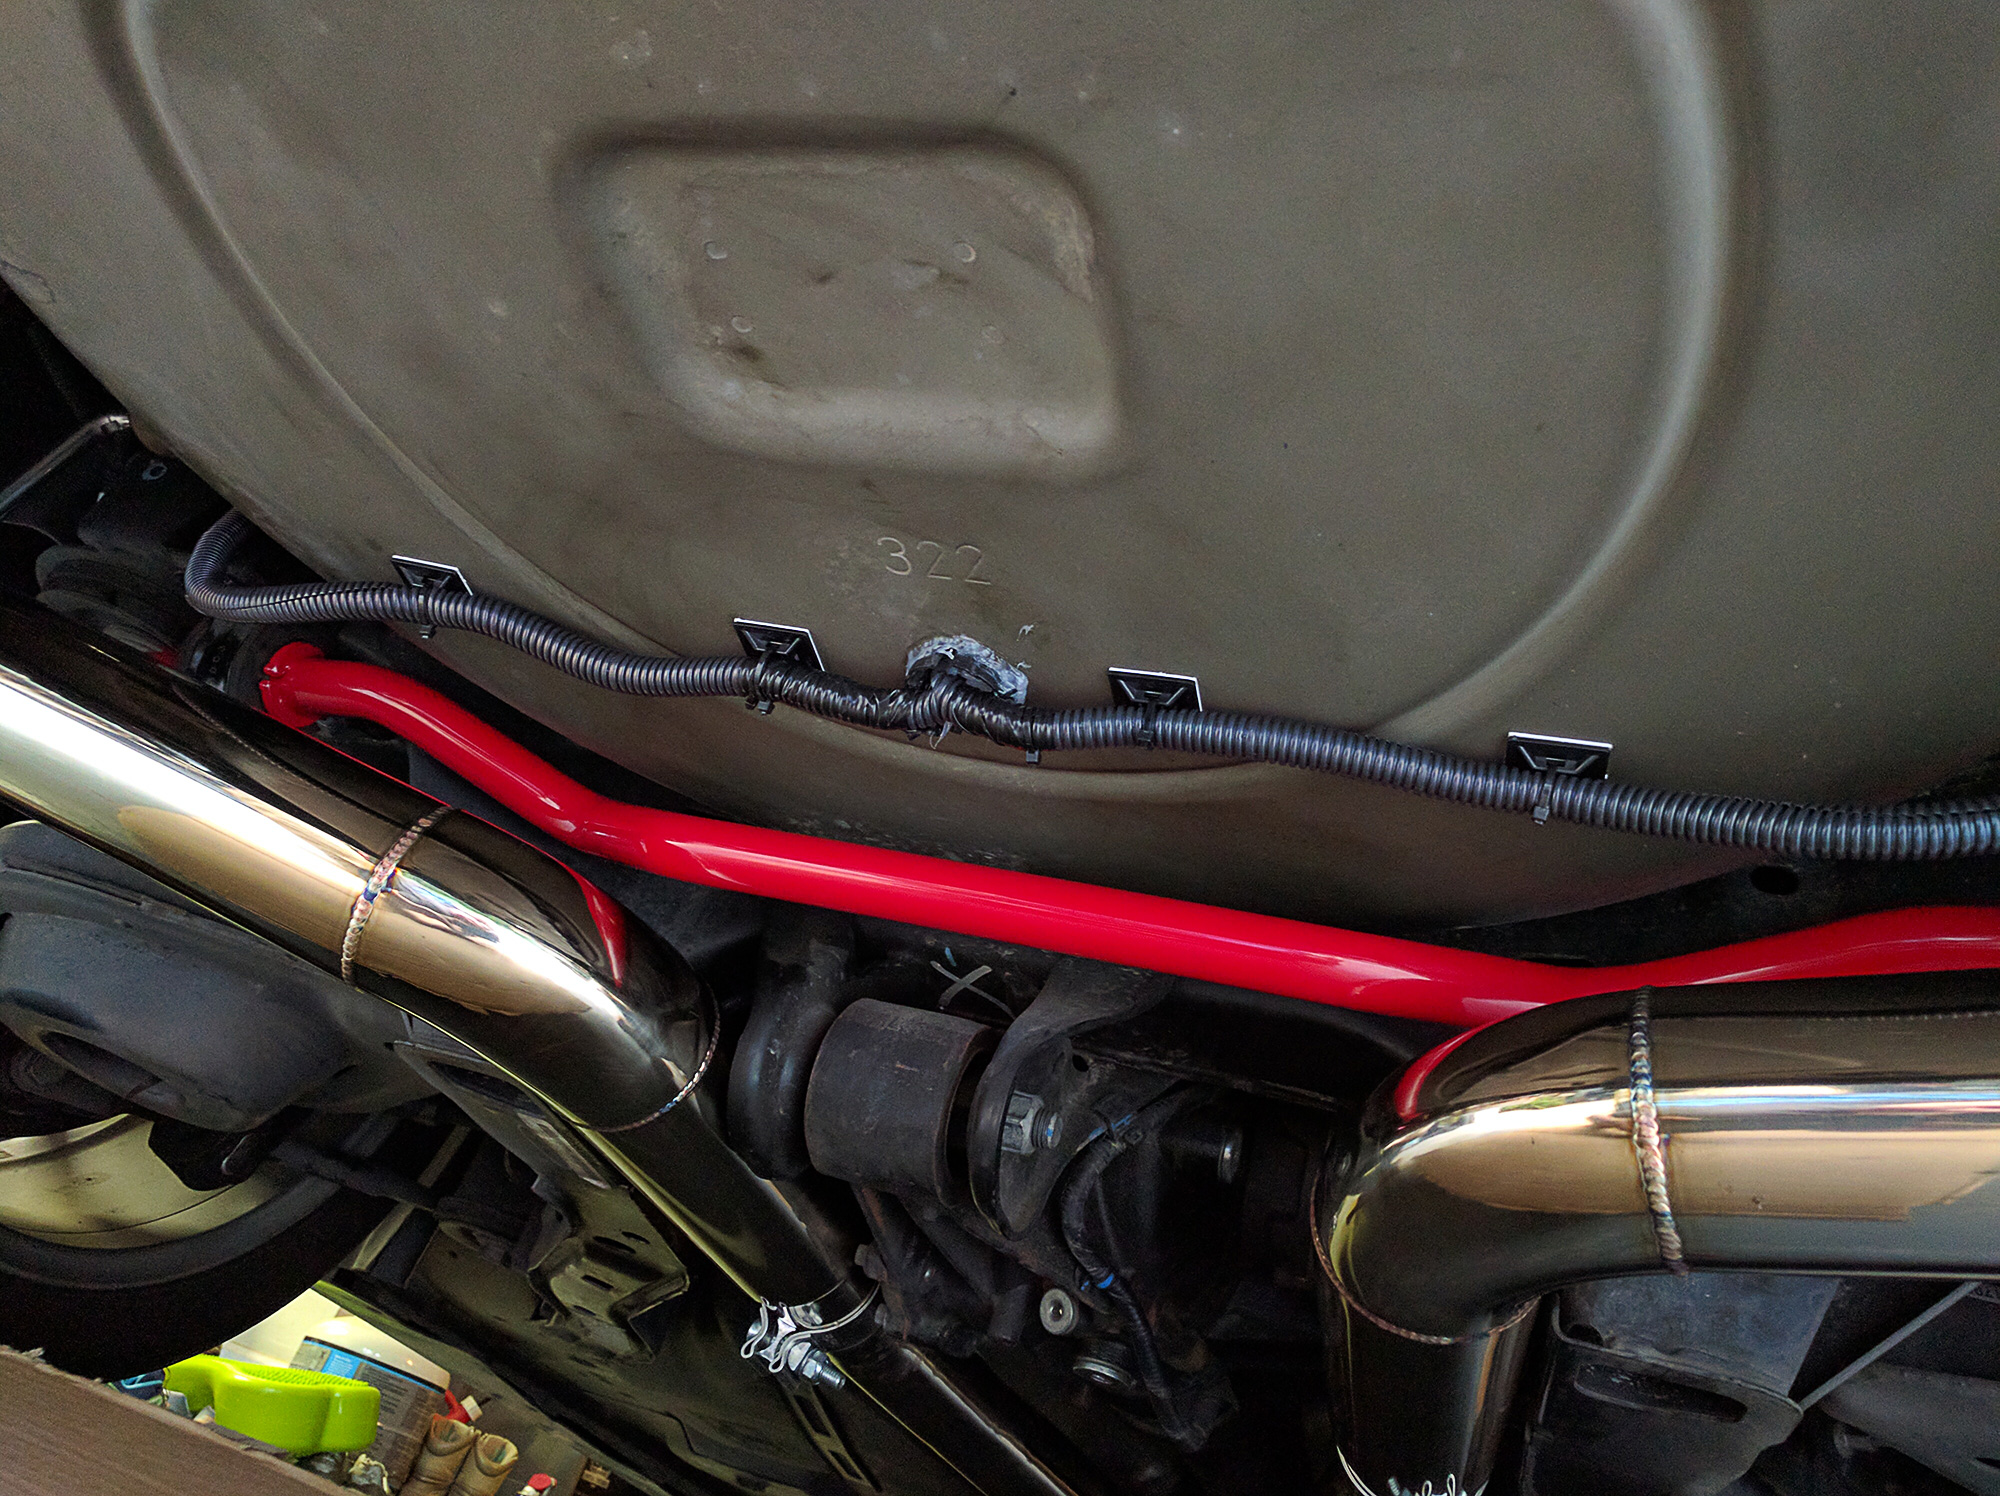
There are a few issues I am working out as far as fitment. Like I mentioned earlier the rear swats are very close to the exhaust but I have not seen any signs yet that they make contact at all and I have done plenty of hard launches after installing them them. The picture actually makes it look closer than it is. The gap is probably a good 1/2in or a little more.
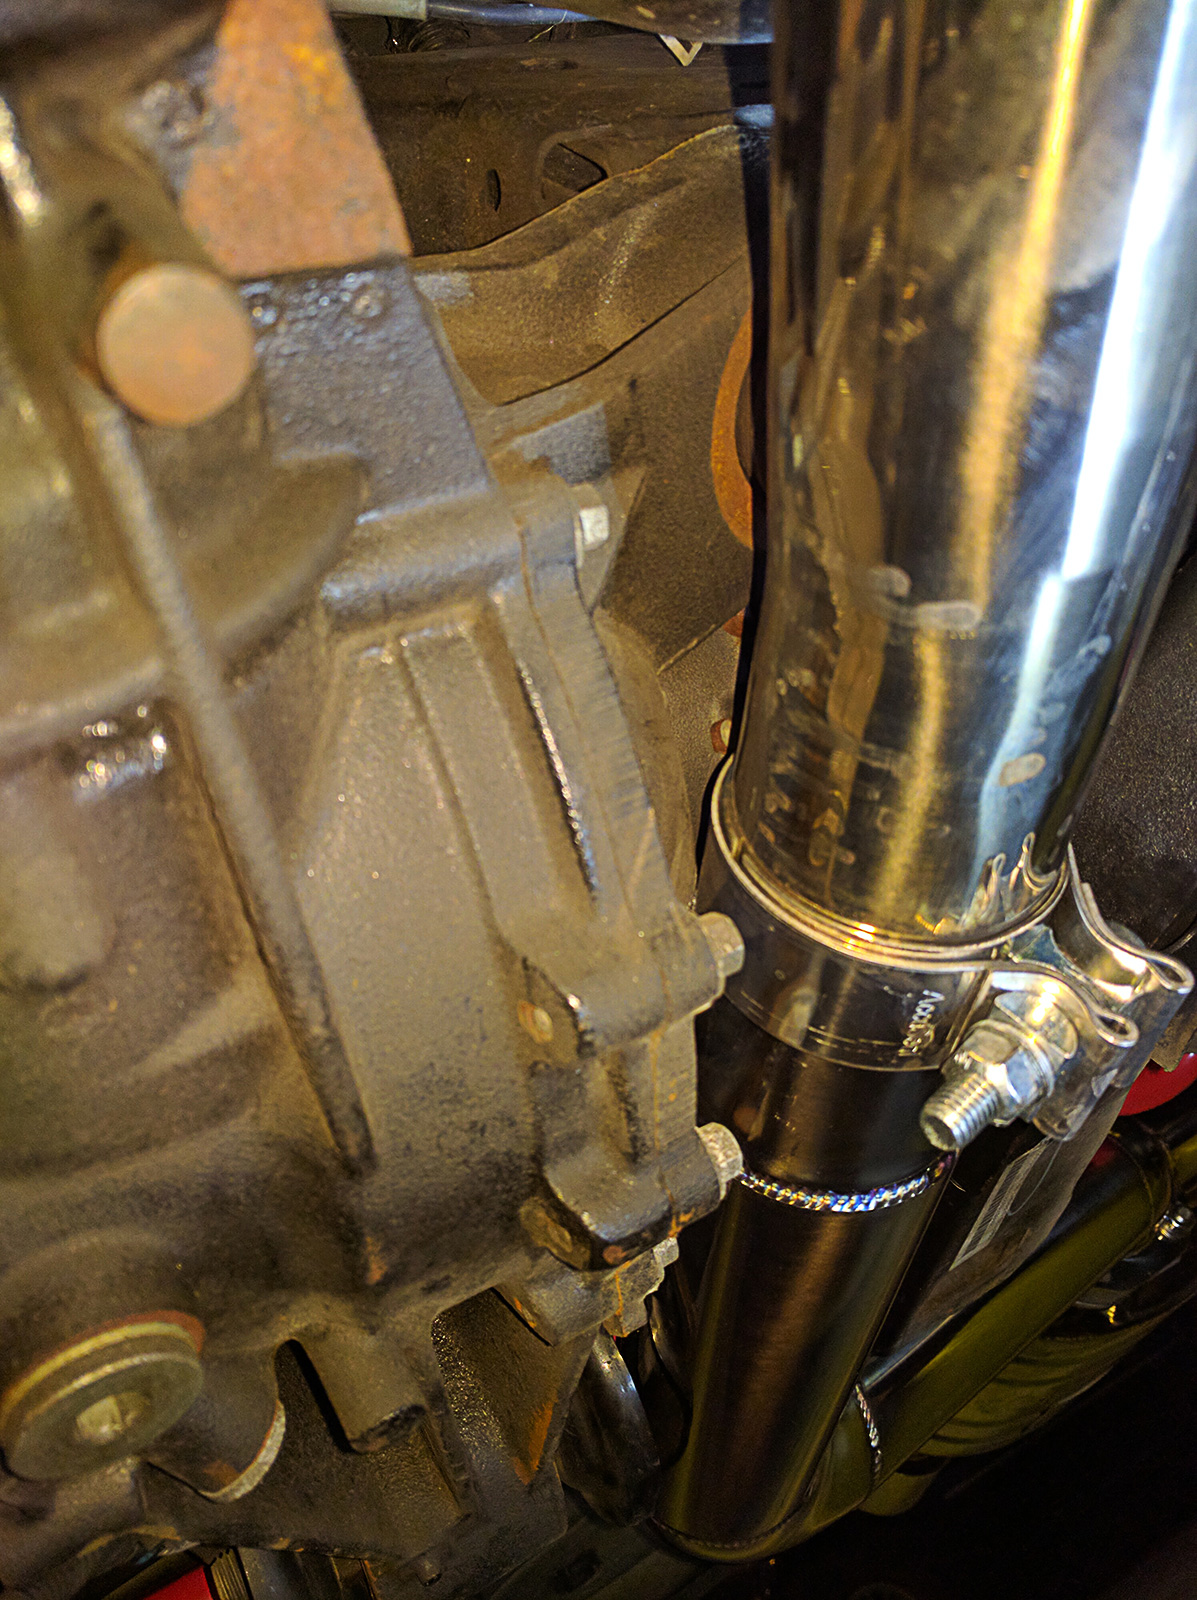
The bigger issues are the fact the rear muffler connector to the mid pipe is like 1/8in away from the rear diff. The rear hangers also make constant contact with the rear hanger mount. I think both of these issues would be solved if I could find some handers for the exhaust that are just 1/4in longer.

Also when I got under the car last night to check and make sure everything was still tight after two days of driving I noticed that I had some spray on the heat shield I had completely cleaned off. I am not exactly sure what is causing that but hopefully it will be a cheap and not expensive repair.
And lastly the most important part of a thread with a new exhaust some videos. I hope to get some driving videos soon but a buddy of mine is borrowing my GoPro so none of those yet. Idle and revving will have to do for now.
At 30 weeks to receive I have received custom one off carbon fiber parts for other cars quicker than this exhaust but it did finally show up.
The exhaust is a work of art. It almost should be hung on a wall it looks so good. They even badge each section of the exhaust with their name and car make and model.
The sway bars and new beefy adjustable endlinks to go with them.
Got a big piece of cardboard to move around and and also so I don't scratch up the new exhaust while installing it under the car.
Then got the car up on the stands and ready to go.
Tear down begins. I documented pretty much everything of the tear down but not much of putting it back together since you obvioiusly just reverse it.
Remove the under brace
Loosen but don't remove right away the bolts that hold the exhaust pipes on. This was also the first exhaust install I have done while having air and man did that make things so much faster.
If you have never removed an exhaust before be sure to get yourself a pair of these as they are a great tool to have to get the rubber hangers off the exhaust. I have had them since the first exhaust I ever did and they make like so easy.
Once you get the hangers off you can lower the exhaust down a little with a jack. don't drop it completely though till you remove the nuts will holding it on up front.
Then you can just slide it straight back nice and easily.
I had all sorts of grease and road dirty up on the heat shield above the driveshaft connection to the rear diff. I cleaned it up nice with having easy access with the exhaust off. We shall see if anything comes back which would mean I might have diff or driveshaft issues. Lets home not.
Moved onto the interior tear down for running the wires for the rear valves. Removed the rear floor cover. I love the little space below the main back floor on the wagon. It is so great for carrying all sorts of things for traveling you might need. I have a scissor jack, tire plug kit, breaker bar, torque wrench, a set of sockets, window cleaner, gloves, and a first aid kit in mine.
Remove the sub and the air compressor
Thanks to ruskiyab for some information on the tear out of the rear part of the wagon that I would need to remove to run the wires for the valves on the exhaust. Was a good help to know what I was getting into ahead of time.
Remove the side tie down rails. They use T40 torx bits.
Then remove the trim at the edge of the trunk opening. Also remove the two panel clips closest to you on the tub.
After that starting on the passenger side begin to remove the tub. You will need something to pry back the think molded carpet panels on the sides to get it out. When I removed mine I had a bit of a surprise. I had moisture down in and around the area of the tub. The padding on the back side of the tub was actually wet. So it was set out to bake in the sun for several hours before I put it back in later on so it would dry out.
The stock endlinks and rear sway to be removed.
Rear sway comparion. Most exhaust shouldn't be an issue I would imagine but with the valves built into the backside of the Meistershaft and the dual piping going into the muffler it gets awfully close with the extra the sway curves towards the back.
New endlinks and rear sway installed.
Once that was done I moved onto running the wires for the valves. There was a nice spot next to the amp to coil up the excess wire and then I wire loomed any wire that went behind other panels. The rear tub though fits snug enough that I left the loom off as it seem like it wouldn't sit right with it on.
Used some 3M double sided body tape to mount the wireless control box behind the fuse panel.
Little better view of how the wires tucked in once the tub was back in.
The wireless remote for the valves matches the Cadillac key pretty well.
The passenger side muffler went on super easy but for some reason the drivers so muffler just did not want to fit. It was an absolute pain to get it on. I think the rear issue is the exhaust could use hangers that are 1/4-3/8 in longer. No idea how I will find a set but I really need to find some.
They look and sound amazing on the car though. They also have the most adjustable exhaust tip I have ever sean on an exhaust. It allows you to adjust how far the tip sticks out as was as angle it a little to get it perfectly lined up and center. Very cool system.
I think finished running the wires to each of the valves safetly and in some wireloom. Then silicone sealed the whole I had drilled in the bottom plastic plug.
There are a few issues I am working out as far as fitment. Like I mentioned earlier the rear swats are very close to the exhaust but I have not seen any signs yet that they make contact at all and I have done plenty of hard launches after installing them them. The picture actually makes it look closer than it is. The gap is probably a good 1/2in or a little more.
The bigger issues are the fact the rear muffler connector to the mid pipe is like 1/8in away from the rear diff. The rear hangers also make constant contact with the rear hanger mount. I think both of these issues would be solved if I could find some handers for the exhaust that are just 1/4in longer.
Also when I got under the car last night to check and make sure everything was still tight after two days of driving I noticed that I had some spray on the heat shield I had completely cleaned off. I am not exactly sure what is causing that but hopefully it will be a cheap and not expensive repair.
And lastly the most important part of a thread with a new exhaust some videos. I hope to get some driving videos soon but a buddy of mine is borrowing my GoPro so none of those yet. Idle and revving will have to do for now.
The following 6 users liked this post by CCColtsicehockey:
00TL-P3.2 (10-03-2016),
fsttyms1 (10-05-2016),
juniorbean (10-04-2016),
Majofo (10-03-2016),
rockstar143 (10-03-2016),
and 1 others liked this post.
The following users liked this post:
CCColtsicehockey (10-03-2016)
10-03-2016, 09:04 AM
#1140
wow, you went all out... that is a f'in baller exhaust... i couldn't touch that... i'd like to, but daymn the price tag... the quality is amazing though... i always wondered though how the EV worked on the dual pipe setup into the muffler...
does it drone at all?
does it drone at all?
The following users liked this post:
CCColtsicehockey (10-03-2016)
10-03-2016, 09:14 AM
#1141
Chapter Leader (Southern Region)
open dem valves up!!
also.. I'm not one bit jealous.

also.. I'm not one bit jealous.
10-03-2016, 09:21 AM
#1143
Chapter Leader (Southern Region)
 10-03-2016, 09:38 AM
#1144
Chapter Leader (Southern Region)
 10-03-2016, 09:57 AM
#1145
Moderator
Regional Coordinator (Southeast)
Regional Coordinator (Southeast)
Thread Starter
Join Date: Dec 2003
Location: Mooresville, NC
Age: 38
Posts: 43,640
Received 3,860 Likes
on
2,580 Posts
^ I hate when that shit happens too 
10-03-2016, 10:02 AM
#1146
Moderator
Regional Coordinator (Southeast)
Regional Coordinator (Southeast)
Thread Starter
Join Date: Dec 2003
Location: Mooresville, NC
Age: 38
Posts: 43,640
Received 3,860 Likes
on
2,580 Posts
The valves are open in the video

I am hoped to get it all fully done and then go out for dinner with the exhaust valves closed. Then I was going to open them up before starting the car up to go home from dinner. Unfortunately that part of the plan got ruined. I think it would have been hilarious had it worked out as planned though.
The following users liked this post:
fsttyms1 (10-05-2016)
10-03-2016, 10:22 AM
#1147
Chapter Leader (Southern Region)
Really.. sounds so refined. Does it dump outside of the muffler or passthrough?
10-03-2016, 10:33 AM
#1149
Chapter Leader (Southern Region)
no wonder.. I was like.. that muffler aggressive AF. 
sounds great colts.. I'm sure it's $$$$
sounds great colts.. I'm sure it's $$$$
10-03-2016, 10:40 AM
#1150
Moderator
Regional Coordinator (Southeast)
Regional Coordinator (Southeast)
Thread Starter
Join Date: Dec 2003
Location: Mooresville, NC
Age: 38
Posts: 43,640
Received 3,860 Likes
on
2,580 Posts
In this pictures you can kind of see how it work. You can see the main large 3in entry into the muffler and right where that goes into the muffler is where the valve is. When the valve is closed nothing goes down the middle of the muffler and it is instead pushed to the left in the smaller pipe down the sides of the muffler and through some baffles. I am sure air still does down that side as well when you open the valve cause air will fill every spot it can but a majority will take the straight shot out the back once opened. At idle with the valves closed it sounds like the car is barely on and just like stock.
10-03-2016, 10:41 AM
#1151
Moderator
Regional Coordinator (Southeast)
Regional Coordinator (Southeast)
Thread Starter
Join Date: Dec 2003
Location: Mooresville, NC
Age: 38
Posts: 43,640
Received 3,860 Likes
on
2,580 Posts
Funny thing about the valves. They are QTP valves.

 10-03-2016, 12:44 PM
#1154
Moderator
Regional Coordinator (Southeast)
Regional Coordinator (Southeast)
Thread Starter
Join Date: Dec 2003
Location: Mooresville, NC
Age: 38
Posts: 43,640
Received 3,860 Likes
on
2,580 Posts
10-03-2016, 01:13 PM
#1155
this was the prototype... dunno what might have changed... but if you don't have the clamp, maybe that is the source of your fitment issue... the clamp helps you adjust how the pipe lines up to the muffler and how it will sit once everything is tightened down...
in the latest version, you should NOT have the pipes crushed near the x where it sits above the crossbrace... (driver side IIRC)
in the latest version, you should NOT have the pipes crushed near the x where it sits above the crossbrace... (driver side IIRC)
10-03-2016, 01:13 PM
#1156
Suzuka Master
iTrader: (1)
Congrats on the sierra hotel exhaust system.
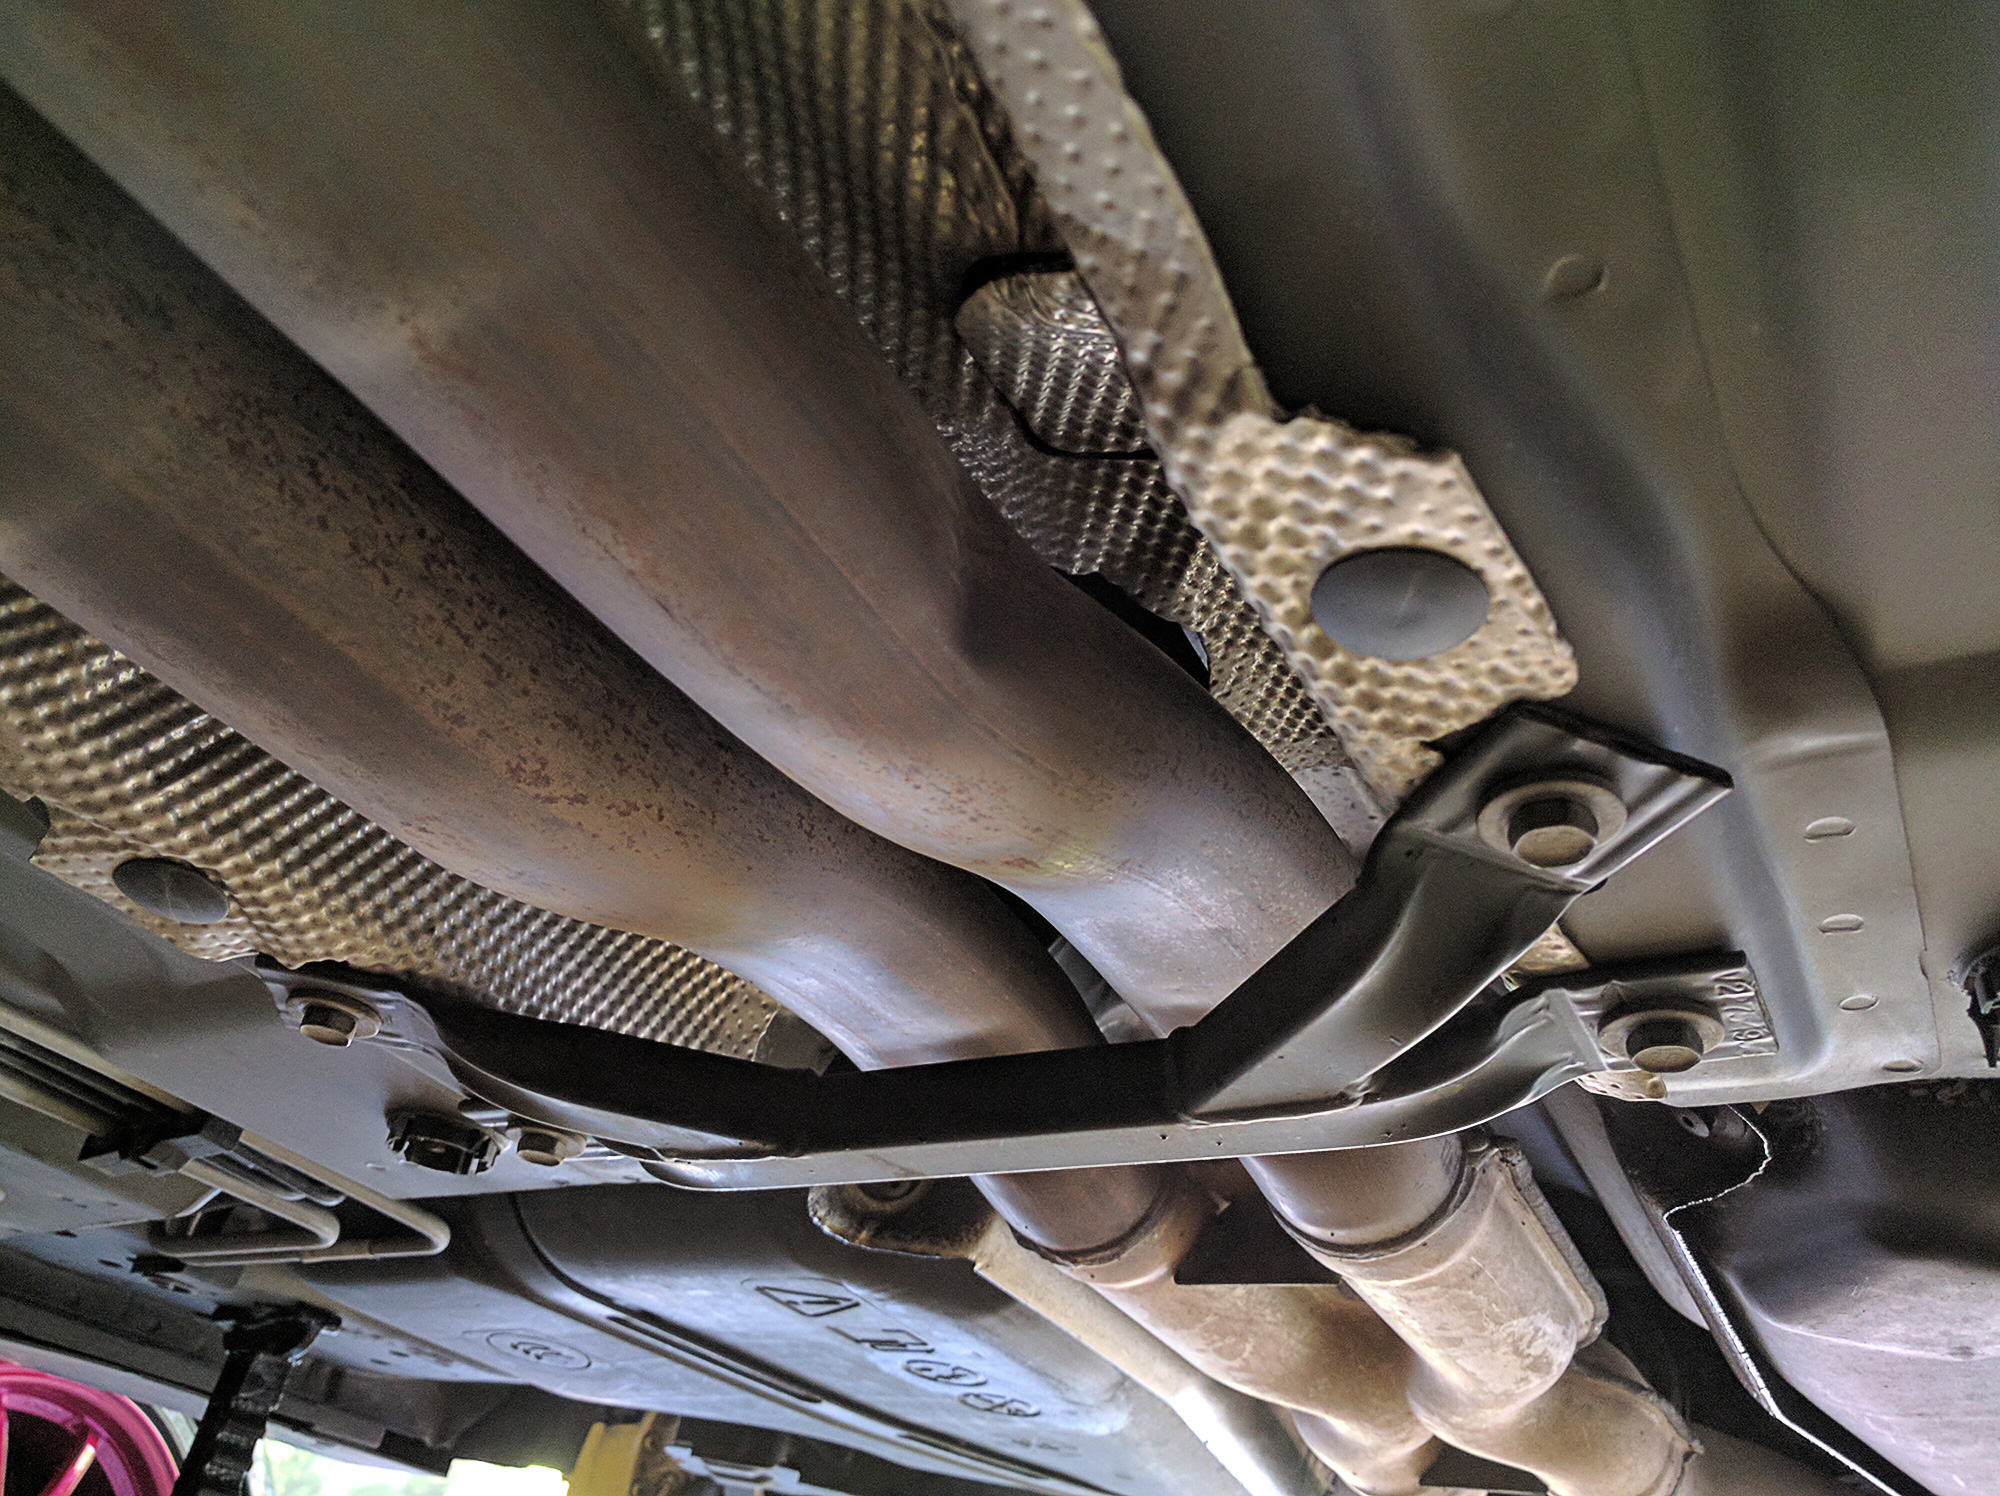
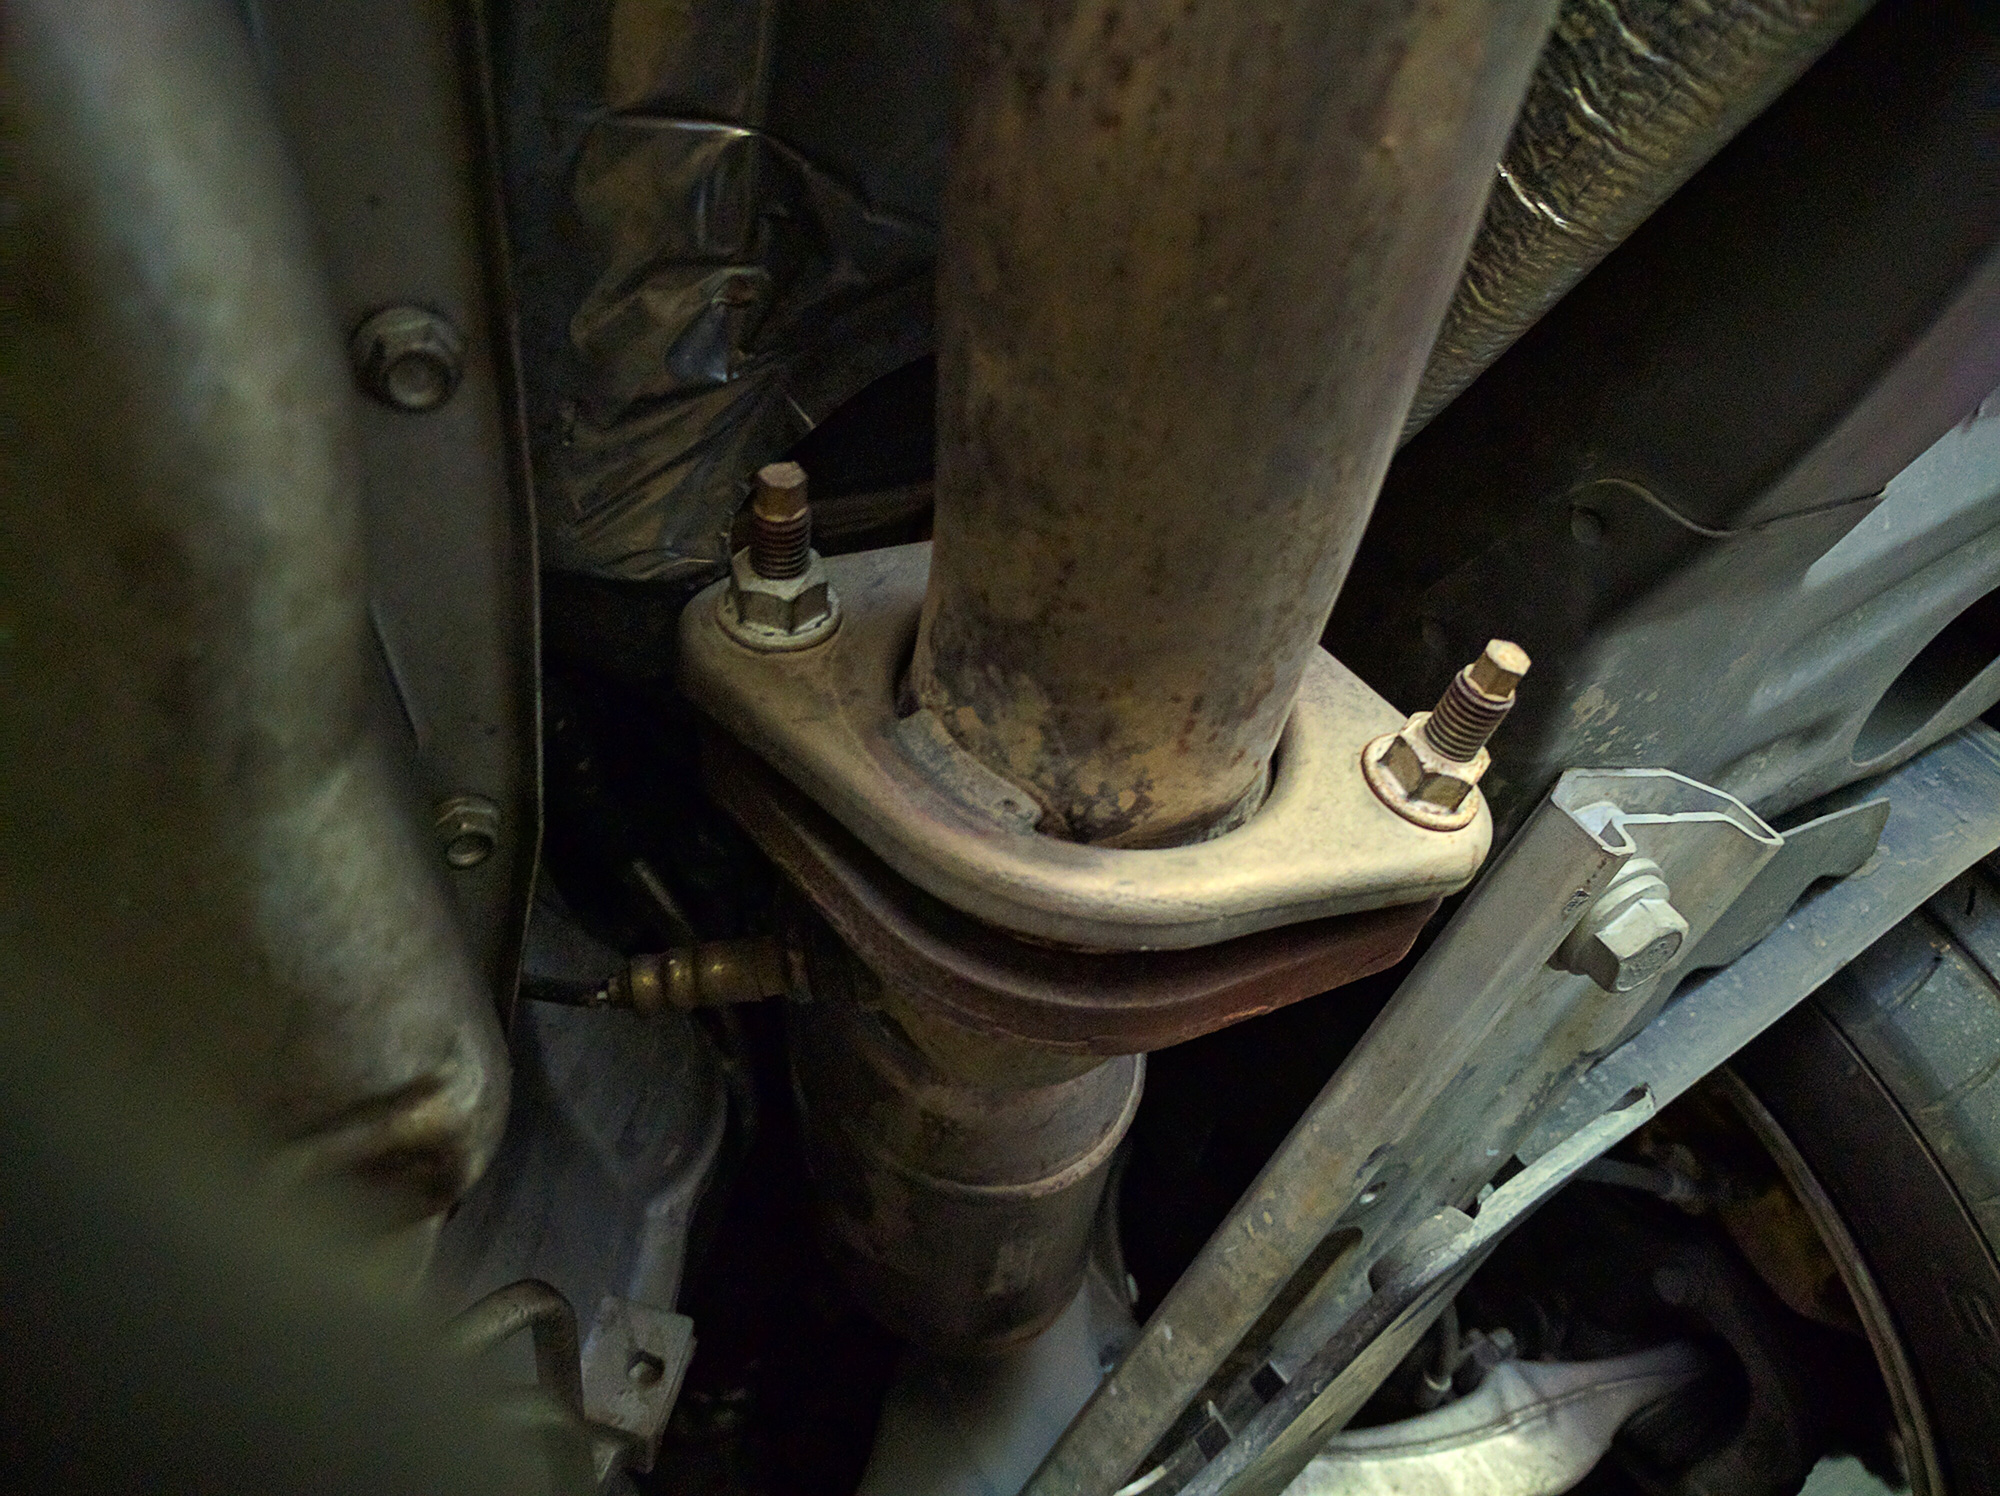
Quick question, while you were under there, did you happen to try and tighten those fasteners to see if they had any give? It's a little difficult to determine exactly by the picture above; however, compared to the prior pics posted on page 28, it appears that the residual slinging is 1) occurring at the bolt heads and 2) at the line of the coupler nearer to the bolt ends?
I spent an hour trying to find a GM parts blow-up diagram of that particular diff. coupler(?) part to get a better visual understanding of the construction/engineering of it to no avail. In addition, it is strange that there is no noticeable residue on the part. One would think some would be present to give a better confirmation/indication; however, the high velocity that that thing spins may explain it.
Quick question, while you were under there, did you happen to try and tighten those fasteners to see if they had any give? It's a little difficult to determine exactly by the picture above; however, compared to the prior pics posted on page 28, it appears that the residual slinging is 1) occurring at the bolt heads and 2) at the line of the coupler nearer to the bolt ends?
I spent an hour trying to find a GM parts blow-up diagram of that particular diff. coupler(?) part to get a better visual understanding of the construction/engineering of it to no avail.
In addition, it is strange that there is no noticeable residue on the part. One would think some would be present to give a better confirmation/indication; however, the high velocity that that thing spins may explain it.
10-03-2016, 01:27 PM
#1157
Moderator
Regional Coordinator (Southeast)
Regional Coordinator (Southeast)
Thread Starter
Join Date: Dec 2003
Location: Mooresville, NC
Age: 38
Posts: 43,640
Received 3,860 Likes
on
2,580 Posts
Congrats on the sierra hotel exhaust system.
Quick question, while you were under there, did you happen to try and tighten those fasteners to see if they had any give? It's a little difficult to determine exactly by the picture above; however, compared to the prior pics posted on page 28, it appears that the residual slinging is 1) occurring at the bolt heads and 2) at the line of the coupler nearer to the bolt ends?
I spent an hour trying to find a GM parts blow-up diagram of that particular diff. coupler(?) part to get a better visual understanding of the construction/engineering of it to no avail. In addition, it is strange that there is no noticeable residue on the part. One would think some would be present to give a better confirmation/indication; however, the high velocity that that thing spins may explain it.
Quick question, while you were under there, did you happen to try and tighten those fasteners to see if they had any give? It's a little difficult to determine exactly by the picture above; however, compared to the prior pics posted on page 28, it appears that the residual slinging is 1) occurring at the bolt heads and 2) at the line of the coupler nearer to the bolt ends?
I spent an hour trying to find a GM parts blow-up diagram of that particular diff. coupler(?) part to get a better visual understanding of the construction/engineering of it to no avail.
In addition, it is strange that there is no noticeable residue on the part. One would think some would be present to give a better confirmation/indication; however, the high velocity that that thing spins may explain it. I think I had read somewhere on ctsv forum that there are two rubber seals inside that coupler along with a set of ball bearings packed with grease. I also could not find any type of diagram to show that though. I am wondering if that is where my grinding noise might be coming from as maybe there is not much grease left inside anymore.
Definitely strange there is no signs of it leaking though as I have tried wiping all around it with a clean white towel once I saw the splatter and got nothing on the rag at all.
10-03-2016, 01:37 PM
#1158
Suzuka Master
iTrader: (1)
I did try and tighten them while I had the old exhaust off the car. I could not get any of them to budge while I was under the car with the large allen key set I have. Only thing I did not try was using my socket allen keys with my impact gun to see if they would budge.
I think I had read somewhere on ctsv forum that there are two rubber seals inside that coupler along with a set of ball bearings packed with grease. I also could not find any type of diagram to show that though. I am wondering if that is where my grinding noise might be coming from as maybe there is not much grease left inside anymore.
10-03-2016, 02:00 PM
#1159
Moderator
Regional Coordinator (Southeast)
Regional Coordinator (Southeast)
Thread Starter
Join Date: Dec 2003
Location: Mooresville, NC
Age: 38
Posts: 43,640
Received 3,860 Likes
on
2,580 Posts
Thanks for the link. I was able to find the diagram. Seems crazy though you can't buy the parts for it though.
10-03-2016, 02:06 PM
#1160
Suzuka Master
iTrader: (1)
One other thing I noticed in regards to your latest diff picture is it appears that the 'light' ring, on the middle piece, proximate to the allen bolt head side, may be a 'witness mark' indicating that the coupler assembly MAY have been disassembled at some point? The picture is slightly out of focus so its hard to differentiate exactly. Just thought I'd throw that out there for analysis.
^
I take back the 'witness mark' comment, a closer look reveals what I was referring to is the lip of that coupler.
Last edited by zeta; 10-03-2016 at 02:12 PM.