
Post Processing Thread
 08-02-2011 | 10:26 AM
#1

Thread Starter
Suzuka Master
Joined: Sep 2007
Posts: 5,993
Likes: 8
Post Processing Thread
Would anyone be interested in some kind of post processing contest? Doesn't have to be a contest really, but I think it would be interesting to share one raw file and see all the different variations of the file in pp that people post. Thoughts?
08-02-2011 | 11:46 AM
#4
Suzuka Master
Joined: Oct 2001
Posts: 6,498
Likes: 53
From: Trumbull, CT
If it becomes a contest rather then just posting results, would anything be game? HDR, B&W, simple Sharpening, really anything? Either way should make for a really interesting thread. We always see the after pics, and while some of us may understand how the image has been improved on, others that are newer to photography may not. It would be cool for them to see what can be done after the fact. I like the idea
Trending Topics

 08-02-2011 | 05:59 PM
#11
Racer
Joined: Jul 2006
Posts: 454
Likes: 9
From: Cen Cal
It's tough for a photog to post a RAW pic but wouldn't mind doing it once I get home. That's if nobody has posted one already. Guessing the pic will be an attachment due to it's file size? Anyone know the size limit for attachments?
08-02-2011 | 06:30 PM
#14
Drifting
Joined: Jun 2004
Posts: 2,751
Likes: 267
From: florida
08-02-2011 | 06:50 PM
#16
Thread Starter
Suzuka Master
Joined: Sep 2007
Posts: 5,993
Likes: 8
Raw file
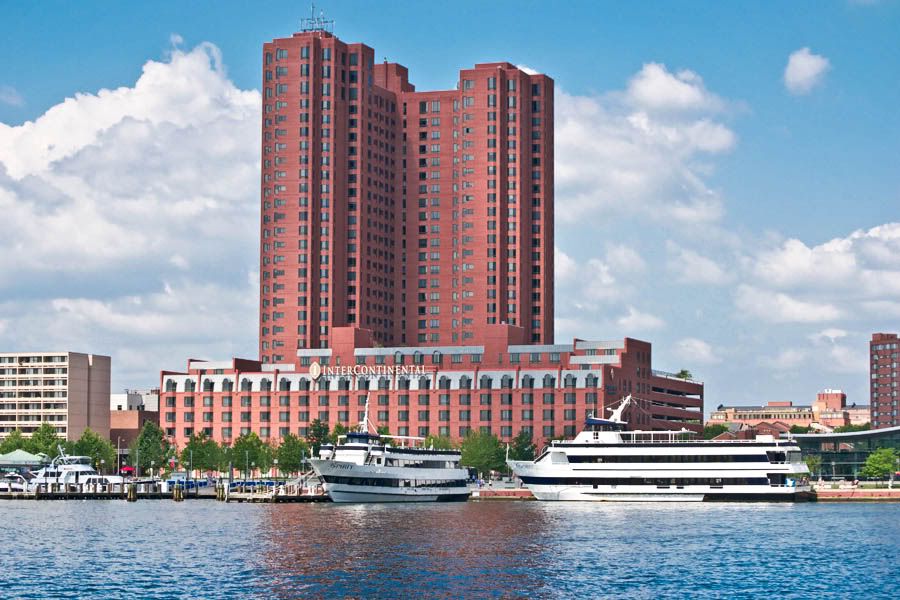
This is actually the picture that made me think about this. I could never get this photo to where I liked it. I am interested to see how this turns out. It's not a great photo, and if anyone wants to post another one instead, that's fine.
This is actually the picture that made me think about this. I could never get this photo to where I liked it. I am interested to see how this turns out. It's not a great photo, and if anyone wants to post another one instead, that's fine.
08-02-2011 | 06:53 PM
#17
Senior Moderator
Joined: Mar 2002
Posts: 59,009
Likes: 11,000
From: Chicago
btw I personally don't see any reason why this needs to be a 'contest'. I mean, I don't think we are out to see who is the "best" at post-processing - rather, I think we just want to see each of our own versions of the same shot and appreciate each one for what it is.
we should agree on a standard image size, though. I would suggest something like 900px.
we should agree on a standard image size, though. I would suggest something like 900px.
The following users liked this post:
wndrlst (08-02-2011)
08-02-2011 | 06:56 PM
#18
Drifting
Joined: Jun 2004
Posts: 2,751
Likes: 267
From: florida
 08-02-2011 | 07:31 PM
#19
Racer
Joined: Jul 2006
Posts: 454
Likes: 9
From: Cen Cal
btw I personally don't see any reason why this needs to be a 'contest'. I mean, I don't think we are out to see who is the "best" at post-processing - rather, I think we just want to see each of our own versions of the same shot and appreciate each one for what it is.
we should agree on a standard image size, though. I would suggest something like 900px.
we should agree on a standard image size, though. I would suggest something like 900px.

 08-02-2011 | 09:17 PM
#21
Pro
Joined: Jan 2002
Posts: 627
Likes: 74
From: Elkridge, Maryland
I'll take a stab at it.
Used Photoshop CS5 with Topaz plugin "Adjust". Played with exposure, contrast, saturation, sharpening and noise reduction. Cropped then re-sized to 1024 on longest side.
[IMG]<a href="http://s33.photobucket.com/albums/d57/Ken_from_MD/kens%20random%20pics/?action=view&current=hotel_1024.jpg" target="_blank"><img src="http://i33.photobucket.com/albums/d57/Ken_from_MD/kens%20random%20pics/hotel_1024.jpg" border="0" alt="Photobucket"></a>[/IMG]
The following users liked this post:
wndrlst (08-02-2011)
08-02-2011 | 09:53 PM
#25
Earth-bound misfit
Joined: Mar 2006
Posts: 31,704
Likes: 608
Here's mine. 
Adobe Camera Raw:
Corrected some minor lens distortion/tilt
Cropped slightly to account for distortion correction and to move buildings slightly off center to balance large boat anchoring image on the lower right
Minor highlight recovery and noise reduction
Warmed it up slightly to make it feel like a sunny day
PS:
Copy background layer
Curve #1 brighten mid-tones & increase blacks - mask out sky & most of water
Curve #2 linear
Curve #3 pull down midtones and increase blacks - mask everything but sky & some water
Multiply background layer and mask out buildings & boats/ smooth gradient to sky & water until happy
Hue/Saturation - blue channel - increase saturation/decrease lightness.
Looking at it, I maybe should have adjusted the hue a tad, too, but that's my quick & dirty.
<a href="http://www.flickr.com/photos/moxiephotos/6004186180/" title="Q1011-20110802.jpg by MoxiePhotos, on Flickr"><img src="http://farm7.static.flickr.com/6121/6004186180_236a7860ec_b.jpg" width="1024" height="683" alt="Q1011-20110802.jpg"></a>
Last edited by wndrlst; 08-02-2011 at 09:55 PM. Reason: forgot a step!
 fanboy.
08-02-2011 | 10:38 PM
fanboy.
08-02-2011 | 10:38 PM
#28
Racer
Joined: Jul 2006
Posts: 454
Likes: 9
From: Cen Cal
My computer almost locked me out thinking someone stole it and uploaded a Nikon image. 
Here's my rendering of it. Done in both Aperture and CS3.
-blue hue boost
-red hue boost
-brightness boost
-shadow boost
-highlights boost
-sharpening boost
-subtle vignette
BEFORE

AFTER

Here's my rendering of it. Done in both Aperture and CS3.
-blue hue boost
-red hue boost
-brightness boost
-shadow boost
-highlights boost
-sharpening boost
-subtle vignette
BEFORE
AFTER
 08-02-2011 | 11:59 PM
#32
Senior Moderator
Joined: Mar 2002
Posts: 59,009
Likes: 11,000
From: Chicago
- bumped saturation and vibrance to 90 in LR to give more color separation
- tweaked one of the Silver Efex presets
- cleaned up sky to get rid of artifacting produced from the b/w conversion
- NR to get rid of noise from b/w conversion
(beautiful shot to begin with, btw.)
zSNpk.jpg
- tweaked one of the Silver Efex presets
- cleaned up sky to get rid of artifacting produced from the b/w conversion
- NR to get rid of noise from b/w conversion
(beautiful shot to begin with, btw.)
zSNpk.jpg
08-03-2011 | 12:29 AM
#33
Camera RAW:
WB to daylight
Clarity to +72
Vibrance to +43
PS
Crop so building is in center of left 3rd
Color balance layer....Cool midtones and shadows. Cyan -8, Blue +13. Warm hightlghts...Red +11, yellow -12
Hue/Saturation Layer....saturation to +30
Magic wand the blue part of the sky and set vibrance to +40
http://www.flickr.com/photos/sho_nuff1997/6004554206/http://www.flickr.com/photos/sho_nuff1997/6004554206/ by http://www.flickr.com/people/sho_nuff1997/, on Flickr
http://www.flickr.com/photos/sho_nuff1997/6004552276/http://www.flickr.com/photos/sho_nuff1997/6004552276/ by http://www.flickr.com/people/sho_nuff1997/, on Flickr
 08-03-2011 | 12:06 PM
#37
Senior Moderator
Joined: Mar 2002
Posts: 59,009
Likes: 11,000
From: Chicago


 08-03-2011 | 02:53 PM
#40
nnInn
Joined: Mar 2006
Posts: 37,670
Likes: 1,084
I made numerous masking layers to either lighten, brighten, strengthen structure or smooth out structure. No darken was made, it was too dark. Though whites on the ships were blown out. Had to bring that down without loosing the structure with them.
I wanted to crop out the building on the right, but that put the hotel in the middle of the image killing the rule of thirds.
I wanted to crop out the building on the right, but that put the hotel in the middle of the image killing the rule of thirds.