
Shock sensor installed. Here is the template.


Thread Starter
Retired. Not available.
Joined: Apr 2001
Posts: 2,828
Likes: 2
From: Houston, TX
Shock sensor installed. Here is the template.
First, I'd like to thanks Mr TL for posting the instruction in the TL forum. Then as always the HELM manual (actually Honda publisher) for providing the information that I needed.
Sorry, spiroh and NOVAwhiteTypeS. I just couldn't wait so I did it this morning.
Here it is.
Tools: philips screw driver, 10mm socket and raquet.
Part:
* shock sensor ($15). you can get it from Best Buy ($40) or local car stereo/alarm shops (cheaper).
* Female prong (connector). you can get it from Autozone, Radioshack for about $2-$3/dozen.
Time: 1 hr (max).
Difficulty: (1-10) 5
Procedure:
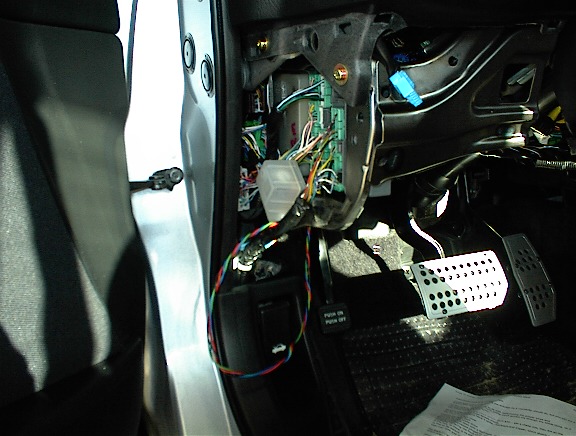
First you need to remove marked screw and bolt in the below pic. Then pull the under dash piece down to remove it.

Unplug all the front harnesses (You'll need to reset your seat position memory when you're done). Push the fuse/relay box toward the passenger side, turn it side way and pull it out little so you can see the marked harness. This is the hardest part.

On the shock sensor, there are 3 wires (instant trigger) or 4 wires (dual-stage trigger). Connect the black wire (sensor) to the black wire(harness) and green wire (green/blue for dual-stage) (sensor) to yellow wire (harness). Put the fuse/relay box back to its original position. NOTE: I didn't mention the silver dots since every wire in the car has silver dots on them.
Connect the female prong to the end of the red wire. then connect it to the second for the left empty harness on the bottom row on the back side of the fuse/relay box as in the pic. The slot is marked "U"

Find a place not to sturdy to mount your shock sensor. I placed it in the wire mess below the fuse box on the side that faces the fuse box cover. NOTE: if you secure the sensor on a hard surface, it would take a very hard impact to trigger the sensor.
Arm the alarm, wait 30sec (the HELM manual states the system arms immediately but not in my case) then hit the glass (do not break it ) it should trigger the factory alarm. Adjust the sensitivity to your liking. When you finish, place the under dash piece back, put the screw and the bolt back. DONE.
Good luck.
Sorry, spiroh and NOVAwhiteTypeS. I just couldn't wait so I did it this morning.
Here it is.
Tools: philips screw driver, 10mm socket and raquet.
Part:
* shock sensor ($15). you can get it from Best Buy ($40) or local car stereo/alarm shops (cheaper).
* Female prong (connector). you can get it from Autozone, Radioshack for about $2-$3/dozen.
Time: 1 hr (max).
Difficulty: (1-10) 5
Procedure:
First you need to remove marked screw and bolt in the below pic. Then pull the under dash piece down to remove it.
Unplug all the front harnesses (You'll need to reset your seat position memory when you're done). Push the fuse/relay box toward the passenger side, turn it side way and pull it out little so you can see the marked harness. This is the hardest part.
On the shock sensor, there are 3 wires (instant trigger) or 4 wires (dual-stage trigger). Connect the black wire (sensor) to the black wire(harness) and green wire (green/blue for dual-stage) (sensor) to yellow wire (harness). Put the fuse/relay box back to its original position. NOTE: I didn't mention the silver dots since every wire in the car has silver dots on them.
Connect the female prong to the end of the red wire. then connect it to the second for the left empty harness on the bottom row on the back side of the fuse/relay box as in the pic. The slot is marked "U"
Find a place not to sturdy to mount your shock sensor. I placed it in the wire mess below the fuse box on the side that faces the fuse box cover. NOTE: if you secure the sensor on a hard surface, it would take a very hard impact to trigger the sensor.
Arm the alarm, wait 30sec (the HELM manual states the system arms immediately but not in my case) then hit the glass (do not break it
) it should trigger the factory alarm. Adjust the sensitivity to your liking. When you finish, place the under dash piece back, put the screw and the bolt back. DONE.Good luck.


Burning Brakes
Joined: Apr 2001
Posts: 779
Likes: 0
From: NJ
I found the TL message on this: http://www.acura-tl.com/forum/showth...ighlight=alarm
Anyone with thoughts on a good shock sensor (brand / model number / price)?
From these messages, looks like you should go with a mechanical shock sensor (not digital). And go with a single stage, not dual stage.
If I have this right, the black on the sensor to tap into the black on this harness,
and the yellow(or green) on the sensor to the yellow on the harness,
the red wire gets a connector and plugs into an empty slot somewhere.
Maybe it makes more sense when you have the car apart?
Trending Topics
Thread Starter
Retired. Not available.
Joined: Apr 2001
Posts: 2,828
Likes: 2
From: Houston, TX
Originally posted by rwwlaw:
<STRONG>More detail would help. Like what wires go where.
Thanks</STRONG>
<STRONG>More detail would help. Like what wires go where.
Thanks</STRONG>
Thread Starter
Retired. Not available.
Joined: Apr 2001
Posts: 2,828
Likes: 2
From: Houston, TX
Originally posted by fast_daddy_car:
<STRONG>I found the TL message on this: http://www.acura-tl.com/forum/showthread.php?s=e81ac9a7a5d554fabf 29fb6a0e47f917&threadid=6578&highlight=alarm
Anyone with thoughts on a good shock sensor (brand / model number / price)?
From these messages, looks like you should go with a mechanical shock sensor (not digital). And go with a single stage, not dual stage.
If I have this right, the black on the sensor to tap into the black on this harness,
and the yellow(or green) on the sensor to the yellow on the harness,
the red wire gets a connector and plugs into an empty slot somewhere.
Maybe it makes more sense when you have the car apart?</STRONG>
about the wire colors,
Sensor Harness
green Yellow
blue yellow (optional)
black black
Red specified empty harness slot (not just somewhere)
single or dual is the same thing. dual has an extra wire for warning trigger. you have the choice of not using it.
I think you got the mechanical and electronic confused. the mentioned electronic in the post is Clifford's which has more wire so the brain can commnunicate and change the setting. The one I used is electronic but not that type. beside I hate the spring type ... it looks cheap and over time it rusts (seen it).

Thread Starter
Retired. Not available.
Joined: Apr 2001
Posts: 2,828
Likes: 2
From: Houston, TX
Originally posted by mr tl:
<STRONG>nice pictures
you ended up removing the fuse box...i didnt think of that</STRONG>
<STRONG>nice pictures
you ended up removing the fuse box...i didnt think of that</STRONG>
Sorry guys, I posted the wrong link for the last pic. It's fixed now.
[ 07-08-2001: Message edited by: SilverKnight ]
Thread Starter
Retired. Not available.
Joined: Apr 2001
Posts: 2,828
Likes: 2
From: Houston, TX
Originally posted by fast_daddy_car:
<STRONG>Is there only one Clifford shock sensor, or is there a certain part number I should get?</STRONG>
<STRONG>Is there only one Clifford shock sensor, or is there a certain part number I should get?</STRONG>
Thread Starter
Retired. Not available.
Joined: Apr 2001
Posts: 2,828
Likes: 2
From: Houston, TX
Originally posted by rwwlaw:
<STRONG>Sorry, What colors go to which wires? Did you splice and solder?
Thanks</STRONG>
<STRONG>Sorry, What colors go to which wires? Did you splice and solder?
Thanks</STRONG>
Thread Starter
Retired. Not available.
Joined: Apr 2001
Posts: 2,828
Likes: 2
From: Houston, TX
Originally posted by spiroh:
<STRONG>Can you post a pic of the female prong, or are they all the same size?
Spiro</STRONG>
<STRONG>Can you post a pic of the female prong, or are they all the same size?
Spiro</STRONG>

Drifting
Joined: Nov 2000
Posts: 3,373
Likes: 0
From: Chicago, IL USA
SK,
Thanks for all your help. The reason why I needed the schematics for the alternator i because I will be installing the pulleys on my own. So far so good with the audio project. I spliced the wires on the deck, and installed the new components in the doors. I still have to run rcas to the back of the car, and I should be done. I ran into an issue. My EQ that I bought is not working correctly, and this causes a problem. Once again thanks for your help.
Spiro
Originally posted by SilverKnight:
<STRONG>
Spiro, you can tell the prong size by looking at the empty harness. Good luck with your project, bro. btw, I read the HELM this morning, it states that the alternator for type S is 120A vs the P 105A. I dont think you need to change your alternator for the system.</STRONG>
<STRONG>
Spiro, you can tell the prong size by looking at the empty harness. Good luck with your project, bro. btw, I read the HELM this morning, it states that the alternator for type S is 120A vs the P 105A. I dont think you need to change your alternator for the system.</STRONG>
Banned
Joined: Jan 2001
Posts: 9,151
Likes: 0
From: Somewhere between here and there, yet neither.
Most likely a DEI shock sensor...those are the biggest aftermarket suppliers of alarms and accessories..ie shock sensors...motion sensors.
Originally posted by SilverKnight:
<STRONG>
I didnt use the clifford's ... as a matter of fact, I dont even know which one I used ... just ask for a shock sensor at local car stereo/alarm shop.</STRONG>
<STRONG>
I didnt use the clifford's ... as a matter of fact, I dont even know which one I used ... just ask for a shock sensor at local car stereo/alarm shop.</STRONG>

Suzuka Master

Joined: Nov 2000
Posts: 7,601
Likes: 0
From: VA
Here it is.
Tools: philips screw driver, 10mm socket and raquet.
Part:
* shock sensor ($15). you can get it from Best Buy ($40) or local car stereo/alarm shops (cheaper).
* Female prong (connector). you can get it from Autozone, Radioshack for about $2-$3/dozen.
Wire inline tap(2 dollar at track auto) optional if you dont feel like splicing wires
1 0 ring connector for screwing in negative wire w/ screw.
Time: 1 hr (max).
Difficulty: (1-10) 5
Procedure:
First you need to remove marked screw and bolt in the below pic. Then pull the under dash piece down to remove it.
Unplug all the front harnesses (You'll need to reset your seat position memory when you're done). Push the fuse/relay box toward the passenger side, turn it side way and pull it out little so you can see the marked harness. This is the hardest part.
On the shock sensor, there are 3(instant trigger) or 4 (dual-stage trigger) wires. Connect the black and green (green/blue for dual-stage) wires to the black and yellow wires on the forementioned harness, respectively. Put the fuse/relay box back to its original position.
Connect the female prong(sp?) to the end of the red wire. then connect it to the second for the left empty harness on the bottom row on the back side of the fuse/relay box as in the pic. The slot is marked "u" as indicated in the following pic. Connect the negative wire to the bottom screw that was in the 1st picture that was holding the front dash piece. I used teh O ring connector to the negative wire then screwed the screw in to the O ring connector so it would ground.
Find a place not to sturby to mount your shock sensor. Placed it in the wire mess below the fuse box on the side that faces the fuse box cover or use a double sided velco tape and attached it right next to teh fuse's.
Arm the alarm, wait 30sec (the HELM manual states the system arms immediately but not in my case) then hit the glass (do not break it) it should trigger the factory alarm. Adjust the sensitivity to your liking. When you finish, place the under dash piece back, put the screw and the bolt back. DONE.
Good luck.
A little modifacation to silverknights instructions. Can a mod put this in the garage.
Tools: philips screw driver, 10mm socket and raquet.
Part:
* shock sensor ($15). you can get it from Best Buy ($40) or local car stereo/alarm shops (cheaper).
* Female prong (connector). you can get it from Autozone, Radioshack for about $2-$3/dozen.
Wire inline tap(2 dollar at track auto) optional if you dont feel like splicing wires
1 0 ring connector for screwing in negative wire w/ screw.
Time: 1 hr (max).
Difficulty: (1-10) 5
Procedure:
First you need to remove marked screw and bolt in the below pic. Then pull the under dash piece down to remove it.
Unplug all the front harnesses (You'll need to reset your seat position memory when you're done). Push the fuse/relay box toward the passenger side, turn it side way and pull it out little so you can see the marked harness. This is the hardest part.
On the shock sensor, there are 3(instant trigger) or 4 (dual-stage trigger) wires. Connect the black and green (green/blue for dual-stage) wires to the black and yellow wires on the forementioned harness, respectively. Put the fuse/relay box back to its original position.
Connect the female prong(sp?) to the end of the red wire. then connect it to the second for the left empty harness on the bottom row on the back side of the fuse/relay box as in the pic. The slot is marked "u" as indicated in the following pic. Connect the negative wire to the bottom screw that was in the 1st picture that was holding the front dash piece. I used teh O ring connector to the negative wire then screwed the screw in to the O ring connector so it would ground.
Find a place not to sturby to mount your shock sensor. Placed it in the wire mess below the fuse box on the side that faces the fuse box cover or use a double sided velco tape and attached it right next to teh fuse's.
Arm the alarm, wait 30sec (the HELM manual states the system arms immediately but not in my case) then hit the glass (do not break it
) it should trigger the factory alarm. Adjust the sensitivity to your liking. When you finish, place the under dash piece back, put the screw and the bolt back. DONE.Good luck.
A little modifacation to silverknights instructions. Can a mod put this in the garage.

Thread
Thread Starter
Forum
Replies
Last Post
JDM96specCTR
Car Parts for Sale
1
Oct 17, 2015 01:06 PM