
How to remove door light covers?
 04-11-2012, 09:29 PM
#1
7th Gear
Thread Starter

Join Date: Mar 2012
Location: Dallas, TX
Age: 66
Posts: 7
Likes: 0
Received 0 Likes
on
0 Posts
How to remove door light covers?
I want to change the door lights of my 2012 TL to led lights but can't figure out how to remove the clear covering? Any suggestions? Thanks.
 04-11-2012, 09:49 PM
#2
Burning Brakes
when I did mine I removed the Door panel half way and was able to use my fingers to pop the housing out from behind, there are clips that hold the door panel on. or you can use a flat head screwdriver and pry the housing, but i dont know which side you would need to pry on.
04-12-2012, 01:49 PM
#3
Love Guru
If you are talking about the courtesy door light that is right under the door, they are super easy brother. Just get a small flat screw driver, slip it between the cover and the door panel and flip... it will be out in no time. Let me know if it works or I will take some pictures this evening and will post them here... I changed mine last month and took me a total of 10 minutes on each side. Mainly because i had to make some minor adjustments to fit the LEDs in there.
04-12-2012, 08:11 PM
#6
Love Guru
These are the one that I got in mine. They are bright and very easy to install. Just need a very minor mod to the bulb holder...
http://www.v-leds.com/Interior-LED-B...72872-1-2.html
http://www.v-leds.com/Interior-LED-B...72872-1-2.html
08-26-2012, 12:48 AM
#7

These are the one that I got in mine. They are bright and very easy to install. Just need a very minor mod to the bulb holder...
http://www.v-leds.com/Interior-LED-B...72872-1-2.html
http://www.v-leds.com/Interior-LED-B...72872-1-2.html
http://www.v-leds.com/BLUE-HIGH-POWE...viewsTabAnchor
I own a white TL. So I think it'll look great

Trending Topics
08-26-2012, 07:54 AM
#8
I installed the blue the other day. Will post pics in a while.
It is important to note that you pry the entire housing, including the interior color outside rim, to get them out. Not just the lens.
It is important to note that you pry the entire housing, including the interior color outside rim, to get them out. Not just the lens.

 08-26-2012, 08:20 AM
#10
moabizzi

wow, those a super blue, wasnt expecting something that strong. the 168's i installed give me a softer white look that doesnt illuminate all that area. does it right underneath in about a 2 square foot area
08-26-2012, 09:23 AM
#12
These are the one that I got in mine. They are bright and very easy to install. Just need a very minor mod to the bulb holder...
http://www.v-leds.com/Interior-LED-B...72872-1-2.html
http://www.v-leds.com/Interior-LED-B...72872-1-2.html
09-04-2012, 03:54 PM
#16
Love Guru
09-04-2012, 06:12 PM
#17
Love Guru
Due to the dimension restriction, I cant post the pictures here, need to learn how to change that in my camera. 
So here is the photobucket link. Let me know if this helps. Thanks.
http://photobucket.com/AcuraDoor
So here is the photobucket link. Let me know if this helps. Thanks.
http://photobucket.com/AcuraDoor
09-05-2012, 12:03 PM
#18
drew the BARBER
Due to the dimension restriction, I cant post the pictures here, need to learn how to change that in my camera.
So here is the photobucket link. Let me know if this helps. Thanks.
http://photobucket.com/AcuraDoor
So here is the photobucket link. Let me know if this helps. Thanks.
http://photobucket.com/AcuraDoor
You need to use 2 fingers to pop it out.
09-05-2012, 01:10 PM
#19
12-21-2013, 04:10 AM
#20
For you guys that have done these... odd ball question... Can I remove the bulb housing and mount just the lens back in the door panel? Or does the lens mount to the bulb housing and that mounts to the door? Also is the housing all plastic?
12-25-2013, 05:54 PM
#21
Love Guru
Yes, the housing is all plastic.
12-25-2013, 10:18 PM
#22
Thanks for the answer... Guess i'll be drilling thru the entire housing for the project... It'll work though.. Better to do that than drill thru the doorpanel I can replace the lights if need be...
12-28-2013, 12:55 PM
#24
Correct they just pop out but I'm doing a different mod... I'm actually doing away with the puddle lights and mounting something else in their place... So i'll be cutting up the Housing and drilling in it to accomplish my project...
12-28-2013, 02:47 PM
#25

 01-06-2014, 12:55 AM
#27
For those wondering what I was doing with the puddle lights here's what I put in them...
The following users liked this post:
mr_raja (01-09-2014)

 01-17-2014, 01:04 PM
#32
Purchased on eBay from Seller Yitamotor His are the best quality from the several sets I ordered he's like $2 more but well worth it... They must be the 5th Generation of lights to fit... the earlier models were too large to fit in the puddle lamp.
Link> http://www.ebay.com/itm/5Th-Gen-Car-Laser-Projector-Logo-Ghost-Door-Step-LED-Light-for-Acura-/251370471406?pt=Motors_Car_Truck_Parts_Accessories&hash=item3a86d8ffee
Okay here goes,
Take a screw driver and pop out the puddle lamp. One end just pops out if it's fighting you do the other end. Unplug it and remove the rear grey housing it just unsnaps then remove the bulb. Take a small drill bit like a 1/8 of an inch drill a hole in the center of the lens from the inside... centering top to bottom and from the side to the bulb contacts or mount.
The Logo lights come with a hole saw once you have your centered pilot hole take the hole saw and drill out the lens to it's size. Then just push the logo light into the hole.
Now remove the door panel, There's a screw behind the inside handle you remove the cover with a bent pick or all... there's a screw in the bottom of where you grab to shut the door under the rubber mat, and one behind the little plastic cover that's where the door panel slopes back in below where you grab to shut it. Once those are out you pull from a lower corner and it'll snap off.
Then remove the Kick panel in the floor board by just pulling on it, Remove the door sill by pulling on it and the B Piller trim remove the lower portion and push it towards the seat. The seatbelt will hold it in place...
This will allow you access to the door pin switch in the B Pillar unplug it.
This is the hardest part by far, you will need to run a wire thru the rubber hose from the door to the interior. I pulled the hose off both sides and shoved one strand of stiff home electrical wire through taped my wire to it and pulled it back through. A Flimsy Metal Coat hanger would prolly work as well. Then push it thru into the interior you'll have to shove your arm far up in behind the kick panel to grab it... pull enough room to you so you can reach the door pin switch with the wire laying in the sill...
Now shove the other end coming out of the door side of the hose into the door reach in and grab a few feet you'll feel wires running inside the door near the bottom wrap it around them and follow those wires to the puddle lamp plug... leave your new wire hanging past the plug a bit
Reinstall the door panel with the plug and your new wire hanging out of the puddle lamp hole in the bottom of the panel...
Take this new wire and connect it to the black wire or ground on the Logo Light..
T tap the red power wire to the white power wire that you unplugged from the puddle lamp above the plug. You will leave this plug unplugged so the contacts inside the housing have no power. Zip tie up your wires as snug as you can get them.
Snap the puddle lamp back in, slide the plug side in first and you'll have to push the logo light to the side and bit as you're pushing in the other side.
Now go to the door sill I wrapped the new wire around the wires currently there, make your way to the B Pillar and T Tap in the new wire to the door pin switch very close to the plug, plug it back into the switch and your logo light should be on at this point if all your connections are good.
Reinstall the B Pillar trim,
Reinstall the kick panel,
Reinstall the door sill, get it in place and a few good smacks to set the clips.
Job well done!
Last edited by User Error; 01-17-2014 at 01:18 PM.
 04-04-2015, 12:36 PM
#34
6th Gear

Join Date: Feb 2012
Posts: 6
Likes: 0
Received 0 Likes
on
0 Posts
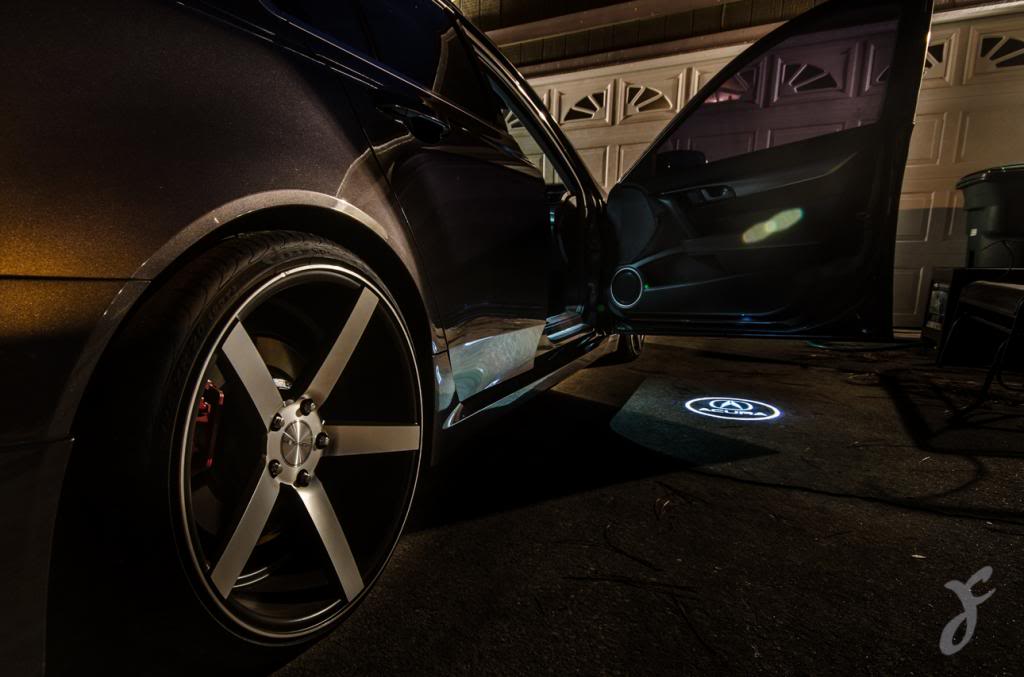
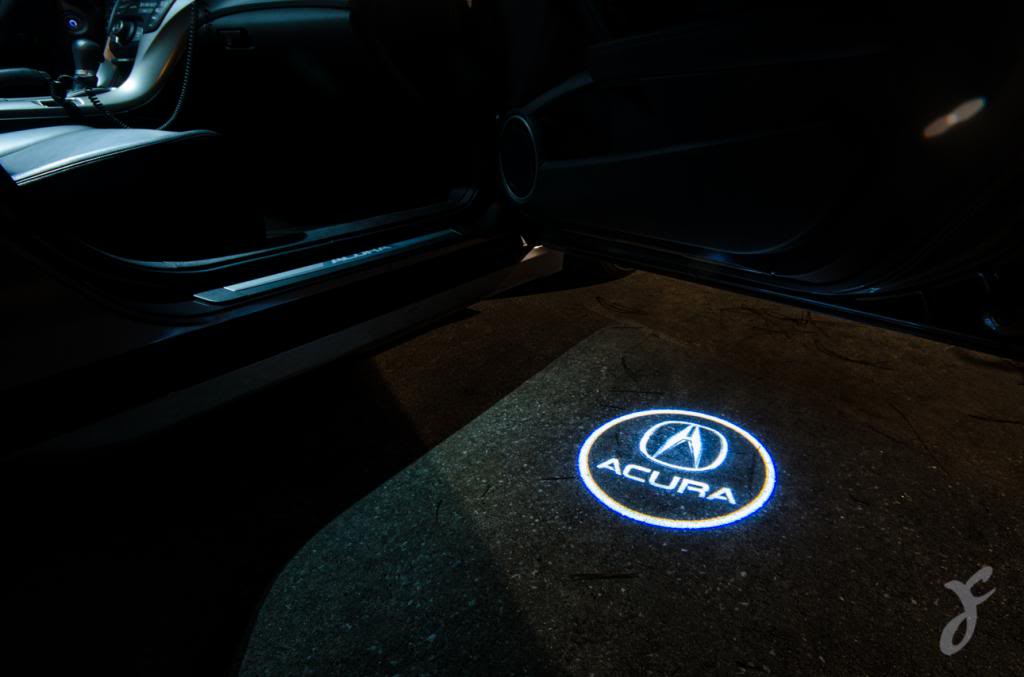
Ghost Lights...
Hey guys,
I was trying to figure out how to pop out the factory puddle lights and I see all the back and forth.
I thought I would share this cool new option that displays the ACURA "A" on the ground without drilling into the housing. They are inexpensive and pop in and out with the same dimensions as the factory light housing.
I got two sets, one for my 2010 and another for my 2012 AWD Techs.
http://www.ebay.com/itm/2-Laser-Projector-Door-LED-Ghost-Shadow-Light-for-Acura-MDX-ZDX-TL-/141603282997?vxp=mtr
04-04-2015, 12:55 PM
#35
6th Gear
Join Date: Feb 2012
Posts: 6
Likes: 0
Received 0 Likes
on
0 Posts
Puddle Light Broke
To add insult to injury trying the trim tool removal, unable to get behind the light. Using the screw driver method mentioned about broke the light. The black housing broke, the lens popped out and I still cannot get the light out.
So I will jut have the dealer do it.
So I will jut have the dealer do it.

Thread
Thread Starter
Forum
Replies
Last Post
cycdaniel
1G TSX Performance Parts & Modifications
8
12-17-2019 10:58 AM
wusty23jd
3G TL Audio, Bluetooth, Electronics & Navigation
4
09-24-2015 11:41 AM
drewdeezy03
3G TL Problems & Fixes
2
09-03-2015 08:04 PM