
Fluid leaking, please help me confirm my hypothesis - PICS inside. Thx!
 11-30-2011, 05:55 PM
#1
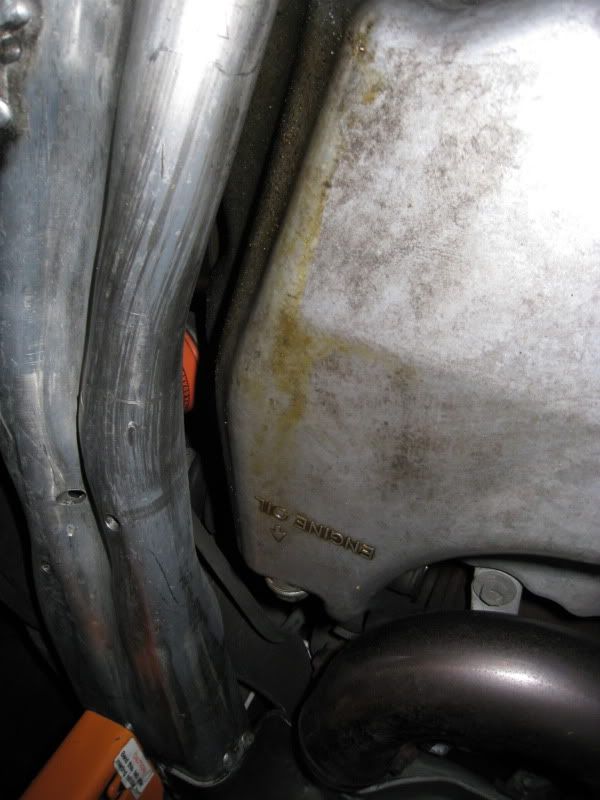
Have an issue. So, smelled something weird after my drives home from work lately. Like a burnt something or other. Well, this weekend...when under the car looking for the exhaust noise (I'm fairly certain it's due to my destroyed side motor mount since it's only under load of accelerating and only when accelerating hard at a certain RPM and you hear the sound up and down as if it's a rotation of the engine) I saw that there was a "fluid" all over the under side
of the oil pan.
I thought maybe it was from the oil pan since the bolt had this fluid on it, but it's in front of it too and you know physics...on a car on the highway, the fluid will drip forward, not back. I wiped it off and had a high school approach..."meh, it'll go away". Ha ha...RIGHT. So today, I get back under the car to check and sure enough, it's there again.
Now, I can see that it ain't transmission fluid
and it looks way to clean to be oil (used).
Can't be clutch...too far and slave is dry.
Can't be brakes, again, too far.
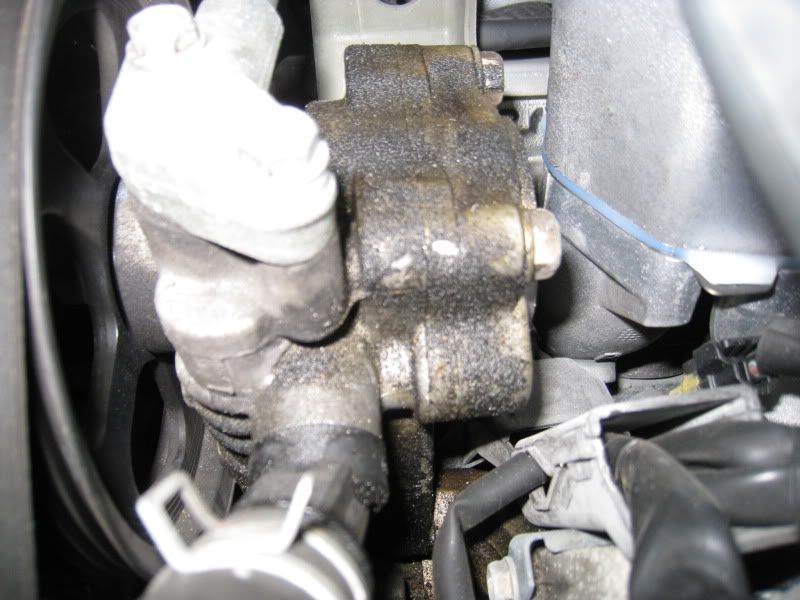
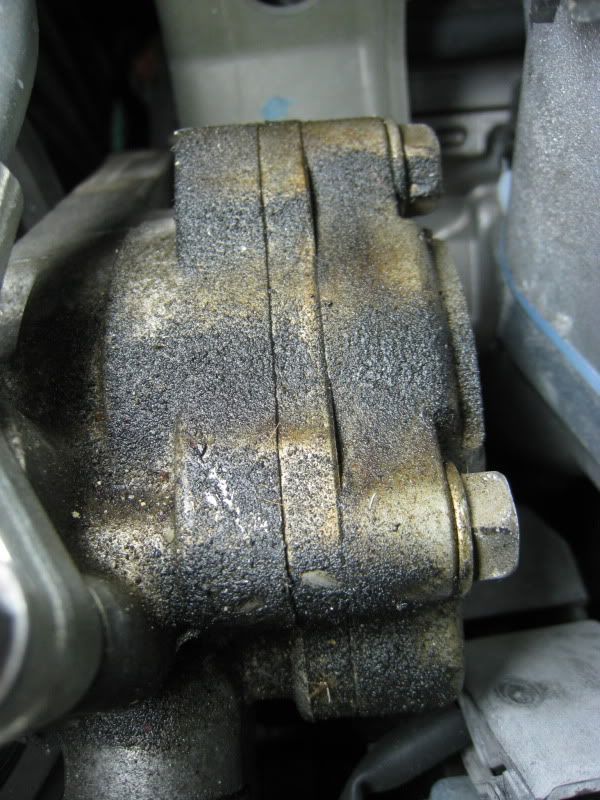
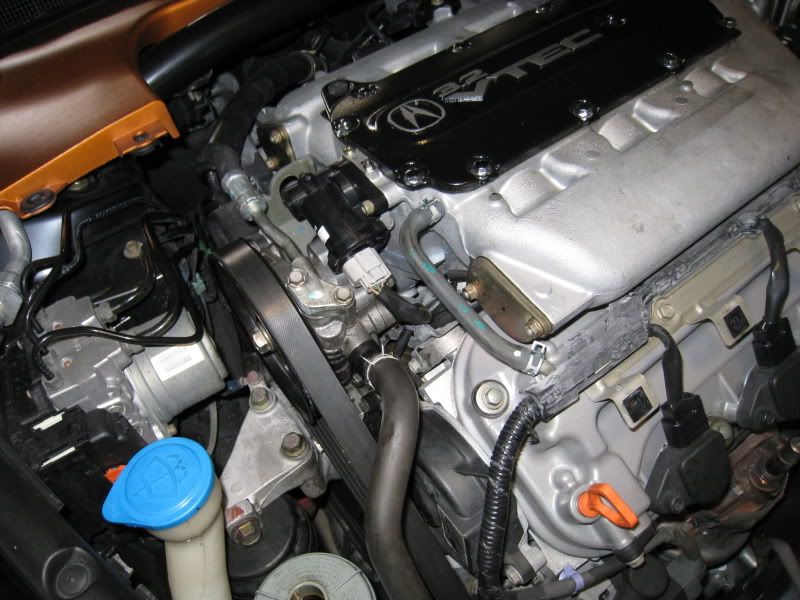
I also noticed the front of the engine (like the head gasket area I would presume) looks caked with dirty fluid (over time, probably) but if that gasket was gone the right side would be leaking too and it's bone dry. Whatever the bottom most right pulley is is is covered in it too but I think it's from the drip down to it (when facing the passenger side of the motor). I traced this fluid back up and I think the starting point is the power steering pump itself.
My question, during the recall, is there a chance they just didn't tighten the bolts properly? My next step this weekend will be to get in there and retighten all the bolts and wash all the dirty fluid off to look and see if it comes back. Just wanted to make sure I was barking up the right tree.
Here are pics
Where it starts
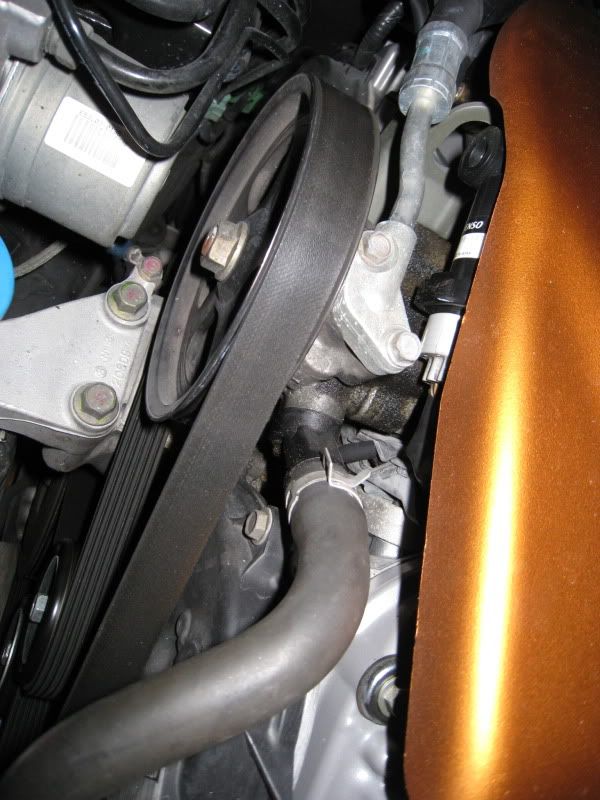
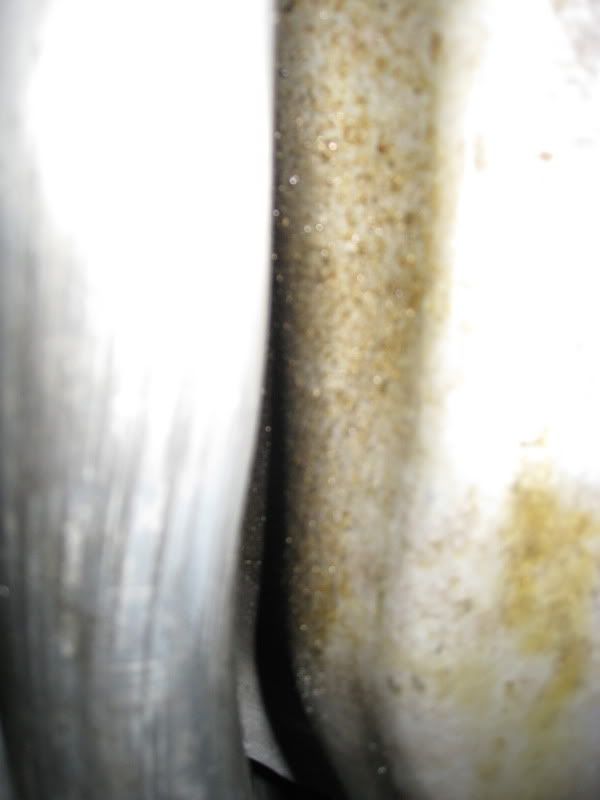
a closer from same angle
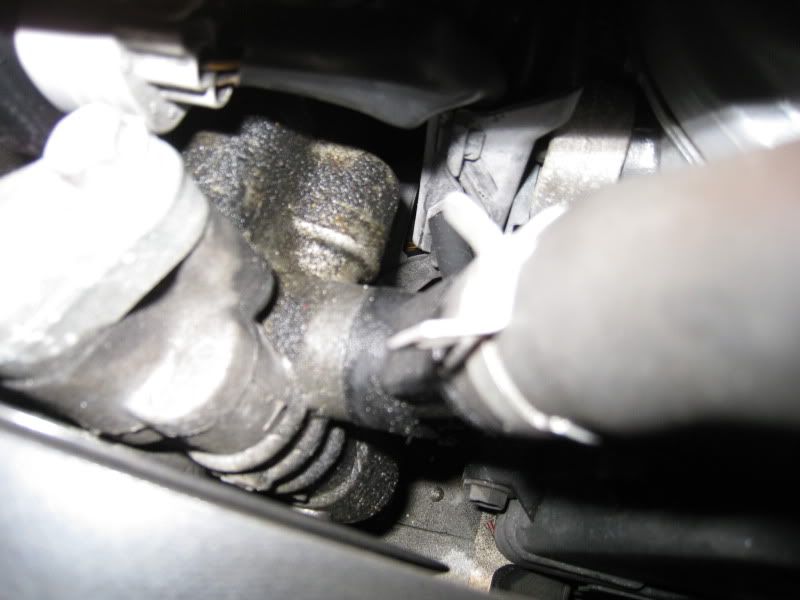
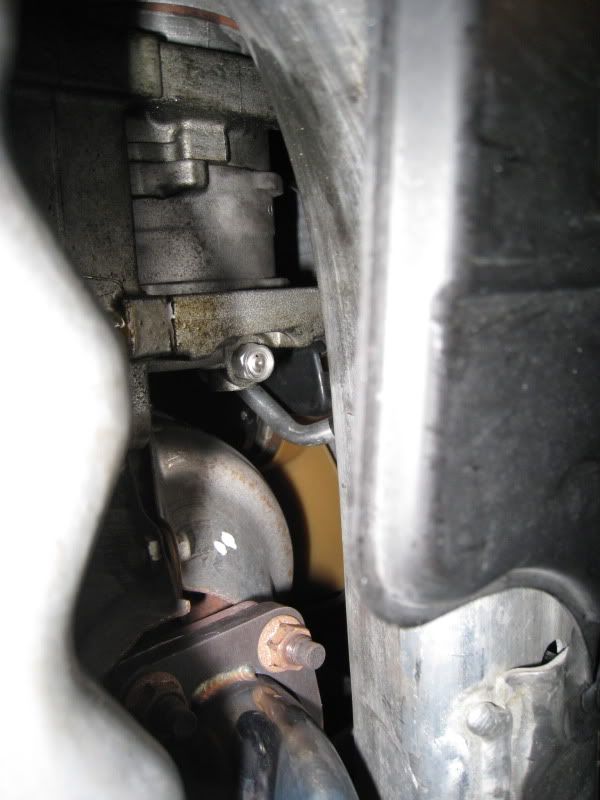
Here's the part of the front of the engine I mentioned
same another angle
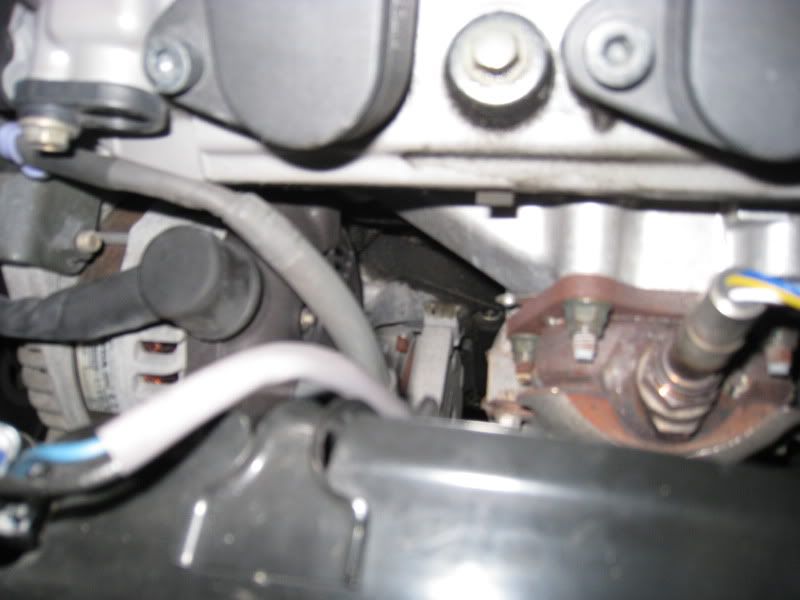
oil pan
side of the oil pan
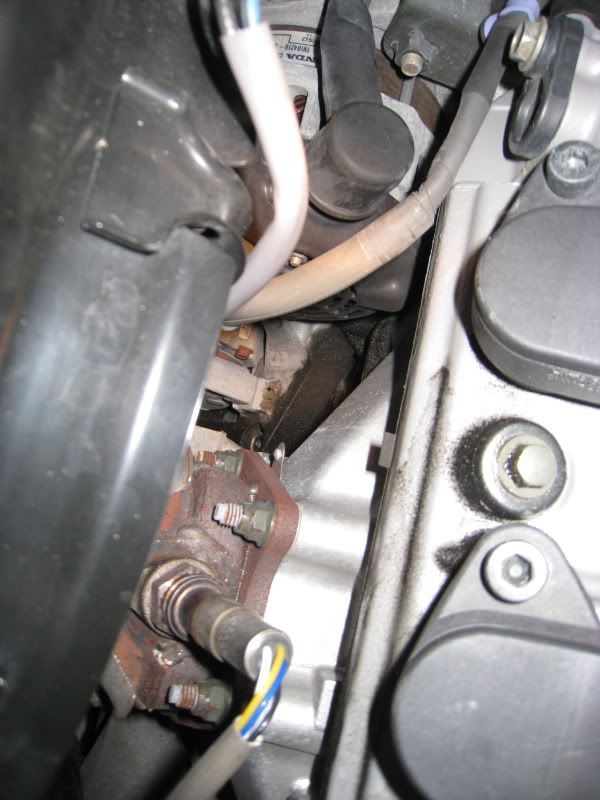
and this is the big thing the pulley I mentioned is on that has the fluid on it.
Any thoughts would be great...thank you.
of the oil pan.
I thought maybe it was from the oil pan since the bolt had this fluid on it, but it's in front of it too and you know physics...on a car on the highway, the fluid will drip forward, not back. I wiped it off and had a high school approach..."meh, it'll go away". Ha ha...RIGHT. So today, I get back under the car to check and sure enough, it's there again.
Now, I can see that it ain't transmission fluid
and it looks way to clean to be oil (used).
Can't be clutch...too far and slave is dry.
Can't be brakes, again, too far.
I also noticed the front of the engine (like the head gasket area I would presume) looks caked with dirty fluid (over time, probably) but if that gasket was gone the right side would be leaking too and it's bone dry. Whatever the bottom most right pulley is is is covered in it too but I think it's from the drip down to it (when facing the passenger side of the motor). I traced this fluid back up and I think the starting point is the power steering pump itself.
My question, during the recall, is there a chance they just didn't tighten the bolts properly? My next step this weekend will be to get in there and retighten all the bolts and wash all the dirty fluid off to look and see if it comes back. Just wanted to make sure I was barking up the right tree.
Here are pics
Where it starts
a closer from same angle
Here's the part of the front of the engine I mentioned
same another angle
oil pan
side of the oil pan
and this is the big thing the pulley I mentioned is on that has the fluid on it.
Any thoughts would be great...thank you.
 12-01-2011, 08:36 AM
#3
BANNED
iTrader: (33)

looks like PSF to me...
like you said, get in there and re-check all their work and re-tighten anything you need to. have some extra fluid on hand in case you lose some in the process.
like you said, get in there and re-check all their work and re-tighten anything you need to. have some extra fluid on hand in case you lose some in the process.
The following users liked this post:
rockstar143 (12-01-2011)
The following users liked this post:
rockstar143 (12-01-2011)
12-01-2011, 01:00 PM
#5
Yeah, check the PS fluid level. PS fluid is the color beer and gets pretty dark after a while. The color and origin are consistent. My first thought was the PS suction hose o-ring, but that's kinda a lot of fluid. And that doesn't usually "leak", it just allows air to get sucked into the system when cold.
For me this did cause a PS fluid spill, but it was coming from too much froth in the reservoir.
Yours kinda looks like the pump itself is leaking under pressure. Maybe start the car and have someone turn the wheel back & forth while you look in there. Just don't get close while doing this. High pressure oil stream from a leak can inject oil straight into your skin and cause you many many health problems immediately after.
The following users liked this post:
rockstar143 (12-01-2011)
12-01-2011, 01:26 PM
#6
Thank you all very much...looks like it...I HAD the fluid topped off at the "full" mark and now it's between full and low...IN the reservoir the fluid wsa dark but the fluid under was pretty clean and definitely had the beer look to it. I added some to buy me some time. You guys made me feel like better about my guess!
12-04-2011, 11:48 AM
#9
and I did a little closer looking at the power steering pump but I'm at a loss. It looks like it's leaking from the entire thing.  I don't really have time for down time to take it apart and find the o-ring that's failing or whatever it is and then wait for the part to arrive. I guess I'll take it all the way apart and off the car during my vacation time in a few weeks.

I don't really have time for down time to take it apart and find the o-ring that's failing or whatever it is and then wait for the part to arrive. I guess I'll take it all the way apart and off the car during my vacation time in a few weeks.
 12-04-2011, 04:39 PM
#11
Sounds good man...thanks...I actually did...sprayed with some degreaser and hosed it down well. I guess when I have some extra time off I'll pull it off to see what's what. I also just purchased a search friendly service manual. $21 on ebay...can't beat it. I have a $5 disc I bought in PDF format but fk me...I never use it because you have to scroll through all 2000 pages to find what you are looking for.
12-04-2011, 09:23 PM
#12
I would just order the #17 & #13 o-rings shown in the first picture, and the #23 o-ring in the second picture. Once they arrive, spend the afternoon changing them out on the pump. Should only take a couple hours from start to finish. If it does fix the leak, then great. If it doesn't, your only out $8.


The following users liked this post:
rockstar143 (12-05-2011)
12-04-2011, 10:12 PM
#13
I know you recommended this to me before, but having seen it now, that's an excellent idea. I may just do that. Can't be that hard...remove belt, remove 2 bolts holding it to engine, remove hoses and take a look at what's what...then swap out any o rings and bleed the system by refilling and turning lock to lock. SHOULD solve the problem. 
12-05-2011, 08:36 AM
#15
#16 & #15 are internal o-rings. The external housing seals are the 3 I mentioned, plus the shaft seal (#12). Personally i wouldn't worry about the shaft or internal seals unless the "easy fix" doesn't work. The easy fix will be simply removing the 4 #8 cover bolts on the pump housing. If you want to replace the other seals, your going to be disassembling the entire pump. This is going to be more of a PITA as there are a lot of small pieces. Why not just throw $8 at the easy fix and see what happens. 
If the easy fix wasn't so cheap, I would probably say just rebuild the whole thing. But either way should be worth trying.
If the easy fix wasn't so cheap, I would probably say just rebuild the whole thing. But either way should be worth trying.
Last edited by 94eg!; 12-05-2011 at 08:40 AM.
12-05-2011, 09:19 AM
#16
Well, clearly, you know your sh*t. I'll take your advice, sir. I'm stopping by acura after work today anyway so I'll probably just place the order then.
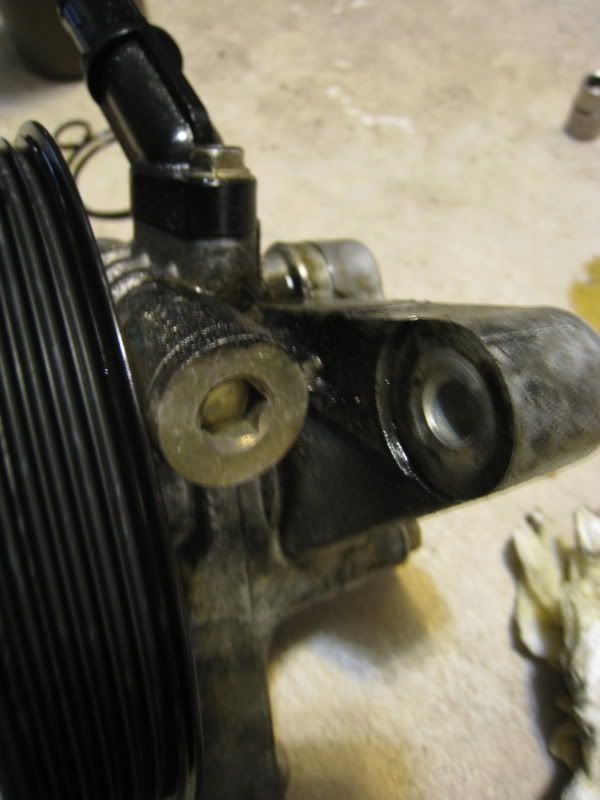
Actually, whatever seal is right below where you remove the 4 10MM bolts is what is failing, almost positive because there's that gunk all the way around it at that point.
Actually, whatever seal is right below where you remove the 4 10MM bolts is what is failing, almost positive because there's that gunk all the way around it at that point.
12-10-2011, 12:42 PM
#17
Scale of difficulty: 1 EASY 10 HARD, I'd say a 3.
Time: About 2 hours if you take your sweet time.
Recently had a leak that trickled down on my oil pan. Traced it back to my power steering pump (hopefully). The fluid had the same consistency and color as the PS fluid so I figured it was time to dig deeper.
Preordered ALL the seals for the power steering pump thanks to 94EG!'s recommendation and cost me about $8 at the local Acura dealership.


In the first image above, I ordered
13 91345-RDA-A01 O-RING (13.0X1.9) $0.67 $0.50 1 Add to Cart 14 91347-PAA-A01 O-RING (16.7X1.8) $0.75 $0.56 1 Add to Cart 15 91347-P2A-003 O-RING (15.2X2.4) $0.50 $0.38 1 Add to Cart 16 91348-P2A-003 O-RING (51.0X2.4) $1.03 $0.77 1 Add to Cart 17 91349-P2A-003 SEAL, POWER STEERING PUMP COVER $7.25 $5.44 1
In the second one, I ordered
23 91370-SV4-000 O-RING (14.4X1.9) $0.78 $0.58
and here they are in person...

OK, so I'll just write it out because it's pretty easy.
1. Remove the plug to the little black sensor thing that's held on by 2 5MM allens bolts (you'll see, even though I'm not sure what it is, engine idle sensor?)
2. Remove 2 5MM bolts and remove said sensor to keep it out of the way (the one bolted to the intake manifold)
3. Take 2 sandwich bags and twisties or tie wraps and unclamp and remove the front hose from the PS pump, careful not to spill on the accessory belt. Put a towel or paper towels down to catch the excess. I used a straw and sucked out and some from the pump so I wouldn't make a mess...spit it into a can of peas :wink: Now undo the 2 10MM bolts for the vacuum line of the ps pump up top...same deal...put a baggie over it and move it out of the way.
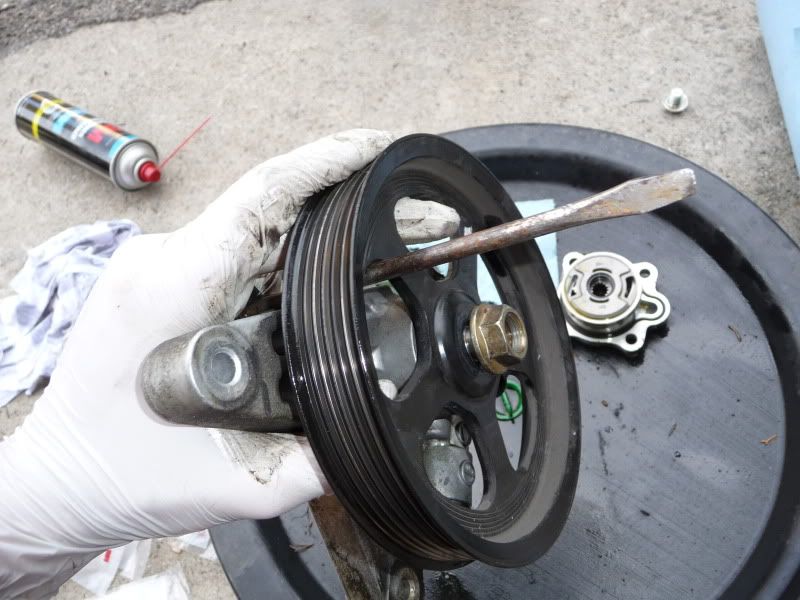
4. Now, use a 14MM socket and ratchet with a breaker bar to push back on the belt tensioner and move the belt off the ps pump pulley. Just move it off to the side, don't remove the belt entirely from the car.
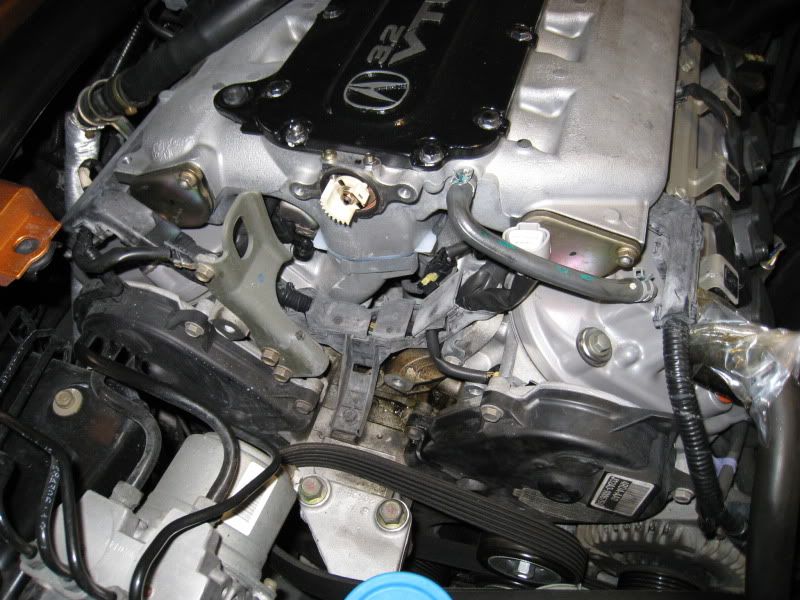
5. There are 2 12MM bolts that hold the PS pump in place...get the rear one first...use a wrench, once you break it free it comes out by hand easily. The other one is trickier...pull the pump up a bit and you can fit a normal sized 6 point 12MM socket and ratchet in there with the breaker bar. When it breaks, careful with your thumb on the pulley Mine hurts now. One it brakes you can wiggle the PS pump up and down to give you more clearance and also to put pressure on the bolt so the ratchet catches and keeps unscrewing.
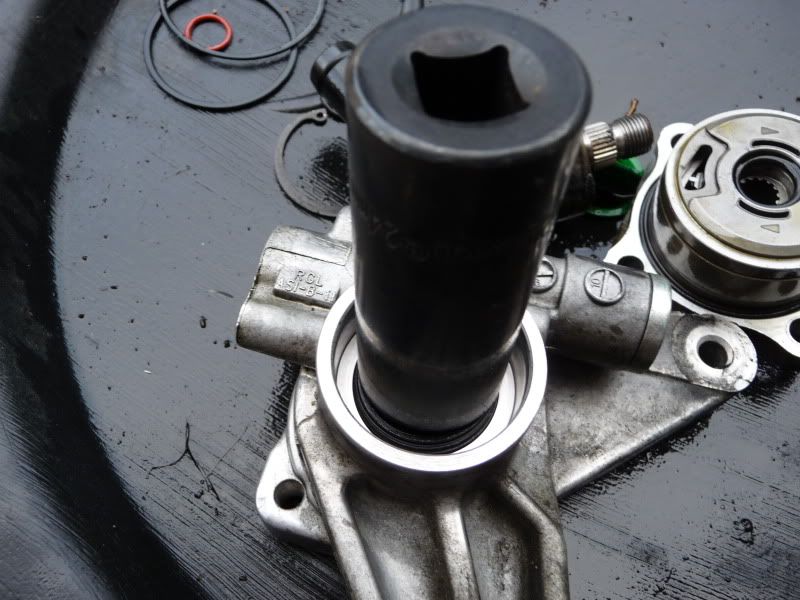
6. At this point, the pump is free and your engine looks like this.
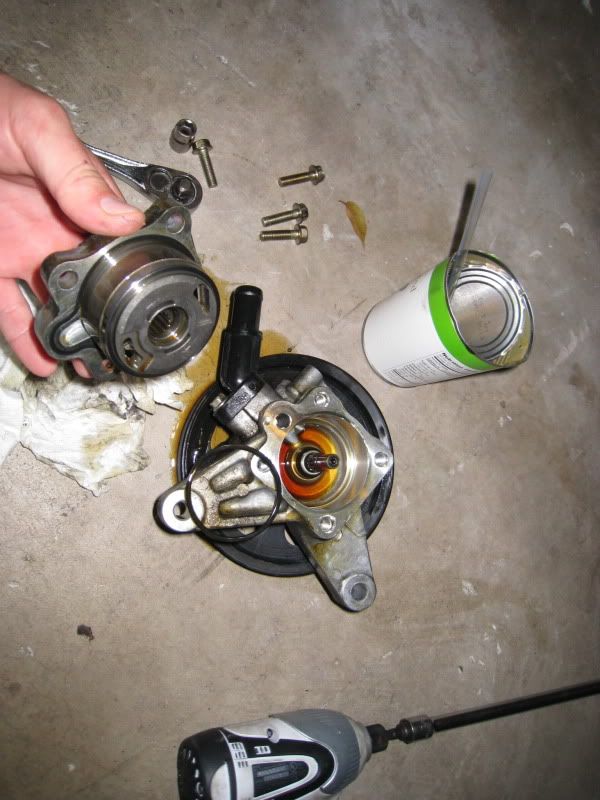
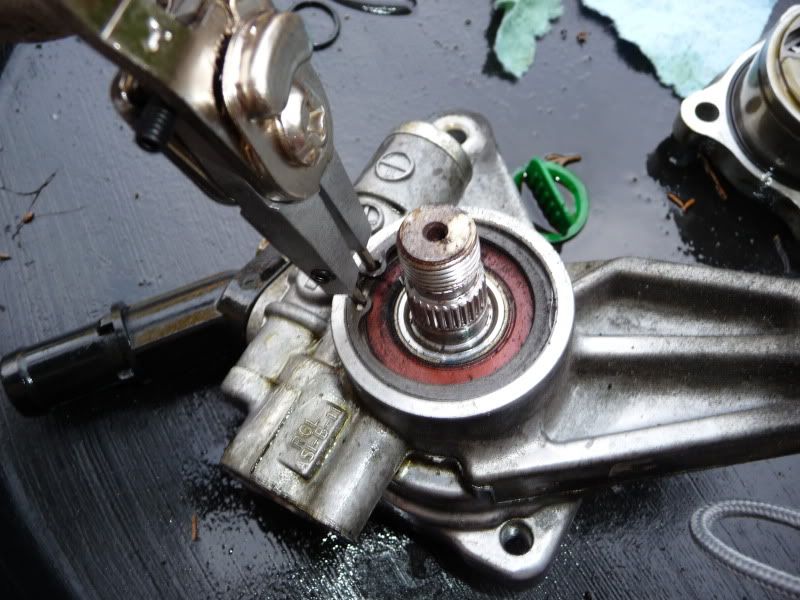
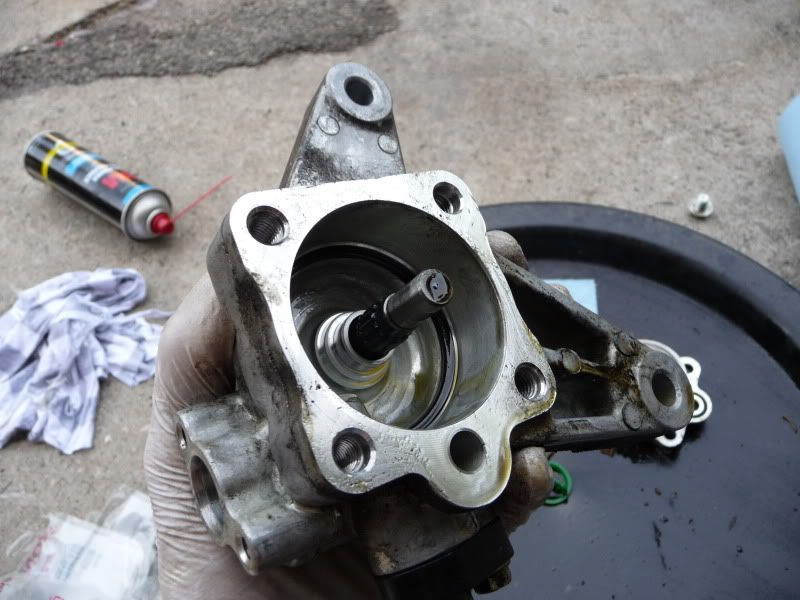
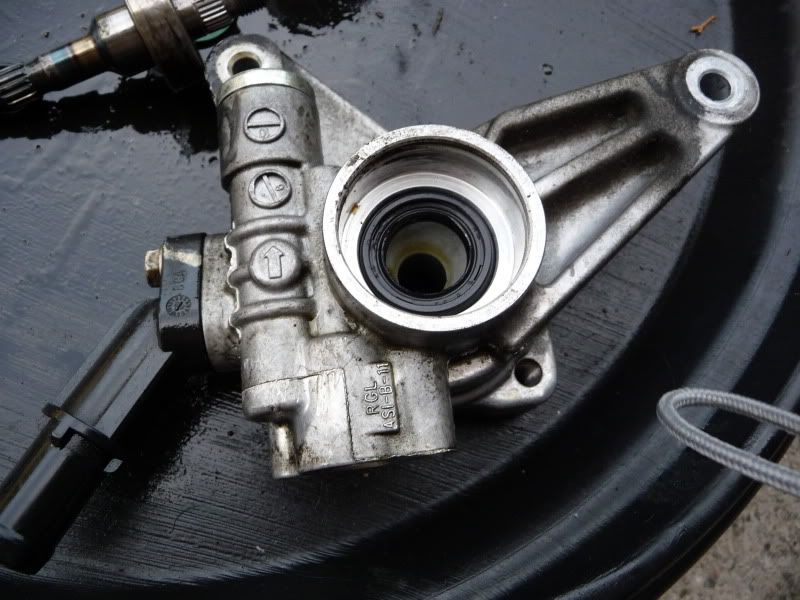
7. Now, remove the 4 12MM bolts that hold on the PS housing on the pump. Once you do, you will see pretty much ALL the o rings you'll be changing.
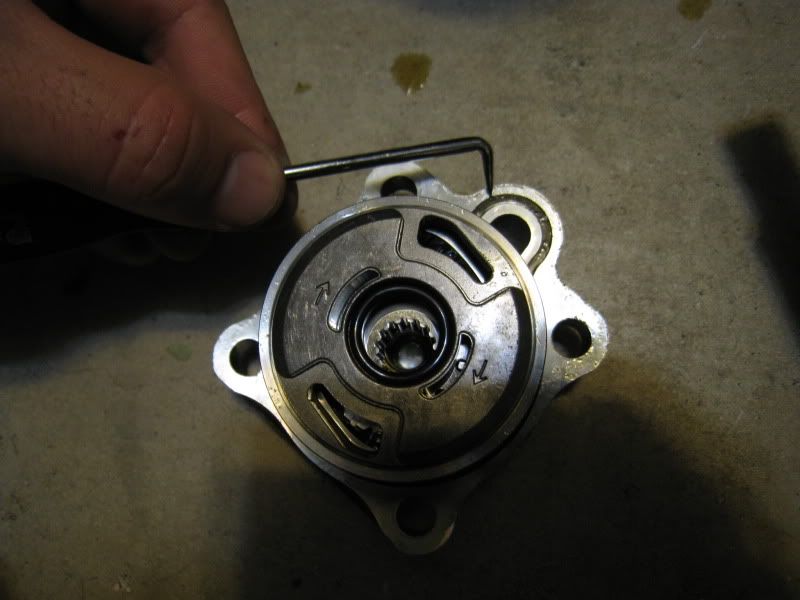
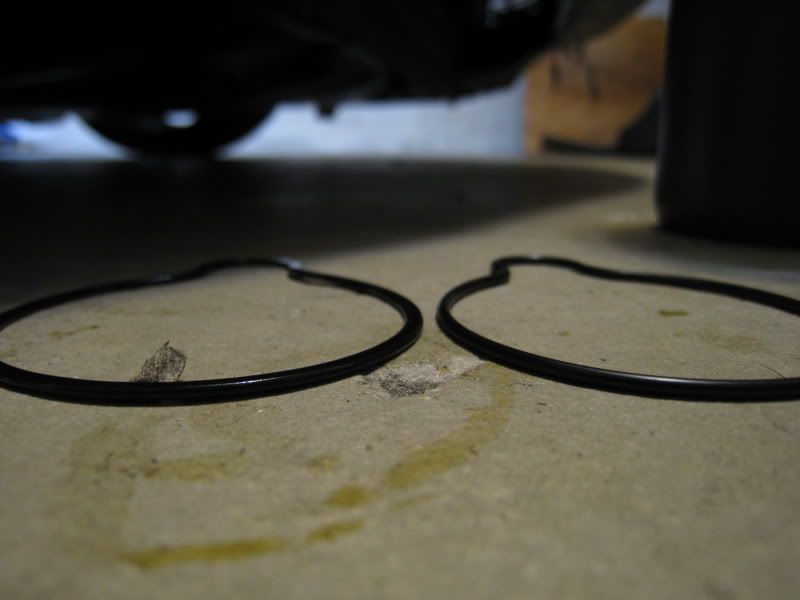
OK...so I used a pick and changed out the o-rings (I used the above diagram to confirm I put the right ring in the right place. Number 15, 16 and 17 were SUPER rigid and dry and we all know that means LEAKS!
Here's a good comparison (hard to show) of the brittle rings and how flat they were compared to the new. Also, remember to put some PS fluid on the new ones when installing.
8. Next one I did was UNDER...it's a 10MM allen wrench bolt and it was a beast to undo. Breaker bar and all my strength but I got it. This ring wasn't too bad, but I wanted ALL NEW ones in there.
9. Put it all back together. To ensure it would seat right, I actually laid all the o rings out and put the cover on the ground and placed the pump down on it, then bolted up. The inlet ring #13, I had done before, but whatever...new one...plus, Was able to tighten that 10MM bolt much easier with the pump off now.
10. #23 is actually the o-ring from the hose that you moved out of the way (with the 10MM bolts).
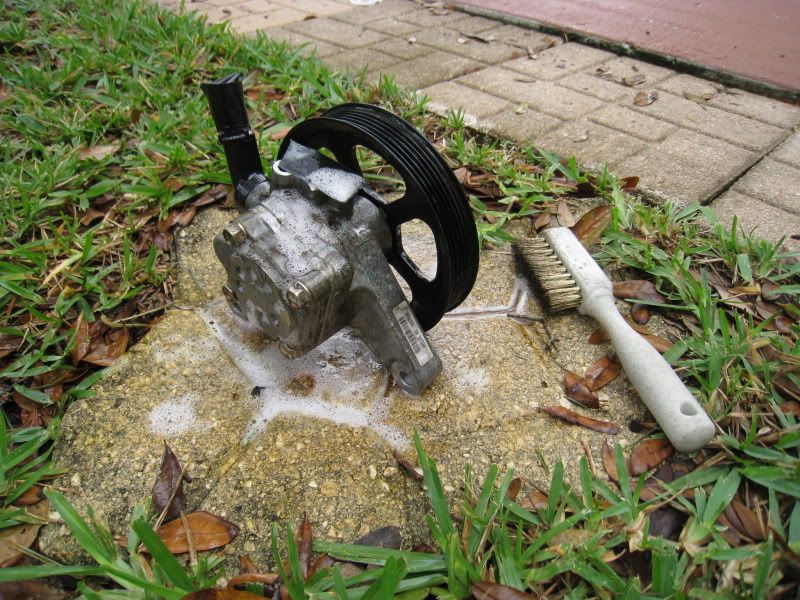
I then used some Gorilla tape to tape up the orifices and used some degreaser and a wire brush to clean her up.
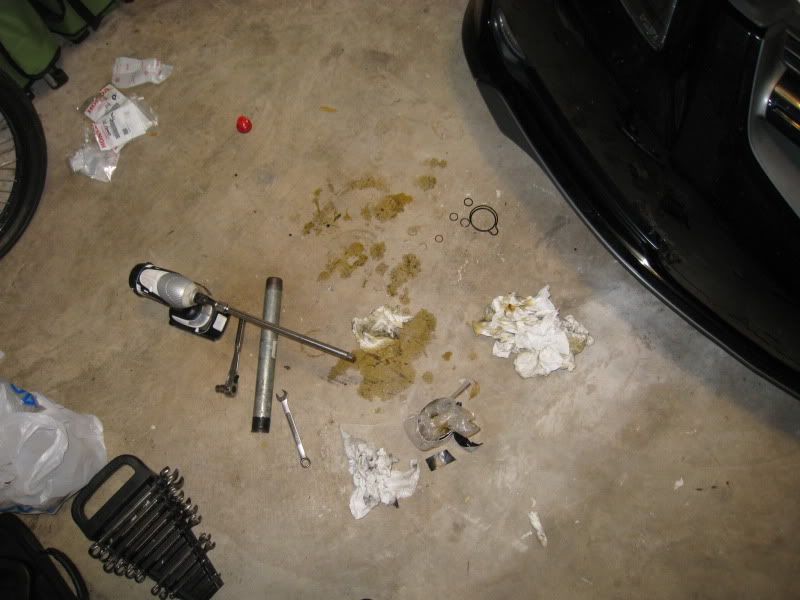
And here is the battlefield after the fact...
And we're done...
2 hours included time for a coffee and taking my time cleaning everything up. GOOD LUCK!
Hope this helps someone with a mystery leak.
I can't confirm yet if this fixed my mystery fluid on the oil pan...but once the old stuff burns off, I'll know...plus, at least this way I KNOW my PS pump is back to original state and is NOT the source of any leaks.
-Jeremy.
Time: About 2 hours if you take your sweet time.
Recently had a leak that trickled down on my oil pan. Traced it back to my power steering pump (hopefully). The fluid had the same consistency and color as the PS fluid so I figured it was time to dig deeper.
Preordered ALL the seals for the power steering pump thanks to 94EG!'s recommendation and cost me about $8 at the local Acura dealership.
In the first image above, I ordered
13 91345-RDA-A01 O-RING (13.0X1.9) $0.67 $0.50 1
In the second one, I ordered
23 91370-SV4-000 O-RING (14.4X1.9) $0.78 $0.58
and here they are in person...
OK, so I'll just write it out because it's pretty easy.
1. Remove the plug to the little black sensor thing that's held on by 2 5MM allens bolts (you'll see, even though I'm not sure what it is, engine idle sensor?)
2. Remove 2 5MM bolts and remove said sensor to keep it out of the way (the one bolted to the intake manifold)
3. Take 2 sandwich bags and twisties or tie wraps and unclamp and remove the front hose from the PS pump, careful not to spill on the accessory belt. Put a towel or paper towels down to catch the excess. I used a straw and sucked out and some from the pump so I wouldn't make a mess...spit it into a can of peas :wink: Now undo the 2 10MM bolts for the vacuum line of the ps pump up top...same deal...put a baggie over it and move it out of the way.
4. Now, use a 14MM socket and ratchet with a breaker bar to push back on the belt tensioner and move the belt off the ps pump pulley. Just move it off to the side, don't remove the belt entirely from the car.
5. There are 2 12MM bolts that hold the PS pump in place...get the rear one first...use a wrench, once you break it free it comes out by hand easily. The other one is trickier...pull the pump up a bit and you can fit a normal sized 6 point 12MM socket and ratchet in there with the breaker bar. When it breaks, careful with your thumb on the pulley
Mine hurts now. One it brakes you can wiggle the PS pump up and down to give you more clearance and also to put pressure on the bolt so the ratchet catches and keeps unscrewing. 6. At this point, the pump is free and your engine looks like this.
7. Now, remove the 4 12MM bolts that hold on the PS housing on the pump. Once you do, you will see pretty much ALL the o rings you'll be changing.
OK...so I used a pick and changed out the o-rings (I used the above diagram to confirm I put the right ring in the right place. Number 15, 16 and 17 were SUPER rigid and dry and we all know that means LEAKS!
Here's a good comparison (hard to show) of the brittle rings and how flat they were compared to the new. Also, remember to put some PS fluid on the new ones when installing.
8. Next one I did was UNDER...it's a 10MM allen wrench bolt and it was a beast to undo. Breaker bar and all my strength but I got it. This ring wasn't too bad, but I wanted ALL NEW ones in there.
9. Put it all back together. To ensure it would seat right, I actually laid all the o rings out and put the cover on the ground and placed the pump down on it, then bolted up. The inlet ring #13, I had done before, but whatever...new one...plus, Was able to tighten that 10MM bolt much easier with the pump off now.
10. #23 is actually the o-ring from the hose that you moved out of the way (with the 10MM bolts).
I then used some Gorilla tape to tape up the orifices and used some degreaser and a wire brush to clean her up.
And here is the battlefield after the fact...
And we're done...
2 hours included time for a coffee and taking my time cleaning everything up. GOOD LUCK!
Hope this helps someone with a mystery leak.
I can't confirm yet if this fixed my mystery fluid on the oil pan...but once the old stuff burns off, I'll know...plus, at least this way I KNOW my PS pump is back to original state and is NOT the source of any leaks.
-Jeremy.
03-11-2012, 10:28 PM
#19
rockstar143: I just noticed my car has the same leak in that area. Did replacing those washers solved your problem? if so, i will be heading down to my acura dealer and getting the same parts as well.
03-12-2012, 09:30 AM
#20
Yes sir, actually, I made a DIY thread aside from this one where someone took the repair further and ended up changing out the final o ring behind the pulley. I didn't do that one but my leaks ALL stopped.
https://acurazine.com/forums/showthread.php?t=841134
https://acurazine.com/forums/showthread.php?t=841134
03-12-2012, 09:41 AM
#21
May as well put it into both threads for ease of future searching. 
I wasn't feeling too good last weekend so I did it today. Mine wasn't leaking too bad. More of a seep actually.
This is only for the one behind the front pulley. I'm not good at taking photos so bear with me.
Tools needed:
Impact Wrench
19mm Socket
24mm Socket
Hammer
Snap Ring Pliers
1. Take off the pulley. Mark the pulley so you know which way to put it back. I stick a screwdriver in between and break it loose with an impact wrench and 19mm socket. A lot of the older guys at work just hold on to it. Not me, I don't want to risk injury so I use the screwdriver.
2. Take out the C-Clip using your Snap Ring Pliers.
3. Turn it around and hammer the shaft out.
4. Pry out the seal. I like these long reach bent nose pliers for this.

5. Start the new seal with your fingers (Seal can only be installed one way) and hit the new one in till it's flush. I use a 24mm Socket.
6. Hammer the shaft back in, Install the C-Clip and Re-install the pulley.
This is only for the one behind the front pulley. I'm not good at taking photos so bear with me.
Tools needed:
Impact Wrench
19mm Socket
24mm Socket
Hammer
Snap Ring Pliers
1. Take off the pulley. Mark the pulley so you know which way to put it back. I stick a screwdriver in between and break it loose with an impact wrench and 19mm socket. A lot of the older guys at work just hold on to it. Not me, I don't want to risk injury so I use the screwdriver.
2. Take out the C-Clip using your Snap Ring Pliers.
3. Turn it around and hammer the shaft out.
4. Pry out the seal. I like these long reach bent nose pliers for this.
5. Start the new seal with your fingers (Seal can only be installed one way) and hit the new one in till it's flush. I use a 24mm Socket.
6. Hammer the shaft back in, Install the C-Clip and Re-install the pulley.
06-03-2012, 12:34 AM
#23
4th Gear

Join Date: Jun 2012
Posts: 4
Likes: 0
Received 0 Likes
on
0 Posts
Hi i am new to this so thank you in advance if anyone reads this and can help advise me. My '99 tl 3.2s head gasket is leaking and i have not been driving it for fear of blowing it. My radiator is not leaking coolant, no white smoke or abnormalities in her oil so is it safe 2 say if i get a valve cover set (rubber valve cover gasket) my girl will be ok? The last thing i want is to damage the internal combustion system, thats why i have not been driving but i gotta get back on the road soon! Im not car savvy but im trying to learn so i appreciate any advice, guys!
06-03-2012, 03:05 AM
#24
Well, if your head gasket is leaking and you change the valve cover gasket, you'll still have a leak! we all started somewhere so welcome! Really though, with a leak like that, mainly make sure you have oil in the engine and you should be ok...post a picture of your leak and it well help us help you
we all started somewhere so welcome! Really though, with a leak like that, mainly make sure you have oil in the engine and you should be ok...post a picture of your leak and it well help us help you


 01-27-2015, 10:04 AM
#28
Advanced
Thank you to everyone who chipped in and a huge thanks to rockstar143 for taking pictures and putting this together
The following users liked this post:
rockstar143 (01-27-2015)
The following users liked this post:
S2K_MoZo (01-27-2015)

Thread
Thread Starter
Forum
Replies
Last Post
cycdaniel
1G TSX Performance Parts & Modifications
8
12-17-2019 10:58 AM
Marmbo
4G TL Problems & Fixes
6
09-21-2015 09:39 AM