When you click on links to various merchants on this site and make a purchase, this can result in this site earning a commission. Affiliate programs and affiliations include, but are not limited to, the eBay Partner Network.
There for those that haven't attempted repair is the 2nd underneath bolt on solenoid. Mine was stuck to screw. Not good Removing hoses Pushing out carefully with screwdriver, because nut never came off screw. Whole piece unscrewed from block. No leakage of anything. If you encounter this issue dont strip your thread. Carfully remove
And insert in new solenoid
Re install in reverse order. Finger screw to start so you reduce risk of dropping nut in engine bay using ratchet. Dropped mine, but lucky went through to the ground.
After all put back together you must drink for good luck.
Hope these pictures added some clarity to the process.
F*** you...
Jk nice. Just makes me want to clean my engine bay some more.... You lucky dry climate ppl
Thanks for this, just did it, only took a few minutes - mainly due to everything being so tightly packed in the engine bay. My error message went away as soon as I started the car. My, how I wish I had found this DIY two or three years ago! BTW got an original Denso OEM part on amazon or ebay for like, $25. NIIICE
Thanks for this, just did it, only took a few minutes - mainly due to everything being so tightly packed in the engine bay. My error message went away as soon as I started the car. My, how I wish I had found this DIY two or three years ago! BTW got an original Denso OEM part on amazon or ebay for like, $25. NIIICE
Purchased my replacement purge valve on eBay - cheap - compared it to the original part, looks exactly the same, same PN and I noticed the original part on my 2006 TL was made in Mexico, not Japan. Only difference with the new part is I had to use the original rubber bushings from the original part. Easy, just slip the inside metal sleeve out of the bushing. Then the rubber bushing will slip out of the part dog-ears. Did everything for $34.
Purchased my replacement purge valve on eBay - cheap - compared it to the original part, looks exactly the same, same PN and I noticed the original part on my 2006 TL was made in Mexico, not Japan. Only difference with the new part is I had to use the original rubber bushings from the original part. Easy, just slip the inside metal sleeve out of the bushing. Then the rubber bushing will slip out of the part dog-ears. Did everything for $34.
I replaced the solenoid, really easy. However the Tighten Fuel Cap did not go away. Had 3/4 tank, so I filled it up. Didn't know about the computer only running test with tank between 3/4 and 1/4.
Have gas cap on the way, already ordered it, rats! Anyway will wait until I get to 1/4 tank to see if the message goes away.
that's odd, I checked your ebay link and it looks the part is correct (made in japan), so you message should not re appear...........not sure what your referencing in regards to the fuel tank levels and how that affects the error message. but ive been on the fence about ordering this for quite some time......please update once you can
I ordered a similar part on Amazon for <$40. Even though there are conflicting accounts on whether it would work on the TL, I can confirm that it does. It's not $25 like on ebay, but hey, sure beats $120 from the dealers.
I ordered a similar part on Amazon for <$40. Even though there are conflicting accounts on whether it would work on the TL, I can confirm that it does. It's not $25 like on ebay, but hey, sure beats $120 from the dealers.
it works for some and not others bc it depends on what the issue going on is. There's a whole troubleshooting diagnostic tree in the fsm. This solves the problem easily for some without the diagnostic procedure, and for the price, I'd say it's worth a shot, bc the diagnostic tree can be an effing pita lol.
I replaced the solenoid, really easy. However the Tighten Fuel Cap did not go away. Had 3/4 tank, so I filled it up. Didn't know about the computer only running test with tank between 3/4 and 1/4.
Have gas cap on the way, already ordered it, rats! Anyway will wait until I get to 1/4 tank to see if the message goes away.
Well I replaced the Purge Solenoid and the gas cap and the "Tighten Fuel Cap" is still displayed. I also have 1/2 tank of gas, so where now?
Not sure what a CEL is? I have display "Tighten Fuel Cap" and if cleared I have a "Letter" icon.
Check Engine Light - I do not have this, just the "Tighten Fuel Cap". I believe the solenoid contacts close when the purge value passes vapor. So the 12V into the value should appear on the other contact if the valve closes. I will use an volt-ohmmeter to see if I'm correct. If the valve is working measuring across the contacts should tell me of the valve is working or not. Maybe tomorrow night. I may have received a defective replacement solenoid.
Well I replaced the Purge Solenoid and the gas cap and the "Tighten Fuel Cap" is still displayed. I also have 1/2 tank of gas, so where now?
Originally Posted by youraway
Not sure what a CEL is? I have display "Tighten Fuel Cap" and if cleared I have a "Letter" icon.
Originally Posted by youraway
Check Engine Light - I do not have this, just the "Tighten Fuel Cap". I believe the solenoid contacts close when the purge value passes vapor. So the 12V into the value should appear on the other contact if the valve closes. I will use an volt-ohmmeter to see if I'm correct. If the valve is working measuring across the contacts should tell me of the valve is working or not. Maybe tomorrow night. I may have received a defective replacement solenoid.
Originally Posted by youraway
Yep, I think your right, but the one that came from the factory was made in Mexico, not Japan, so is it a real one? Just wondering.
Tonight I used a compressor and blew back towards the gas tank through the valve to ensure the line wasn't clogged, or stopped up due to overfilling the gas tank, it's clear. I ensured the hose between the valve and the engine was clear, it is. Now I'm wondering how the solenoid works. Normally I would believe the 12V activates the solenoid just as in perhaps a starter motor. Without being activated the airflow is in the direction to the gas tank from the engine. If activated; does it reverse the direction of airflow? If that's all the solenoid does, then where is the sensor that activates the "Tighten Fuel Cap" Or maybe when the 12V activates the solenoid the 12V is felt on the opposite (return) contact and that is the sensor. That would only indicate if the solenoid relay was activated or not, it would not sense direction nor would it sense if the gas cap was really loose. In fact in the past I have forgot the put my gas cap back on after filling up, and did not get a tighten gas cap message.
Not trying to be a pain, but this is now becoming interesting to me. I have an electronic background and will check to see if each of my (new and old) solenoids actually activates when 12V is applied and I will check to see if the direction of airflow is changed. That's in the morning, been a long day doing other chores. However if someone knows what the purpose of solenoid valve is; please let me know.
I tested both valves; when 12V was applied I could feel the solenoid engage. Therefore the solenoid in each is activating, perhaps the airflow sensor in the original part doesn't work. As mentioned previously I purchased another valve and gas cap to no avail, it did not clear the "Tighten Fuel Cap" (TFC) message. I checked the 12V in the connector and it's good. I wanted to see the results so I left the connector disconnected, I get a CEL. With the connector connected to the valve, the CEL goes away, but I get "Tighten Fuel Cap". So after all this I believe I do not have enough information on how this valve works and the software associated with it. As a last resort I disconnected the battery, and reconnected it. The "Tighten Fuel Cap" message no longer appears. I'll drive the car for a few days to see if it returns, but if replacing the valve does not remove the message, is the only way to clear the TFC message to disconnect the battery?
Just ordered one on Ebay 36162-RDV-J01
Hope it fixes my gas cap error message! I'll letcha know!
just for full transparency on those ebay parts so people have an idea what they are buying. I posted this in the other thread:
Originally Posted by sparc
I bought a similar part and it's been working fine for me for about 7 months.
Only word of caution is that I wouldn't necessarily believe anything listed about the quality like OEM and Japan. These are all coming out of China so it could be some sort of knockoff part or refurb, or just recycled from old Hondas. IIRC, the Denso Japan was actually sanded off on mine. The price is just low enough that it's worth the risk.
Thanks sparc! I'll thoroughly check mine when it arrives, not sure what that means 'though (that is, what there is to check...maybe a tell-tale Made in China?). But I'll heed the warning. I do wonder if an inferior knock-off product may be why some do not see their warning message go away or soon return? That could be the answer.
Thanks sparc! I'll thoroughly check mine when it arrives, not sure what that means 'though (that is, what there is to check...maybe a tell-tale Made in China?). But I'll heed the warning. I do wonder if an inferior knock-off product may be why some do not see their warning message go away or soon return? That could be the answer.
not saying it's a bad part or inferior since I haven't had an issue in a long time. I definitely got my money's worth since it was priced so low. Worth the risk.
More of a heads up that they may be trying to mislead about the origin of the part. It could be a used OEM part that they have refurbed with a chinese solenoid. Perfectly ok, but it's not necessarily a new oem japanese part anymore. It could also be some sort of surpus japanese parts where they had to remove the manufacturer name. I don't thing this any sort of critical part to the car so not a big deal if it's chinese as long as it works.
I finally got around to replacing the purge solenoid. 10 minute job, easy to do. Now to see how long that dern light "stays" off! Amazon $25 part, "appears" to be OEM.
In this case and my personal experience - I bought OEM thinking it will permanently solve this problem... after about 18 months I'm looking to buy another purge solenoid on our 08 TL. If the ebay part lasts 18 months I'll be happy with that.
In my search for a solution to the "Tighten Fuel Cap" (TFC) annoying on-&-off message on my '08 Acura TL (103,340 m) I went on Internet, then to Acurazine site, and finally found the great posting by "RxWorld" which included the Acura Bulletin suggesting a replacement of the EVAP Canister Purge Valve, and his very detailed replacement process step-by-step with relevant photos. Additionally there was also a follow-up posting by "nanxum" with further tips and photos.
I found a new OEM part on Amazon for $54.00, but also several less expensive on eBay. So, I took the chance and bought a tested one on eBay at a very good deal for $17.99 (the Seller :"atlantaautopart", Atlanta Auto Dismantling, Inc.). A mechanic replaced it for $20.00 plus tip (removed the fuse box for better access, of course dropped the lower washer but found it). Battery was not disconnected. The blasted TFC message is gone so far. The removed item was made in Mexico, the installed replacement was made in Japan (I made sure that I'm buying a Japanese). Further reminder learned : never overfill the gas tank by stopping when the gas pump clicks and stops, and close the cap while pushing it down and turning until it clicks min. 3 times.
My thanks again to RxWorld and to nanxum for their postings with great advices !!!
b) unbolting the fuse box assembly --loosen 2 bolts and unclip one plastic mount (cir
Originally Posted by nanxun
Some thoughts and additional tips for this:
1. Very easy and straight-forward job that even a complete non-wrenching person like myself was able to complete--although it did take me 90 min., 3x what it should have according to RxWorld's estimate.
2. The main problem I encountered was access to that bottom nut/washer. To make this easier, I'd also suggest:
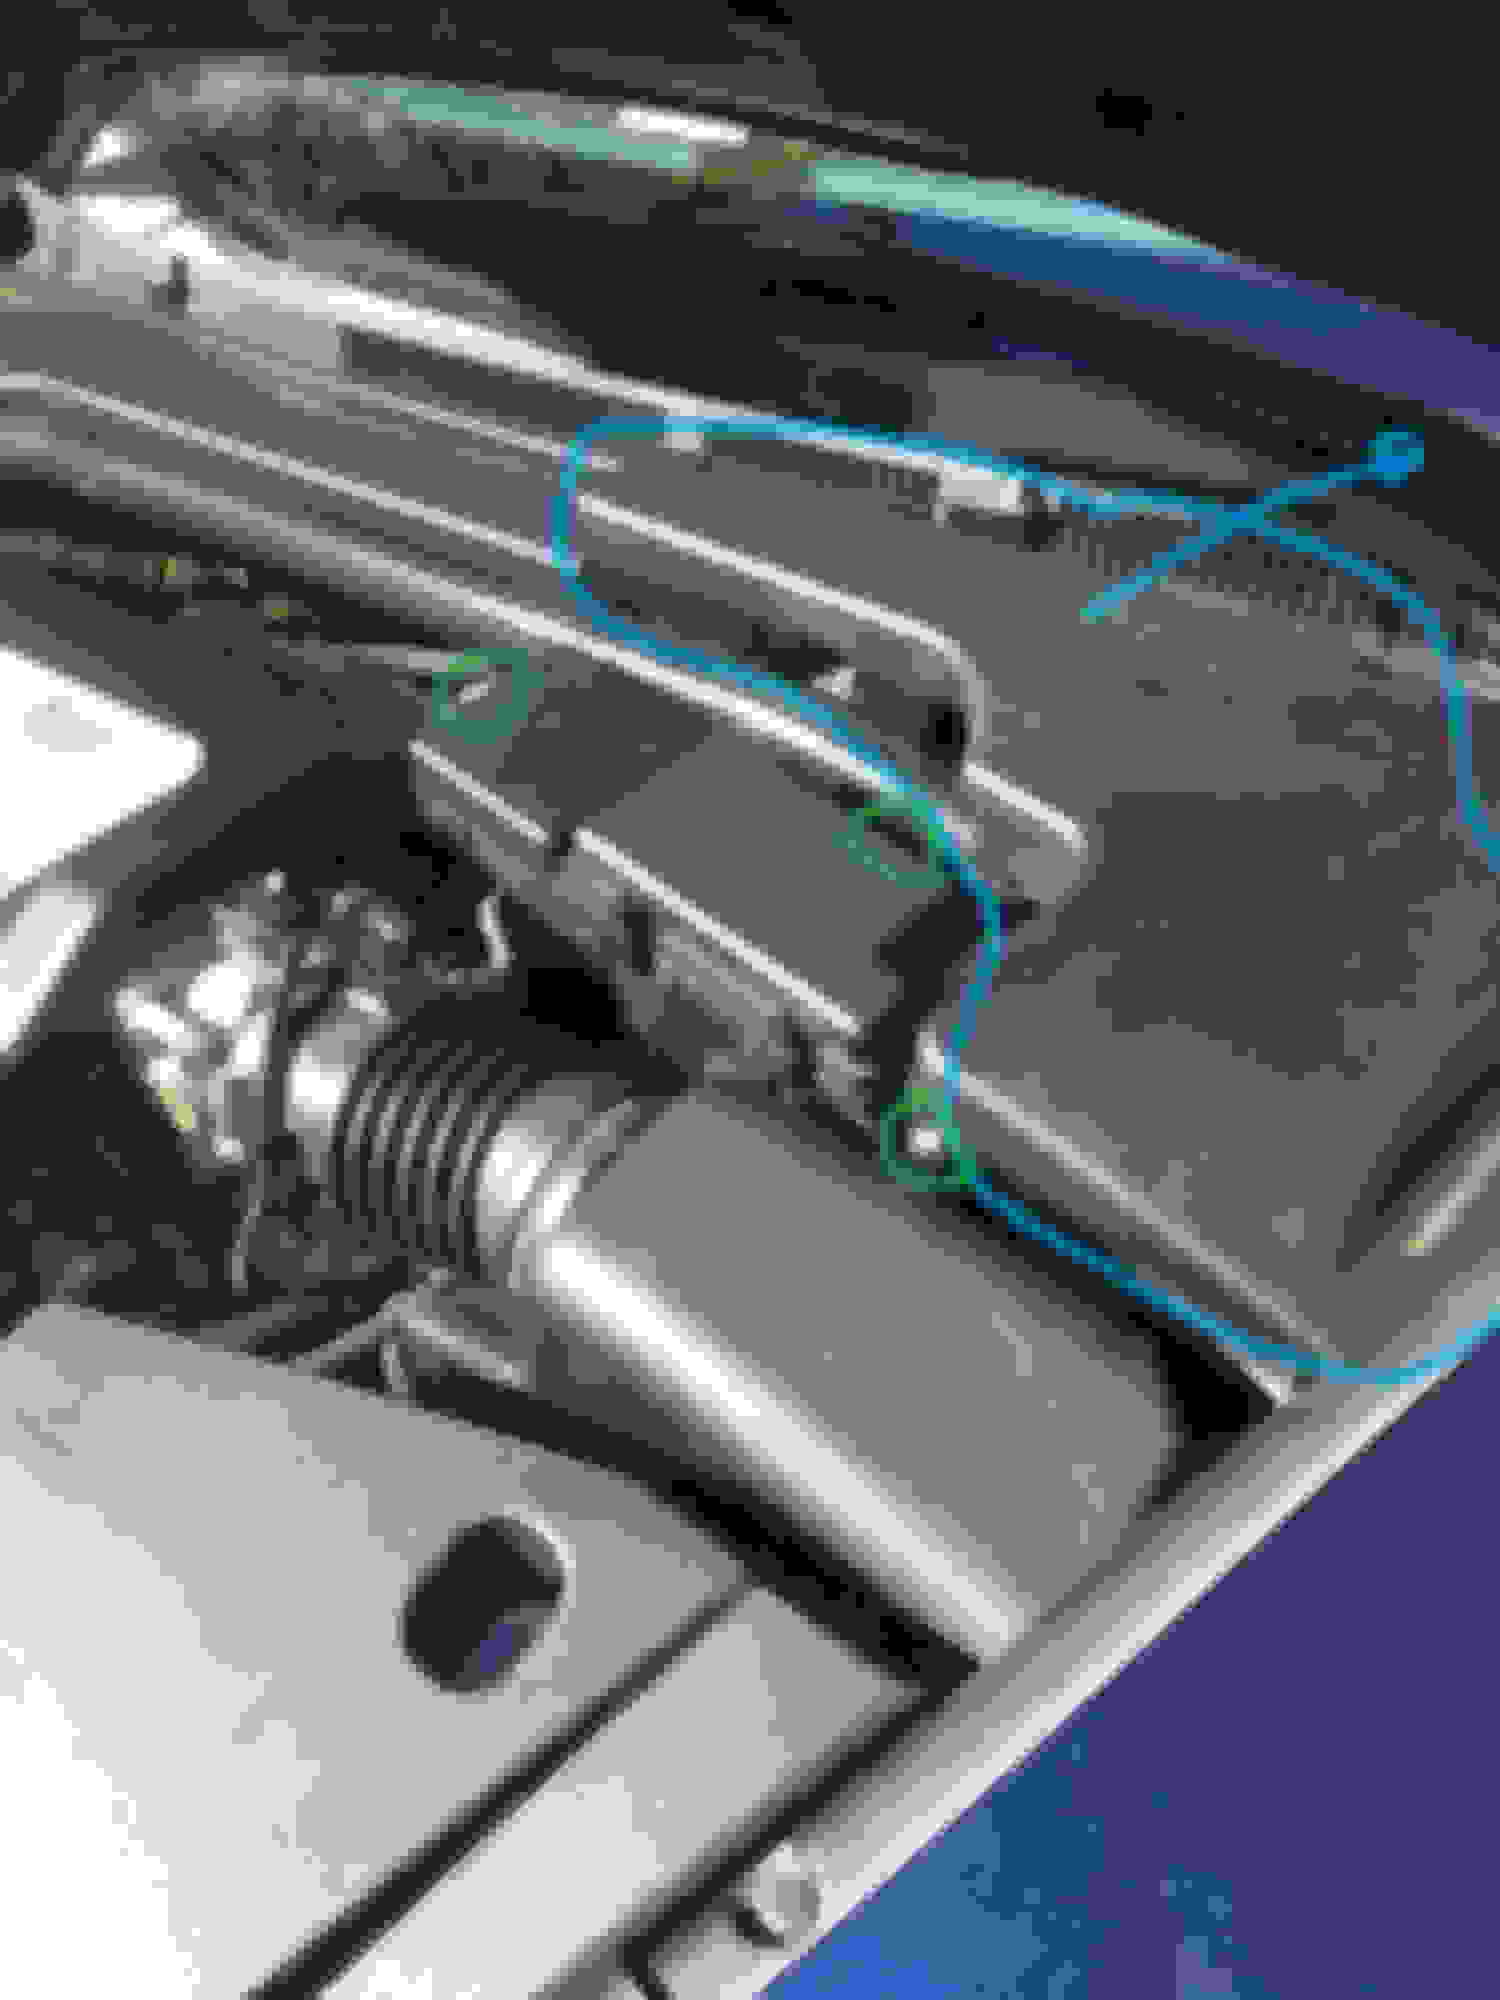
a) removing the panel/cover with "BRAKE FLUID" and "CLUTCH FLUID" on it (circled in blue in photo) as well as
b) unbolting the fuse box assembly --loosen 2 bolts and unclip one plastic mount (circled in green in photo). This will allow you to move the fuse box and gain better access to that bottom nut/washer.
Both of these sit right in front of the driver's side of the engine bay, on either side of the strut bar--see photos below.
3. An additional tool that would've been incredibly helpful is a magnetic tipped screwdriver or retrieval/pick-up tool since it's sometimes difficult--esp. if you have large fingers--to keep the bottom nut and washer from falling into the engine bay.
4. To remove the heavy rubber bushings from the old EVAP purge valve, use a screwdriver to pry out the inner metal plugs, which give the rubber bushings/washers their stiffness. Then pull out the rubber bushings/washers and press them into place in the new EVAP purge valve and replace the cylindrical metal plugs.
Also, my old/original EVAP purge valve also had "DENSO Mexico" stamped on it.... Hmmmmm.....
When you unbolted the fuse box assembly, Do you know how plastic pieces of the box attach to each other? The reason why I'm asking, is I replaced the EVAP today and the bottom left side of the plastic box is VERY brittle and pieces will literally break off with a slight touch. I'm I found the part number for the bottom piece (38252-SEF-A01) Based on removing yours do you think the bottom piece can be replaced without having to remove individual relays/fuses? Based on the diagram its like 3 layers I'm hoping I can leave the middle layer intact.
I'm debating on whether or not to do it myself of fork over the money for the labor to get it done at the dealership. The part is not expensive the labor quote is ridiculous. I don't want to remove it without the part in hand just in case it falls a apart when I do so. I even searched my local LKQ pick thinking I could practice on that and even get the entire cover but they just crushed the 2007 they had.
Sorry to hear of the additional difficulties you're having. What a drag. I only wish that I could be of more help, but (as I indicated in my own posts) I'm pretty useless when it comes to wrenching on things.
My gut tells me that you should be able to DIY and replace the part in question yourself, but hopefully someone else who's more knowledgeable and experienced can provide more concrete/practical advice and/or guidance.
Even though they said it was gone I went to the salvage anyway and as luck would have it the wrecked TL was still there. A lot of parts had been stripped but sitting there like like a diamond on a pillow and still still bolted down was the fuse box. This one, unlike mine, was just like new, not brittle and falling apart. So thankfully I have all 3 pieces of the fuse box cover. While I was there I snagged the EVAP as well as the gas cap. I have already replaced my EVAP with the new one I purchased from Amazon so if you anyone needs one just let me know. I will let it go cheap if anyone is interested.
I have 2008 acura tl-s with p145c code.
2 questions;
1. Does faulty purge valve cause any issue beside engine light? Does it impact driving?
2. Has anyone used purge valves made by: Dorman, WVE, STANDARD MOTOR PRODUCTS (I saw them on rockauto.com)
I am from Canada.
Thank you!
If you want to buy a foreign 'knock-off' for half the price, (with a fake honda label) find one on ebay or Amazon, and roll the dice at its reliability / longevity.
Install it yourself, per the DIY on the first page, and save big $$$.

 09-14-2017, 09:46 PM