'04 to '08 front lower control arm bushing failure - please read and look
 10-25-2013, 07:22 PM
#1041

just another way for honda to make money i guess since mine are fine
 10-25-2013, 07:44 PM
#1042
Race Director
^^^^ u have the link to those ebay bushings?
10-25-2013, 10:17 PM
#1043
10-26-2013, 08:16 AM
#1044
Instructor

Fastline bushings still look like new here, just did the brakes and took a good look at them. Around 30,000km and over a year and still look good and feel tight, have ISC coil overs to go on hopefully the first week of November, so they'll be getting a thorough look then and I'll update if theres any issues.
The following users liked this post:
nfnsquared (10-26-2013)
10-26-2013, 09:52 AM
#1045
Race Director
Fastline bushings still look like new here, just did the brakes and took a good look at them. Around 30,000km and over a year and still look good and feel tight, have ISC coil overs to go on hopefully the first week of November, so they'll be getting a thorough look then and I'll update if theres any issues.
 10-26-2013, 11:15 PM
#1046
www.colradodetail.com
11-14-2013, 09:57 AM
#1047
10th Gear

Join Date: Aug 2011
Age: 44
Posts: 10
Likes: 0
Received 0 Likes
on
0 Posts
Fastline bushings still look like new here, just did the brakes and took a good look at them. Around 30,000km and over a year and still look good and feel tight, have ISC coil overs to go on hopefully the first week of November, so they'll be getting a thorough look then and I'll update if theres any issues.
01-22-2014, 04:00 PM
#1049
Burning Brakes
iTrader: (3)
I hit a pothole and mine completely detached, I know it happened because of the pothole because I had just checked them when I rotated the wheels the day prior. I also bent 2 wheels BTW, it was a serious pothole. Thanks New York!!!
01-22-2014, 08:19 PM
#1050

I've had to replace the compliance bushings in every Honda/Acura I've ever owned, so much so I bought the tool to do it easily, no press needed.
They're really easy to replace, I normally just undo the axle nut, push the axle back through the knuckle. Then I remove the front and rear lower control arm bolts, lightly pry the arm out and let it hang by the lower ball joint. Use the linked to tool to quickly press out the old bushing, and use the tool in reverse to install the new ones.
Normally only takes 1/2 hour per side...Acura charging $500 is straight up rape.
I'm doing mine on my 07 NBP TL-S tomorrow, so I'll make a write-up with pics.
The following users liked this post:
glennjr15 (01-06-2017)
01-23-2014, 11:46 AM
#1051

I've had to replace the compliance bushings in every Honda/Acura I've ever owned, so much so I bought the tool to do it easily, no press needed.
Schley (SCH68100) Honda/Acura Front Compliance Bushing R&R Tool - Amazon.com
They're really easy to replace, I normally just undo the axle nut, push the axle back through the knuckle. Then I remove the front and rear lower control arm bolts, lightly pry the arm out and let it hang by the lower ball joint. Use the linked to tool to quickly press out the old bushing, and use the tool in reverse to install the new ones.
Normally only takes 1/2 hour per side...Acura charging $500 is straight up rape.
I'm doing mine on my 07 NBP TL-S tomorrow, so I'll make a write-up with pics.
01-23-2014, 10:07 PM
#1052
Race Director
01-24-2014, 08:35 PM
#1053

Does it matter how short the bolts are?, couldn't I just get a 10" bolt and use it for both sides? Or maybe I don't exactly understand what is happening. I am hoping my tractor supply has the 2-1/8" socket and then I was going to try the 3-1/4" socket on amazon with extra washers.
01-29-2014, 03:06 PM
#1054
Instructor

Join Date: Apr 2007
Location: Toms River, NJ
Age: 43
Posts: 118
Likes: 0
Received 0 Likes
on
0 Posts
Just FYI I was able to use the powerbuilt socket setup that you mentioned from amazon to do mine.
I used a grade 8 8" bolt, nut and 2 thick washers. Pressed it out fine, but pressing in the new one was a little difficult. Really needed a longer bolt, so I started the bushing with the socket and a hammer tapping it in until I could get a few threads on the bolt and push it in using the socket setup.
Worked fine, even used an electric impact gun to do it. I have the makita BTW450Z though. Hit the bushing with PB about a week before doing it and then again while I was changing out my passenger axle when I did this job. I also completely removed the control arm for the car since it was easier and I already had the coil-over out and the balljoint popped since I was doing the axle.
Immediately after replacing the bushings, the same shop (not dealer) did an alignment and I got the car back and still had vibrations at 70+ mph. They did however decide to balance my two front wheels while they were off (guess they were just being nice) which I didn't really want because they do not have a roadforce machine. I eventually went in and got another balancing and alignment at the dealer, and now for the first time in over 5 years I feel very little if any vibration. Go figure.
 Maybe the bushings did fix the vibration and they just balanced the wheels incorrectly.
That being said, since the parts worked for mzilvar, if anyone wants to buy the parts for the tool off of me, shoot me a PM. My car has 152k on the clock now and I won't be replacing these again before I sell it so I have no use for the "tool" anymore.

 02-11-2014, 01:43 PM
#1057
Advanced


Last edited by photog; 02-11-2014 at 01:52 PM.
02-11-2014, 04:11 PM
#1058
Three Wheelin'
Use a hammer and just hit the lower arm where the ball joint goes through it. Of course remove the nut first. The impact will cause the arm to pop off.
I dont get why people are so scared to remove the lower arm to do this... Its super easy.
I dont get why people are so scared to remove the lower arm to do this... Its super easy.
02-11-2014, 07:54 PM
#1059
That has never worked for me once, and I've been working on my own Hondas for around 15 years (yes lots of suspension work). I live in the desert and there is zero rust out here. I always torque to spec.
The best way to get it separated is to buy a tool called a tie-rod lifter. You can get them on Amazon for ~$24. You can also rent them for free from Oreilly Auto Parts (part of the 5-piece front end service set).

The best way to get it separated is to buy a tool called a tie-rod lifter. You can get them on Amazon for ~$24. You can also rent them for free from Oreilly Auto Parts (part of the 5-piece front end service set).
02-12-2014, 12:02 AM
#1060
Advanced
This is how Acura tech's admit to popping off control arms, I was hoping to try it but my service manual explicitly states to not strike the arm with any hammer. In fact, that was one of the only steps listed for LCA removal. "do NOT use a hammer/mallet on the joint or arm". Seems likely that the hammer would misshape the sleeve/joint enough to not go back in the same way ever again. Honestly I wouldn't be nervous about popping the arms at all but I've been seeing lots of hype in these threads about not letting the ball joint sleeve pop out of the control arm, seems completely inevitable though, unless you get lucky.
02-12-2014, 08:24 AM
#1061
Three Wheelin'
It amazes me that people are so scared to hit the control arm with a hammer... I use a 5 pound hammer and hit it as hard as i can and I have yet to bend a control arm or not get one loose (and I live in MN where everything is covered in rust). I could see that separation tool ruining a ball joint. I guess everyone has their own way of doing things but I have never had an issue separating ball joints of any kind this way and I have done it well over 200 times.
02-12-2014, 08:56 AM
#1062
Advanced
It amazes me that people are so scared to hit the control arm with a hammer... I use a 5 pound hammer and hit it as hard as i can and I have yet to bend a control arm or not get one loose (and I live in MN where everything is covered in rust). I could see that separation tool ruining a ball joint. I guess everyone has their own way of doing things but I have never had an issue separating ball joints of any kind this way and I have done it well over 200 times.
02-12-2014, 09:44 AM
#1063
Three Wheelin'
I have never had an issue with a sleeve not coming off, but I have had to use a propane torch to heat the arm up before. Also be sure to not hit the threads on the ball joint with the hammer, I keep the nut on, just loosened, so I do mess up the threads.
02-12-2014, 12:53 PM
#1064
Advanced
Also, nice g35 in your avatar. One of my favorite coupes
03-22-2014, 03:45 PM
#1065

Mine are surprisingly still in same shape as 2 year ago,,, but
Will MOOG be making one for us?? (since TSX, accord, and TL have same problematic bushing?)
http://www.moogproblemsolver.com/548...l#.Uy31sk2PI95
Honestly i'd buy the heeltoe one if it had covers.
Will MOOG be making one for us?? (since TSX, accord, and TL have same problematic bushing?)
http://www.moogproblemsolver.com/548...l#.Uy31sk2PI95
Honestly i'd buy the heeltoe one if it had covers.
03-27-2014, 10:17 AM
#1066
Moved to the LOU
iTrader: (6)
Would it be necessary to replace any of the other bushings since I am already going to replace the compliance bushings? I.E. Lower front arm bushing (51393-SEP-A01) and or front shock absorber bushing (51810-SDA-A01)
http://www.acuraoemparts.com/delray/...All&vinsrch=no
http://www.acuraoemparts.com/delray/...All&vinsrch=no
03-28-2014, 02:06 PM
#1067
Personally I wouldn't bother unless they looked shot. The lower-arm shock bushings tend to sag (hole in the middle gets of center) from the weight of the car, but that happens very early in their life. It doesn't mean they are toast. If they look deeply cracked & dried out, it couldn't hurt.
At $15 & $22 each plus the cost to press them, it's completely up to you. If you are buying a press yourself (harbor freight 20-ton coupon $154 till March 31....get the silver version), then what have you got to loose.
At $15 & $22 each plus the cost to press them, it's completely up to you. If you are buying a press yourself (harbor freight 20-ton coupon $154 till March 31....get the silver version), then what have you got to loose.
The following users liked this post:
twigglius (03-28-2014)
 03-31-2014, 12:50 PM
#1070
Mine are surprisingly still in same shape as 2 year ago,,, but
Will MOOG be making one for us?? (since TSX, accord, and TL have same problematic bushing?)
http://www.moogproblemsolver.com/548...l#.Uy31sk2PI95
Honestly i'd buy the heeltoe one if it had covers.
Will MOOG be making one for us?? (since TSX, accord, and TL have same problematic bushing?)
http://www.moogproblemsolver.com/548...l#.Uy31sk2PI95
Honestly i'd buy the heeltoe one if it had covers.
Covers? Why? They aren't needed.
04-01-2014, 12:28 AM
#1072
The only downside to that method on the Integra/Civic shown is that it puts all the tension directly through the ball & socket of the lower ball joint. Not necessarily ideal for ball joint life.
Also on the TL, that method will pull the steel stud-sleeve out of the arm. Honda says that's bad and requires the arm be replaced. They don't explain why.
Also on the TL, that method will pull the steel stud-sleeve out of the arm. Honda says that's bad and requires the arm be replaced. They don't explain why.
Last edited by 94eg!; 04-01-2014 at 12:31 AM.
The following users liked this post:
glennjr15 (01-06-2017)
04-01-2014, 01:08 AM
#1073

I plan on doing my bushings next week. What is the general consensus on the best method for separating the ball joint? Pitman puller? I was going to try the method in the video above, but now i am hesitant.
04-01-2014, 08:35 AM
#1074
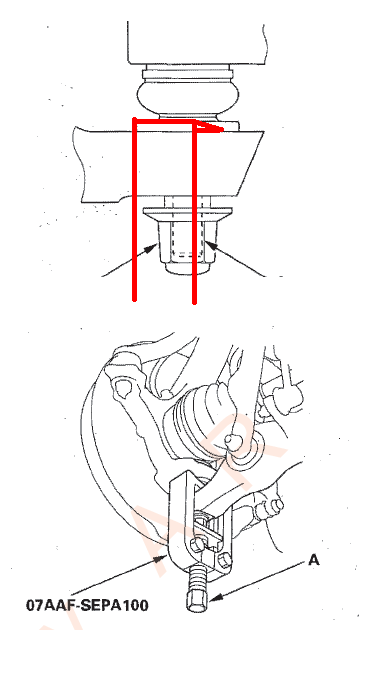
Rent this tool set (5-piece front end service set) from OerillyAutoParts for free and see which one of these tools fits and still grabs the sleeve in the control arm. If it's not grabbing the sleeve on top of the arm (just below the boot) then it's wrong.

I drew this picture to illustrate the idea of pressing the sleeve (magenta) back into the arm (green). But it does give you an idea of how the tool should be setup with the claws grabbing the sleeve.
This Image shows the $500+ Honda tool. But the red lines someone drew are incorrect as they should be on top of the sleeve instead of next to it.

I drew this picture to illustrate the idea of pressing the sleeve (magenta) back into the arm (green). But it does give you an idea of how the tool should be setup with the claws grabbing the sleeve.

This Image shows the $500+ Honda tool. But the red lines someone drew are incorrect as they should be on top of the sleeve instead of next to it.
The following users liked this post:
glennjr15 (01-06-2017)
04-01-2014, 08:42 AM
#1075
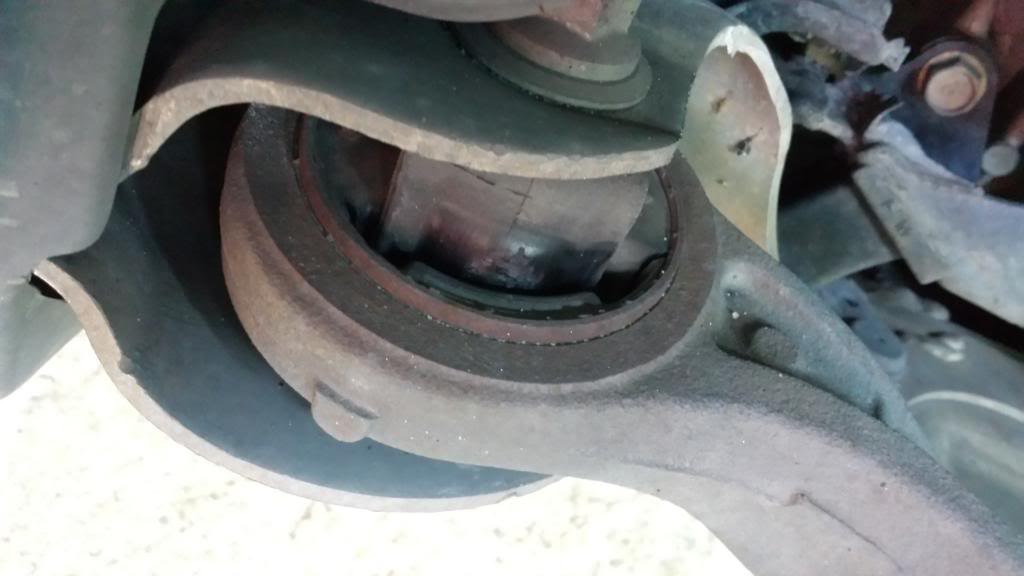
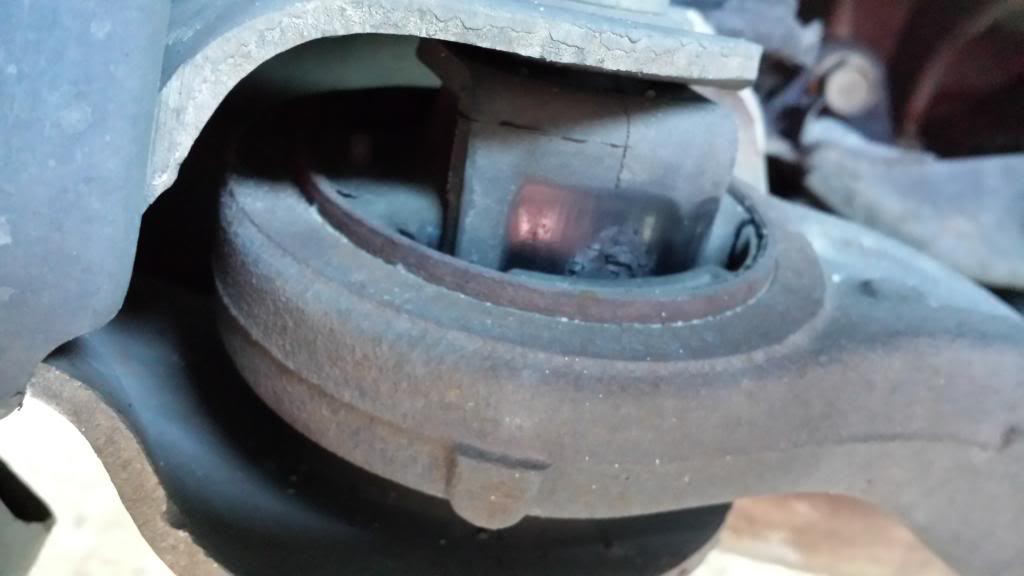
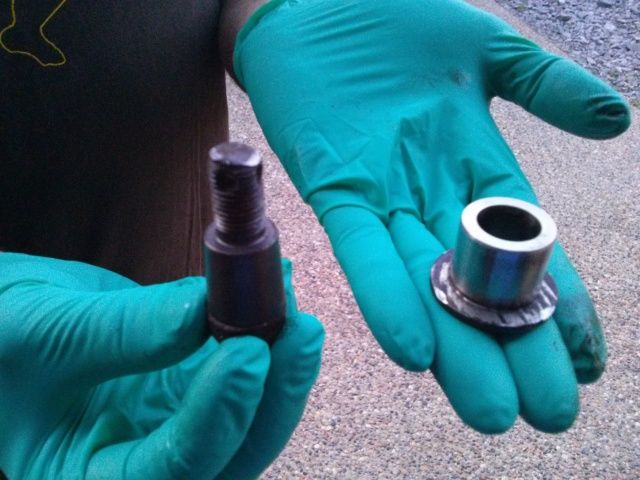
This pictures show the bad news when the sleeve comes out of the arm.
Still attached to the ball-joint stud:
CAM00602_zpsc1e8b02e.jpg?t=1374625512
After being cut off:
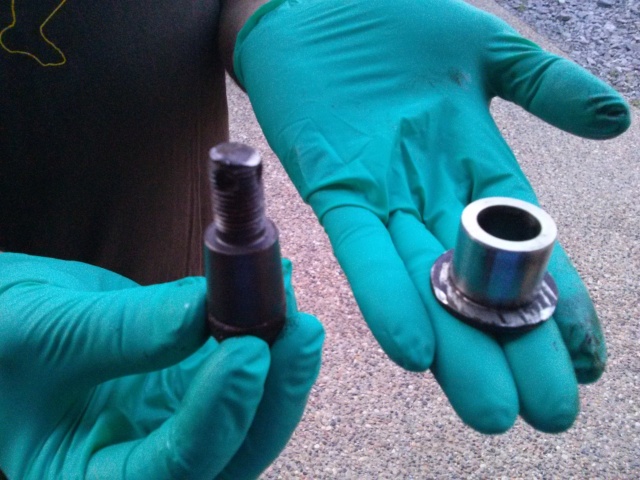
Another shot of 1 missing and 1 pulled arm sleeve:

Still attached to the ball-joint stud:
CAM00602_zpsc1e8b02e.jpg?t=1374625512
After being cut off:
Another shot of 1 missing and 1 pulled arm sleeve:
Last edited by 94eg!; 04-01-2014 at 08:49 AM.
04-03-2014, 08:39 AM
#1078
Not that I've ever seen. You could just buy one and sell it again here on the black market. It will probably sell very fast if you knock $20 or $30 off the new tool price. It's $140 on Amazon, or you could build your own for $50 as mentioned above.
04-03-2014, 07:35 PM
#1079
No it isn't. It isn't a powertrain part (engine).
The force of pulling out the ball joint is much less than that of getting the sleeve out. I believe it is perfectly safe and have done it a bunch of times.
These images are NOT from popping the ball joint loose. This happened, I am assuming, when (Yawsport?) installed extended ball joints in their TL with the provided nuts, which were not large enough to capture the sleeve, and it came loose during a high-performance climb event.

These images are NOT from popping the ball joint loose. This happened, I am assuming, when (Yawsport?) installed extended ball joints in their TL with the provided nuts, which were not large enough to capture the sleeve, and it came loose during a high-performance climb event.
The following users liked this post:
glennjr15 (01-06-2017)
The following users liked this post:
glennjr15 (01-06-2017)