
Death Metal's Journey (a DIY'ers Worklog for TL Perfection!)

 11-03-2011, 09:36 PM
#602
Team Owner
iTrader: (2)
Join Date: Jan 2008
Location: Kansas City, MO (Overland Park, KS)
Posts: 36,545
Received 6,470 Likes
on
5,162 Posts
Dude....STOP!
Then come to KC and LED my Type S.
Then come to KC and LED my Type S.
11-04-2011, 11:39 AM
#603
takin care of Business in
iTrader: (5)
Join Date: Jan 2008
Location: Kansas City, MO
Age: 40
Posts: 30,994
Received 4,732 Likes
on
4,064 Posts
^^^ and while you are here might as well do mine 
and my name is Anil not Alin LOL
and my name is Anil not Alin LOL
11-05-2011, 05:52 PM
#604
Fearless DIY Guy
Thread Starter
iTrader: (2)
Busy moving along this evening in the garage with my girl Stella Artois, more pics tonight! Panel is FINALLY done!
PERSONAL NOTE: WORK FASTER BEFORE THE BEER TAKES OVER
PERSONAL NOTE: WORK FASTER BEFORE THE BEER TAKES OVER
Last edited by Steven Bell; 11-06-2011 at 09:14 PM. Reason: Merged Posts.
11-05-2011, 10:17 PM
#605
takin care of Business in
iTrader: (5)
Join Date: Jan 2008
Location: Kansas City, MO
Age: 40
Posts: 30,994
Received 4,732 Likes
on
4,064 Posts
^^^ 
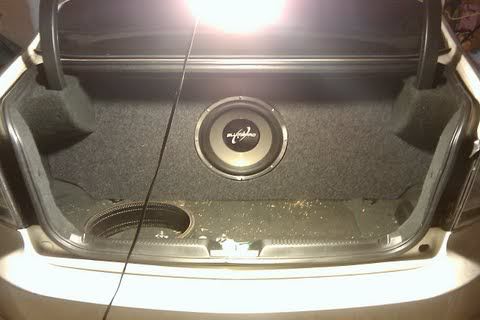
i always thought you had the sub and that panel
i always thought you had the sub and that panel
The following users liked this post:
DeathMetal (11-06-2011)
11-06-2011, 09:08 PM
#609
BANNED
iTrader: (33)

lookin good D.
trunk panel is money! clean clean clean!
trunk panel is money! clean clean clean!
11-07-2011, 08:07 AM
#611
If you insist! 
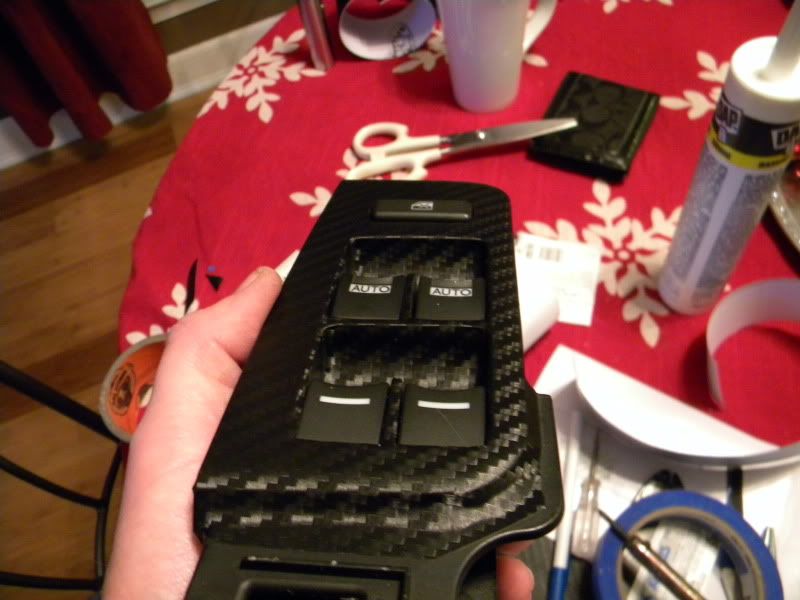
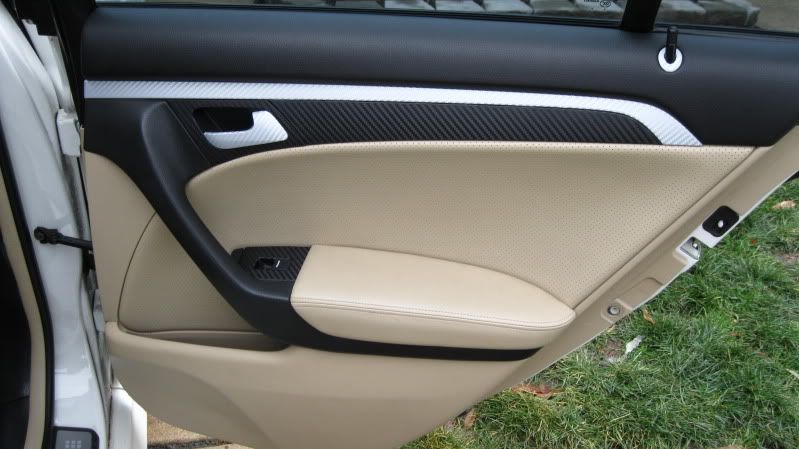
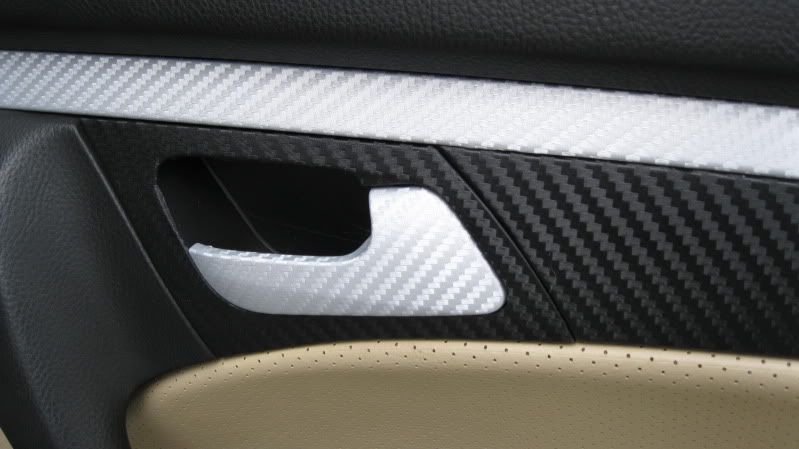
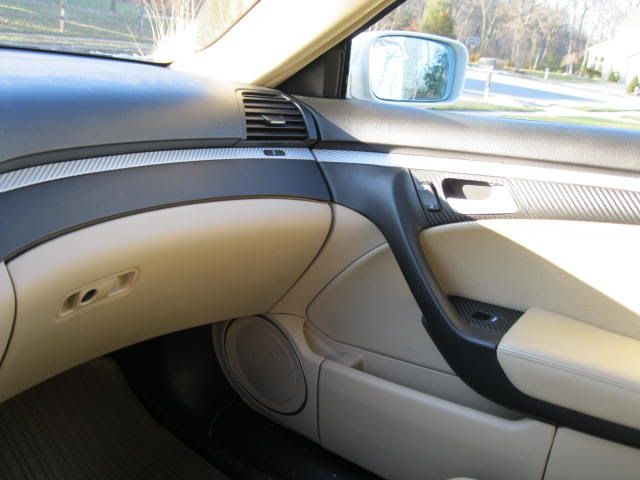
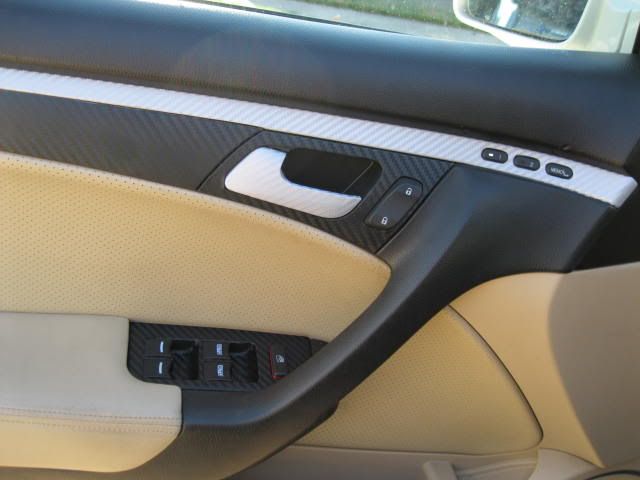
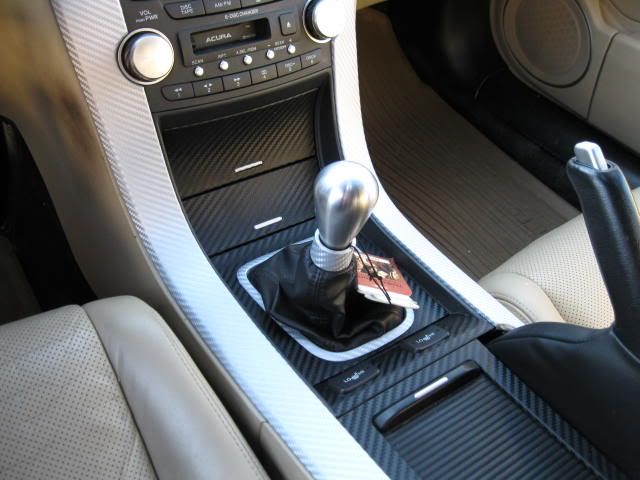
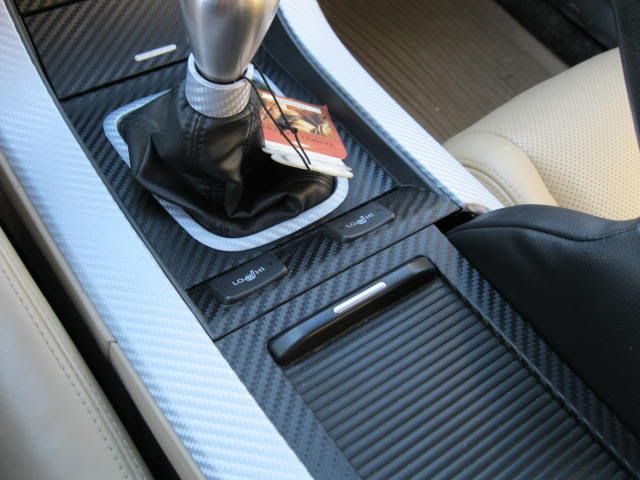
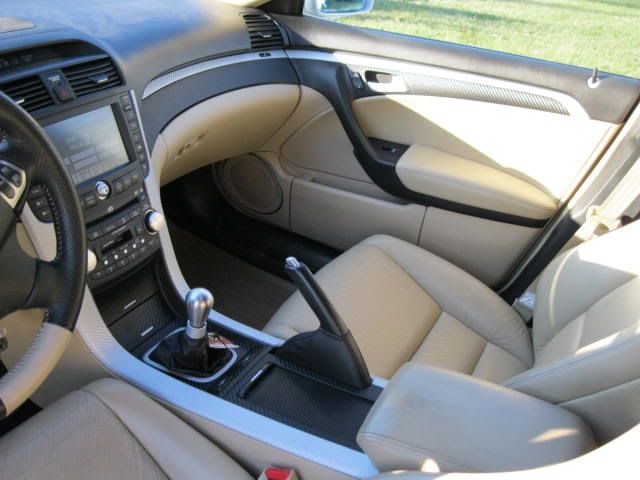
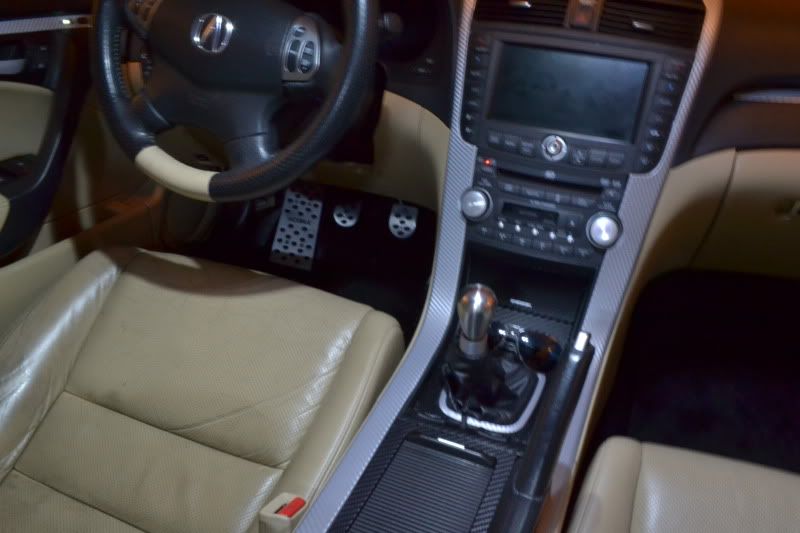
So, after seeing a fair number of Di-noc threads, and doing what I ALWAYS do (slave over a ton of research), I decided to pull the trigger and change things up on the interior a bit. I did not, however, go with the flavor of the month Di-Noc and instead went with Metro Restyling's M-500 vinyl as it was a bit shinier than the Di-Noc and claims to hold up to the elements better, which is a good thing because Lord knows there's plenty of shitstorms thundering in my car when teh 'Garden State's Finest' decide to hit the road and elect to text over drive.
Of course, we're doing this with a twist, and you'll see what I mean. Just as with my tails, I am doing something DIFFERENT here - take it or leave it. So let's do this.
For whatever reason, I decided to do this part first, probably due to the fact that it's the easiest part to get to. I'll probably do this one over and add some silver to one of the switches, as it's not absolutely flawless...but it gets the jeorb done.

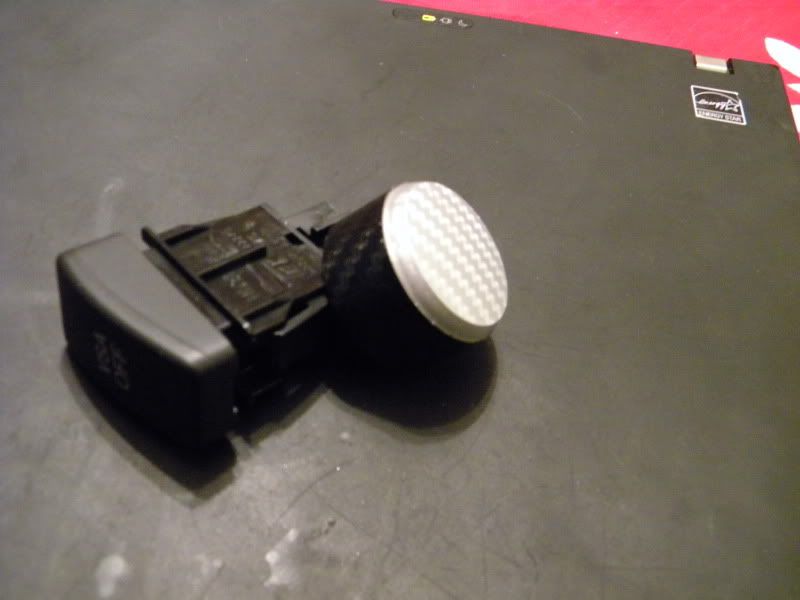
Just another random pic
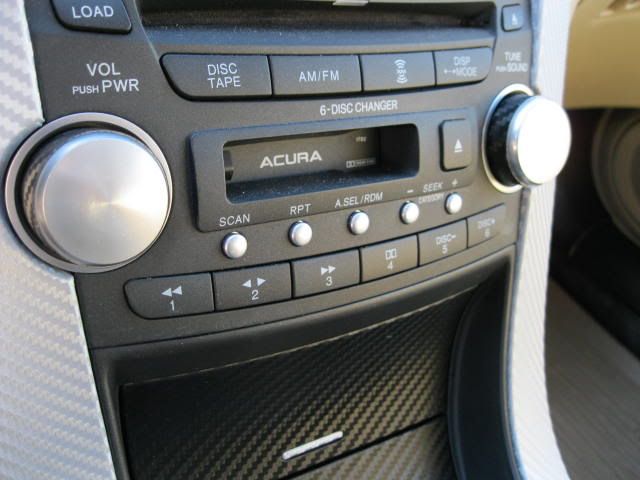
So, since we can play around, I decided to try something different with the radio knobs for shits and giggles. While the end product is nice, it did not quite flow as I had wished, so we'll have some shots of this down the road...
You know what happens when you combine wrapping presents, a curious dog, and vinyl? If you read the last post, you'd know. Again, BAD THINGS. So I spent about an hour looking for the stupid silver garnish on one of the storage doors when I accepted defeat and needed to look for alternative solutions. Enter the toothpick.
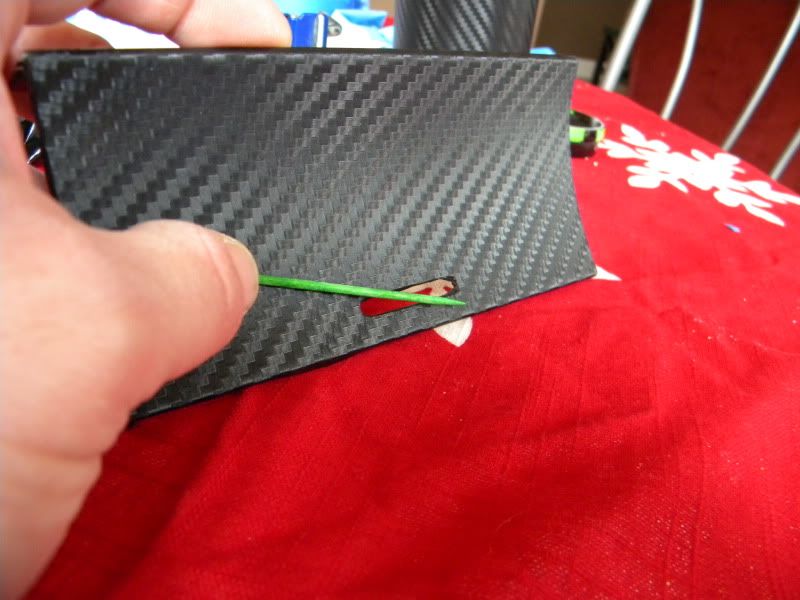
Hmmm...I'll bet I could make this fit...
This looks promising...
Yep, got it.
...and there you have it. That's how a toothpick becomes a modded TL component. So if someone asks what did I do to my car, I can honestly respond, "Just added some sticks and stuff." Ironically, it fills the gap better than the OE part!!!
I did not take many pics of the wrapping as all you would see is a ton of disassembly, trimming, heat gunning, and the like. For me, each door took about 3 to 4 hours from removal to install. I stripped all components from the door to REALLY get the vinyl in there well and to make sure even the CF weave was continuous from part to part (probably the second hardest part, hardest being the silver/black seam). Overall, though, the single most PITA part was the long silver garnish on the console - this bitch has some crazy curves and gets wider in a very subtle way that turns a straight forward install a tortuous tantrum fest.
...but it's done. To all my friends on the 'Zine, sorry if I have not replied yet (to PMs as well), I'll be sure to tend to this tonight/tomorrow.
Enjoy, and keep on modding!
So, after seeing a fair number of Di-noc threads, and doing what I ALWAYS do (slave over a ton of research), I decided to pull the trigger and change things up on the interior a bit. I did not, however, go with the flavor of the month Di-Noc and instead went with Metro Restyling's M-500 vinyl as it was a bit shinier than the Di-Noc and claims to hold up to the elements better, which is a good thing because Lord knows there's plenty of shitstorms thundering in my car when teh 'Garden State's Finest' decide to hit the road and elect to text over drive.
Of course, we're doing this with a twist, and you'll see what I mean. Just as with my tails, I am doing something DIFFERENT here - take it or leave it. So let's do this.
For whatever reason, I decided to do this part first, probably due to the fact that it's the easiest part to get to. I'll probably do this one over and add some silver to one of the switches, as it's not absolutely flawless...but it gets the jeorb done.
Just another random pic
So, since we can play around, I decided to try something different with the radio knobs for shits and giggles. While the end product is nice, it did not quite flow as I had wished, so we'll have some shots of this down the road...
You know what happens when you combine wrapping presents, a curious dog, and vinyl? If you read the last post, you'd know. Again, BAD THINGS. So I spent about an hour looking for the stupid silver garnish on one of the storage doors when I accepted defeat and needed to look for alternative solutions. Enter the toothpick.
Hmmm...I'll bet I could make this fit...
This looks promising...
Yep, got it.
...and there you have it. That's how a toothpick becomes a modded TL component. So if someone asks what did I do to my car, I can honestly respond, "Just added some sticks and stuff."
Ironically, it fills the gap better than the OE part!!! I did not take many pics of the wrapping as all you would see is a ton of disassembly, trimming, heat gunning, and the like. For me, each door took about 3 to 4 hours from removal to install. I stripped all components from the door to REALLY get the vinyl in there well and to make sure even the CF weave was continuous from part to part (probably the second hardest part, hardest being the silver/black seam). Overall, though, the single most PITA part was the long silver garnish on the console - this bitch has some crazy curves and gets wider in a very subtle way that turns a straight forward install a tortuous tantrum fest.
...but it's done. To all my friends on the 'Zine, sorry if I have not replied yet (to PMs as well), I'll be sure to tend to this tonight/tomorrow.
Enjoy, and keep on modding!
i know this was awhile ago in your timeline, but did you happen to make yourself a template/measurement set? you hit every piece that i want to wrap
11-07-2011, 02:04 PM
#612
Just an FYI...I just used your thread to confirm whether or not the mirror left/right select and heater actually have a bulb in them that is out. Looks like they don't.
Thank you!
My bulbs are going, little by little. Need to replace about 5 of them.
Thank you!
My bulbs are going, little by little. Need to replace about 5 of them.
11-07-2011, 08:17 PM
#613
takin care of Business in
iTrader: (5)
Join Date: Jan 2008
Location: Kansas City, MO
Age: 40
Posts: 30,994
Received 4,732 Likes
on
4,064 Posts
^^^ hahahaha....i know how you feel....
its like one by one they are going....feels like the car is slowing nearing her end.....
i need to do an LED transplant to keep her alive....
its like one by one they are going....feels like the car is slowing nearing her end.....
i need to do an LED transplant to keep her alive
....
11-08-2011, 05:39 PM
#614
DAN! Clear your fkn PM'S! Figured you'd see this here...
Dan!!!...saw this and thought of you, if you haven't pulled the trigger yet...$85 is probably a STEAL for all this comes with. Based on the shape, my guess is this will work on a 3G.
Let me know if you pull the trigger!
https://acurazine.com/forums/car-parts-sale-361/mdx-spacer-2-p2r-manifold-gaskets-bolts-838076/
The following users liked this post:
DeathMetal (11-08-2011)
11-08-2011, 07:19 PM
#615
Fearless DIY Guy
Thread Starter
iTrader: (2)
DAN! Clear your fkn PM'S! Figured you'd see this here...
Dan!!!...saw this and thought of you, if you haven't pulled the trigger yet...$85 is probably a STEAL for all this comes with. Based on the shape, my guess is this will work on a 3G.
Let me know if you pull the trigger!
https://acurazine.com/forums/showthread.php?t=838076
Dan!!!...saw this and thought of you, if you haven't pulled the trigger yet...$85 is probably a STEAL for all this comes with. Based on the shape, my guess is this will work on a 3G.
Let me know if you pull the trigger!
https://acurazine.com/forums/showthread.php?t=838076
The following users liked this post:
rockstar143 (11-08-2011)
11-08-2011, 07:28 PM
#616
takin care of Business in
iTrader: (5)
Join Date: Jan 2008
Location: Kansas City, MO
Age: 40
Posts: 30,994
Received 4,732 Likes
on
4,064 Posts
^^^ Yo J...thats a great find....
Dan....jump on eeettttt !!!! Thats a heck of a deal....i paid $70 just for the damn P2R gaskets....
Dan....jump on eeettttt !!!! Thats a heck of a deal....i paid $70 just for the damn P2R gaskets....
The following users liked this post:
rockstar143 (11-08-2011)
11-08-2011, 09:09 PM
#619
Fearless DIY Guy
Thread Starter
iTrader: (2)

Sadly, I'm doing one more interior mod this week (time pending), and we've officially closed out the 'INTERIOR' portion of this overhaul. The final segments, assuming we get bonuses next year, will close out the final two chapters - EXTERIOR and EXHAUST....but you know how THAT goes in this neck of the woods!
 Anyway, Go to metrostyling and look for the 6" width wrap - that's ALL YOU NEED for ALL portions except the o'head console - that's 12" width...or was it 8"
For the template, I used this crazy thing called THE ACTUAL PART OF THE CAR, fortunately all TLs come with this feature standard!

NO COMPARISON, PERIOD. The wrap. This game is about details, no? You'll never beat the level of precision the wrap will provide, which ultimatley makes or brakes the line between a GOOD and GREAT mod
11-08-2011, 09:16 PM
#620
takin care of Business in
iTrader: (5)
Join Date: Jan 2008
Location: Kansas City, MO
Age: 40
Posts: 30,994
Received 4,732 Likes
on
4,064 Posts
even if he ask $10 more its worth it LOL....give him some value added service to convince him for the sale....
sorry IT guy in management shoes talking....
sorry IT guy in management shoes talking....
11-08-2011, 09:54 PM
#622
Fearless DIY Guy
Thread Starter
iTrader: (2)
Oh, it's ON. Just sent payment. Talk about saving some serious dinero, I'll be able to order the IM setup and the pulley next month!
In the meantime, I'm going to try my foot in retrofitting the 2nd gen TL tails...
In the meantime, I'm going to try my foot in retrofitting the 2nd gen TL tails...
11-08-2011, 10:13 PM
#623
takin care of Business in
iTrader: (5)
Join Date: Jan 2008
Location: Kansas City, MO
Age: 40
Posts: 30,994
Received 4,732 Likes
on
4,064 Posts
^^^ 
that might come out with hate it / love it reviews....
that might come out with hate it / love it reviews....
The following users liked this post:
swoosh (11-09-2011)
11-09-2011, 06:46 AM
#626
takin care of Business in
iTrader: (5)
Join Date: Jan 2008
Location: Kansas City, MO
Age: 40
Posts: 30,994
Received 4,732 Likes
on
4,064 Posts
There should be a "like" button on Azine
11-09-2011, 08:15 AM
#627
sent payment for what??! You got the spacer/gaskets!?!? Yay!!!
You are trying to retro some 2nd gens to fit the 3G?! Maybe I missed something...
PS...I took your advice on the vinyl...ordered from metro...super cheap and fast ship! Nevermind that the "brushed aluminum" looked like scratched up aluminum foil dipped in chrome...I asked them if they would split the difference in a few feet of the their carbon fiber but they told me "tough cr*p" should have ordered a sample first. Whatever...they were right...I should have. But cheap and easy to deal with...
11-10-2011, 06:28 AM
#629
Fearless DIY Guy
Thread Starter
iTrader: (2)
sent payment for what??! You got the spacer/gaskets!?!? Yay!!!
You are trying to retro some 2nd gens to fit the 3G?! Maybe I missed something...
PS...I took your advice on the vinyl...ordered from metro...super cheap and fast ship! Nevermind that the "brushed aluminum" looked like scratched up aluminum foil dipped in chrome...I asked them if they would split the difference in a few feet of the their carbon fiber but they told me "tough cr*p" should have ordered a sample first. Whatever...they were right...I should have. But cheap and easy to deal with...
You are trying to retro some 2nd gens to fit the 3G?! Maybe I missed something...
PS...I took your advice on the vinyl...ordered from metro...super cheap and fast ship! Nevermind that the "brushed aluminum" looked like scratched up aluminum foil dipped in chrome...I asked them if they would split the difference in a few feet of the their carbon fiber but they told me "tough cr*p" should have ordered a sample first. Whatever...they were right...I should have. But cheap and easy to deal with...
Yes, got the spacer/gaskets, again, that was a tremendous look-out, my man!
Finally - tails. Since I am going to be in 'idle' mode in December - Feb on the mods, I am going to be working on fabbing 2nd gen LED tails since its an untapped market. This will give me some more play money to finish out the TL, or come close to it, while giving me something to work on when it's cold as balls outside!
11-12-2011, 08:20 PM
#630
Fearless DIY Guy
Thread Starter
iTrader: (2)
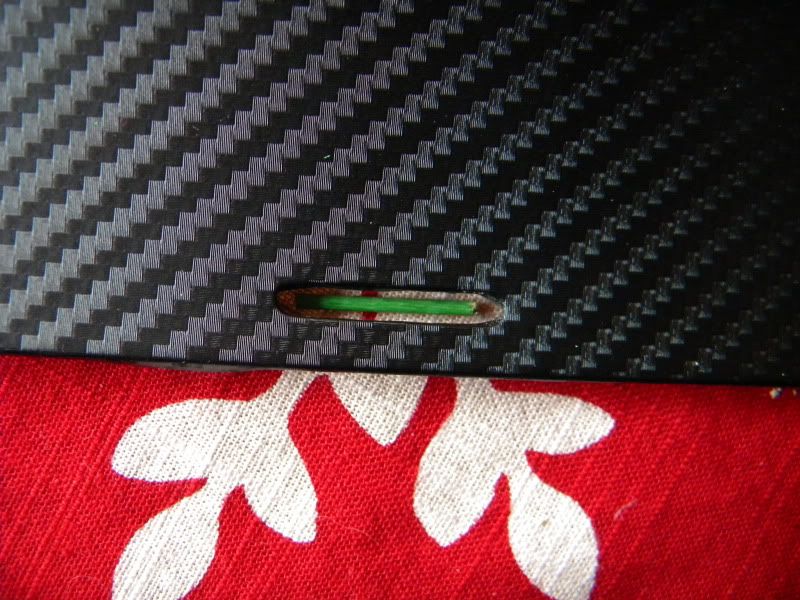
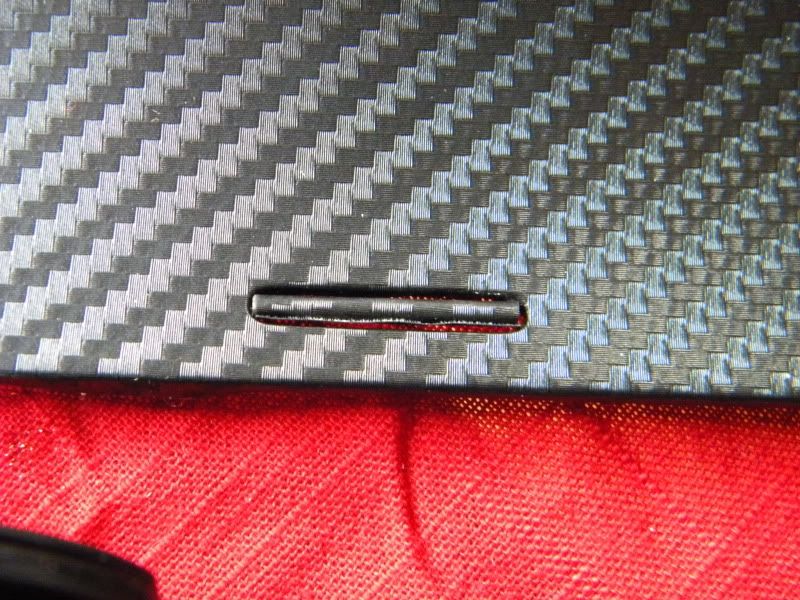
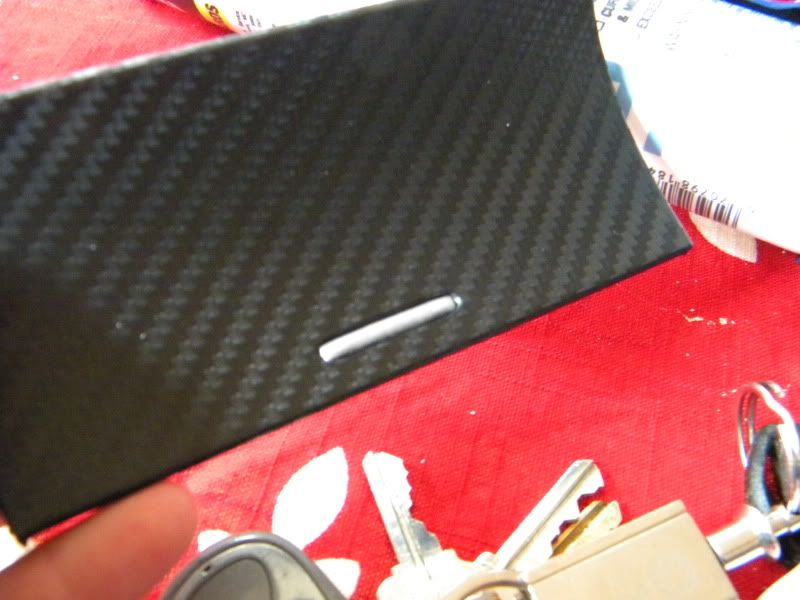
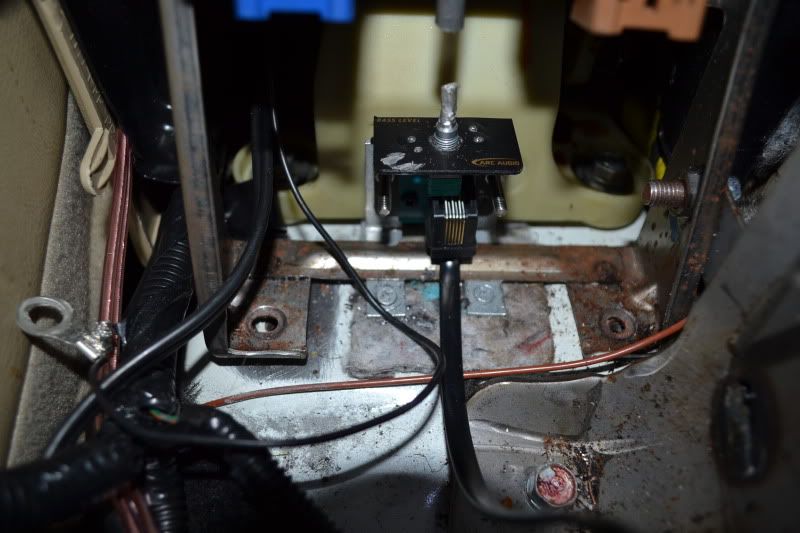
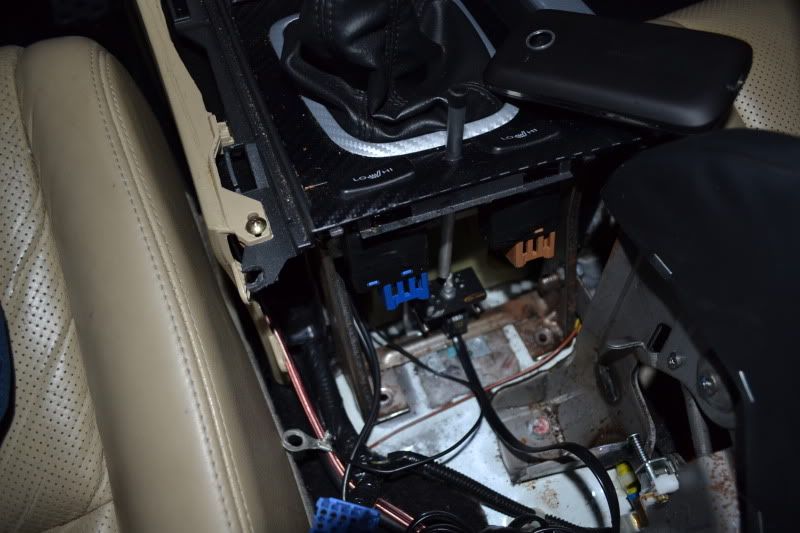
So, with the vast differences between Death Metal and Trance, it was only of vital necessity that I install the bass knob in a readily accessible location, so I purchased some aluminum rod and gave it the brushed look with some scotchbrite....
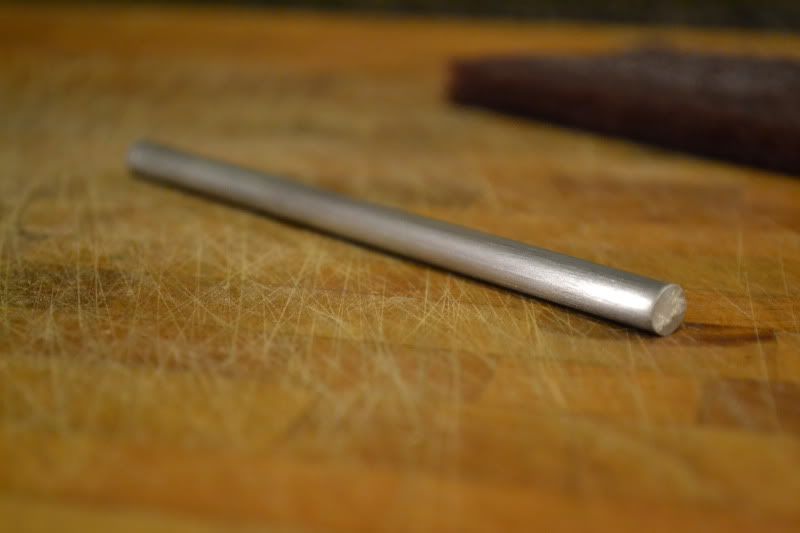
After that, it was time to punch out a center hole...GODDDAMN GOOD considering how I did this with a drill in one hand and the rod in the other!!!
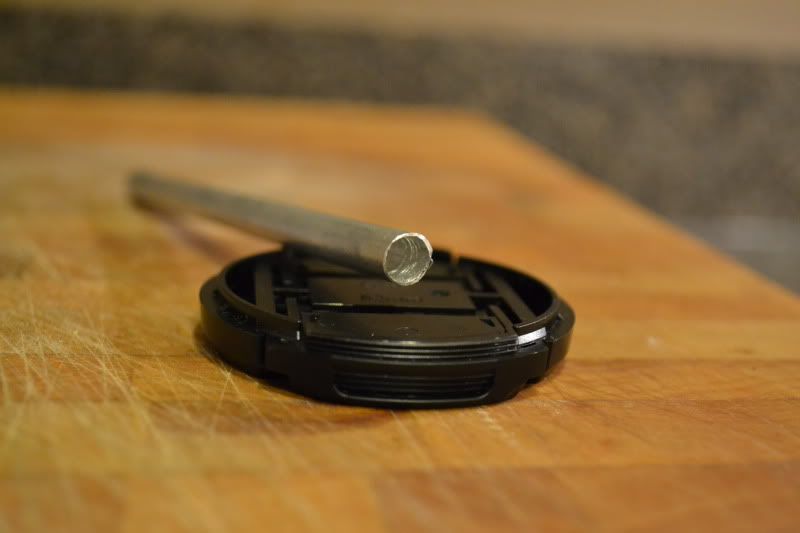
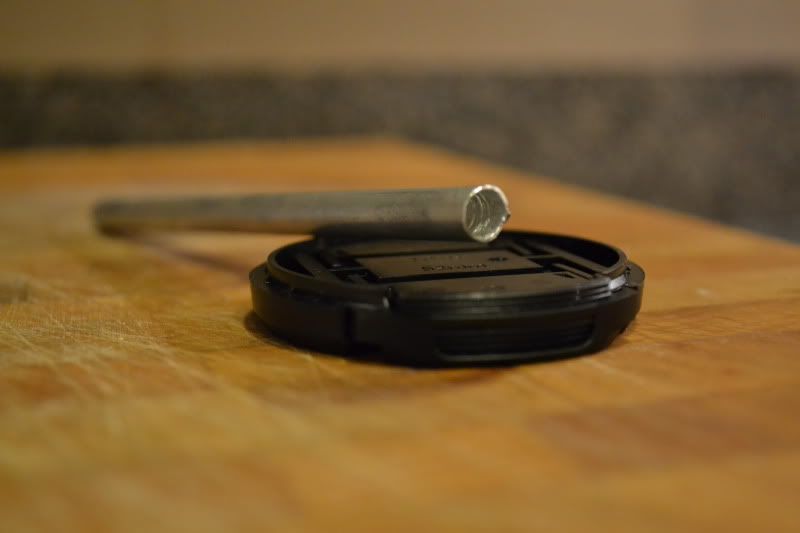
After that, it's time for some CF wrap to complete the look...
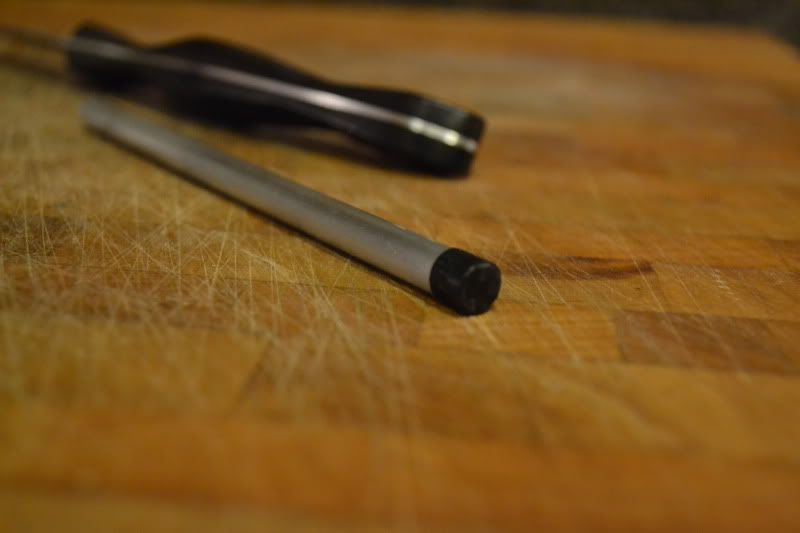
Here's the installation and a blurry shot of the final completed version!
After that, it was time to punch out a center hole...GODDDAMN GOOD considering how I did this with a drill in one hand and the rod in the other!!!
After that, it's time for some CF wrap to complete the look...
Here's the installation and a blurry shot of the final completed version!
Last edited by DeathMetal; 11-12-2011 at 08:24 PM.
11-12-2011, 09:27 PM
#631
that's pretty balsy dude...you're lucky you didn't come out of the sides of the aluminum and fk up your hand!
But, now that I see why you did it, looks great...I thought you had it backlit in blue LED? I love the location, I actually used double sided tape to hold down the mb quart bass knob remote in the little cubby hole.
But, now that I see why you did it, looks great...I thought you had it backlit in blue LED? I love the location, I actually used double sided tape to hold down the mb quart bass knob remote in the little cubby hole.
11-12-2011, 11:47 PM
#632
takin care of Business in
iTrader: (5)
Join Date: Jan 2008
Location: Kansas City, MO
Age: 40
Posts: 30,994
Received 4,732 Likes
on
4,064 Posts
Install looks good as always.....very professionally done....
where was the bass knob before the install....?
where was the bass knob before the install....?
11-13-2011, 03:45 AM
#635
takin care of Business in
iTrader: (5)
Join Date: Jan 2008
Location: Kansas City, MO
Age: 40
Posts: 30,994
Received 4,732 Likes
on
4,064 Posts
^^^ LOL....what is a bass knob for ? hint: its in the name
11-13-2011, 06:30 PM
#636
Fearless DIY Guy
Thread Starter
iTrader: (2)
On the passenger seat, with the cable routed behind the e-brake handle

The bass level varies greatly from song to song on most of my playlists, so I spent a good deal of time scanning the interior for the single easiest place to reach...and viola, the location was born!
11-14-2011, 12:29 AM
#638
11-14-2011, 12:31 AM
#639
takin care of Business in
iTrader: (5)
Join Date: Jan 2008
Location: Kansas City, MO
Age: 40
Posts: 30,994
Received 4,732 Likes
on
4,064 Posts
^^^ its ight bro....we all are here to help....LOL
11-14-2011, 07:00 AM
#640
Well, FWIW, I think what you ended up doing is perfect. Great and it absolutely is the easiest place to use it.
My old amp didn't have a knob (or a working on)...so I snagged signal from the oem amp. I'd have to go thru the menu on the HU to change bass from song to song, what a PITA. I ended up daisy chaining my mid/high amp to my sub amp and ran the remote. MUCH more user friendly...plus, the mb remote has clip indicator ON it. Helps me push the limit without frying anything.
My old amp didn't have a knob (or a working on)...so I snagged signal from the oem amp. I'd have to go thru the menu on the HU to change bass from song to song, what a PITA. I ended up daisy chaining my mid/high amp to my sub amp and ran the remote. MUCH more user friendly...plus, the mb remote has clip indicator ON it.
Helps me push the limit without frying anything.