
Visualogic VMOD (Media On Demand)


Thread Starter
Instructor
Joined: Feb 2007
Posts: 125
Likes: 0
From: Houston, TX
Visualogic VMOD (Media On Demand)
My apologies if this has already been discussed but I searched with no threads found on it.
Has anyone thought about or actually installed this? It's $1k so not super cheap as far as CarPC goes but for an easy CarPC install that looks very clean and can be easily hidden I'm very tempted to go with this instead of building a typical CarPC.
I have an 07 Navi TL so I already have the display and an auxillary audio input in the center console as well as with my DICE and I have the NavTool interface for video (not installed yet) so basically all I'd have to do is mount in the trunk near the DVD and then get it connected to remote power, constant power, ground, and then run a 3.5mm male/male audio cable to the center console (while also running the toggle switch for the NavTool) for the audio and finally connect the video to the NavTool via RCA. The unit has a bluetooth hand held remote control so that's all I would have in the front seat with me and it could be stored in the center console. You can also use a USB or PS/2 mouse and keyboard when in Windows XP mode.
The interface is modified StreetDeck software.
The negatives that I can see with this (and help me out if I'm missing something) are:
Product website:
http://www.myvmod.com/home.php
Crutchfield Page:
http://www.crutchfield.com/p_030VMOD...465&tab=review
And here are the pics from Crutchfield:


Has anyone thought about or actually installed this? It's $1k so not super cheap as far as CarPC goes but for an easy CarPC install that looks very clean and can be easily hidden I'm very tempted to go with this instead of building a typical CarPC.
I have an 07 Navi TL so I already have the display and an auxillary audio input in the center console as well as with my DICE and I have the NavTool interface for video (not installed yet) so basically all I'd have to do is mount in the trunk near the DVD and then get it connected to remote power, constant power, ground, and then run a 3.5mm male/male audio cable to the center console (while also running the toggle switch for the NavTool) for the audio and finally connect the video to the NavTool via RCA. The unit has a bluetooth hand held remote control so that's all I would have in the front seat with me and it could be stored in the center console. You can also use a USB or PS/2 mouse and keyboard when in Windows XP mode.
The interface is modified StreetDeck software.
The negatives that I can see with this (and help me out if I'm missing something) are:
- Price is double what I would pay for a pretty decent CarPC (but it's smaller and a lot cleaner of an install)
- 40GB hard drive is pretty small and I'm not sure if I can upgrade that or not as it says that it's an "automotive grade hard drive" which could mean that it's solid state and would be hella expensive to replace. Does anyone know what that likely means? I emailed the company a little while ago asking whether or not it can be upgraded by myself (yes I know it will void the warranty lol) but haven't heard back from them yet. It may also be possible to use an external hard drive with it but I'm not sure if the VMOD can play straight from the external or if it has to copy to the main hard drive. Again I asked that question and am waiting to hear back from them.
- It won't be touch screen but I can't really do anything about that anyway since I have the factory Navi screen.
- No DVD drive so I'd need another piece of hardware to play DVD's.
Product website:
http://www.myvmod.com/home.php
Crutchfield Page:
http://www.crutchfield.com/p_030VMOD...465&tab=review
Vizualogic's Media On Demand mobile media server eliminates the need for multiple entertainment gadgets on family road trips. This compact server combines portable music, video, and Internet capabilities in one durable package that works with the existing audio/video system in your car. Imagine driving while your passengers check their e-mail, share photos and videos on your vehicle's screens, play challenging games, or get down with hot new songs � the VMOD can make it happen.
PC-like functionality
The VMOD's hardware features a 40GB automotive-grade hard drive with plenty of storage space for your media files. It comes with a 1GHz Intel Celeron processor and runs Microsoft Windows� XP with Windows Media Player� 11. The die-cast aluminum housing keeps your media safe.
Connections galore
Five high-speed USB 2.0 ports allow for plenty of connectivity to your thumb drives and other devices. The VMOD also includes a wired ethernet port, a mouse/keyboard/video game input, and an audio input. Use the VGA/composite video and audio outputs for sending images to your vehicle's screen, along with impressive 16-bit stereo sound to your audio system. You control the VMOD using the included Bluetooth remote or an external keyboard. A remote-mounted power switch allows you to turn it on or off from nearly anywhere in the car.
Keep your riders occupied
Your passengers will thrill to the options the VMOD provides � load up the hard drive with up to 10,000 songs or 50 hours of compatible video for endless entertainment on the go, or play the pre-loaded video games on your vehicle's screen. The VMOD runs Microsoft Internet Explorer� for browsing the web in your car with its built-in Wi-Fi connectivity. Most impressively, the VMOD automatically synchs with your home computer, giving you access to video, photos, music, and other content when you're miles away.
Even more options
Vizualogic offers an add-on GPS navigation package so the VMOD can give you directions to all your destinations. Find nearby points of interest and faster routes without having to clutter up your dash with additional devices. The VMOD's add-on satellite radio compatibility means even more options for listening with your optional subscription to your favorite satellite radio service.
Details:
- General features
- mobile media server with built-in PC running Windows� XP
- plays Windows Media video and audio files from hard drive, external devices, or streaming
- 40GB hard drive and 512MB RAM
- Wi-Fi compatible
- 2 pre-loaded games
- Bluetooth remote
- Expandability:
- inputs: 5 USB 2.0 slots, ethernet and ENAMP ports, audio input, keyboard/mouse input
- outputs: composite and VGA video outputs, audio output
- navigation and satellite radio add-ons available
- Other features:
- dimensions: 1-3/4"H x 8-1/8"W x 5-1/4"D
- warranty: 1 year
Thread Starter
Instructor
Joined: Feb 2007
Posts: 125
Likes: 0
From: Houston, TX
Senior Moderator


Joined: Feb 2006
Posts: 21,418
Likes: 2,187
From: Space Coast, FL
the exact number is 480x234 which is the size and resolution of the startup image on the navi screen. I did the car-pc with navi and dom's converter and it wasn't very legible unless I forced it to run 640x480 16 bit and squinted.
Thread Starter
Instructor
Joined: Feb 2007
Posts: 125
Likes: 0
From: Houston, TX
Thread Starter
Instructor
Joined: Feb 2007
Posts: 125
Likes: 0
From: Houston, TX
To my surprise I heard back from the company very quick!
[quote]-- 1st email to me
The hard drive is an automotive grade (1.8") Toshiba drive. At this time no upgrade available. The VMOD system is run off Windows XP. Everything you can do with your home computer, as far as software, can be done with the VMOD.
I will be running a special on the VMOD come Monday. Please let me know when your ready to purchase.
-- 2nd email to me
Yes, you can use any external drive for extra space. As for connecting it to your factory system ... your text wont look great on that screen but video will be pretty good.
Any questions, please let me know. The special I can offer you is $750. Purchased off one of our customers websites./quote]
If it weren't for the limitations of the factory screen I'd be sold (especially at $750!) but if I can't read the text on the screen then it doesn't do me a whole lot of good.
So does anyone have a suggestion on where to go from here?
Is there a way to get a higher resolution displayed on the factory screen?
Is it possible to replace the factory screen with an aftermarket screen? What functionality would be lost in doing so?
Thread Starter
Instructor
Joined: Feb 2007
Posts: 125
Likes: 0
From: Houston, TX
To my surprise I heard back from the company very quick!
If it weren't for the limitations of the factory screen I'd be sold (especially at $750!) but if I can't read the text on the screen then it doesn't do me a whole lot of good.
So does anyone have a suggestion on where to go from here?
Is there a way to get a higher resolution displayed on the factory screen?
Is it possible to replace the factory screen with an aftermarket screen? What functionality would be lost in doing so?
-- 1st email to me
The hard drive is an automotive grade (1.8") Toshiba drive. At this time no upgrade available. The VMOD system is run off Windows XP. Everything you can do with your home computer, as far as software, can be done with the VMOD.
I will be running a special on the VMOD come Monday. Please let me know when your ready to purchase.
-- 2nd email to me
Yes, you can use any external drive for extra space. As for connecting it to your factory system ... your text wont look great on that screen but video will be pretty good.
Any questions, please let me know. The special I can offer you is $750. Purchased off one of our customers websites.
If it weren't for the limitations of the factory screen I'd be sold (especially at $750!) but if I can't read the text on the screen then it doesn't do me a whole lot of good.
So does anyone have a suggestion on where to go from here?
Is there a way to get a higher resolution displayed on the factory screen?
Is it possible to replace the factory screen with an aftermarket screen? What functionality would be lost in doing so?
Trending Topics
Advanced

Joined: Apr 2007
Posts: 55
Likes: 4
From: Russia, Tula
So then there really is no way to use the factory screen as a display? I remember the thread that met152 posted about how he used his and it looked pretty good to me. What is the difference with this that would keep it from looking the same as his? Is it because he used a "Scan DO 800 scan converter" instead of using RCA?
very cool idea, I am in the killer process of putting in a carpc but not just a pc but to put some digital logic and hopefully have car automation with it. All the info you would need can be found on www.mp3car.com not only there but csmeance is also very knowledgeable with carpc's. He has helped me find info and answer any questions you might have in mind. Hopefully the i big idea i have, wont be such a killer task for me. Good luck with whatever route you go.
Thread Starter
Instructor
Joined: Feb 2007
Posts: 125
Likes: 0
From: Houston, TX
Ways exist! One of them here.
Thanks for that link at least it appears that it's possible.
Thread Starter
Instructor
Joined: Feb 2007
Posts: 125
Likes: 0
From: Houston, TX
very cool idea, I am in the killer process of putting in a carpc but not just a pc but to put some digital logic and hopefully have car automation with it. All the info you would need can be found on www.mp3car.com not only there but csmeance is also very knowledgeable with carpc's. He has helped me find info and answer any questions you might have in mind. Hopefully the i big idea i have, wont be such a killer task for me. Good luck with whatever route you go.
LOL well csmeance helped me waste about 2 hours reading page after page of a few different threads on the adapter that he was going to make for production but as far as I can tell it never got finished which after reading all of those pages of posts was a huge let down.
Thanks for the good luck and I'll be checking to see what you end up with.
If you look up this product Black Box ProVideo Converter AC095A. It is not a scan do but it is the same unit just different company. There are alot of vga to rgb converters out there but id rather not keep running around and figure out if it works or not. I just went with something i know that works.
No but i do have a navtool. What the navtool does is allows you to add in a video source like dvd or backup cam. http://www.tvandnav.com/ And the best part is that they have a plug and play harness so i will work with the plug and play harness and see what tweaks i need to do to get the video signal to the oem screen. The harness has a 20pin, so you unplug the signal from the navi unit in the trunk and plug the harness into the unit than the other end goes to the plug you just unplugged from the unit and there is a rgb cord that i will plug into the scan do and hopefully it works, if not just gotta change the pinouts of the rgb cord. If you want you can try to do this build with me.
Thread Starter
Instructor
Joined: Feb 2007
Posts: 125
Likes: 0
From: Houston, TX
No but i do have a navtool. What the navtool does is allows you to add in a video source like dvd or backup cam. http://www.tvandnav.com/ And the best part is that they have a plug and play harness so i will work with the plug and play harness and see what tweaks i need to do to get the video signal to the oem screen. The harness has a 20pin, so you unplug the signal from the navi unit in the trunk and plug the harness into the unit than the other end goes to the plug you just unplugged from the unit and there is a rgb cord that i will plug into the scan do and hopefully it works, if not just gotta change the pinouts of the rgb cord. If you want you can try to do this build with me.
Is that what you're saying?
1. Unplug the factory plug in the trunk
2. Plug that into the female portion of the NavTool harness
3. Plug the male portion of the harness into the nav in the trunk where the factory plug was
4. Plug the entire harness into the RGB port on the scan do
Does the NavTool itself no longer get used?
Is the RGB plug on the scan do an input or an output?
What plugs into the VGA input on the scan do and where does the output on the scan do go?
Sorry I'm probably not understanding you correctly but I'd love to see if this works, it sounds like an interesting idea.
I also have the NavTool, I bought it a couple of weeks ago during the group buy on here. I'm definitely curious as to whether your idea will work.
Is that what you're saying?
1. Unplug the factory plug in the trunk
2. Plug that into the female portion of the NavTool harness
3. Plug the male portion of the harness into the nav in the trunk where the factory plug was
4. Plug the entire harness into the RGB port on the scan do
Does the NavTool itself no longer get used?
Is the RGB plug on the scan do an input or an output?
What plugs into the VGA input on the scan do and where does the output on the scan do go?
Sorry I'm probably not understanding you correctly but I'd love to see if this works, it sounds like an interesting idea.
2. The scan do can do both rgb in/out and vga in/out. So from the carpc you would go to the scan do and the scan do out to the harness that is used from the navtool. There would be no splicing of any factory wires but if you need to change the wires they can be done from the navtool harness. That way everything can back to factory.
If you dont mind having to use a mouse and keyboard than that will be all that there is to do. But i am going the route to use the oem touchscreen.
Thread Starter
Instructor
Joined: Feb 2007
Posts: 125
Likes: 0
From: Houston, TX
1. Yeah the navtool will be rendered useless since it is the scan do but in a different form.
2. The scan do can do both rgb in/out and vga in/out. So from the carpc you would go to the scan do and the scan do out to the harness that is used from the navtool. There would be no splicing of any factory wires but if you need to change the wires they can be done from the navtool harness. That way everything can back to factory.
If you dont mind having to use a mouse and keyboard than that will be all that there is to do. But i am going the route to use the oem touchscreen.
I'd most definitely prefer to use the oem touchscreen but I doubt I have the skills to do it if it involves anything like what met152 did. The benefit of using the VMOD was that it had a bluetooth remote that is very small so you wouldn't need the keyboard/mouse except to use Windows and that wouldn't be very often to me, but it only has a composite RCA out and an s-video out so that wouldn't work with the scan do.
Advanced
Joined: Apr 2007
Posts: 55
Likes: 4
From: Russia, Tula
no but the navtool already has the video in. But If vmod is more like a dvd player than you shouldnt have issuses with the screen. The only reason you would need the scan do is to get the video out of a carpc to the oem screen. That is the reason why you would have bad picture quality going from vga to video. But if your already going from video to video there shouldnt be any problems. Computers dont have video outs they use vga, dvi, and now hdmi. So the carpc is the part that makes everything complicated. But VMOD just looks like a dvd player. So you already have everything you need to get the video to the oem screen.
Thread Starter
Instructor
Joined: Feb 2007
Posts: 125
Likes: 0
From: Houston, TX
no but the navtool already has the video in. But If vmod is more like a dvd player than you shouldnt have issuses with the screen. The only reason you would need the scan do is to get the video out of a carpc to the oem screen. That is the reason why you would have bad picture quality going from vga to video. But if your already going from video to video there shouldnt be any problems. Computers dont have video outs they use vga, dvi, and now hdmi. So the carpc is the part that makes everything complicated. But VMOD just looks like a dvd player. So you already have everything you need to get the video to the oem screen.
The VMOD is a computer and it's running Windows XP but it's front end interface is StreetDeck which is something like RoadRunner. You can exit out of StreetDeck on the VMOD to get to Windows XP and from there run any program on Windows that you would normally run like Windows Media Player, iTunes, VLC, Firefox, etc. The problem is that going from the composite video output on the VMOD and going into the NavTool composite input and then using the NavTool and trying to do anything else but watch a video is apparently going to be low quality. So I'm thinking about going back to what I was planning which is the traditional CarPC that has a VGA output on it and using the method that you're referring to.
Thread Starter
Instructor
Joined: Feb 2007
Posts: 125
Likes: 0
From: Houston, TX
All modes are accessible: only LVDS, only CRT, Clone, LVDS +CRT Expanded. Quality of video the oem screen can be looked in my project Acura MDX.
yes you are correct. The thing is that our oem navi screen uses a rgb input. There are many aftermarket touchscreens that can be bought. But the thing i had to debate was do i want to loose all the factory features if i go aftermarket touch sceen or can i get the best of both worlds. To be honest you seem like you know about electronics that there would be no need for complex soldering. The hardest part of doing the install, is to get oem touchscreen wired to utilize the touch screen usb controller. Also to build a carpc would be way less than that of the VMOD.
Last edited by wrxyboy; Feb 7, 2009 at 08:08 PM.
Thread Starter
Instructor
Joined: Feb 2007
Posts: 125
Likes: 0
From: Houston, TX
yes you are correct. The thing is that our oem navi screen uses a rgb input. There are many aftermarket touchscreens that can be bought. But the thing i had to debate was do i want to loose all the factory features if i go aftermarket touch sceen or can i get the best of both worlds. To be honest you seem like you know about electronics that there would be no need for complex soldering. The hardest part of doing the install, is to get oem touchscreen wired to utilize the touch screen usb controller. Also to build a carpc would be way less than that of the VMOD.
The CarPC part is pretty easy, I just liked the VMOD because it's smaller, it uses an automotive grade 1.8" hard drive which is great for a hot climate like we have in Houston most of the year, and because it's a pretty clean install without wires all over the trunk.
Yep that's the part that I don't have any experience or knowledge about it. The only person I've seen successfully use their oem touch screen with the CarPC is met152 and he had to create that extra board and solder some wires and I'd be terrified to try that on my car without someone experienced guiding me.
The CarPC part is pretty easy, I just liked the VMOD because it's smaller, it uses an automotive grade 1.8" hard drive which is great for a hot climate like we have in Houston most of the year, and because it's a pretty clean install without wires all over the trunk.
The CarPC part is pretty easy, I just liked the VMOD because it's smaller, it uses an automotive grade 1.8" hard drive which is great for a hot climate like we have in Houston most of the year, and because it's a pretty clean install without wires all over the trunk.
Advanced
Joined: Apr 2007
Posts: 55
Likes: 4
From: Russia, Tula
https://acurazine.com/forums/2g-rl-audio-bluetooth-electronics-navigation-90/ga-net-connect-any-pc-any-acura-705233/
if you are in no rush to get this done than you can wait to see how my carpc setup goes. But i wont be done for like another 6 - 8 weeks as i am waiting for other parts and components to arrive for very the reason of doing this carpc.
Thread Starter
Instructor
Joined: Feb 2007
Posts: 125
Likes: 0
From: Houston, TX
The circuit board is no more than a blank board that as areas where you can solder the wires too. That circuit board had no control function and does not do anything to the install. So you would only need to get the 4 wires from the touchscreen to the relay switch but met152 did it with the use of that circuit board. I have a full navigation electrical wiring diagram if you want to see exactly how the wiring and circuitry works.
Yeah I'd love to see the diagram thank you!
Thread Starter
Instructor
Joined: Feb 2007
Posts: 125
Likes: 0
From: Houston, TX
No I'm not in a rush to get it done. If you can tell me all the parts that I will need then I can go ahead and order them so that they'll be ready when you're ready.
I already have a list of parts that are needed and i will post them later just to make sure i am not missing anything. Expect to spend about $500 to $750 for everything and depending on how powerful you want the carpc to be.
Thread Starter
Instructor
Joined: Feb 2007
Posts: 125
Likes: 0
From: Houston, TX
So how met152 did his setup to the relay, to only have the touchscreen command only one at a time. That switch he installed is to switch from carpc and back to factory navi. If he didnt use the relay switch whatever he touched with on the carpc interface would also be pressed in the background of the navigation system even if it is not visual. So he set it up to only control one at a time.
I already have a list of parts that are needed and i will post them later just to make sure i am not missing anything. Expect to spend about $500 to $750 for everything and depending on how powerful you want the carpc to be.
I already have a list of parts that are needed and i will post them later just to make sure i am not missing anything. Expect to spend about $500 to $750 for everything and depending on how powerful you want the carpc to be.
$750 would be great, I definitely want the setup to be as current as possible so that it won't be obsolete in 6 months.
I really appreciate your help with this!
Okay so basically instead of having the toggle switch from the NavTool installed there will be a toggle switch from the oem screen to go between nav and carpc, right?
$750 would be great, I definitely want the setup to be as current as possible so that it won't be obsolete in 6 months.
I really appreciate your help with this!
$750 would be great, I definitely want the setup to be as current as possible so that it won't be obsolete in 6 months.
I really appreciate your help with this!
So this is the list of items that you will need.
- Carpc this is the obvious one of course.
- Touchscreen usb controller (http://shop-on-line.tvielectronics.c...ch-controllers)
- Scan do. This may be the hardest item to find but you have to search hard for it.
- Items need for the relay between the touchscreen usb controller and video feed from the navi unit/ car pc. All can be found at www.digikey.com
1. FFC, FPC (Flat Flex) - Connectors - Board Mount QTY (2)
http://search.digikey.com/scripts/Dk...me=609-1814-ND
2. FFC, FPC (Flat Flex) - Connectors - Board Mount QTY (2) These are different from the ones above.
http://search.digikey.com/scripts/Dk...me=609-1928-ND
3. FFC, FPC (Flat Flex), Ribbon - Jumpers QTY (1)
http://search.digikey.com/scripts/Dk...ame=WM10013-ND
4. RELAY PWR 3A 4PDT 12VDC QTY (2)
http://search.digikey.com/scripts/Dk...l&name=Z186-ND
5. RELAY SOCKET 4PDT EYELET QTY (2)
http://search.digikey.com/scripts/Dk...l&name=Z812-ND
- Toggle switch
- The following items are all optional parts but i purchased them anyways in case i wanted to do upgrades.
For audio you could use the aux in the middle console, but i went ahead and bought the pie x3
http://www.logjamelectronics.com/piex3auxconv.html
If you want to use the gps features of the front end program than you will need a gps usb receiver.
I bought a amp kit to run the power wire from the front to the rear and i also bought a 2 farad capacitor to prevent any drainage to the battery and a distributor block, but this is also good in case i want to put in a nice sound system everything is ready to go.
And dont forget all the necessary pc cables to extend things from front to back.
Thread Starter
Instructor
Joined: Feb 2007
Posts: 125
Likes: 0
From: Houston, TX
Thank you for the listing of parts and links for a lot of them, that will help a lot! It does seem like it will be difficult finding a scan do 800 so I went ahead and bought the Black Box ProVideo Converter AC095A that you told me about earlier and it looks exactly the same. I have no idea how much it should have cost but it's brand new shipped to me for $180 on eBay. The seller has 1 more left in case anyone wants to buy it.
http://cgi.ebay.com/ws/eBayISAPI.dll...m=320250198169
I'm going to get the other parts ordered today as well.
http://cgi.ebay.com/ws/eBayISAPI.dll...m=320250198169
I'm going to get the other parts ordered today as well.
Thread Starter
Instructor
Joined: Feb 2007
Posts: 125
Likes: 0
From: Houston, TX
I'm curious how this works. I've never put in a toggle switch before except for a switch that was already wired to a component. I understand the basics of how it works but not the details of it. So do you run a wire from 1 post on the toggle switch to the navi unit and another wire from the other post to the usb touchscreen controller?
how the toggle switch works is that one leg of the switch will im to 12v the other leg will go to the two relay switches 12v power source. when you flip the toggle switch it energizes the relay and complete the other circuit of the relay than comes complete. which is why you have a 4 leg relay, one leg to each wire of the usb controller and video source.
Thread Starter
Instructor
Joined: Feb 2007
Posts: 125
Likes: 0
From: Houston, TX
how the toggle switch works is that one leg of the switch will im to 12v the other leg will go to the two relay switches 12v power source. when you flip the toggle switch it energizes the relay and complete the other circuit of the relay than comes complete. which is why you have a 4 leg relay, one leg to each wire of the usb controller and video source.
Oh okay that makes sense. What type of toggle switch do you recommend? Just the standard one like the one that came with the NavTool? Any idea which GPS receiver you are going to use? A couple of things that I'm not clear on is where are those parts from Digikey used? Are they connected to the board on the OEM screen? Or are they connected to the USB controller? I assume that they need to be soldered, is that correct? How do you plan to connect the USB controller to the short 4 wires on the OEM screen? I think you said that you aren't planning on using a circuit board so then are you planning on using wires? I have ordered all of the parts that I'm going to need other than the basics that I can get in the store and then I will look into which CarPC I'm going to order later tonight. As always thanks for the help and sorry for all the questions, I just really want to make sure I understand how this is all going to work.
http://www.parts-express.com/pe/show...number=060-096
I purchased a garmin usb gps receiver i am not sure how well it works but if it is not working good enough i can always switch back to the factory navi.
A couple of things that I'm not clear on is where are those parts from Digikey used? Are they connected to the board on the OEM screen? Or are they connected to the USB controller? I assume that they need to be soldered, is that correct? How do you plan to connect the USB controller to the short 4 wires on the OEM screen? I think you said that you aren't planning on using a circuit board so then are you planning on using wires?

Thread Starter
Instructor
Joined: Feb 2007
Posts: 125
Likes: 0
From: Houston, TX
I will be using a rocker switch and be installing it next to the power mirrors switch in that empty spot. This is the rocker switch but im not sure if it is the exact one but looks just like this.
http://www.parts-express.com/pe/show...number=060-096
I purchased a garmin usb gps receiver i am not sure how well it works but if it is not working good enough i can always switch back to the factory navi.
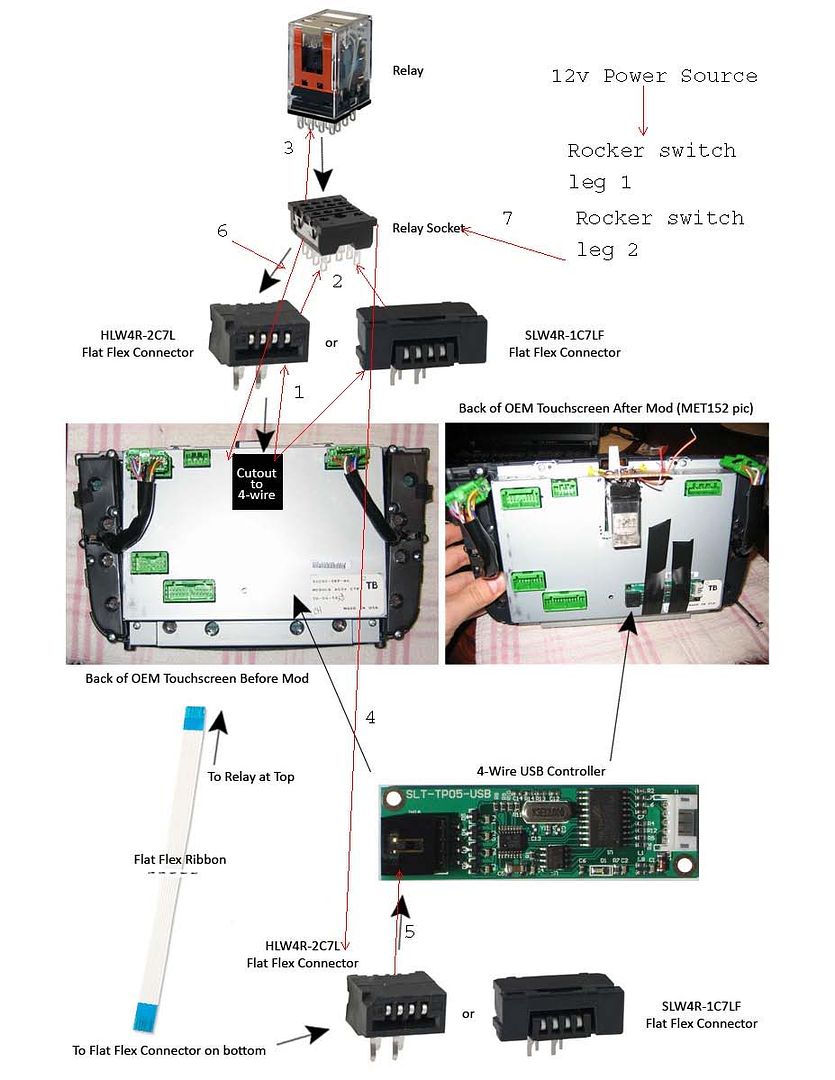
The parts you bought from digikey are to be used with both the touchscreen and the controller. The four wires from the oem touchscreen will be plugged into one of the flat connector and the other end of that flat connector has 4 prongs where you would solder the wire to them and there they go to the relay. There is no cutting of any factory wires. This how you would wire everything up and this image was taken from met152 setup. I am just copying.
http://www.parts-express.com/pe/show...number=060-096
I purchased a garmin usb gps receiver i am not sure how well it works but if it is not working good enough i can always switch back to the factory navi.
The parts you bought from digikey are to be used with both the touchscreen and the controller. The four wires from the oem touchscreen will be plugged into one of the flat connector and the other end of that flat connector has 4 prongs where you would solder the wire to them and there they go to the relay. There is no cutting of any factory wires. This how you would wire everything up and this image was taken from met152 setup. I am just copying.
Sorry if this is kinda big, I just wanted it to have enough detail to be able to see it. Thanks to Met152 for the pics I borrowed.

you have the right idea but let me clarify it more for you.
1. From the oem touchscreen you go to the flat connector.
2. From the flat connector you go the common legs of the relay eye socket
3. The eye socket gets plugged into the relay. But i would wire all the wires to the eye socket first than plug the relay after.
4. The normally open legs of the relay eye socket go to the other flat connector.
5. From that flat connector that goes to the usb touchscreen controller.
6. From normally closed part of the eye socket of the relay, that goes back into where the first set of 4 wires that the oem touchscreen went to or factory computer board.
7. This is the part that when you power the relay with the rocker switch it will switch the normally closed legs and energize the normally open legs that feed the signal from carpc and back to factory navi.