DIY 3G TL Tail Light EASY Swap Mod
#1
Thread Starter
Moderator
Chapter Leader (South Florida Region)
Chapter Leader (South Florida Region)
iTrader: (6)
Joined: Sep 2008
Posts: 78,019
Likes: 20,036
Ok, so, the sucky part first...you will still have to drop either side of the bumper to get your tails off THIS time. BUT, that's it...it's over. You'll never have to touch your bumper to swap tails again.
It's a very easy and all you need is:
BALLS
10mm socket
Dremel with a cutting wheel.
I almost feel badly calling this a DIY because it was so simple. I can't take total credit as a few other members have either mentioned this to me directly, or have suggested that it would work.
And it did.
As per usual, remove screws on side bumper behind wheel to unclip the bumper from one side. Remove the 10MM bolt behind that little door that you can't see when the trunk is closed. Drop that side to get at those 2 10MM bolts out that hold the bracket that are screwed to the tail light.
Now remove the tail light, unscrew the bracket...
Here is the fun part, now rebolt that bracket back to the car, with the 2 10MM bolts.
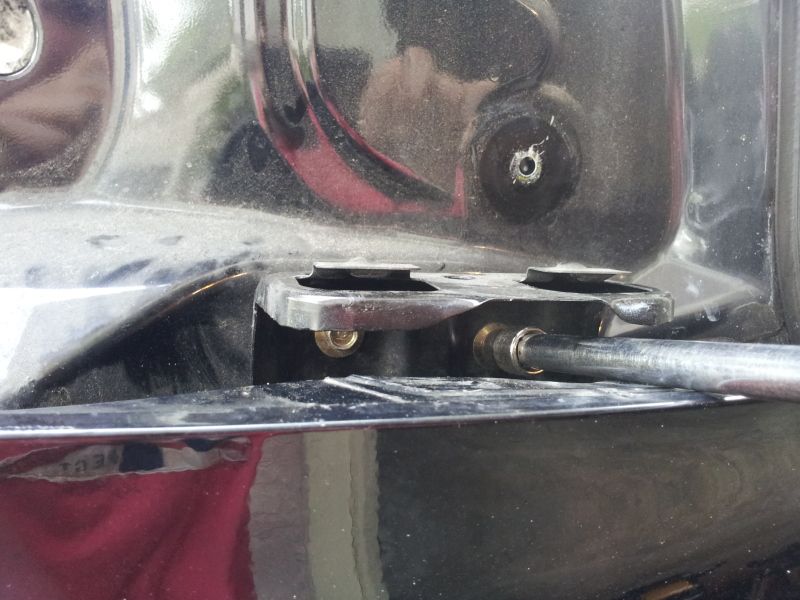
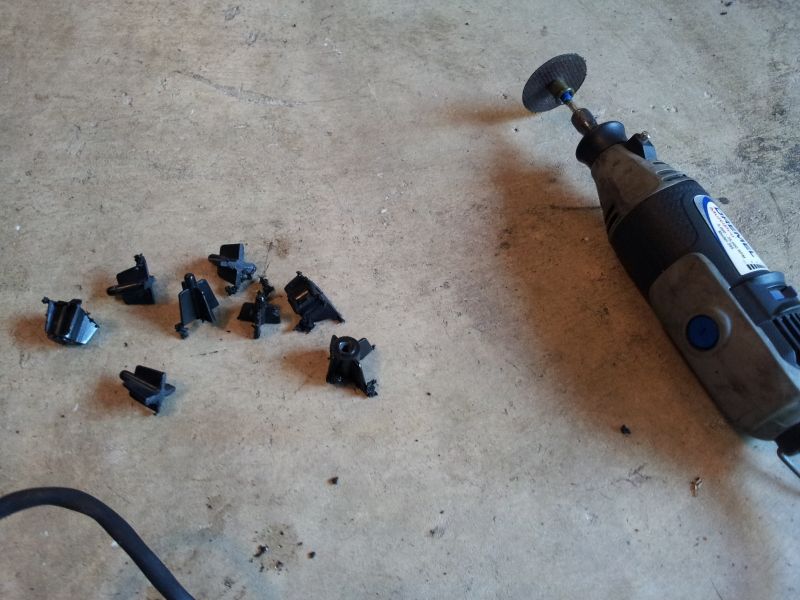
Ok, now, you'll need to cut the plastic pieces that protrude from the tails themselves. Take 2 seconds with the dremel...
I used my extraneous reds that were damaged and already cut open so please don't mind the Terminator 2 look
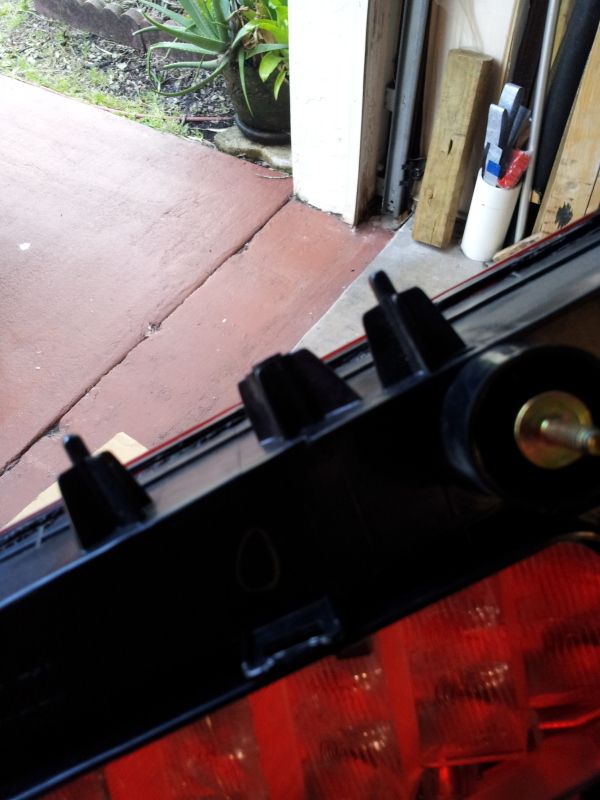
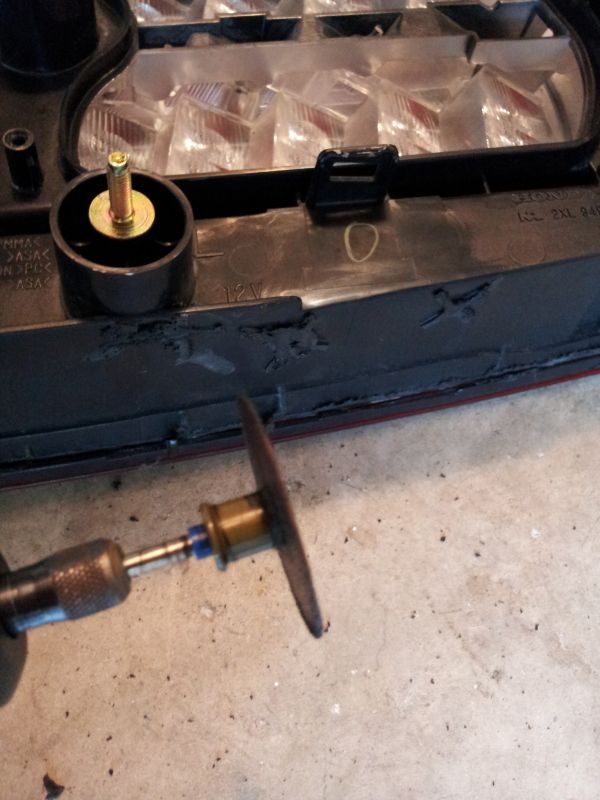
don't start counting, this is the 3 tabs from my test and the 3 from my newly modded tails
Here's what it looks like with the bumper back in place prior to jamming the tail back in
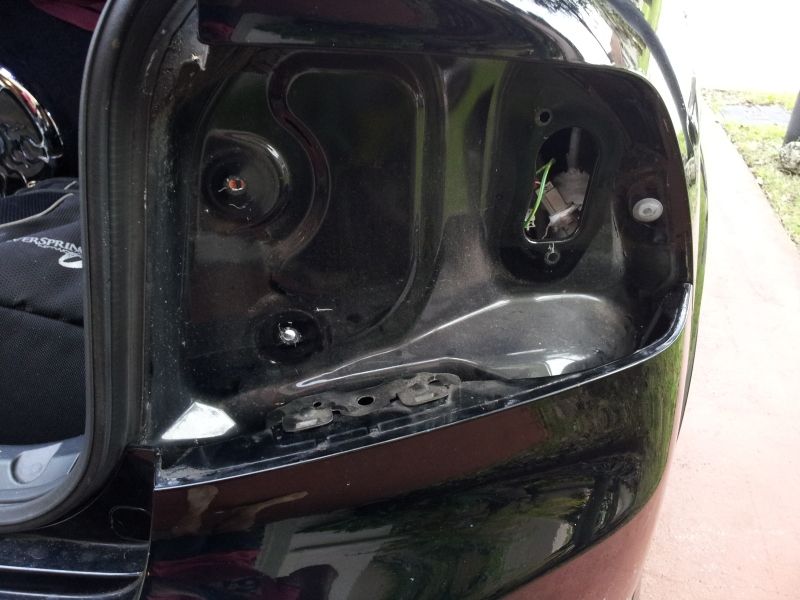
and here...T2!
I promise you all, it slides in and out now, no issues.
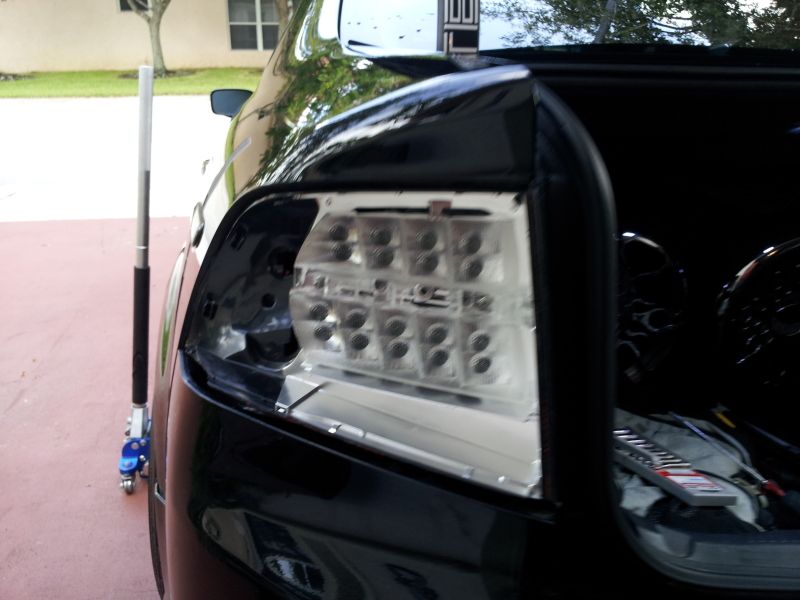
All you need now, to swap over tails is the 4 8MM bolts inside the trunk...accessible by ONLY removing that 1 clip and 1 plastic bolt and pulling the liner back...unplug, swap LED board, and that's IT. You should now be able to swap tails in under 20 minutes.
J.
It's a very easy and all you need is:
BALLS
10mm socket
Dremel with a cutting wheel.
I almost feel badly calling this a DIY because it was so simple. I can't take total credit as a few other members have either mentioned this to me directly, or have suggested that it would work.
And it did.
As per usual, remove screws on side bumper behind wheel to unclip the bumper from one side. Remove the 10MM bolt behind that little door that you can't see when the trunk is closed. Drop that side to get at those 2 10MM bolts out that hold the bracket that are screwed to the tail light.
Now remove the tail light, unscrew the bracket...
Here is the fun part, now rebolt that bracket back to the car, with the 2 10MM bolts.

Ok, now, you'll need to cut the plastic pieces that protrude from the tails themselves. Take 2 seconds with the dremel...
I used my extraneous reds that were damaged and already cut open so please don't mind the Terminator 2 look


don't start counting, this is the 3 tabs from my test and the 3 from my newly modded tails

Here's what it looks like with the bumper back in place prior to jamming the tail back in

and here...T2!

I promise you all, it slides in and out now, no issues.

All you need now, to swap over tails is the 4 8MM bolts inside the trunk...accessible by ONLY removing that 1 clip and 1 plastic bolt and pulling the liner back...unplug, swap LED board, and that's IT. You should now be able to swap tails in under 20 minutes.
J.
The following users liked this post:
TheLowLife (09-19-2012)
#4
Thread Starter
Moderator
Chapter Leader (South Florida Region)
Chapter Leader (South Florida Region)
iTrader: (6)
Joined: Sep 2008
Posts: 78,019
Likes: 20,036
LOL...well, I DID try and just not screw in the bracket to the headlights, but that protrusion of the plastic pieces was way too bulky to slide slickly into place. 
I can't take TOTAL credit, except maybe for the dremel'ing part...which was the icing on the cake. I'm telling you, now, a quick 20 minute job to swap tails! YAY!
Ahh...what the heck, here are the finished products, even though not the main focus of this thread
http://www.flickr.com/photos/rockstar143/7993756533/http://www.flickr.com/photos/rockstar143/7993756533/ by http://www.flickr.com/people/rockstar143/, on Flickr
Last edited by rockstar143; 09-16-2012 at 09:38 PM.
#5
takin care of Business in
iTrader: (5)
Joined: Jan 2008
Posts: 30,994
Likes: 4,732
From: Kansas City, MO

I think the credit for this goes to Matt McCollins....while installing his tails we took the bracket off....it was his idea and we tested it out and it was just nice to have that "feature"....for some reason his Type S modded tails from ACK were able to slide in and out even with the tabs in place...the tabs looks "grinded" down but thats how they came from ACK...am glad Jeremy cut those tabs off for "easier" access....
I was mentioning it on Jeremy's thread to take the brackets off as he switches between the tails often, guess he forgot to mention it on here

Another thing we did while installing Steves tails is we added 1-2 washers behind the tails coz the tails were not sitting flush with the bumper....by adding the washers the tails were now sitting very flush....so if you encounter that problem, you can add washers

Jeremy the tails look awesome....its awesome how you take a little idea and make it better....cutting those tabs up is a great idea....
The following users liked this post:
rockstar143 (09-17-2012)
#6
Thread Starter
Moderator
Chapter Leader (South Florida Region)
Chapter Leader (South Florida Region)
iTrader: (6)
Joined: Sep 2008
Posts: 78,019
Likes: 20,036
been done before brotha 
I think the credit for this goes to Matt McCollins....while installing his tails we took the bracket off....it was his idea and we tested it out and it was just nice to have that "feature"....for some reason his Type S modded tails from ACK were able to slide in and out even with the tabs in place...the tabs looks "grinded" down but thats how they came from ACK...am glad Jeremy cut those tabs off for "easier" access....
I was mentioning it on Jeremy's thread to take the brackets off as he switches between the tails often, guess he forgot to mention it on here
Another thing we did while installing Steves tails is we added 1-2 washers behind the tails coz the tails were not sitting flush with the bumper....by adding the washers the tails were now sitting very flush....so if you encounter that problem, you can add washers
Jeremy the tails look awesome....its awesome how you take a little idea and make it better....cutting those tabs up is a great idea....

I think the credit for this goes to Matt McCollins....while installing his tails we took the bracket off....it was his idea and we tested it out and it was just nice to have that "feature"....for some reason his Type S modded tails from ACK were able to slide in and out even with the tabs in place...the tabs looks "grinded" down but thats how they came from ACK...am glad Jeremy cut those tabs off for "easier" access....
I was mentioning it on Jeremy's thread to take the brackets off as he switches between the tails often, guess he forgot to mention it on here

Another thing we did while installing Steves tails is we added 1-2 washers behind the tails coz the tails were not sitting flush with the bumper....by adding the washers the tails were now sitting very flush....so if you encounter that problem, you can add washers

Jeremy the tails look awesome....its awesome how you take a little idea and make it better....cutting those tabs up is a great idea....
sorry for not giving credit...I KNEW a few people had given the suggestion before but couldn't remember who. I figured since I had to swap yesterday anyway, might as well take a little extra time to mess with it and test it. I definitely don't remember any mention of slicing off the tabs...but realistically, if you're not screwing the tails to the bumper bracket, there's really no need for them.
I think that for oemish'ness of it, it was just easier to have the bracket held in place by the tail to put the 2 bolts in...no other reason you'd need that there.
About the washers, I appreciate the idea, but I'd be afraid that if you put washers in, it'll now create a gap from behind the light that will allow water to enter the trunk, as well as the tail/led board. Probably not that serious, but if you couldn't pull the light itself tight to the trunk, those 3 rubber seals around the bolt holes wouldn't pull tight between the light and the body of the car.
J.
#7
takin care of Business in
iTrader: (5)
Joined: Jan 2008
Posts: 30,994
Likes: 4,732
From: Kansas City, MO
^^^ we put some washers on Stevens tails and no signs on water....but that is a great thought....i tend to skip things like this....good catch 
without the bracket and the tabs, is there any vibration at all ??? just wondering....

without the bracket and the tabs, is there any vibration at all ??? just wondering....
Trending Topics
#8
i never had to remove my bumper. just the two bolts by the trunk and i just pull back on the bumper just enough so i can get to the tail lights, but your way is still much easier good job to you and the rest of the memebers you create this.
#9
Thread Starter
Moderator
Chapter Leader (South Florida Region)
Chapter Leader (South Florida Region)
iTrader: (6)
Joined: Sep 2008
Posts: 78,019
Likes: 20,036
LOL...thanks, Anil...yeah, I tend to overthink things...just feeling that the washers might not be a good idea for water only...for flushness with bumper, I'm sure they're awesome.
With bumper side removal, it was about a 45 minute job. Now, it'd be 15 to 20 to swap tails.
The following users liked this post:
EvilVirus (09-17-2012)
#10
Awesome post.
I did this when I installed my cleared tails about a month ago. Taking off the rear bumper is always a PITA and I always manage to damage it somehow so this makes swapping tails a breeze.
Thanks for posting up for everyone else J
I did this when I installed my cleared tails about a month ago. Taking off the rear bumper is always a PITA and I always manage to damage it somehow so this makes swapping tails a breeze.
Thanks for posting up for everyone else J

The following users liked this post:
rockstar143 (09-17-2012)
The following users liked this post:
rockstar143 (09-19-2012)
The following users liked this post:
rockstar143 (09-19-2012)
#14
Thread Starter
Moderator
Chapter Leader (South Florida Region)
Chapter Leader (South Florida Region)
iTrader: (6)
Joined: Sep 2008
Posts: 78,019
Likes: 20,036
sauceja: I'm fkn busted, aren't I?
05: Are you swapping lights? I'd wait until you do that...only one more time of it being a PITA. And YES, without trunk liner, even easier...and now, you'll lose a few grams of plastic and can probably just use 2 of the 4 small bolts on the back too.
WEIGHT SAVINGS!
05: Are you swapping lights? I'd wait until you do that...only one more time of it being a PITA. And YES, without trunk liner, even easier...and now, you'll lose a few grams of plastic and can probably just use 2 of the 4 small bolts on the back too.
WEIGHT SAVINGS!
#15
^True, but now im going a different route than the diet mod!
Going to this...


Full audio install coming soon. Already have th ID XS-65 components, got the IDMAX 12 monday, the components amp (ID Q450.4) coming in tomorrow. Just need to order my sub amp and deadning. Everyone puts on weight now and then

Going to this...


Full audio install coming soon. Already have th ID XS-65 components, got the IDMAX 12 monday, the components amp (ID Q450.4) coming in tomorrow. Just need to order my sub amp and deadning. Everyone puts on weight now and then


Thread
Thread Starter
Forum
Replies
Last Post
cycdaniel
1G TSX Performance Parts & Modifications
8
12-17-2019 10:58 AM
handsom-hustla
Car Parts for Sale
70
11-13-2015 05:04 PM
wusty23jd
3G TL Audio, Bluetooth, Electronics & Navigation
4
09-24-2015 11:41 AM


