
RBC Manifold Install Progress

Thread Starter
Vancouver B.C.
Joined: Nov 2008
Posts: 2,704
Likes: 325
RBC Manifold Install Progress
Havent posted in a while, but just read that many of you have now purchased the RBC, so I thought I would provide my thoughts and knowledge throughout my experience so far.
I know axionindustries explains their RRC install as very straight forward, but perhaps because me and my buddy are not professionals, it was quite a bit tricker for us.
Here are some quick notes off the top of my head on what kind of differences we have encountered with the install.
1) First of all, I made a thread before saying you had to dremel to get the P2R runners to fit. I now know that axionindustries already wrote about a way around this and we did it the same way as them. The best way to get the manifold on is to remove the studs on the head first to slide the manifold into position, and then re-screw the studs after. We did not have a bolt extractor of any kind, so we used the double bolt method in the video below. Sometimes we used 3 bolts though cause our wrench was kind of thick. Worked great! The manifold clears the alternator pulley assembly by like 3mm. Very close but works. Make sure you have the correct gaskets for the install (I have the RBC manifold gasket and I think we might have a leak, more on that later..)
2)Not too familiar with this part, but just reciting what my buddy said. Where both the grounding straps were on the plastic manifold, is not exactly where it is on the RBC manifold. They are located now 1 on each side on top of the manifold.
3) The fuel injector ports on the new manifold are a little bit smaller than our plastic manifold. Once you tighten down the fuel rail, it seems ok and all the O-rings appear to be sealed. But we did not tighted all the way because the injectors are just plastic and we did not want to break them. So we tightened as much as we felt comfortable, and did not over tighten. Consequently though, there is a small gap between the washer and the bolts that hold the fuel rail down. So if you dont want a gap, perhaps get a thicker washer to replace the one thats already there. Or you can try tightening down all the way, but we just decided not to cause the O-rings did look sealed and did want to damage the injectors.
4) axionindustries mentions this too, but the RBC uses studs for our throttle body, and out stock throttle body uses bolts. But the stock bolts are too long for the new manifold so you need to get new shorter bolts. I think we used 2 studs from the RBC manifold, and 2 bolts from the stock TB to attach them together. So you will have 2 extra bolts. Remember, throughout this entire procedure, we are turning 2 stock pieces (the plastic manifold and the runners), into one new whole piece. So in general we are left with some extra bolts and screws. So dont freak out if you have extra pieces!
5)My takeda intake is now NOT bolted onto anything because we had to move it over since the new setup is much shorter, width wise. I probably could have bought a longer coupler so I can still use the arm on the intake tube that bolts it to the engine bay, but I didnt.
The whole intake is now just attached to the throttle body, and kind of just resting by the ECU. I dont think its a big deal and it is still very very sturdy.
6) Since the new setup is shorter, the throttle body harness is now too short to reach its plug in the throttle body. So we have to open up the T-fitting case that holds the wires and keeps it tidy, and play around with it to get some more slack out of the harness. We not only tugged a bit on the harness, but kind of pressured the entire case forward as much as possible. Dont over pressure anything here though because they are wires and you dont want to damage them. And make sure you get enough slack to plug it in, plus a little extra. Because once it is plugged in, you dont want there there still to be some tension that may cause problems over time.
7) There was a floppy grey hose, small diameter, from the stock manifold, that did not have a clear spot in the new manifold. It is located on the very left side of the manifold. Cant remember what we did with it lol
8) We used the karcepts plug that axionindustries mentions, but on top of that we had to plug a couple more things, dont know exactly what they were but my buddy knew exactly what they were. Also some hoses had to be replaced with longer ones, and some we cut because they were too long and it looked messy. So make sure you have some around. Lots of "hose" work.
9) You lose a lot of coolant doing this so make sure you have some extra.
Summary. Ok so we finished the install, manifold cover doesnt fit because one of the hoses with the plastic casing, runs over the manifold itself. So it is in the way of the cover and prevents it from sitting flush.
Driving home, and could not resist the urge to floor it once. What a difference! wow. Car felt absolutely amazing and even sounds different. Louder.
Few minutes later, my check engine oil light is going through moments of hyperflashing. I hear knocking gradually getting louder and louder. Also, my AC/heating is not working at all, even at full temp and full speed. Knocking gets louder so I pull over and pop my hood. There is smoke or steam (both are bad...) coming a little from a spot where we thought we might have had a gasket leak. Not sure if thats a coincidence or its a sign that it is indeed a leak.
waited for my car to cooldown and drove slowly to my closest buddy's house and parked it there over night. Im not sure if my stupid decision to floor it caused a spike in the A/F or something, since the car is in learning mode. I have put a completely foreign part on my car and it is trying to learn whats going on, and so hard driving should not be done. I am going to reset the ECU again and drive slow for a week..if I have to drive at all. Im kind of scared.
Or perhaps the problems were due to the gasket leak. The gasket does cover all the holes on both the manifold and head, but on the right corner of the manifold/gasket, I think it was a coolant port that was just BARELY covered. The gasket covered it, but did not overlap any extra. After we finished the install, we did notice that it was dripping drops of coolant like once every 10 sec. Very little. But that's only what we can see. Who knows how that is affecting the entire car.
Anyways, so that was all last night and I am looking to start diagnosing the problems today. It was pretty scared having all of those symptoms happen altogether. Like, why would the heating system stop working?! Maybe we did tamper with the wires too hard? But dont even know if those wires are related to heating. Sigh. Anyways, more updates later. Just thought I needed to share my experience before anyone else tackles it.
Here are some cell phone pictures for reference for anyone doing the install.
Couple of the manifold.


After everything is done.
See, I cannot use the arm on the intake tube thats meant to bolt onto the engine bay. Its just resting by the ECU but it is very sturdy. Could this some how at all be affecting my heating/AC problem??
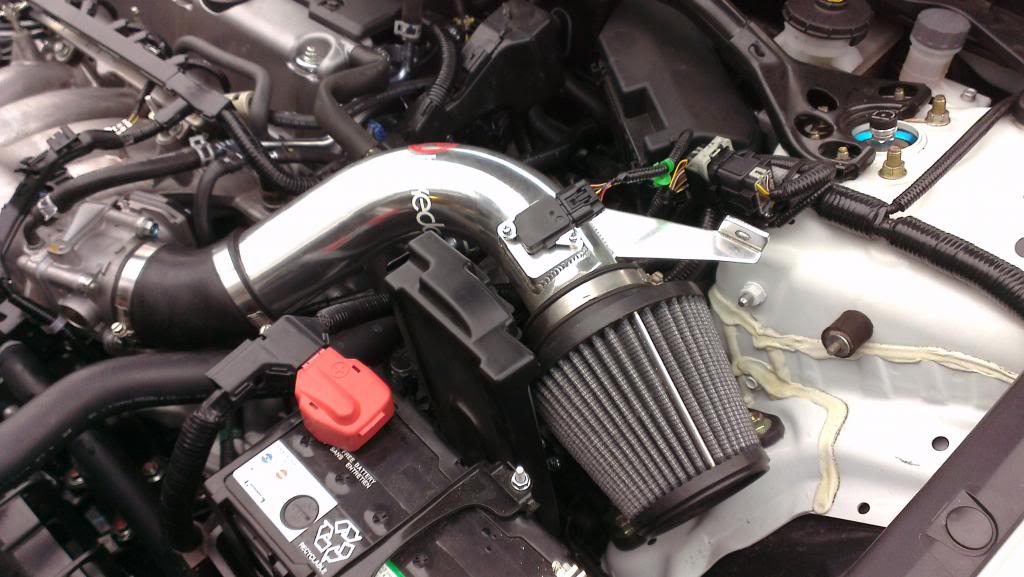

That wire with the blue clip, is whats preventing me from putting my manifold cover back on. Its so short, and has to be clipped on right there.


So stressed out last night and this morning. Im sure the problem is an easy fix, but diagnosing the issues are stressful. So many variables who knows what is causing the problems. Anyways, gluck. Cheers!
I know axionindustries explains their RRC install as very straight forward, but perhaps because me and my buddy are not professionals, it was quite a bit tricker for us.
Here are some quick notes off the top of my head on what kind of differences we have encountered with the install.
1) First of all, I made a thread before saying you had to dremel to get the P2R runners to fit. I now know that axionindustries already wrote about a way around this and we did it the same way as them. The best way to get the manifold on is to remove the studs on the head first to slide the manifold into position, and then re-screw the studs after. We did not have a bolt extractor of any kind, so we used the double bolt method in the video below. Sometimes we used 3 bolts though cause our wrench was kind of thick. Worked great! The manifold clears the alternator pulley assembly by like 3mm. Very close but works. Make sure you have the correct gaskets for the install (I have the RBC manifold gasket and I think we might have a leak, more on that later..)
2)Not too familiar with this part, but just reciting what my buddy said. Where both the grounding straps were on the plastic manifold, is not exactly where it is on the RBC manifold. They are located now 1 on each side on top of the manifold.
3) The fuel injector ports on the new manifold are a little bit smaller than our plastic manifold. Once you tighten down the fuel rail, it seems ok and all the O-rings appear to be sealed. But we did not tighted all the way because the injectors are just plastic and we did not want to break them. So we tightened as much as we felt comfortable, and did not over tighten. Consequently though, there is a small gap between the washer and the bolts that hold the fuel rail down. So if you dont want a gap, perhaps get a thicker washer to replace the one thats already there. Or you can try tightening down all the way, but we just decided not to cause the O-rings did look sealed and did want to damage the injectors.
4) axionindustries mentions this too, but the RBC uses studs for our throttle body, and out stock throttle body uses bolts. But the stock bolts are too long for the new manifold so you need to get new shorter bolts. I think we used 2 studs from the RBC manifold, and 2 bolts from the stock TB to attach them together. So you will have 2 extra bolts. Remember, throughout this entire procedure, we are turning 2 stock pieces (the plastic manifold and the runners), into one new whole piece. So in general we are left with some extra bolts and screws. So dont freak out if you have extra pieces!
5)My takeda intake is now NOT bolted onto anything because we had to move it over since the new setup is much shorter, width wise. I probably could have bought a longer coupler so I can still use the arm on the intake tube that bolts it to the engine bay, but I didnt.
The whole intake is now just attached to the throttle body, and kind of just resting by the ECU. I dont think its a big deal and it is still very very sturdy.
6) Since the new setup is shorter, the throttle body harness is now too short to reach its plug in the throttle body. So we have to open up the T-fitting case that holds the wires and keeps it tidy, and play around with it to get some more slack out of the harness. We not only tugged a bit on the harness, but kind of pressured the entire case forward as much as possible. Dont over pressure anything here though because they are wires and you dont want to damage them. And make sure you get enough slack to plug it in, plus a little extra. Because once it is plugged in, you dont want there there still to be some tension that may cause problems over time.
7) There was a floppy grey hose, small diameter, from the stock manifold, that did not have a clear spot in the new manifold. It is located on the very left side of the manifold. Cant remember what we did with it lol
8) We used the karcepts plug that axionindustries mentions, but on top of that we had to plug a couple more things, dont know exactly what they were but my buddy knew exactly what they were. Also some hoses had to be replaced with longer ones, and some we cut because they were too long and it looked messy. So make sure you have some around. Lots of "hose" work.
9) You lose a lot of coolant doing this so make sure you have some extra.
Summary. Ok so we finished the install, manifold cover doesnt fit because one of the hoses with the plastic casing, runs over the manifold itself. So it is in the way of the cover and prevents it from sitting flush.
Driving home, and could not resist the urge to floor it once. What a difference! wow. Car felt absolutely amazing and even sounds different. Louder.
Few minutes later, my check engine oil light is going through moments of hyperflashing. I hear knocking gradually getting louder and louder. Also, my AC/heating is not working at all, even at full temp and full speed. Knocking gets louder so I pull over and pop my hood. There is smoke or steam (both are bad...) coming a little from a spot where we thought we might have had a gasket leak. Not sure if thats a coincidence or its a sign that it is indeed a leak.
waited for my car to cooldown and drove slowly to my closest buddy's house and parked it there over night. Im not sure if my stupid decision to floor it caused a spike in the A/F or something, since the car is in learning mode. I have put a completely foreign part on my car and it is trying to learn whats going on, and so hard driving should not be done. I am going to reset the ECU again and drive slow for a week..if I have to drive at all. Im kind of scared.
Or perhaps the problems were due to the gasket leak. The gasket does cover all the holes on both the manifold and head, but on the right corner of the manifold/gasket, I think it was a coolant port that was just BARELY covered. The gasket covered it, but did not overlap any extra. After we finished the install, we did notice that it was dripping drops of coolant like once every 10 sec. Very little. But that's only what we can see. Who knows how that is affecting the entire car.
Anyways, so that was all last night and I am looking to start diagnosing the problems today. It was pretty scared having all of those symptoms happen altogether. Like, why would the heating system stop working?! Maybe we did tamper with the wires too hard? But dont even know if those wires are related to heating. Sigh. Anyways, more updates later. Just thought I needed to share my experience before anyone else tackles it.
Here are some cell phone pictures for reference for anyone doing the install.
Couple of the manifold.
After everything is done.
See, I cannot use the arm on the intake tube thats meant to bolt onto the engine bay. Its just resting by the ECU but it is very sturdy. Could this some how at all be affecting my heating/AC problem??
That wire with the blue clip, is whats preventing me from putting my manifold cover back on. Its so short, and has to be clipped on right there.
So stressed out last night and this morning. Im sure the problem is an easy fix, but diagnosing the issues are stressful. So many variables who knows what is causing the problems. Anyways, gluck. Cheers!
Last edited by ttk5; Jan 19, 2013 at 11:25 AM.


Thread Starter
Vancouver B.C.
Joined: Nov 2008
Posts: 2,704
Likes: 325
Alright I'm at a performance shop now. Don't know if it's cause I'm a 2012 but for now let's just say DON'T INSTALL THE RBC MANIFOLD IF YOUR A 2012 ASPEC. I'm in the process of putting stock pieces back on. Imagine a sandwich with the manifold and head as the buns, and the gasket as the meat. The manifold and gasket line up perfectly but they protrude past the corner of the head. So a cm on the corner has nothing sealing it from the back side (the head), causing a huge leak. Hope that makes sense.
Thread Starter
Vancouver B.C.
Joined: Nov 2008
Posts: 2,704
Likes: 325
You can modify the manifold to make it work so If you want to go that route make sure you do that before hand. Fuck so pissed !! I'm out like 500$ including labor and Shit and in the end im just back to stock. Fuuu
Trending Topics
Thread Starter
Vancouver B.C.
Joined: Nov 2008
Posts: 2,704
Likes: 325
Correct. if the gasket were different then no problem at all. the p2r gasket I used says 06-09 on the package so isn't that the right one ??? But totally if the gasket were different then no problem. But I had no idea I had the wrong one.


Burning Brakes
Joined: Feb 2011
Posts: 972
Likes: 241
From: STL
I think this would work out well here:
http://prlmotorsports.com/store/2012...d-adapter-kit/
http://prlmotorsports.com/store/2012...d-adapter-kit/
Thread Starter
Vancouver B.C.
Joined: Nov 2008
Posts: 2,704
Likes: 325
axionindustries, thanks so much! but your saying that the TSX stock manifold gasket worked fine and sealed everything? Why do I need that kit then?
\vortexblue: they did fit, well to us it fit well enough. Didnt have time to drive around to see if there were problems, but shop thought they were okay too. Its just that we couldnt tighten down the fuel rail as tight as stock because the ports were a tiny bit smaller. So just dont over tighten it is all. And you can get thicker washers if you dont want extra space in those bolts.
\vortexblue: they did fit, well to us it fit well enough. Didnt have time to drive around to see if there were problems, but shop thought they were okay too. Its just that we couldnt tighten down the fuel rail as tight as stock because the ports were a tiny bit smaller. So just dont over tighten it is all. And you can get thicker washers if you dont want extra space in those bolts.

Intermediate
Joined: Apr 2012
Posts: 44
Likes: 42
From: Chino,CA
That kit works perfect, but the 09 gasket has worked perfect on ours... If I would be doing the swap I would do it with this PRL setup for the perfect seal. Like I said though, no problems leaking over here
Burning Brakes
Joined: Jun 2011
Posts: 1,180
Likes: 132
From: Worcester Ma
The PRL is the perfect kit but i have one problem....my injectors (this is what my mechanic said) are to big and dont fit...are they different then 10+? How are the Si ones the same but shaped differently?
Thread Starter
Vancouver B.C.
Joined: Nov 2008
Posts: 2,704
Likes: 325
Ask your mechanic for his opinion, off the record. Perhaps he just doesn't want to be reliable? I mean I know they are not a perfect fit, but the O-rings are still pretty sealed. Hmm, or maybe the engine is a bit different from year to year. I guess you could look for some stock SI injectors to be safe.
And I messaged PRL about selling me just the gasket. Lets see what they say!
And I messaged PRL about selling me just the gasket. Lets see what they say!
Burning Brakes
Joined: Jun 2011
Posts: 1,180
Likes: 132
From: Worcester Ma
Ya...he told me it was a lost cause....because the injectors wont fit...what is the point in mocking it up...that's pretty much what he said...does anyone know if the injector output is the same on the si...just different shape? because if that is the case couldn't I swap them out no problem ?
Pro

Joined: Jul 2010
Posts: 740
Likes: 140
From: Germany
Sorry to hear you got such problems.
What s with this gasket, sorry if I�m wrong, but this Thread is full of technique words, which I dont understand 100%
http://www.ebay.com/itm/200691039612...WAX:IT&vxp=mtr
What s with this gasket, sorry if I�m wrong, but this Thread is full of technique words, which I dont understand 100%
http://www.ebay.com/itm/200691039612...WAX:IT&vxp=mtr
Old Member
Joined: Nov 2004
Posts: 179
Likes: 4
From: South California
Ya...he told me it was a lost cause....because the injectors wont fit...what is the point in mocking it up...that's pretty much what he said...does anyone know if the injector output is the same on the si...just different shape? because if that is the case couldn't I swap them out no problem ?
Burning Brakes
Joined: Jun 2011
Posts: 1,180
Likes: 132
From: Worcester Ma
Intermediate
Joined: Apr 2012
Posts: 44
Likes: 42
From: Chino,CA
Purchase the RBC from PRL and have them machine out the injector holes to match the newer style injectors... Or you can get new injectors from 06-2011 si and get the injector clips and wire them.
Burning Brakes
Joined: Feb 2011
Posts: 972
Likes: 241
From: STL
If we need to purchase injectors, which is the correct type of injectors to purchase? I am thinking 1000cc injectors?? This is assuming that the turbo is still happening, just been patiently waiting still...
Thread Starter
Vancouver B.C.
Joined: Nov 2008
Posts: 2,704
Likes: 325
Just got off the phone with PRLmotorsports. I ordered the full adapter kit from them. After all my troubles I want the peace of mind.
optimus: I dont have the answer to your question, but on a side note, denis from PRL said that their stage 1 2012 si turbo kit might fit our car.
http://prlmotorsports.com/store/2012...ystem-stage-1/
this is the kit without the intercooler because the intercooler probably wont fit our car. Actually, they dont know for sure if any of the kit will fit at all, but their speculation is that this stage 1 kit will fit the TSX. We also talked about getting the 12' si ECU and trying to swap that into my 2012 TSX so I can use hondata...since hondata said they wont be releasing a 11-12 TSX reflash any time soon.
Burning Brakes
Joined: Feb 2011
Posts: 972
Likes: 241
From: STL
I was thinking about using their stage one kit with no intercooler, and having a local shop construct an air to water intercooler, which is more efficient anyway, and would require less piping. That would be pretty sweet I think....
Intermediate
Joined: Jun 2013
Posts: 47
Likes: 4
Just got off the phone with PRLmotorsports. I ordered the full adapter kit from them. After all my troubles I want the peace of mind.
optimus: I dont have the answer to your question, but on a side note, denis from PRL said that their stage 1 2012 si turbo kit might fit our car.
http://prlmotorsports.com/store/2012...ystem-stage-1/
this is the kit without the intercooler because the intercooler probably wont fit our car. Actually, they dont know for sure if any of the kit will fit at all, but their speculation is that this stage 1 kit will fit the TSX. We also talked about getting the 12' si ECU and trying to swap that into my 2012 TSX so I can use hondata...since hondata said they wont be releasing a 11-12 TSX reflash any time soon.
optimus: I dont have the answer to your question, but on a side note, denis from PRL said that their stage 1 2012 si turbo kit might fit our car.
http://prlmotorsports.com/store/2012...ystem-stage-1/
this is the kit without the intercooler because the intercooler probably wont fit our car. Actually, they dont know for sure if any of the kit will fit at all, but their speculation is that this stage 1 kit will fit the TSX. We also talked about getting the 12' si ECU and trying to swap that into my 2012 TSX so I can use hondata...since hondata said they wont be releasing a 11-12 TSX reflash any time soon.

Cruisin'
Joined: Dec 2013
Posts: 21
Likes: 7
From: Gatineau, Qc
For the fitment, maybe you can buy 06-11 SI O-Ring part number 91302-PNA-003
You can see obviously that the 2 O-rings have differents sizes. Just look the links below
Civic SI 06-11 http://www.hondapartscheap.com/parts...e-manifold-20l
TSX 09+ http://www.acuraoemparts.com/delray/...All&vinsrch=no


Cruisin'
Joined: Jun 2015
Posts: 23
Likes: 4
From: MNTSXClub Est.2015
All of those PRL links are bad and or have been removed. Installing RBC today with Thermal 09 TSX IM gasket I ordered from Axion Industries since they said they had "0" leaks, spoke to a gentleman on the phone and he assured me it'd seal tight. Install RBC + S2 headers and dyno tune today at our shop. Newly opened performance shop here in MN, so getting our shop cars ready for HIN MN this weekend. So hope it all goes well, i will update and confirm my build pro and cons later tonight.
Alex M.
SM Speed Performance
MNTSXClub
MN Acuras
Alex M.
SM Speed Performance
MNTSXClub
MN Acuras
Cruisin'
Joined: Jun 2015
Posts: 23
Likes: 4
From: MNTSXClub Est.2015
So lastnight I finally installed my "thermal manifold gasket" onto my car along with RBC IM. Axion says the "thermal gasket" STOP leaks from coolant design differences from the RBC to stock K24 head...BUT NOPE!!!! it leaked everywhere. I torqued down the IM again and started my car and it still leaked. Took the IM back off and to my upsetting amazement, I FOUND COOLANT IN CYL #3 & 4 !!!! LUCKILY the valves were closed and none got in!!! I was super upset, being that this is the main issue people have since the coolant designs are oval-ish to circle when placing RBC IM to head. I called Axion while the gasket was in transit, and again they asssured me it'd be the cure!!!! A waste of time seriously!! Other CU2 members I've reached out to, say they bought the adapter kit from Axion and they have a different gasket, its aluminum and not thermal plastic!!
They say they're not leaking, and I tell them to check again. I'm pissed, if that is the true cure, then why wasn't I prompted that and told to get that one instead of the plastic one!!?? Luckily we have our own shop, so having my fab guy weld it shut and re-port to match circle coolant design on stock k24 head...THATS THE ONLY CURE!!!!! So i say to Axion, inform your customers better...and you claim to NOT BE A VENDOR I've seen on other threads, and yet you push your products like their GOLD. Perhaps more attempts, instead of saying "no leaking over here" giving people the assumption that it'll solve their issues the same. We own our own tuning and performance shop, and I am very deep into the Acura/ Honda scene here, so i will pass the word out asap..saving people from possible detonation or worse!!!! I am stayin true to my RBC build and will complete it and tune tonight getting ready for our shops showcasing tomorrow at HIN MN 2015...
Gather more info and data besides your own, b4 pushing your items out in mass #'s...lotta ppl will be very upset, esp when they call and you re-assure them kindly on the phone, thanks.

Thread
Thread Starter
Forum
Replies
Last Post
cycdaniel
1G TSX Performance Parts & Modifications
8
Dec 17, 2019 10:58 AM
MonkeyTrucker
3G TL Tires, Wheels & Suspension
8
Sep 21, 2015 06:15 PM