Aftermarket stereo Install. DIY/Guide.
#1
Hey all. I have found tons of information on this forum so I decided to create a little Guide/DIY of installing an aftermarket stereo in our cars to give back to the community. I know there are several users online here that have done this install but in my research I had to get bits of information from several sources to figure everything out.
This install is not the same as installing those Chinese units that replace the top screen. This replaces the entire stock TSX radio (Non ELS/ Non tech package). As far as I know this will not work with the ELS system as the wiring is different and the stock amp does everything including EQ as well as volume control.
Please note:
Replacing the stock radio in this case retains everything with the base system. You end up using the stock amplifier and all speakers + subwoofer work. There is a world of difference in sound quality and most of all, EQ controls that are actually helpful. You can even use a HI-Pass filter to the subwoofer in the stock amplifier system. My rear deck speakers now play full range instead of just rear fill which makes everything sound so much better IMO and my stereo comes with an 8 band graphic eq which is enough for the stock system. I get clean 4V preout signals from my aftermarket deck which in turn creates a clean output from the stock amp.
Parts used:
- - Double din Stereo of your choice, I choose the pioneer avh-5500bhs as it has appmode and I can use GPS from my iphone on screen without the need for an actual NAVI type stereo.
- - Double din Frame for our tsx. I bought mine from china on aliexpress.com. Cost about $115 to Canada after all shipping+duties. It was missing two of four screw holes for the vents but still held well with just two.
- - PAC SWI-RC if you want to add steering wheel controls, which I did. You loose Bluetooth button control however. No big deal for me.
- - Metra 70-1730 Wiring Harness for 2008+ Honda accord with factory amplifier.
Install:
- - First and formost, here is a guide on how to remove your factory radio:
http://www.smartauto24.com/docs/inst...e/991-8989.pdf
- - I bought the double din frame from this link: http://www.aliexpress.com/item/2-Din...445880751.html You will have to take the vents and hazard light button from the factory frame and screw them to the aftermarket dash kit.
- - The wiring harness uses RCA’s to plug into your aftermarket deck. Two for front left and right, two for rear left and right. There is a single loose RCA harness in the metra 70-1730 kit that goes to an 8 pin connector that is used for subwoofer control from the stock harness. Since there is two subwoofer outputs (left +right) on my deck I choose one at random and I don’t think it makes a difference. Everything else is easy as there are only basic things to wire like ignition power, ground, illumination etc.
- - I routed my Bluetooth MIC to above my rear view mirror. I just ran the wire along the top headliner and through the top of the A pillar cover, to the bottom of the dash and then to my stereo. I was worried that I had to remove the A-pillar but it seems like this way worked well.
- - This is the guide for installing the PAC steering wheel adapter. I had to splice into the main stereo harness to find the two wires needed. http://www.pac-audio.com/swi/SWIAppG...er&swiOptions=
That’s it for now. I dont have much pictures as i did this in toronto while it was really cold out. If you have any questions I will try to answer when I can. Let me know if there are any broken links.
 Thanks
This install is not the same as installing those Chinese units that replace the top screen. This replaces the entire stock TSX radio (Non ELS/ Non tech package). As far as I know this will not work with the ELS system as the wiring is different and the stock amp does everything including EQ as well as volume control.
Please note:
Replacing the stock radio in this case retains everything with the base system. You end up using the stock amplifier and all speakers + subwoofer work. There is a world of difference in sound quality and most of all, EQ controls that are actually helpful. You can even use a HI-Pass filter to the subwoofer in the stock amplifier system. My rear deck speakers now play full range instead of just rear fill which makes everything sound so much better IMO and my stereo comes with an 8 band graphic eq which is enough for the stock system. I get clean 4V preout signals from my aftermarket deck which in turn creates a clean output from the stock amp.
Parts used:
- - Double din Stereo of your choice, I choose the pioneer avh-5500bhs as it has appmode and I can use GPS from my iphone on screen without the need for an actual NAVI type stereo.
- - Double din Frame for our tsx. I bought mine from china on aliexpress.com. Cost about $115 to Canada after all shipping+duties. It was missing two of four screw holes for the vents but still held well with just two.
- - PAC SWI-RC if you want to add steering wheel controls, which I did. You loose Bluetooth button control however. No big deal for me.
- - Metra 70-1730 Wiring Harness for 2008+ Honda accord with factory amplifier.
Install:
- - First and formost, here is a guide on how to remove your factory radio:
http://www.smartauto24.com/docs/inst...e/991-8989.pdf
- - I bought the double din frame from this link: http://www.aliexpress.com/item/2-Din...445880751.html You will have to take the vents and hazard light button from the factory frame and screw them to the aftermarket dash kit.
- - The wiring harness uses RCA’s to plug into your aftermarket deck. Two for front left and right, two for rear left and right. There is a single loose RCA harness in the metra 70-1730 kit that goes to an 8 pin connector that is used for subwoofer control from the stock harness. Since there is two subwoofer outputs (left +right) on my deck I choose one at random and I don’t think it makes a difference. Everything else is easy as there are only basic things to wire like ignition power, ground, illumination etc.
- - I routed my Bluetooth MIC to above my rear view mirror. I just ran the wire along the top headliner and through the top of the A pillar cover, to the bottom of the dash and then to my stereo. I was worried that I had to remove the A-pillar but it seems like this way worked well.
- - This is the guide for installing the PAC steering wheel adapter. I had to splice into the main stereo harness to find the two wires needed. http://www.pac-audio.com/swi/SWIAppG...er&swiOptions=
That’s it for now. I dont have much pictures as i did this in toronto while it was really cold out. If you have any questions I will try to answer when I can. Let me know if there are any broken links.
 Thanks
Last edited by D4nnyD; 01-03-2014 at 11:41 AM.
The following 5 users liked this post by D4nnyD:
iamitman (01-15-2014),
my01ninja (03-16-2014),
opboarding (01-24-2014),
Slade037 (01-03-2014),
vtec4me21 (01-03-2014)
#2
Great write up! I was able to find some of the links you listed here in searching but this is nice to have all the information in one spot.
I'm planning on replacing the factory stereo with an Pioneer single DIN. I've seen the double DIN frame / dash kit you mentioned. I wonder if they make a single DIN model or if you can use a DIN blank to cover the space not taken up by the stereo?
Do you need: http://www.metraonline.com/part/40-HD21 for connecting the factory antenna to an aftermarket stereo?
metra 70-1730 - Are there instructions on the wire colors to use for the appropriate connections such as ignition power? I was planning on using a wiring harness to plug into the factory one and connect to the aftermarket stereo harness so I wouldn't have to cut into the factory harness.
Does anyone have the factory stereo wiring harness pinout information? I want to make sure metra 70-1730 is compatible.
#3
Great write up! I was able to find some of the links you listed here in searching but this is nice to have all the information in one spot.
I'm planning on replacing the factory stereo with an Pioneer single DIN. I've seen the double DIN frame / dash kit you mentioned. I wonder if they make a single DIN model or if you can use a DIN blank to cover the space not taken up by the stereo?
Do you need: http://www.metraonline.com/part/40-HD21 for connecting the factory antenna to an aftermarket stereo?
metra 70-1730 - Are there instructions on the wire colors to use for the appropriate connections such as ignition power? I was planning on using a wiring harness to plug into the factory one and connect to the aftermarket stereo harness so I wouldn't have to cut into the factory harness.
Does anyone have the factory stereo wiring harness pinout information? I want to make sure metra 70-1730 is compatible.
I'm planning on replacing the factory stereo with an Pioneer single DIN. I've seen the double DIN frame / dash kit you mentioned. I wonder if they make a single DIN model or if you can use a DIN blank to cover the space not taken up by the stereo?
Do you need: http://www.metraonline.com/part/40-HD21 for connecting the factory antenna to an aftermarket stereo?
metra 70-1730 - Are there instructions on the wire colors to use for the appropriate connections such as ignition power? I was planning on using a wiring harness to plug into the factory one and connect to the aftermarket stereo harness so I wouldn't have to cut into the factory harness.
Does anyone have the factory stereo wiring harness pinout information? I want to make sure metra 70-1730 is compatible.
I used this antenna adapter:
http://www.sonicelectronix.com/item_...sche-HAAB.html
The following users liked this post:
vtec4me21 (01-03-2014)
#4
Thanks for the information. I was up in the air on letting a shop install the deck, but now you've given me the confidence to DIY! I'll check out the positaps.
I'll check out the antenna adapter, sounds like another piece for that order with Sonic Electronix .
.
I'll check out the antenna adapter, sounds like another piece for that order with Sonic Electronix
 .
.
#5
Glad i Could help. Also, for anyone wondering since i missed this in my op, all the climate controls are retained on the stock screen. Only thing missing now is the clock, song info, and compass.
#6
Hmmm...I would think the compass and clock could be routed to the stock screen. I'll have to get a Helm's manual and look at the wiring schematics for the stereo connecters. Maybe another wiring harness could be made to connect the wiring up for the compass and clock. The replacement radio will have a clock, and not having a compass isn't a big deal. I'm just glad the climate controls are still displayed. I'll reply back if I find anything out.
Trending Topics
#8
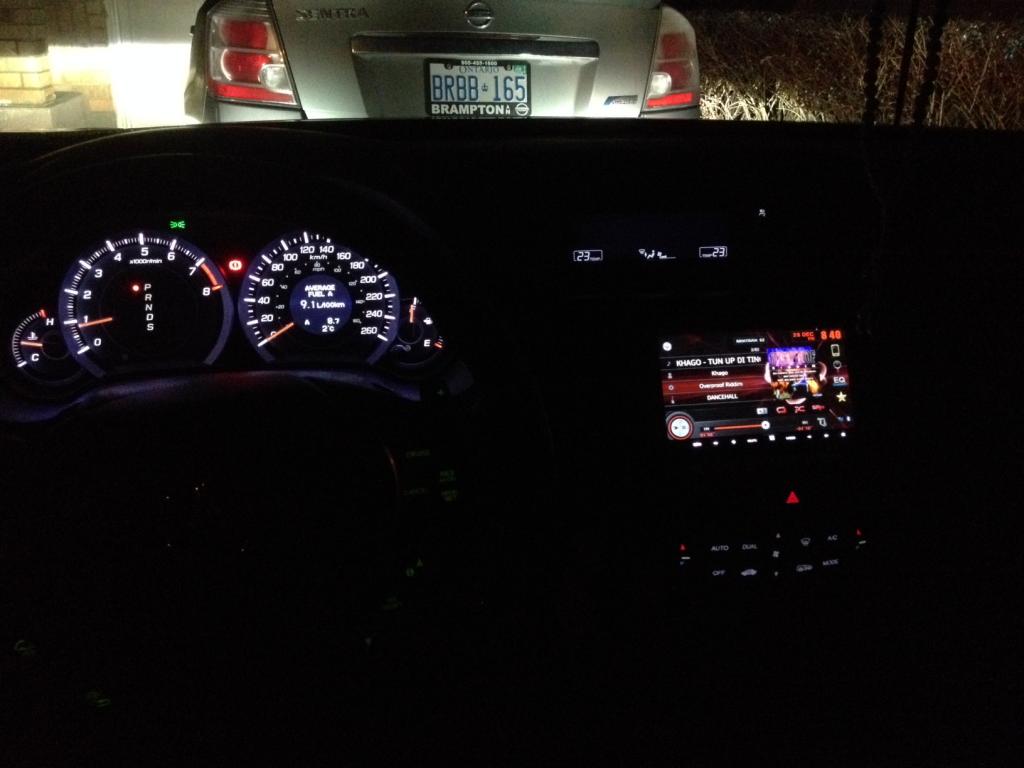
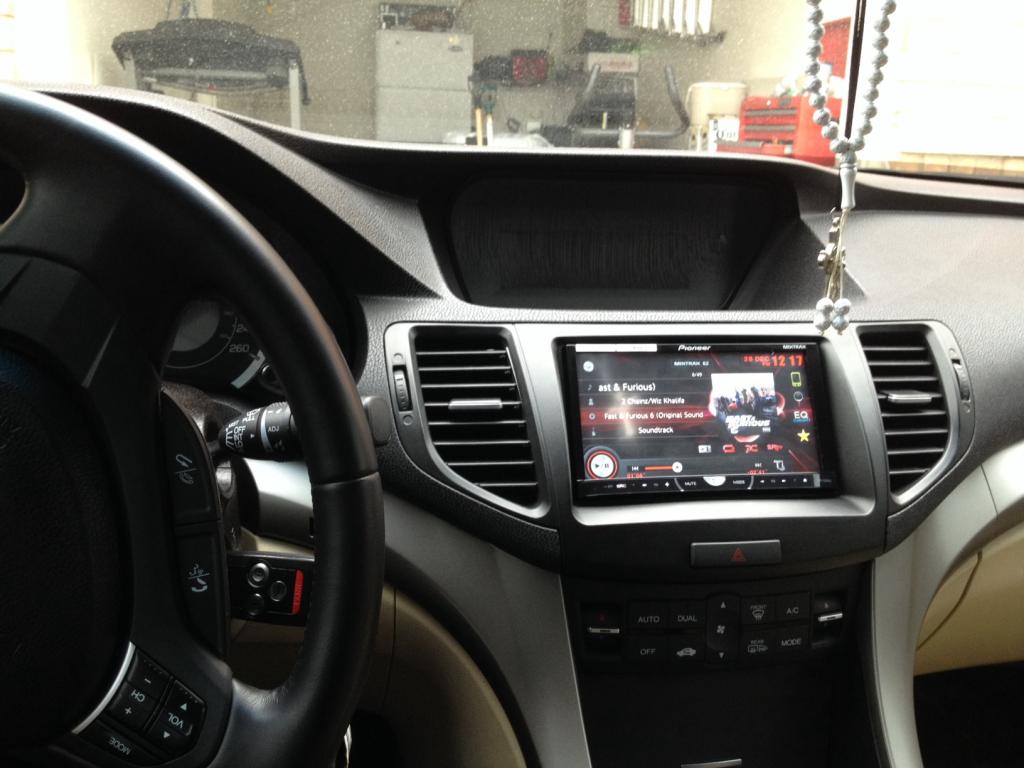
I got a good deal on this deck during boxing week so i went for it. I thought of kenwood or alpine though. Ive had pioneer before and never got let down in terms of sound quality and features so that also led me to this deck. Alpine to me is over priced. Most kenwood decks only have a 3 band eq while pioneer comes with at least 8.
Last edited by D4nnyD; 01-07-2014 at 09:52 AM.
#11
Hey man. Yeh i plan to do some bigger things this summer. I want to add three amps in a semi three way setup. Still working out the details but i plan to change all internal speakers and add rear door speakers. Three amps will be used. One for bass, and the other two for mids/highs. Want it to be loud and clean. Ive also been looking into an active crossover as well.
I want to dip into the fiberglass world and maybe try to build two rear trunk corner boxes too. We will see how that goes. My biggest concern will be if i am going to need a higher output alternator, i really dont want to change the stock one.
#12
Drifting
Join Date: Jun 2012
Location: City of Champs, MA
Age: 32
Posts: 2,969
Received 657 Likes
on
478 Posts
I've been running one 13.5" JLW7 powered by a JL 1000/1 for about a year now, and my lights are just now beginning to dim when I turn the bass up. Never used to happen before, and I have an Optima Yellow Top battery.
In other words, you may not need to replace your alternator right away, but eventually you will. Especially if you'll be running 3 amps.
In other words, you may not need to replace your alternator right away, but eventually you will. Especially if you'll be running 3 amps.
#14
Danny so fronts plus rear doors plus rear deck and two subs? Yeah sounds like you may need an alternator lol...I was going to do domething similar at first ..then after doing some research I was advised to just spend the money on a strong front setup and go active ... Reasoning was the subs produce bass in the back and will cancel out some of the rears anyway and if you have people in the back you probably are not bumping it anyway.. So get selfish and focus on yourself...
Also def get the optima yellow top.. I did it just because I had slow starts in the winter ..
I seeyoutwo..are you running just that one amp?
Idk if you guys know what the big 3 is but this is also supposed to help along with possibly a cap like geuxtigers did.. I know someone did the big 3 just don't know who
#15
I've been running one 13.5" JLW7 powered by a JL 1000/1 for about a year now, and my lights are just now beginning to dim when I turn the bass up. Never used to happen before, and I have an Optima Yellow Top battery.
In other words, you may not need to replace your alternator right away, but eventually you will. Especially if you'll be running 3 amps.
In other words, you may not need to replace your alternator right away, but eventually you will. Especially if you'll be running 3 amps.
#16
Thats correct. Im not sure about the mic but there may be a way if you are willing to cut wires and splice. If you dont solder with mic wires you could introduce noise along the line.
#17
Danny so fronts plus rear doors plus rear deck and two subs? Yeah sounds like you may need an alternator lol...I was going to do domething similar at first ..then after doing some research I was advised to just spend the money on a strong front setup and go active ... Reasoning was the subs produce bass in the back and will cancel out some of the rears anyway and if you have people in the back you probably are not bumping it anyway.. So get selfish and focus on yourself...
Also def get the optima yellow top.. I did it just because I had slow starts in the winter ..
I seeyoutwo..are you running just that one amp?
Idk if you guys know what the big 3 is but this is also supposed to help along with possibly a cap like geuxtigers did.. I know someone did the big 3 just don't know who
Also def get the optima yellow top.. I did it just because I had slow starts in the winter ..
I seeyoutwo..are you running just that one amp?
Idk if you guys know what the big 3 is but this is also supposed to help along with possibly a cap like geuxtigers did.. I know someone did the big 3 just don't know who
We dont have so much space in the front doors so i cant really run as powerfull components id like. You are right about the bass and the rear speakers though. Everything is still under consideration.
#18
I've never done the big 3 .. Snap some pics when you do it..looks like the alternator wire is gonna be a pain to get to
And optima was easy..I got the one that was recommended for our car I think it's the 51... It fit with no issues ..if anything I think there was a plastic piece for the top I didn't put back on.. Some ppl have gone a size bigger in 1g tsx and they just don't put the tray back in for the battery..idk if that would apply for us..I didn't feel like experimenting lol
What would you fit if you had no limits? You could custom fiberglass or even move the speaker to the floor but then you got the fuse boxes to worry about... I. Actually got 6.75 not realizing it lol and have been trying to figure out the best way to fit them...spent a whole day on it last weekend.. I m trying to avoid cutting the door open .. I may also just not be aligning things correctly.. I couldn't put the door back on after i put my spacer in...
We shall see
#19
I will take some pics when i do it. Has to warm up here first though. what size of bracket are you using? bigger than 1 inch?
I really dont want to do so much fiberglass work to mount speakers in the front. Its too time consuming.
I really dont want to do so much fiberglass work to mount speakers in the front. Its too time consuming.
#20
It is 1.25 inches ..that's what I need to avoid cutting metal.. Maybe if I play around with it more I can get 1inch to work.. It's so cold and so I haven't gotten back to it.. It's also just tough to fit it right because the door panel had a circular plastic , kind of like a housing that goes around the speaker ..but like I said.. It could be me..I might just need to play with it a bit
#22
Drifting
Join Date: Jun 2012
Location: City of Champs, MA
Age: 32
Posts: 2,969
Received 657 Likes
on
478 Posts
I'm actually also running a 2000.4 Autotek Mean Machine which is powering 2 10 inch EV's and 2 Beyma CP22 Tweeters. Before the summer I plan on upgrading the 'big 3' and also running 0 gauge wiring because right now I'm running 4 gauge.
 And eventually I will replace the alternator with a beefier one as well.
#23
I'm actually also running a 2000.4 Autotek Mean Machine which is powering 2 10 inch EV's and 2 Beyma CP22 Tweeters. Before the summer I plan on upgrading the 'big 3' and also running 0 gauge wiring because right now I'm running 4 gauge.  And eventually I will replace the alternator with a beefier one as well.
 And eventually I will replace the alternator with a beefier one as well.
do you have any pics of this setup bro? are those 2 10s for mids? only way i can see them in our cars is with the back seats down firing forward from the trunk. Is this right?
#24
Drifting
Join Date: Jun 2012
Location: City of Champs, MA
Age: 32
Posts: 2,969
Received 657 Likes
on
478 Posts
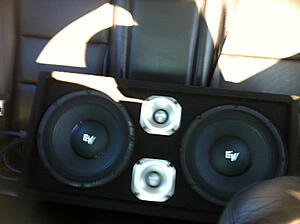
Yes they are for mids. Loud as f*ck lol. Eventually I will be installing one in the location that you mentioned, but as of now I have them in a small portable box with a quick release connection because I use it mostly for the outdoors as you can see in the pictures. If not, I just lay it on the rear seat. You can kind of see the Autotek amp in the 2nd picture. No pics of the subwoofer though

#26
Drifting
Join Date: Jun 2012
Location: City of Champs, MA
Age: 32
Posts: 2,969
Received 657 Likes
on
478 Posts
I'm going to upload a video to Youtube so you can hear it lol.
As far as how the tweeters are wired, I paid a professional to wire them up and make that quick disconnect wire for me. So I really can't answer that but I'm pretty sure you are right.
Last edited by iSeeYouTwo; 01-24-2014 at 08:51 AM.
#28
Burning Brakes
Wow... so you can swap out an aftermarket double din streo, and keep the volume up/down buttons, and the channel changing with the steering wheel buttons? Does the mode button also work?
This is pretty interesting...
This is pretty interesting...
#31
#32
#33
im baaaack!!
I swapped in a bigger battery and did the big 3 on mine. added a few more 4 ga grounds to the engine as well. i havent had any dimming lights or nothing. I decided to go back to die hard platinum deep cycle since i had a few optimas crap out on me. Im running 6 1/2" mids on the doors and the same on the deck with an 8" mid on the deck as well. The factory tweeters are still running strong. they have been on my amp since day one and kick ass. Im running a 4 channel on the doors a 2 channel on the mids and a monoblock for the 15" solobaric. She sounds ok lol
#34
Instructor
How is the fit and the quality of aftermarket double din frame?
In the picture it looks perfect!
In the picture it looks perfect!
Hey all. I have found tons of information on this forum so I decided to create a little Guide/DIY of installing an aftermarket stereo in our cars to give back to the community. I know there are several users online here that have done this install but in my research I had to get bits of information from several sources to figure everything out.
This install is not the same as installing those Chinese units that replace the top screen. This replaces the entire stock TSX radio (Non ELS/ Non tech package). As far as I know this will not work with the ELS system as the wiring is different and the stock amp does everything including EQ as well as volume control.
Please note:
Replacing the stock radio in this case retains everything with the base system. You end up using the stock amplifier and all speakers + subwoofer work. There is a world of difference in sound quality and most of all, EQ controls that are actually helpful. You can even use a HI-Pass filter to the subwoofer in the stock amplifier system. My rear deck speakers now play full range instead of just rear fill which makes everything sound so much better IMO and my stereo comes with an 8 band graphic eq which is enough for the stock system. I get clean 4V preout signals from my aftermarket deck which in turn creates a clean output from the stock amp.
Parts used:
- - Double din Stereo of your choice, I choose the pioneer avh-5500bhs as it has appmode and I can use GPS from my iphone on screen without the need for an actual NAVI type stereo.
- - Double din Frame for our tsx. I bought mine from china on aliexpress.com. Cost about $115 to Canada after all shipping+duties. It was missing two of four screw holes for the vents but still held well with just two.
- - PAC SWI-RC if you want to add steering wheel controls, which I did. You loose Bluetooth button control however. No big deal for me.
- - Metra 70-1730 Wiring Harness for 2008+ Honda accord with factory amplifier.
Install:
- - First and formost, here is a guide on how to remove your factory radio:
http://www.smartauto24.com/docs/inst...e/991-8989.pdf
- - I bought the double din frame from this link: http://www.aliexpress.com/item/2-Din...445880751.html You will have to take the vents and hazard light button from the factory frame and screw them to the aftermarket dash kit.
- - The wiring harness uses RCAís to plug into your aftermarket deck. Two for front left and right, two for rear left and right. There is a single loose RCA harness in the metra 70-1730 kit that goes to an 8 pin connector that is used for subwoofer control from the stock harness. Since there is two subwoofer outputs (left +right) on my deck I choose one at random and I donít think it makes a difference. Everything else is easy as there are only basic things to wire like ignition power, ground, illumination etc.
- - I routed my Bluetooth MIC to above my rear view mirror. I just ran the wire along the top headliner and through the top of the A pillar cover, to the bottom of the dash and then to my stereo. I was worried that I had to remove the A-pillar but it seems like this way worked well.
- - This is the guide for installing the PAC steering wheel adapter. I had to splice into the main stereo harness to find the two wires needed. http://www.pac-audio.com/swi/SWIAppG...er&swiOptions=
Thatís it for now. I dont have much pictures as i did this in toronto while it was really cold out. If you have any questions I will try to answer when I can. Let me know if there are any broken links.
 Thanks
This install is not the same as installing those Chinese units that replace the top screen. This replaces the entire stock TSX radio (Non ELS/ Non tech package). As far as I know this will not work with the ELS system as the wiring is different and the stock amp does everything including EQ as well as volume control.
Please note:
Replacing the stock radio in this case retains everything with the base system. You end up using the stock amplifier and all speakers + subwoofer work. There is a world of difference in sound quality and most of all, EQ controls that are actually helpful. You can even use a HI-Pass filter to the subwoofer in the stock amplifier system. My rear deck speakers now play full range instead of just rear fill which makes everything sound so much better IMO and my stereo comes with an 8 band graphic eq which is enough for the stock system. I get clean 4V preout signals from my aftermarket deck which in turn creates a clean output from the stock amp.
Parts used:
- - Double din Stereo of your choice, I choose the pioneer avh-5500bhs as it has appmode and I can use GPS from my iphone on screen without the need for an actual NAVI type stereo.
- - Double din Frame for our tsx. I bought mine from china on aliexpress.com. Cost about $115 to Canada after all shipping+duties. It was missing two of four screw holes for the vents but still held well with just two.
- - PAC SWI-RC if you want to add steering wheel controls, which I did. You loose Bluetooth button control however. No big deal for me.
- - Metra 70-1730 Wiring Harness for 2008+ Honda accord with factory amplifier.
Install:
- - First and formost, here is a guide on how to remove your factory radio:
http://www.smartauto24.com/docs/inst...e/991-8989.pdf
- - I bought the double din frame from this link: http://www.aliexpress.com/item/2-Din...445880751.html You will have to take the vents and hazard light button from the factory frame and screw them to the aftermarket dash kit.
- - The wiring harness uses RCAís to plug into your aftermarket deck. Two for front left and right, two for rear left and right. There is a single loose RCA harness in the metra 70-1730 kit that goes to an 8 pin connector that is used for subwoofer control from the stock harness. Since there is two subwoofer outputs (left +right) on my deck I choose one at random and I donít think it makes a difference. Everything else is easy as there are only basic things to wire like ignition power, ground, illumination etc.
- - I routed my Bluetooth MIC to above my rear view mirror. I just ran the wire along the top headliner and through the top of the A pillar cover, to the bottom of the dash and then to my stereo. I was worried that I had to remove the A-pillar but it seems like this way worked well.
- - This is the guide for installing the PAC steering wheel adapter. I had to splice into the main stereo harness to find the two wires needed. http://www.pac-audio.com/swi/SWIAppG...er&swiOptions=
Thatís it for now. I dont have much pictures as i did this in toronto while it was really cold out. If you have any questions I will try to answer when I can. Let me know if there are any broken links.
 Thanks
#35
I swapped in a bigger battery and did the big 3 on mine. added a few more 4 ga grounds to the engine as well. i havent had any dimming lights or nothing. I decided to go back to die hard platinum deep cycle since i had a few optimas crap out on me. Im running 6 1/2" mids on the doors and the same on the deck with an 8" mid on the deck as well. The factory tweeters are still running strong. they have been on my amp since day one and kick ass. Im running a 4 channel on the doors a 2 channel on the mids and a monoblock for the 15" solobaric. She sounds ok lol
Thanks
Last edited by D4nnyD; 02-06-2014 at 08:35 AM.
#36
im baaaack!!
I got 6 1/2" o2 mid drivers with a 1/2" spacer. I didnt have to cut the door either just grabbed the to tabs and bent them in slightly with a visegrip. The magnets on these speakers are huge. They are 150 watts rms each. I have a video of my settup on my build thread.
#37
I wanna get some eminence alpha 6 speakers for my doors. Those have very large magnets too man. I check out your video, car looks great and sounds great. How hard was it for your to remove the rear deck to get to the stock rear sub? any tips you could offer?
#38
Intermediate
Any close up pics would be appreciated.
#39
Intermediate
Metra actually makes a double din dash kit, it's model Metra 95-7805CH, nice! I might just purchase a 2013 TSX non-tech as installing an aftermarket DD HU is fairly simple, plus the price of a TSX are very good.
#40
Fitment is great. I used the trim ring that came with the deck when i mounted it, I see no gaps. its a tight fit and just enough so my motorized face plate moves in and out properly.
I would go with the metra kit though.. its cheaper and looks like it might be better. Reason being is that the chinese one only has one screw mount for each vent when you relocate the vent from the stock deck..there should be 2 on each vent for factory mounting.
I would go with the metra kit though.. its cheaper and looks like it might be better. Reason being is that the chinese one only has one screw mount for each vent when you relocate the vent from the stock deck..there should be 2 on each vent for factory mounting.
The following users liked this post:
Jrvtecaccord (02-11-2014)

