
Dash Clock Light Out

 02-03-2012 | 08:17 AM
#82

Intermediate
Joined: Apr 2004
Posts: 47
Likes: 6
From: Lutz, FL
Are there pics detailing the replacement of the clock bulb or a link to fully describe the procedure??? I've looked all over this site and the only info I find is the removing of the 2 screws and pulling the black cover off. I tried to no avail. Thanks,
 06-26-2012 | 03:56 PM
#85

10th Gear
Joined: Jun 2012
Posts: 14
Likes: 1
Can anyone tell me how many LED's you would need to do the entire instrument cluster and the dash? I really want to replace all of the lights in the switches, clock, gauges, ets to LED's. I have already replaced the dome light bulb, door courtesy light bulbs, center console bulb, license plate light, and glove box bulb with white LED's, now I want to do the dash as well. If anyone knows how many of each size, (I am guessing some are 3 mm and some are 5 mm) that you need, I would greatly appreciate the information.
 08-14-2012 | 06:03 PM
#87

Advanced
Joined: Aug 2007
Posts: 58
Likes: 3
Great write-ups and photos, fellas. I'm going to fix mine this weekend. Thanks everyone.
Anachostic, though I gotta give you some advice - next time shut the ignition off before you pry off the instrument panel! ... just a hopefully helpful suggestion. You could do a lot more damage if you accidentally short something out.
Anachostic, though I gotta give you some advice - next time shut the ignition off before you pry off the instrument panel! ... just a hopefully helpful suggestion. You could do a lot more damage if you accidentally short something out.
08-17-2012 | 04:12 PM
#88
Advanced
Joined: Aug 2007
Posts: 58
Likes: 3
Just did mine. It took around 30 minutes. If I had to do it again it would take 10 due to the learning curve (despite all the good advice here I still had to mess around a bit to figure it out.) Lessons learned:
1. Don't mess around with trying to reach behind without removing all the wire connectors first, unless your hands are tiny and your forearms bend like a goose's neck. Just remove the five connectors on the right side and the two on the left side (maybe three if you have fog lights?) and it will be much easier.
2. Similarly, just remove the steering column cover right off. It takes only a second - just pull it straight up, and it just snaps back in in another second. It isn't 100% necessary but the more room you give yourself to manipulate the bezel/panel the easier it will be.
3. A compact makeup mirror will be very helpful. Work in a place with good ambient light.
4. Be careful not to damage the driver's side air vent. It is attached to the back of the bezel with a tiny clip and a screw and as you try to pull the bezel out you can easily twist it. I broke the tiny clip and although I was able to get it all back together it would have been easier if the vent were still properly attached to the bezel.
5. Don't drop your screwdriver into the opening behind the bezel. I did this while trying to get the light bulb detached from the back of the clock without removing all the wire connectors. I managed to retrieve it. It was at this point I decided to remove all the connectors and by doing so I was able to pull the bezel out farther and also tilt it so the rear of the clock was tilted up which both made it more accessible and also meant that it was easier not to drop the screwdriver or bulb down behind. Just do it.
BTW I got the bulb for free (and it is an incandescent lamp, not an LED - that's why it burned out.) I went to the dealer and gave them my part number and the attendant asked me for my name and address and phone number (the last of which I refused) so they could put me in their computer => advertisement nag list. Then he disappeared for a good five minutes and when he came back he said their computer network just went down so he gave me the bulb for free.
Lastly, I have one question: why is their a thread just about the CLOCK light? Don't the other instrument panel lamps also burn out? While I was working in there I noticed the climate control display had what looked like two similar looking lamps - maybe I should have replaced those at the same time?
10-03-2012 | 08:47 PM
#89

Instructor
Joined: Dec 2000
Posts: 109
Likes: 17
Just changed my light bulb and wanted to add in my experience. I:
1. Lowered the steering wheel to the lowest setting.
2. Removed the two screws at the top of the instrument panel.
3. Pulled out the right side of the dash, starting with under the AUTO and OFF buttons. I pulled out the dash to above the steering column, but the clips to the left of the steering column I was having difficulty with and I didn't want to force it, so the right side of the dash was out an inch, but the left side was still attached.
4. I unplugged three connectors under the right side of the dash and was able to fit a small screwdriver behind the clock and unscrew and take out the lightbulb. I loosened the old bulb and tapped on the front of the clock to make it fall out, but screwing in the new one wasn't easy because you can't see well so it's difficult to tell if your screwdriver is in the slot. After a couple of tries, I tapped on it and felt it to make sure it was screwed on correctly.
If I had lots of difficulty, I would try again to take off the entire dash, but this worked out well enough.
The following users liked this post:
webmastir (10-04-2012)
 12-02-2012 | 04:10 PM
#91

1st Gear
Joined: Dec 2012
Posts: 1
Likes: 0
From: Edmonton, Alberta, Canada
This kind of writeup is very helpful. Due to cold weather conditions here in Alberta I am reluctant to try this now, but the site is bookmarked and I will try this fix when it warms up (afraid the dash with crack with the cold temperature
12-08-2012 | 02:08 PM
#92

1st Gear
Joined: Dec 2012
Posts: 1
Likes: 0
From: Silver Springs, FL
Your instructions were so detailed. Thank you very much! Personally, I didn't have to remove the climate control knobs, plus the dealership only charged me $4.34 for the new bulb. Other than that, it was a breeze.
12-08-2012 | 02:17 PM
#93

Suzuka Master
Joined: Oct 2007
Posts: 5,296
Likes: 784
Hey HookedOnSonics518, welcome !
Just wondered if ya tried the old trick of giving the dash clock a love tap ?
I was going to tear into my dash panel as detailed, but was spared by doing the tap !
Surprised the heck out of me that it would even work at all, but it's still ok a year later.
Probably quit tonite !!!!!
Just wondered if ya tried the old trick of giving the dash clock a love tap ?
I was going to tear into my dash panel as detailed, but was spared by doing the tap !
Surprised the heck out of me that it would even work at all, but it's still ok a year later.
Probably quit tonite !!!!!


The following users liked this post:
M3thod (02-26-2017)
The following users liked this post:
M3thod (02-26-2017)
11-30-2013 | 11:34 AM
#98
2003 CL
Joined: Mar 2007
Posts: 238
Likes: 32
From: Skippack, PA
I added couple of pictures of where the clips are located on the instrument bezel. Look for the areas where the blue tapes are & carefully pry it out towards you with the tool pictured below.
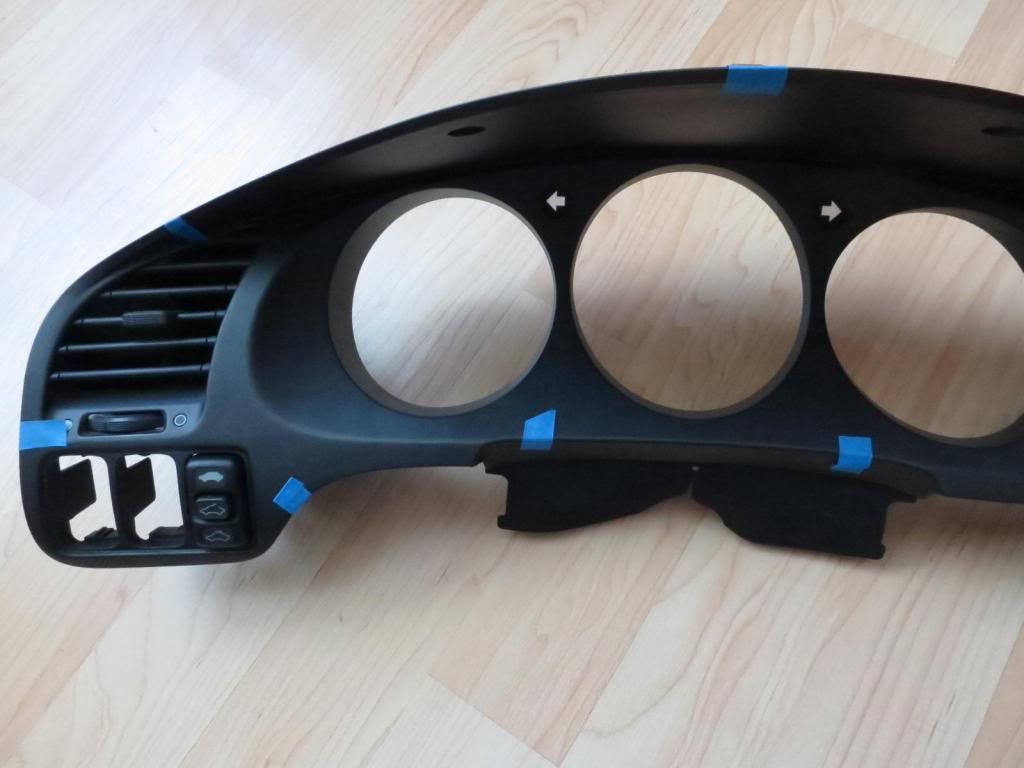
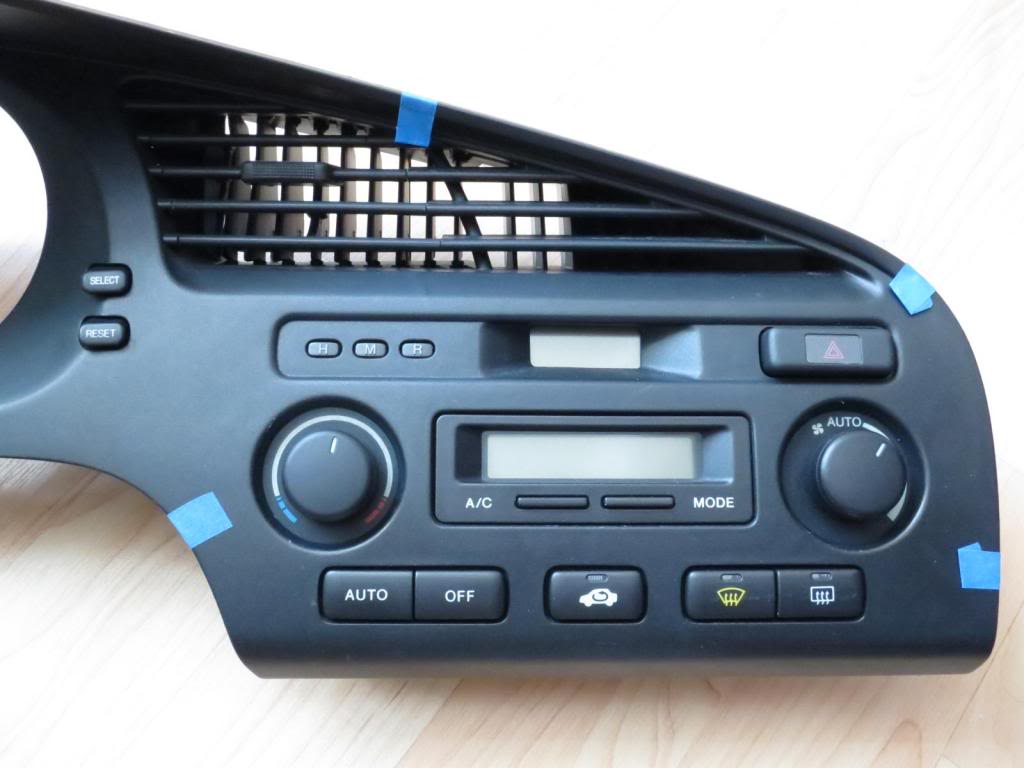

Last edited by hotclick56; 11-30-2013 at 11:49 AM.
The following 3 users liked this post by hotclick56:
02-23-2014 | 08:19 AM
#99

2nd Gear
Joined: Jan 2014
Posts: 2
Likes: 0
I know this is an ancient thread, but I thought that an update to reassure readers about parts and prices might help...even though one could easily search elsewhere for the info.
P/N has been updated: 35505-S0K-A01, ought to be in stock at your Acura dealer (my local dealer had 2 in stock, and said they immediately ordered 5 when I got them).
Acura dealer retail price is $3.00 each (February 2014). The online dealers that discount factory parts a little are around $2.20 or a little higher (but then you probably have shipping costs).
07-31-2014 | 01:08 PM
#100

5th Gear
Joined: Jul 2014
Posts: 5
Likes: 0
great write up. my clock has been out since i have owned my tl.
i noticed in the pics that there are blue screws similar to the one for the light.
does any one know what bulbs fit in those? or if those can modify the color of the climate control and buttons?
just curious and i will keep checking the feed for more info.
i know some one out there has an answer.
i noticed in the pics that there are blue screws similar to the one for the light.
does any one know what bulbs fit in those? or if those can modify the color of the climate control and buttons?
just curious and i will keep checking the feed for more info.
i know some one out there has an answer.
01-21-2015 | 09:39 PM
#102

Advanced
Joined: Apr 2004
Posts: 56
Likes: 1
From: Seattle
The lights behind the AC/OFF and Defroster/Rear Window Defog and Manual Fan switches are out. I was able to pop off the dash trim, but the connectors?...do those just pull straight out or is there a pressure clip that needs to be pressed while pulling?
01-22-2015 | 02:35 AM
#103

Pro
Joined: Jan 2008
Posts: 510
Likes: 61
From: Troy, Ohio 45373
Every connector in the car has a release tab you have to press to get the connector halves to separate. If they made connectors without the release tab then eventually it would work its way free.
Use both hands and firmly disconnect the halves while pressing on the tab. It should separate with ease. Use a light to get a better idea of where the tab is.
Use both hands and firmly disconnect the halves while pressing on the tab. It should separate with ease. Use a light to get a better idea of where the tab is.
 01-23-2015 | 06:04 PM
#105
Advanced
Joined: Apr 2004
Posts: 56
Likes: 1
From: Seattle
2002 3.2 TL...instrument panel lights with the plastic base and wiring wrapped around the base...heater controls area...I found something similar on superbrightleds.com, but the smallest package is 50-99...I only need 5. Does anyone have another source? Hard buggers to find!
01-24-2015 | 04:02 PM
#106
Advanced
Joined: Apr 2004
Posts: 56
Likes: 1
From: Seattle
Also...what are the part numbers for the fog/sunroof lights? Looks like they stopped working after I removed the instrument trim...damn! And the clock light, too! When it rains it pours!
Is the clock light the same part number as the climate control lights: 35505-S0K-A01
My Acura dealer near Seattle wants $9.00 ea for those bulbs!
Is the clock light the same part number as the climate control lights: 35505-S0K-A01
My Acura dealer near Seattle wants $9.00 ea for those bulbs!

 10-22-2016 | 10:45 PM
#109

1st Gear
Joined: Oct 2016
Posts: 1
Likes: 0
Help!
 I finally got around to changing my clock bulb now for the life of me cannot figure out what happened with my headlights. Just after changing and putting everything back together I was getting ready to leave and turned on my headlights and they have lost their minds... Tried many times and couldn't get both to turn on at the same time. One will turn on then neither, then the other then nothing. Then the other... Any ideas?
12-17-2016 | 08:17 PM
I finally got around to changing my clock bulb now for the life of me cannot figure out what happened with my headlights. Just after changing and putting everything back together I was getting ready to leave and turned on my headlights and they have lost their minds... Tried many times and couldn't get both to turn on at the same time. One will turn on then neither, then the other then nothing. Then the other... Any ideas?
12-17-2016 | 08:17 PM
#110
Intermediate
Joined: Nov 2016
Posts: 35
Likes: 0
From: Nor cali
damn RadioShack stopped carrying the bulb man I've been on da hunt all day for it..now I guess I gotta wait till Monday and just go to the dealership..damn this sux..
12-22-2016 | 04:46 PM
#111
Pop's Wheels
Joined: May 2016
Posts: 80
Likes: 1
I have been thinking about trying this. New to working on cars but this sounds simple even if it's tedious. My clock has been out since I got the car earlier this year and it wasn't much of a problem before, but now that it gets dark so early I can never see what time it is 


Thread
Thread Starter
Forum
Replies
Last Post
mada51589
3G TL Problems & Fixes
79
05-03-2022 08:54 PM
cycdaniel
1G TSX Performance Parts & Modifications
8
12-17-2019 10:58 AM
BoricuaTL
Car Parts for Sale
138
04-08-2016 01:08 PM
Greengecko
3G TL Audio, Bluetooth, Electronics & Navigation
4
09-16-2015 08:19 PM