When you click on links to various merchants on this site and make a purchase, this can result in this site earning a commission. Affiliate programs and affiliations include, but are not limited to, the eBay Partner Network.
Was your 8 & 9 digit on the Tachometer always lit up or did you peel the backing? I thought those were covered stock.
Always lit up. I never pulled anything off.
Lots of positive progress indeed. Except for this stupid thing I did that set me back that you're helping me with. I'll talk about it when I've figured out how to fix it. That way everyone can share a laugh at my stupidity.
Looking good. I did led tape instead of led retro. The hot spots bugged. Still have one slight hot spot but not trying to take of the dash piece. Already have repaired two of the dash slots that hold the clips. I still prefer the 6th gen accord cluster from the 01-02. Cleaner and evenly lit. Regarding the sub. Sealed enclosure out of 3/4" will be lighter than mdf. Sub box pro website might have the box dimensions cut out sheet. If you need an amp hit me up. I have old school stuff Jl 500/1 black orion. Subs not that critical except power. Down for sound is the place new their own brand stuff is super good. Way more power than what the bix says. Blown a 12w6 twice with the same song. 😂
Still searching for a drivers bottom cushion in black. Even a small tear I can live with/repair. If you find one please grab it for me. Can be removed without removing the entire seat incase you cannot get it out. Four 12 or 14mm bolts with a wrench. 🙏
Sorry for all the typos. Fat finger on a phone.
So this is going to be a long winded post chasing down an electrical issue. I owe 619rcr a couple of beers. He helped me with trying to figure things out, answering my never ending questions.
Let's begin with this. When I was putting the plastic housing back in that sits over the gauge cluster, I had the moon roof switch popped out. I went to go grab it from my passenger seat, and plugged it in. Then I realized.. it was the automatic's seat warmer switch, with the high/low setting. But it fit the plug. So I got to thinking, what would happen if I tried to use this switch for the moon roof? Maybe it could be a one push option like how it is on the 3G TLs. So I tried.
Pushing low, nothing. Neutral, nothing. But the high switch.. the high switch turned on the fuel pump. It was pouring out into my floor. So I was done with my fun, and put the moon roof switch in, and pushed the buttons. The moon roof didn't open, but rather, I popped the fuel pump fuse. So I replaced it, and checked the moon roof fuse. Fuse leads was burnt, but not popped.
For the past two days, I've been trying to figure out this headache. Never ending messages to 619rcr, just trying to think of what could have happened. What did I do? He thought maybe the MUX was fried. So I swapped the passenger side fuse box. Nothing still. So I swapped the driver side fuse box. Nothing. So I checked for continuity on all the fuses. All good. I checked the voltages on the fuses. All good. What the hell could it be?
619rcr said that there were relays for the moon roof. So I unplugged them, and tested them. They clicked. I still pulled the two relays from the black CL, plugged them in, nothing. Tested them, they clicked. So then I pulled the rear of the head liner down to check the limit switch. It was fine.
While looking under the dash, I made a discovery. Apparently, there are two big brown plugs. One for the main relay, and one for moon roof controls. They are the exact same connector, and I had them backward. This is why I was turning on the fuel pump.
Plugging them in correctly, and all of a sudden, my moon roof was opening! But, it wasn't closing. What the hell.
So, 619rcr helped me with probing the wires & relays to check for power. All seemed to be good, kind of. I then checked for continuity amongst all of the wires. All beeped. Then I cut a very small slit into the pillar arm wires. 2 we're getting 12V, but one was dead. So then I started measuring the voltage on the moon roof plug. 619rcr, again, helped me with this.
Eventually, he told me to check the manual to see if there was a procedure on what to do. What do you know, there was. So I followed the manual, and checked for continuity on the switch itself.
All of them were beeping, except for 1 & 4; the close button. I should mention, I had already tried the black CL's moon roof switch, nothing. So I decided to give my girl's switch a try. I couldn't get her switch out to test it, so I just plugged in my switch, and what do you know, it wasn't closing the moon roof. But it did open it. Then I remembered something..
I had taken apart the moon roof switch earlier to inspect the circuits. I had noticed a pin was sticking up. I had tried sticking it back down before, but it would immediately spark when plugged in. I figured maybe it was meant to be like that, and thought nothing else of it. Then I went back, took it apart, pushed that pin back down, plugged it in, and my moon roof now closed.
What an absolute headache this was. I still don't know what will happen if you try to use the seat warmer switch as a moon roof switch, and I personally do not care to find out. Electrical problems are the most annoying thing ever to deal with. I'm going to finish putting the interior back together now and go to sleep. It's been a long 8 hours sitting inside of my car.
Originally Posted by Proguy747
Looking good. I did led tape instead of led retro. The hot spots bugged. Still have one slight hot spot but not trying to take of the dash piece. Already have repaired two of the dash slots that hold the clips. I still prefer the 6th gen accord cluster from the 01-02. Cleaner and evenly lit. Regarding the sub. Sealed enclosure out of 3/4" will be lighter than mdf. Sub box pro website might have the box dimensions cut out sheet. If you need an amp hit me up. I have old school stuff Jl 500/1 black orion. Subs not that critical except power. Down for sound is the place new their own brand stuff is super good. Way more power than what the bix says. Blown a 12w6 twice with the same song. 😂
Still searching for a drivers bottom cushion in black. Even a small tear I can live with/repair. If you find one please grab it for me. Can be removed without removing the entire seat incase you cannot get it out. Four 12 or 14mm bolts with a wrench. 🙏
Sorry for all the typos. Fat finger on a phone.
I can get an amp, it's no biggy. I do want something better than the crappy planet audio that's in my TL though. That thing kept over heating, so I cut a hole in the top plate, and put an old Dell PC fan on it to keep it cool. Works great. That fan, however, is so powerful, it can generate it's own lift a bit. I've had it accidently cut and make me bleed while working on PCs in the past. Really need to fix the wiring in that car, it's an absolute mess. I will in the future.
As for a box, I want to try and fit it in the corner of the trunk. I really want to take up a minimal amount of space possible. The sub is already adding more weight, a box will as even more. Not trying to strip the car & put my car on a diet. I like the 'luxury' interior and all the creature comforts that come with it. But I don't want to add more weight and make me slower. I also would like to keep my trunk as free from clutter as possible. Never know when you need to fill it up. Ideally, I would like to cut a hole in the middle of the backboard and stick it there, but I think a 12' is too big for that.
It's a job for future me to figure out. I'll probably do it when I get around to putting the ASPEC kit on my car.
There's only one CL-S at the yard currently. Seats aren't in good condition unfortunately. I have been looking!
Woke up this morning, and looked at the junkyard page to see what cars were there. A 2005 RL was thrown into the lot 2 days ago. Finally, my chance to get a set of RL cams! So I rushed my ass down there ASAP to get them.
IT WAS ON THE LOT FOR TWO DAYS. TWO DAYS!Some one already took the fucking motor. I JUST WANTED CAMSHAFTS WHY.
I at least managed to grab the brake calipers.
I was going to sell these for $300 on eBay, with offers open obviously. But I asked my girl if she wanted them for $150. She got mad at me, and now I feel like an asshole. So I decided, I'm going to paint these purple, because they're her favorite color, and give them as a Valentine's gift. She can get everything else to make them fit her self. So much for funding my project car through my side hustle. Best part; the pads still look pretty new.
I also grabbed this front lip off of a 2000 Miata for my friend. Now he's stressing out about the side skirts thinking they might be Tupperware. Those shits sell for like $400, and Miatas don't last long at the yard.
Anyways, let's get back on topic to the swap, shall we?
Two different sets of transmission mounts came in yesterday. One for the black CL, the other for a 2004 Accord V6. Except one of them is missing that longer metal cylinder for the bolt. Since I have them now, I can throw the motor/trans in, and test fit things. I'll be seeing if they bolt onto the transmission with that metal bar on & off. For the most part, it looks like they might work with the transmission. But I don't think they're line up with the subframe holes. I'll find out tomorrow. For now, I don't have much time to get these calipers cleaned & painted. So I'll be throwing the motor/trans in tomorrow, and focusing on the calipers.
Oh, and two new magnets for my collection. Didn't have these yet.
Don't ask me how many magnets I have. I have a problem.
Originally Posted by Proguy747
Fiberglass enclosure would work. I am most likely going to go IB in the spare tire well. Boom no added weight besides the 24" sub. 😁
I wouldn't dare drive without my spare tire. I popped a brand new tire because of a pot hole that was hidden. That spare got me home, and I was an hour away.
I was going to sell these for $300 on eBay, with offers open obviously. But I asked my girl if she wanted them for $150. She got mad at me, and now I feel like an asshole.
You are a smooth operator, mang!
Originally Posted by Thefireball
Two different sets of transmission mounts came in yesterday. One for the black CL, the other for a 2004 Accord V6. Except one of them is missing that longer metal cylinder for the bolt. Since I have them now, I can throw the motor/trans in, and test fit things. I'll be seeing if they bolt onto the transmission with that metal bar on & off. For the most part, it looks like they might work with the transmission. But I don't think they're line up with the subframe holes. I'll find out tomorrow.
Interested to see / hear what you find on this trans mount endeavor.
Interested to see / hear what you find on this trans mount endeavor.
Getting them to fit looks like it might take some modification of the mounts themselves, or the metal bar itself.
You can bolt the rear mount on the outside of the bar itself, but then they'll be sticking past the subframe. You can, however, bolt it directly to the transmission itself, but one of the holes will need to be tapped, as it's not used on this transmission. By bolting it to the transmission itself, you would maybe need to add a couple of washers to space it out enough to reach the subframe holes.
The mount might work if you put the bar in-between the two bolt holes, and lines up with the subframe holes I think, but you will need to shave the bar down a little bit to make it sit straight. Not to mention, the hole that sits closer to the transmission doesn't reach the hole for the bolt, while the other one does just fine.
The mount can be bolted to the outside of the bar, but some of the metal in-between the mount, closer to the right mount hole, would need to shaved down. But doing this causes it to stick out past the subframe.
Sandwiching it in-between doesn't work, and it hits the bar before the holes can reach. The bar would need to be shaved down a bit to make it fit this way.
The front mount can be only bolted to the transmission directly, but it will only be utilizing one bolt, and there is no where else to put the second bolt.
There is no way to bolt the front mount to the transmission itself, unless you're comfortable with only using of the two bolt holes.
This is what I've taken pics of this far, and will try some of the modifications, to the mount only as I don't want to mess with the bar, tomorrow when putting the motor/trans in.
It should be noted that the '04 Accord front mount is the exact same design as the '03 CL mount, just that the subframe studs are spaced out further. So it will not fit into your subframe. The transmission bolt holes are the same however, I think. I didn't measure, just going off of looks.
Edit: fixed the front mount description as I got confused and said the wrong thing.
Last edited by Thefireball; 02-03-2023 at 06:57 PM.
Did quite a bit yesterday. Was up late putting things together.
Picked up my shift boot yesterday. Post office attempted delivery, but I was at the junkyard, and so they took it back since I wasn't there for a signature. Stapling this in was a pain. I used a washer that fit over the threads, but didn't go past the handle, and a ziptie on the tip of the tip of the leather to prevent it from falling.
I don't like the shift stick either, but it's what I have to use. The throw is absolutely ridiculous. Still have to find something I like and order it.
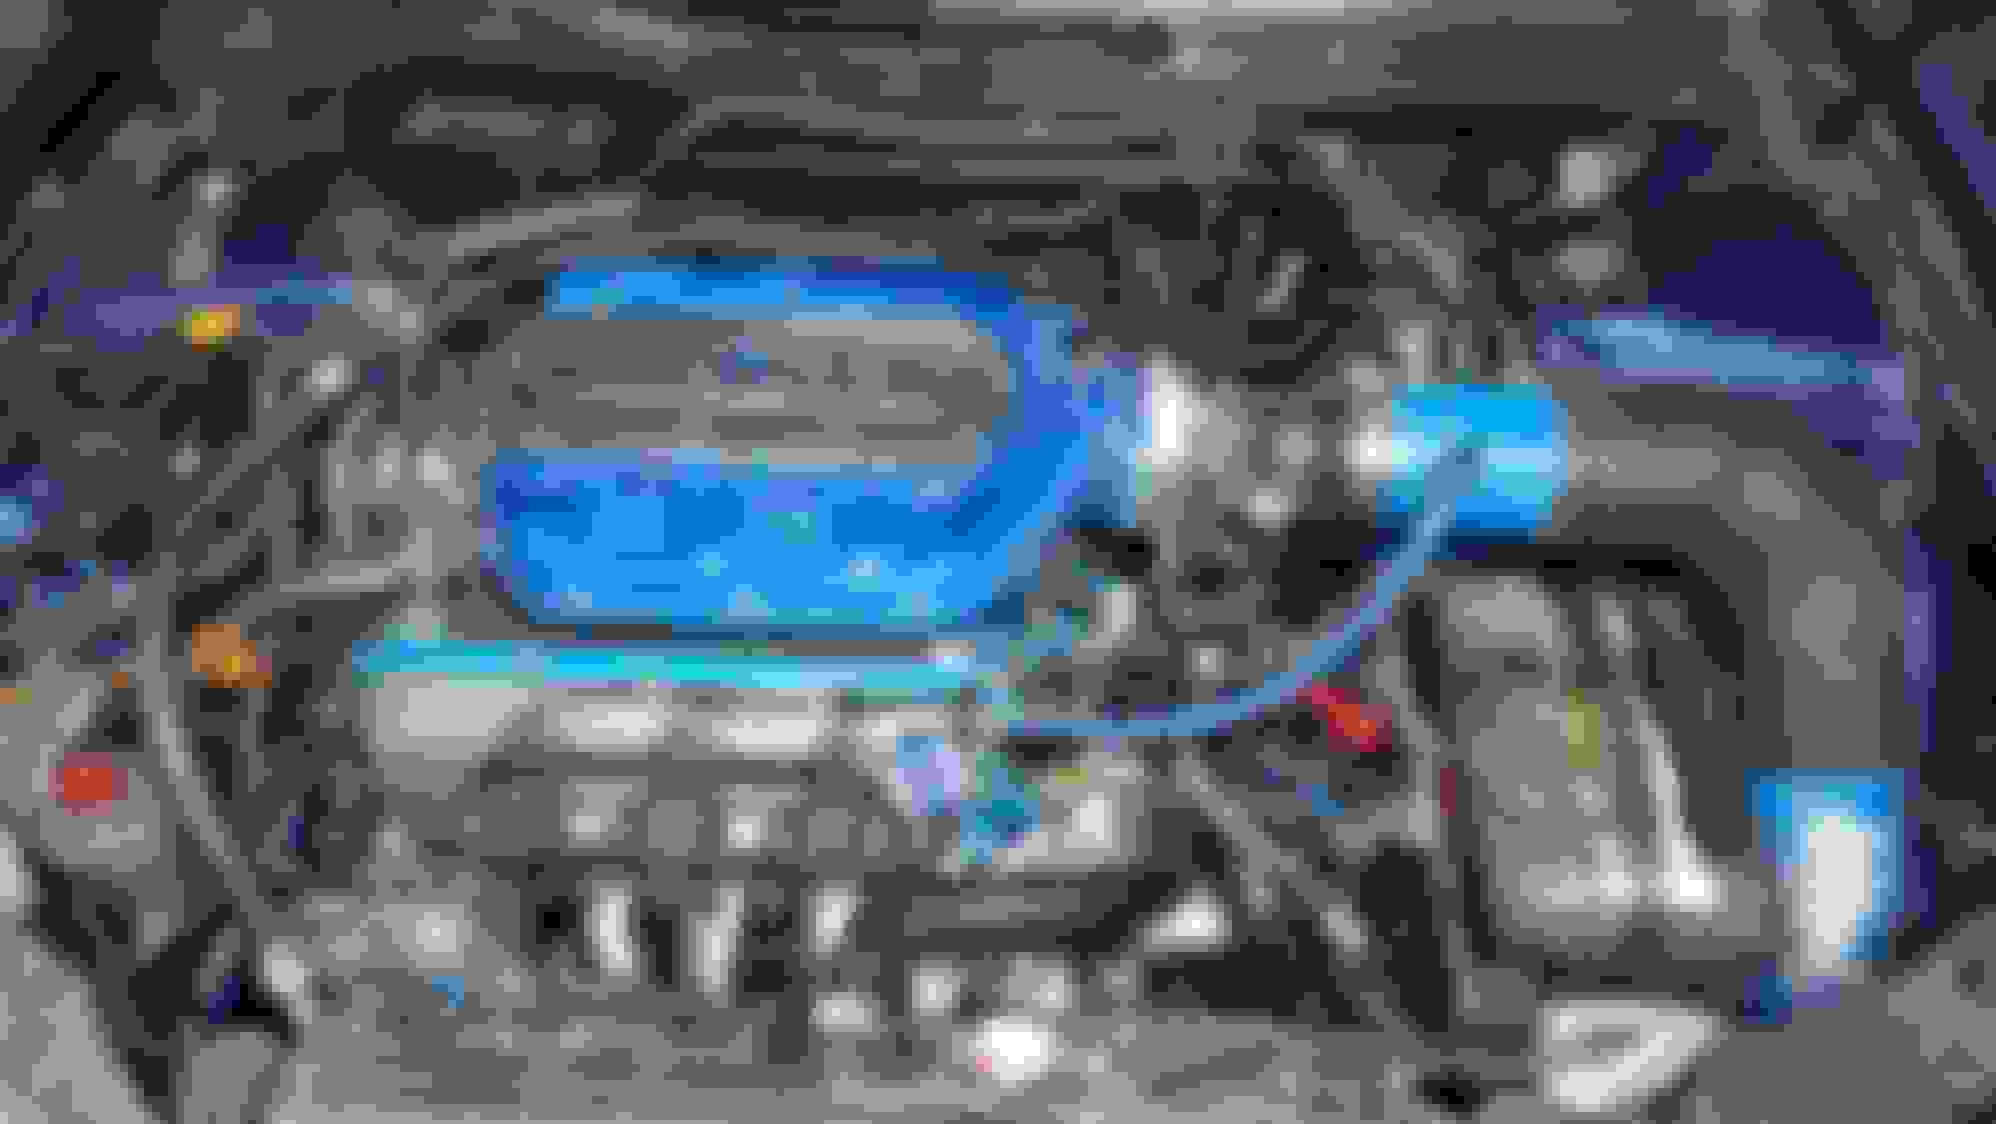
Motor/transmission are in. This image isn't even of where I stopped. I already have the engine wire harness put where they need to go & plugged in for the most part. But it was 4AM, I was tired, and didn't care to take another pic.
The rear mount made getting the motor in more difficult than the auto's rear mount. Plus, the combo kept tilting on the hoist, so I had to pull it out 3 times before I got fed up and rewrapped the strap in in a way it wouldn't tilt. Then I got fed up with the rear mount, so I unbolted it from the subframe onto the engine, and managed to get it bolted down.
AC is on, slave cylinder installed with the line put down where it goes, lower runners & fuel rails are also installed.
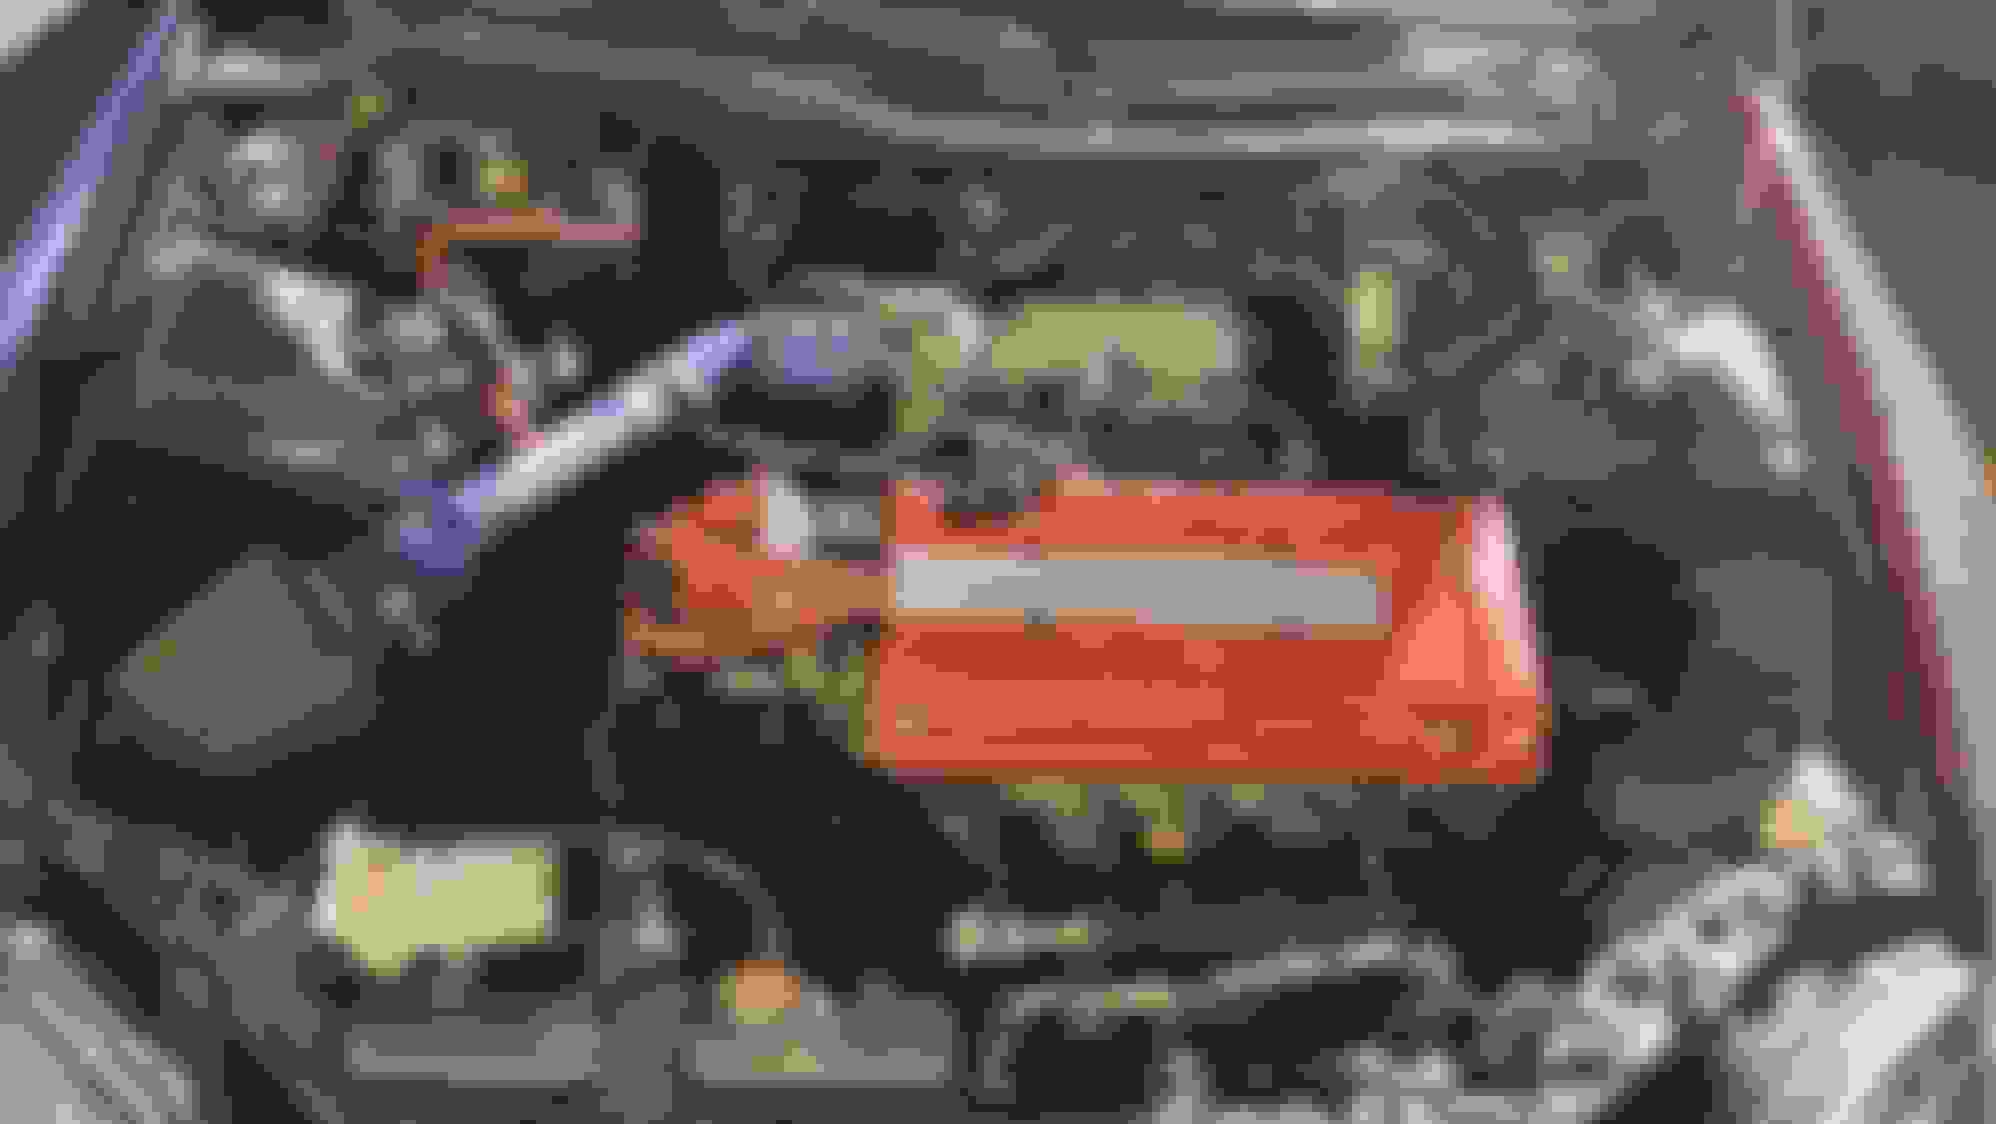
Headers have also been installed, and we have a problem. It's too long. Cat will have to come off. But even still, this flex pipe needs to be welded on, and it won't reach after the cat. So I guess I'll be driving with a straight pipe to a shop. Or maybe I'll attempt welding myself? I don't know yet.
Should probably remove that O2 sensor now that I'm looking at it. Pretty sure it's holding the cat up.
So, the transmission mounts. The '04 accord rear mount can work bolted directly to the transmission, but will need to have something like a long cylinder or a bunch of washers to prevent bending the metal on the mount itself.
The front mount, which is the OEM auto mount for our cars, will not work bolted onto the transmission. It won't reach the sub frame holes. But it can be bolted onto the transmission, as you can see the two holes for it.
With the bar on, you can see where the metal bar would need to be shaved down, but I believe it might work. I'm not going to attempt shaving some metal off of mine. This would be an absolute last resort if polyurethane did not work for you. Another solution could be to simply cut the metal bar at the back, and using it to fit the front mount on, and bolting the rear mount to the transmission directly. The front of the bar would still need to be shaved down a bit to clear the front mount.
However, I did find another solution, I think. I had already put on the CLS6 mounts before I realized I didn't try this. The front mount looks like it would actually work bolting outside of the metal bar itself. The studs look like they would line up with the subframe, and even if they don't, you could maybe just slim the side of the bar a little bit. The rear mount, however, does not line up with the subframe. Again, I think the bar would need to be shaved down, or cut in half.
This whole transmission mount nonsense had me thinking Friday night. Why would Honda design a brand new manual transmission for the J series, but have to extend it to fit our cars? I think CLS6 owners were beta testers. I say this, because in the next gen TL and Accords, they use this same design transmission, but bolt mounts directly to it. They used the CL as a way to give the transmission a real road test with people before making them in much larger quantities. That's why there are so few of these cars.
Perhaps the transmissions we're also slightly over engineered, maybe due to the reputation of the automatic transmission? Then they used the information that they learned, and later revised it, removing and adding things as needed. Perhaps this is why the next gens don't have the flywheel sensor? Perhaps this is why the transmissions are so strong & reliable?
If my thoughts are true, that means that Honda designed this transmission with the '04 Accord/TL in mind back in either '01-'02 when they were still selling CLs. They used a different subframe design, and I can only imagine how long it takes to design & build a car, especially the foundation of one, like the subframe.
But, those were just shower thoughts. So maybe I'm just crazy.
Now, I'm going to go and sit in my car for 10 minutes and play with the shifter. Maybe wiggle it in neutral a couple of times. BECAUSE I CAN.
This whole transmission mount nonsense had me thinking Friday night. Why would Honda design a brand new manual transmission for the J series, but have to extend it to fit our cars? I think CLS6 owners were beta testers. I say this, because in the next gen TL and Accords, they use this same design transmission, but bolt mounts directly to it. They used the CL as a way to give the transmission a real road test with people before making them in much larger quantities. That's why there are so few of these cars.
Perhaps the transmissions we're also slightly over engineered, maybe due to the reputation of the automatic transmission? Then they used the information that they learned, and later revised it, removing and adding things as needed. Perhaps this is why the next gens don't have the flywheel sensor? Perhaps this is why the transmissions are so strong & reliable?
If my thoughts are true, that means that Honda designed this transmission with the '04 Accord/TL in mind back in either '01-'02 when they were still selling CLs. They used a different subframe design, and I can only imagine how long it takes to design & build a car, especially the foundation of one, like the subframe.
:
Although the trans case may have the same casting as the early 7GA/3G TL, the subframe design differences between the 2G and 7GA/3G likely explain the lower mounting differences.
As for the beta testing, if that is true it may explain why the CLS6 in many ways is unique.
My thought has always been that the CL Type S was test of the luxury sport coupe market. However, the CLS' Achilles heel may have been the end of life 6GA platform it was based on. The 6GA V6 is already nose heavy car stock. Then Acura upgraded the motor, brakes, wheels, interior, audio, etc. The end result is 63/37 weight distribution for the AT and 62/38 for the MT. All this nose weight, really pushes the limits of what the old school steel double wishbone suspension can handle. Not to mention safety improvements made in the later gen unibody construction.
At the end of the day, I still prefer the 2G/6GA over 3G/7GA.
I'm finding more and more little things that are different between the two cars as I'm reassembling things.
Two nights ago, I had noticed that the coolant passages that bolts into the heads, as well as the tube that runs through the middle of the block, were different. There were passages for the auto transmission, which the manual transmission does not use. Originally, I had only noticed the tube was different and only swapped that in, only to find I still had one inlet with no hose to attach to it. Annoyed, I swapped these as well, but not before painting it.
In addition to this, I was noticing I had a socket next to the front cam gear area, but nothing to plug into it. It's for a coolant temp sensor, which the 6 speed does not use. I've been informed that the 6 speed only uses 1 coolant temp sensor. I'll be leaving it in, because I'm not undoing the timing at this point. I'll just pull one off of my spare heads and swap it onto the other motor later.
On top of this, I already have the radiator & fans in, and there's another temp sensor on the radiator itself. Now, I'm not sure if the 6 speed's radiator has a bung for this sensor, but I sure hope so, because as easy as it is to remove the radiator, I'd prefer not having to swap them over. I hope it's just as easy as swapping the sensors over.
Motor is pretty much done for the most part. I still need to extend the IAT sensor wire to reach the intake tubing. Already extended the IMRC wire. Clutch has been bled, but I might need to adjust the screw under the dash. The clutch pedal doesn't begin to feel firm until an inch or two of pushing it. I probably loosened it when removing it. I still need to make some sort of plate for the top nut on top of the pedal, but for now, the two nuts holding it in are doing perfectly well.
I was having a slight problem yesterday when hooking the battery up. I needed to test the head lights to make sure I had the polarities correct. Turns out, the battery was just low on juice. So I charged it up off the TL, and everything worked perfectly fine again. Passenger side head light has had the original plug cut off, and the new wire soldered on. The previous owner had some Xentec ballasts installed, and I've kept using them ever since. Both sides of the ballasts have already died once, and they're cheap enough to just replace. The driver side is a little janky. The shop they took it to just took the leads of the original plug, and just pushed them in the sockets, and taped it down. I decided to keep it like this.
Forgot to take pics of the end results, oh well. Head lights work though, so all good there.
Axles are in, and the passenger side sits uncomfortably close to the rear header. They aren't touching, but they're super close. The good news with installing the headers was that I did not have to notch the subframe at all. Must mean my mounts are in good enough shape.
I was going to replace my axles for new ones, since they are cheap, and put these ones on the black CL since the passenger side axle for that car has a small tear in the boot. But I figured, the axles are pretty easy to remove. If mine ends up going bad, I'll just replace it then. Not sure what I'm going to do for the black CL's axle though. Maybe I can just seal the bot with some gasket maker or something. Doesn't make any sound, and still feels smooth moving it. So I don't think anything got into it, but who knows.
I also got a quote from a shop after showing them pics of the exhaust issue, and telling them what I needed done. Only $150 to push the cat back and get my exhaust all connected. Going to be a loud ride there.
Currently working on the front end suspension. I only managed to get the upper control arm replaced so far, as I ran out of time attempting to remove that tie rod. Need to figure out a way to get it off, but 619rcr, as per usual, gave me some tips on getting it off. So that'll be what I'm doing tomorrow. If I manage to get all of the suspension done tomorrow, then I'll be bleeding all of the brake lines. Just need to go buy some brake fluid.. might have to wait until payday.
After that, I still need to get fluids of all kinds. Motor oil & filter, trans fluid, power steering fluid, some freeon, & even some wiper fluid. Blinker fluid is already topped off. After that, it's a matter of getting the keys programmed, and the exhaust fixed up. I might be able to start the car by having the black CL's key up next to the key clinder, but so far it hasn't worked. Might be because I had the top of the key next to it, instead of the actual metal part of the key.
Not going to lie, I'm pretty nervous about starting my car again. So much has been done to it, I could have messed something up along the way. Either I didn't install the clutch & flywheel correctly, maybe a bolt is loose some where, perhaps a break in the wire harness, anything. From starting the car, to driving it, I'm a little worried. Let's just hope everything goes according to plan.
The key chip is under the logo on the key. I dug mine out and glued it to the top of the immobilizer so a standard key works. Did that on my accord because I had an aftermarket alarm.
I'm finding more and more little things that are different between the two cars as I'm reassembling things.
Two nights ago, I had noticed that the coolant passages that bolts into the heads, as well as the tube that runs through the middle of the block, were different. There were passages for the auto transmission, which the manual transmission does not use. Originally, I had only noticed the tube was different and only swapped that in, only to find I still had one inlet with no hose to attach to it. Annoyed, I swapped these as well, but not before painting it.
Interesting you say that about the water passages.
Could the 'different' one you noticed be the factory MDX water passage original to the swapped J35A3?
CL-S6:
CL-S Automatic:
02 MDX:
Originally Posted by Thefireball
Axles are in, and the passenger side sits uncomfortably close to the rear header. They aren't touching, but they're super close. The good news with installing the headers was that I did not have to notch the subframe at all. Must mean my mounts are in good enough shape.
Wow, that is close!
That's the half shaft assembly, correct?
I'm thinking, since it is in a 'fixed' position, you may be OK?
The key chip is under the logo on the key. I dug mine out and glued it to the top of the immobilizer so a standard key works. Did that on my accord because I had an aftermarket alarm.
I keep forgetting I need to hold the clutch down to engage the starter. Coil packs aren't hooked up, so it won't start. Just want to see if the motor will crank. That way I can test drive the car before I get the keys programmed.
Definitely won't be digging the chip out. The next owner of the black CL is going to need a key lol.
Originally Posted by zeta
Interesting you say that about the water passages.
Could the 'different' one you noticed be the factory MDX water passage original to the swapped J35A3?
CL-S6:
CL-S Automatic:
02 MDX:
Wow, that is close!
That's the half shaft assembly, correct?
I'm thinking, since it is in a 'fixed' position, you may be OK?
The coolant passage was not from the MDX. I swapped the one my car originally had during the J35 swap. Both the portion that bolts onto the heads & the tube that runs through the middle. The one inlet that isn't used is the far right one. You can see it's just blocked off and unused completely. The tube that runs through the middle is missing the branching off tube that sits over the top of the passage way.
I'm sure you could just plug off the one inlet, but I'm not sure how you would do that. A simple plastic cap with a ziptie might just leak or pop off. Could fill it with gasket maker, maybe. Easier to just swap it. Two of the inlets are also rerouted to flow right back to the passage, since I originally removed it from the TB, and now the B series TB doesn't have the ports for it anyways.
As for the image, they look exactly the same. So I'm not sure what's up with that.
The headers sit just slightly left of where the axle mounts to the motor to hold it in place. Let's keep in mind that the header still isn't situated to the exhaust. Even though I can't physically move the Y pipe at all, when it's welded/clamped onto the rest of the exhaust, it might pull it back a little bit.
I might end up going back into the headers to put some copper gasket maker where the headers meet the Y pipe. That rear header was slightly tilted a bit, with a slight gap. I eventually managed to get the V band clamp on and tightened it down, but I'm still worried there might still be a slight gap, allowing the exhaust to leak.
Nice catch on the water passage difference.
Just goes to show that one cannot trust the parts diagram pictures to be entirely accurate.
There are even two distinct part #'s between the manual & automatic.
Your Jade Blue Afterglow picture below is for CL-S6 water passage 19410-PGE-A10
Originally Posted by Thefireball
CLS-Automatic water passage 19410-P8E-A01 has the extra side coolant port (green arrow).:thumbsup
Progress on the suspension has been slow. I've had to rent two different tools from the auto parts store to get things done. Step by step, I'm figuring out how everything comes off and reinstalling the parts. I'm also running on fumes today, with only 4 hours and 30 minutes of sleep. Why? This is why.
Another RL showed up at the yard, an '07 ASPEC to be exact. Today was it's second day on the lot. I woke up early, woke my girl up because she was off work today, we rushed down there, and with her help, got these pulled. The best news of them all, I got the cams free. 'Forgot' I had them wrapped in a Tshirt in my wheel barrow. After that, we got some burritos from the Mexican store, and went home. So today was pretty good all things considering.
I did accidently leave my electric ratchet at the yard though. Maybe it's karma? But it was crap anyways. Tightened just fine, but it didn't do well loosening. On top of that, the anchor broke lose on my impact, again, for the second time. I'm probably put some JB weld in it this time. I'll be getting some proper power tools soon, and not some chinesium crap. But I will say, that little crappy avid power impact honestly works pretty damn good, and I'd recommend it if you're on a budget like me.
SO, this means I have to undo the timing on my motor, AGAIN, IN THE CAR. Great. As for the calipers, I just need to get them cleaned, boxed up, and they'll be thrown up on eBay.
As for the suspension..
Yesterday, I rented this tool and got the ball joints out. Holy hell, what a pain in the arse. Not sure I used it correctly, but it got them out. One of them came out all in one piece. The
other.. well, it got pushed out through the back of itself. Never the less, they are out, and the new ones are in, and undamaged at that. Getting the snap rings was also a pain. Went to the auto parts store to get some snap ring pliers, only to find that they didn't open up enough to slip them on with easy. But, I persevered, and managed to slip them on without damaging the boots. Now where did I leave that one castle nut and cotter pin..
I also managed to get the upper & lower control arms on yesterday. I removed the outer tie rod as well, only to find I also had inner tie rods, which I was not aware of. Getting those outer tie rods off was really difficult.
Thanks to 619rcr's recommendation (how many beers do I owe this guy), I rented this tool from the auto parts store as well. Only had it for about 15 minutes. Removing the old tie rods & installing the new was an absolute breeze with this thing. I used a ziptie in place of the old metal crimp ring that holds the inner portion of the boot on. I tightened that sucker down pretty good. It ain't goin' no where. However, I think there still might be a power steering leak at that nut that I inspected. Saw some clear/brown fluid on the steering rack's adjustment screw. Guess I'll find out later.
As it sits, this is where I am on the suspension. I've been trying to get the new sway bar linkage on the passenger side, but it's not really wanting to go in fully. I believe it's because the new linkage is just so stiff. Honestly, all of the new suspension bars are really stiff. All of the old parts flop about loosely, and I can move them like it's nothing. I have to push absolutely HARD to move any of the new joints. It really has me hyped on how well my car is going to handle. Really wish I would have replaced struts though. The driver side is really decrepid and worn out. All in due time. However, I did notice this on the driver side linkage.
The boot doesn't seem to want to sit straight on the stud, and had a little bit of grease poking out. This is both ends of the linkage. Driver side is perfectly fine. I tried pulling it up, but it just went straight back down. I'm hoping that with a bit of driving, it'll fix itself. But if not, a new linkage is cheap, so who cares.
I have another surprise that is soon to be on the way. I finally have found a custom shift knob that I like, and fits with the color scheme of my car. However, what I want done requires me to contact the company. I've already done so, and they said it was possible. So now it's just a matter of waiting for them to take my order, having it made, and sent to me. I've decided to splurge a little bit, as a custom shift knob is something I've always wanted. There's just so many designs & shapes, that I don't know what I want. But it's also hard to find ones that fit my theme. So I decided to have one customized to my liking. It's not a cheap Etsy knob, that's all I'll say on it for now.
Another RL showed up at the yard, an '07 ASPEC to be exact. Today was it's second day on the lot. I woke up early, woke my girl up because she was off work today, we rushed down there, and with her help, got these pulled. The best news of them all, I got the cams free. 'Forgot' I had them wrapped in a Tshirt in my wheel barrow.
...
SO, this means I have to undo the timing on my motor, AGAIN, IN THE CAR. Great. As for the calipers, I just need to get them cleaned, boxed up, and they'll be thrown up on eBay.
Thanks to 619rcr's recommendation (how many beers do I owe this guy), I rented this tool from the auto parts store as well.
Nice come up on the RL parts. Don't forget you'll need the P2R cam extensions to fit the older heads.
Glad to hear that inner tie rod tool was available to rent. Makes the job easy.
Did the p2r headers go up around $200 recently? I thought they were closer to $550 before.
Not sure on the headers, but a lot of there prices have come up. I viewed some of my older orders from a couple years back, and all of them were higher in price, and that was with things being on sale when I was checking the price change.
I finished up all the little things on the car Sunday night. All of the new suspension parts are on & torqued down to their correct torque specs per the service manual, and the cotter pins are in place and twisted down. Brake calipers are on, and have been bleed two times over in their the correct order. Clutch line was rebled again, and the pedal feels much better now. Power steering reservoir has been filled up & the pump spun with my drill to cycle it through with no leak at the flare nut. Coolant has been poured in, but I'm going to need a second bottle for when I start the car. All wires are extended where need be, and plugged in, aside from the 2 O2 sensors. All hoses are in place.
The radiator & fans have also been swapped. I actually discovered that the 6 speed radiator is shorter than the auto's, along with it's fans. So I also had to swap over the top mounts that bolt in to the frame of the car. The radiator has the hole for the sensor, but it's plugged with plastic that would need to be drilled out. It was easier to just swap it.
Spent today putting tightening the intake filter, getting the bumper, wheel well, and plastic undercover put on. I also got the hood on, but had to mess with the latch alignment to get it to go down properly. Wheels have been put on. She's pretty all done and ready to go. Only things that are left to do are pouring in the transmission fluid, oil & filter change, getting the keys programmed, getting the exhaust fixed up, getting an alignment done, and we're all done. I do want to mention that I had to adjust the tierod on the passenger side wheel, due to it sticking out a little bit when the driver side wheel was straight.
While I'm waiting to save up the funds to get everything else done, I'm going to start cleaning the interior starting tomorrow. Seats will be coming out, and everything is going to be getting vacuumed & shampooed. Already have the new little tree air fresheners ready to be thrown in. At the same time, I'll be pulling out the radio so that I can ground the parking brake wire. I'll be bypassing it instead of connecting it to the actual parking brake sensor.
As far as the swap goes, it's all done. Question is, after my car is truly done, should I continue this thread with the black CL converting it to an auto?
Shift knob has been ordered and is being made, it'll be here soon.
I am in awe. I've moved onto a different platform but decided to randomly browse these forums again and stumbled upon your thread.
This build is f*cking sweet man, lol. It seems to be moving lightning fast. Meanwhile it takes me weeks to get simple mods done.
I really find this motivational. Can I ask,
1. How did you learn so much about working on cars? (Youtube?)
2. How long have you been working on cars?
I'd like to reach your drive and expertise some day
I appreciate the kind words lol. ADHD meds help me keep focused lol. Just chip a little bit away at a time each day, while my girl gets mad at me for neglecting chores.
Well as I said before, growing up, I didn't care about cars. I was into computers. Wasn't until I started driving, which my first car was a '99 CL with the J30, that I just decided to go WOT, got into a race here and there, lost, and experienced VTEC. From there, it sort of just spiraled into this. I've always been the type to take things apart, learn how they work, put them back together. It's what I've done with everything, especially computers.
So, I started with oil changes, even though my mother said I shouldn't because I might "mess something up". Then I decided to try brakes & rotors. I just kept accumulating more & more tools. Watched plenty of YouTube videos, then started browsing these forums heavily. Any question I might have, I just type in 'Acurazine 2g CL/TL (insert question here)' with different variations of the question. I just see what others have done. But sometimes that's not enough. You just gotta get in there and figure it out. In the end, it's a puzzle. More you do it, better you know it, faster you can do it. I accelerated my knowledge on pulling an engine when I killed 3 J motors lol. That's in my other thread. If I can't find something on here, I check out other forums. Honda in general have very similar parts amongst all their cars.
As for how long? I don't know. Maybe since I joined these forums in 2018? I'm only 26, started driving at 18. Tried to get my license at 16. Did a rolling stop with NO CARS AROUND. Instructor screamed at me as he pushed himself into my door fearing for his life. Really scarred me from trying again. After I started driving, think I started doing my own oil changes after 2 or 3 years of driving?
My main motivation is that I like doing things my self. It's cheaper, and I don't trust shops. Plus, I can say I did that.
Question is, after my car is truly done, should I continue this thread with the black CL converting it to an auto?
Maybe just show cumulative updates and / or post when you run into unique problems in functionality?
Also, when you get around to it, show the seat belt buckle rework you perform to get the SRS light off.
Well, it's been a little bit since I made an update. I have been keeping busy however. Let's start with the off topic portion first.
No longer are the days of using cheap Chinese power tools! I am officially a Ryobi guy. My girl got me an amazing Valentine's gift, which was a Ryobi kit that included two batteries and a charger. Not included in this pic is the Ryobi 1/2inch Impact that also came with a battery & charger. So far, they have been awesome to use, and I look forward to growing my collection. I now have to out do her with gifts..
Besides me being lazy some days, I have been detailing the interior of my car. Vacuuming & shampooing the carpets, polishing the leather & plastic. I first used this brillo carpet cleaner, rubbed it in, then sucked it up with my wet vac. Then I watered it, sucked it up again. Did this about 3 times. I was hoping it would get some of the stains out, but alas, it did not. Once the carpet was dried, I finished it off with some Meguiar's foam carpet cleaner with a 'new car scent', mainly to just give my car a good smell to it. The brillo carpet cleaner had no smell to it.
My girl also had some Meguiar's black plastic trim polisher. This stuff has done wonders to clean up all of the black trim, making it look new. However, the leather cleaner that I used ended up leaving some swirl marks. I will be going back over them. One issue I did run into was that I have had my rear seat arm rest set down for the longest time, as I had a Sony subwoofer sitting on it, which I had spliced into the rear speakers. Being that I've had a child in my backseat, they spilled something sticky that got underneath it, and lifting it back up caused some of the leather to get pulled off. It's not too bad, but I'm not too happy about it. Oh well. The Sony subwoofer will now be staying out, since I now have a proper subwoofer that I will be setting up in the future.
All that's left on cleaning is the driver & passenger seats, inside of the windshield & windows, and the exterior of the car. Hood & outside front windshield have been done already.
My custom shift knob arrived today! Finally, after a little under 3 weeks of waiting. It was not cheap. It is a Billetworkz custom engraved shift knob. On their site, they have a list of images to choose from. They had 'Type R' on the list, but no 'Type S'. So I had to request it, which cost extra, and required me to go into Photoshop to make it black/white, and exporting it to a custom file format for their engraver to read. I chose the Japanese kanji, because I can count in Japanese, and it looks better than normal numbering, at least in my opinion. This shift knob came out beautiful, and feels amazing. It is WAY better than the tall black dildo that was on it previously.
Overall, I am very pleased with Billetworkz, and I highly recommend them.
The keys have been programmed, and she starts! When I finally had the money to get the keys programmed, I contacted MULTIPLE locksmiths. Many argued with me saying "it's not that simple", saying they could do it but it would be $500, other places charging me $260, and then finally I settled on $150 with some one, only for them to never show up and they weren't answering my calls. Fed up, I decided to find a tool that could allow me to do it myself. Everywhere was charging a minimum of $150, so longer can I find some one to do it for $100. I paid less than everyone was charging, and I can use the same tool on the other car.
Being that this is immobilizer related, I won't be going into details about it, unless the mods/admins give the okay. Regardless, I programmed the keys myself, the car starts, and the open headers sound MEAN.
So, the next step is to now finishing detailing, get the cat hung up so it's not dragging on the road to the muffler shop, and then take it to the shop to get the exhaust attached and fixed up. Then after that, it's off to get an alignment.
The radiator still need to be filled up all the way, and the transmission currently only has 1 quart of fluid in it. I'm waiting to drop the car on it's wheels before filling her all the way up, as the rear jackstands sit slightly lower than the front.
Oh, and I found a work around for the clutch pedal top bracket. I managed to get two thick zipties to hold it up, and it works great. I have no pictures of this unfortunately.
In other news, I have been investigating the notorious SRS seat buckle issue that is common on these cars while my seats were out. I believe I have found the cause of it, and the fix is rather cheap, like $1 cheap, if I can manage to find the parts. I'm waiting to hear back from the company who made the part, and I'm trying to decide if I should make a new thread on this issue, or if I should just dump the info in here. However, I just decided to swap the buckles from the black CL into mine, as they have been verified to work using my multimeter. So no more SRS light for my car!
And just for liability sakes, I really don't recommend anyone messing around with SRS or safety equipment related things. But it'd be good to have the information out there as to why it's happening.
Last edited by Thefireball; 02-23-2023 at 05:07 PM.
badass!
You never updated on your girlfriends V-day gift (Purple Calipers)
Still being worked on. It's a lot to clean up. She's focused on getting her first set of wheels first. I had no clue the brackets to fit the calipers were so expensive now. I could have sworn I spent $80 on mine? But now that's how much steel braided brake likes are. Sheeeeesh.
I still have to finish getting them cleaned up, then painted. Getting them cleaned up will be easier with my Ryobi tools at least.
I did recently fix her rear brake caliper being seized however. So I'm not completely slacking.
Took my car out for it's first test drive today. Had to recharge the battery, and also fix my jumper cables. Filled the transmission all the way just the other night. Topped off the coolant, and away we went.
Man, she feels really good to drive. The clutch is smooth, and the handling feels excellent. Only took her around the block. The clutch feels a lot easier than my girl's with a stock LUK clutch kit. The exhaust.. well I was that 'Civic at 2AM', except it was 2:40PM. Just revving to 3K RPMs was extremely loud, and I felt bad for my neighbors having to experience such a noise. CEL was on, but that's more than likely because of the O2 sensors being no where near the exhaust, but they are plugged in.
For now, she sits next to my TL, as she waits to get the exhaust welded up. The cat hangs pretty low, but it doesn't drag on the ground. I did accidently scrape it when I went over my walkway to park. It'll be fiiiiiiiiine.
As I haven't mentioned this yet: the J35A8 RL cams will be put in at a later date. Besides needing a spacer, I don't feel like undoing the timing again. I'm too eager to drive my car again. I think it's best I get her back on the road, learn how to properly drive a manual without worrying about some one behind me when at a stop on a hill, and then when I feel the need for a power bump & regular maintenance, then I'll throw them in.
However, I do think those J35A8 TLS valve springs helped the engine out a LOT. Either because the J32A2 cams were to much for the weak J35A3 springs, or the J35A3 springs were simply just worn out. Now I'm not too sure about the engine dying as soon as I thought it would. Won't really know how much of a difference they make until the ECU stops getting reset and learns how to idle properly, considering that's what my issue was on a cold start. Idling so low that it wanted to stall, then went back up, constantly surging until warmed up.
Had some fun in Photoshop last night after enjoying some , so I'm just going to throw these in here, and in my pics thread with some other pics later on.
Last edited by Thefireball; 02-27-2023 at 03:52 PM.
I had been talking with 619rcr, and he gave me the motivation that I needed to try welding the exhaust myself. I figured, I'm a DIYer, and if I'm going to be doing big things on my car, like converting it to a manual, I might as well pick up learning how to weld myself. So I looked everywhere for a welder, and found one on Amazon for $130 that I cluded everything I needed.
So this here is an azzuno mig welder. Small in size, and typically you 'get what you pay for'. But this welder is actually really good for the price, though I wouldn't know because I've never touched a welder before this. Doesn't feel cheap, and did the job with no issues, aside from user errors. It was the accessories that came with it that were cheap.
The mask was flimsy & a piece of crap. I wanted my other hand to be free, so I went to Harbor Freight and picked up an auto dimming helmet for $40. I'm VERY glad I did this.
The gloves are also not super great. I still use them for protection, but I'll be getting better ones later.The brush ain't bad, but I prefer using the wire wheel on my drill.
It also came with a spool of .08mm wire, and it's given me no issues, at least I think.
So, I got this Thursday, and did my first two practice welds. I had NEVER welded before this, so this was purely just to get the feel of how it all works.
First two pics are of my first ever weld. The others are my second welding attempt. At this point, I had already cut the cat off in preparation, as well as some of the exhaust pipe so as to fit the cat on. I was using the cut off excess pipe to practice welding on. I had kept cutting it, and attempted the practice welds.
Friday came along, and my friend called me up. He told me there was going to be a car meet Saturday. So now I was on a time crunch. So I got up out of bed, and immediately went to the garage to practice more. I cut off a new piece, expanded it, cleaned it up, and got it ready to weld. As soon as I went to go grab my welder, there was a super loud explosion outside, and then NO POWER. It was super windy that day, and a lot of trees had fallen over. A transformer in my area had exploded. I was without power for the entire day & night. So great. Now what?
Eventually, Saturday rolls around, I get back home, and I immediately start getting to practicing. I didn't have much time. The meet was at 5:30, and I started at 12. So I had to hurry up.
So I started practicing again, and I started getting the hang of it. I started dialing in the settings of the amps & wire speed more, and messed with the shade settings on my helmet. I started figuring out how to carry the molten pool of metal, and fusing the two separate pieces together. And I was getting better. Eventually, I felt confident enough to try welding my exhaust. The first piece was the flex pipe to the cat.
Still lots of spatter, not sure why. What I did, was that there was a piece of pipe from the DC sports why pipe that was still on the cat. I cut it off, and flipped it over, because the other side sat in the flex pipe perfectly. However, that part was were it was welded. So at the top, that's the original weld line, and I just welded back over it. The bottom portion looks muchs better.
I didn't take many pics after this, because I was rushing to get this shit done quick. I told me friends I would meet them at 2, but I didn't leave until 5:30.
I had the entire exhaust welded up, and was rushing to extend the O2 sensor wires. But I managed, and got it to the meet, but there were some issues along the way. About 30 minutes into driving, I was at a red light on a bit of a steep hill, and a car close to me. Well, I panicked, and accidently spun my tires all the way to third gear. After that, I started having issues with the transmission. It would buck like crazy at 2100RPMs and under, no matter what gear.. I also didn't burp the radiator, so the engine went up about 75% on the temp gauge, but quickly cooled off later. On top of that, the IACV is bad on my car, so the RPMs love to go up & down, up & down. The polyurethane motor mounts keeps scaring me with how much vibrations I feel, because I keep thinking something is wrong with my car. On top of that, I think one the RPMs get high enough, that the axle might be rubbing against the rear header. I'll have to take a look and see at some point. I also have a slight exhaust leak, and I'm not sure where yet. I still need an alignment, my steering wheel was completely off, but I fixed that today by removing the steering wheel. I also still need to fix the AC pressure switch.
The Miata & Del Sol are my friend's cars. My friend just got done painting his valve cover red, and my other friend just finished getting the roof rack on with the bike, and putting his brand new wheels on. You all know what I just got done with lol. Over all, the meet was pretty dead. As soon as I showed up, two chargers drifted around my car. I was the only J series there, sadly. But at one point, a group of kids were all over my car, getting underneath with their phones & lights, and taking a look at everything. So that felt nice to see my work being appreciated lol. While I was there, my friend picked up some coolant & we burped the radiator.
Now, here's the thing though. After my car cooled off for a bit, the bucking issue went away. I had my friend drive it, and nothing! On the way home, which was an hour away, nothing! She drove perfectly fine! I have no clue what or why that happened. But I was panicking, thinking I wasn't going to make it back home. I still have no clue what it was, and I drove my car again today, with no issues.
Now, I was waiting to show my welds, because like I said, I was in a rush yesterday. So I just took the pics and hour ago, so here's my exhaust welded up. All done by ME. I DID IT. I LEARNED TO WELD. I CAN WELD NOW.
Now, are they perfect? No. Would they pass in a shop? Probably not. But do they hold & work? Absolutely. And that's all that matters to me. Looking at the O2 sensor bung, I think the leak might be there. Because I cleaned everything with my wire wheel on my drill after welding. That tan color wasn't there before. I will have to check it out later. Today, I'm fucking exhausted & tired. My body hurts, I took 4 ibuprofens just to get out of bed. I need a break.
Oh, also, I threw the new decals on my car windows. I left the old ones on, like the DC Sports and Unorthodox racing, because while they may now longer be on my motor (besides the OR P/S Pulley), they are still apart of the history of this car. And because they look cool.
And yes, that is a P2R shirt with a CL on it. I also wore it to the meet.
So thanks for reading my latest blog post. I will be posting more updates on the little fixes later on. For now, I'm gonna go chill out and relax.
Last edited by Thefireball; 03-05-2023 at 03:52 PM.
Well, I did it. I took her out on the highway blasting some Wangan Midnight OST for her first high speed run with the 6 speed manual transmission, and man, what a difference. The car is actually so fast now, that I got a little scared. I've never had so much power available before, i'm not used to.
Not sure how fast I was driving, either 50 or 60mph, and I threw her into third gear, and just went wide open throttle. I was maybe half way through fifth gear, and I was already at 117mph, and she was still pulling. I promptly let off and slowed back down to the flow of traffic, which there wasn't much of. There was still a whole other gear I didn't even try out.
The handling also feels WAY better now. Going around turns on the highway going fast felt really good. I don't really know how to describe it, but I wasn't worried about going fast around the turns like I was previously. On the way back home, off the highway, I messed up going from a stop a couple of times. Bogged the engine too much, and caused it to buck back and forth. I struggled with moving starting in first gear, only to have to shift to second a second later. I might just start with it in second.
Anyways, some fixes. Thursday, I took my car to get an alignment; $54. The guy who was doing it said that there was a bubble in the front driver side tire, and tried showing me. I didn't see it, nor could I feel it. But when I going WOT, there was a little bit of left & right shaking in my steering wheel when going around 100 and higher. Everything under, it drove smooth. So i'm not sure if that's the tire, or if my suspension is loose, which it shouldn't be as I torqued everything down to spec as per the service manual. On top of this, they told me that my alignment was way off. After they finished, the steering tightened up, and it felt REALLY good. The guy who worked on my car, while he didn't speak much english, was really in love with my car. He kept revving it, and gave me a thumbs up saying he really liked it. Felt pretty good.
For the past couple of days, I decided to try and tackle my cold start low idle issue. Ever since I did my J35A3 swap, I figured it was due to the valves not sealing properly. The reason being that when I hand crank the motor, I can hear the compression hissing past the valves. Whenever I start my car, the idle RPMs would fluctuate from 750, and go as low to almost wanting to stall. The other night, it was so bad, I legitimately thought the motor had stalled. But it came back to life a whole second later. It would continue to do this until the motor began warming up. I say began warming up, because it would fix itself before the temp needle even moved. I had already cleaned the IACV using some carb cleaner the other day. I sprayed it in there, and took a wire brush, and cleaned all the gunk out, and even connected it to a spare car battery to get it moving to further clean it's insides. Then I took some silicone lube, sprayed it in there, and hotwired it again. Throwing it on, the idle RPMs were performing MUCH better. But I mainly did that because back on the automatic, when I threw it in parking after driving, the RPMs would jump between 750 to 1200, up & down, up& down, until I blipped the idle. This continued with the manual, except it did it when I would push the clutch in, complicating driving. But the cold start issue was still present.
I started doing some research, and start thinking about it. I bought my J37 intake manifold used, as well as P2R ported lower intake runners and a thermal gasket new, and threw them all on at the same time. I can't remembering having a cold start issue before, but only after I threw the J35A3 in. But what I did remember, was that some of the bolts holding down the IM were stripped. Harbor Freight was having a sale, and I picked up some items, including a tap & die set. I rethreaded the intake runner bolt holes, and the bolts went right in and held in place tight, with no budging at all. Before I did it on my car, I tried it out on a spare runner that I had, as well as some experimenting, and i've learned some things that might help out others.
I attempted to try and strip the threads on this spare runner. I took my Ryobi impact, on the lowest '1' speed, and screwed the bolt in. Held down the trigger for a few seconds, then loosened it, then tightened, and did this like 3 times. The threads weren't stripping. So I bumped up the speed, still nothing. So I did it on the highest speed, and ending up breaking the bottom of the bolt hole on the runner completely off. So the threads are pretty strong when they bottom out. I tried this again, only with the runner attached to a J32 IM. Guess what, the bolt head broke off, and the threads remained intact. So what the hell is going on? Why did my runners strip, but I can't even get them to strip on this spare runner?
After rethreading my runner's bolt holes, I threw the thermal gasket & J37 IM on, and went to go put the bolts in. They all tightened down pretty good, but never bottomed out. Except for one bolt, specifically the far right one near the front of the motor. I could just push this bolt in aaaaalll the way down, with no threading in site. Then I started to realize, these bolts aren't bottoming out. The Thermal Gasket is thick compared to OEM, but even with the OEM gasket, they wouldn't really thread. So I went down to Home Depot & Ace Hardware, and bought a set of bolts. The stock length bolt is an M8-1.25 65mm. I bought a set of 70mm, and 4 75mm. 3 were a flanged hex head, with the rest were just a hex, and not flanged. Ace only had 3 flanged bolts, home depot has none. Oh well.
I threw in the 70mm bolts, and they all screwed in, and even gave me more room for torqueing down the IM even tighter. Except for one, it started stripping the threads. However, I needed to use a washer on all of the non flanged bolts, as it started chewing into the magnesium bolt holes on the IM. As for the one bolt that I managed to strip, I swapped it out for a 75mm bolt, and even still, 10mm, it screwed in, torqued down tight, with even more room to screw down in. I'd say it might max out with a 80mm.
After doing all this, I started up the car, which was still cold as it hadn't been started in 3 days, and it was idling at 1200 RPMs. Then I realized, I forgot to put a vacuum line on, woops. Put it on, and the RPMs were at a solid 750. Blipped the idle, and it went straight back down to 750, and didn't dip any lower. The motor was also noticeably quieter than usual. This entire time, my intake manifold wasn't fully bolted down, and i've been driving with a vacuum leak. I recommend everyone to upgrade to a slightly longer bolt, either a 70mm, or a 75mm. I don't use a spacer, but I know those come with much longer bolts to begin with. Though I have one, I don't want it. Car already makes enough torque to spin tires easily. Why would I want more of that? I tried cold starting the car again before the highway run, and it started up perfectly, with no almost stalling.
Now, the next thing I need to fix up is the oil leak & exhaust leak. There is a tapping noise, which sounds just like my girl's car when she had her custom exhaust with the P2R headers installed. I already went ahead and put copper gasket maker on the exhaust flange gaskets, both sides, and that really shut things up. But there is still a tapping noise that seems to be coming from maybe the rear header? It's much louder underneath the car. No, it's not the purge valve. When I rev the engine, the tapping gets faster. I already checked the valve lash, and it's within spec. My guess is a leak at the V band flange. I'll be disconnecting the exhaust and putting copper gasket maker on those V band areas.
While the Y pipe is off, i'll be removing the oil pan to put a new layer of gasket maker on it. There is oil clearly leaking from the drain plug, probably because i've never put a new copper crush washer on, so I picked up a set of that. But there is also oil half way up the back side of the block. I can't tell if it's from oil leaking from the drain plug, hitting the axle, and the axle spinning is flinging it up. It looks like oil might possibly be leaking from an oil pan bolt as well. Might as well just remove it all, inspect it, and put a new gasket on it. I already have new oil & a filter, so i'm covered there.
I'll be getting to that at a later date. I'm going to be busy this week, so I won't have time to do it. But as for all the little fixes, the 6 speed swap is done as a whole. She drives, she handles, is fast, and feels amazing. I'm very happy with the swap, and recommend anyone who wants to make power from these cars/motors to just get a 6 speed to begin with. The amount of work just to convert a car to a manual transmission was the most i've ever done to a car, and it was exhausting. But i'm happy, and my car is much more fun now. The difference between the automatic and manual is pretty shocking. But there is still more to be done to my car, but I need a break from modifications. My wallet is hurting. I'm going to finish up the little things on my car, and get this black CL converted and sold off to make up for how much I spent on converting & modifying my car even further.
Once i'm done with the little fixes, i'll do occasional updates on the black CL here and there until it's sold off, then this thread will be done.
I'm very happy with the swap, and recommend anyone who wants to make power from these cars/motors to just get a 6 speed to begin with. The amount of work just to convert a car to a manual transmission was the most i've ever done to a car, and it was exhausting. But i'm happy, and my car is much more fun now. The difference between the automatic and manual is pretty shocking. But there is still more to be done to my car, but I need a break from modifications. My wallet is hurting.
Fuckin' hell, man. I want to be 26 again. You did an amazing job.
I love that you were willing to take some chances and try things that you've never done before. Buy that fuckin' MIG welder, practice, and learn as you go. And the payoff is the knowledge you gained and the satisfaction in knowing that YOU did the job, and you did it well.
Got back from a short vacation last weekend. Went to the largest aquarium in the US in Atlanta, then down to the US SPace and Rocket Center in Alabama. Did you know that the fuel lines for rocket thrusters run up through the inside of the thruster itself to help cool it off before it shoots out through the many injectors at the top? Wild stuff. Each of those Apollo thrusters was bigger than my car. Boggles my mind trying to learn how they work.
I'm mentioning my trip though, because while in Alabama, I got to see a brand new TLX Type S for the first time in person.
Such a good looking car, I hope to own one some day. Was really hoping the owner would pop up so I could ask to look under the hood, but they never showed up. Oh well.
Anywho, I've been busy this entire week working on my car. Car was up on jackstands all week until yesterday. I have been dealing with a grinding/rubbing & creaking/knocking noise. I thought maybe it was the axle rubbing against the header due to how close it sits. So I got underneath the car, and spun the wheels to see. Nothing. There were some noticeable marks on the header than looked like the axle had rubbed against the header, but they wiped off. You can see the marks on the top right.
Alright, so it's not rubbing. That's good to know at least. I also did an oil change on my girl's car, and checked to see how close hers sat.
Top image is her car, bottom image is mine. Lucky her.
I also noticed that the rear header is touching the rear engine mount bracket.
I'll be shaving that down when I upgrade to proper polyurethane mounts. The front header also has some rub marks from rubbing against the front subframe. For now, it's not causing any issues. But I plan to notch the subframe at some point in the future. For now it'll stay.
So the main thing to tackle after doing some investigating was the oil leak. Then, the exhaust leak. Since I had to pull off the Y pipe & front header first, that's what I investigated next. The exhaust leak was happening from the where the Y pipe connects with the flex pipe. I could tell from the amount of soote that was around the V band flange. I'm guessing it's because I welded the flex pipe/cat combo to the rest of the exhaust at a slight angle that sits too much to the driver side. This means the flex pipe is having to turn to make up for the angle. I'll probably be upgrading my cat in the future due to 619rcr's cat bottlenecking his power, and I don't know what the hell the muffler shop put on my car. Especially since I asked for a THREE INCH CAT AND THEY GAVE ME A 2.75 INCH.
Next up, the oil pan. Getting this out was not easy. I thought I might be able to get it out with the front header still on, but nope. So I had to remove the AC & bracket, and pull out the front header. Managed to do this by pulling it down, then turning it 180�, and pulling it the rest of the way. Even with it out, the oil pan is still difficult to take out due to the oil pick up tube placement & the sub frame, giving you a small amount of room to pull the oil pan out from. This makes things really difficult when you have gasket maker on the edge of the pan, and you're trying to be careful not to let the edge touch anything. Well, it did a couple of times.
The edge kept touching the damn pick up tube. Then actually centering it up was hard, and it kept moving and falling. I really should have done this when the motor was out.
I eventually got it bolted up, then got the front header back in after cleaning the flange from the old copper gasket maker. Put the AC back on with it's belt. Then I took the front header metal gasket, cleaned off the copper gasket, then cleaned the mating surface on the head. Put fresh copper gasket on everything, then bolted the header down. Then I put more copper gasket on the V band flanges. All that was left to do was wait for the gaskets to dry. Filled the car up with fresh oil. Already put the new filter on before hand with some oil in it.
Took the car out twice for a drive today aaaaaaand...
oil is still leaking. Fuck. And the creaking/knocking/rubbing noise is still there, and it sounds to be getting worse. The oil leak I think is coming from the oil filter housing. I removed it during my J35 swap to paint it. I think I reused the old gasket. The leak is coming from that area. Easy fix, but I still need to investigate.
The popping noise, at first, I thought was maybe coming from the transmission. At first I thought it was clutch chatter. Then maybe a bad throw out bearing. It only makes a noise when moving. Idling or parked, it doesn't do it. But the clutch acts perfectly fine. Nothing abnormal. But I think I've figured it out. I bet the CV axles are bad. I think with all the new added suspension parts are causing the axle to show it's problems.
I still need to get the car back up on jackstands and investigate things, but I'll probably be ordering new CV Axles here soon. The ride never ends.
On top of all this, while out driving somewhere, I had a pretty scary problem pop up. Started moving from a stop after my light turned green. Really smooth take off, no bucking at all. Then all of a sudden, my car starts bucking violently. CEL pops up, major loss of power. I immediately pull over and start investigating. Couldn't rev past 2K RPMs. This is why I was bucking badly, because of it cutting off the fuel, on & off. Code P0336. I ended up resetting the CEL, and the issue went away, and hasn't come back yet. Checking the sensor, it was a little dirty, but nothing bad. Perhaps it's beginning to go out? If it happens again, I'll replace it.
Still need to tighten the hand brake down as well. It works, just not on a bit of a steep hill. Drum brake boots need to be replaced as well. Last I checked, they were crumbling off.
Also, the other day, I was driving next to a challenger. Decided to gun it and see if they would chase. Holy crap, my car is absolutely squirrelly now. I didn't swerve out of my lane, but it a struggle to keep it straight. Need to figure out what I can do to stiffen it up. Never had it get like that with the auto. I think all the new suspension parts just need to be worn in a bit. I now know what torque steer is at least.
I'm already planning my next project for my car. I just need to save up the money for the tools to make it possible. So expect a new thread around the summer time.
As for the black CL, I haven't even touched it. I've only got the brake lines & ABS unit in. Trying to fix my car of it's issues before I start on the other. But the sooner I get that fixed up and sold off, the sooner I can start this next project. It's not going to be cheap.
Last edited by Thefireball; 03-24-2023 at 05:23 PM.
...the creaking/knocking/rubbing noise is still there, and it sounds to be getting worse.
Maybe go back and retorque the flange bolts on the front beam:
Also, recheck the 40lbf-ft torque on the self lock nut for the radius rods and the RR flange bolts securing the lower arms 119lbf-ft.
Those are some pretty 'stout' torque values there holding things together, maybe something has worked loose.
Good Luck.
I will give them a check over. But I don't think it's any of those. It's a constant sound when I'm moving only. It doesn't only happen when I'm turning either, which is normal of a failing CV axle, but happens when I'm going straight.
As for the radius rod nut, that was one of the first things I checked. It hasn't budged at all, which was one thing I was worried about reusing the nut. When I get under the car again though, I'll check and see if there's any play on those rods, and check the subframe bolts with my torque wrench.
Another thing I forgot to mention is starting my car. Everytime the starter engages and goes to spin the flywheel, there is a very noticeable high pitched 'zip' sound. It only happens when starting the car. Nothing abnormal seems to happen, it's just the sound. When I was removing the oil pan, I inspected the ring gear on the flywheel, and they looked perfectly fine. Not sure if it's something I should be worried about. I have another 6 speed starter from the Accord that I can always swap in if need be.
These are good issues because you over the hump. Regarding the cv axle yeah definitely sounds bad. Any vibrations on acceleration? Being lowered wears them out because the length is usually not correct. Vtec academy has a good video on measuring them. Regarding the catalytic converter can you guys recommend a high flow. I have the comptech header so 3" is out for me. It looks like no one sells a high flow drop in. I saw a magnaflow universal with o2 bung that I could have the muffler guy cut my old flanges and weld to the new one. Is the stock exhaust @ the cat 2.25"? Any advice is appreciated.
 02-01-2023, 09:10 PM


 shower thoughts. So maybe I'm just crazy.


 picture below is for CL-S6 water passage 19410-PGE-A10