
About to install some DIY Ambient Light for less than $10!!
 12-29-2007, 01:58 PM
#1
Instructor
Thread Starter
Join Date: Nov 2003
Location: Dallas
Age: 40
Posts: 113
Likes: 0
Received 0 Likes
on
0 Posts
About to install some DIY Ambient Light for less than $10!!
So I'm finally off from work today and have enough time to start on my little project. I'm about to install some DIY ambient light for less than $10 compare to $200 plus at the dealership... I will post up some DIY pictures and step-by-step when I'm done 


 12-29-2007, 06:50 PM
#3
Instructor
Thread Starter
Join Date: Nov 2003
Location: Dallas
Age: 40
Posts: 113
Likes: 0
Received 0 Likes
on
0 Posts
OK i just got done installing some ambient light if anyone is interested here's some pic and material that you will need
some LED's where you can get it at Pep Boys for less than $7


Some Scott Brite or sand paper

Some plexi glass maybe about 4in by 4in piece of it
Glue
Electrical tape
Phillips Screw Drive
Start by taking out the drive side knee panel

Then pull down on the under dash panel on the drive side and the passenger side...
Now grab the plexi-glass and sandpaper and sand down about a 4in x 4in area on both side which is going to look like this

cut a small piece of plexi glass about the size of 1in x 1in like the picture shown this is for the driver side

Then glue the small piece in the area circle in red... this is the drive side under panel

and do the same side to the passenger side which is shown in the pic

this is how it look like on the other side

Now start and sand down the LED all around it and flatten to top part the one on the left is sanded the one on the right is originally new

after doing that... now start gluing or tape the LED over the area where the plexiglass is at shown like this do it to the passenger side also

after all the LEDs is install put everything back together and now run the LEDs line into the middle compartment area...
I wire these LEDs to the compartment light so when the light turn on it also light up the LEDs... start by taking out the middle cubby out and tap into the wires that is located on top of the cubby...
The reason why i sand down the plexiglass and the LEDs cause it would give out a more even glow and it wont shine as bright...
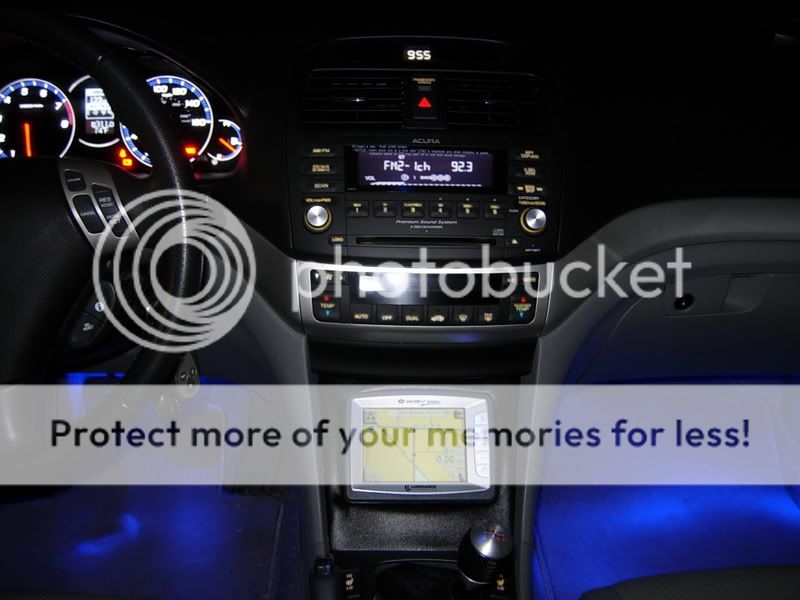
and now the end result

Tell me what you guys think... for less than $10 bucks you can't beat that :-D
The picture may make it look bright and all but actually its really dim almost if not the same as you see on the RLs new TLs and the new Accord.. looks more like the glow under your radio
Difficulty 1-10 = 3
Time done = 45minutes to an hour
some LED's where you can get it at Pep Boys for less than $7
Some Scott Brite or sand paper
Some plexi glass maybe about 4in by 4in piece of it
Glue
Electrical tape
Phillips Screw Drive
Start by taking out the drive side knee panel
Then pull down on the under dash panel on the drive side and the passenger side...
Now grab the plexi-glass and sandpaper and sand down about a 4in x 4in area on both side which is going to look like this
cut a small piece of plexi glass about the size of 1in x 1in like the picture shown this is for the driver side
Then glue the small piece in the area circle in red... this is the drive side under panel
and do the same side to the passenger side which is shown in the pic
this is how it look like on the other side
Now start and sand down the LED all around it and flatten to top part the one on the left is sanded the one on the right is originally new
after doing that... now start gluing or tape the LED over the area where the plexiglass is at shown like this do it to the passenger side also
after all the LEDs is install put everything back together and now run the LEDs line into the middle compartment area...
I wire these LEDs to the compartment light so when the light turn on it also light up the LEDs... start by taking out the middle cubby out and tap into the wires that is located on top of the cubby...
The reason why i sand down the plexiglass and the LEDs cause it would give out a more even glow and it wont shine as bright...
and now the end result
Tell me what you guys think... for less than $10 bucks you can't beat that :-D
The picture may make it look bright and all but actually its really dim almost if not the same as you see on the RLs new TLs and the new Accord.. looks more like the glow under your radio
Difficulty 1-10 = 3
Time done = 45minutes to an hour
 12-29-2007, 06:59 PM
#5
Racer

Join Date: Jan 2006
Age: 54
Posts: 328
Likes: 0
Received 0 Likes
on
0 Posts
Looks great!! I used the same location to mount my outside puddle lights, they just fit under those taps. Yours looks a little better, mine has just a bit more "spot light" look to it.
I think yours looks a bit cleaner. Nice job!!!
I think yours looks a bit cleaner. Nice job!!!
12-29-2007, 07:31 PM
#6
Instructor
Thread Starter
Join Date: Nov 2003
Location: Dallas
Age: 40
Posts: 113
Likes: 0
Received 0 Likes
on
0 Posts
Originally Posted by kennungesser
Looks great!! I used the same location to mount my outside puddle lights, they just fit under those taps. Yours looks a little better, mine has just a bit more "spot light" look to it.
12-29-2007, 07:58 PM
#7
Burning Brakes
Join Date: May 2006
Location: Portland, OR
Age: 41
Posts: 752
Likes: 0
Received 0 Likes
on
0 Posts
great job! did you use any specific wire taps when you tapped into the cubby wires, or did you just cut away a little bit of the rubber casing and make a connection like that?
i don't know if i would want these on all the time when my headlights are on, so maybe a good project would be to make a switch in the cubby hole or maybe in the "not an ashtray" area that could turn them on and off...
i don't know if i would want these on all the time when my headlights are on, so maybe a good project would be to make a switch in the cubby hole or maybe in the "not an ashtray" area that could turn them on and off...
Trending Topics
12-29-2007, 08:05 PM
#8
Instructor
Thread Starter
Join Date: Nov 2003
Location: Dallas
Age: 40
Posts: 113
Likes: 0
Received 0 Likes
on
0 Posts
Originally Posted by ruffellprefley
great job! did you use any specific wire taps when you tapped into the cubby wires, or did you just cut away a little bit of the rubber casing and make a connection like that?
i don't know if i would want these on all the time when my headlights are on, so maybe a good project would be to make a switch in the cubby hole or maybe in the "not an ashtray" area that could turn them on and off...
i don't know if i would want these on all the time when my headlights are on, so maybe a good project would be to make a switch in the cubby hole or maybe in the "not an ashtray" area that could turn them on and off...
Actually i did put a switch on it.. the switch is located on the same area as the sunroof... its a flush mount switch... i just didnt explain it cause sometime people would like it on all the time
and yeah i cut into the cubby wires and soildered it to the LEDs too didnt use any special wire taps just cut splice soldiered and add a switch
 12-29-2007, 09:16 PM
#10
Instructor
Thread Starter
Join Date: Nov 2003
Location: Dallas
Age: 40
Posts: 113
Likes: 0
Received 0 Likes
on
0 Posts
Originally Posted by GTSX-05
Looks great! is there anywhere else possible that I could tap into the power besides the cubby, any pictures or instructions on how to remove the cubby and tap into the wires? thanks just a little confused on that part.
and on top of the cubby is the light/wire... grab the bulb area and twist it counter clock wise and pull the light/wire out...
and then cut or peel out the electrial tape to expose the two wires which is... BLACK... and the other is RED/BLACK....
BLACK is ground
RED/Black is the power source
either you can tap into the RED/BLACK wires if you like or tap into one of those open fuse slot located on your left foot on the kicker panel of your car
12-29-2007, 10:58 PM
#13
Instructor
Thread Starter
Join Date: Nov 2003
Location: Dallas
Age: 40
Posts: 113
Likes: 0
Received 0 Likes
on
0 Posts
Originally Posted by GTSX-05
Thanks, the second question I have is how did you run the wiring from the underdash ligthing to the center cubby?
 aww darn haha oh well LOL
12-30-2007, 01:01 AM
aww darn haha oh well LOL
12-30-2007, 01:01 AM
#16
Jon (PWP FTW)
Join Date: Aug 2006
Location: Walnut/Diamond bar
Age: 35
Posts: 393
Likes: 0
Received 0 Likes
on
0 Posts
hey this is a great cheap and easy mod. i will definitely attempt to do this.
can you post up some pictures of the switch you got?
where did you get the switch from and how much?
also how would i attach the switch to these LED lights. sorry i'm not too familiar with electrical stuff.
thanks
btw do they have these on the 07 TL's stock?
can you post up some pictures of the switch you got?
where did you get the switch from and how much?
also how would i attach the switch to these LED lights. sorry i'm not too familiar with electrical stuff.
thanks
btw do they have these on the 07 TL's stock?
12-30-2007, 03:19 AM
#18
Instructor
Thread Starter
Join Date: Nov 2003
Location: Dallas
Age: 40
Posts: 113
Likes: 0
Received 0 Likes
on
0 Posts
Originally Posted by liquidg3n3rati0n
hey this is a great cheap and easy mod. i will definitely attempt to do this.
can you post up some pictures of the switch you got?
where did you get the switch from and how much?
also how would i attach the switch to these LED lights. sorry i'm not too familiar with electrical stuff.
thanks
btw do they have these on the 07 TL's stock?
can you post up some pictures of the switch you got?
where did you get the switch from and how much?
also how would i attach the switch to these LED lights. sorry i'm not too familiar with electrical stuff.
thanks
btw do they have these on the 07 TL's stock?
supposely they do cause my friend has it on her 07 TL and the switch ill try to make a drawing of the layout and take some pic for you
12-30-2007, 10:56 AM
#21
Burning Brakes
Join Date: May 2006
Location: Portland, OR
Age: 41
Posts: 752
Likes: 0
Received 0 Likes
on
0 Posts
don't mean to threadjack, but i think a good idea would be to put a single LED in each wheel well that would light up the curb at night (kind of like puddle lights). i use my mirrors to see where my wheels are in relation to the curb so that i don't scrape them. but at night they're useless...
12-30-2007, 08:45 PM
#23
Boring Teacher
Originally Posted by bignoodleboi
Nice mod though. I actually did mine about 6 months ago and it's the best and cheapest mod ever!
12-30-2007, 09:01 PM
#24
Instructor
Thread Starter
Join Date: Nov 2003
Location: Dallas
Age: 40
Posts: 113
Likes: 0
Received 0 Likes
on
0 Posts
Originally Posted by spoiledkari
Is that your LED light showing through the crack in the panels under your steering wheel??? Tape that off and it'll look alot better. I have mine fixed up so that the light is actually sticking out of the hole that I drilled in the panel so that the light doesn't want to come peeking out of any crack in the paneling.
Nice mod though. I actually did mine about 6 months ago and it's the best and cheapest mod ever!
Nice mod though. I actually did mine about 6 months ago and it's the best and cheapest mod ever!
 12-31-2007, 01:41 AM
#26
Instructor
Thread Starter
Join Date: Nov 2003
Location: Dallas
Age: 40
Posts: 113
Likes: 0
Received 0 Likes
on
0 Posts
Originally Posted by malnik
I think everyone is going get a bunch of LED and stick it all around their cars now that this thread is growing.
12-31-2007, 01:47 AM
#27
eh
Join Date: Jun 2003
Location: Vancouver, Canada
Age: 47
Posts: 355
Likes: 0
Received 0 Likes
on
0 Posts
Originally Posted by aznboi2424

looks awesome, make me want to tackle something like this in my CL
01-02-2008, 09:54 PM
#29
Jon (PWP FTW)
Join Date: Aug 2006
Location: Walnut/Diamond bar
Age: 35
Posts: 393
Likes: 0
Received 0 Likes
on
0 Posts
hey guys i just got these installed. looks great. it definitely is not as bright as the ones posted in the pictures. its much dimmer. looks perfect and looks stock just like the TL's.
now i need some instructions on how to put that flush mount switch in. any kind of input on where to purchase them and how to install them will be helpful.
now i need some instructions on how to put that flush mount switch in. any kind of input on where to purchase them and how to install them will be helpful.
 . What's the center cubby?
01-03-2008, 07:22 AM
. What's the center cubby?
01-03-2008, 07:22 AM
#31
The center cubby is the C.D. holder at least that�s what I use it for, if you open the center cubby and pull on the sides it should slide out quite easy (you might need to give it a little bit of force) pull it out all the way, then begin by unscrewing or twisting the light that�s wired to the top of the cubby, you can now clearly start to see the positive (red) and negative (black) wires, tap into those wires. Then run the wiring to the driver side and passenger side foot wells, what I used is a flashlight so I could see where the wire was actually going, which made it easier to fish out. All and all this was definitely a easy install with great results.
hope this helps a bit?, if you need anymore information pm me.
hope this helps a bit?, if you need anymore information pm me.
01-04-2008, 07:58 PM
#37
Advanced
Join Date: Apr 2007
Location: Loss Wages, NV
Age: 43
Posts: 82
Likes: 0
Received 0 Likes
on
0 Posts
Thanks for the idea/DIY for this mod. I did this last night and the results are like I said originally to the OP, it is f-ing dope!
Although it costs me a few pennies over $10 and a cut finger! But the result is all good. I like it a lot.
I like tapping into the center cubby light because it only shows at night and when you need your headlights on. The light is muted not as bright as the picture and matches very well with the factory ambience.
I don't know if sand grit or sanding pattern affects light output but something you should consider when doing the project. I used 2000 grit (very fine) and sanded in a up and down motion on one side and then left to right on the other side. I wanted to diffuse the light and so I thought this "t" pattern would dim the light. I don't know if this makes a difference.
Definitely do this mod. There really isn't much to lose, if it doesn't work out, no one can see it because of the location and it is CHEAP!
01-06-2008, 01:27 AM
#38
Instructor
Thread Starter
Join Date: Nov 2003
Location: Dallas
Age: 40
Posts: 113
Likes: 0
Received 0 Likes
on
0 Posts
Originally Posted by snailspeed
Thanks for the idea/DIY for this mod. I did this last night and the results are like I said originally to the OP, it is f-ing dope!
Although it costs me a few pennies over $10 and a cut finger! But the result is all good. I like it a lot.
I like tapping into the center cubby light because it only shows at night and when you need your headlights on. The light is muted not as bright as the picture and matches very well with the factory ambience.
I don't know if sand grit or sanding pattern affects light output but something you should consider when doing the project. I used 2000 grit (very fine) and sanded in a up and down motion on one side and then left to right on the other side. I wanted to diffuse the light and so I thought this "t" pattern would dim the light. I don't know if this makes a difference.
Definitely do this mod. There really isn't much to lose, if it doesn't work out, no one can see it because of the location and it is CHEAP!
Although it costs me a few pennies over $10 and a cut finger! But the result is all good. I like it a lot.
I like tapping into the center cubby light because it only shows at night and when you need your headlights on. The light is muted not as bright as the picture and matches very well with the factory ambience.
I don't know if sand grit or sanding pattern affects light output but something you should consider when doing the project. I used 2000 grit (very fine) and sanded in a up and down motion on one side and then left to right on the other side. I wanted to diffuse the light and so I thought this "t" pattern would dim the light. I don't know if this makes a difference.
Definitely do this mod. There really isn't much to lose, if it doesn't work out, no one can see it because of the location and it is CHEAP!
glad that this little project to me enhance your car interior and gives you a " cooling " feel to it
 01-16-2008, 11:01 AM
#40
B A N N E D
Join Date: Sep 2003
Location: Jerzey
Age: 45
Posts: 845
Likes: 0
Received 0 Likes
on
0 Posts
Originally Posted by simsimi1004
the next time someone does this, can u make a more picture used diy. like how to take off the panels and cubby.
Open the cover, place your hands inside it and pull toward you.
To remove the panels under the steeringwheel, there is a screw there, take the screw out, and pull down.
It is very easy.