
Dash board display goes off an on


Three Wheelin'
Joined: Mar 2005
Posts: 1,966
Likes: 182
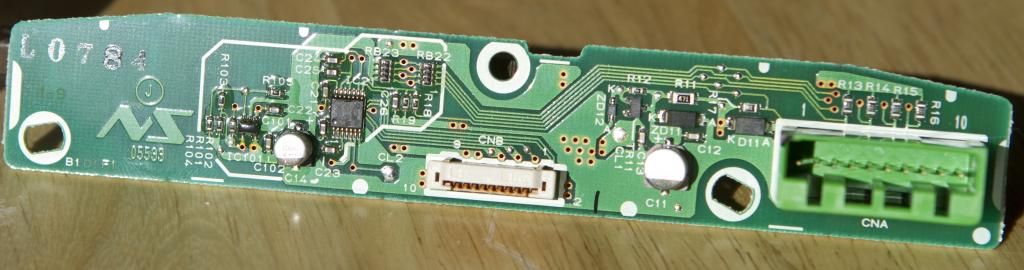
Yes, I had the same issue. The cloth looking unit that houses the display also has the center speaker and it can be removed by simply pulling the unit up from the 4 clips that hold it in place. Once removed there are 2 connectors that need to be unplugged, one for the display and one for the speaker. The display unit may be removed from the assembly and the display unit comes apart by releasing the clips around it. Once inside, the circuit board is exposed and I noticed a dry joint on one of the soldering points. I re-soldered the dry joint and it is good to go with the re-assembly of the unit. One way to look for dry joints is with a magnifying glass and look for corrosion or looseness at the solder connection. BTW the unit may be replaced for approx $420 discounted. Another clue to a dry joint issue is that when you check its operation and it fails, try flexing the unit or the circuit board to see if it is intermittent. I think that my dry joint issue was with the solder connection of the socket to the PC board.

Cruisin'
Joined: Jun 2012
Posts: 22
Likes: 2
Yes, I had the same issue. The cloth looking unit that houses the display also has the center speaker and it can be removed by simply pulling the unit up from the 4 clips that hold it in place. Once removed there are 2 connectors that need to be unplugged, one for the display and one for the speaker. The display unit may be removed from the assembly and the display unit comes apart by releasing the clips around it. Once inside, the circuit board is exposed and I noticed a dry joint on one of the soldering points. I re-soldered the dry joint and it is good to go with the re-assembly of the unit. One way to look for dry joints is with a magnifying glass and look for corrosion or looseness at the solder connection. BTW the unit may be replaced for approx $420 discounted. Another clue to a dry joint issue is that when you check its operation and it fails, try flexing the unit or the circuit board to see if it is intermittent. I think that my dry joint issue was with the solder connection of the socket to the PC board.
that post is in a few threads about this topic. Its probably the best description.
There are two pics of the speaker pod here: https://acurazine.com/forums/2g-rl-audio-bluetooth-electronics-navigation-90/speakers-doors-876219/
There are two pics of the speaker pod here: https://acurazine.com/forums/2g-rl-audio-bluetooth-electronics-navigation-90/speakers-doors-876219/

Cruisin'
Joined: Jan 2002
Posts: 21
Likes: 1
From: GA.
that post is in a few threads about this topic. Its probably the best description.
There are two pics of the speaker pod here: https://acurazine.com/forums/showthread.php?t=876219
There are two pics of the speaker pod here: https://acurazine.com/forums/showthread.php?t=876219
Special tool to recommend?
Trending Topics

Senior Moderator
Joined: Dec 2010
Posts: 31,897
Likes: 7,251
From: Austin, TX
Generally with trim items like this, wedge your finger tips under the edge. (You may need a screwdriver covered with cloth to get an edge up.) Move them around the edge to find the clips. If you are away from a clip, the edge will come up easier. As you get closer to a clip, you will feel more resistance. In most cases, the clips will release as you get closer. This is true for the door sills, the CHMSL, the dome lights, the trunk lining and surely the center speaker among other things. Be sure to have clean hands or wear latex gloves as to not stain any fabric areas.
Cruisin'
Joined: Jan 2002
Posts: 21
Likes: 1
From: GA.
Thanks. Used a 2" plastic putty knife and it popped out...easy. I was too worried about just yanking on it, but it turns out it came out with no reservations
I have soldered a few times before, but hardly call myself a pro. I have looked a few pics of "bad" soldering joints...but was wondering if anyone can give me a second opinion on which ones to attack.
Can't quite figure out how to get links to the higher resolutions photos...photobucket seems to be resizing them
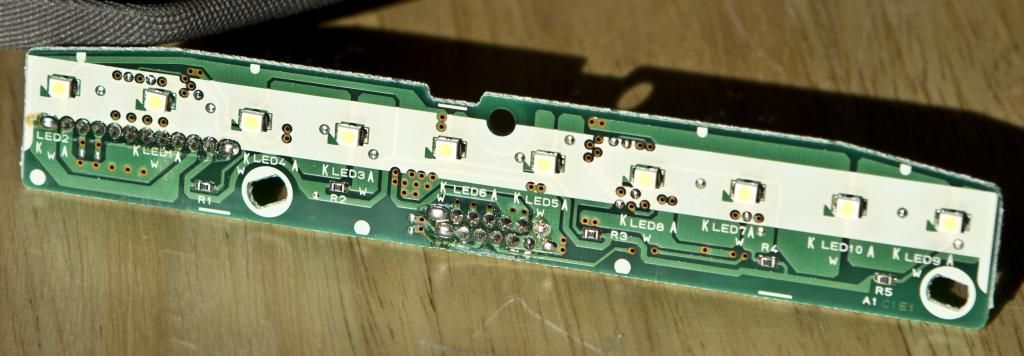
Last edited by forcemac; Dec 24, 2012 at 04:26 PM.
Cruisin'
Joined: Jan 2002
Posts: 21
Likes: 1
From: GA.
I think found the offending pin. It was on the power socket...there was a cracked soldering joint that matches some of the photos i saw on google. Put it back in, andit seems to pass the tapping test....it would come off or on by tapping it....no more of that so hopefully that was it.
Thanks for all the help!
Thanks for all the help!
Racer
Joined: Oct 2007
Posts: 366
Likes: 5
I think found the offending pin. It was on the power socket...there was a cracked soldering joint that matches some of the photos i saw on google. Put it back in, andit seems to pass the tapping test....it would come off or on by tapping it....no more of that so hopefully that was it.
Thanks for all the help!
Thanks for all the help!
Can you post a pic of what you are talking bout?
Cruisin'
Joined: Jan 2002
Posts: 21
Likes: 1
From: GA.
Senior Moderator
Joined: Dec 2010
Posts: 31,897
Likes: 7,251
From: Austin, TX


Thread
Thread Starter
Forum
Replies
Last Post
ITSJESTER
4G TL Audio, Bluetooth, Electronics & Navigation
17
Dec 6, 2018 02:29 AM
ExcelerateRep
4G TL Performance Parts & Modifications
8
Oct 14, 2015 08:20 AM