
A-122: DIY - 105k Service: Timing Belt, Water Pump, Spark Plugs, Thermostat *PICS*

 08-30-2014, 08:05 AM
#1243
Race Director
 08-30-2014, 08:35 AM
#1245
Race Director


 09-25-2014, 11:59 PM
#1249
Intermediate

Join Date: Jul 2010
Location: St. Louis, MO
Age: 32
Posts: 47
Likes: 0
Received 0 Likes
on
0 Posts
Hey guys. I posted a while back asking for help with getting the bolts out of the engine mount bracket below the power steering pulley.... I ended up taking the pulley loose to hammer a socket onto the stripped bolt head. Thanks for the advice to those that replied.
New question:
When I was routing the TB, there was a lot of tension on the rear cam pulley. At one point while routing it, the cam pulley actually slipped at least 30 degrees. It wasn't a gradual slip, it went straight from being lined up to the place it wanted to be naturally. Would this be indicative of a valve out of adjustment? Or a valve spring thats weaker than the rest?
I ended up cranking the cam pulley back to the right spot with a wrench and slipping the belt on, and the car runs, but I do notice a ticking noise especially at low engine speeds. Can't say for certain if the noise existed before.
09-26-2014, 12:55 AM
#1250
Race Director
Hey guys. I posted a while back asking for help with getting the bolts out of the engine mount bracket below the power steering pulley.... I ended up taking the pulley loose to hammer a socket onto the stripped bolt head. Thanks for the advice to those that replied.
New question:
When I was routing the TB, there was a lot of tension on the rear cam pulley. At one point while routing it, the cam pulley actually slipped at least 30 degrees. It wasn't a gradual slip, it went straight from being lined up to the place it wanted to be naturally. Would this be indicative of a valve out of adjustment? Or a valve spring thats weaker than the rest?
I ended up cranking the cam pulley back to the right spot with a wrench and slipping the belt on, and the car runs, but I do notice a ticking noise especially at low engine speeds. Can't say for certain if the noise existed before.
New question:
When I was routing the TB, there was a lot of tension on the rear cam pulley. At one point while routing it, the cam pulley actually slipped at least 30 degrees. It wasn't a gradual slip, it went straight from being lined up to the place it wanted to be naturally. Would this be indicative of a valve out of adjustment? Or a valve spring thats weaker than the rest?
I ended up cranking the cam pulley back to the right spot with a wrench and slipping the belt on, and the car runs, but I do notice a ticking noise especially at low engine speeds. Can't say for certain if the noise existed before.
09-26-2014, 09:19 AM
#1251
Safety Car
Question.
So I'm guessing this would apply every 105k miles?
Just bought a 06 TL at 160k. Previous owner got the 105k service done at the acura dealer (receipt was $3000, ouch). So basically when the car hits 200k, is this supposed to be done again?
So I'm guessing this would apply every 105k miles?
Just bought a 06 TL at 160k. Previous owner got the 105k service done at the acura dealer (receipt was $3000, ouch). So basically when the car hits 200k, is this supposed to be done again?
09-26-2014, 09:21 AM
#1252
Race Director
It should be done when you get a "4" on the MID.
09-26-2014, 12:50 PM
#1255
Race Director
 09-26-2014, 03:48 PM
#1257
Chapter Leader (Southern Region)
Thread Starter
indeed
09-26-2014, 07:35 PM
#1258

Just picked up an '04 Base with 125,000 miles, but the seller was unsure if the previous owner had the 105k service done or not. It had "A15" on the MID when I was checking out the car, which I promptly serviced after I brought the car home.
Would you recommend I just do this entire service to be on the safe side? Are there any tell-tale signs I can physically/visually check to see if it had been done within the last 25,000 miles?
Would you recommend I just do this entire service to be on the safe side? Are there any tell-tale signs I can physically/visually check to see if it had been done within the last 25,000 miles?
09-26-2014, 08:08 PM
#1259
Safety Car
Just picked up an '04 Base with 125,000 miles, but the seller was unsure if the previous owner had the 105k service done or not. It had "A15" on the MID when I was checking out the car, which I promptly serviced after I brought the car home.
Would you recommend I just do this entire service to be on the safe side? Are there any tell-tale signs I can physically/visually check to see if it had been done within the last 25,000 miles?
Would you recommend I just do this entire service to be on the safe side? Are there any tell-tale signs I can physically/visually check to see if it had been done within the last 25,000 miles?
But otherwise I would not take any chances. A damaged engine from the timing belt going out is going to cost alot more than getting the 105k service done even at a dealer.
I was looking at a 2003 TL before I found my 06 and the used car lot had no definitive proof that it was done. So they were honest and assumed it was not.
Also, another used car lot had a 05 Accord EX-L V6 that I was looking at and it had about 166k miles, they also had no proof that the TB service was done but the saleswoman kept saying it most likely had been done to have been still running at that high of a mileage. Needless so say I did not give them my business at all.
Cars are known to last 150k on original timing belts and I've read a story of a guy who drove off the lot on the way home and the timing belt broke.
Oh and I was looking at a Honda Fit at another used lot and the sales/owner guy said he's never heard of a timing belt breaking and he says hes been in the car business for like 20 years....lol wow. Needless to say he did not get my business either.
Last edited by nist7; 09-26-2014 at 08:11 PM.
09-26-2014, 08:25 PM
#1260
Race Director
Just picked up an '04 Base with 125,000 miles, but the seller was unsure if the previous owner had the 105k service done or not. It had "A15" on the MID when I was checking out the car, which I promptly serviced after I brought the car home.
Would you recommend I just do this entire service to be on the safe side? Are there any tell-tale signs I can physically/visually check to see if it had been done within the last 25,000 miles?
Would you recommend I just do this entire service to be on the safe side? Are there any tell-tale signs I can physically/visually check to see if it had been done within the last 25,000 miles?
09-26-2014, 08:45 PM
#1261
I would definitely do so. Unless there is definitive proof that it was done (check the carfax, sometimes if it was done at a dealer it may show up there) or if the prior owner can be contacted since he may done it himself or had an independent shop do it.
But otherwise I would not take any chances. A damaged engine from the timing belt going out is going to cost alot more than getting the 105k service done even at a dealer.
I was looking at a 2003 TL before I found my 06 and the used car lot had no definitive proof that it was done. So they were honest and assumed it was not.
Also, another used car lot had a 05 Accord EX-L V6 that I was looking at and it had about 166k miles, they also had no proof that the TB service was done but the saleswoman kept saying it most likely had been done to have been still running at that high of a mileage. Needless so say I did not give them my business at all.
Cars are known to last 150k on original timing belts and I've read a story of a guy who drove off the lot on the way home and the timing belt broke.
Oh and I was looking at a Honda Fit at another used lot and the sales/owner guy said he's never heard of a timing belt breaking and he says hes been in the car business for like 20 years....lol wow. Needless to say he did not get my business either.
Will do, thanks for the advice.
If I come up empty on the service history, looks like I'm getting this done ASAP.
09-28-2014, 05:41 PM
#1263

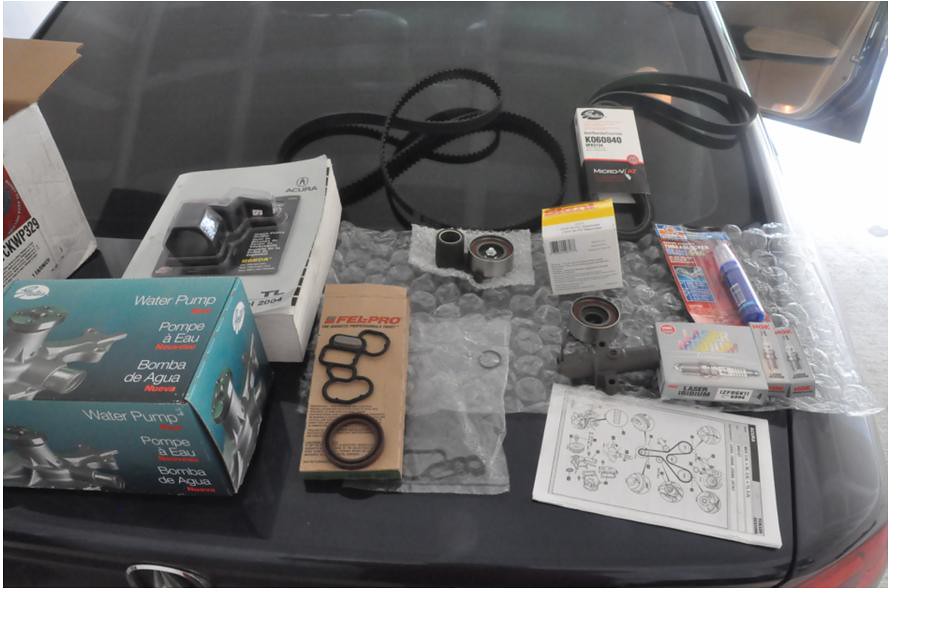
Here's a basic DIY guide for you guys considering on doing the 105k service yourself. Below will be the basic list of materials and tools you need to complete the job. Feel free to add anything that I may have omitted in the writeup.
A few notes about the task, find at least a half empty garage to do it and give yourself the weekend to complete it. Start early Saturday morning and if you're lucky and everything goes right, you're done early Saturday afternoon.. If not.. late Sunday Afternoon.
Most importantly, I take no responsibility if you attempt this DIY and fuck something up.
Parts
Timing Belt
Drivebelt
Water Pump
TB Adjuster
TB Auto Tensioner
TB Idler Pulley
170F Thermostat
NGK Laser Iridium plus #6994
Brake Cleaner
Anti Seize
Thread Locker
PB Blaster
2gals Coolant 50/50 (silicate free - Honda Type 2 / Prestone)
Shop Towels
Tools
Hydraulic Jack
Jack Stands
Wood Block
At least a 2' Breaker Bar (Can be rented at Autozone for free, or bought at AZ or HF for ~$20)
Impact Sockets & Extensions - CP 19mm
10mm, 12mm, 14mm, 17mm socket set, deep neck and normal
10mm angled / elbow wrench, standard metric wrench set
Torque Wrench at least 200 ft lb spec (Can be rented at Autozone for free)
Mirror, Magnet, Metallic tray, Gloves (optional but very useful)
Pan to hold used coolant
Gloves
Prep
Engine cool
Dry covered secure place - garage
1. Remove all covers, unplug battery, raise front end and put up on jacks, remove front pass wheel, remove lower front splash guard.
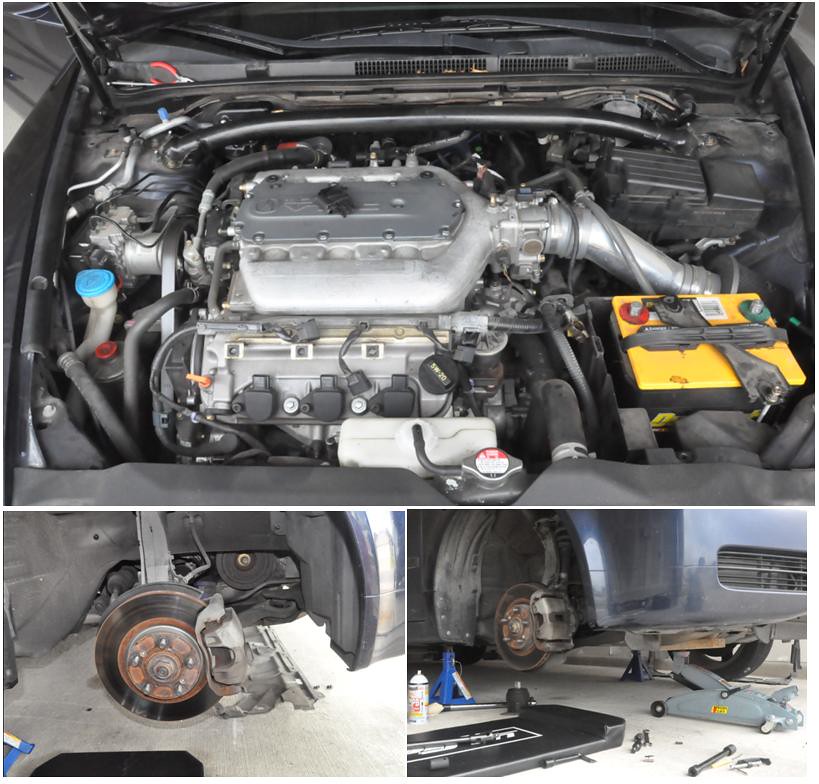
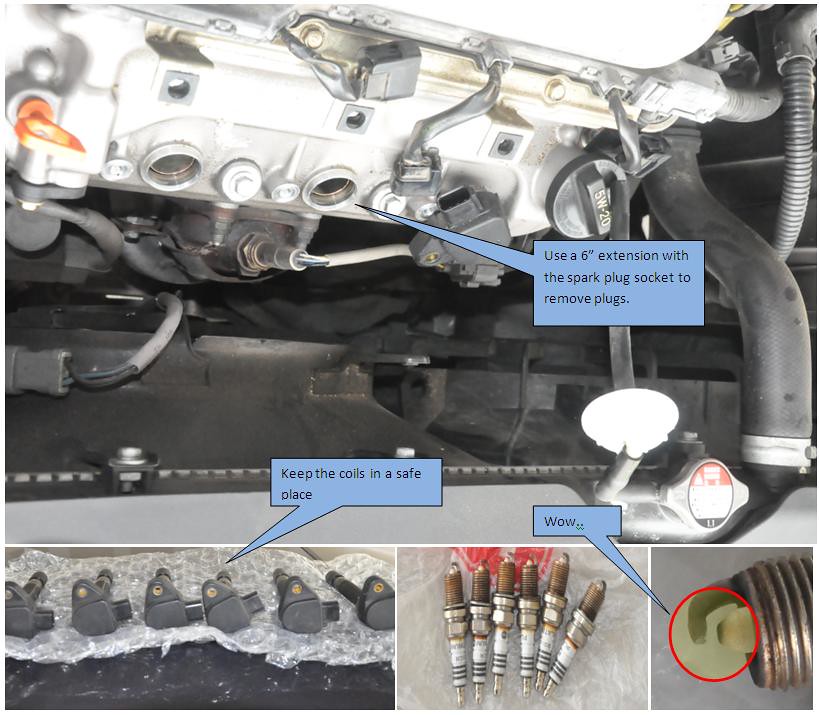
2. Remove Rad Res, Remove spark plugs, place coils in a safe location - helps when turning Crank and cams to leave them out until after TB job.
3. Unhook PS res and tuck it out of the way, Remove drive belt, remove belt tensioner (learned the hard way)

4. Place jack with wood block under oil pan to support engine, remove side engine mount bracket & side engine mount
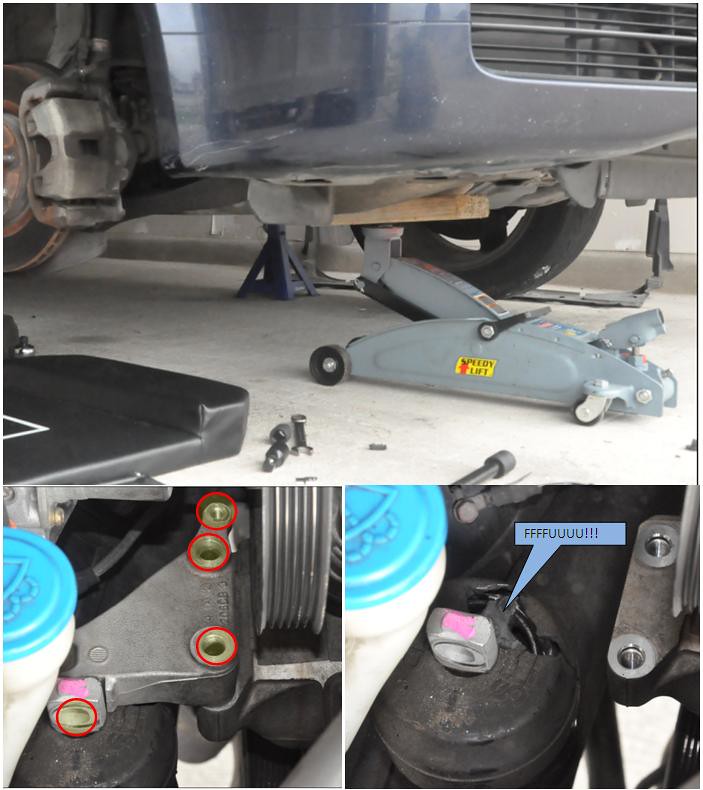
5. Turn CP to line up the CP, rear & front cam marks (1st piston TDC position) - verify front, rear might be off a little.
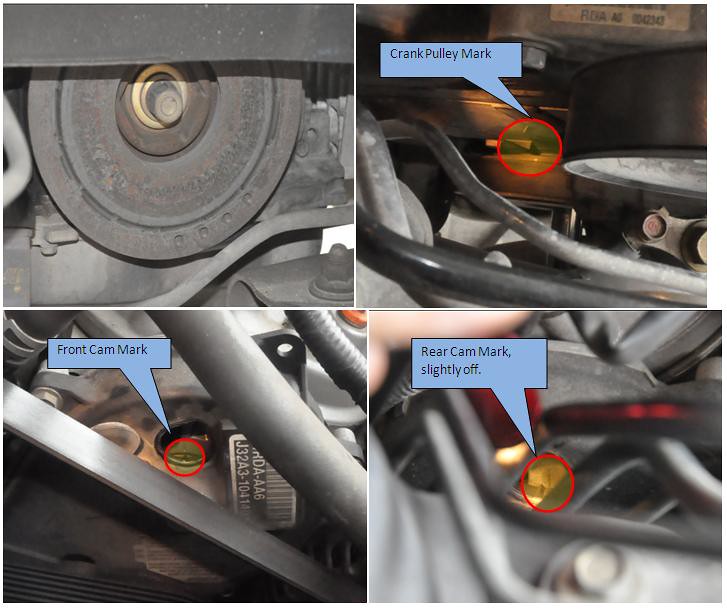
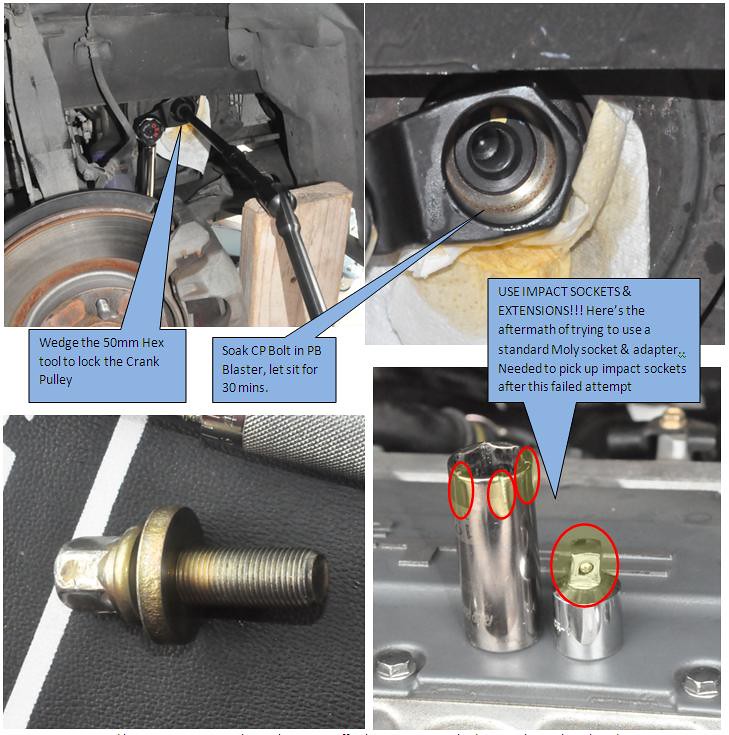
6. Remove CP bolt.. ffffuuuu!!! If you can get an impact wrench, get one. Otherwise don't be pussy, wedge the hex tool with a breaker bar & using another breaker bar, remove CP bolt. I used 2' breaker bar and impact sockets & extensions to get the job done. I soaked the bolt in some PB, not sure if helped but I got it off. It should be easy to remove after the initial pop.
7. Remove upper and lower TB covers. Don't pry the covers off otherwise you might damage the seal on the edge. Remove remaining engine mount bracket.
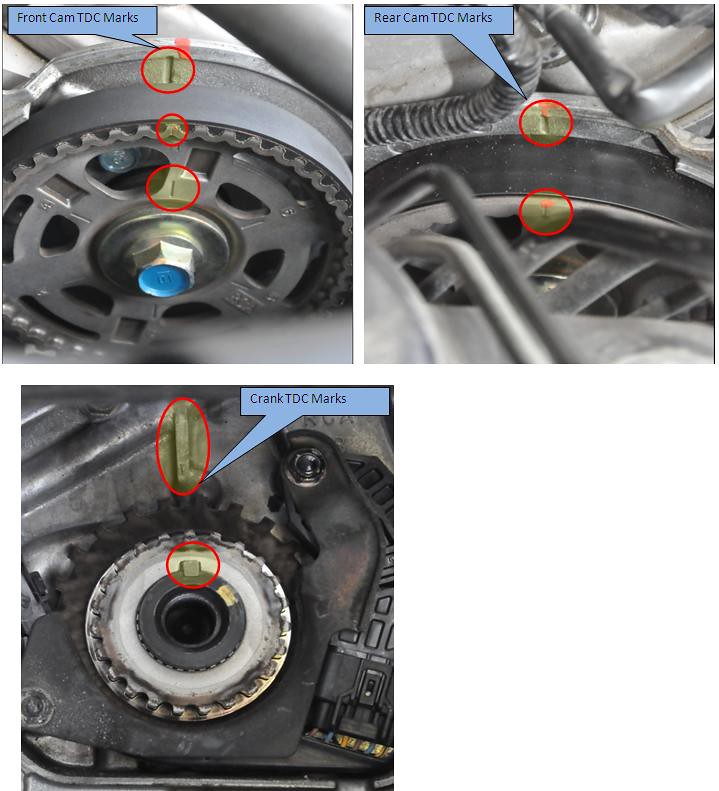
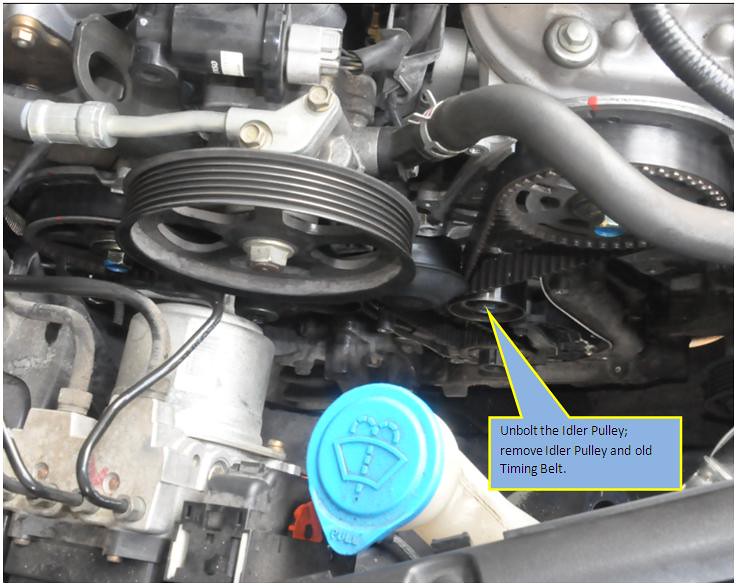
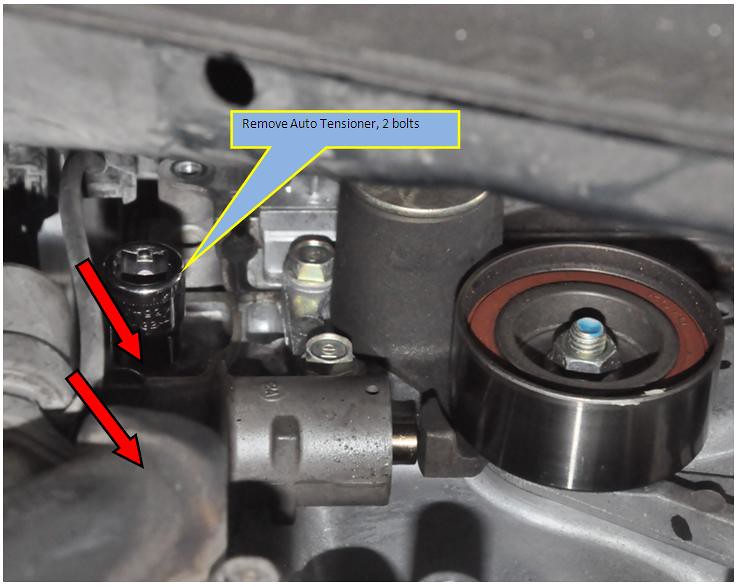
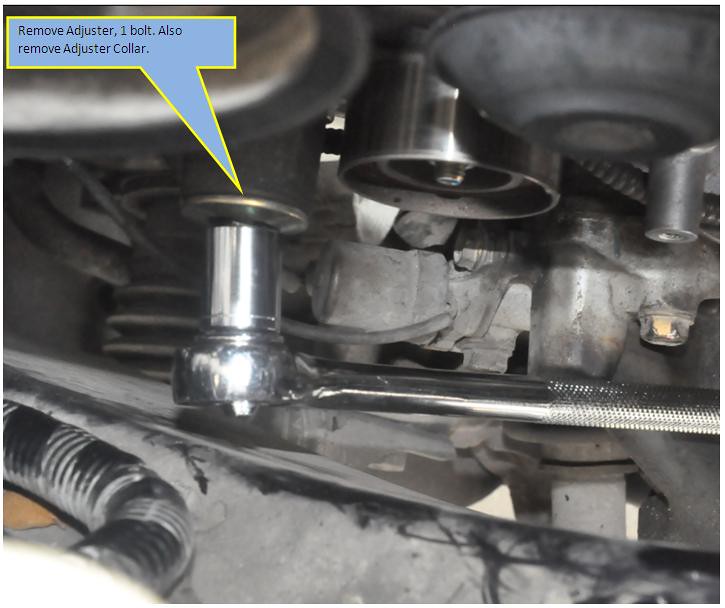
8. Get all the timing marks in spec with the body, remove idler pulley, remove CP, remove TB, remove adjuster, remove auto tensioner

9. Open radiator cap on top and then open up bottom radiator cap to drain Coolant from rad.

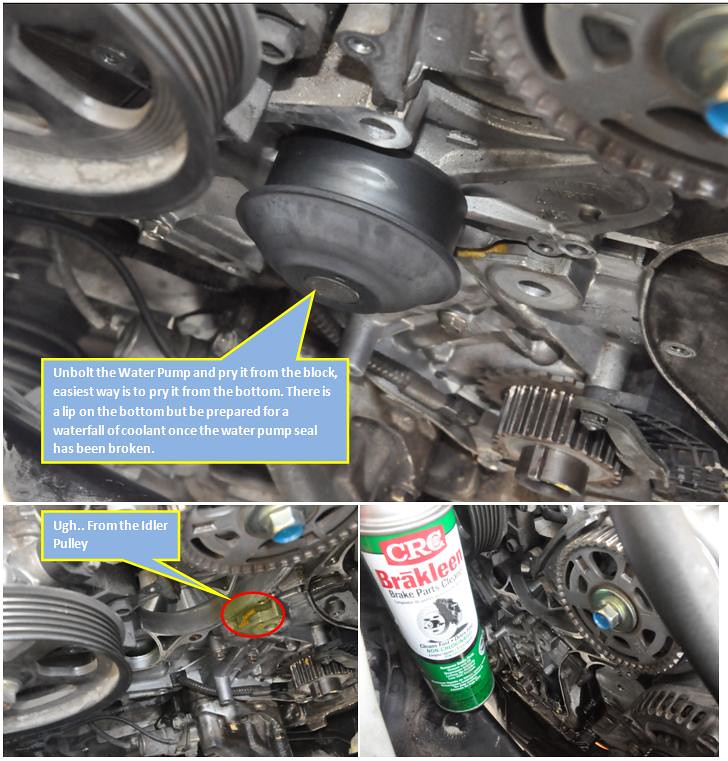
10. Don't bother with rear engine coolant drain, it's a PITA bleeder valve to get to.. I was able to open it up but not a lot of coolant came out. I consulted 240sx and he said they just pop the WP and let the coolant spill out in the shop and to spray down with Brake cleaner to evaporate everything. If you want to bleed it from the rear of the block get a 1/8� long hose leading to your fluid container and open up the valve with a wrench. If you decide to open up the WP without draining, put l long tray underneath the area collect the coolant and pack paper towels around the CP sensor assy.
Remove the Water Pump. Soak up excess coolant and spray down CP area / WP seal and Timing Belt cover areas with lots of Brake Cleaner. Wipe Clean. Make sure CP area is completely dry and WP seal areas are clean as well as timing belt cover areas.
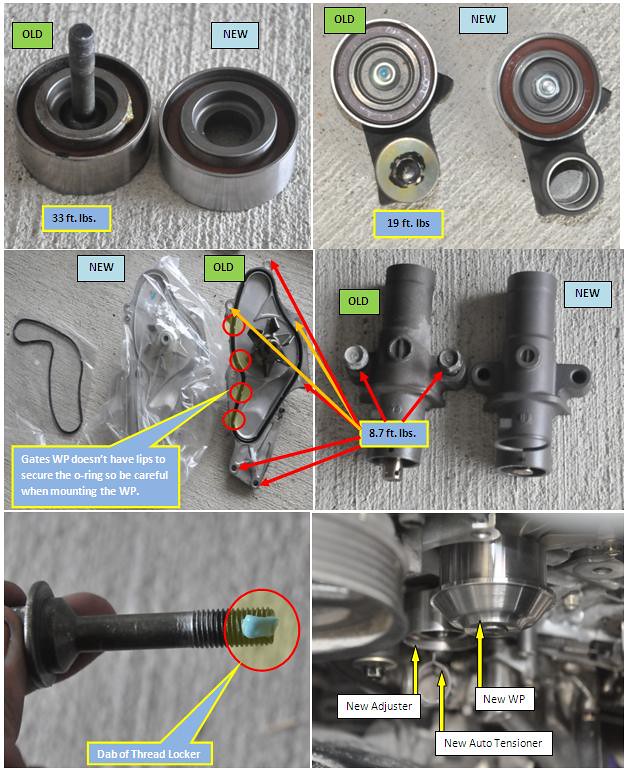
11. Install new WP, Idler Pulley, Adjuster, Auto Tensioner � tighten battery tie down against adjuster
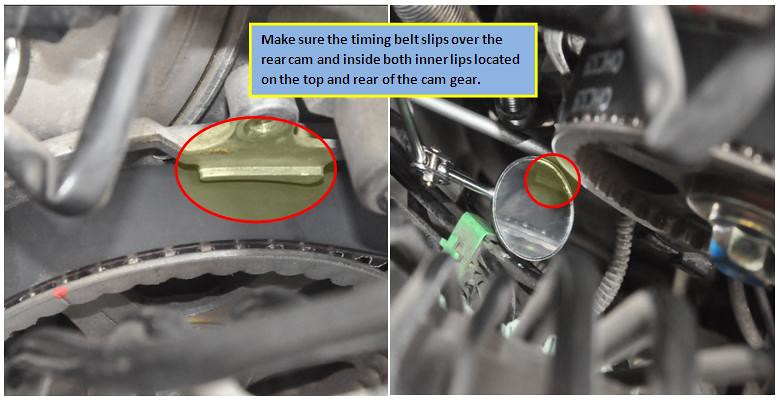
12. Check your TDC marks and install new TB starting at the CP � counter clockwise. There should be ZERO SLACK all the way to the adjuster. All the slack should be at the adjuster / tensioner. Tighten idler pulley to spec once TB is on.

Check your TDC marks again after the belt is on
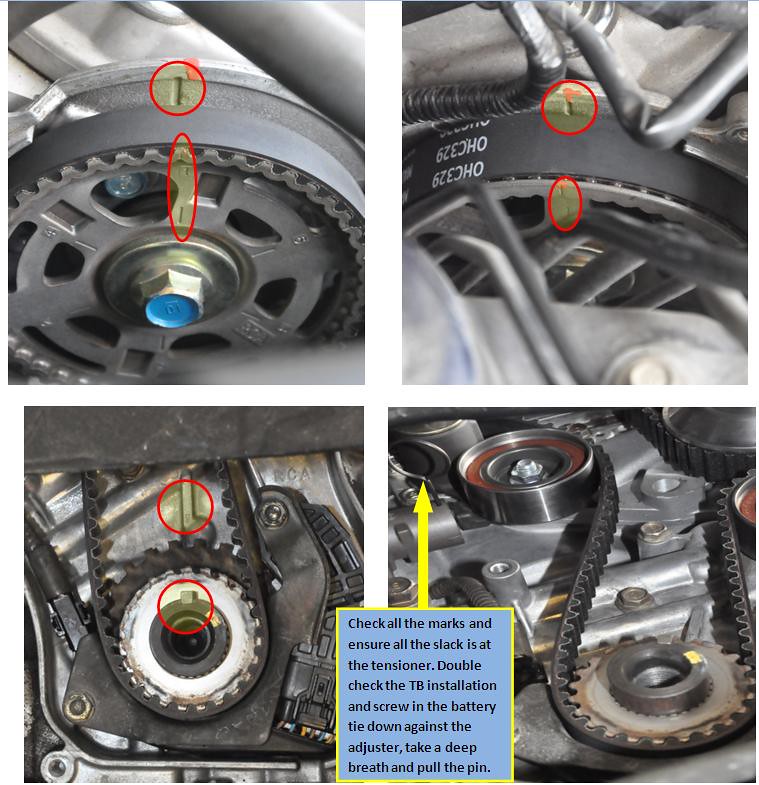
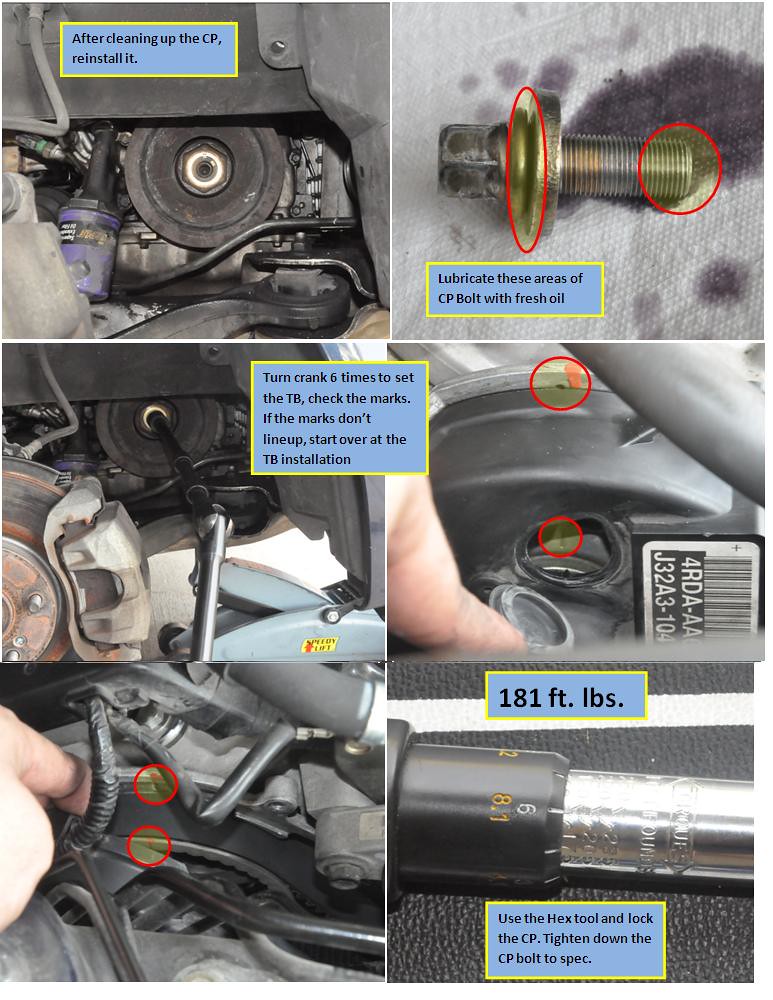
13. Clean up CP gear and shim with brake cleaner, reinstall shim (should be lip out) & CP. Clean up CP bolt and lubricate end threads and neck of CP bolt between head and washer with fresh oil. Install bolt loosely and cycle crank six times, check TDC marks (front / rear cam & CP marks). If they don't line up, redo TB installation. Wedge the hex tool again to keep the CP from moving and spec in the bolt to 181 ft.lbs.
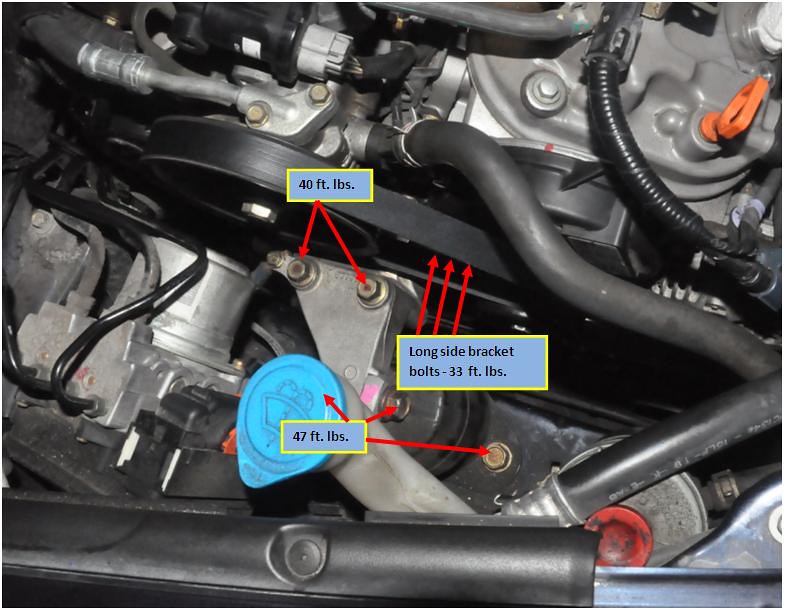
14.Replace timing covers, side mount bracket, drivebelt tensioner, check TDC marks for sanity. Remember.. check TDC marks with block not covers. Replace Drivebelt starting at CP, push tensioner back and slip top of Drivebelt over PS pump pulley. Replace Side Engine Mount, clean up securing bolts first. Torque into spec. Release jack from oil pan.
Thermostat
1. Remove intake, remove securing bolts on thermostat

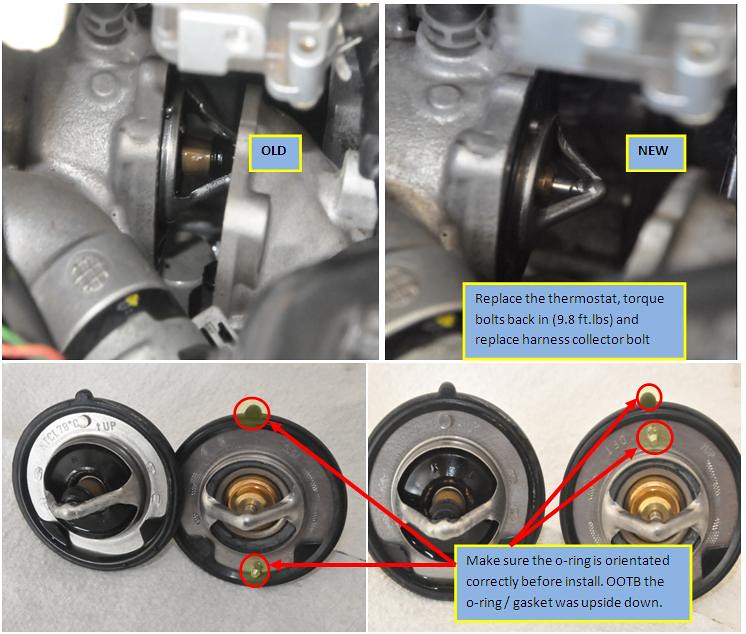
2. Replace Thermostat with new one / new gasket.
Spark Plugs & Burping
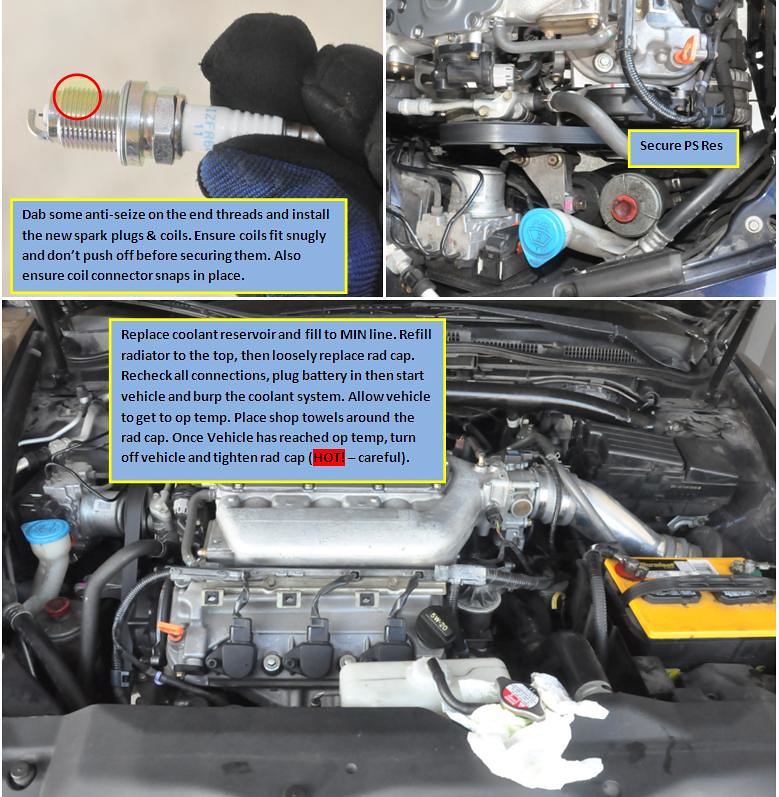
Install plugs and coils. Make sure to apply anti seize to end of the thread on the plugs. Replace Rad Res and refill rad. Do a triple check on all harness connections and look for any missing bolts, etc.. Verify everything is back together. Don�t forget to secure the PS Res. Plug in battery and tighten clamps. Start the car and let it get to op temp to burp the coolant system.
Put the car back together and on the ground then take it for a ride.. the SM says to put it on the street and keep it in 2nd then let it drop from 2.5k down as part of the relearning drive cycle but I think it's only applicable when interfacing with the HDS. Not sure..
But other than that, that's it. I'm sure I left some stuff out or neglected to mention some things but that's the basics of the 105k service. I recommend doing a valve adjustment at this time as well. It's an additional few steps after the TB removal but definitely worth it. I have new heads that have been ported with new hardware going in as well, so with my limited time I opted to skip the valve adjustment.
Special thanks to MisterFubar for selling me his Timing Kit at such a good price and 240sx acura tech for the inside tips on the job.
A few notes about the task, find at least a half empty garage to do it and give yourself the weekend to complete it. Start early Saturday morning and if you're lucky and everything goes right, you're done early Saturday afternoon.. If not.. late Sunday Afternoon.
Most importantly, I take no responsibility if you attempt this DIY and fuck something up.
Parts
Timing Belt
Drivebelt
Water Pump
TB Adjuster
TB Auto Tensioner
TB Idler Pulley
170F Thermostat
NGK Laser Iridium plus #6994
Brake Cleaner
Anti Seize
Thread Locker
PB Blaster
2gals Coolant 50/50 (silicate free - Honda Type 2 / Prestone)
Shop Towels
Tools
Hydraulic Jack
Jack Stands
Wood Block
At least a 2' Breaker Bar (Can be rented at Autozone for free, or bought at AZ or HF for ~$20)
Impact Sockets & Extensions - CP 19mm
10mm, 12mm, 14mm, 17mm socket set, deep neck and normal
10mm angled / elbow wrench, standard metric wrench set
Torque Wrench at least 200 ft lb spec (Can be rented at Autozone for free)
Mirror, Magnet, Metallic tray, Gloves (optional but very useful)
Pan to hold used coolant
Gloves
Prep
Engine cool
Dry covered secure place - garage
1. Remove all covers, unplug battery, raise front end and put up on jacks, remove front pass wheel, remove lower front splash guard.
2. Remove Rad Res, Remove spark plugs, place coils in a safe location - helps when turning Crank and cams to leave them out until after TB job.
3. Unhook PS res and tuck it out of the way, Remove drive belt, remove belt tensioner (learned the hard way)
4. Place jack with wood block under oil pan to support engine, remove side engine mount bracket & side engine mount
5. Turn CP to line up the CP, rear & front cam marks (1st piston TDC position) - verify front, rear might be off a little.
6. Remove CP bolt.. ffffuuuu!!! If you can get an impact wrench, get one. Otherwise don't be pussy, wedge the hex tool with a breaker bar & using another breaker bar, remove CP bolt. I used 2' breaker bar and impact sockets & extensions to get the job done. I soaked the bolt in some PB, not sure if helped but I got it off. It should be easy to remove after the initial pop.
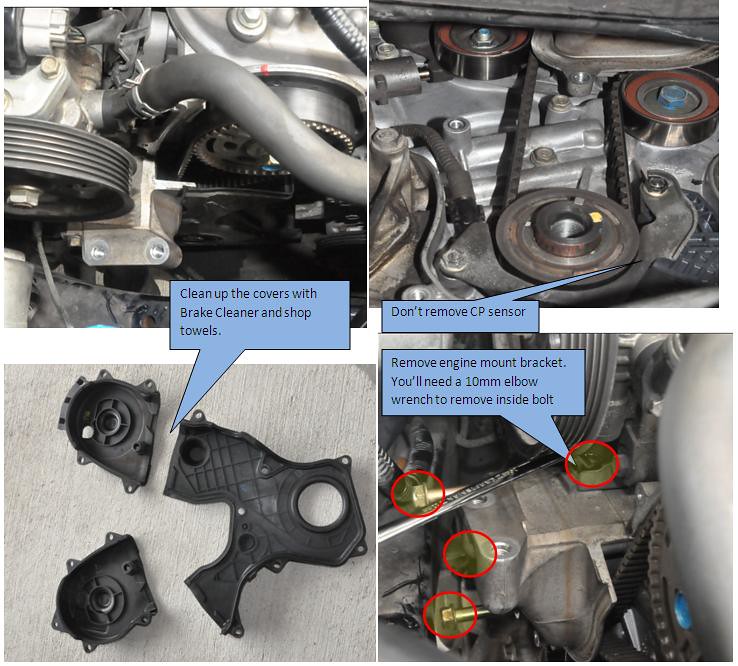
7. Remove upper and lower TB covers. Don't pry the covers off otherwise you might damage the seal on the edge. Remove remaining engine mount bracket.
8. Get all the timing marks in spec with the body, remove idler pulley, remove CP, remove TB, remove adjuster, remove auto tensioner
9. Open radiator cap on top and then open up bottom radiator cap to drain Coolant from rad.
10. Don't bother with rear engine coolant drain, it's a PITA bleeder valve to get to.. I was able to open it up but not a lot of coolant came out. I consulted 240sx and he said they just pop the WP and let the coolant spill out in the shop and to spray down with Brake cleaner to evaporate everything. If you want to bleed it from the rear of the block get a 1/8� long hose leading to your fluid container and open up the valve with a wrench. If you decide to open up the WP without draining, put l long tray underneath the area collect the coolant and pack paper towels around the CP sensor assy.
Remove the Water Pump. Soak up excess coolant and spray down CP area / WP seal and Timing Belt cover areas with lots of Brake Cleaner. Wipe Clean. Make sure CP area is completely dry and WP seal areas are clean as well as timing belt cover areas.
11. Install new WP, Idler Pulley, Adjuster, Auto Tensioner � tighten battery tie down against adjuster
12. Check your TDC marks and install new TB starting at the CP � counter clockwise. There should be ZERO SLACK all the way to the adjuster. All the slack should be at the adjuster / tensioner. Tighten idler pulley to spec once TB is on.
Check your TDC marks again after the belt is on
13. Clean up CP gear and shim with brake cleaner, reinstall shim (should be lip out) & CP. Clean up CP bolt and lubricate end threads and neck of CP bolt between head and washer with fresh oil. Install bolt loosely and cycle crank six times, check TDC marks (front / rear cam & CP marks). If they don't line up, redo TB installation. Wedge the hex tool again to keep the CP from moving and spec in the bolt to 181 ft.lbs.
14.Replace timing covers, side mount bracket, drivebelt tensioner, check TDC marks for sanity. Remember.. check TDC marks with block not covers. Replace Drivebelt starting at CP, push tensioner back and slip top of Drivebelt over PS pump pulley. Replace Side Engine Mount, clean up securing bolts first. Torque into spec. Release jack from oil pan.
Thermostat
1. Remove intake, remove securing bolts on thermostat
2. Replace Thermostat with new one / new gasket.
Spark Plugs & Burping
Install plugs and coils. Make sure to apply anti seize to end of the thread on the plugs. Replace Rad Res and refill rad. Do a triple check on all harness connections and look for any missing bolts, etc.. Verify everything is back together. Don�t forget to secure the PS Res. Plug in battery and tighten clamps. Start the car and let it get to op temp to burp the coolant system.
Put the car back together and on the ground then take it for a ride.. the SM says to put it on the street and keep it in 2nd then let it drop from 2.5k down as part of the relearning drive cycle but I think it's only applicable when interfacing with the HDS. Not sure..
But other than that, that's it. I'm sure I left some stuff out or neglected to mention some things but that's the basics of the 105k service. I recommend doing a valve adjustment at this time as well. It's an additional few steps after the TB removal but definitely worth it. I have new heads that have been ported with new hardware going in as well, so with my limited time I opted to skip the valve adjustment.
Special thanks to MisterFubar for selling me his Timing Kit at such a good price and 240sx acura tech for the inside tips on the job.
09-28-2014, 05:47 PM
#1264
Wonderful instructions.
I followed the instructions to the letter. My car is running like a new car.
Thanks for the video.
And thanks everyone for the amazing support!
The....
Acur8lady!

I followed the instructions to the letter. My car is running like a new car.
Thanks for the video.
And thanks everyone for the amazing support!
The....
Acur8lady!
The following users liked this post:
Majofo (10-20-2014)
The following users liked this post:
Majofo (10-20-2014)
10-20-2014, 07:05 PM
#1266
Three Wheelin'
Very thorough DIY and good read. Too bad I don't have the tools, time, knowledge, or guts to change my own Timing Belt...
10-20-2014, 11:23 PM
#1267
Chapter Leader (Southern Region)
Thread Starter
Glad it's still making the rounds and helping members out no matter which direction you go.
The following users liked this post:
Majofo (10-27-2014)
10-27-2014, 12:08 PM
#1270
Chapter Leader (Southern Region)
Thread Starter

 10-27-2014, 01:05 PM
#1272
Chapter Leader (Southern Region)
Thread Starter
Well.. I did some digging under the car and at first I was 100% on the culprit, but now I'm seeing fluid at the banjo fitting near the top of the case leading towards either the warmer or external filter.
I'll post up pics and you let me know what you think. I still haven't ruled out rear main leak. My guess right now.. everything is leaking.
I did pop both axle nuts and ball joints though. The driver side axle nut gave me no issue at all. It was butter to remove. The passenger side almost killed me. PB plus my giagantic frame bouncing on the breaker bar, this after letting it soak and taking a hammer to it. Still alive though.
10-27-2014, 01:41 PM
#1273
Oof, that sounds terrible! Worse than the CP bolt, huh...!?!!? The one thing I've never done is take heat to it, never really had to. I can say that after the S2000 (coming from Northern Snow States)...I'll probably never buy a car that doesn't live in AZ, CA, TX, or Florida. No rust never ever. 
Post away, I'll take a stab at it, although you're likely more knowledgeable.
Post away, I'll take a stab at it, although you're likely more knowledgeable.
10-27-2014, 01:42 PM
#1274
Chapter Leader (Southern Region)
Thread Starter
Yeah, the passenger side axle nut had more grit than the CP.
10-27-2014, 01:52 PM
#1276
Chapter Leader (Southern Region)
Thread Starter
He would have died..
 10-27-2014, 02:02 PM
#1278
Race Director
10-27-2014, 02:14 PM
#1280
Chapter Leader (Southern Region)
Thread Starter
Top to bottom..

Then going back to the driver's side I see this:
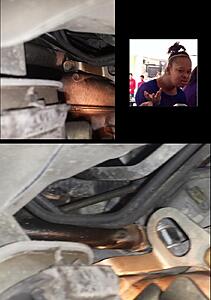
WTPhoook... looks like a leak on hose b. Contemplating whether I should tie everything back up, clean up and do banjo fitting and hose replacement. Then work my way down. Or go ahead and do shafts and seals since I'm already there, as well as hose and fitting. Then do checks afterwards.
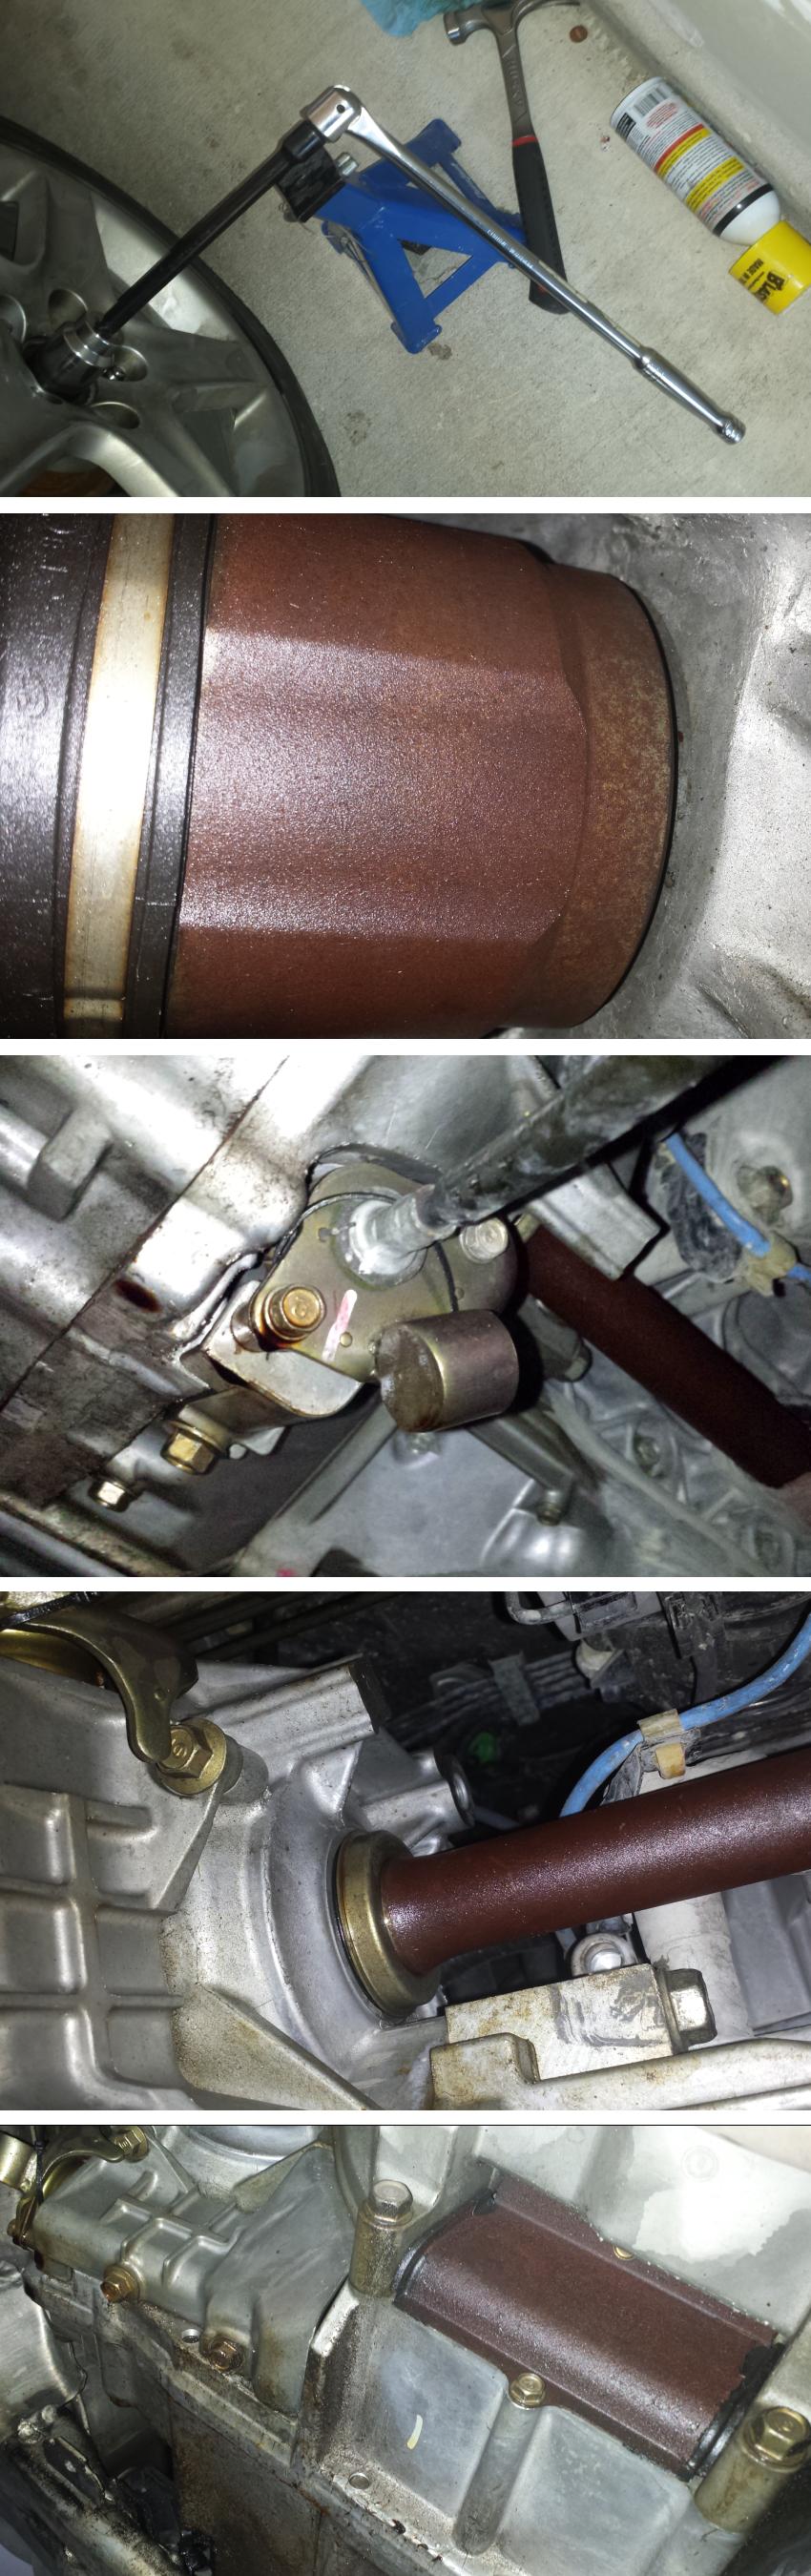
my setup to pop the axle nut.
First thought it was the driver's side seal.. notice the driveshaft is moist but not necessarily the culprit.
Then crawled under to notice lowest point and half shaft inward side seal is possible culprit..
but then looked at the half shaft and although moist and some atf.. not necessarily the culprit either.
Then checked the TC cover.. little bit of ATF, but for the amount that I'm leaking, not necessarily the culprit either..
Then going back to the driver's side I see this:

WTPhoook... looks like a leak on hose b. Contemplating whether I should tie everything back up, clean up and do banjo fitting and hose replacement. Then work my way down. Or go ahead and do shafts and seals since I'm already there, as well as hose and fitting. Then do checks afterwards.
Last edited by Majofo; 10-27-2014 at 02:16 PM.