Acura TL 2004-2008: How to Change Automatic Transmission Fluid and Filter
Changing your ATF fluid doesn't have to be a job for the pro. If you can change your oil, you have what it takes to change the transmission fluid as well.
This article applies to the Acura TL (2004-2008).
When it's time to change your transmission fluid and filter, don't fret because the job is just about as easy as changing your oil. And don't ignore it, because some Honda and Acura models have had premature transmission failures in the past. One of the fixes was to equip these vehicles with two filters for the transmission. The internal filter is the tough one to change, requiring quite a bit of disassembly to get to. That is likely a job for a pro. The external filter is your first line of defense, and it is much easier and cheap to replace, so it's not a bad idea to do this at the same time you are draining the fluid. You need just some basic tools as well as about an hour of your time and you'll have this DIY job done.

Materials Needed
- 3/8 inch ratchet and 8, 10 and 17mm sockets with 6" extension
- Flat head screwdriver or other small prying tool
- Replacement fluid and external filter
- Replacement crush washers (if needed)
- New O-ring
- Phillips screwdriver
- 3+ liters of Honda/Acura transmission fluid
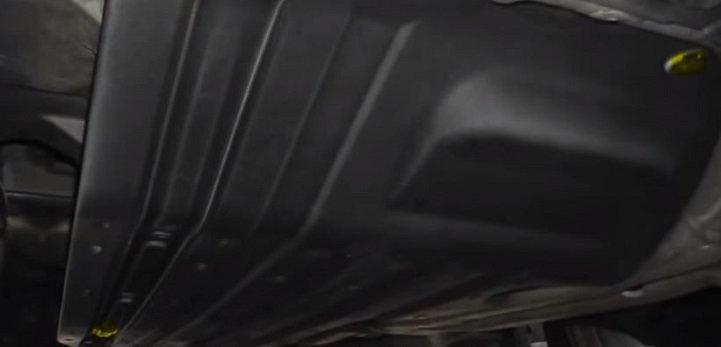
Step 1 – Warm up engine and remove splash guard
Start your Acura and let it warm up until you hear the radiator fan come on. Be sure to place the shifter into D, N and R for at least 30 seconds, without moving, so the fluid can circulate through the transmission. The fluid needs to be warmed up to flow faster, and to help flush out the dirt. Underneath the front center of your car is a plastic cover that protects the bottom of the engine and provides some aerodynamics. This plate is held on by two 10mm bolts and some plastic rivets. Remove the bolts and carefully pop out the rivets by prying out the center part. You may want to have some extra rivets on hand, as these are easily broken during the removal process. Once these are all removed, the plastic cover will come right off.
Step 2 – Drain transmission fluid
With the plastic cover removed, you'll find the large, bluish-colored drain plug. This may be a 17mm bolt, or it could be a recessed square hole that fits the drive from a 3/8 drive ratchet extension. Get your drain pan in place and remove this plug. Inspect and clean the magnetic end of the drain plug. Look for any larger metal shavings or debris that may indicate internal problems that you'll definitely want to address. Replace the plug and torque it to 36 foot-pounds.
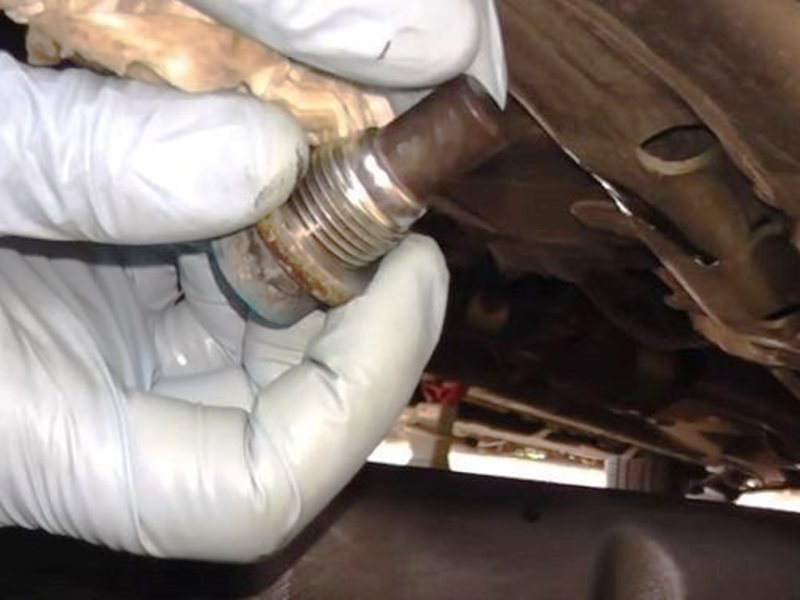
Figure 2.1. Inspect the drain plug for any metal shavings or debris. 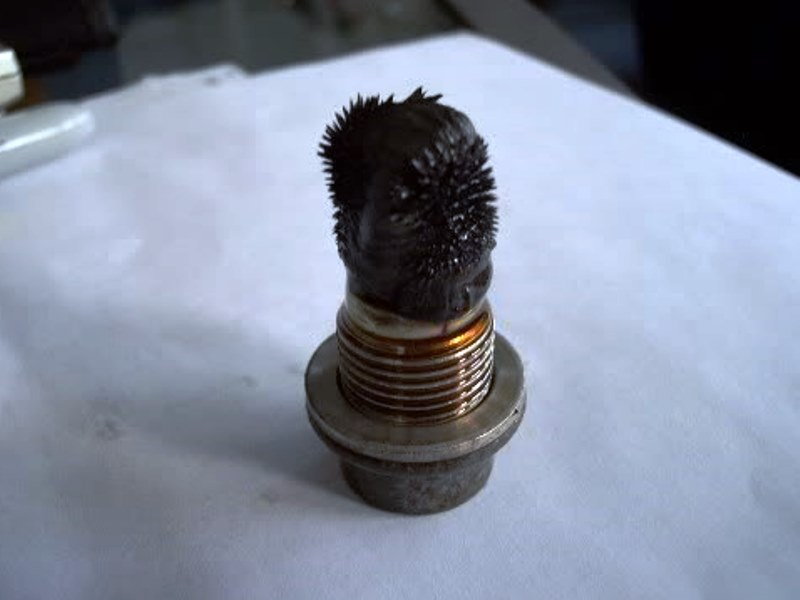
Figure 2.2. This plug shows signs of metal shavings and burned fluid.
Step 3 – Remove the airbox and hose
- In order to reach the filter, you will need to take off the airbox and intake hose.
- Use a Phillips head screwdriver to remove the four screws on each corner of the airbox cover.
- Remove the hose clamps on the large and smaller hoses that connect the airbox to the intake. The larger hose clamp is secured with a 10mm bolt. The smaller clamp just squeezes together to loosen and pop it off the larger hose.
- Remove the two 10mm bolts that hold the airbox in place. There is also a clip style bolt that disconnects the electrical connection to the airbox. Pull the airbox and set it aside.
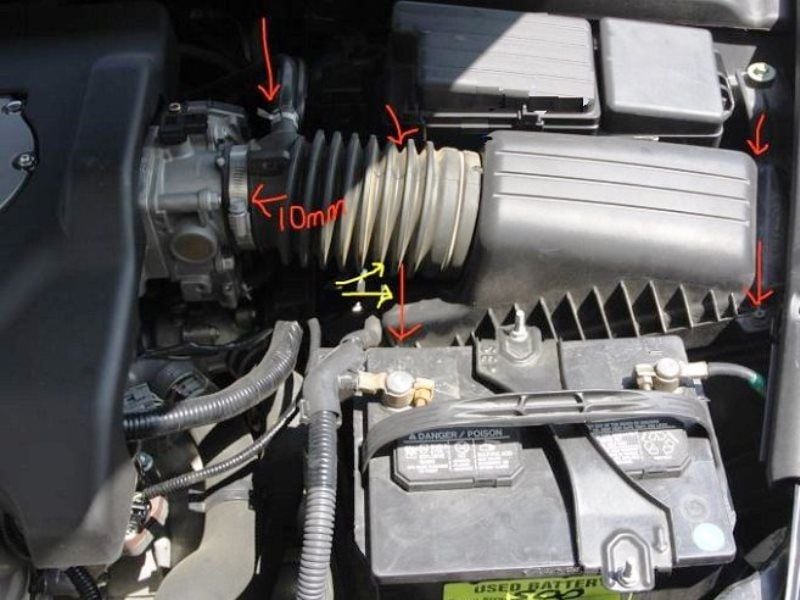
Figure 3.1. Remove the airbox cover and hoses. 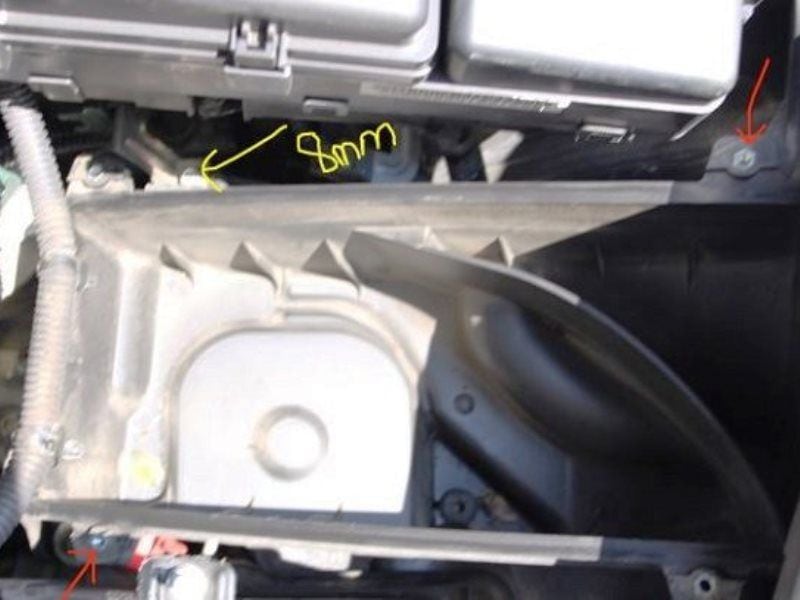
Figure 3.2. Remove the airbox.
Step 4 – Remove the transmission filter
- Remove the ATF line banjo bolt with a 19mm box wrench or small socket. This can be loosened and then turned out by hand.
- Take care when working with the two crush washers and inspect when you remove these. You may want to have spares on hand.
- Use a 10mm box wrench to break free the three bolts that hold the filter cover in place. These bolts are easiest to remove by hand as well.
- The cover is spring-loaded, so take care when removing.
- Once the cover is off, reach in and remove the filter and the spring. Make note of the orientation of the filter to the spring when replacing with the new filter.
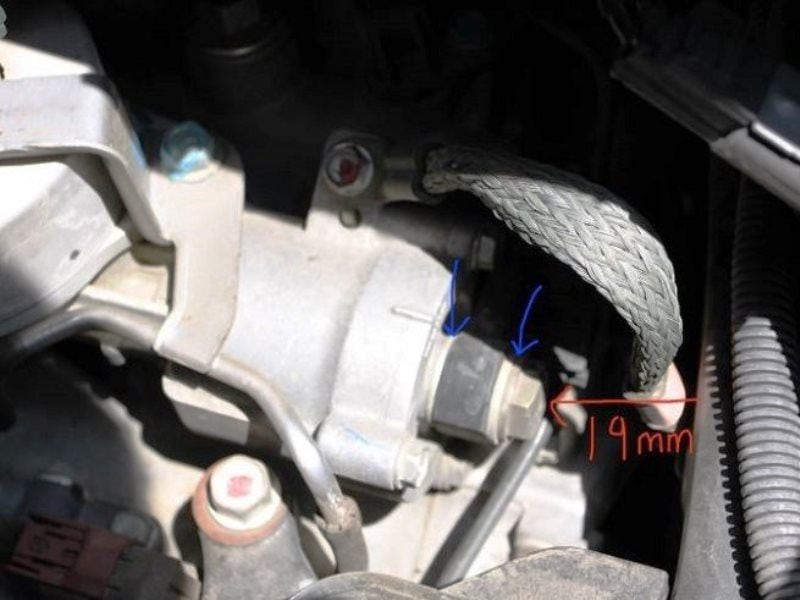
Figure 4.1. Remove the 19mm ATF inlet line bolt and inspect the crush washers. Replace if they are damaged. 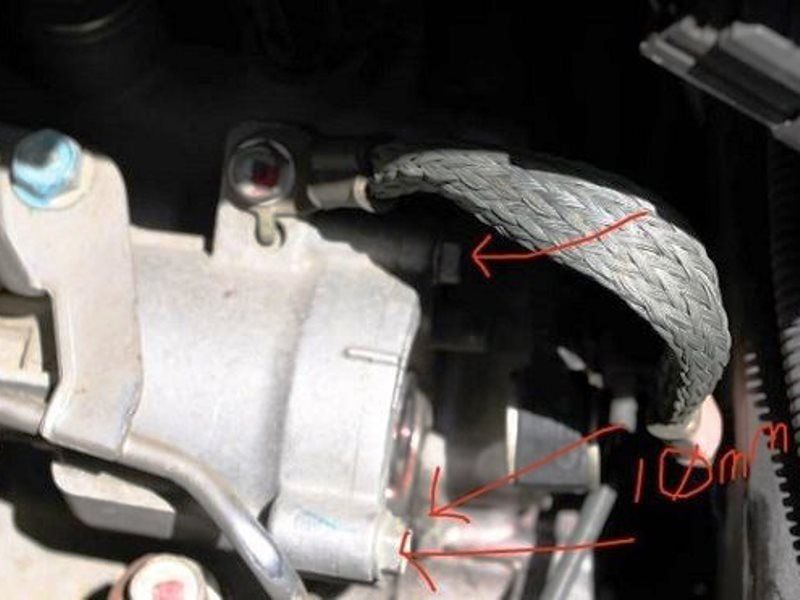
Figure 4.2. These three 10mm bolts hold on the spring loaded filter cover.
Step 5 – Replace the filter and assembly
- Clean out the inside of the housing and replace the O-ring.
- Clean the spring and re-insert followed by the filter.
- The beveled end of the filter goes in toward the housing, and the flat side goes with the spring.
- There is a mark on the housing and on the cover that must be lined up.
- Replace the three bolts.
- Install new crush washers, unless the old are still good, and replace the ATF inlet pipe.
- Replace the airbox assembly.

Step 6 – Add new ATF fluid
Make sure you use the correct type of ATF fluid for the Acura TL, which used to be Honda Z1, but has since been superseded by the DW-1 fluid. The two different fluids are compatible, so no need to worry if you mix the old one with the new one.
- The fill bolt is just below and to the left of the fuse box.
- Use a 17mm socket with extension to reach the bolt. Remove the bolt, use a funnel and refill the transmission fluid with the amount indicated in your owner's manual.
- Check the cold level on the dipstick.
- Run the car again until the fan comes on, shift into reverse, and drive, but don't drive the car.
- Shut the car down and check the dipstick for the hot level.
- Add more fluid if needed.
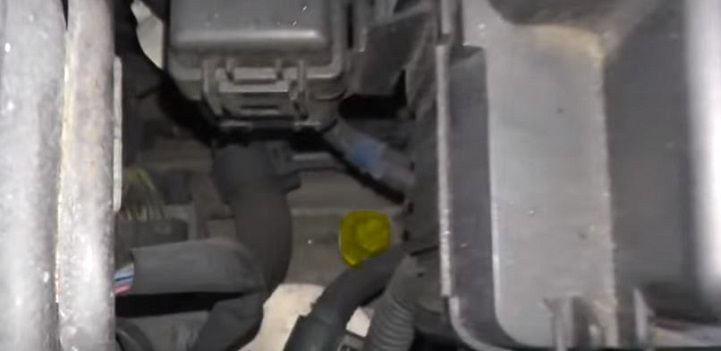
Figure 6. Filling via this tranny fluid port is much faster than the alternative, which is to refill it via the dipstick tube.
Pro Tip
Automatic transmissions when warm keep at least 1/3 of their fluid in the torque converter. For this reason, many people recommend doing three quick fluid changes within the space of a few days, or even the same day. Be sure to drive the car for at least an hour before changing it again. If you do the so called 3 x 3 flush (at least 3 quarts, 3 times), you would wait until the last fill to change the filter.
Featured Video: Automatic Transmission Fluid Change
Related Discussions
- Transmission Fluid Change Question - AcuraZine.com
- ATF Drain and Refill - AcuraZine.com
- Transmission Fluid Change - AcuraZine.com
- Transmission Fluid Change - AcuraZine.com
- DIY Transmission Filter Change with Pics - AcuraZine.com
