
[DIY] Let's Add Some Class: Door Handle Puddle Lights

Thread Starter


Joined: Mar 2010
Posts: 10,766
Likes: 2,317
From: ON, Canada
[DIY] Let's Add Some Class: Door Handle Puddle Lights
[DIY] Let's Add Some Class: Door Handle Puddle Lights
Introduction:
These lights are stock on some BMWs.
What are puddle lights?
They come on when you unlock your car, just as your dome lights do. They fade in and out simultaneously with the dome lights. They won't be on when you're driving. Handy for watching out for things like puddles before opening your door.
This is not the first TL to do this, a few others have also done it a while ago such as paperboy
His car was the reason spatel83 wanted to get it done.
I think someone already made a DIY, but the more the merrier I guess.
I did this mod for member spatel83.
He also helped out for the mod
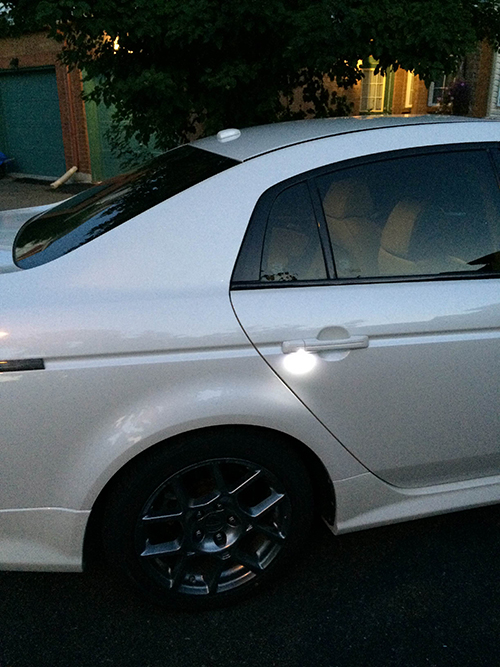
Here's how it looks:


This mod is similar to the side mirror puddle light mod.
If you're interested in that, here's the link and what it looks like:
https://acurazine.com/forums/third-g...lights-907045/

If you're set on doing this mod, let's get started!
Materials:
The LED: Flush Mount LED Bolt
6mm size
Bought four, one for door.
You can always paint the housing with touchup paint for it to match your colour.
They're the same ones I use for the my side mirror, except smaller.
These fit FLUSH. You can barely tell they're there!
Butt connectors
Splice connectors
20 gauge wire
Add-a-fuse
Tools:
Dremel with small drill bit
Tiny flathead screwdriver
Phillips Screwdriver
Wire Cutters
Wire Crimper
Wire strippers
Warning: Not held accountable for any mistakes you may make.
You WILL be drilling into your door handle covers. It's not really all that bad. It's the bottom you're working with. If you mess up, just plug it, OR just buy a replacement cover. They're cheap, and come painted!
Steps:
1. First step is to remove your door handle cover.
All you do is lock your car door, pull the door handle towards you, and you'll see the two notches on the side of the cap where it clips onto. Take your tiny flathead precision screwdriver and pry it off.
Not so hard right!
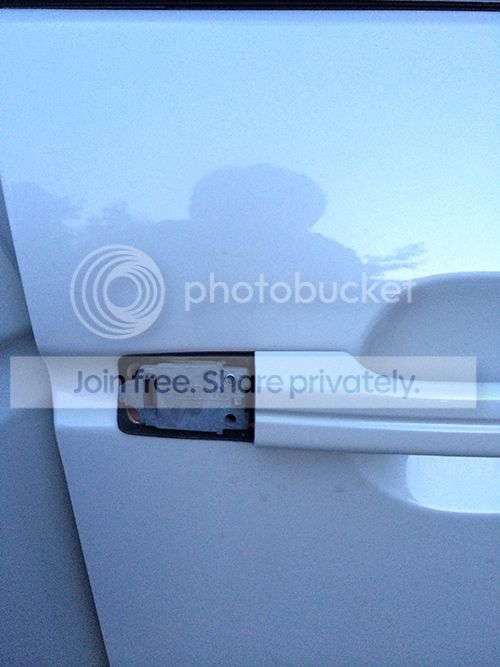
2. Bring this piece inside, and drill a hole close to the edge. If you drill it too close to the door side, it will not fit.
Use your eyes and see where I drilled, you'll want to drill in the same place.

You can see it is close to the curve edge. If you drill it closer to the bottom (in reference to the picture above), it will not fit.
3. Take the LED bolt and put it through, and tighten the bolt down from the other side. Do not over tighten, they are fragile.

Congrats, that's all there is to it!.
4. Remove the heat shrink from the resistor that's in the LED bolt wires.
The heat shrink makes it too thick to fit through the hole.
5. Put the wire through the available hole behind the cover area.
It's a tight fit even when the heat shrink is removed, so just be careful and not too forceful.
You can see the exposed resistor in this picture from removing the heat shrink.

6. Remove the door panel.
Service manual instructions:
How to: REMOVE DOOR PANEL - AcuraZine Community
Takes like 5 minutes.
7. Grab the wire from inside the door panel, and MAKE SURE IT IS NOT INFRONT OF THE WINDOW CHANNEL. If the wire is infront of the window channel area, once you roll down your window.... your wire will break.
Put it around the rear of the window channel. It'll make more sense when you're actually doing the mod. Also common sense
8. Bring the wires inside to the cabin. Route them through the door loom holes.
At this point, you just need to wire them.
Now to wire it:
I won't post pictures for this section because the wiring is done EXACTLY the same as my footwell lighting DIY.
The way you route wires is EXACT same as this diagram for the footwell lighting:
Just replace the "led strips" in the diagram with your LED bolts

1. Extend the wires for the LED so it reaches the interior using butt connectors and your spool of 20 gauge wire.
2. Route them through the door loom. They should come out somewhere on top of the fuse box (for the driver side). They come out on top of the AMP on the passenger side. Rear door LED wires will be routed under the door sill panels and spliced into the front wires.
3. Use a splice connector and splice the black wire (negative) into the dome supervision wire. It is located on a connector at the back of the fusebox.
Undo the connector, to give you room, and use a splice connector.
The detailed wiring part is already apart of my Footwell Lighting DIY
[DIY] Let's Add Some Class: Footwell LED Lighting - AcuraZine Community
4. Use the add a fuse and connect it to the end of the red wire. Plug the add-a-fuse into a constant powered fuse such as power seats. Use something like 5A for the accessory fuse on the add-a-fuse.
Again, refer to my footwell lighting thread.
5. Test everything out.
Just repeat for all sides and you're done!
Hope more of you try it out!
Introduction:
These lights are stock on some BMWs.
What are puddle lights?
They come on when you unlock your car, just as your dome lights do. They fade in and out simultaneously with the dome lights. They won't be on when you're driving. Handy for watching out for things like puddles before opening your door.
This is not the first TL to do this, a few others have also done it a while ago such as paperboy
His car was the reason spatel83 wanted to get it done.
I think someone already made a DIY, but the more the merrier I guess.
I did this mod for member spatel83.
He also helped out for the mod
Here's how it looks:
This mod is similar to the side mirror puddle light mod.
If you're interested in that, here's the link and what it looks like:
https://acurazine.com/forums/third-g...lights-907045/
If you're set on doing this mod, let's get started!
Materials:
The LED: Flush Mount LED Bolt
6mm size
Bought four, one for door.
You can always paint the housing with touchup paint for it to match your colour.
They're the same ones I use for the my side mirror, except smaller.
These fit FLUSH. You can barely tell they're there!
Butt connectors
Splice connectors
20 gauge wire
Add-a-fuse
Tools:
Dremel with small drill bit
Tiny flathead screwdriver
Phillips Screwdriver
Wire Cutters
Wire Crimper
Wire strippers
Warning: Not held accountable for any mistakes you may make.
You WILL be drilling into your door handle covers. It's not really all that bad. It's the bottom you're working with. If you mess up, just plug it, OR just buy a replacement cover. They're cheap, and come painted!
Steps:
1. First step is to remove your door handle cover.
All you do is lock your car door, pull the door handle towards you, and you'll see the two notches on the side of the cap where it clips onto. Take your tiny flathead precision screwdriver and pry it off.
Not so hard right!
2. Bring this piece inside, and drill a hole close to the edge. If you drill it too close to the door side, it will not fit.
Use your eyes and see where I drilled, you'll want to drill in the same place.
You can see it is close to the curve edge. If you drill it closer to the bottom (in reference to the picture above), it will not fit.
3. Take the LED bolt and put it through, and tighten the bolt down from the other side. Do not over tighten, they are fragile.
Congrats, that's all there is to it!.
4. Remove the heat shrink from the resistor that's in the LED bolt wires.
The heat shrink makes it too thick to fit through the hole.
5. Put the wire through the available hole behind the cover area.
It's a tight fit even when the heat shrink is removed, so just be careful and not too forceful.
You can see the exposed resistor in this picture from removing the heat shrink.
6. Remove the door panel.
Service manual instructions:
How to: REMOVE DOOR PANEL - AcuraZine Community
Takes like 5 minutes.
7. Grab the wire from inside the door panel, and MAKE SURE IT IS NOT INFRONT OF THE WINDOW CHANNEL. If the wire is infront of the window channel area, once you roll down your window.... your wire will break.
Put it around the rear of the window channel. It'll make more sense when you're actually doing the mod. Also common sense
8. Bring the wires inside to the cabin. Route them through the door loom holes.
At this point, you just need to wire them.
Now to wire it:
I won't post pictures for this section because the wiring is done EXACTLY the same as my footwell lighting DIY.
The way you route wires is EXACT same as this diagram for the footwell lighting:
Just replace the "led strips" in the diagram with your LED bolts
1. Extend the wires for the LED so it reaches the interior using butt connectors and your spool of 20 gauge wire.
2. Route them through the door loom. They should come out somewhere on top of the fuse box (for the driver side). They come out on top of the AMP on the passenger side. Rear door LED wires will be routed under the door sill panels and spliced into the front wires.
3. Use a splice connector and splice the black wire (negative) into the dome supervision wire. It is located on a connector at the back of the fusebox.
Undo the connector, to give you room, and use a splice connector.
The detailed wiring part is already apart of my Footwell Lighting DIY
[DIY] Let's Add Some Class: Footwell LED Lighting - AcuraZine Community
4. Use the add a fuse and connect it to the end of the red wire. Plug the add-a-fuse into a constant powered fuse such as power seats. Use something like 5A for the accessory fuse on the add-a-fuse.
Again, refer to my footwell lighting thread.
5. Test everything out.
Just repeat for all sides and you're done!
Hope more of you try it out!


Trending Topics


Advanced
Joined: Nov 2013
Posts: 69
Likes: 29
From: Toronto, Ontario
Registered TL Owner
Joined: Oct 2006
Posts: 1,487
Likes: 95
From: California
I've been waiting until I could get some decent pictures to attach with my post, but who knows when that'll be. lol
I've never done any kind of electrical stuff in my car other than adding an iSimple and I was able to just follow the DIY and learn from trial and error, but was finally able to complete this project a couple of week ago. So thanks for posting! I would've never been able to do this without this thread.
I've never done any kind of electrical stuff in my car other than adding an iSimple and I was able to just follow the DIY and learn from trial and error, but was finally able to complete this project a couple of week ago. So thanks for posting! I would've never been able to do this without this thread.
Last edited by pnoi521; Dec 8, 2014 at 11:21 PM.

Thread
Thread Starter
Forum
Replies
Last Post
tman570
2G RL Audio, Bluetooth, Electronics & Navigation
11
Jun 11, 2019 07:56 AM
ahsm
3G TL Problems & Fixes
3
Sep 9, 2015 08:35 AM