When you click on links to various merchants on this site and make a purchase, this can result in this site earning a commission. Affiliate programs and affiliations include, but are not limited to, the eBay Partner Network.
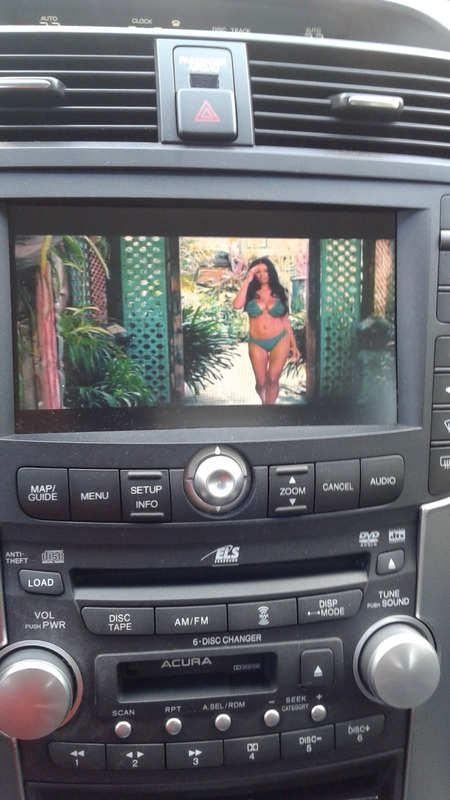
I recently finally finished my Navtool Install for mobile video in my TLS. Basically I chose the Navtool route with HDMI Smartphone-Mirroring using an Android Mini-PC instead of a tablet. I then Wi-Fi Tether to my HTC for internet access for all the apps on the Mini-PC. I also purchased a Rii bluethooth touchpad to control the Mini-PC with, since I know of no way to use the factory touchscreen to transfer inputs. I have a WD MyCloud on my home network where I have hundreds of movies and TV Shows, so this install will allow me to stream that video to the Navigation Screen.
I would like to start this write-up off by giving thanks to Acurazine and other notable members I studied to make this happen:
Thanks to: DeathtoToasters, jrocka312, supadavesNHBP, RxWorld, and writeups consolidated by datmrman
Here are the major components I used for this install, but there's also a bunch of odds and ends I left out like crimpers, meters, etc that are vital to a safe and clean install.
Major Items Used:
(1)15ft SPDIF and (1) 15ft Stranded Copper Cable: Hint: http://Monoprice.com is your friend
Smartphone for Wi-Fi Internet Tethering
Other Items to consider I did not use:
Micro SD CARD (Optional for Movie/Audio Local Storage)
SPDIF Audio Y Adapter (Smartphone and Navtool to Aux vice just one or the other)
Quick shot of the major items used
Here is a quick look at how the major items will connect. I forgot the SPDIF cable in the picture, but it just goes from Navtool ran all the way to the inside at Aux port under armrest. The red extension is the Wi-Fi antenna.
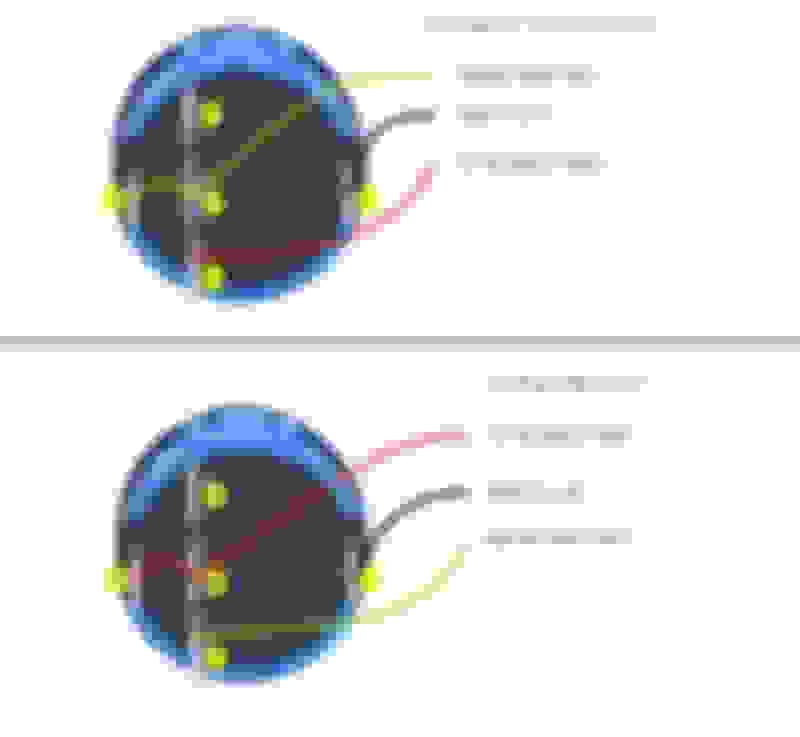
The updated Red LED Momentary switch was puzzling to me to find how to wire it. So I'm posting it here to help somebody else out too. I chose to have my LED always on, since it only comes on with the Accessory anyway.
***Disconnect Negative Terminal on Battery***
I began breakdown by opening up the armrest container, and lifting the rubber cutout to reveal two screws to be removed.
Next, I used a flathead screwdriver to pop out the two silver panels for more screws to be removed. As others have stated, the panels are expensive, so try not to break them. I didn't remove the panels all the way, but it's up to you.
Lift console, and disconnect all three harnesses (12v, Aux, and Light), then remove light assembly completely. This will leave the hole for the SPDIF cable from Navtool. (Note: Another option is to cut a small hole in plastic cover at the bottom. Your preference.) The center console should now be free to slide back and away for easier wire running.
This is the hole where I ran the SPDIF cable underneath the carpet and cushion. I had to end up sitting on backseat and running the wire snake forward to get SPDIF cable to go over the kinks under the carpet.
Next, pull rubber weather seal up from bottom of doorway. Then gently pop-out and remove driver-side step panel to reveal a pathway for the momentary switch cable. Also, while you're over here, go ahead and pop-out the panel that holds the mirror, VSA, and Side Mirror defroster (This is where I decided to place my momentary switch in the blank slot like RxWorld). The Accessory power cord will also need to be ran down to the fuse block.
Now on to the backseat. The backseat removal is by a socket-wrench and extension with a 10mm socket on the end. There is a "Seat-Bolt" on the left-hand side underneath next to the seat-belt which you'll have to remove. Then slightly press down on front of seat, while using other hand to pull connector tab outward toward front of car. Do this on both sides, and lift up and remove backseat. I ran the Audio Cord toward the front, and the Switch Cord along the driver side.
Inside the trunk, there are several trunk lining anchors you have to unscrew. Use a hammer and flathead screwdriver in the slot of the anchor to give a loosening bump if you have to. Be sure to get the one at the top, as I missed it initially and wondered why it was still stuck. Once all anchors are removed, use a flathead to pull the tabs back from being wrapped around the curve of the trunk decklid, and slide the trunk lining out enough to work.
To get the switch and SPDIF cables from backseat to trunk, I found a small opening hole in trunk at the top below back glass. I then used my wire snake and fished it through. The side panel pops out just enough to run wires through without having to completely remove. Attaching SPDIF and switch cable to snake will easily let you pull them through. I flipped back the carpet from the two backseat tabs and hid wires there and inside the panels.
Next remove the XM Radio to get 12v Accessory Power. Grab the same socket-wrench and partially unscrew the 3 screws. Then slide it up and back, then pull it out. Unplug the larger of the two, to borrow accessory power for the Navtool. Set it aside for now.
After the wires were pulled, it's time for some trunk wiring. Be thorough here, and make good connections. I used a tap to get 12v Accessory power to Navtool from XM Radio, but DO NOT connect Navtool to XM RADIO harness. The connection will fit, but you will fry your Navtool and have to send it back for repair. Yes, unfortunately I have experience in this matter. Anyhow, the cable should be Red and Yellow, but make sure you meter for 12v Accessory power (Not Constant). Once you find it, tap into it to give power to the Navtool. Ground can be found and done easily by identifying the screw with all the connections. Hook a Terminal Crimp from Navtool Black Wire (I included Grey to show video while driving), and ground to screw.
NavTool wiring connections:
NavTool Red Wire <----> Red & Yellow Wire tapped on XM-Radio
NavTool Black Wire <----> Grounded to OEM Ground Screw (See picture above)
NavTool Grey Wire <----> Ground to Chassis for constant picture, or to E-Brake for Parking Only
NavTool Yellow Wire <----> Connect to Momentary Switch (See diagram above)
NavTool Orange Wire <----> Not Used
NavTool Blue wire <----> Not Used
I tested operations by temporarily connecting negative on battery, and plugging the Android Mini PC in the HDMI and USB Power into Navtool. I used Fuse #32 (7.5A) on driver-side fuse box for accessory power to switch, but meter yours to be sure. After ensuring everything is good to go, disconnect Negative on battery again to prevent drainage and arcs. I then ran all wires as neat as possible, securing the Navtool and mini pc with heavy duty zip-tie. Since the gauge of the wires were small, I chose not to solder, but I used heat-shrink tubes w/ heat gun and electrical tape to protect from shorts. I then put everything back together the same way it came apart, and here's the end result:
I recently configured the MyCloud app to launch on startup I'm a Full-Time Network Engineer, Part-Time Trekky by trade Lets Petition Acura to make HD Screens for our TL's
In the future, I plan on installing a Mobile TV Tuner since Mobile TV has taken off in the last few years.
If anybody wants a Youtube video of the operation, I'll make one. Thanks
In regards to HD Screens: dream on sir Best bet is the Nexus 7 install in there. I doubt you'll get any traction from Acura themselves.. they couldn't care less..
It wasn't too hard as long as you're electronically inclined and not afraid of slightly undressing your TL. To be honest, that damn "Seat-Bolt" kicked my butt more than anything.
And I will make a short videoof the operation for you.
In regards to HD Screens: dream on sir Best bet is the Nexus 7 install in there. I doubt you'll get any traction from Acura themselves.. they couldn't care less..
I know, all the manufacturers don't want to upgrade old models of their cars, they want you in the dealership "While the Deal Lasts" to get the latest and greatest lol
Correct me if I'm wrong, but HDMI would be pointless in our cars unless the screens themselves were capable of that resolution, and they are not. It's like putting a DVD player on a black and white TV with no coax cables.
HDMI is mainly used for this application due to simplicity of being able to connect video inputs to the car. Most AV outputs on current gen electronics/phones/tablets(with adapters) use HDMI. While yes you won't get full HD on the screen, you're able to use one single wire connected to whatever device you're using.
HDMI is mainly used for this application due to simplicity of being able to connect video inputs to the car. Most AV outputs on current gen electronics/phones/tablets(with adapters) use HDMI. While yes you won't get full HD on the screen, you're able to use one single wire connected to whatever device you're using.
I made real quick to show the usage of the Navtool w/ Android Mini-PC. My LTE was acting up that day, but I'll take a pic to show the MyCloud app's menu and the Internet accessed.
I too recently installed the NavTool 3.0 on my 2006 Acura TL, however, instead of utilizing the HDMI input on the unit, I installed a Media Player which is utilized to play Music Videos utilizing the A/V output. The video source connects to the NavTool Video 1 and the Back-Up Camera uses Video 2. The audio from the Media Player connects via the ISimple ISHD-571. The video quality is excellent considering the screen resolution. I will be installing a Back-up camera (to include Media Player) in my 2016 Audi A5 using the Cargadget interface instead of NavTool.. I got the ideal to add the media player from Audizine member jrocka312.
That's pretty cool. I thought about using something like that media player, because I foresaw a situation where I'd have to have access to the Mini SD Card stuck in the Navtool. I was pondering a Bluetooth-copy solution from phone to Navtool to solve that. Can you give me the model of the Media Player? Also, did you drill a hole in the console for the Media Player connections?
My Media Player is the Mecca Speck G2 w/32GB SD Card. I am using a small power inverter stored in the armrest compartment to allow me to utilize the AC adapter instead of the Cigarette lighter. For some reason, the cigarette lighter power introduces noise in the video signal. I drilled -2- small holes in the rear of the upper storage compartment to run the Power and A/V Cable. The Media Player sits back to allow me to close the compartment to conceal it and to maintain the OEM look.
I personally don't drive and watch movies. I basically use it as my music player (DVD Videos) with a wow factor for passengers. The video quality is exceptional especially for the OEM screen resolution. The one reason I don't do alot with the NavTool 3.0 is because it is located behind the truck trim panels and not readily accessible. Sole purpose is for back-up camera and external video source.
Looking at your install, you won't have any problems incorporating a Media Player into your system.
How do you solve the voice search? Is a mic integrated into your bluetooth keyboard?
So I've never really thought about that. That Rii Bluetooth keyboard doesn't have a microphone, so there's no way to avoid losing that function. Just have to safely type it in at a stop light.
Which wires from the XM harness are you tapping into exactly? Is there only 1 single red wire that comes out of it that I'd connect the wiretap to? Did you just use a red 3M wiretap? How do you connect the Navtool's red wire to the wire tap? Is it like in this video:
(where you just put both wires inside the tap, the existing and the new and then clamp it shut?) Last question: my Navtool actually has a brown and blue wire coming from the red/yellow. I assume I'd use the brown wire that is coming from the red wire (attached photo). Thanks in advance, obviously I'm really new to this, haha.
Which wires from the XM harness are you tapping into exactly? Is there only 1 single red wire that comes out of it that I'd connect the wiretap to? Did you just use a red 3M wiretap? How do you connect the Navtool's red wire to the wire tap? Is it like in this video: https://www.youtube.com/watch?v=YBxJmoXdBxk (where you just put both wires inside the tap, the existing and the new and then clamp it shut?) Last question: my Navtool actually has a brown and blue wire coming from the red/yellow. I assume I'd use the brown wire that is coming from the red wire (attached photo). Thanks in advance, obviously I'm really new to this, haha.
Maestro
The XM-Constant 12V wire I used was striped Red/Yellow. I have a Fluke Multi-Meter that tells me what the voltage is with the ignition key turned to ACC. You can get a cheap one that just shows you Voltage in DC is really all you're concerned with here. Hardware stores sell things with lights and stuff for 12V. I can't remember where I got the tap from, I think it was just left over/laying around from one of my other car's older radio harnesses. My tap is red, but any will do as long as you can get it on the XM Harness. I'd recommend just for sanity purposes to swap your connectors around so that they match (Black to Black, etc). I used wire connectors and crimps to attach longer wires to Navtool harness to then connect/run them wherever they needed to go (see attached photo). Let me know if you need anything else.
Any idea if a wireless switch like this would work for my Momentary switch (attached photo)? It has a little controller with a button for "on" and 1 for "off" on a small controller. Would I connect the Navtool's yellow wire to the red "12vDC In" wire on the module and the module's White "12vDC Out" to another wiretap off of the Navtool's power wire? (Then the 2 black grounds to the car's ground). Or am I supposed to leave the white wire disconnected since there is only 1 button and not 2? In which case, would the module receive power from the Navtool's yellow wire? Thanks in advance.
I too recently installed the NavTool 3.0 on my 2006 Acura TL, however, instead of utilizing the HDMI input on the unit, I installed a Media Player which is utilized to play Music Videos utilizing the A/V output. The video source connects to the NavTool Video 1 and the Back-Up Camera uses Video 2. The audio from the Media Player connects via the ISimple ISHD-571. The video quality is excellent considering the screen resolution. I will be installing a Back-up camera (to include Media Player) in my 2016 Audi A5 using the Cargadget interface instead of NavTool.. I got the ideal to add the media player from Audizine member jrocka312.
I'm on the Westside (The Best Side) of J-Ville. Not sure if you are familiar with the area, I'm right off Chaffee Road and I-10. I will be available to assist with installing the NavTool 3.0. It's a pretty simple installation. Also, I have a 10" HDMI cable for both IPhone and Andriod phones. I'll part with it at a really great price. I initially was going to utilize the cable to mirror the phone screen, but decided to go another route. At any rate, let me know when you're ready.
Sorry for the typo. That should read 10' (10 Foot) HDMI Cable.
I'm pretty convinced in getting a Media Player now thanks to you. Can you tell me if this can reliably play .mkv files? Almost all my movies are in this format which I've found alot of my devices have trouble with.
As I mentioned in an earlier post, I purchased a small power inverter placed in the armrest storage compartment to facilitate using the A/C Power cord that comes with the unit. I prefer this over D/C power which introduced noise in the picture. Also, I have a few movies stored on the scan disc, but the Media Player is mainly used for music videos (MP4 format) which as displayed on the Navi screen.
I too recently installed the NavTool 3.0 on my 2006 Acura TL, however, instead of utilizing the HDMI input on the unit, I installed a Media Player which is utilized to play Music Videos utilizing the A/V output. The video source connects to the NavTool Video 1 and the Back-Up Camera uses Video 2. The audio from the Media Player connects via the ISimple ISHD-571. The video quality is excellent considering the screen resolution. I will be installing a Back-up camera (to include Media Player) in my 2016 Audi A5 using the Cargadget interface instead of NavTool.. I got the ideal to add the media player from Audizine member jrocka312.
did your navigation drive work prior to your installation? I have to fix my navigation drive and just need to know if this navtool upgrade works without fixing the navigation drive or I have to have it fixed and working before attempting this upgrade??
Thanks for the details on installing, can I add something and simply mirror my iphone to my nav screen?
Hi,
This Navtool interface will allow you to mirror your Iphone on the "SmartPhone Mirroring" Input. Usually on the first press of the momentary switch to cut it over from Nav Screen.
Just curious, did you incorporate the Media Player into your system?
Not yet. Probably going to abandon that after all, since between my frequent travel requirements for work, and the fact I figured out why my mobile streaming sucked so bad (T-Mobile Wifi-Tether Throttling), I chose not to go that route. After I added "T-Mobile One Plus" to my plan at $15/extra a month, that allowed me to stream content that was choppy at best to my car even while driving like Curiosity Stream and CNN Video. (My Mini PC doesn't support Netflix App, so I'm looking to replace it).
Also, if I can get my VPN from my phone to my House working again, I won't have to go through Amazon's Web Services to access my home's MyCloud videos and movies, speeding that up too.
Thanks for all of the detail in your install post. I just installed an OEM Carplay upgrade in my wife's 2017 CX-5, and it's made me a little more confident in removing some interior parts for the TL. I'm revisiting how I can have something similar (obviously not true CarPlay) with the stock nav screen. I have one of the original iSpimple models and I was thinking of adding the Navtool 3.0 as a video interface from the phone. I've read that you can jailbreak the iPhone and allow a third party CarPlay software to be installed that looks pretty spot-on. The nav screen would mirror what's on the phone. Is the video from the phone related to the screen by a factory compatible connector from the NavTool harness? Also, what is the audio out? I think the iSimple can support RCA LR input. What does the audio output look like on the Navtool? Here's what I'm picturing:
For iPhone video: iPhone> lightning to HDMI cable> HDMI to Navtool 3.0 > iphone video to nav screen via factory harness
For iPhone audio: Navtool 3.0 RCA out> iSpimple RCA input aux 2> source audio to aux 2 on iSimple radio display

 02-12-2017 | 04:42 PM


 Best bet is the Nexus 7 install in there. I doubt you'll get any traction from Acura themselves.. they couldn't care less..