
Synth19 Skyline Hakosuka Thread


Thread Starter
Senior Moderator


Joined: Nov 2000
Posts: 16,424
Likes: 720
From: Chicago, IL
Part 1 of the restoration got posted today. I'll copy/paste for the lazy. Pics/Restoration work and write-up by JDM-Legends.
http://www.jdmlegends.com/?p=4702
http://www.jdmlegends.com/?p=4702
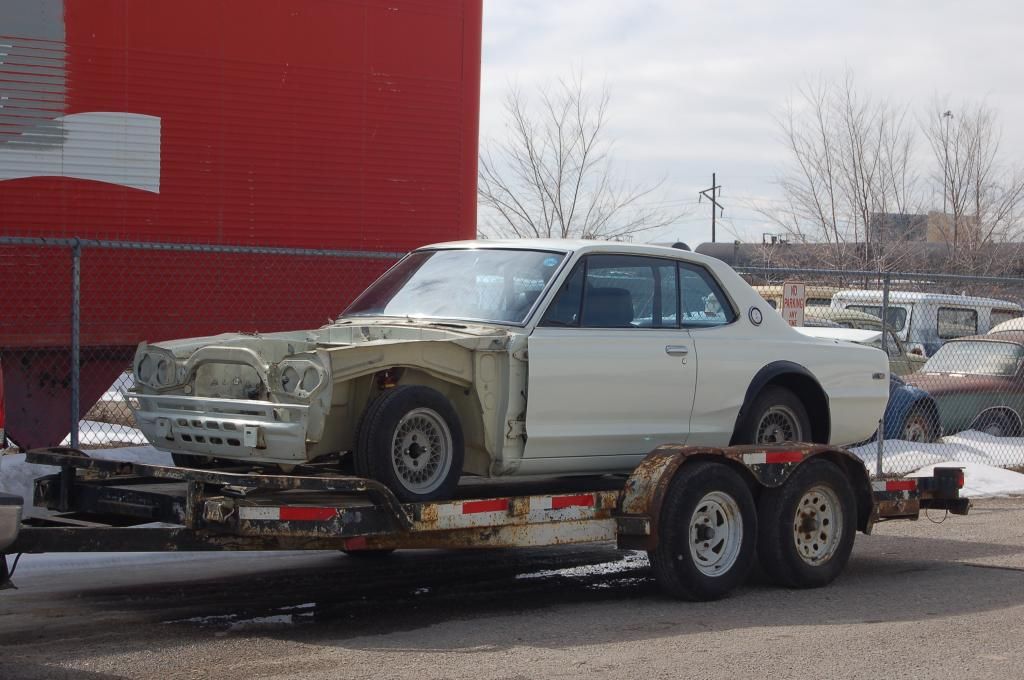
In today’s blog post I’m going to discuss the differences between trim models of the C10 generation chassis as well as what it takes to covert a standard GT to a GT-R “clone” as they are commonly referred to in Japan. First off, lets take a look at our candidate below, a 1972 Nissan Skyline 2000 GT-X.

We imported this car a while back and and when it arrived along with our SA22 RX-7 and we were very impressed with it’s condition. It’s very uncommon to find these cars in such stock form in Japan because they are so popular to modify and customize.

The interior on this car was immaculate, and quite possibly the best I’ve ever seen in a C10 chassis. As I mentioned before, this is a GT-X which is basically the top of the line Skyline which meant this car came equipped with power windows, optional factory installed 8-track player, air conditioning and power antenna.

The GT-X also came with twin SU carburetors that were good for an additional 10hp over the standard single Hitachi down draft that came standard on the GT. Another minor difference on the GT-X is the usage of throttle linkage versus the cable actuation used on the GT.

Based off the records we have, this car had been restored about 20 years ago in Japan and the chassis is still in very solid condition. One of the only modifications this car did have is a very nice Fujitsubo legalis R twin-pipe exhaust system. I wish they all came over with one of these… the quality and sound is second to none.

As is sometimes the case for us here at JDM Legends, we ended up finding a buyer for this particular car before we had a chance to post it up on the site for sale. If at all possible, we like to give our customers the choice of how they prefer to have their cars restored. While I would have been happy to go either way with this one, the customer decided he preferred the styling of the GT-R clone over the factory GT-X look.
The benefit of purchasing a vehicle before it is restored is that it gives you the option of having the restoration performed exactly how you want. So with that being said, we ordered up a full set of over-fenders, spoilers, and a few other odds and ends to complete the conversion that we’ll get into a bit later.

To give you a good idea on how drastic of a transformation this is, here’s the GT-R style over-fender placed over the stock surfline fender. The good thing about the conversion on this particular car is that we’ll be eliminating one of the only major rust spots on the back of the both rear fenders that you can see in this picture.

Now on to the dirty work… the first step is get the over-fenders mounted. Because we’re doing this conversion without re-painting the entire car, we’re using tape to protect the paint as much as possible. As you can see, we decided to also go with the front over-fenders as well on this car. Factory GT-R’s were only equipped with rears to allow the addition of a wider wheel and tire but the race cars had them all around so both versions are very common to see. Unless it’s a legitimate GT-R I personally feel that having them on the front and rear gives a more balanced appearance.

After that, it’s a matter of marking where the fender sits, and figuring out how high up to make your cut. The new owner had some pretty aggressive wheels in mind and he wanted to go low so I wanted to make sure we had as much clearance as possible.

Here’s the front.

After that, it’s time to take a deep breath and try to get over the fact that you’re cutting into the quarter panel of a Hakosuka and use that die grinder like a surgeon uses a scalpel.

After that, it’s a matter of separating the inner fender form the outer.

And for the purists that are cringing right now, we would be more than happy to bring over another stock one so you can keep it just the way you like it… and we now have a spare set of factory surfline steel to keep your original fender lines looking as good as new if that’s your preference.
You can see there was some corrosion starting to form around the pinch welds so we’re actually getting rid of a decent amount of potential rust here. We now have to figure out where to cut the inner fender so that it will sit at the same level as the outer fender and we retain as much clearance as possible.

And this is what we’re left with.

We now have to weld a panel in to fill the gap so I start by first selecting the proper gauge steel and then giving the side facing inside a coat of etching primer followed by a coat of weld-through zinc primer for maximum corrosion resistance. I then start by stitch welding it from the inner seam first.

Then the outer edge is cut and formed to make as tight of a gap as possible.

And then tack-welded in place.

The ideal scenario would be to do the conversion while re-painting the entire car but considering the amount of welding that is done, the effected area is very small and will be underneath the over-fender.

There is still some finish work to be done in the rear but we’ll get into that later. Next up is the fronts which are a slightly easier affair with a relatively simple trim. Note how close the cut is to the mounting holes, not only for maximum wheel clearance but I also dislike when you can see the original fender under the over-fender.

The next step to the GT-R conversion is the rear spoiler. Although it was never a factory installed item, they were used on the works race cars so they naturally also made their way onto the street cars as well. Combined with front chin spoiler they also add a decent amount of additional down force considering the primitive aerodynamics of the era. On these I start with a template made from the actual spoiler I’m installing because every one can vary a little.

The back of the spoiler should be mounted flush with end of the trunk lid. Also, the rear mounting stud should sit just in front of the inner frame under the trunk lid. If you want to know where that is in relation to the top, I found a good way is to use a very small magnet underneath…

And then place a socket on top and it will stick exactly where the hole should be drilled.

Then re-install the template, drill some holes and done.

The front spoiler is pretty straightforward but it’s also something that is always requires a little finesse on every car.

The GT-R’s also do not have the filler panel in between the tail lights like the GT’s and GT-X’s do so these holes will have to welded up and ground smooth.


We imported this car a while back and and when it arrived along with our SA22 RX-7 and we were very impressed with it’s condition. It’s very uncommon to find these cars in such stock form in Japan because they are so popular to modify and customize.
The interior on this car was immaculate, and quite possibly the best I’ve ever seen in a C10 chassis. As I mentioned before, this is a GT-X which is basically the top of the line Skyline which meant this car came equipped with power windows, optional factory installed 8-track player, air conditioning and power antenna.
The GT-X also came with twin SU carburetors that were good for an additional 10hp over the standard single Hitachi down draft that came standard on the GT. Another minor difference on the GT-X is the usage of throttle linkage versus the cable actuation used on the GT.
Based off the records we have, this car had been restored about 20 years ago in Japan and the chassis is still in very solid condition. One of the only modifications this car did have is a very nice Fujitsubo legalis R twin-pipe exhaust system. I wish they all came over with one of these… the quality and sound is second to none.
As is sometimes the case for us here at JDM Legends, we ended up finding a buyer for this particular car before we had a chance to post it up on the site for sale. If at all possible, we like to give our customers the choice of how they prefer to have their cars restored. While I would have been happy to go either way with this one, the customer decided he preferred the styling of the GT-R clone over the factory GT-X look.
The benefit of purchasing a vehicle before it is restored is that it gives you the option of having the restoration performed exactly how you want. So with that being said, we ordered up a full set of over-fenders, spoilers, and a few other odds and ends to complete the conversion that we’ll get into a bit later.
To give you a good idea on how drastic of a transformation this is, here’s the GT-R style over-fender placed over the stock surfline fender. The good thing about the conversion on this particular car is that we’ll be eliminating one of the only major rust spots on the back of the both rear fenders that you can see in this picture.
Now on to the dirty work… the first step is get the over-fenders mounted. Because we’re doing this conversion without re-painting the entire car, we’re using tape to protect the paint as much as possible. As you can see, we decided to also go with the front over-fenders as well on this car. Factory GT-R’s were only equipped with rears to allow the addition of a wider wheel and tire but the race cars had them all around so both versions are very common to see. Unless it’s a legitimate GT-R I personally feel that having them on the front and rear gives a more balanced appearance.
After that, it’s a matter of marking where the fender sits, and figuring out how high up to make your cut. The new owner had some pretty aggressive wheels in mind and he wanted to go low so I wanted to make sure we had as much clearance as possible.
Here’s the front.
After that, it’s time to take a deep breath and try to get over the fact that you’re cutting into the quarter panel of a Hakosuka and use that die grinder like a surgeon uses a scalpel.
After that, it’s a matter of separating the inner fender form the outer.
And for the purists that are cringing right now, we would be more than happy to bring over another stock one so you can keep it just the way you like it… and we now have a spare set of factory surfline steel to keep your original fender lines looking as good as new if that’s your preference.
You can see there was some corrosion starting to form around the pinch welds so we’re actually getting rid of a decent amount of potential rust here. We now have to figure out where to cut the inner fender so that it will sit at the same level as the outer fender and we retain as much clearance as possible.
And this is what we’re left with.
We now have to weld a panel in to fill the gap so I start by first selecting the proper gauge steel and then giving the side facing inside a coat of etching primer followed by a coat of weld-through zinc primer for maximum corrosion resistance. I then start by stitch welding it from the inner seam first.
Then the outer edge is cut and formed to make as tight of a gap as possible.
And then tack-welded in place.
The ideal scenario would be to do the conversion while re-painting the entire car but considering the amount of welding that is done, the effected area is very small and will be underneath the over-fender.
There is still some finish work to be done in the rear but we’ll get into that later. Next up is the fronts which are a slightly easier affair with a relatively simple trim. Note how close the cut is to the mounting holes, not only for maximum wheel clearance but I also dislike when you can see the original fender under the over-fender.
The next step to the GT-R conversion is the rear spoiler. Although it was never a factory installed item, they were used on the works race cars so they naturally also made their way onto the street cars as well. Combined with front chin spoiler they also add a decent amount of additional down force considering the primitive aerodynamics of the era. On these I start with a template made from the actual spoiler I’m installing because every one can vary a little.
The back of the spoiler should be mounted flush with end of the trunk lid. Also, the rear mounting stud should sit just in front of the inner frame under the trunk lid. If you want to know where that is in relation to the top, I found a good way is to use a very small magnet underneath…
And then place a socket on top and it will stick exactly where the hole should be drilled.
Then re-install the template, drill some holes and done.
The front spoiler is pretty straightforward but it’s also something that is always requires a little finesse on every car.
The GT-R’s also do not have the filler panel in between the tail lights like the GT’s and GT-X’s do so these holes will have to welded up and ground smooth.
Thread Starter
Senior Moderator
Joined: Nov 2000
Posts: 16,424
Likes: 720
From: Chicago, IL
continued....
The same goes for the chrome trim on the hood.


The mirrors will also be painted black from the original chrome to complete the GT-R look which will require a bit of work smoothing out these pitted mirrors that came on the car.

As a nice little distraction, the wheels the customer had ordered showed up at the shop just in time for a quick test fit.

Ahh yes� I�ve been itching to get my hands on a set of TE37v�s for a while now. It�s common knowledge that you can never go wrong with a set of TE37′s and these vintage-style versions will fit the bill perfectly for this build. After a bit of measurement we decided a 15″x10″ -25 in the rear (which is the widest size available in a 15″) and 15″x9″ -15 up front would fit the narrow flares perfectly with a bit of camber.

I love the original Rays logo on these.

That looks just about right.

While we were at it I decided to test fit one of the Work CR01′s from the RX-7 to give you an idea of the amount of suspension travel we�ll have after the fender modification. This is the maximum amount of travel possible without tubbing the rear fenders and should be more than enough at the ride height we�ll be at.

Now back to the conversion, there was one more area that needed to be addressed before we could take the car in for paint. This particular GT-X came with the optional lower rocker trim that when installed will interfere with over-fenders so they will need to be removed as well.

While removing the paint in preparation for welding up the mounting holes I came across an unexpected amount of body filler in this particular area as well as couple of spots where the paint was starting to bubble which leads me to believe there was more than likely some previous patchwork performed in that area when it was previously restored in Japan.
After a bit of discussion with the customer we decided that while we were repainting this area we might as well take care of any areas that look suspect for corrosion so we decided to strip it from the surfline down because that was where 99% of the problematic areas were located.

Overall not too bad but there were a few areas where there were patches on patches so we would need to cut out the entire area for a proper repair.

This also gave us the opportunity to fix a few ares in under the rear bumper that we wanted to as well.

Now onto the patchwork, due the additional work we�ve been taking on lately I had our paint/body and all around fabricator Mauricio to help out with a few of these.


You can see here where the old patch was simply overlaid which allowed corrosion to from in between the two.


Very complex shape on this one�

One big patch to fix 3 small areas in the rear.

And finally out for paint� how�s that for a good combo?
[IMG]And finally out for paint� how�s that for a good combo?[/IMG]
And into the booth, primer first.

And then single-stage to blend in with the original paint.

Note that we have retained the OEM drain holes in the rocker panels as well as the notch in the frame rail to keep the repair as factory correct as possible.

spoilers

Now that we�re all finished up with paint and body, check back for part 2 to see how it all comes together along with some custom suspension upgrades.

The mirrors will also be painted black from the original chrome to complete the GT-R look which will require a bit of work smoothing out these pitted mirrors that came on the car.
As a nice little distraction, the wheels the customer had ordered showed up at the shop just in time for a quick test fit.
Ahh yes� I�ve been itching to get my hands on a set of TE37v�s for a while now. It�s common knowledge that you can never go wrong with a set of TE37′s and these vintage-style versions will fit the bill perfectly for this build. After a bit of measurement we decided a 15″x10″ -25 in the rear (which is the widest size available in a 15″) and 15″x9″ -15 up front would fit the narrow flares perfectly with a bit of camber.
I love the original Rays logo on these.
That looks just about right.
While we were at it I decided to test fit one of the Work CR01′s from the RX-7 to give you an idea of the amount of suspension travel we�ll have after the fender modification. This is the maximum amount of travel possible without tubbing the rear fenders and should be more than enough at the ride height we�ll be at.
Now back to the conversion, there was one more area that needed to be addressed before we could take the car in for paint. This particular GT-X came with the optional lower rocker trim that when installed will interfere with over-fenders so they will need to be removed as well.
While removing the paint in preparation for welding up the mounting holes I came across an unexpected amount of body filler in this particular area as well as couple of spots where the paint was starting to bubble which leads me to believe there was more than likely some previous patchwork performed in that area when it was previously restored in Japan.
After a bit of discussion with the customer we decided that while we were repainting this area we might as well take care of any areas that look suspect for corrosion so we decided to strip it from the surfline down because that was where 99% of the problematic areas were located.
Overall not too bad but there were a few areas where there were patches on patches so we would need to cut out the entire area for a proper repair.
This also gave us the opportunity to fix a few ares in under the rear bumper that we wanted to as well.
Now onto the patchwork, due the additional work we�ve been taking on lately I had our paint/body and all around fabricator Mauricio to help out with a few of these.
You can see here where the old patch was simply overlaid which allowed corrosion to from in between the two.
Very complex shape on this one�
One big patch to fix 3 small areas in the rear.
And finally out for paint� how�s that for a good combo?
[IMG]And finally out for paint� how�s that for a good combo?[/IMG]
And into the booth, primer first.
And then single-stage to blend in with the original paint.
Note that we have retained the OEM drain holes in the rocker panels as well as the notch in the frame rail to keep the repair as factory correct as possible.
spoilers
Now that we�re all finished up with paint and body, check back for part 2 to see how it all comes together along with some custom suspension upgrades.

Joined: Sep 2008
Posts: 78,246
Likes: 20,200
Holy FK...thanks for posting that, I can honestly say that I did not realize even closely how much work went into the transformation. I thought some sh*t just got bolted on and slammed and done. Not so. Gorgeous.
On one had, I hate to see a car in that good an original condition converted, but when you see how cool it ends up looking...hard to NOT go that route.
On one had, I hate to see a car in that good an original condition converted, but when you see how cool it ends up looking...hard to NOT go that route.
Holy hell, how did I miss this thread? Must have been the timing (wasn't around much during the holidays).
Anyway... wow. Awesome Synth!
I'll have to keep tabs on this thread!!
Anyway... wow. Awesome Synth!
I'll have to keep tabs on this thread!!


Thread Starter
Senior Moderator
Joined: Nov 2000
Posts: 16,424
Likes: 720
From: Chicago, IL
 Be sure to keep us updated on that too, I love your NSX. Skyline is looking great too
 Gorgeous. Can't wait to see the finished product.


