When you click on links to various merchants on this site and make a purchase, this can result in this site earning a commission. Affiliate programs and affiliations include, but are not limited to, the eBay Partner Network.
So my rubber weather stripping along the A-pillar and roof line finally gave up on life after becoming dry and brittle, and would flap against the windshield and front window at highway speeds. Instead of just using silicone or glue to put it back on, the best solution is to just replace the whole thing, which only comes as an assembly of chrome trim + rubber that is held to the body with plastic clips. The service manual instructions are pretty straight forward but not totally clear, so I just took a couple of pictures along the way to add some clarity in case anyone needed it. Took about 1 hour to replace both sides, and that's including the time it took to loosen up some stubborn clips without breaking them.
Time Required:
1 - 1.5 hours
Tools:
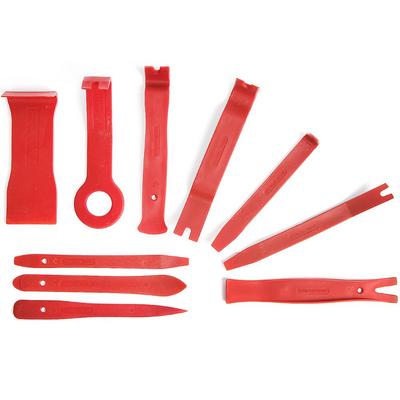
Set of plastic trim tools used for prying clips apart like these:
Required Parts (prices from Acuraoemparts.com):
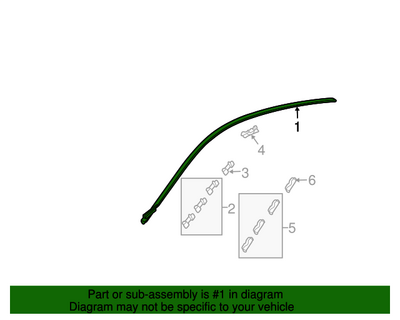
#1 - Molding, L Drip Side (73163-TK4-A02) - Driver's Side - Qty 1 - $86.23
#1 - Molding, R Drip Side (73153-TK4-A02) - Passenger Side - Qty 1 - $86.23
**Note 1 - each of these parts comes in a box that is about 94" long, 24" wide, and maybe 3" deep, so for me, it would have cost $230 to ship $175 worth of parts from FL to NJ. I instead purchased mine from the local dealership, pulled them out of the boxes, and slid them through my trunk pass-through door to get them home.
**Note 2 - each drip molding with part number above doesn't come with the associated clips, but the clips can be removed and swapped to the new molding very easily. As long as you don't break them you won't need:
Optional Parts if clips/retainers are broken:
#2 - Clip A, Windshield (73155-TK4-A01) - Qty 3 per side - $1.05
#6 - Clip, T-Stud (A)(Blue) (91570-SDA-A01) - Qty 1 per side - $1.25
#3 - Clip B, Windshield (73155-TK4-A11) - Qty 1 per side - $1.05
#5 - Clip, T-Stud (B)(Natural) (91571-SDA-A01) - Qty 3 per side - $1.25
#4 - Clip, Roof Molding (91572-TK4-A01) - Qty 4 per side - $0.90
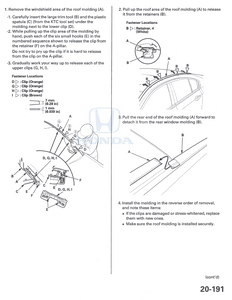
Service Manual Procedure:
The procedure is pretty straightforward:
1 - Starting from the bottom of the windshield, use a J-hooked plastic prybar to lift the trim away from the windshield, and use a sharper straight plastic tool to press on the 8 tiny plastic teeth of each clip to release it from the retainer. Once that clip is free, move up the windshield to release the remaining 3 clips. The clip will remain attached to the chrome trim, and the retainer will remain attached to the car.
2 - Once the windshield clips are released, push the chrome trim toward the center of the roof, and the clips will slide out of the trim and remain in the roof channel.
3 - When the chrome trim can be completely removed, you can push the orange clips into the trim to release them from the small channel that they sit in, then push them into the channel on the new replacement trim. The clips can be easily slid to the left or right to properly align with the retainers when reinstalling.
4 - Installation is done in reverse - Start from the rear of the roof to attach the new trim to the rear window trim, slide the trim away from the center of the roof to reattach the clips, then push downward on the 4 windshield clips to re-seat them.
Pics or it didn't happen:
Now for the images for clarification, since the service manual illustrations are never great:
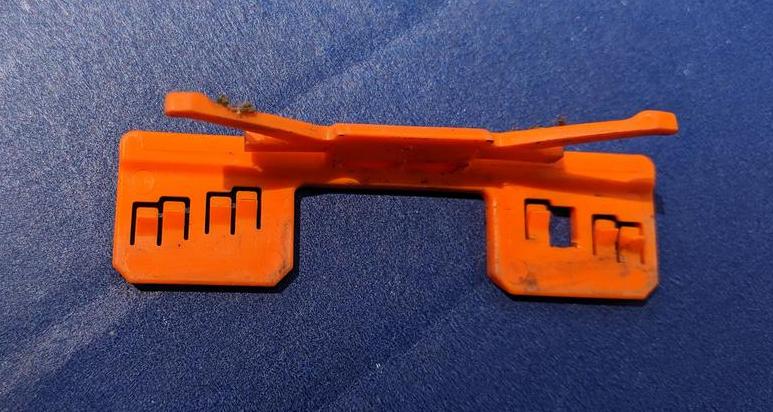
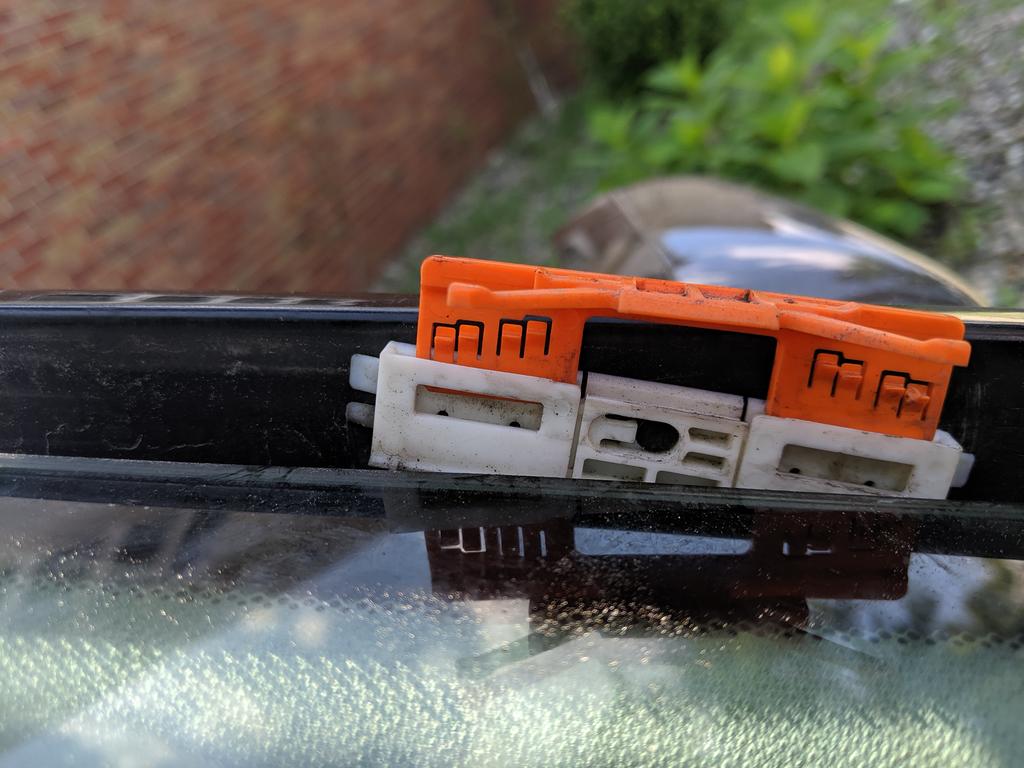
These are the 4 clips along the windshield. The 8 tiny teeth are what holds the clips into the retainer, and the 2 wings on the top are what holds the clip into the chrome trim. Push the clips in the direction of those wings to release them from the trim so you can transfer them to the new replacement trim. Note that I broke one tooth from pressing too hard with the tool, but it still functions just fine.
This is how the clip interfaces with the retainer (drip molding omitted for clarity). All 8 teeth must be pushed inward for the entire clip to be pulled up through the top of the retainer.
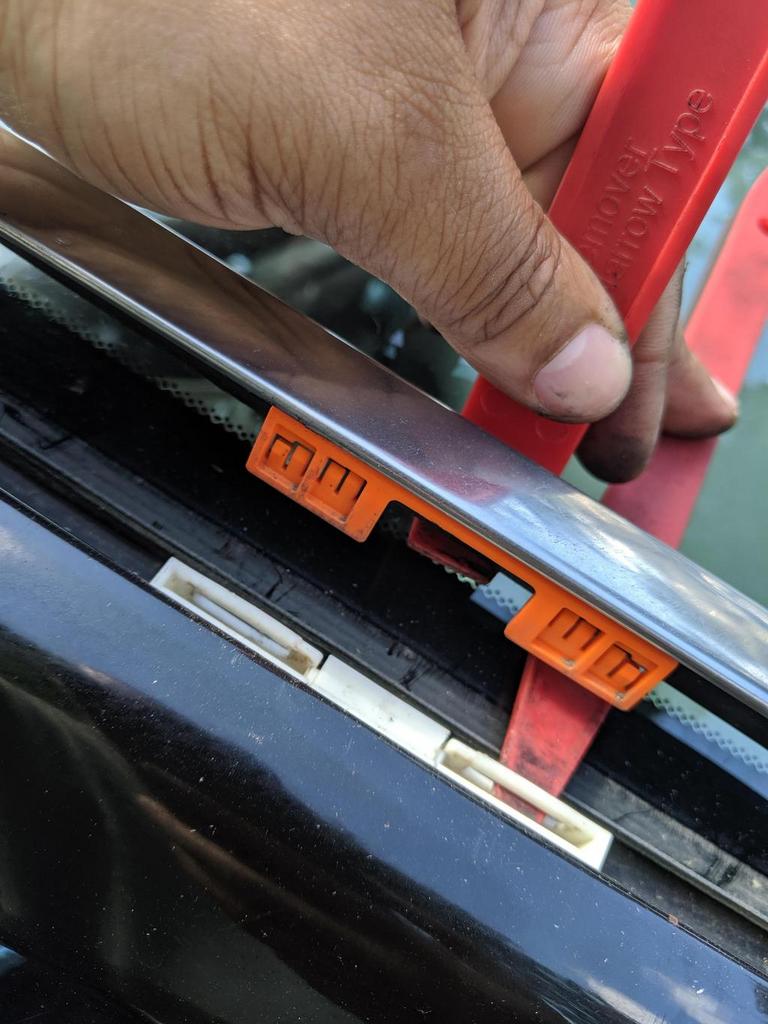
This is the method of releasing the clips (one hand used just so I could hold the camera). Use the J-hook to lift the trim while using the straight edge to push on the teeth of the clip. These clips are the hardest part of the job since 1 tooth on the side may be stubborn and cause the whole clip to stay stuck in the retainer. Had to use some elbow grease to pull pretty hard while pressing on the stubborn tooth, but just be careful enough that you don't break anything. Eventually they'll come loose with enough finessing.
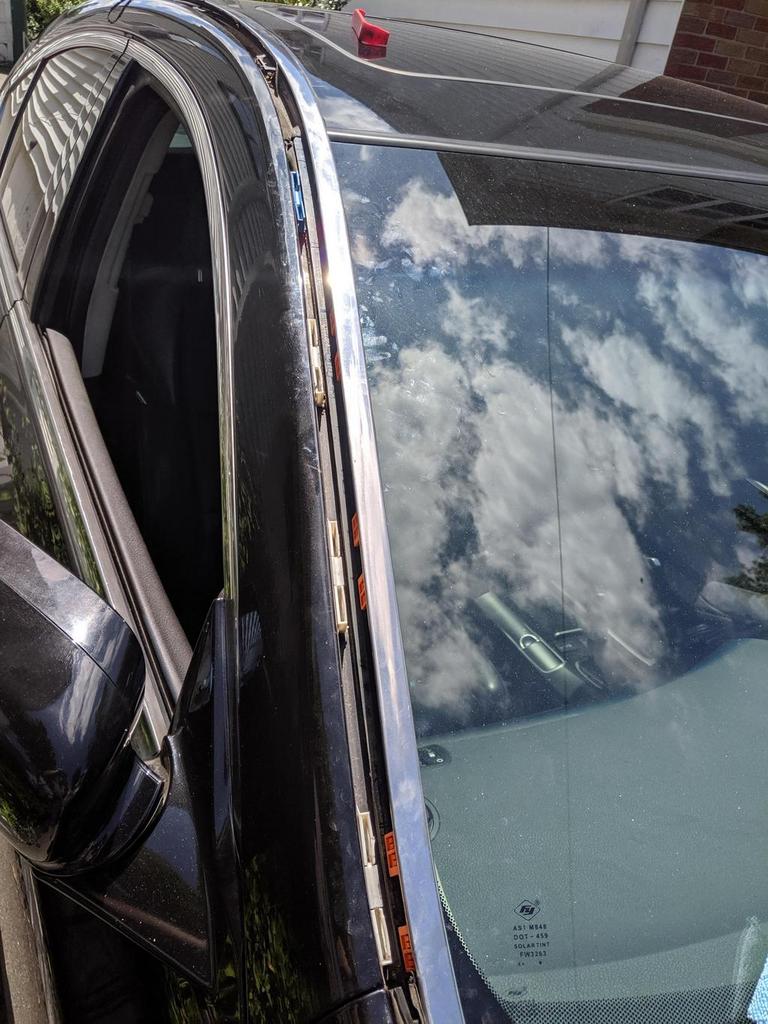
This is how the front clip retainers will look after pulling off the trim
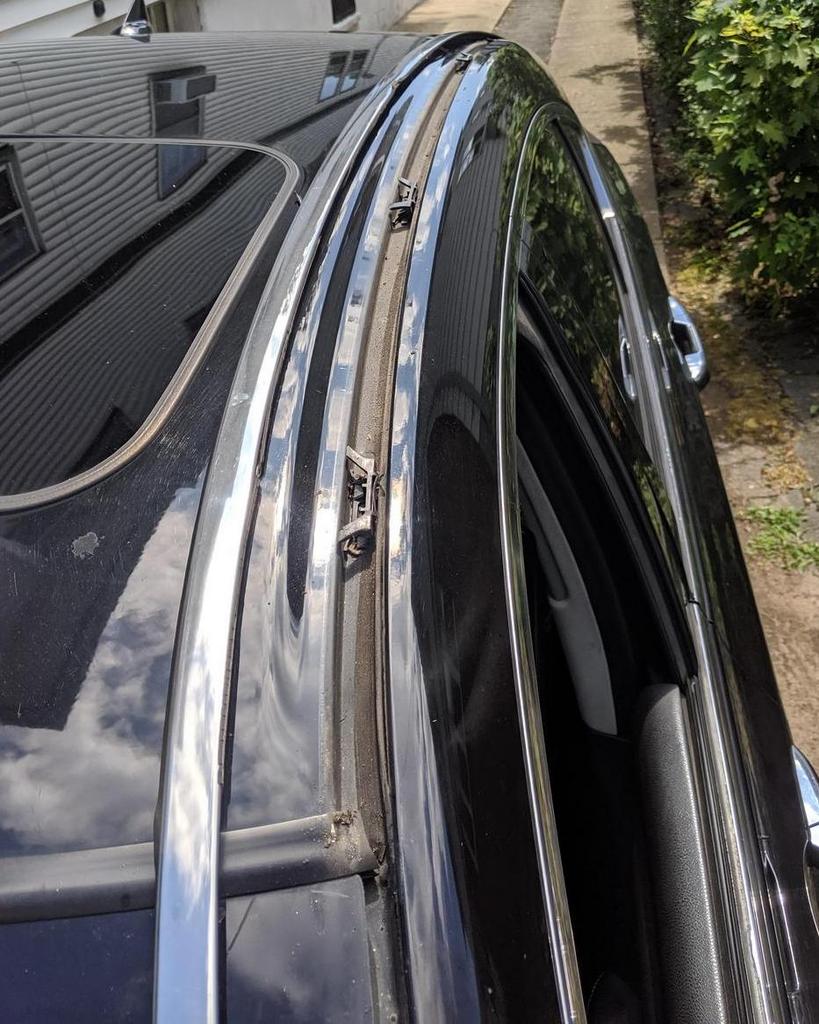
This is how the roof clips look after pulling off the trim.
**Note 3 - the very back edge of the drip molding chrome trim is sharp enough to scratch the paint, so watch out for it. I scratched my roof a bit getting these photos, but I'm planning on a full respray soon anyway, so it's whatever lol.**
I was actually looking into replacing my molding too so thanks for this ! Also the rubber piece going across where the windshield and the roof meet is starting to pop up as well. I just push it down and it stays for a bit but after a quick drive, its back up. Do you know if I can replace this as well? Or does this involve removing windshield and stuff?
Thank you for this. The rubber underneath the drip edge is flaking away and now I need to do this! Your article was passed on to me on a post I had regarding this so I just wanted to give thanks to you the author.
So my rubber weather stripping along the A-pillar and roof line finally gave up on life after becoming dry and brittle, and would flap against the windshield and front window at highway speeds. Instead of just using silicone or glue to put it back on, the best solution is to just replace the whole thing, which only comes as an assembly of chrome trim + rubber that is held to the body with plastic clips. The service manual instructions are pretty straight forward but not totally clear, so I just took a couple of pictures along the way to add some clarity in case anyone needed it. Took about 1 hour to replace both sides, and that's including the time it took to loosen up some stubborn clips without breaking them.
Time Required:
1 - 1.5 hours
Tools:
Set of plastic trim tools used for prying clips apart like these:
Required Parts (prices from Acuraoemparts.com):
#1 - Molding, L Drip Side (73163-TK4-A02) - Driver's Side - Qty 1 - $86.23
#1 - Molding, R Drip Side (73153-TK4-A02) - Passenger Side - Qty 1 - $86.23
**Note 1 - each of these parts comes in a box that is about 94" long, 24" wide, and maybe 3" deep, so for me, it would have cost $230 to ship $175 worth of parts from FL to NJ. I instead purchased mine from the local dealership, pulled them out of the boxes, and slid them through my trunk pass-through door to get them home.
**Note 2 - each drip molding with part number above doesn't come with the associated clips, but the clips can be removed and swapped to the new molding very easily. As long as you don't break them you won't need:
Optional Parts if clips/retainers are broken:
#2 - Clip A, Windshield (73155-TK4-A01) - Qty 3 per side - $1.05
#6 - Clip, T-Stud (A)(Blue) (91570-SDA-A01) - Qty 1 per side - $1.25
#3 - Clip B, Windshield (73155-TK4-A11) - Qty 1 per side - $1.05
#5 - Clip, T-Stud (B)(Natural) (91571-SDA-A01) - Qty 3 per side - $1.25
#4 - Clip, Roof Molding (91572-TK4-A01) - Qty 4 per side - $0.90
Service Manual Procedure:
The procedure is pretty straightforward:
1 - Starting from the bottom of the windshield, use a J-hooked plastic prybar to lift the trim away from the windshield, and use a sharper straight plastic tool to press on the 8 tiny plastic teeth of each clip to release it from the retainer. Once that clip is free, move up the windshield to release the remaining 3 clips. The clip will remain attached to the chrome trim, and the retainer will remain attached to the car.
2 - Once the windshield clips are released, push the chrome trim toward the center of the roof, and the clips will slide out of the trim and remain in the roof channel.
3 - When the chrome trim can be completely removed, you can push the orange clips into the trim to release them from the small channel that they sit in, then push them into the channel on the new replacement trim. The clips can be easily slid to the left or right to properly align with the retainers when reinstalling.
4 - Installation is done in reverse - Start from the rear of the roof to attach the new trim to the rear window trim, slide the trim away from the center of the roof to reattach the clips, then push downward on the 4 windshield clips to re-seat them.
Pics or it didn't happen:
Now for the images for clarification, since the service manual illustrations are never great:
These are the 4 clips along the windshield. The 8 tiny teeth are what holds the clips into the retainer, and the 2 wings on the top are what holds the clip into the chrome trim. Push the clips in the direction of those wings to release them from the trim so you can transfer them to the new replacement trim. Note that I broke one tooth from pressing too hard with the tool, but it still functions just fine.
This is how the clip interfaces with the retainer (drip molding omitted for clarity). All 8 teeth must be pushed inward for the entire clip to be pulled up through the top of the retainer.
This is the method of releasing the clips (one hand used just so I could hold the camera). Use the J-hook to lift the trim while using the straight edge to push on the teeth of the clip. These clips are the hardest part of the job since 1 tooth on the side may be stubborn and cause the whole clip to stay stuck in the retainer. Had to use some elbow grease to pull pretty hard while pressing on the stubborn tooth, but just be careful enough that you don't break anything. Eventually they'll come loose with enough finessing.
This is how the front clip retainers will look after pulling off the trim
This is how the roof clips look after pulling off the trim.
**Note 3 - the very back edge of the drip molding chrome trim is sharp enough to scratch the paint, so watch out for it. I scratched my roof a bit getting these photos, but I'm planning on a full respray soon anyway, so it's whatever lol.**
This is incredible! I literally just had this happen to me over the weekend, noticed a loud noise at 60+mph, found a long strip along the passenger side A piller was peeling back. Thanks for the part #s!
If anyone is still here for this thread... what have you guys paid for this part? To ship this to me from any of my normal places it's literally over 300 dollars in shipping costs alone!
If anyone is still here for this thread... what have you guys paid for this part? To ship this to me from any of my normal places it's literally over 300 dollars in shipping costs alone!
hey buddy,
I literally did this last month super easy DIY thanks to the write up but the reason your shipping is out of control os because of the nature of the boxes themselves. What I ended up doing was calling a local dealership and having them sent to that dealership and when they came in I simply popped the access port in the back seat open and fed the drip side molding through there and drove my butt home 200 dollars still in my pocket! The molding will come almost all the way to the front seat and I would suggest propping it up in such a way so as to minimize movement. That way you don't bend or otherwise warp the molding as it IS rather... not flimsy but thin.
any dealership should have no problem with you doing it that way.
If anyone is still here for this thread... what have you guys paid for this part? To ship this to me from any of my normal places it's literally over 300 dollars in shipping costs alone!
also, in case I wasn't clear just open the boxes and take the molding out LOL for me it was worth the hour drive into Dallas to save that rediculous shipping fee
If anyone is still here for this thread... what have you guys paid for this part? To ship this to me from any of my normal places it's literally over 300 dollars in shipping costs alone!
Yep. That's why I added Note #1 lol. The box is basically a giant thin rectangle to accommodate the long curved part, and that oversized length screws up the shipping calculations.
Even though you can get 15-25% off ordering through various online dealers like AcuraOEMParts, the shipping costs will typically eat all of those savings, and then some.
It'd probably still be cheaper to just order the part through your local dealership and pick it up in person. If you need to get them home in the TL, rip open the boxes, and snake the moldings through your trunk and pass thru door in the back seat to get them home.
I installed the driver's side the past weekend. Took me about 45 minutes to do it. The part cost me $160 CDN for the driver's side at my local Acura dealership. Thank you Riboflavin for the write-up and the tip on taking this home !
Are the parts below the only trim/molding pieces you need to replace all the rubber trim going from the front windshield to the back windshield on both sides?
Required Parts (prices from Acuraoemparts.com): #1 - Molding, L Drip Side (73163-TK4-A02) - Driver's Side - Qty 1 - $86.23 #1 - Molding, R Drip Side (73153-TK4-A02) - Passenger Side - Qty 1 - $86.23
Not if you're trying to replace the trim that goes along the sides of the rear windshield too.
These 2 parts only cover the front windshield and roof. It ends just where the rear windshield starts.
Any idea how much they might charge for this at a dealership? I'm all thumbs with this kind of stuff.
far too much. Your better off contacting a company that does windshield replacement like a safelite. Thats what i ended up doing but regretted it. I know it seems like a lot but the install is really quite simple. Just a matter of clipping it into place and the clips attached to the actual "rail" if you will slide back and forth. Simple trim tools will make it a breeze. That being said, investigate a windshield replacement company before giving your money to a stealership
I was quoted at $475 for parts and labor, after some good-hearted negotiations. I'm in NJ.
good GOD man... Thats roughly 300 dollars in labor for a job that will take MAYBE an hour and a half...
I know you feel like your all thumbs at this stuff but I PROMISE it is not as daunting as it might seem! If you can change your brakes you can do this!
So my rubber weather stripping along the A-pillar and roof line finally gave up on life after becoming dry and brittle, and would flap against the windshield and front window at highway speeds. Instead of just using silicone or glue to put it back on, the best solution is to just replace the whole thing, which only comes as an assembly of chrome trim + rubber that is held to the body with plastic clips. The service manual instructions are pretty straight forward but not totally clear, so I just took a couple of pictures along the way to add some clarity in case anyone needed it. Took about 1 hour to replace both sides, and that's including the time it took to loosen up some stubborn clips without breaking them.
Time Required:
1 - 1.5 hours
Tools:
Set of plastic trim tools used for prying clips apart like these:
Required Parts (prices from Acuraoemparts.com):
#1 - Molding, L Drip Side (73163-TK4-A02) - Driver's Side - Qty 1 - $86.23
#1 - Molding, R Drip Side (73153-TK4-A02) - Passenger Side - Qty 1 - $86.23
**Note 1 - each of these parts comes in a box that is about 94" long, 24" wide, and maybe 3" deep, so for me, it would have cost $230 to ship $175 worth of parts from FL to NJ. I instead purchased mine from the local dealership, pulled them out of the boxes, and slid them through my trunk pass-through door to get them home.
**Note 2 - each drip molding with part number above doesn't come with the associated clips, but the clips can be removed and swapped to the new molding very easily. As long as you don't break them you won't need:
Optional Parts if clips/retainers are broken:
#2 - Clip A, Windshield (73155-TK4-A01) - Qty 3 per side - $1.05
#6 - Clip, T-Stud (A)(Blue) (91570-SDA-A01) - Qty 1 per side - $1.25
#3 - Clip B, Windshield (73155-TK4-A11) - Qty 1 per side - $1.05
#5 - Clip, T-Stud (B)(Natural) (91571-SDA-A01) - Qty 3 per side - $1.25
#4 - Clip, Roof Molding (91572-TK4-A01) - Qty 4 per side - $0.90
Service Manual Procedure:
The procedure is pretty straightforward:
1 - Starting from the bottom of the windshield, use a J-hooked plastic prybar to lift the trim away from the windshield, and use a sharper straight plastic tool to press on the 8 tiny plastic teeth of each clip to release it from the retainer. Once that clip is free, move up the windshield to release the remaining 3 clips. The clip will remain attached to the chrome trim, and the retainer will remain attached to the car.
2 - Once the windshield clips are released, push the chrome trim toward the center of the roof, and the clips will slide out of the trim and remain in the roof channel.
3 - When the chrome trim can be completely removed, you can push the orange clips into the trim to release them from the small channel that they sit in, then push them into the channel on the new replacement trim. The clips can be easily slid to the left or right to properly align with the retainers when reinstalling.
4 - Installation is done in reverse - Start from the rear of the roof to attach the new trim to the rear window trim, slide the trim away from the center of the roof to reattach the clips, then push downward on the 4 windshield clips to re-seat them.
Pics or it didn't happen:
Now for the images for clarification, since the service manual illustrations are never great:
These are the 4 clips along the windshield. The 8 tiny teeth are what holds the clips into the retainer, and the 2 wings on the top are what holds the clip into the chrome trim. Push the clips in the direction of those wings to release them from the trim so you can transfer them to the new replacement trim. Note that I broke one tooth from pressing too hard with the tool, but it still functions just fine.
This is how the clip interfaces with the retainer (drip molding omitted for clarity). All 8 teeth must be pushed inward for the entire clip to be pulled up through the top of the retainer.
This is the method of releasing the clips (one hand used just so I could hold the camera). Use the J-hook to lift the trim while using the straight edge to push on the teeth of the clip. These clips are the hardest part of the job since 1 tooth on the side may be stubborn and cause the whole clip to stay stuck in the retainer. Had to use some elbow grease to pull pretty hard while pressing on the stubborn tooth, but just be careful enough that you don't break anything. Eventually they'll come loose with enough finessing.
This is how the front clip retainers will look after pulling off the trim
This is how the roof clips look after pulling off the trim.
**Note 3 - the very back edge of the drip molding chrome trim is sharp enough to scratch the paint, so watch out for it. I scratched my roof a bit getting these photos, but I'm planning on a full respray soon anyway, so it's whatever lol.**
thanks for this thread it�s definitely going to help me change out my drip moldings
but quick question before finding your thread I did research I think you mixed qty needed below
#2 - Clip A, Windshield (73155-TK4-A01) - Qty 3 per side - $1.05
I believe only need Qty 2 - one for each side
and
#3 - Clip B, Windshield (73155-TK4-A11) - Qty 1 per side - $1.05
this is Qty 6 3 for each side
can you let me know before I purchase them
thxs
Those quantities actually came directly from the diagram in the parts catalog:
#2 - Clip A, Windshield (73155-TK4-A01) - Qty 3 per side - $1.05
#3 - Clip B, Windshield (73155-TK4-A11) - Qty 1 per side - $1.05
#4 - Clip, Roof Molding (91572-TK4-A01) - Qty 4 per side - $0.90
#5 - Clip, T-Stud (B)(Natural) (91571-SDA-A01) - Qty 3 per side - $1.25
#6 - Clip, T-Stud (A)(Blue) (91570-SDA-A01) - Qty 1 per side - $1.25
Not sure if mine's different from yours, but even in the pics I uploaded, I definitely had 3 Clip A's and 1 Clip B per side. The 3 #2 Clip A's go into the #5 white T-studs that line the side of the windshield, and the single #3 Clip B goes into the #6 blue T-stud at the top of the windshield.
More importantly, you don't even need to buy those clips unless you accidentally break them while trying to free them from the studs. No need to buy them all ahead of time just for the sake of replacement. And even if you do break a tooth or 2, they still work decently well.
thanks for replying back
I�m getting my windshield replaced and I just wanted to get a few of those clips to keep on hand they don�t cost much doesn�t & doesn�t hurt have them on hand
Thanks again for the help
thanks for replying back
I�m getting my windshield replaced and I just wanted to get a few of those clips to keep on hand they don�t cost much doesn�t & doesn�t hurt have them on hand
Thanks again for the help
Actually wait, I went to triple check, and you might be correct.
Went back to cross reference the part lists again, and they show 3 Clip B's and 1 Clip A. I didn't have to buy any of these as replacements, and I can only go on what was already installed on mine, so I'll trust the Stealership's part count lol.
Went back to cross reference the part lists again, and they show 3 Clip B's and 1 Clip A. I didn't have to buy any of these as replacements, and I can only go on what was already installed on mine, so I'll trust the Stealership's part count lol.
lol
appreciate you letting me know
yeah I was going off this dealerships website
Went back to cross reference the part lists again, and they show 3 Clip B's and 1 Clip A. I didn't have to buy any of these as replacements, and I can only go on what was already installed on mine, so I'll trust the Stealership's part count lol.
One more quick question
Did you ever have to replace your windshield?
Trying to figure out if new windshields come with the rearview mirror bracket already glued on there Sound of the bracket
Mine just started peeling and flapping as well over the past few days; I'm just going to remove it run a black silicone bead and be done with it. Not spending hundreds of dollars on some rubber strip for a 10+ year old car.
Just wondering. From other’s experience, would this also lead to water collecting in the trunk? We have a similar problem and are wondering if there is a secondary issue in addition to this.
Much appreciated for this thread.
Just got another TL and both sides had several dents along with some areas being all uneven. A must do list to get her in tip top shape.
Just did this over the weekend on my 4G TL! Your guide was a huge help! I purchased the tools ahead of time and parts from the local dealer! Clips can be a pain but overall was an easy job and well worth the replacement.
My primary reasoning was because the rubber seal on both trims were completely dry and flaking away. New ones look great!
I purchased all new clips just to ensure a proper seal and they were all very easy to replace. FYI the red roof clips, just use a flat head to pry the little flat stop up and they can then slide right to release from the metal grommet on roof.
Thank you for this. I used this as my guide over the weekend and saved myself $711.40 of labor, which was what the dealership wanted, $1,276.24 including parts. Insane!!! It took me 2 hours. If I had to do it again, it'd take 30 minutes.
Your guide was incredibly helpful and I replaced the drip molding long piece that ran from front windshield to roof about a year ago.
Now the rear windshield drip molding is flapping. Smaller chrome part. Will I need to remove the long piece that runs from front windshield to roof in order to replace the rear or can I simply remove and replace the rear portion?