
TL Type S Brembo paint/plastic peeling
 09-26-2011, 04:47 PM
#1

TL Type S Brembo paint/plastic peeling
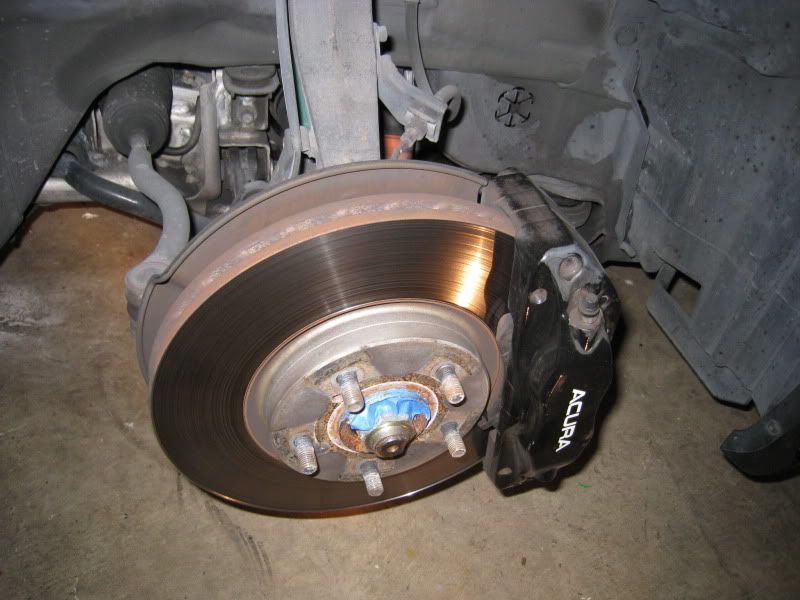
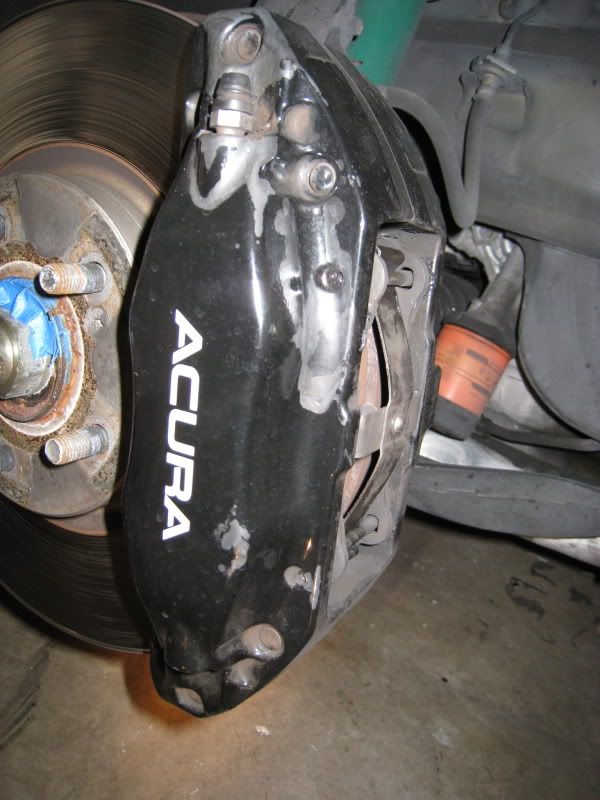
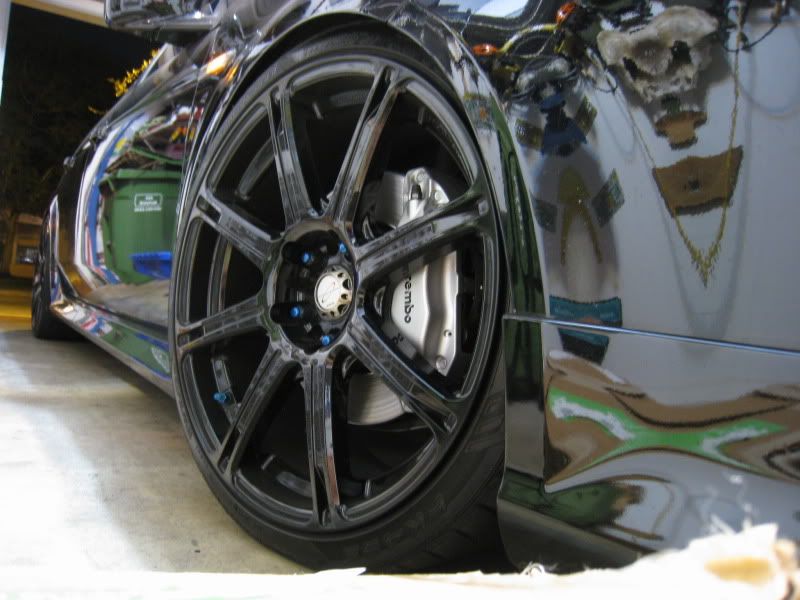
Gentlemen, a little help. I noticed today that both my front brembo calipers seem to be demonstrating a peeling issue. There appears to be a plastic substances over the caliper that is peeling off almost like cellophane. Under it is a dark grey caliper and the white Acura lettering is not affected. Neither caliper is leaking any fluid. Has anyone seen or heard of anything like this? I think this is a relatively new situation because i replaced my brakes within the last 9 months and i don't remember this being there then? I had the car detailed recently but that is all that has recently changed? I also have had a substantial amount of rain recently?
Now the hard question... what can i do?
Now the hard question... what can i do?

 09-27-2011, 12:13 AM
#3
AZ Community Team

Join Date: May 2007
Location: N35�03'16.75", W 080�51'0.9"
Posts: 32,488
Received 7,771 Likes
on
4,342 Posts
I don't know what's causing blistering/peeling on yours, but on mine it's from a slight spill of brake fluid. 
The "cellophane" looking stuff is, I think, the clear coat (it is on mine anyhhow).
Leave it or repaint it. Or get a remanufactured/salvaged caliper as a replacement.
The "cellophane" looking stuff is, I think, the clear coat (it is on mine anyhhow).
Leave it or repaint it. Or get a remanufactured/salvaged caliper as a replacement.
 09-27-2011, 09:48 AM
#5
BANNED
iTrader: (33)

yup mine did the same thing, i'm gonna repaint when i have the time.
11-20-2011, 12:00 AM
#7
I've never spilled fluid on mine...and just noticed today that mine are doing the same thing...
funny part, I recently decided to leave them black and NOT paint them...ok...that's a sign for me to do it. I just don't think I'll end up going with blue...I think I'll go for silver with black brembo letters.
funny part, I recently decided to leave them black and NOT paint them...ok...that's a sign for me to do it. I just don't think I'll end up going with blue...I think I'll go for silver with black brembo letters.
Trending Topics
11-20-2011, 01:56 AM
#8
the overexplainer
mine started peeling after bleeding my calipers..either i didnt rinse them good enough or it continued to weep fluid after. Either way now it's dry, but there's a line of bubbled clear coat going down my caliper. Sucks but oh well.
11-20-2011, 11:21 AM
#10
My LF did this and I was PISSED!!!
I bled the brakes and washed the shit out of the calipers afterwards. I didn't want any brake fluid dripping down on the caliper. I guess after I took it for a drive, a little heat in the fluid caused it to swell and dribble out from under the rubber bleed cap. Effin lame.
I talked to the guys at Stoptech and they said there is nothing you can really do about this with painted calipers. They offer a "trophy" caliper with anodized finish. They say this is the only caliper finish that won't peel.
Maybe we can get our calipers stripped and anodized...
 11-22-2011, 09:25 PM
#14
The good news is Centric (think Stoptech) now sells reman'd calipers for the TL. A lot less than new Acura ones.
http://extranet.soleniuminc.com/Cent...05&m=58&mm=749
142.40084 left
142.40083 right
Only $122 each (-$125 core) if you trust partsgeek.com...
http://www.partsgeek.com/gbproducts/...se&fp=pp&gbm=a
This pic shows the 141 "loaded caliper" option part number suffix:

http://extranet.soleniuminc.com/Cent...05&m=58&mm=749
142.40084 left
142.40083 right
Only $122 each (-$125 core) if you trust partsgeek.com...
http://www.partsgeek.com/gbproducts/...se&fp=pp&gbm=a
This pic shows the 141 "loaded caliper" option part number suffix:
Last edited by 94eg!; 11-22-2011 at 09:32 PM.
11-27-2011, 10:51 AM
#18
Ok...so this long holiday weekend, decided to tackle this, since I knew I could leave my car out of commission and take my time.
Got 2 things done, swapped out my ebay special jpower front camber balljoint to the spc one. I have to say, the jpower people did a GREAT job of copying the style. It's identical, save for the 17mm castle nut vs the 16mm spc (lucky I realized before I stripped it). Also, the SPC one, when you tighten it down, it actually presses the balljoint into the upper control arm, the ebay one was moveable as soon as you'd loosen the upper nut.
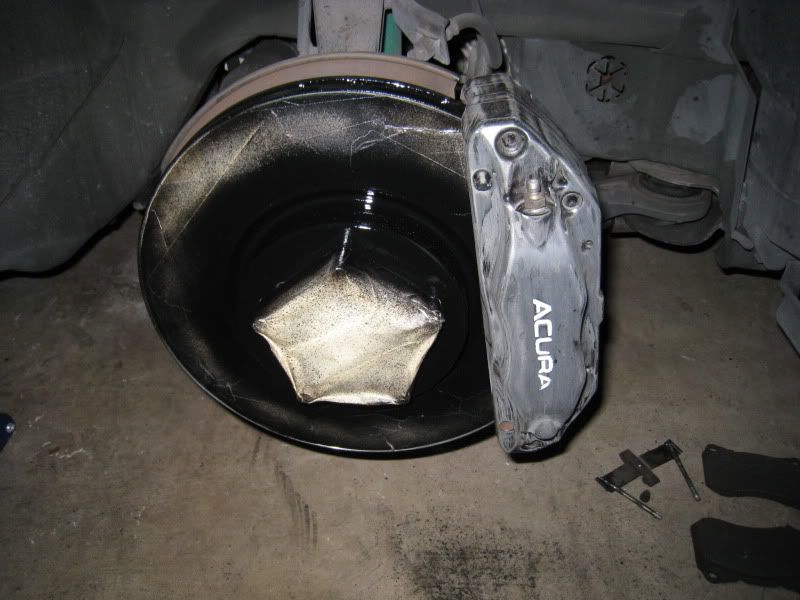
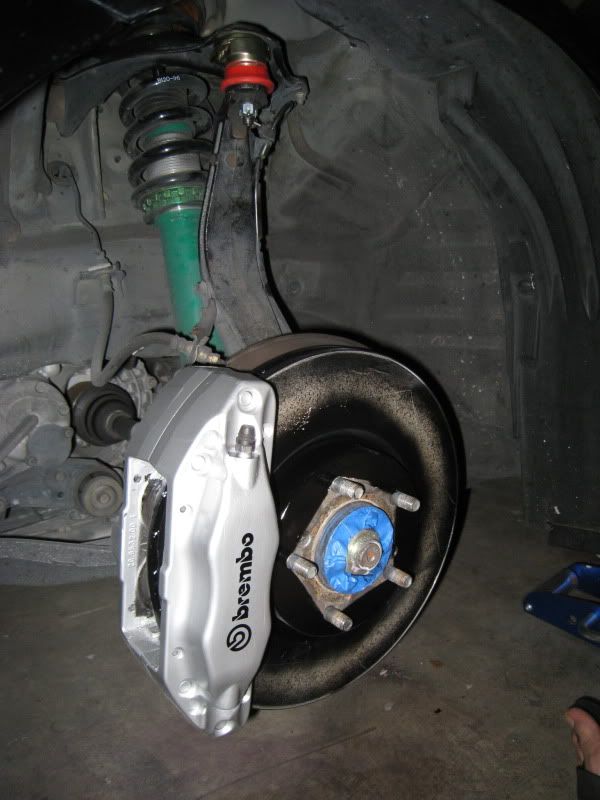
Next up, I got my brake calipers and hubs/discs done. I had done a half assed job of spraying the discs in silver a year ago , but I definitely didn't prep correctly. I'll probably end up getting some zinc plated brakemotive discs down the line, but this'll buy me some time.
On to the pics...I made a semi DIY, although I'm sure it's pretty self explanatory. Won't bother with the camber pics, although there's one of the spc one installed.

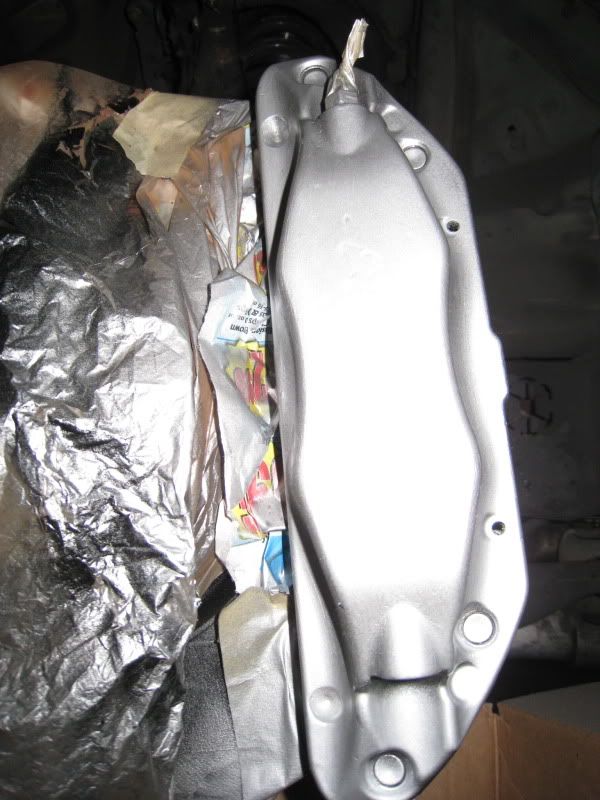
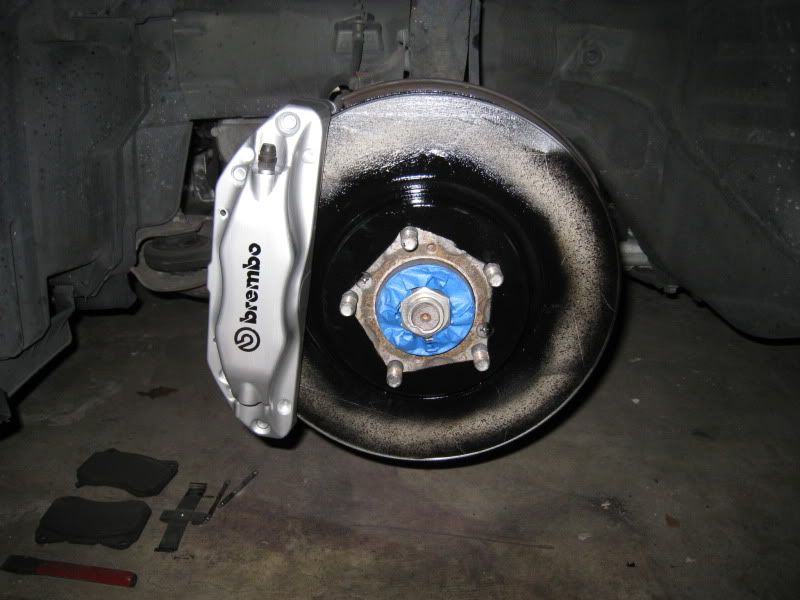
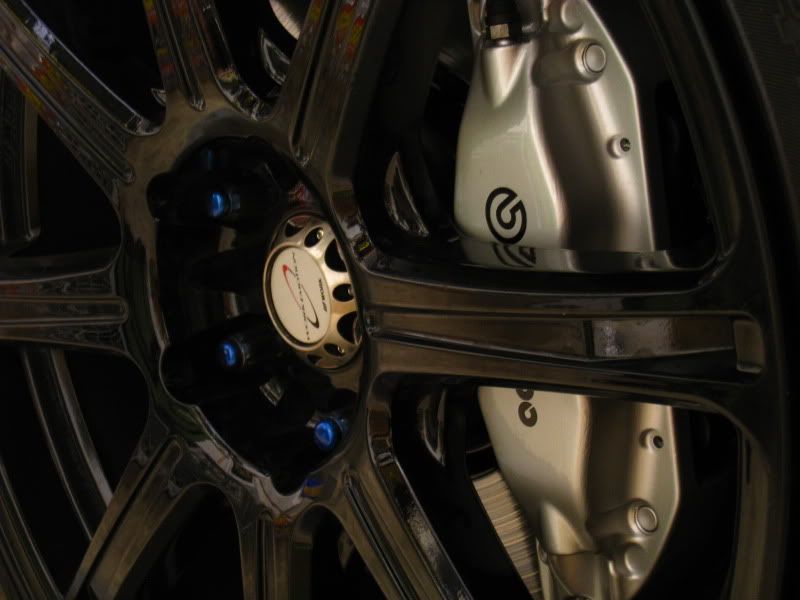
Here's what we're starting with...some rusty hubs and here are some good pics of the bubbling that was occurring on my brembos...the final push I needed to go ahead with repainting them.
prepped everything at once, wiped down with some natural solvent stuff for the kitchen, then sanded with 50 grit and then 150, then wiped down again, then taped up, then wiped down with IPA. I learned on one side, use 150, the 50 leaves deep scratch marks, but you have to look closely to see them.


depending on your rims, you can see some parts of where the rim seats against the hub, so paint that too...covered the lugs, you don't want a few millimeters of paint on those.


Ok, HUB done...
For the discs...the brakes will take care of scraping and burning off any extra paint after, but you don't want all that gunk on there...I used 1.5" painters tape, put on long straight strips to cover the most area...then I put a razor blade on the grooves and spun the disc by hand to cut a perfect circle. Took about 5 minutes per disc and made cleanup a breeze (nonexistent). An ounce of prevention...pound of cure, right?
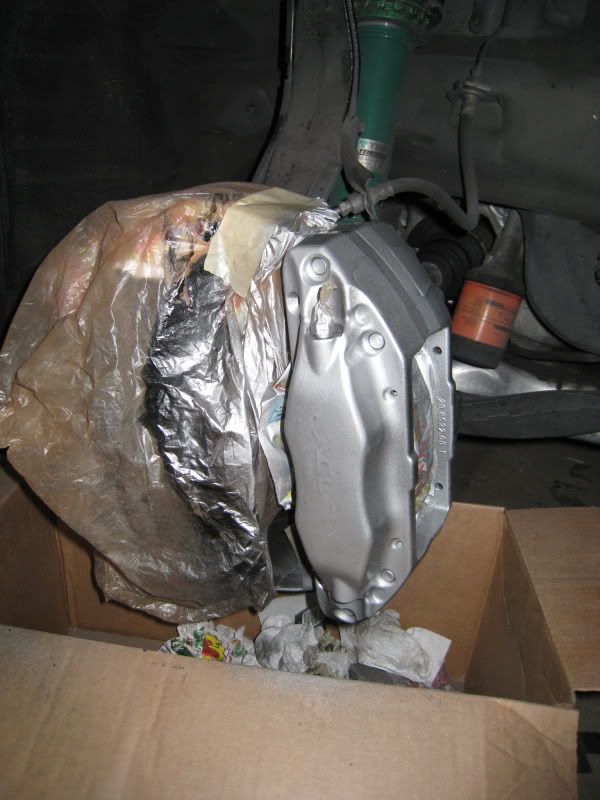
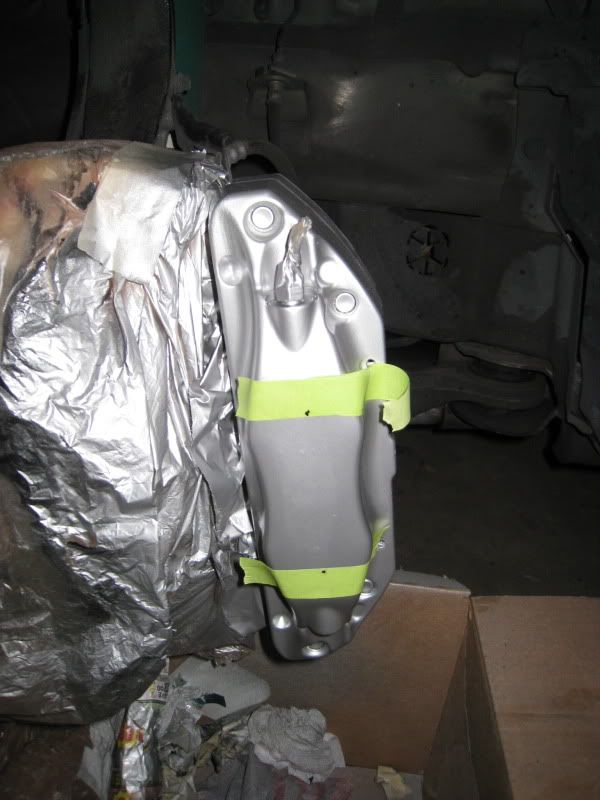
Once that was dry (and after getting home from the UM game)...I reversed the process...covered up the disc and secluded the caliper. I will make this recommendation when doing this, if you want to do it right and get good coverage and NOT on your pads or have weird paint lines where you should have painted but didn't because you had to tape and overtaped (if you've ever painted calipers back in the day you'll know what I mean). The level of detail and perfection is the line in the sand that separates if something looks oem and classy or like a hack job and why would you do that to that poor tl look from people. SO REMOVE THE BRAKE PADS/SLIDES/PINS. Seriously. Takes an extra few minutes but makes it easier to mask under...I basically just put a piece of newspaper and then slid it under the caliper.
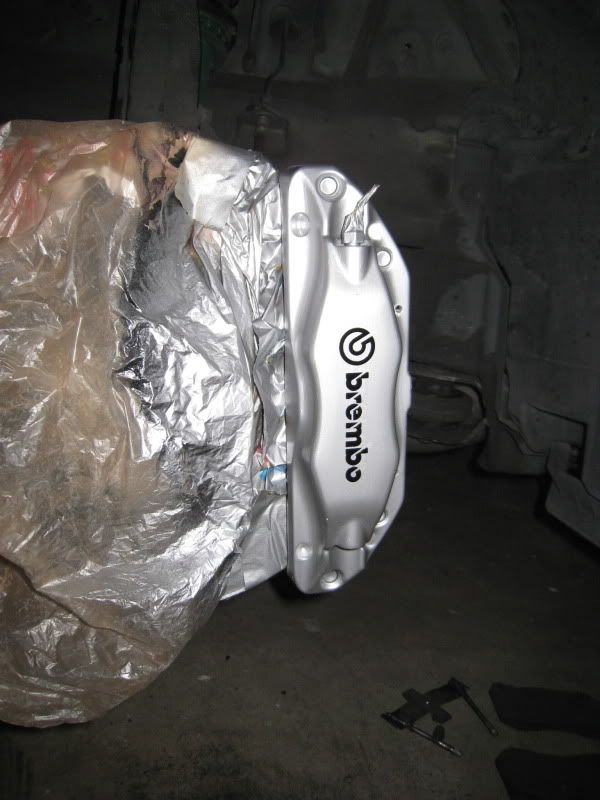
Already looking pretty good...OK, now, let me say this too...get a bearing on where the decal ends up...once this thing touches the semi wet paint (i installed after 30 minutes after the last coat of the base silver color, after an hour, they say not to do another coat of anything for a week) it will stick and NOT move. I messed up the first time...the pulled the letters off and put on my second one...but you could kind of see the ghosted image of where I messed up and put down the original letters...so scrapped it all and sanded it all back down and redid it. Then I measured where the center was vertically for a bearing, and then eyeballed horizontally...got it right. Only had 4 black decals so once I messed up the first two...ZERO margin for error.
Then clear it...I did 3 coats of base, 3 of clear.
Rears done...
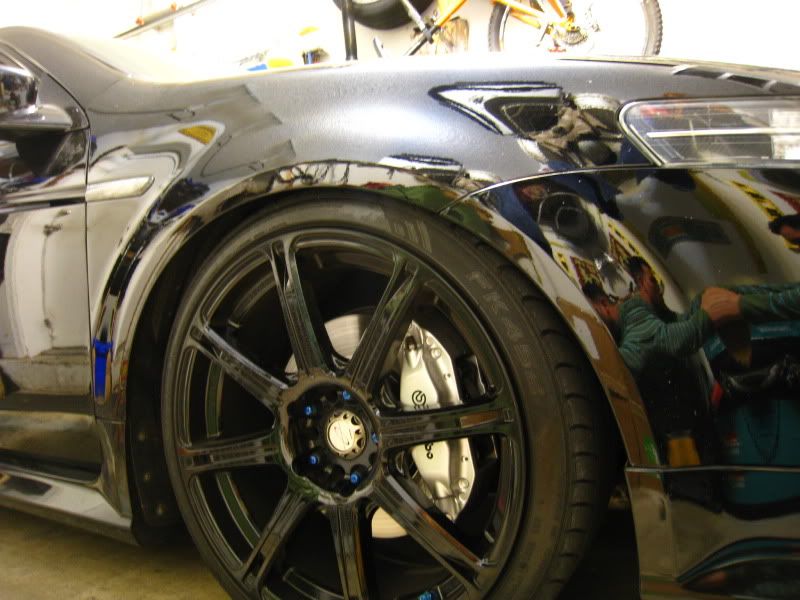
and now the fronts...
with the tein and spc, it looks like Christmas under my fender!
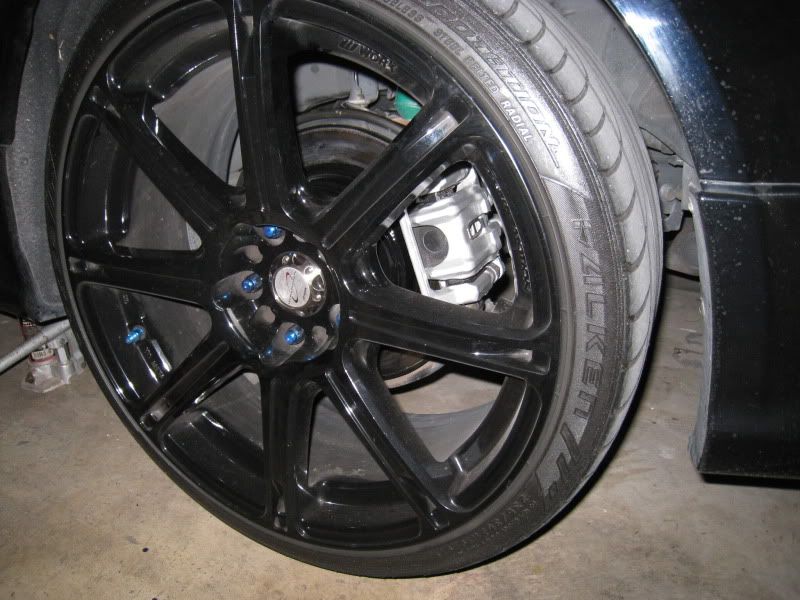
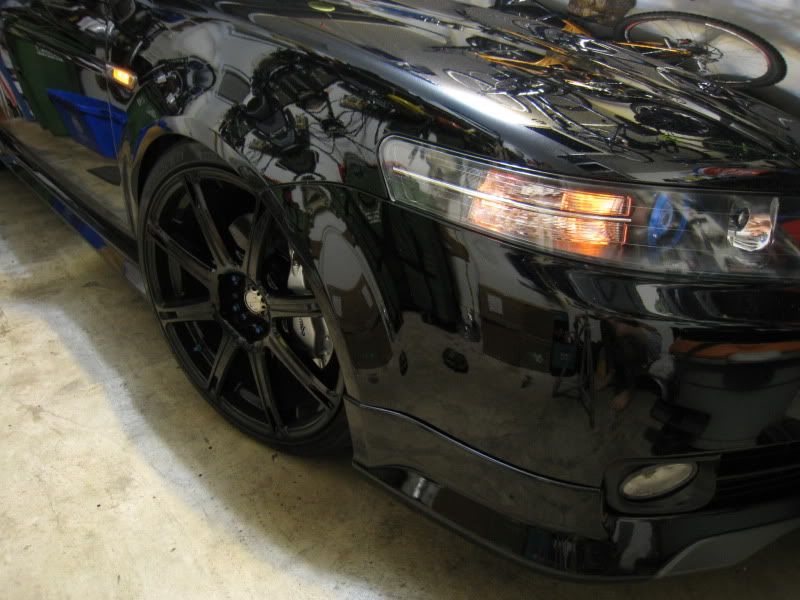
and here it is, complete...


Got 2 things done, swapped out my ebay special jpower front camber balljoint to the spc one. I have to say, the jpower people did a GREAT job of copying the style. It's identical, save for the 17mm castle nut vs the 16mm spc (lucky I realized before I stripped it). Also, the SPC one, when you tighten it down, it actually presses the balljoint into the upper control arm, the ebay one was moveable as soon as you'd loosen the upper nut.
Next up, I got my brake calipers and hubs/discs done. I had done a half assed job of spraying the discs in silver a year ago
, but I definitely didn't prep correctly. I'll probably end up getting some zinc plated brakemotive discs down the line, but this'll buy me some time. On to the pics...I made a semi DIY, although I'm sure it's pretty self explanatory. Won't bother with the camber pics, although there's one of the spc one installed.
Here's what we're starting with...some rusty hubs and here are some good pics of the bubbling that was occurring on my brembos...the final push I needed to go ahead with repainting them.
prepped everything at once, wiped down with some natural solvent stuff for the kitchen, then sanded with 50 grit and then 150, then wiped down again, then taped up, then wiped down with IPA. I learned on one side, use 150, the 50 leaves deep scratch marks, but you have to look closely to see them.
depending on your rims, you can see some parts of where the rim seats against the hub, so paint that too...covered the lugs, you don't want a few millimeters of paint on those.
Ok, HUB done...
For the discs...the brakes will take care of scraping and burning off any extra paint after, but you don't want all that gunk on there...I used 1.5" painters tape, put on long straight strips to cover the most area...then I put a razor blade on the grooves and spun the disc by hand to cut a perfect circle. Took about 5 minutes per disc and made cleanup a breeze (nonexistent). An ounce of prevention...pound of cure, right?
Once that was dry (and after getting home from the UM game)...I reversed the process...covered up the disc and secluded the caliper. I will make this recommendation when doing this, if you want to do it right and get good coverage and NOT on your pads or have weird paint lines where you should have painted but didn't because you had to tape and overtaped (if you've ever painted calipers back in the day you'll know what I mean). The level of detail and perfection is the line in the sand that separates if something looks oem and classy or like a hack job and why would you do that to that poor tl look from people. SO REMOVE THE BRAKE PADS/SLIDES/PINS. Seriously. Takes an extra few minutes but makes it easier to mask under...I basically just put a piece of newspaper and then slid it under the caliper.
Already looking pretty good...OK, now, let me say this too...get a bearing on where the decal ends up...once this thing touches the semi wet paint (i installed after 30 minutes after the last coat of the base silver color, after an hour, they say not to do another coat of anything for a week) it will stick and NOT move. I messed up the first time...the pulled the letters off and put on my second one...but you could kind of see the ghosted image of where I messed up and put down the original letters...so scrapped it all and sanded it all back down and redid it. Then I measured where the center was vertically for a bearing, and then eyeballed horizontally...got it right. Only had 4 black decals so once I messed up the first two...ZERO margin for error.
Then clear it...I did 3 coats of base, 3 of clear.
Rears done...
and now the fronts...
with the tein and spc, it looks like Christmas under my fender!
and here it is, complete...
The following users liked this post:
Chisel (06-20-2015)
11-29-2011, 09:20 AM
#19
Advanced
Quick question...I have to repaint my calipers this weekend. Did you use some type of a liquid paint remover and then sand them down? What is IPA? I understand there will be some sanding involved, but if I can get the majority of the paint off (its that G2 epoxy stuff) it sure would be much easier. Thoughts everyone?
11-29-2011, 09:33 AM
#20
My thoughts:
Epoxy is strong as fk...so TOTAL removal won't be necessary for it. I used a chisel and 50 grit to get the areas where the clear coat had lifted off. Obviously, if you don't and paint over that, it'll just pop back up with the paint on it.
IPA=isopropyl alcohol. Good for removing grease/grime to prep surface for paint.
My suggestion, don't use paint stripper, not necessary...sand with 150 grit as much as you need to to get a smooth surface...especially where the brembo sticker will be going. Sand the whole thing down, wipe down with some degreaser or cleaner...then tape up and right before paint...wipe down with the alcohol.
Should give you good adhesion.
The following 2 users liked this post by rockstar143:
demon-cleaner (06-04-2013),
gatoferoz25 (11-29-2011)
 04-09-2013, 12:51 PM
#25
Has anyone used those refurb Centric calipers from Parts Geek? Did they last? Perform well? After core return, it'll be about $275 for both front Brembo calipers. Versus $99 for a G2 caliper paint kit PLUS the time and effort to do the repaint...so just trying to see if the Centric calipers are even something to consider. I don't want to have to buy new ones or look at refinishing the calipers again in a year.
04-09-2013, 04:38 PM
#26
Read the thread? I did read the thread and not seeing what I was looking for I asked for BRAND names that were recommended. I saw the grit references and even a mention of the G2 expoxy...but that's it. No brand names other than G2 and none for clear coat. So how about you "just read the thread dude".
05-04-2016, 09:10 PM
#28
Rockstar... Can you provide me with a link to where you purchased the brembo stickers? Also, after you did the 3 base coats did you just put the sticker on and then do 3 coats of clear?

Thread
Thread Starter
Forum
Replies
Last Post
justin.w13.walker
Car Parts for Sale
0
09-22-2015 02:21 PM