
Quick Type-S brake bleed/flush question
 04-29-2010, 10:00 AM
#1
Quick Type-S brake bleed/flush question
Doing new rotors and pads this weekend on all 4 corners for my 07 type s and I am planning on flushing the fluid as well. I have the service manual for the car and it does not make much sense to me how they have the "bleed" section worded. The way I read it is to connect a hose to the bleed screw to a container of new fluid, apply pressure to the system, crack the bleed screw and let the pedal go to the floor. Then, tighten the bleed screw, check for pedal pressure and repeat as needed to get rid of sponginess in the pedal. My questions are:
1) wouldn't this cause the master cylinder to overflow and get fluid everywhere?
2) doesn't it make sense to keep the master cylinder full with new fluid and cycle the old fluid through the system and calipers by the same procedure, only have the hose from each bleed screw draining to an empty bucket and repeat until the fluid runs clear?
Thanks in advance.
Also, is there anything goofy with the ABS/VSA system where it just makes more sense to have the dealer flush the system?
 04-29-2010, 10:18 AM
#2
Race Director
Huh? Don't see anything in the service manual (04) procedure about draining into a container of clean fluid.
It does specify at least two times to be sure that the master cylinder is at the Max level before beginning the bleed procedure and to check it after each caliper and to use only new, unopened brake fluid.
It does specify at least two times to be sure that the master cylinder is at the Max level before beginning the bleed procedure and to check it after each caliper and to use only new, unopened brake fluid.
04-29-2010, 01:26 PM
#3
Do not reuse the drained fluid. Use only clean Acura
DOT 3 Brake Fluid from an unopened container.
Using a non-Acura brake fluid can cause corrosion
and shorten the life of the system.
• Do not mix different brands of brake fluid; they may
not be compatible.
• Make sure no dirt or other foreign matter is allowed
to contaminate the brake fluid.
• Do not spill brake fluid on the vehicle, it may damage
the paint; if brake fluid does contact the paint, wash it
off immediately with water.
• The reservoir on the master cylinder must be at the
MAX (upper) level mark at the start of the bleeding
procedure and checked after bleeding each brake
caliper. Add fluid as required.
• Front caliper for the Type-S model (4-piston caliper
type); do this by first bleeding the outside piston of
the front caliper. Then bleed the inside piston of the
front caliper.
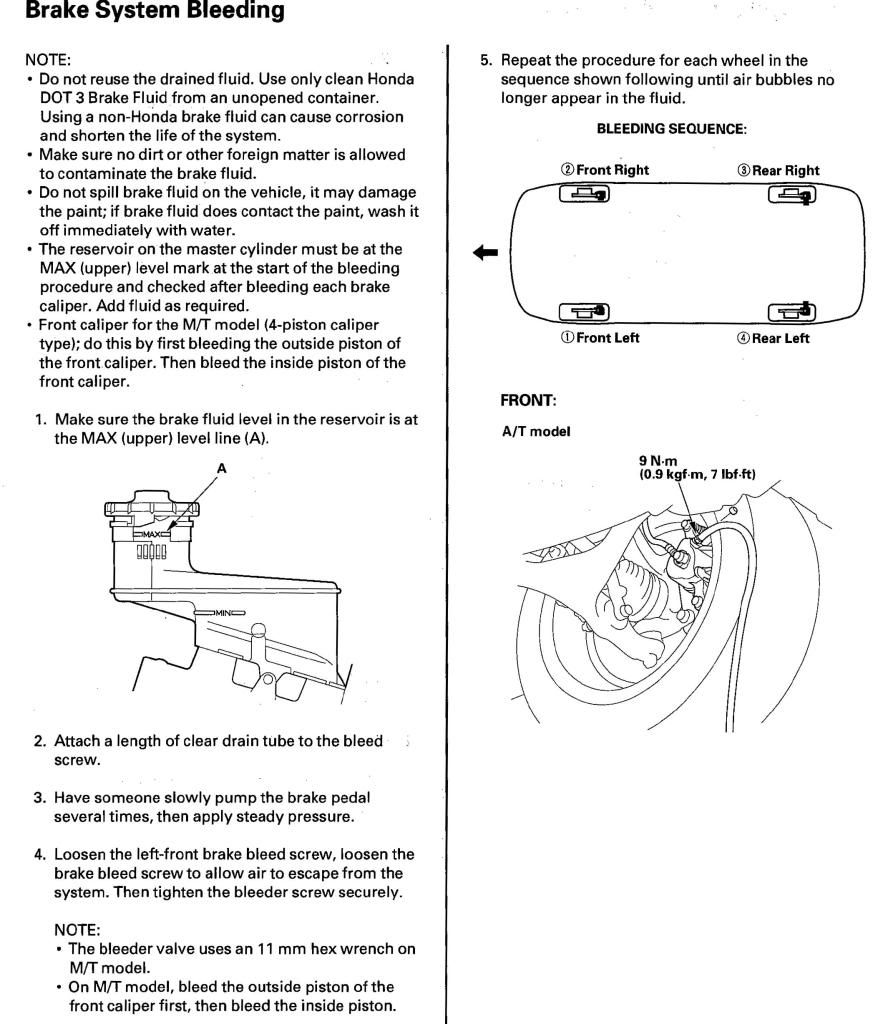
1. Make sure the brake fluid level in the reservoir (A)
is at the MAX (upper) level line (B).
2. Slide a piece of clear plastic hose over the first
bleed screw, and submerge the other end in a
container of new brake fluid.
3. Have someone slowly pump the brake pedal
several times, then apply steady pressure.
4. Loosen the left-front brake bleed screw, loosen the
brake bleed screw to allow air to escape from the
system. Then tighten the bleed screw securely.
NOTE: The bleed valve uses an 11 mm hex wrench
on the Type-S model (4-piston caliper type).
~~~the above is copied and pasted from the .pdf of the manual~~~
DOT 3 Brake Fluid from an unopened container.
Using a non-Acura brake fluid can cause corrosion
and shorten the life of the system.
• Do not mix different brands of brake fluid; they may
not be compatible.
• Make sure no dirt or other foreign matter is allowed
to contaminate the brake fluid.
• Do not spill brake fluid on the vehicle, it may damage
the paint; if brake fluid does contact the paint, wash it
off immediately with water.
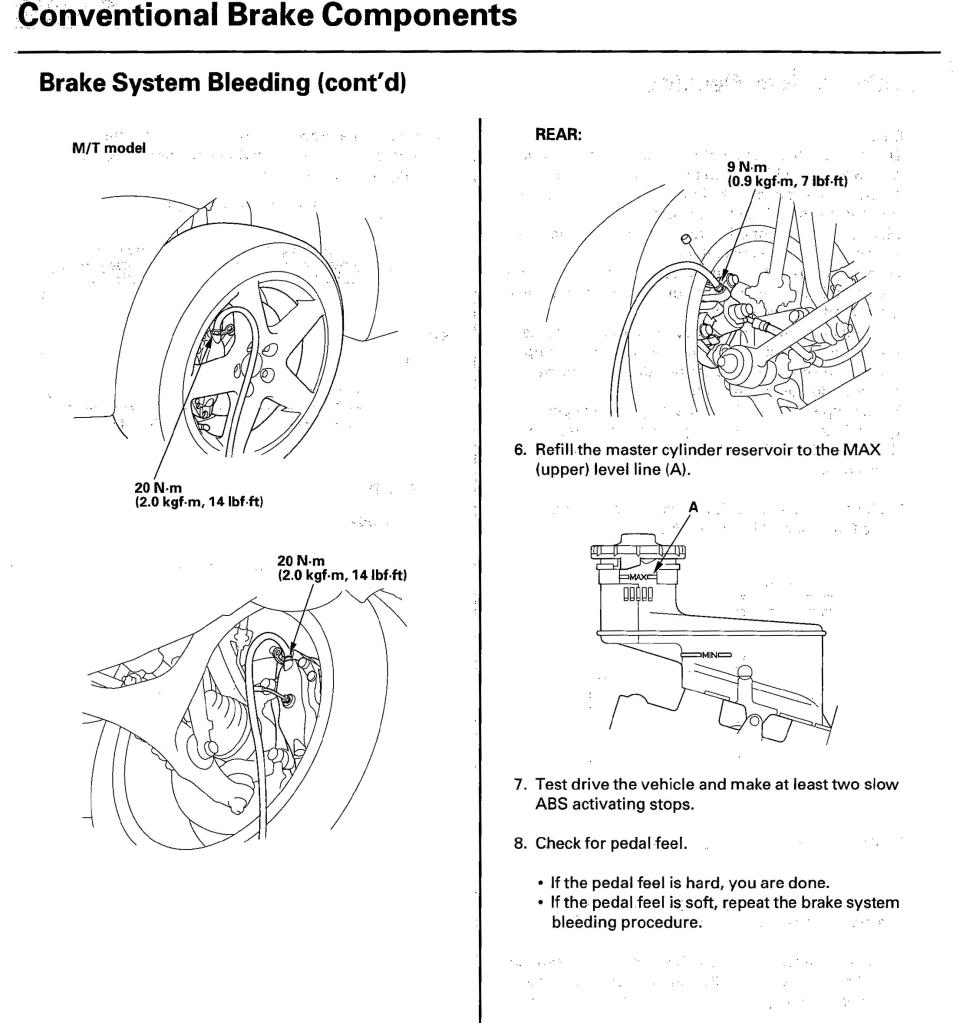
• The reservoir on the master cylinder must be at the
MAX (upper) level mark at the start of the bleeding
procedure and checked after bleeding each brake
caliper. Add fluid as required.
• Front caliper for the Type-S model (4-piston caliper
type); do this by first bleeding the outside piston of
the front caliper. Then bleed the inside piston of the
front caliper.
1. Make sure the brake fluid level in the reservoir (A)
is at the MAX (upper) level line (B).
2. Slide a piece of clear plastic hose over the first
bleed screw, and submerge the other end in a
container of new brake fluid.
3. Have someone slowly pump the brake pedal
several times, then apply steady pressure.
4. Loosen the left-front brake bleed screw, loosen the
brake bleed screw to allow air to escape from the
system. Then tighten the bleed screw securely.
NOTE: The bleed valve uses an 11 mm hex wrench
on the Type-S model (4-piston caliper type).
~~~the above is copied and pasted from the .pdf of the manual~~~
04-29-2010, 01:30 PM
#4
One on the right for me
Yeah. That makes sense. I don't bleed by having one end submerged but I've seen it done by other people. From my understanding it helps keep air out. Isn't necessary though.
04-29-2010, 01:52 PM
#5
AZ Community Team

Join Date: May 2007
Location: N35�03'16.75", W 080�51'0.9"
Posts: 32,488
Received 7,771 Likes
on
4,342 Posts

 04-29-2010, 01:55 PM
#6
Race Director
Hmmm. Step 2 in the 04 SM only says:
"2. Attach a length of clear drain tube to the bleed screw."
Not sure why the difference in the SMs.
I'm with subinf, don't know why you would need fluid in the container. Just make sure the reservoir stays full throughout the procedure so you don't draw any air into the system and you'll be fine.
"2. Attach a length of clear drain tube to the bleed screw."
Not sure why the difference in the SMs.
I'm with subinf, don't know why you would need fluid in the container. Just make sure the reservoir stays full throughout the procedure so you don't draw any air into the system and you'll be fine.
04-29-2010, 03:52 PM
#7
see, now that makes more sense. It is funny. That is laid out exactly like mine with the same diagrams and everything. Text is just different. Also it says "Type-S" instead of "M/T" in a few places. I wonder if it is just a typo, or I got a early revision or something.

Trending Topics
04-29-2010, 04:19 PM
#8
Hmmm. Step 2 in the 04 SM only says:
"2. Attach a length of clear drain tube to the bleed screw."
Not sure why the difference in the SMs.
I'm with subinf, don't know why you would need fluid in the container. Just make sure the reservoir stays full throughout the procedure so you don't draw any air into the system and you'll be fine.
"2. Attach a length of clear drain tube to the bleed screw."
Not sure why the difference in the SMs.
I'm with subinf, don't know why you would need fluid in the container. Just make sure the reservoir stays full throughout the procedure so you don't draw any air into the system and you'll be fine.
04-29-2010, 09:46 PM
#10
Race Director
Screwdriver with a rag on it.
04-29-2010, 09:51 PM
#11
AZ Community Team
Join Date: May 2007
Location: N35�03'16.75", W 080�51'0.9"
Posts: 32,488
Received 7,771 Likes
on
4,342 Posts
 05-05-2011, 02:25 PM
#16
AZ Community Team
Join Date: May 2007
Location: N35�03'16.75", W 080�51'0.9"
Posts: 32,488
Received 7,771 Likes
on
4,342 Posts
If your '04 is a Manual Trans, then yes.
Otherwise it's not a direct fit. Lots of parts to add.
Check for the list here (it's a topic in this thread): https://acurazine.com/forums/3g-tl-2004-2008-93/3g-tl-garage-faq-3g-tl-newbies-553554/
Otherwise it's not a direct fit. Lots of parts to add.
Check for the list here (it's a topic in this thread): https://acurazine.com/forums/3g-tl-2004-2008-93/3g-tl-garage-faq-3g-tl-newbies-553554/
10-21-2011, 09:45 AM
#17
I just changed out my pads and rotors and have a question.
If we have the Brembo brakes, do we do the outside of the driver's side, inside, then outside of the passenger side, then inside? or outside of both, then inside. I started from the driver's and worked my way clockwise (doing outer,inner on the fronts) When bedding in my pads, I noticed only the rear (stock pads) transfered a thick layer, and the fronts (ET500 with RB Rotors) had a very thin layer. I'm guessing I didn't bleed the fronts correctly.
If we have the Brembo brakes, do we do the outside of the driver's side, inside, then outside of the passenger side, then inside? or outside of both, then inside. I started from the driver's and worked my way clockwise (doing outer,inner on the fronts) When bedding in my pads, I noticed only the rear (stock pads) transfered a thick layer, and the fronts (ET500 with RB Rotors) had a very thin layer. I'm guessing I didn't bleed the fronts correctly.
10-21-2011, 10:49 AM
#18

I just changed out my pads and rotors and have a question.
If we have the Brembo brakes, do we do the outside of the driver's side, inside, then outside of the passenger side, then inside? or outside of both, then inside. I started from the driver's and worked my way clockwise (doing outer,inner on the fronts) When bedding in my pads, I noticed only the rear (stock pads) transfered a thick layer, and the fronts (ET500 with RB Rotors) had a very thin layer. I'm guessing I didn't bleed the fronts correctly.
If we have the Brembo brakes, do we do the outside of the driver's side, inside, then outside of the passenger side, then inside? or outside of both, then inside. I started from the driver's and worked my way clockwise (doing outer,inner on the fronts) When bedding in my pads, I noticed only the rear (stock pads) transfered a thick layer, and the fronts (ET500 with RB Rotors) had a very thin layer. I'm guessing I didn't bleed the fronts correctly.
10-21-2011, 09:21 PM
#19


Thread
Thread Starter
Forum
Replies
Last Post